
EEDP2980AX - Varmeskuffe ELECTROLUX - Gratis brugsanvisning og manual
Find enhedens vejledning gratis EEDP2980AX ELECTROLUX i PDF-format.

Brugerspørgsmål om EEDP2980AX ELECTROLUX
0 spørgsmål om dette apparat. Besvar dem du kender, eller stil dit eget.
Stil et nyt spørgsmål om dette apparat
Download vejledningen til din Varmeskuffe i PDF-format gratis! Find din vejledning EEDP2980AX - ELECTROLUX og tag din elektroniske enhed tilbage i hånden. På denne side er alle dokumenter nødvendige for brugen af din enhed offentliggjort. EEDP2980AX af mærket ELECTROLUX.
BRUGSANVISNING EEDP2980AX ELECTROLUX
Electrolux
Cooking

natural_image
Abstract geometric design with three overlapping white shapes on a gray background (no text or symbols)Warming Drawer
EEDP1470AX
EEDP2080AX
EEDP2980AX
ENGLISH
3
CONTENTS
- SAFETY INFORMATION......4
- SAFETY INSTRUCTIONS....6
- PRECAUTIONS DURING USE 6
- APPLIANCE DESCRIPTION 7
- CONTROL PANEL 7
- HOW THE CROCKERY WARMER WORKS 8
- USE 8
- LOAD CAPACITY 10
- CLEANING AND MAINTENANCE....11
- WHAT SHOULD I DO IF THE CROCKERY WARMER DOESN'T WORK?......12
- INSTALLATION INSTRUCTIONS 12
- ENVIRONMENT CONCERNS....17
- GREAT BRITAIN & IRELAND - CUSTOMER CARE AND SERVICE....17
WE'RE THINKING OF YOU
Thank you for purchasing an Electrolux appliance. You've chosen a product that brings with it decades of professional experience and innovation. Ingenious and stylish, it has been designed with you in mind. So whenever you use it, you can be safe in the knowledge that you'll get great results every time. Welcome to Electrolux.
Visit our website to:

Get usage advice, brochures, trouble shooter, service information:
www.electrolux.com
Register your product for better service:
1.
Children less than 8 years of age shall be kept away unless continuously supervised.
- During use the appliance becomes hot. Care should be taken to avoid touching heating elements inside the oven.
- WARNING: Accessible parts may become hot during use. Young children should be kept away.
- Do not use harsh abrasive cleaners or sharp metal scrapers to clean the oven door glass since they can scratch the surface, which may result in shattering of the glass.
- Do not use steam cleaners to clean the appliance.
- Do not use abrasive detergents or metal scrapers to clean the appliance.
- The electric connection is made via an omnipolar switch, which is suitable for the intensity to be tolerated and which has a minimum gap of 3mm between its contacts, which will ensure disconnection in case of emergency or when cleaning the crockery warmer. If a plug is used for the electric connection, then it must be accessible after installation.
- The connection should include correct earthing, in compliance with current norms.
- Disconnect the appliance from the power supply before carrying out any maintenance operation.
2.
3.
4.
5.
- 7.
Do not force the thermostat control to the left of the "0" position or to the right of the maximum position since this may damage the appliance.
As soon as the temperature selected is reached, the heating is turned off. When the temperature drops to a value below that selected, the heating is turned back on. Temperature scale:
| °C | Function |
| 30°C | Defrosting |
| 40-50°C | Proving doughCups / glasses warming |
| 60-70°C | Preheat dishesKeep food warm |
| 80°C | Low temperature cooking(only in some models) |
PREHEAT DISHES 60°-70°C
The heating up time is influenced by various factors:
• Material and thickness of the crockery
- Load quantity
• How the crockery is arranged
| Load | Time (min) |
| Crockery for 6 people | 30 – 35 |
| Crockery for 8 people | 30 – 40 |
| Crockery for 12 people | 35 – 45 |
As you use the crockery warmer more and more you will learn the best settings for your crockery.
KEEP FOOD WARM 60-70°C
Heed the following:
As a principle preheat the device 15 minutes to ensure the interior space has the required temperature Place hot food onto the preheated dishes. Tip: place those dishes into the device while it is being preheated.
LOW TEMPERATURE
COOKING 80° C (ONLY AVAILABLE
IN THE EEDP2080AX AND EEDP2980AX
MODELS)
With the low temperature cooking meat can be gently prepared at low temperatures over a longer period of cooking time.
The cooking time is dependent on the piece of meat's size.
Use dishes made of glass, china or pennions
| Application | Quantity | Roast gently on the cooking plate | Cooking times |
| Well-done | 1kg | on all sides, on each 3min | 214 - 212 hrs |
| Roast beef in one piece | 1kg | on all sides, on each 3min | 3 hrs rare 412 hrs medium |
| Veal | |||
| Filet, whole | 1kg | on all sides, on each 2min. | 114 - 2 hrs |
| Loin, in one piece | 1kg | on all 4 sides, on each 3min. | 214 - 212 hrs |
| Roast, vat | 1kg | on all sides, on each 3min. | 2 - 212 hrs |
| Roast, shoulder | 1kg | on all aides, on each 3min. | 212 hrs |
| Porc | |||
| Filet, whole | 500-600 g | on all sides, on each 2min. | 112 hrs |
| Loin | 600-1000g | all around 10-15min. | 2-3hrs |
| Lamb | |||
| Gigot with haunch | 2kg | on all sides, on each 4min. | 3-4hrs |
| Gigot steak of the haunch | 200g | on all sides, on each 2min | 34 hr-1hr |
| Filet | 400g | on all sides, on each 2min | 1 - 114 hrs |
If you wish to keep the cooked meat warm, put the setting back to 60^ . We recommend not to use the warming function for more than 1hr
| EEDP1470AX | EEDP2080AX | EEDP2980AX |
| 40 tea cups | 60 tea cups | 80 tea cups |
| or | or | or |
| ... | ... | ... |
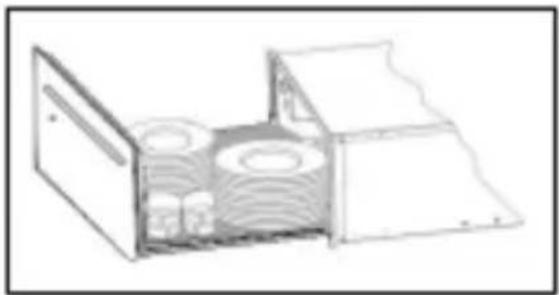
natural_image
Diagram of a box with internal circular patterns and a lid, showing no text or symbols9. CLEANING AND MAINTENANCE
Cleaning is the only maintenance action that is required normally.

WARNING!
Cleaning must be done with the crockery warmer disconnected from the electrical power supply. Remove the plug from the power socket or disconnect the crockery warmer power supply circuit. Do not use aggressive or abrasive cleaning products, abrasive sponges or pointed objects since stains or abrasion marks may appear. Do not use high pressure or steam jet cleaning appliances.
APPLIANCE FRONT AND CONTROL PANEL
The crockery warmer can be cleaned using just a damp cloth. If it is very dirty, add a few drops of washing-up liquid to the washing water. Wipe the surfaces dry using a dry cloth.
For stainless steel fronted crockery warmers, special products for treatment of stainless steel surfaces can be used. These products prevent the surfaces becoming dirty again for some time.
Apply a thin layer of such a product on the surface using a soft cloth. On aluminium fronted crockery warmers use a gentle glass cleaning product and a soft cloth that does not release fluff. Wipe horizontally without pressing on the surface since aluminium is sensitive to scratches and cuts.
INTERIOR OF THE CROCKERY WARMER
Clean the inside of the crockery warmer regularly using a damp cloth. If it is very dirty add a few drops of washing-up liquid to the washing water.
Wipe the surfaces dry using a dry cloth.
Avoid water entering through the air circulation opening.
Only use the crockery warmer again when it is completely dry.
MAT WITH NON-SLIP SURFACE
The non-slip surface mat can be removed to facilitate cleaning of the drawer.
The mat can be cleaned by hand using hot water with a few drops of washing-up liquid. Dry thoroughly.
The non-slip mat should only be
replaced when it is completely dry.
10. WHAT SHOULD I DO IF THE CROCKERY WARMER DOESN'T WORK?

WARNING!
Any type of repair must only be done by a specialised technician. Any repair done by a person not authorised by the manufacturer is dangerous.
Before contacting Technical Assistance, check on the following:
• The crockery doesn't heat up enough. Check whether:
- The appliance has been switched on. - The appropriate temperature has been selected.
- The air circulation orifices are covered by the crockery.
- The crockery was left to heat up for sufficient time.
• Heating time depends on several factors, such as, for example:
- Crockery material type and thickness.
- Quantity of crockery. - How the crockery is arranged.
- The crockery doesn't heat up at all. Check whether:
- You can hear the noise of a fan. If the fan is operating then the heating element is broken; if the fan is not operating then the fan is broken.
- The switchboard fuses / circuit breakers have fused / tripped out.
• The crockery is heating up too much. The temperature selector is broken.
- The on/off switch does not light up. The switch's pilot light has blown.
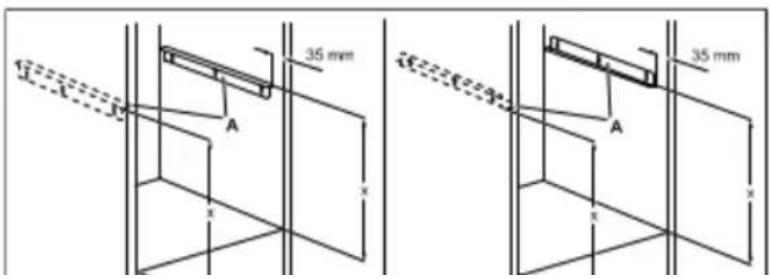
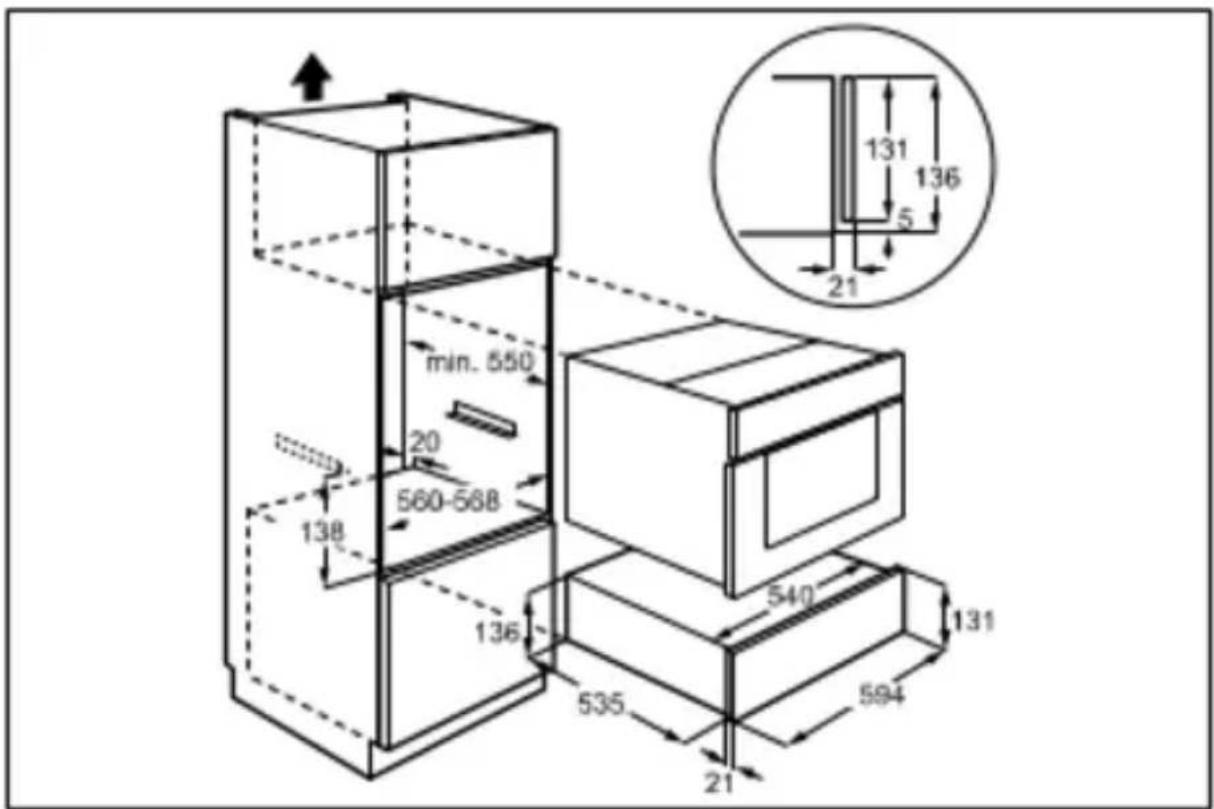
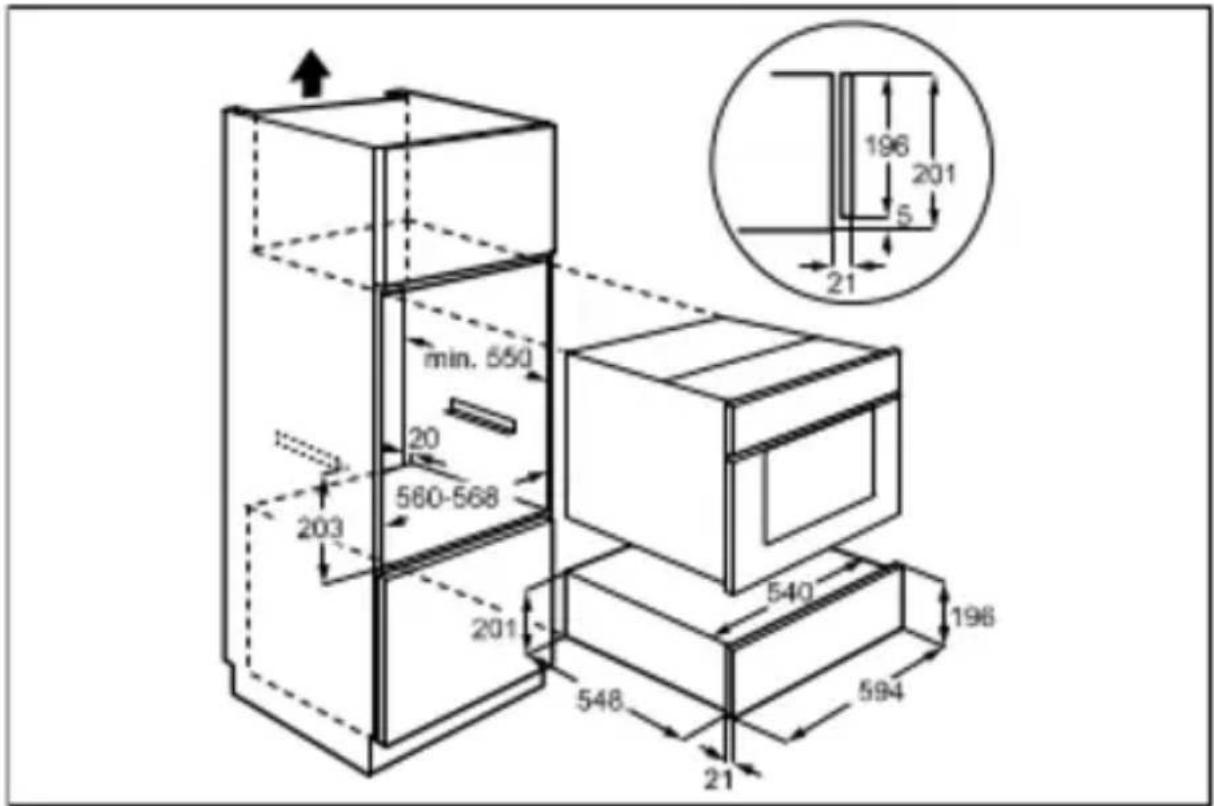
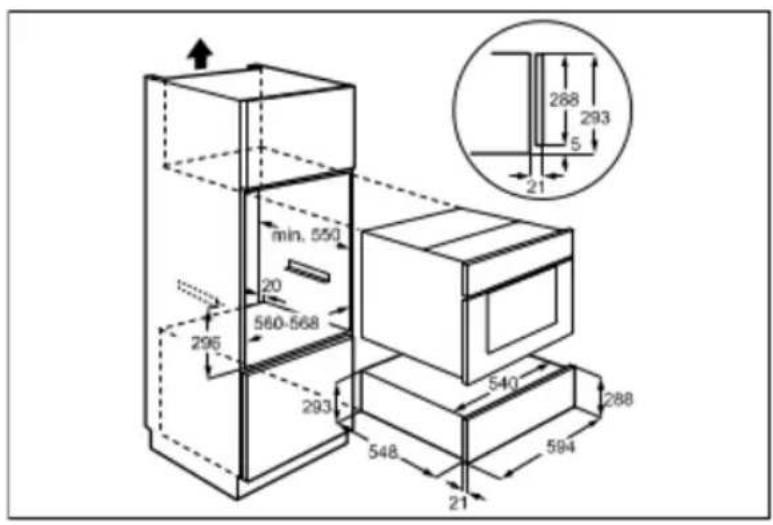
11. INSTALLATION INSTRUCTIONS

WARNING!
Read the *Safety Information*
Make sure that the crockery warmer is not damaged in any way. Check that the drawer opens

A 2x
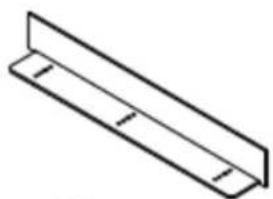
natural_image
Simple line drawing of a rectangular metal profile with two side notches (no text or symbols)60x60x510 mm
B 4x

∅3,9 - 19 mm
C 6x

∅4,5 - 16 mm
natural_image
Simple line drawing of a rectangular structure with supports, no text or symbols present12. ENVIRONMENT CONCERNS
Recycle the materials with the symbol ⚠. Put the packaging in applicable containers to recycle it. Help protect the environment and human health and to recycle waste of electrical and electronic appliances.
Do not dispose appliances marked with the symbol with the household waste. Return the product to your local recycling facility or contact your municipal office.
13. GREAT BRITAIN & IRELAND - CUSTOMER CARE AND SERVICE
Standard Guarantee Conditions and Exclusions. To see our guarantee conditions and exclusions please visit www.electrolux.co.uk or contact our Customer Care Department.
Service & Spare Parts. Please contact your local Service Force Centre on; 08445 616616 (Your call will automatically be routed to your local centre). For the address of your local centre please visit; www.electrolux.co.uk. Please ensure you read the information under 'What to do if' in your instruction booklet
before contacting us for service. Servicing and/or installation of your product, including electrical connections and water connections should be carried out by a suitably qualified engineer. In the user manual and on our web site, www.electrolux.co.uk you will find some useful information on how to deal with minor faults and how to take care of your product. When contacting us for Service please ensure that you have your purchase receipt and the following information available:
- Electrolux
- Cooking
- CONTENTS
- WE'RE THINKING OF YOU
- Visit our website to:
- PREHEAT DISHES 60°-70°C
- KEEP FOOD WARM 60-70°C
- LOW TEMPERATURE
- COOKING 80° C (ONLY AVAILABLE
- IN THE EEDP2080AX AND EEDP2980AX
- MODELS)
- CLEANING AND MAINTENANCE
- WARNING!
- APPLIANCE FRONT AND CONTROL PANEL
- INTERIOR OF THE CROCKERY WARMER
- MAT WITH NON-SLIP SURFACE
- WHAT SHOULD I DO IF THE CROCKERY WARMER DOESN'T WORK?
- INSTALLATION INSTRUCTIONS
- ENVIRONMENT CONCERNS
- GREAT BRITAIN & IRELAND - CUSTOMER CARE AND SERVICE
Mærke : ELECTROLUX
Model : EEDP2980AX
Kategori : Varmeskuffe