8899 - Kompressor HBM - Gratis brugsanvisning og manual
Find enhedens vejledning gratis 8899 HBM i PDF-format.


Brugerspørgsmål om 8899 HBM
0 spørgsmål om dette apparat. Besvar dem du kender, eller stil dit eget.
Stil et nyt spørgsmål om dette apparat
Download vejledningen til din Kompressor i PDF-format gratis! Find din vejledning 8899 - HBM og tag din elektroniske enhed tilbage i hånden. På denne side er alle dokumenter nødvendige for brugen af din enhed offentliggjort. 8899 af mærket HBM.
BRUGSANVISNING 8899 HBM
HBM

Machines
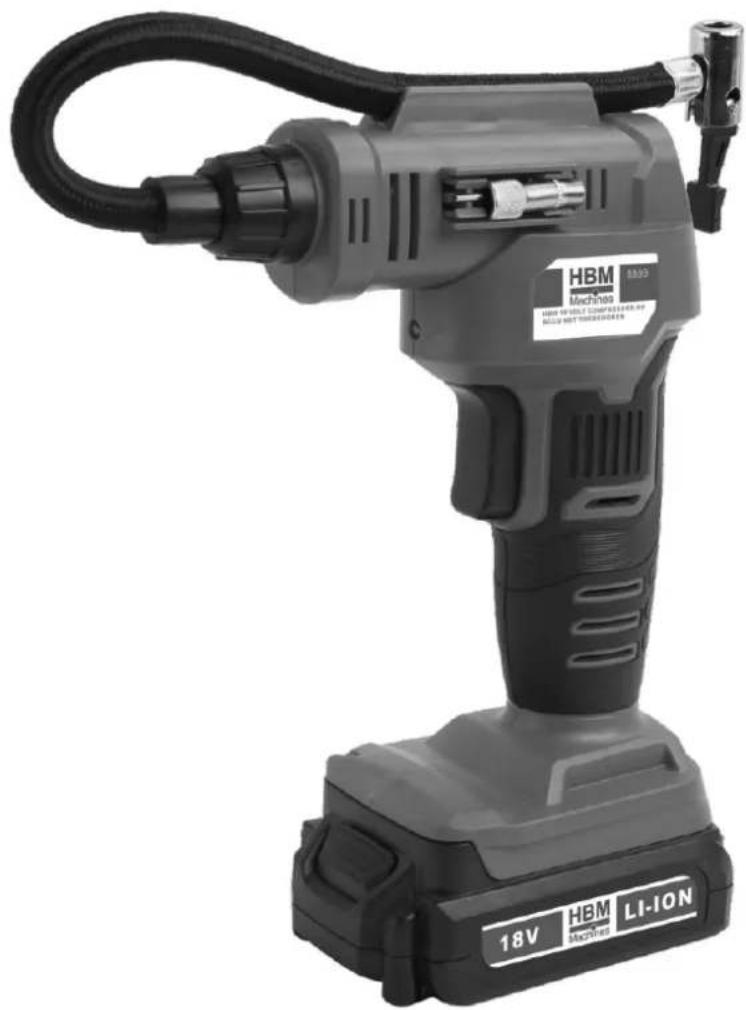
HBM 18 VOLT COMPRESSOR OP ACCU MET TOEBEHOREN
8899
natural_image
HBM Li-ion electric drill press with attached cable and base (no visible text or symbols on the device body)


ORIGINAL INSTRUCTION
AIR PUMP
a) APPLICATION
This air pump is intended for inflating car and bicycle tyres, sports/gym balls and the like. It is designed for domestic use and is not designed for commercial, trade or industrial use.

WARNING! Please read and understand this instruction manual before use and keep it for your future reference. Your power tool should only be passed on together with this instruction manual.
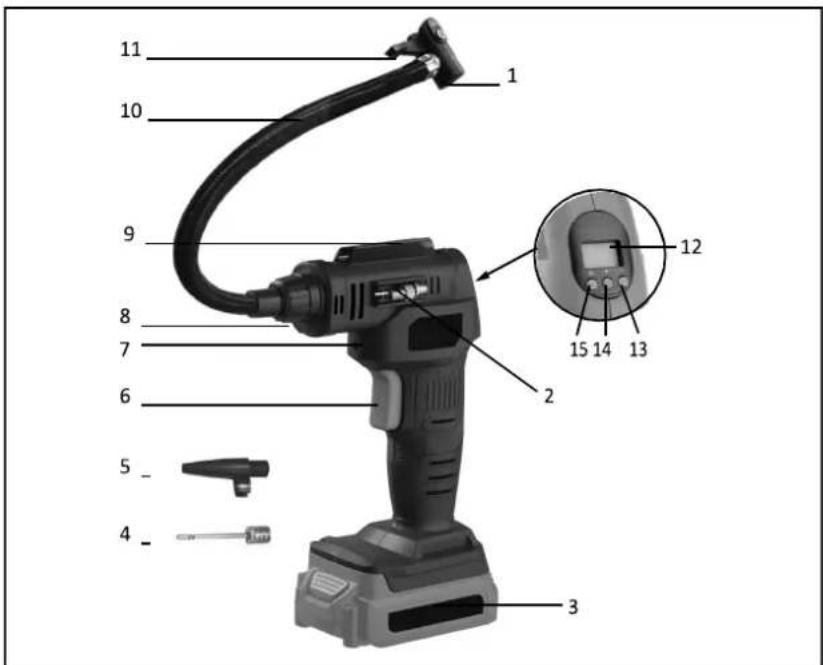
b) PARTS DESCRIPTION
Fig.A
text_image
11 10 9 8 7 6 5_ 4_ 3 1 2 12 15 14 131 Air Chuck
2 Adapter Storage Area
3 Battery (not included)
4 Ball Needle Adapter
5 Tapered Universal Adapter
6 Trigger Switch
7 LED Worklight
8 Air Hose Connector
- Air Hose Storage Area
- Air Hose
- Air Chuck Clamp
- Digital Pressure Gauge
- Pressure Setting(-)
- Pressure Setting(+)
- Power and Mode Button
a) PACKAGE CONTENT LIST
1 x Air Pump
1 x Ball Needle Adapter
1 x Flexible Hose with Air Chuck
1 x Tapered Universal Adapter
1 x Instruction Manual
- Remove all packing materials
- Ensure all parts on the contents list are present
- Check the appliance, and all accessories for transportation damages

WARNING! Packaging material are not toys! Children must not play with plastic bags! Danger of suffocation!

If any parts are missing or damaged, please contact Action Spares 1300 777 137.
b) SYMBOLS
The following symbols are used in this manual and/or on the air pump.
 | Denotes risk of personal injury or damage to the tool |  | Read instruction manual before use |
 | Australian Regulatory Compliance mark |  | Dispose appliances according to the regulation and requirement of local council |
c) GENERAL POWER TOOL SAFETY WARNINGS

WARNING! Read all safety warnings and all instructions. Failure to following the warnings and instructions may result in an electric shock, fire and/or serious injury.
Save all warnings and instructions for future reference!
The term "power tool" in the warnings refers to your mains-operated (corded) power tool or battery-operated (cordless) power tool.
• Work area safety
a) Keep work area clean and well lit. Cluttered or dark areas invite accidents.
b) Do not operate power tools in explosive atmospheres, such as in the presence of flammable liquids, gases or dust. Power tools create sparks which may ignite the dust of fumes.
c) Keep children and bystanders away while operating a power tool. Distractions can cause you to lose control.
• Electrical safety
a) Power tool plugs must match the outlet. Never modify the plug in any way. Do not use any adapter plugs with earthed (grounded) power tools. Unmodified plugs and matching outlets will reduce the risk of an electric shock.
b) Avoid body contact with earthed or grounded surfaces, such as pipes, radiators, ranges and refrigerators. There is an increased risk of electric shock if your body is earthed or grounded.
c) Do not expose power tools to rain or wet conditions. Water entering a power tool will increase the risk of an electric shock.
d) Do not abuse the cord. Never use the cord for carrying, pulling or unplugging the power tool. Keep cord away from heat, oil, sharp edges or moving parts. Damaged or entangled cords increase the risk of electric shock.
e) When operating a power tool outdoors, use an extension cord suitable for outdoor use. Use of a cord suitable for outdoor use reduces the risk of electric shock.
f) If operating a power tool in a damp location is unavoidable, use a residual current device (RCD) protected supply. Use of an RCD reduces the risk of electric shock.
• Personal safety
a) Stay alert, watch what you are doing and use common sense when operating a power tool. Do not use a power tool while you are tired or under influence of drugs, alcohol or medication. A moment of inattention while operating
power tools may result in serious personal injury.
b) Use personal protective equipment. Always wear eye protection. Protective equipment such as dust mask, non-skid safety shoes, hard hat, or hearing protection used for appropriate conditions will reduce personal injuries.
c) Prevent unintentional starting. Ensure the switch is in the off-position before connecting to power source and/or battery pack, picking up or carrying the tool. Carrying power tools with your finger on the switch or energising power tools that have the switch on invites accidents.
d) Remove any adjusting key or wrench before turning the power tool on. A wrench or a key left attached to a rotating part of the power tool may result in personal injury.
e) Do not overreach. Keep proper footing and balance at all times. This enables better control of the power tool in unexpected situations.
f) Dress properly. Do not wear loose clothing or jewellery. Keep your hair, clothing and gloves away from moving parts. Loose clothes, jewellery or long hair can be caught in moving parts.
g) If devices are provided for the connection of dust extraction and collection facilities, ensure these are connected and properly used. Use of dust collection can reduce dust-related hazards.
• Power tool use and care
a) Do not force the power tool. Use the correct power tool for your application. The correct power tool will do the job better and safer at the rate for which it was designed.
b) Do not use the power tool if the switch does not turn it on and off. Any power tool that cannot be controlled with the switch is dangerous and must be repaired.
c) Disconnect the plug from the power source and/or the battery pack from the power tool before making any adjustments, changing accessories, or storing power tools. Such preventive safety measures reduce the risk of starting the power tool accidentally.
d) Store idle power tools out of reach of children and do not allow persons unfamiliar with the power tool or these instructions to operate the power. Power tools are dangerous in the hands of untrained users.
e) Maintain power tools. Check for misalignment or binding of moving parts, breakage of parts and any other condition that may affect the power tools operation. If damaged, have the power tool repaired before use. Many accidents are caused by poorly maintained power tools.
f) Keep cutting tools sharp and clean. Properly maintained cutting tools with sharp cutting edges are less likely to bind and are easier to control.
g) Use the power tool, accessories and tool bits etc. in accordance with these instructions, taking into account the working conditions and the works to be performed. Use the power tool for operations different from those intended could result in hazardous situations.
• Battery tool use and care
a) Recharge only with the charger specified by the manufacturer. A charger that is suitable for one type of battery pack may create a risk of fire when used with another battery pack.
b) Use power tools only with specifically designated battery packs. Use of any other battery packs may create a risk of injury and fire.
c) When battery pack is not in use, keep it away from other metal objects, like paper clips, coins, keys, nails, screws or other small metal objects, that can make a connection from one terminal to another. Shorting the battery terminals together may cause burns or a fire.
d) Under abusive conditions, liquid may be ejected from the battery; avoid contact. If contact accidentally occurs, flush with water. If liquid contacts eyes, additionally seek medical help. Liquid ejected from the battery may cause irritation or burns.
• Service
a) Have your power tool serviced by a qualified repair person using only identical replacement parts. This will ensure that the safety of the power tool is maintained.
• Special safety notes for air pump
a) Observe the maximum pressure. Do not inflate any items to excess pressure.
b) The air pump is designed for occasional use. Allow the air pump to cool down after 5 minutes of use.
c) Never use the air pump near flammable fluids or gases.
d) Never allow anyone to pump air into mouth, ears, nose etc. of people and animals.
e) Do not direct air stream at body.
f) Do not expose to rain.
- Residual risk
Even if you use the air pump as prescribed, it is not possible to eliminate all residual risk. The following hazards may arise:
• Damage to the lungs if an effective breathing mask is not worn.
• Damage to hearing if effective ear protection is not worn.
• Damage to the eyes if effective eye protection is not worn.
d) OPERATION

WARNING: Always observe the pressure on the pressure gauge. Never inflate object to a pressure greater than the maximum pressure specified by the manufacturer of the object.

WARNING: Switch off the air pump immediately should any danger arise.

WARNING: The metal parts on the adaptor and extension tube can become very hot. Allow the parts to cool down before touching these parts.

WARNING: The air pump should not continue operating for more than 5 minutes. After 5 minutes, it must be switched off and allowed to cool down for at least 10 minutes before restarting.
- Insert and remove the battery pack (sold separately)

WARNING: Before inserting or removing the battery pack, make sure the air pump is switched off.
6 To insert the battery pack, align the battery pack with the air pump's base and slide the battery pack into the air pump, so that the battery pack is locked in position.
7 To remove the battery pack, press the battery's release button and pull the battery pack off at the same time.
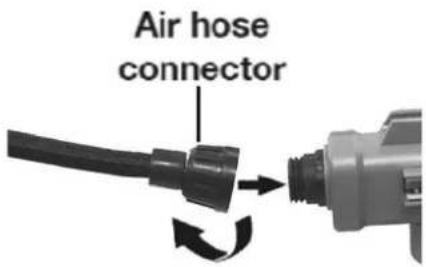
• Fitting the air hose (Fig. 1)
a) Remove the battery pack from the air pump.
b) Insert the air hose connector (8) into the open end of the air pump then tighten it by turning clockwise.
c) To remove, turn the air hose connector (8) anti-clockwise and remove the air hose.
text_image
Air hose connectorFig. 1
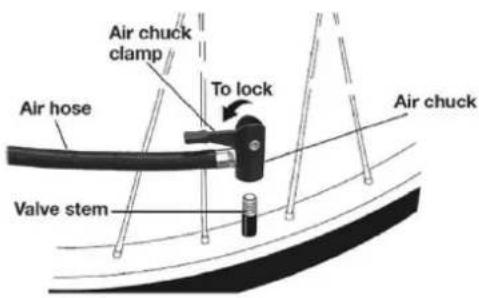
• Inflating with the air hose (Fig. 2)
a) The air chuck (1) on the air hose (10) can be used to inflate tires or any object with a valve stem that can fit into the air chuck opening.
b) Place the air chuck (1) on the valve stem.
c) Push the air chuck (1) down so that the thread section of the valve stem is inside the air chuck (1).
d) Clamp the end of the air chuck (1) down onto the valve stem by pressing the air chuck clamp (11) down until it locks into place.
e) To remove, lift the air chuck clamp (11) and remove the air chuck from valve stem.
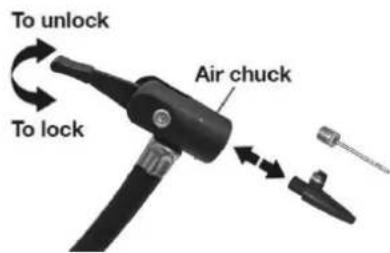
• Inflating with the air hose and adapters (Fig. 3)
a) The air hose (10) can be used with adapters to inflate different objects.
b) Insert adapter into the air chuck (1) and it locks into place.
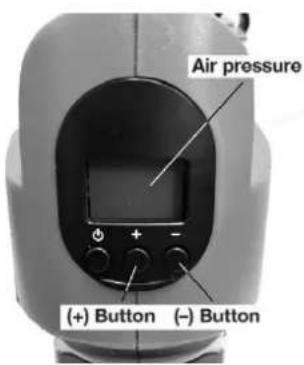
• Switching on and setting the digital pressure gauge (Fig. 4)
a) The digital pressure gauge can be used to set the pressure of the inflated objects and monitor the pressure inside the inflated object.
Press the power button (15) to switch on the digital pressure gauge.
b) To switch between PSI, BAR or KPA modes - Press the digital pressure gauge power button (15) to select the desired measured unit.
text_image
Air chuck clamp Air hose To lock Valve stem Air chuckFig. 2
text_image
To unlock Air chuck To lockFig. 3
text_image
Air pressure (+) Button (-) ButtonFig. 4
- Setting digital pressure gauge for automatic shut off
a) With the digital pressure gauge (12) switched on, press and hold down (+) or (-) button to select desired shutoff pressure.
Note: Numbers will flash while setting pressure. Holding buttons down will make the pressure number increase or decrease faster.
b) When the desired pressure has been selected, begin inflating. The air pump will shut off once the set pressure is reached.
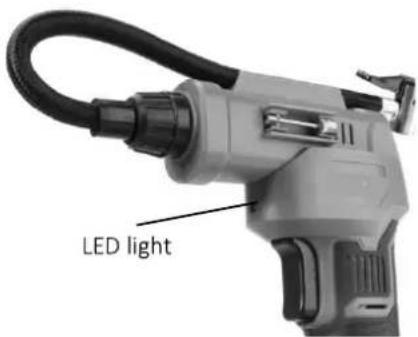
• LED worklight (Fig. 4)

WARNING: Do not stare directly at the LED worklight. Never aim the LED worklight at any person or animal.
5 The LED worklight (7) will switch on when the power button (15) is pressed.
6 The LED worklight (7) will stay on when the air pump is switched on.
When the air pump is switched off, the LED worklight will turn off after 30 seconds.
text_image
LED lightFig. 5
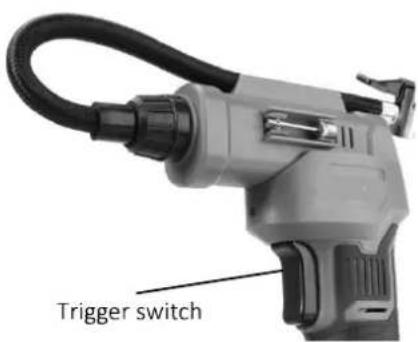
• Starting and stopping (Fig. 5)
- To switch the air pump on, press and hold the power and mode button (15) till the digital pressure gauge (12) is on.
- Once the digital pressure gauge has switched on, select the desired shutoff pressure.
- Depress and hold the trigger switch (6) to start pumping air.
- After a few seconds release the trigger switch (6) and the air pump will continue running.
The air pressure will appear on the digital pressure gauge (12) as the object is being inflated.
text_image
Trigger switchFig. 6
- To turn the air pump off, press the trigger switch (6) again.
- After the pre-set pressure is reached, the air pump will turn off automatically.
e) CLEANING, MAINTENANCE AND STORAGE

WARNING: Remove the battery from the air pump before cleaning, maintenance and storage.
- Cleaning
-
Regularly clean the air pump's housing with a soft cloth, preferably after each use. If the dirt does not come off, use a soft cloth moistened with soapy water.
-
Never use solvents such as petrol, alcohol, ammonia water etc. These solvents may damage the plastic parts.
- Maintenance
-
The air pump has been designed to operate over a long period of time with a minimum of maintenance. Continuous satisfactory operation depends upon proper care and regular cleaning.
-
The air pump should only be repaired by an authorized service centre. There is no serviceable parts that can be repaired by the user.
- Storage
Thoroughly clean the air pump and its accessories before storage.
Store the air pump and its accessories out of the reach of children in a stable and secure place.
f) DISPOSAL
Dispose appliances according to the regulations and requirements of your local council. If appliances are disposed in landfills or dumps, hazardous substances may leak into the ground water and get into the food chain, damaging your health and well-being.
g) TROUBLESHOOTING
| Problem | Possible causes | Possible solutions |
| Air pump cannot start. | Battery not installed properly. | Insert the battery again. |
| Battery not charged. | Charge the battery. | |
| No pressure. | Adaptor not fitted properly. | Fit the adaptor properly. |
| Pump is not working. | Repair by an authorized service centre. | |
| Pump operates but object does not inflate. | Adaptor is not fitted properly. | Fit the adaptor properly. |
| Adaptor is not clean. | Clean the adaptor. | |
| Incorrect adaptor. | Use the correct adaptor. |
h) TECHNICAL DATA
| Rated voltage | 18Vd.c. |
| Maximum pressure | 8 bar/120PSI |
| Maximum operating time | S2: 5 min |
| Weight | 0.8kg |
| Product dimension | 21.5cm X 15cm X 7.5cm |