
Collection LW-200-1AVEF - Armbåndsur CASIO - Gratis brugsanvisning og manual
Find enhedens vejledning gratis Collection LW-200-1AVEF CASIO i PDF-format.


Brugerspørgsmål om Collection LW-200-1AVEF CASIO
0 spørgsmål om dette apparat. Besvar dem du kender, eller stil dit eget.
Stil et nyt spørgsmål om dette apparat
Download vejledningen til din Armbåndsur i PDF-format gratis! Find din vejledning Collection LW-200-1AVEF - CASIO og tag din elektroniske enhed tilbage i hånden. På denne side er alle dokumenter nødvendige for brugen af din enhed offentliggjort. Collection LW-200-1AVEF af mærket CASIO.
BRUGSANVISNING Collection LW-200-1AVEF CASIO
Operation Guide 2672
CASIO®
About This Manual

- Button operations are indicated using the letters shown in the illustration.
- Each section of this manual provides you with the information you need to perform operations in each mode. Further details and technical information can be found in the "Reference" section.
General Guide
- Press Ⓑ to change from mode to mode. - In any mode, press Ⓛ to illuminate the display.

flowchart
graph LR
    A["Timekeeping Mode"] -->|Press B.| B["Alarm Mode Stopwatch Mode Dual Time Mode"]
    B --> C["Dual Time Mode"]
    C --> D["12:00"]
    D --> E["5T 00 0:00 00"]
    E --> F["8:58 50"]
Timekeeping
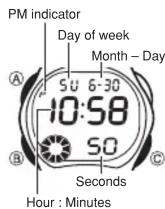
Use the Timekeeping Mode to set and view the current time and date.

flowchart
graph TD
    A["1. In the Timekeeping Mode, hold down Ⓐ until the seconds start to flash, which indicates the setting screen."] --> B["2. Press Ⓡ to move the flashing in the sequence shown below to select other settings."]
    B --> C["Seconds Hour"]
    C --> D[" "]
    D --> E["Minutes"]
    E --> F["YearMe"]
    F --> G[" "]
    G --> H[" "]
    H --> I[" "]
    I --> J[" "]
    J --> K[" "]
    K --> L[" "]
    L --> M[" "]
- When the setting you want to change is flashing, press © to change it as described below.
| To change this setting | Perform this button operation |
| Seconds | Press © to reset to 00. |
| Hour, Minutes, Year, Month, Day, Day of week | Press © to increase the setting.Holding down © changes the setting at high speed. |
- Pressing © while the seconds are in the range of 30 to 59 resets them to 00 and adds 1 to the minutes. In the range of 00 to 29, the minutes are unchanged.
- Press Ⓐ to exit the setting screen.
•The year can be set in the range of 2000 to 2099. - The watch's built-in full automatic calendar automatically makes allowances for different month lengths and leap years. Once you set the date, there should be no reason to change it except after you have the watch's battery replaced.
To toggle between 12-hour and 24-hour timekeeping
In the Timekeeping Mode, press © to toggle between 12-hour timekeeping and 24-hour timekeeping.
- With the 12-hour format, the P (PM) indicator appears to the left of the hour digits for times in the range of noon to 11:59 p.m. and no indicator appears to the left of the hour digits for times in the range of midnight to 11:59 a.m.
- With the 24-hour format, (24 indicator), times are displayed in the range of 0:00 to 23:59.
- The P and 24 indicators are not displayed with the Timekeeping Mode time in the Alarm Mode and Dual Time Mode.
- The 12-hour/24-hour timekeeping format you select in the Timekeeping Mode is applied in all other modes.
Alarm

When the daily alarm is turned on, the alarm tone sounds when the alarm time is reached. You can also turn on an Hourly Time Signal that causes the watch to beep twice every hour on the hour. •Alarm setting (and Hourly Time Signal setting) is available in the Alarm Mode, which you enter by pressing Ⓗ.
Alarm Operation
The alarm tone sounds at the preset time for 10 seconds, regardless of the mode the watch is in.
To set an alarm time

- In the Alarm Mode, hold down Ⓐ until the hour setting starts to flash, which indicates the setting screen. ●This operation automatically turns on the alarm
- Press Ⓑ to move the flashing between the hour and minutes.
- While a setting is flashing, use © to increase it. Holding down © changes the setting at high speed.
- With the 12-hour format, set the time correctly as a.m. (no indicator) or p.m. (P indicator).
- Press Ⓐ to exit the setting screen.
To stop the alarm tone after it starts to sound Press any button.
To turn the Daily Alarm and Hourly Time Signal on and off

In the Alarm Mode, press © to cycle through the on and off settings as shown below.
Alarm On Indicator/Hourly Time Signal On Indicator

- The alarm on (ALM) indicator flashes while the alarm sounding.
- The alarm on (ALM) indicator and Hourly Time Signal on (SIG) indicator are displayed in all modes.
To test the alarm
In the Alarm Mode, hold down © to sound the alarm.
Stopwatch

The stopwatch lets you measure elapsed time, split times, and two finishes.
•The display range of the stopwatch is 23 hours, 59 minutes, 59.99 seconds.
- The stopwatch continues to run, restarting from zero after it reaches its limit, until you stop it.
- The stopwatch measurement operation continues even if you exit the Stopwatch Mode.
- Exiting the Stopwatch Mode while a split time is frozen on the display clears the split time and returns to elapsed time measurement.
- All of the operations in this section are performed in the Stopwatch Mode, which you enter by pressing Ⓗ.
To measure times with the stopwatch
Elapsed time
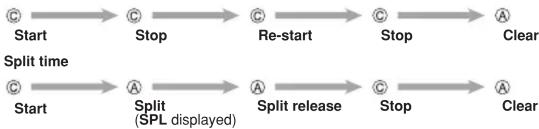
flowchart
graph LR
    A["Start"] --> B["Stop"]
    B --> C["Re-start"]
    C --> D["Stop"]
    D --> E["A Clear"]
    F["Start"] --> G["A Split (SPL displayed)"]
    G --> H["A Split release"]
    H --> I["Stop"]
    I --> J["A Clear"]
Two Finishes

flowchart
graph LR
    A["Start"] --> B["A Split"]
    B --> C["C Stop"]
    C --> D["A Split release"]
    D --> E["A Clear"]
    B --> F["First runner finishes. Display time of first runner."]
    C --> G["Second runner finishes."]
    D --> H["Display time of second runner."]
Dual Time
The Dual Time Mode lets you keep track of time in a different time zone.
- In the Dual Time Mode, the seconds count is synchronized with the seconds count of the Timekeeping Mode.
Timekeeping Mode time (Hour : Minutes)
Mode Indicator

Hour:Minutes
To set the Dual Time
- Press Ⓑ to enter the Dual Time Mode.
- Hold down Ⓐ until the hour setting starts to flash, which indicates the setting screen.
- Press Ⓑ to move the flashing between the hour and minutes settings.
- Press © to increase the setting. Holding down © changes the setting at high speed.
- Press Ⓐ to exit the setting screen.
Display Illumination

Three-second indicator
An LED (light-emitting diode) and a light guide panel illuminate the entire display for easy reading in the dark. - See “Display Illumination Precautions” for more important information.
To illuminate the display
In any mode, press Ⓛ to illuminate the display.
- You can use the procedure below to select either one second or three seconds as the display illumination duration. When you press Ⓑ, the display will remain illuminated for about one second or three seconds, depending on the current display illumination duration setting.
To specify the display illumination duration
In the Timekeeping Mode, hold down © for about two seconds to toggle the display illumination duration between three seconds (3" displayed) and one second (3" not displayed).
- Pressing © also toggles between 12-hour and 24-hour timekeeping.
- When the three-second setting is selected, the three-second (3") indicator remains on the display in all modes.
- To protect against running down the watch's battery, the watch automatically switches to the one-second setting about seven hours after the three-second setting is selected. To continue to use the three-second setting, perform the above procedure again.
Reference
This section contains more detailed and technical information about watch operation. It also contains important precautions and notes about the various features and functions of this watch.
Auto return features
If you leave a screen with flashing digits for one or two minutes without performing any operation, the watch automatically saves any settings you have made up to that point and exits the setting screen.
Display Illumination Precautions
- The illumination provided by the light may be hard to see when viewed under direct sunlight.
- Display illumination automatically turns off whenever an alarm sounds.
- Frequent use of the light shortens the battery life.

- Operation Guide 2672
- CASIO®
- General Guide
- To toggle between 12-hour and 24-hour timekeeping
- Alarm Operation
- To turn the Daily Alarm and Hourly Time Signal on and off
- To test the alarm
- Dual Time
- To set the Dual Time
- Display Illumination
- To illuminate the display
- To specify the display illumination duration
- Reference
- Auto return features
- Display Illumination Precautions
Mærke : CASIO
Model : Collection LW-200-1AVEF
Kategori : Armbåndsur