
Collection A168WEC-1EF - Ur CASIO - Gratis brugsanvisning og manual
Find enhedens vejledning gratis Collection A168WEC-1EF CASIO i PDF-format.


Brugerspørgsmål om Collection A168WEC-1EF CASIO
0 spørgsmål om dette apparat. Besvar dem du kender, eller stil dit eget.
Stil et nyt spørgsmål om dette apparat
Download vejledningen til din Ur i PDF-format gratis! Find din vejledning Collection A168WEC-1EF - CASIO og tag din elektroniske enhed tilbage i hånden. På denne side er alle dokumenter nødvendige for brugen af din enhed offentliggjort. Collection A168WEC-1EF af mærket CASIO.
BRUGSANVISNING Collection A168WEC-1EF CASIO
Operation Guide 3298
CASIO®
General Guide
- Press Ⓑ to change from mode to mode. Each mode is explained in detail on the following pages.
-
After you perform an operation in any mode, pressing Ⓐ returns to the Timekeeping Mode.
-
Holding down Ⓐ at any time illuminates the display.
- The backlight of this watch employs an electroluminescent (EL) light, which loses its illuminating power after very long term use.
Frequent use of the backlight shortens the battery life.

flowchart
graph LR
    A["Timekeeping Mode"] --> B["Alarm Mode"]
    B --> C["Stopwatch Mode"]
    C --> D["Time Setting Mode"]

    subgraph Timekeeping Mode
        A1["10:5850A"]
        A2["10:5850B"]
    end

    subgraph Alarm Mode
        B1["8:35AL"]
    end

    subgraph Stopwatch Mode
        C1["00:0000ST"]
    end

    subgraph Time Setting Mode
        D1["10:5850TM"]
    end
E
E-1
Timekeeping Mode
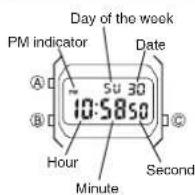
- In the Timekeeping Mode, press © to switch between the 12-hour and 24-hour formats. Day of the week is displayed as follows.
SU:Sunday MO:Monday TU:Tuesday WE:Wednesday TH:Thursday FR:Friday SA:Saturday
Alarm Mode
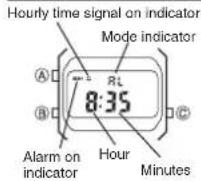
When the Daily Alarm is switched on, the alarm sounds for 20 seconds at the preset time each day. When the Hourly Time Signal is switched on, the watch beeps every hour on the hour.
To set the alarm time 1. In the Alarm Mode, press Ⓐ: The hour digits flash because they are selected. 2. Press Ⓐ to change the selection in the following sequence.
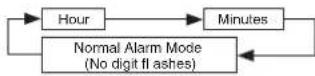
E-2
E-3
- Press © to increase the selected digits. Holding down © changes the number at high speed.
- The format (12-hour and 24-hour) of the alarm time matches the format you select for normal timekeeping.
- When setting the alarm time using the 12-hour format, take care to set the time correctly as morning or afternoon (PM).
- After you set the alarm time, press Ⓐ to return to the Alarm Mode. At this time the Daily Alarm is switched on automatically.
To stop the alarm
Press Ⓐ to stop the alarm after it starts to sound.
To switch the Daily Alarm and Hourly Time Signal on and off
Press © while in the Alarm Mode to change the status of the Daily Alarm and Hourly Time Signal in the following sequence.
[Alarm on Indicator/Hourly Time Signal on Indicator]

flowchart
graph LR
    A["Both on"] --> B["Both off"]
    B --> C["Daily Alarm only"]
    C --> D["Hourly Time Signal only"]
E-5
E-4
Stopwatch Mode
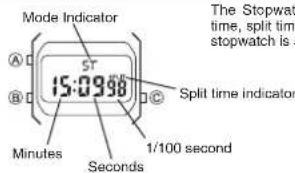
text_image
Mode Indicator A 57 B 15:09:88 Minutes 1/100 second Seconds Split time indicator The Stopwatch time, split time stopwatch is 5The Stopwatch Mode lets you measure elapsed time, split times, and two finishes. The range of the stopwatch is 59 minutes, 59.99 seconds.
To test the alarm
Hold down © while in the Alarm Mode to sound the alarm.
(a) Elapsed time measurement

(b) Split time measurement

(c) Split time and 1st-2nd place times
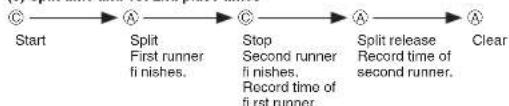
flowchart
graph LR
    Start --> Split1["Split First runner fi nishes."]
    Split1 --> Stop1["Stop Second runner fi nishes. Record time of first runner."]
    Stop1 --> Split2["Split release Record time of second runner."]
    Split2 --> Clear
E-7
E-6
Time Setting Mode
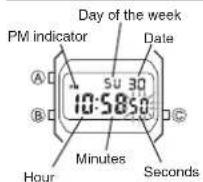
To set the time and date
Use 1. Ⓑ to enter the Time Setting Mode.
- The seconds digits flash because they are selected.
2. Press Ⓐ to change the selection in the following sequence.
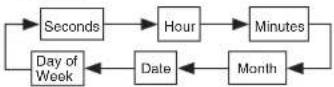
- While the seconds digits are selected (flashing), press Ⓐ to reset the seconds to "00". If you press Ⓐ while the seconds count is in the range of 30 to 59, the seconds are reset to "00" and 1 is added to the minutes. If the seconds count is in the range of 00 to 29, the minutes count is unchanged.
- While any other digits (besides seconds) are selected (flashing), press Ⓓ to increase the number. While the day of the week is selected, pressing Ⓓ advances to the next day. Holding down Ⓓ changes the current selection at high speed. After you set the time and date, press 5. Ⓓ to return to the Timekeeping Mode.
- If you do not operate any button for a few minutes while a selection is flashing, the flashing stops and the watch goes back to the Timekeeping Mode automatically.
E-8
E-9
Specifications
Accuracy at normal temperature: ± 30 seconds a month
Timekeeping Mode: Hour, minutes, seconds, am/pm, date and day of the week
Time system: Switchable between 12-hour and 24-hour formats
Calendar system: Auto-calendar set at 28 days for February
Alarm Mode: Daily alarm, hourly time signal
Stopwatch Mode
Measuring units: 1/100th of a second
Measuring capacity: 59 minutes, 59.99 seconds
Measuring modes: Elapsed time, split time and two finishes
Other: Backlight (Electro-luminescent light)
Battery: One lithium battery (Type: CR2016)
Approximately 7 years on type CR2016 (Assuming 1 second light operation
and 20 seconds alarm operation per day)
Frequent use of the backlight shortens the battery life noted above.