
EWH-eco R - Vandvarmer ELECTROLUX - Gratis brugsanvisning og manual
Find enhedens vejledning gratis EWH-eco R ELECTROLUX i PDF-format.


Brugerspørgsmål om EWH-eco R ELECTROLUX
0 spørgsmål om dette apparat. Besvar dem du kender, eller stil dit eget.
Stil et nyt spørgsmål om dette apparat
Download vejledningen til din Vandvarmer i PDF-format gratis! Find din vejledning EWH-eco R - ELECTROLUX og tag din elektroniske enhed tilbage i hånden. På denne side er alle dokumenter nødvendige for brugen af din enhed offentliggjort. EWH-eco R af mærket ELECTROLUX.
BRUGSANVISNING EWH-eco R ELECTROLUX
I N F O

text_image
iUSER MANUAL
STORAGE WATER HEATER
EWH-eco R/RN, EWH-R/RN
EWH-SL/SLN, EWH-S/SN
INSTALLATION
This electric unvented storage water heater includes the basic installation elements which are found in the packaging, i.e.:
- Insulating bushing for pipes.
- Safety valve.
Installation and first operation of the storage heater and the fittings have to be done by an expert which can take the responsibility for properly done work and explains the handling procedures.
For the connection the specific technical conditions of the energy supplier as well as the valid standards and safety regulations have to be considered.
WALL MOUNTING PROCEDURE
Use 4 adequately resistant and sturdy screws and raw-plugs capable of holding the weight of the filled heater.
LOCATION
The installation procedure is greatly facilitated by the possibility to locate the unit horizontally (EWH-SL/SLN and EWH-R/RN) or vertically in a frost-free (!) place anywhere the house.
It would be a good idea to place the unit as close as possible to the outlet - short piping means little loss of temperature.
A minimum space of 50 cm below the outlet pipe is necessary for servicing.
As shown in the drawing the input and output pipes must be on the left side when the heater is installed horizontally.
Should the unit be close to a wall leave the recommended minimum-space for maintenance and service.
Do not install the heater with its wall mounts against the floor nor on a horizontal plane.
HYDRAULIC INSTALLATION
The heater must be connected to the water supply mains.
a) The safety valve - supplied with the heater- MUST be installed on the cold water input (see right side)
- Before connecting the safety valve with the heater, the connecting pipe must be rinsed carefully.
- The draining pipe and the safety valve must be left open to the air and be installed in a continuous downward slope.
Water expands when heated. The units of the series R, eco R and SL are supplied with a safety valve that lets the expanding water flow back into the cold-water feed.
The units of the series RN and SLN have a safety valve that prevents the expanding water (N=non return) from flowing back into the cold-water feed. Here a suitable siphon for the absorption of the expanding water is to install.
The drain of the safety valve must not be blocked.
To open the safety valve (not safety valve eco) to let the water flow from the heater - via the outlet - turn the knob clockwise or counterclockwise as you please.
The proper operating of the safety valve should be tested periodically that way:
- turn the knob clockwise or counterclockwise up to the top position
- the water should flow out of the passage
- turn the knob to its down position
The pressure rating is indicated on the knob.
b) If the water-supply pressure exceeds 5 bar, a type-approved reducing valve must be installed.
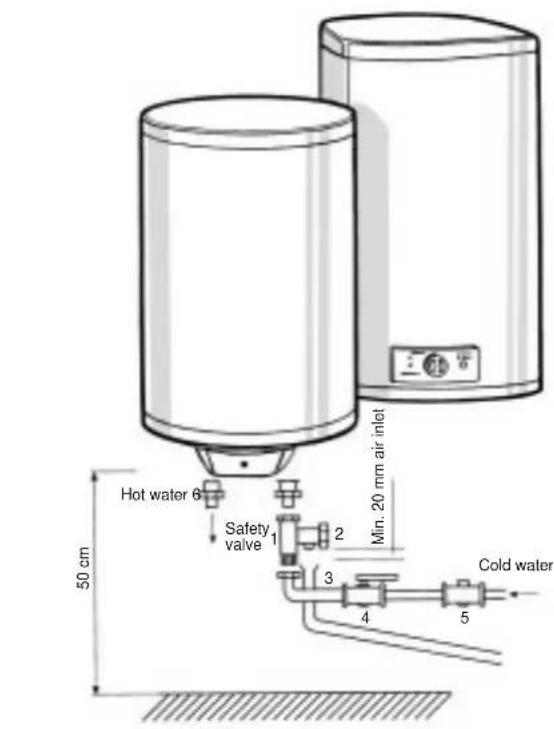
text_image
Hot water 6 Safety valve 1 2 3 4 5 Min. 20 mm air inlet Cold water 50 cm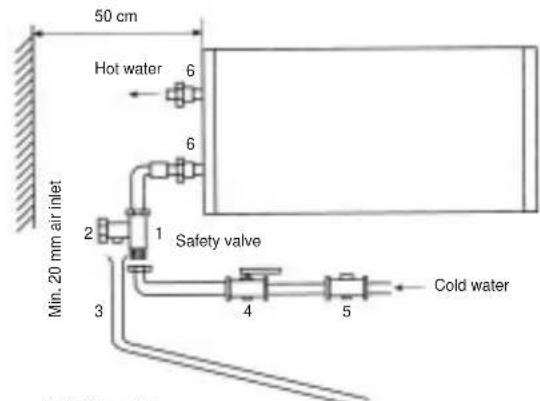
text_image
50 cm Hot water 6 Min. 20 mm air inlet 1 Safety valve 2 3 4 5 Cold water- Safety valve
- Turning knob for cleaning and draining
- Draining pipe for the safety valve
- Stop valve
- Reducing valve - necessary when pressure is more than 5 bar-to be installed after the "meter"
- Earthed plastic sleeves (supplied with the heater)
ELECTRIC INSTALLATION
All storage water heaters of the EWH-series are of 220/230 V single phase design. Before connecting make sure that the mains supply and unit input features coincide.
The heaters installation procedure is totally straightforward and only requires that Low Voltage Electronic Regulations are met. Although well known by the installers we would like to point out some of the basics:
"The following volumes and provisions shall be taken into account for installations in bathrooms or toilets".
PROHIBITED VOLUME.- It is the volume limited by the tangential and vertical planes with respect to the outer edges of bathtub, toilet pan or shower enclosure and by a plane situated 2,25 m above the same or the floor, should the units be embedded in the same.
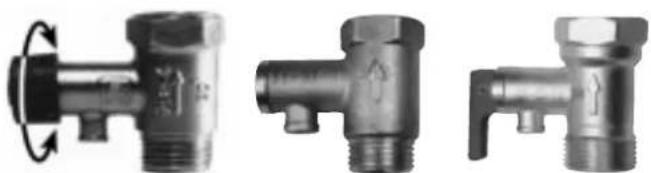
natural_image
Three different types of metallic valve fittings shown from left to right, with no visible text or symbols.Safety valve Safety valve ECO Safety valve
PROTECTION VOLUME.- It is the volume situated within the horizontal planes previously stated for the prohibited volume plus another two vertical ones 1,00 meters away from those of the said volume.
No switches, power sockets or lighting equipment must be installed within the PROHIBITED volume.
Do not install switches within the PROTECTION volume; this does not apply, however, to safety power sockets.
If possible the heater must be installed outside the PROHIBITED VOLUME so as to prevent water splashing against the unit.
Power must be supplied via a multi-polar switch, circuit breaker
or contactor. Adequate power rating fuses shall be made available for unit protection purposes.
All electrical installations shall incorporate an earthing connection. The plug used by the heater already has this connection and only has to be inserted in a mains socket of the same features.
Make sure the household or place of installation does have an earth line. If not available, a differential switch is recommendable.
The electric connection must be made with a power cable Type H05VVF 3x1,5 (Serie eco-R/RN).
OPERATION
Filling up. Open the shutoff cock as soon as the heater has been installed. Open the hot water taps. Water appears as soon as the unit fills up completely. Close the laps and check the system for leaks. Do not connect the heater to the power mains if uncertain as to whether it is foll or not.
Electric connection. Plug into the mains and press the main power input switch. A light flashes when the heating element is activated (on some models). The thermostat re-connects the heating element after a certain amount of water has been used.
Setting water temperatures. In the case of top-range models, the external control knob allows water temperature adjustments between 30^ C (min. setting) and 70^ C (max. settling).
E Position. (Energy saving) the water reaches a temperature of approx. 55°C thus allowing the heater to operate economically. Heat losses are minimal and calcareous deposits are practically fully eliminated.
Heating element power setting switch. The deluxe and super deluxe models incorporate double power rating features and a switch for power setting changes:
Pos. II; ■; MAX.: Total power
Pos. I; I; MIN.: Minimum power
It is advisable to have the heater plugged into the mains permanently as the thermostat will only activate the unit when it becomes necessary to maintain the selected temperature settings.
How to empty the unit. The heater should be fully drained if left unused for extended periods of time or if subject to freezing hazards where installed. This can be done by means of the safety valve (not safety valve eco). Always remember:
- Cut-off the power supply
- Shut-off the inqut cock
- Open the hot water tap.
MAINTENANCE
The heater does not require a special maintenance procedure. Clean by wiping with a soft cloth or damp sponge. Never use abrasives nor detergents.
The customer is advised to contact the AFTER SALES SERVICE to check the magnesium bar once the guarantee has expired. Although this particular operation is not covered by the guarantee, as it does not imply «unit servicing», it does allow the wear rate of the bar to be monitored and to establish how soon it should be changed. Moreover, indefinite heater duration can be guaranteed.
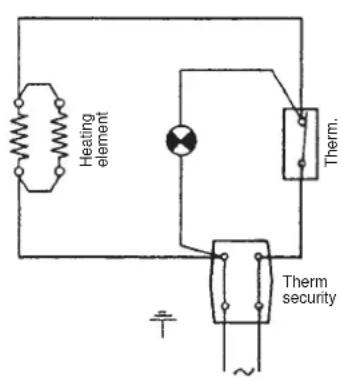
Any overheating caused by thermostat failures is offset by the safety limiting device cutting both stages off and leaving the heater without power input.
If this happens, contact our After Sales Service.
WARNING.- Never remove the lead cover without previously disconnecting the heater from the power supply.
THE MANUFACTURER reserves the right to modify the characteristics and specifications of all products without prior notice.
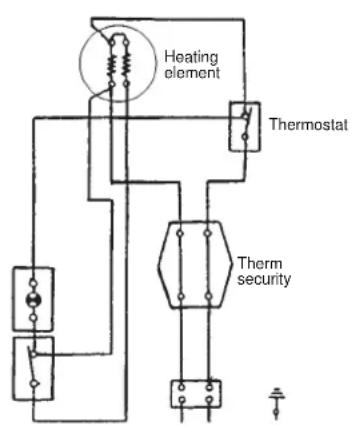
text_image
Heating element Thermostat Therm securityEWH-SL/SLN EWH-S/SN
text_image
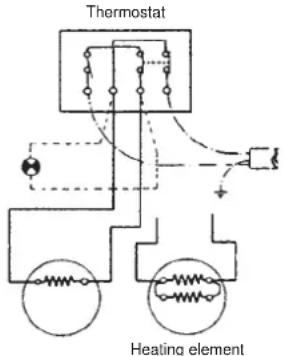
Heating element Therm. Therm security
Two heating elements
Three heating elements
text_image
Thermostat Heating element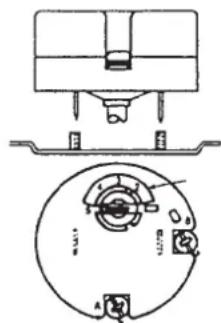
text_image
Technical diagram showing a mechanical assembly with labeled components and a circular component with internal features.
EWH-R/RN EWH-eco R/RN
ELECTRIC HEATER FEATURES
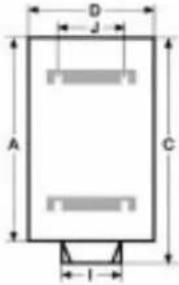
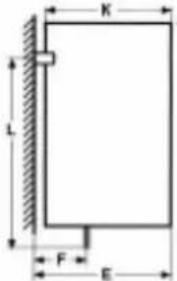
| MODELS | CAPACITY (l) | POWER RATING 230 V | HEATING TIME (h) 65°C (Δ50°C) | DIMENSIONS (mm) | WEIGHT (kg) K L | |||||||||||
| A | B | C | D | E | F | G | H | I | J | |||||||
| EWH-R/RN | 30 | 1000 | 1,75 | 530 | 599 | 596 | 380 | 393 | 120 | 235 | 155 | 160 | 340 | - | - | 16 |
| 50 | 1000 | 3 | 743 | 812 | 809 | 380 | 393 | 120 | 435 | 200 | 160 | 340 | - | - | 21 | |
| 80 | 2x800 | 3 | 727 | 789 | 785 | 489 | 516 | 175 | 322 | 250 | 230 | 440 | - | - | 32 | |
| 100 | 2x800 | 3,75 | 859 | 921 | 917 | 489 | 516 | 175 | 435 | 250 | 230 | 440 | - | - | 35 | |
| 120 | 2x800 | 4,40 | 992 | 1054 | 1050 | 489 | 516 | 175 | 570 | 250 | 230 | 440 | - | - | 39 | |
| 150 | 2x900 | 4,40 | 1197 | 1259 | 1255 | 489 | 516 | 175 | 790 | 250 | 230 | 440 | - | - | 45 | |
| 200 | 2x1200 | 4,40 | 1525 | 1587 | 1583 | 489 | 516 | 175 | 790 | 250 | 230 | 440 | - | - | 60 | |
| EWH-ECO R/RN | 30 | 1200 | 1,50 | 530 | 599 | 596 | 380 | 393 | 120 | 235 | 155 | 160 | 340 | - | - | 16 |
| 50 | 1200 | 2,50 | 743 | 812 | 809 | 380 | 393 | 120 | 435 | 200 | 160 | 340 | - | - | 21 | |
| 80 | 1200 | 4 | 727 | 789 | 785 | 489 | 516 | 175 | 322 | 250 | 230 | 440 | - | - | 32 | |
| 100 | 1200 | 5 | 859 | 921 | 917 | 489 | 516 | 175 | 435 | 250 | 230 | 440 | - | - | 35 | |
| 120 | 1200 | 6 | 992 | 1054 | 1050 | 489 | 516 | 175 | 570 | 250 | 230 | 440 | - | - | 39 | |
| 150 | 1500 | 6 | 1197 | 1259 | 1255 | 489 | 516 | 175 | 790 | 250 | 230 | 440 | - | - | 45 | |
| 200 | 2400 | 5 | 1525 | 1587 | 1583 | 489 | 516 | 175 | 790 | 250 | 230 | 440 | - | - | 60 | |
| EWH-SL/SLN | 30 | 800/1600 | 1,10 | 599 | - | - | 375 | 388 | 120 | 235 | 155 | 160 | 340 | - | - | 17 |
| 50 | 800/1600 | 1,90 | 812 | - | - | 375 | 388 | 120 | 435 | 200 | 160 | 340 | - | - | 22 | |
| 80 | 2x900 | 2,60 | 785 | - | - | 489 | 516 | 175 | 322 | 250 | 230 | 300 | - | - | 33 | |
| 100 | 2x900 | 3,25 | 912 | - | - | 489 | 516 | 175 | 435 | 250 | 230 | 300 | - | - | 37 | |
| 120 | 2x900 | 4 | 1050 | - | - | 489 | 516 | 175 | 570 | 250 | 230 | 300 | - | - | 41 | |
| 150 | 2x1200 | 3,75 | 1251 | - | - | 489 | 516 | 175 | 790 | 250 | 230 | 300 | - | - | 47 | |
| EWH-15S/SN | 15 | 1200 | 0,50 | 470 | - | 468 | 320 | 315 | 70 | - | - | 100 | 284 | 307 | 313 | 12 |
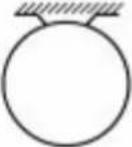
DIMENSIONAL CHART
 | 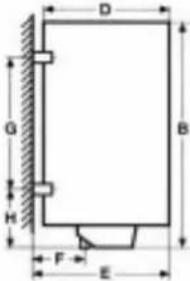 | 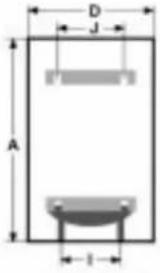 | 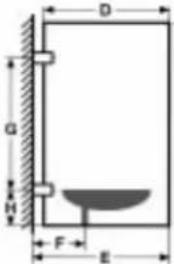 | 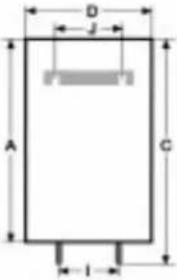 |  |
 | EWH-eco R/RNEWH-R/RN | 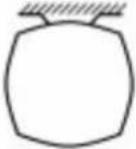 | EWH-SL/SLN EWH-S/S | 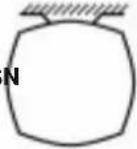 | |
 | WALL MOUNTINGWATER HEATERS15 litres |  | |||