B644 (1996) - Campingvogn Hymer - Gratis brugsanvisning og manual
Find enhedens vejledning gratis B644 (1996) Hymer i PDF-format.

Brugerspørgsmål om B644 (1996) Hymer
0 spørgsmål om dette apparat. Besvar dem du kender, eller stil dit eget.
Stil et nyt spørgsmål om dette apparat
Download vejledningen til din Campingvogn i PDF-format gratis! Find din vejledning B644 (1996) - Hymer og tag din elektroniske enhed tilbage i hånden. På denne side er alle dokumenter nødvendige for brugen af din enhed offentliggjort. B644 (1996) af mærket Hymer.
BRUGSANVISNING B644 (1996) Hymer
Bedienungsanleitung
Notice d'emploi
Operating instructions
natural_image
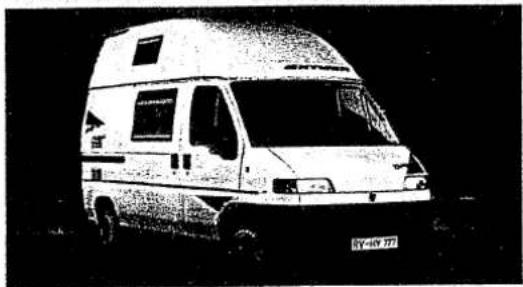
Front view of a white van with open lid and visible window, parked in black (no text or symbols)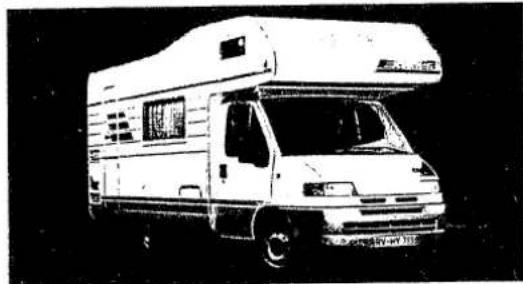
natural_image
Side view of a white RV with a canopy and open roof, parked against a dark background (no visible text or symbols)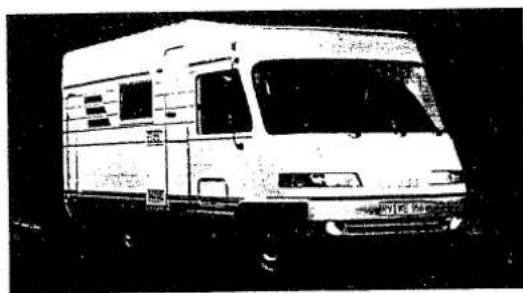
natural_image
Front view of a white military-style vehicle (no visible text or symbols)Reisemobil
B-Klasse 196 | Camp
-Englisch-
HYMER

Please note the different speed limits in other countries.
For your information we show the speed limits for the most-visited countries.
| Country | Weight | Built-up area | Country Road | Motorway |
| Germany | up to 2,8t | 50 | 100 | No limit |
| 7,5t | 50 | 80 | 80 | |
| over 7,5t | 50 | 60 | 80 | |
| Belgium | up to 7,5t | 60 | 90 | 120 |
| over 7,5t | 60 | 60 | 90 | |
| Bulgaria | 50 | 70 | 100 | |
| Denmark | up to 3,5t | 50 | 80 | 110 |
| over 3,5t | 50 | 70 | 70 | |
| Finland | up to 3,5t | 50 | 80 | 120 |
| over 3,5t | 50 | 80 | 80 | |
| France | up to 10,0t | 60 | 90/110 | 130 |
| Greece | up to 3,5t | 50 | 80 | 100 |
| over | 40 | 70/100 | - | |
| Gt. Britain | 48 | 96 | 112 | |
| Ireland | 48 | 88 | - | |
| Italy | up to 8t | 50 | 90 | 130 |
| over 8t | 50 | 60 | 80 | |
| Luxembourg | up to 3,5t | 60 | 90 | 125 |
| over 3,5t | 60 | 75 | 90 |
Stand 01/93
| Country | Weight | Built-up Area | Country Roads | Motorway |
| Netherlands | up to 3,5t | 50 | 80 | 120 |
| over 3,5t | 50 | 80 | 80 | |
| Norway | up to 3,5t | 50 | 80 | 90 |
| up to 7,5t | 50 | 70 | 70 | |
| over 7,5t | 50 | 70 | 70 | |
| Austria | up to 3,5t | 50 | 100 | 130 |
| over 3,5t | 50 | 70 | 80 | |
| Poland | 60 | 70 | 70 | |
| Portugal | up to 3,5t | 60 | 90 | 120 |
| over | 60 | 80 | 100 | |
| Slovac Rep. | up to 3,5t | 60 | 90 | 110 |
| up to 6,0t | 60 | 80 | 80 | |
| over 6,0t | 60 | 70 | 70 | |
| Sweden | up to 3,5t | 50 | 70-90 | 90-110 |
| over 3,5t | 50 | 70 | 90 | |
| Switzerland | up to 3,5t | 50 | 80 | 120 |
| over 3,5t | 50 | 80 | 80 | |
| Spain | up to 3,5t | 50 | 120 | |
| over | 50 | 100 | ||
| Turkey | 50 | 80 | 80 | |
| GUS | up to 3,5t | 60 | 90 | 90 |
| over 3,5t | 60 | 70 | 70 | |
| Hungary | up to 3,5t | 60 | 80/100 | 120 |
| over 3,5t | 50 | 70 | 80 |

Make sure before starting your journey that the cab pull-down bed is secured with the fastenings provided (B & S Class).
During the journey all seating must face forward and be secure.
Before starting a journey make sure the steadies are removed or that the built-in jacks are up.
Before starting a journey check all entrance doors on the Hymer. Make sure the step is fully up (check dashboard warning light).
During the journey check that all windows are closed and locked.
Allow only trained engineers to check, test and repair brakes.
When the weight of the vehicle is over 4t and when parking on a slope use wedges. For your own safety we recommend you always use wedges when parking on sloping ground. Wedges for vehicles over 4t are supplied and stored in the gas locker.
Be aware that adding extra weight to the vehicle can affect the handling characteristics.
When parking make sure the handrake is fully applied.
In wintry conditions make sure that ice and snow are removed from the vehicle before starting the journey.

GAS INSTALLATION
Do not carry out any repair or alteration on the gas installations, always go to a qualified workshop.
Any defect in the Gas installation (smell of gas or excessive consumption), turn off the gas (close gas bottle valve and give the vehicle a good airing, have the defect repaired at once by qualified staff. When a smell of gas is detected do not use any electrical appliances. Open fires and smoking are not allowed).
When using open burners (Gas Cooker/Gas Light/Heating/Boiler) the roof vent must be open and all gas covers must be removed (see part "General").
You must not use the Gas Cooker to heat the vehicle. When you are not using any gas appliances please turn off all the main taps and the gas bottle. If there is more than one gas appliance all must be turned off. The gas appliances which are not in use must be turned off.
Because of the risk of explosion all gas appliances must be turned off during refuelling.
11kg or 5kg gas bottles may be used. Camping bottles (Blue with max. 2.5 - 3 kg capacity and also red bottles (propane) are only allowed with safety ventilation. Make sure that the gas bottles are secured in the gas locker.
Please observe that Propane gas must not be used where the temperature is 32 degrees centigrade or over.
Butane gas is only suitable above ) degrees centigrade as the gas will not vapourise below this temperature. It is therefore not suitable for winter use.
If the vehicle is not in use for a considerable time ensure that the gas is turned off at the gas bottle.
Before you start on your "Big Journey" pay attention to the servicing and safety hints.

This warning sign shows all safe parking places. Ignoring it could result in internal or external damage. Please pass on your knowledge to other users.

Recommends places of special interest.
Respect nature.

General.
Ensure you have adequate ventilation when you spend time in your Hymer. Do not cover skylight with the winter insulation pad, it could cause suffocation by high accumulation of CO 2 Gas.
For built-in appliances - Gas Heater, Cooker, Fridge etc. Also for the base vehicle (Motor, Brakes etc. the operating instructions are important).
Watch the clearance height of the entrance door, driver's door etc.
When leaving the vehicle ensure all door and windows are securely locked.
When the heating is on take care not to have clothing too near to the heater.

Travel Safety.
When the vehicle is on the move all passengers must be seated in their appropriate places. (see supplement "A" - seating arrangements). Passengers seated in the living area must comply with regulations and use seat belts.
When loading the Hymer please observe the loading allowance and axle loading (vehicle ticket 15416).
The load on the vehicle must be spread evenly (see section 2 on loading).
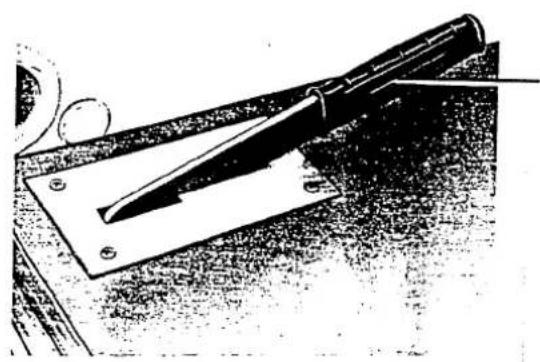
STEP.
natural_image
Mechanical device with a lever and base plate, no visible text or symbolsPicture 1. Step up
To raise the step from the inside, pull the handle towards you, then push up to the vertical position, then move it sideways into the cut away slot.
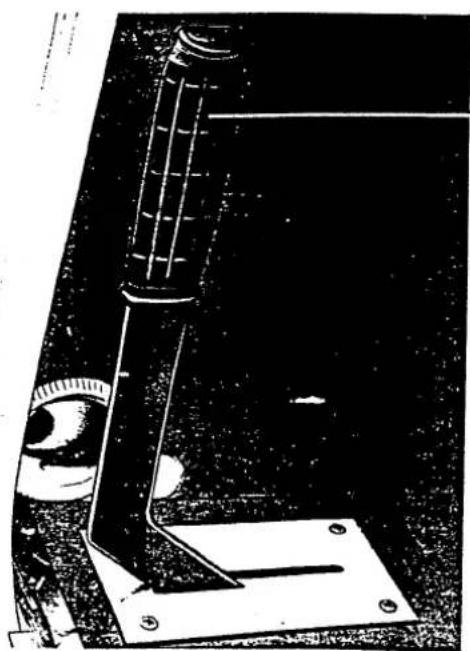
natural_image
Technical illustration of a mechanical device with a vertical rod and base plate, no visible text or symbolsPicture 2. Step down
To lower the step from inside the vehicle, move the lever sideways out of the slot, pull the lever downwards then push the lever away from you.
Fixing the Number Plates.
The number plates will need to be firmly screwed in place (depending on the model) either on the bumper or between the number plate lights.
For this operation:
- use only self-tapping screws.
- bore two holes, slightly greater in diameter than the diameter of the screws used, at suitable points on the number plate.
- hold the number plate up to the motorcaravan and mark on the vehicle the positions of the holes already bored.
- drill the fastening holes with the same diameter as the self-tapping screws which are being used.
- either place a compounding agent in the holes or onto the screws.
- screw the number plate tightly into place.
Fix your "GB" disc under right-hand side Red Light.

After travelling 50 km tighten your wheel nuts. Then check them from time to time.
Loading.
Take care not to alter the driving characteristics of the vehicle, by loading heavy items at floor level.
To load your Hymer properly place heavy articles on the floor and lightweight in the top lockers.
You must not overload.

Motorhomes may park here
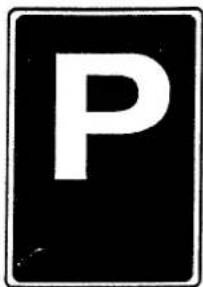
text_image
PAll vehicles are allowed to park here.
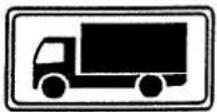
Only lorries (also motorhomes) with a permissible total weight over 2.8t and prime mover traction engines and buses.

No motorhomes allowed on this parking place.
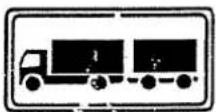
Only lorries with trailers.
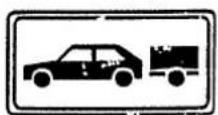
Only for cars with trailers.
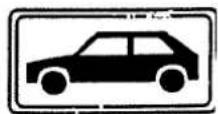
Cars only.
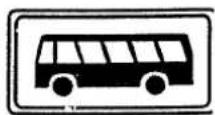
Buses only.
• Calculate the loading.
Max loading (including passengers) = total loading weight, minus weight of empty vehicle.
1) Take the estimate from your vehicle documents, No. 14-15

Please remember that the loading of your vehicle includes the weight of your passengers. The max allowed weight must not be exceeded

We recommend in your own interest and safety to have the loaded vehicle weighed (with passengers) before the start of your journey.
With Citroen, Peugeot and Fiat based vehicles the rear suspension springs are built up of several layers. When the vehicle is empty the springs are level. When loaded the leaves of the springs bend downwards. This gives the impression the vehicle is overloaded, this behaviour comes from a progressive characteristic which means that initially, through the loading, the suspension is soft but as the load increases the suspension gains strength and stiffens. Do not lose confidence when on max loading the springs bend downwards.

The max roof loading is 75kg.
* The Step is up
* During winter months keep the roof free of ice and snow
* Make sure all living area doors are secure
* The built in TV ariel is fully retracted
* The chimney extension on the heating system is in position on the roof
* Loose articles are stowed away and secured so they cannot move during the journey.
Test on the base vehicle
* The vehicle lights
* Oil level
* Radiator water level
* Windscreen washer water level
Tyre Pressure Testing
* Test regularly before you start your journey, look at supplement F (tyre pressures).
Gas installation testing.
Ensure before your journey that the gas bottles in your gas locker are aecured by the straps provided, the valves on the bottles are turned off and the appliances, Burners, Boiler, Heating and Fridge are turned off.
Battery Testing
When outside temperatures are low the starter battery and secondary battery may lose some capacity.
Before the journer, check the batteries (see supplement D "Panel").
DRIVING THE HYMERMOBILE
Remembers as the driver you are responsible for:-
- The accompanying persons staying seated in their places (supplement A "Seating order") and use the seat belts provided.
- The door lock is not opened and under sections 1 and 2 keep to the safety measures
- Avoid unnecessary jerky breaking, drive slowly on bad roads. Remember, with long, larger vehicles, because of the overhang scraping along the road can occur and under unfavourable conditions grounding can occur. Special care should be taken when boarding ferries and reversing the vehicle to avoid damage.
Always use the safety belts provided for the driver and passengers.

On the base vehicle. Drive the vehicle with the necessary caution required for driving small commercial vehicles.

Check at the start of your journey and after a break during yourjourner, that the step is up.
Brakes
Test before every journey that your brakes are functioning by applying the brakes to check that they are pulling-up evenly and staying in the same track.
Should you find anything wrong with the braking system, have them put right at once by an authorised workshop for your own safety.

text_image
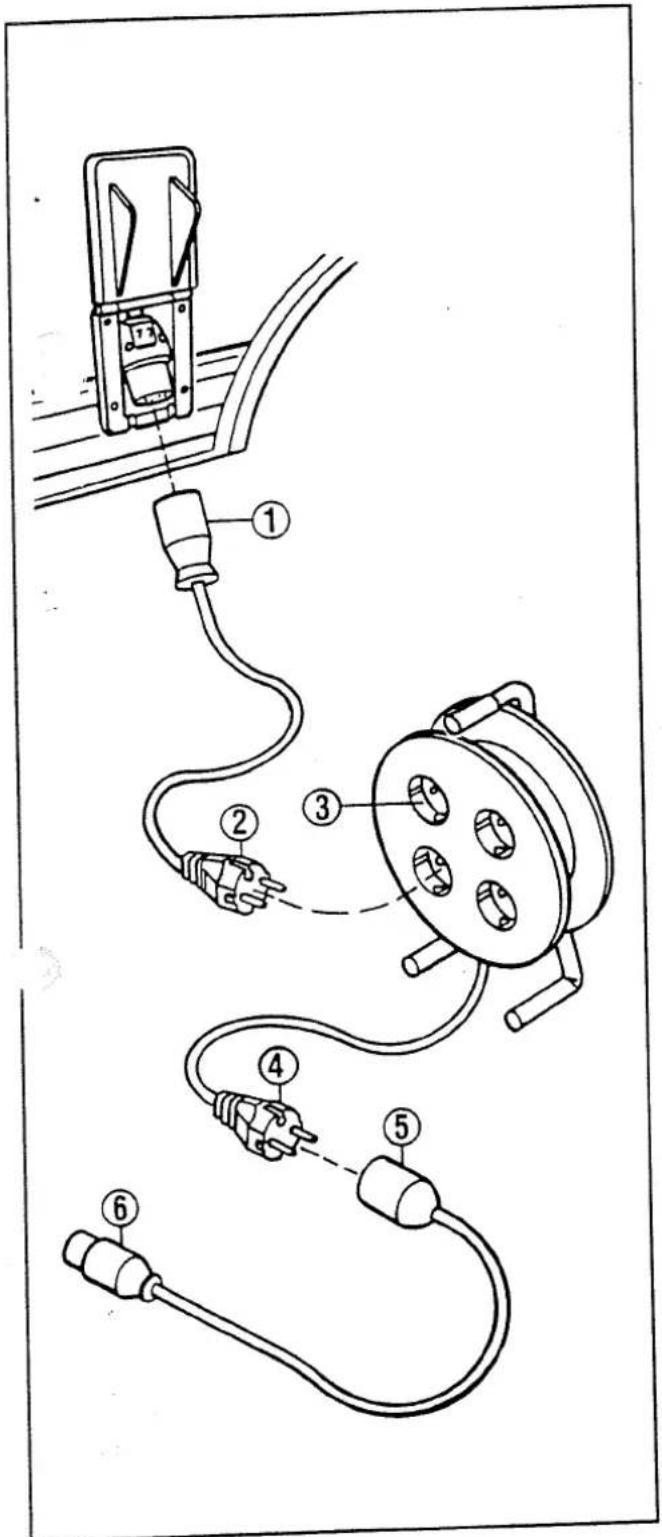
Diagram showing cable installation steps with labeled components including a switch, cable, and plug connectionsExterior Connection
The electrical connection between the motorcaravan and the 220 V network is to be made using a three core flex inside a flexible rubber cable with a minimum cross section 3 x 2,5 mm and with a plug which meets the DIN 49462 norm.
In order to be equipped for every eventuality, we recommend the following combinations:
- Adapter cable:
EC socket (1) → Schuko plug (2), - Cable drum:
Schuko socket (3) → Schuko plug (4), - Adapter cable:
Schuko-socket (5) → EC plug (6).
Your Eriba-Hymer dealer will always be ready to supply you with the necessary parts.
ATTENTION
In the accessory catalogue cable drums with a thermo-fuse against overabundant warming are offered. Only by using these cable drums, the cable hasn't to be unrolled off the cable drum.
HANDBRAKE
When parking the vehicle apply the handbrake firmly (particularly on an incline).
CHOCKS
Use wheel chocks when parking on an incline. Vehicles over 4 ton gross weight, chocks are obligatory, these can be found in the gas locker.
Below 4,6 ton gross weight we recommend the use of chocks under the wheels. Your Hymer dealer will advise.
ENTRANCE STEPS
When leaving the vehicle, make sure the step is fully down (control light on dashboard).
VEHICLE SUPPORTS
To stabilise the vehicle you may use the attached steadies or when not fitted use loose ones.
Detached steadies must not be placed under the floor, they must be placed under the vehicle chassis.

On soft ground place small planks of wood under the steadies as a base.

Steadies must not be used to jack up a vehicle. e.g. for tyre/wheel changing. They only have limited strength and only serve to stabilise the vehicle.
If there is insufficient clearance to insert the steadies use the jack first, to lift.
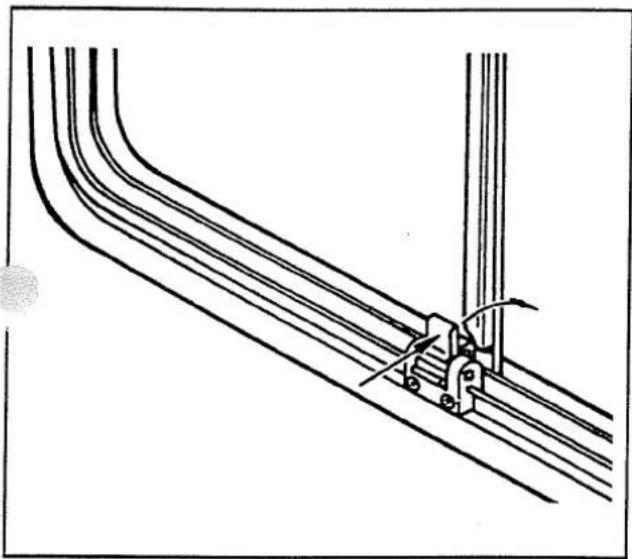
* How to use the fixed steadies on the Hymer (special fittings).
Press lever and compress the square tube to release and lower the steady to a vertical position. Release the lever. Put the spanner provided on to the hexagon nut snd rotate until the vehicle is level - remove spanner.
text_image
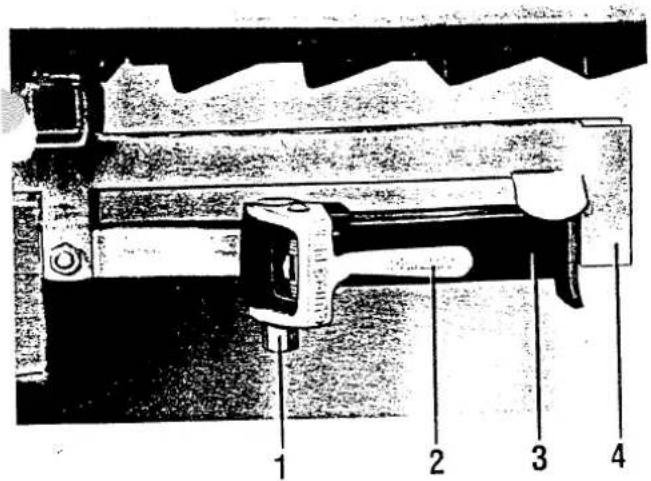
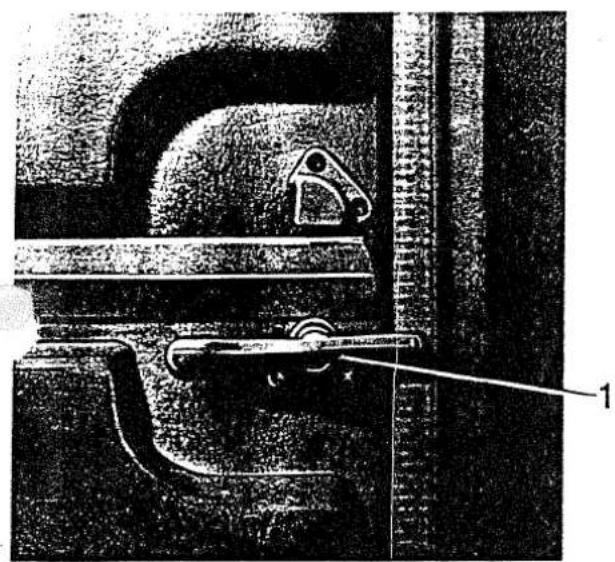
Technical diagram of a mechanical device with numbered parts labeled 1 to 4ENTRANCE DOOR
text_image
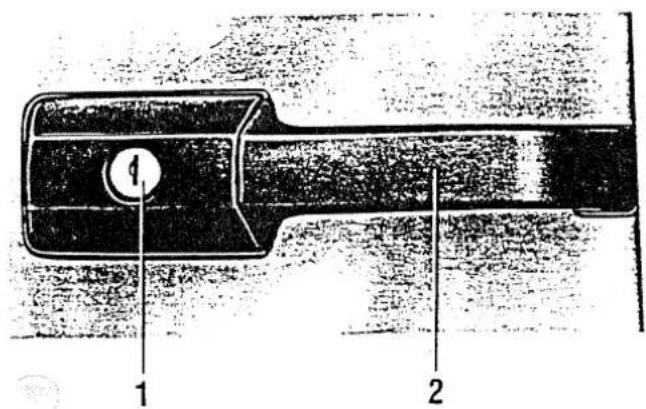
Technical diagram of a mechanical caliper with labeled parts 1 and 2Picture 8.
Opening a locked door:
Put the key in the lock and turn clockwise until the lock clicks into place.
Turn key back to its central position and pull out.
Press the lock (8.1) and pull the handle to open door.

text_image
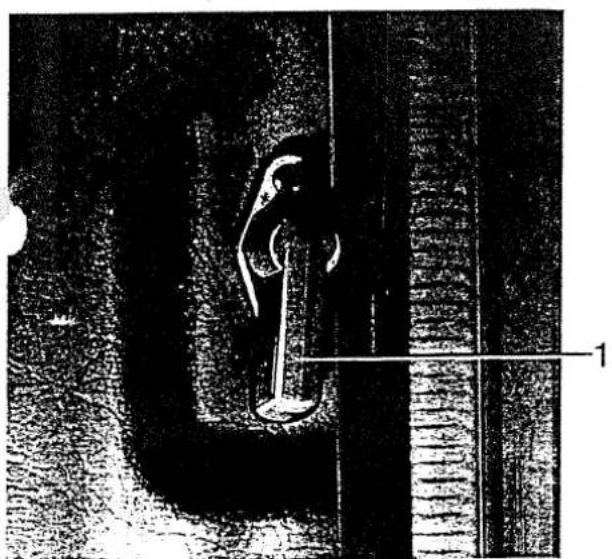
1 2Picture 9.
To lock the door:
Put the key in the lock and turn 90 degrees anticlockwise.
Turn key back to central position and pull out.
When leaving the vehicle make sure all doors and windows are closed
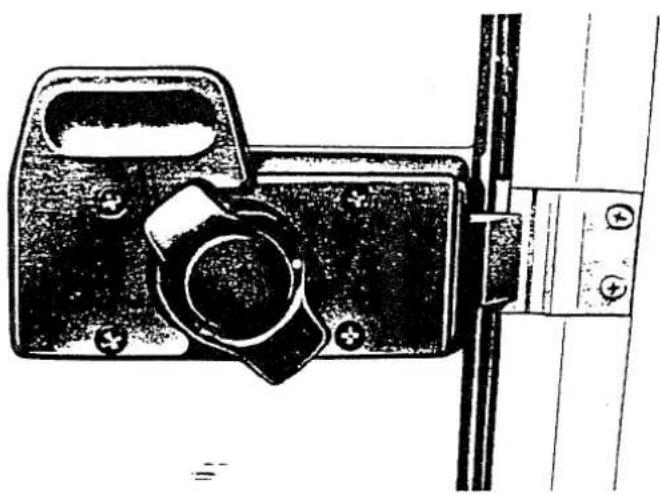
Opening the entrance door from the inside, turn the knob anticlcowise (9.1).
When locking the door from the inside turn the knob to 45 degrees clockwise and leave in that position. (10)
natural_image
Technical line drawing of a mechanical lock or latch component (no text or symbols)Picture 10.
natural_image
Close-up of a mechanical clamp or bracket assembly with a numbered label pointing to a specific part (no readable text or symbols)You can also open the top half of the door.
To do this, bolt the bottom half of the door, with the handle turned 90 degrees downward. Move the locking handle on the upper half into the horizontal position.
natural_image
Black-and-white illustration of a person standing in a doorway, possibly near a wall or structure (no visible text or symbols)Overcab bed in Hymercamp.
Attention !!
To avoid falling out of the pull-down or over-cab bed in the Hymermobile use the safety harness provided.
natural_image
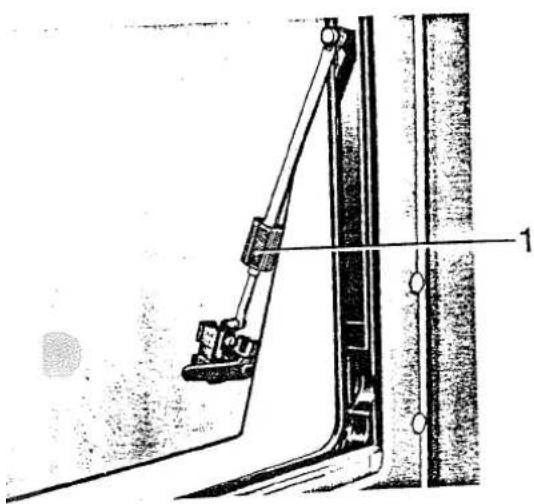
Technical line drawing of a mechanical assembly with a lever and bracket (no text or symbols)Picture 16. Outward opening windows
text_image
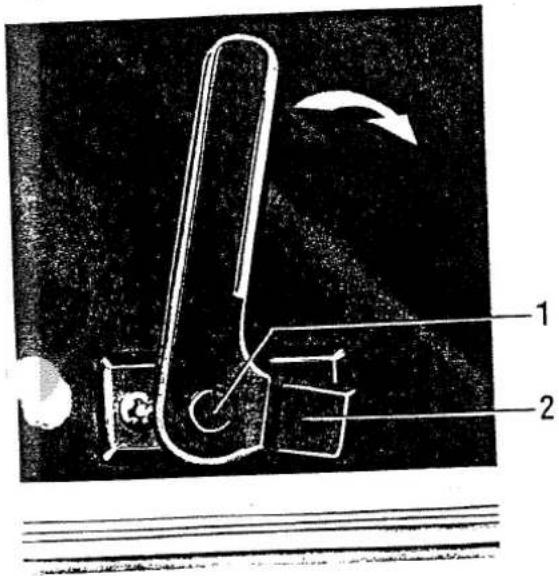
Technical diagram of a mechanical device with labeled parts and directional arrow indicating motion or movementPicture 17. Outward opening window
Closing the window:
Turn the locking tab (1) to release the locking stays left and right. Pull the window closed and turn the handles to lock.
Opening the window:
Press the centre button on the handles and turn to release. Push the window open and turn the tab on the telescopic stay to lock into position.
natural_image
Pure technical line drawing of a cable or wire connection with no text, numbers, or symbolsPicture 14. Sliding Window
SLIDING WINDOW
To open:
Lift the locking catch and slide the window open.
To close:
Slide it closed and press down locking catch.

text_image
1 2Picture 15. Closed in this position.
OUTWARD OPENING WINDOW
To open:
Press security button (1), turn locking handle (2) to vertical position (15.2)
Open window to desired position. The telescopic arms will then lock it into position by turning the black plastic sleeve on the arm.
● Displaying the fuel level
- By pressing the toggle switch (36,3), the fuel level in the generator tank will be displayed.
● Time-in-use counter
The time-in-use counter (36,6) counts and displays the number of hours during which the generator has been in use.
When the generator has been in use for a certain number of hours, it must be serviced by a qualified engineer.
You can find out information about the specified hours in use in the "Generator" user instructions.
● Starting and switching off the generator
- Press the toggle switch (36,7) to "start"; the generator will start.
- Press the toggle switch (36,7) to "stop"; the generator will be switched off.
● Displaying the generator voltage
The generator voltage (220 V) is shown by the indicator (36,2) on the control panel IT 111.
The locking handles enable the windows to be put in two different positions:
- Slightly open ventilation position or
- Fully closed position.
ATTENTION
For windows with ratchet arms the window must be opened fully in order to release 1 catch. If the catch is not properly free, there is a danger that the window will buckle w the strain of being forcefully pulled back.
Roof Ventilation
o Handle operated roof vent
Depending on the direction in which the roof vent lever is turned, you can raise (open) or lower (clothe vent. You can adjust it as you please. The mosquito net should be placed over the rubber gas above the four corner knobs (not visible from the inside).
- Roof vent with a winding mechanism
Depending on the direction in which the handle turns, the vent can be freely opened or closed to a fixed position.
o Snap-effect roof vent
Opening or closing is effected by a light push or pull on both of the handles.
TIP
Depending on the weather, make sure the roof vent or windows are closed tightly enough to prevent any damp entering the motorcaravan.
TIP
Both the collapsible double bed and the suspended bed are designed to provide sleeping space for two people and are not intended for use as extra luggage space. When the bed is not in use, therefore, only the bedding for two people should be stored in it.
ATTENTION
Make sure before you drive away that the collapsible double bed or the suspended bed are firmly secured to the roof by the straps provided.
Handle operated roof vent.
Depending on the direction in which the roof vent handle is turned, you may raise (open) or lower (close) the vent.
It may be adjusted to suit your requirements.
The mosquito net should be placed above the rubber gasket and should be located over the 4 plastic hooks (which are not visible from below).
Three way push-up opening vent:
Release plastic mosquito net frame and swing downwards. Press the 2 locking tabs inwards and push up the vent to the desired position and replace mosquito net.
To close, reverse procedure, depending on the weather, close all vents and doors to prevent any damp entering.
natural_image
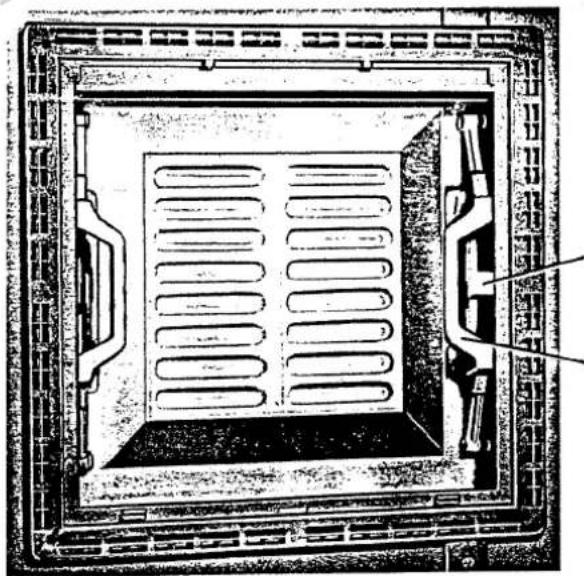
Technical diagram of a rectangular device with internal ventilation slots and mounting brackets (no text or symbols)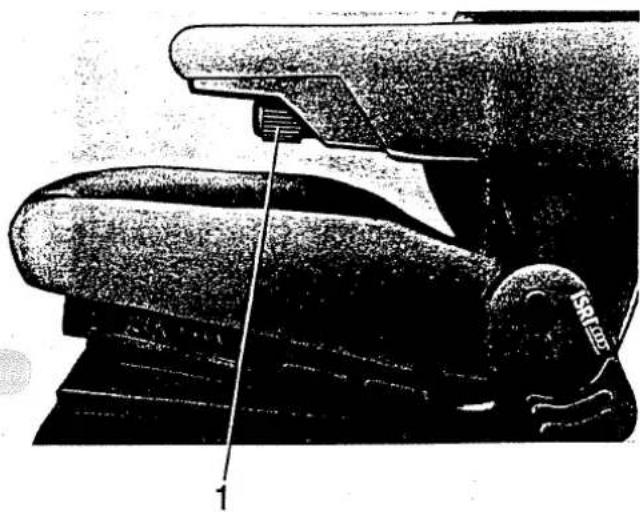
natural_image
Close-up of a vintage mechanical device with a labeled component (no readable text or symbols)* Armrest Adjustment.
To set the height of the armrests, rotate knob found under the front of the armrest.
* Preparing for bed.
Draw the curtains round the windscreen and side window. Drop the seat backs inward by lifting the curved lever situated at the angle between the seat and seat back. Pull down the bed, first releasing the safety belt attached to the roof.
Attention !!
The pull down bed must not be used as a luggage area. It is designed to hold bedding for 2 persons.
Before commencing a journey make sure that the safety belt securing the bed to the roof is properly engaged.
Original Hymer Driver/Passenger Seat adjustment for Hymercamp/Tramp, special equipment.
* Driver/Passenger Seat turning.
Lift both arm rests up. lift the curved lever situated at the angle of the seat and seat back and push the seat back forwards. Where a seat swivel is fitted push down the lever protruding in front of the seat and just below and the seat will swivel.
ATTENTION ! Before commencing your journey, both the driver and passenger seats must face front and be locked in that position. When travelling no seats in the living area must be turned.
* Correct seating position.
The Hymer driver and passenger seats can be adjusted for height. The operating levers on the side of the seat can be used to adjust the seat as follows:-
To lift front of seat, lift forward lever and lean seat backwards, the fron then rises. To lift rear of seat lift rear lever and lean seat forward, the back then rises. To lower, reverse procedure. Picture (19.4)
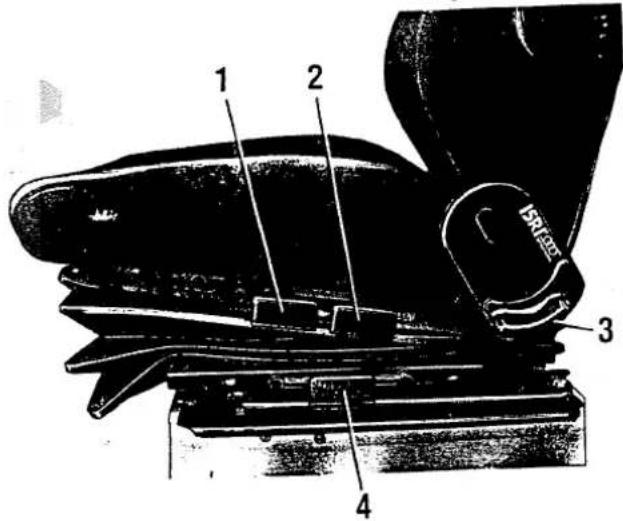
text_image
1 2 3 4Picture 19
Air pressure table for tyres
| Type\Tyre pressure | Front | Rear |
| Hymermobil 534 | 4.30 | 4.50 |
| Hymermobil 544 | 4.30 | 4.50 |
| Hymermobil 564 | 4.30 | 4.50 |
| Hymermobil 594 | 4.30 | 4.50 |
| Hymermobil 644 | 4.30 | 4.50 |
| Hymermobil 654 | 4.30 | 4.50 |
| Hymermobil 694 | 4.30 | 4.50 |
Tyre pressures are given in bar
* When the engine is running, both batteries are being charged together by the engine alternator, but when the engine is switched off the batteries split thus preventing the starter battery being discharged. This ensures that the starter battery is always available for starting.
The load on the secondary battery can be read from the control panel (see ameter charge/discharge).
* Position of secondary battery.
Hymercamp/Tramp: located under driver/passenger seat. Hymermobile : located under the false floor to left of driver/passenger seat.
* Battery checking/testing.
In low temperature conditions the batteries may lose capacity.
Test before start of journey.
Attention !!
Do not start with disconnected starter/second battery.
* Safety fuse box 12v.
The 12v electric supply for the living Area/Appliances are via the fuse box.
Position of fuse box see supplement E "fuse box"
* 12v SUPPLY IN THE LIVING AREA
When not connected to the mains, the 12v system in the living area is provided by the starter battery when the engine is running and by the secondary battery when the engine is idle.
12v electrical appliances should not be used for a long period of time without mains back-up.
When the vehicle is left idle for some time the starter battery and the secondary battery should be charged from time to time.
in the hymermobile models, the 12v supply may be disconnected by means of the isolating switch (next to the 12v fuse box).
To avoid flattening the secondary battery only run from the starter battery when the engine is running.
When connected to mains the secondary battery is automatically charged.
Switch 12v on.
text_image
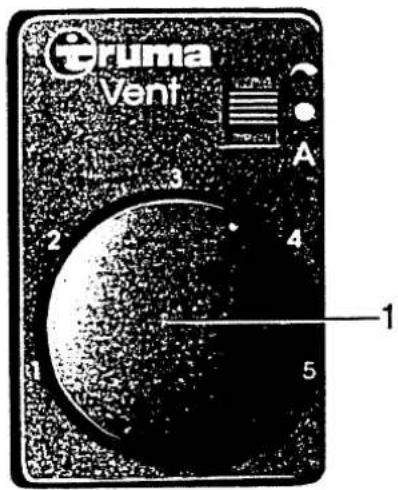
eRuma Vent A 3 2 4 1 5Air Circulation.
The Trumavent combines with the gas heating system to provide a better heat distribution in the Hymer.
Set the required speed with the control knob.
• Air Circulation closed
A Automatic operation.
Further operating instructions from the Truma handbook,
Cooking Area.
Attention !!
When using the burners avoid leaving any article near the flame which could catch fire.
Check burners are fully lit before placing saucepans etc. on to flame.
The burners must not be used for heating purposes.
The lids over the burners must not be closed when the burners are in use.
Do not place heavy articles on top of Burner lid.
Do not place hot saucepans on top of burner lid.
Keep hot saucepans clear of top of burner lid.
Some layouts in Hymers have flame safety devices for the cookers, always use it when using the burners.
To avoid explosion never allow gas to escape.
text_image
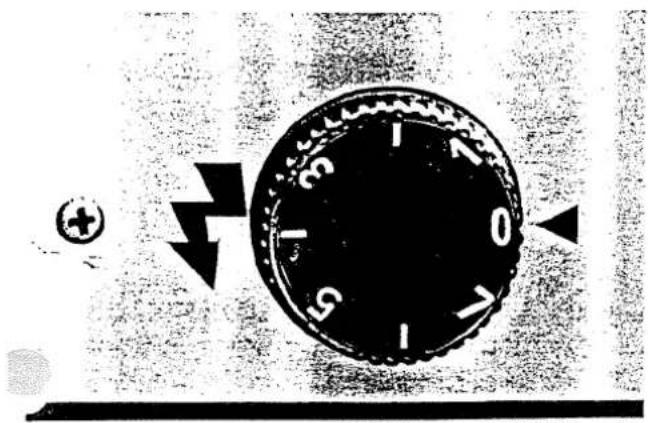
Diagram of a rotary dial with labeled degrees and directional arrows, including a plus symbol and arrowheads.Picture No. 30 - Fridge Thermostat.
- 220 volt operation.
Switch 12v to '0'
Switch 220v to '1'
- Regulator should now be switched to desired setting between 1 and 7
- With the setting on '0' the appliance is disconnected from mains supply.
* 12v operation
220v switched to '0'
12v switched to '1'
On 12 operation the fridge will only be supplied with current from the starter battery when the vehicle engine is running.
The thermostat is non-operational when in 12v mode.
When the ambient temperature rises above 25 degrees C or when the vehicle work surface/fridge etc. are in direct sunlight the fridge ventilator fan should be switched on.
On rear mounted fridges a removable panel is located on the outside of the vehicle for easier access for maintenance. (further info is available from the "Fridge Instructions" leaflet).
General.
Fridge
Depending on the layout, the following appliances are built-in. Heater, Hob, Fridge and Boiler.
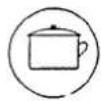
Hob
Your operating instructions for Hymermobiles only refer to the built-in apparatus described.

Boiler
More information for the boiler is available in the separate special handbook.
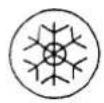
Heating
To use the built-in apparatus, ensure that the cut-off valves on the gas bottle/tank are on Heating. More information in the special handbook.
Picture 23 Symbol of the built-in appliance cut-off valve.
HEATING.

Attention !!
Remove the outside cover from the vent before using the Trumatic heater.

Replace the outside cover when the heating has been turned off.
natural_image
Technical line drawing of a mechanical component with no visible text or symbolsPicture No. 26 Controls
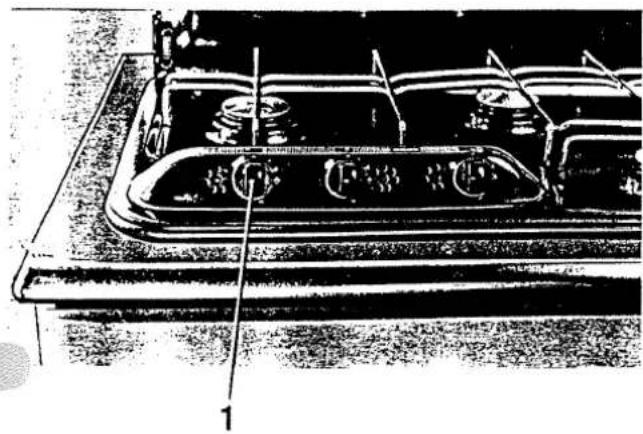
* Using the burners.
- Lift Hob Lid
- Raise hinged aluminium flame guard into position.
- Open main cut off valve (bottle or tank)
- Open cut off valve in cupboard
* Turn control knob on hob to "Big Flame" or "Small flame", wait for gas to flow then light using match or gas lighter. Hold control knob in, until safety cut-out keeps flame on. Allow 15 seconds to operate.
Turn hob regulator to desired position.
* To shut off burners.
Turn control knob on hob clockwise to "0" position. The flame dies.
Close both cut off valves cupboard and bottle/tank.
When the flame dies the lighting safety valve will operate and will automatically stop the gas flow.
Water Supply (General)
The motorcaravans water supply is derived from the built-in fresh water tank. The wateris conveyed to the wash basin/sink etc. by a submersible pump controlled by a microswitch within the water tap.
The waste water is collected in the foul water tank located externally under the rear of the vehicle.
Water levels in both tanks may be checked from the control panel.
Tip: When the fresh water tank is being refilled from empty, an air lock sometimes develops at the pump, stopping the water flow. To clear shake pump in fresh water tank vigorously.
Wash out the fresh water tank from time to time to clear any deposits which may form (lime scale, sand etc).
In areas where the water contains large amounts of deposits a piece of nylon stocking tied over the water pump can prevent fouling of the pump.
Water left in the tank for only a short period of time soon becomes undrinkable, flush out and sterilize with Bicarb.
Attention !! If there is a likelihood of frost, drain the whole system.
Never allow the pump to run when there is no water in the tank.
Washroom
Thetford Cassette.
Water for flushing the toilet is supplied from the fresh water tank.
To flush the toilet after use, press the large control downwards and turn anticlockwise to open the drain valve.
To close release the control and turn clockwise to close the drain valve.


To empty the cassette first make sure the control valve is fully shut.
Open access door on outside of vehicle with key provided. Press down locking catch in front of cassette and pull out. Only empty at sewage emptying point provided on site.
Flush out when empty and recharge with suitable chemical (non-toxic and 100% decomposable).

Please make sure when camping in winter that the heating is left on at around 15 degrees C during frosty nights and that the circulating fan is left on in its automatic setting.
Internal doors and flaps should be left slightly ajar when temperatures are low. This will allow warm air into storage areas preventing pipes (eg in water supply) from freezing up, it will also prevent the build-up of condensation in these areas.
Make sure the chimney is kept free from snow and use a chimney extension at least 10 cm long.
Generally you must insulate the upper and lower external fridge vents with the covers supplied if the temperature is extreme.
During frosty periods we recommend the use of an insulation mat to cover the winscreen and side windows of the driving area.
Emptying the water system
If you are not using the Hymer during winter, drain the whole water system to prevent frost damage, especially to the boiler.
Open the two valves.
a) 32.1 Round white covered valve open anti-clockwise.
b) 32.2 Yellow lever open upright.
See section C for position of waste valve.
When you follow this procedure you will have a guarantee of an acceptable method of draining and bleeding of the fresh water/hot water system to prevent frost damage.
- Switch on 12v system at main switch.
- Pull out drain plug from fresh water tank via the tank screw cap.
- Adjust mixers on tap in kitchen and bathroom tap exactly in mid position (warm-cold)
- Open both drain valves for cold-hot water.
- Hang handspray in shower position.
If you want to lay up your vehicle we recommend you fill the fuel tank to the brim to prevent corrosion of the tank due to condensation.

Before beginning a journey after the vehicle has been laid up for some time it is advisable to have all systems checked by an authorised workshop e.g. Brakes and Gas system.

Remember to empty the whole of the water system when laying up the vehicle, even for only a short time. Make sure the main gas taps are turned off.

Remember water left in the fresh water tank becomes undrinkable in only a short while.
Interior Maintenance.
Basic household cleaning materials may be used, do not use any caustic based cleaning materials.
Do not use scouring agents on washbasins etc. or material that would scratch chrome surfaces.
Clean furniture with damp cloth (wool), polish with furniture polish on varnished surfaces.
Never wash the upholstery, instead clean carefully using washing up liquid, foam or dry foam.
Dry Clean curtains.
Winter Maintenance.
Widespread use of salt on roads in winter is determental to the underside of vehicles and to parts open to spray from the road.
It is advisable to wash the vehicle thoroughly and regularly in winter to remove the salt deposits in particular.
The underside mechanical and exposed body/chassis parts require thorough washing.
Asa preventative measure you can use a wax based preservative on the underside - a recommended underseal (part No. 217026), mechanical rubbing parts should be well lubricated in winter e.g. locks and hinges etc.
+++
Maintenance of exterior of vehicle.
- Wash your vehicle frequently and rinse with copious amountsof water.
- Remove tar and insects from the bodywork and windscreen as soon as practicable.
- Avoid using anything which might scratch or mark the paintwork e.g. Brushes or course cloth etc.
Tip:- We recommend a major service once a year (see service booklet).
See that the Damp Test check is carried out by your authorised Dealer to validate your Six-Year Warranty.
Only use a soft sponge and lots of water to clean Acrylic windows - if there is locked-in grime, use "Unipol" (part No. 994519).
Smear external hinges with an acid free grease to maintain free movement of flaps and doors etc.
+++
Servicing.
Like every other technical product a vehicle requires servicing. The scope and frequency of the servicing depends, in the first instance, on the conditions of use.
When operated under severe conditions the vehicle must be serviced more frequently than would otherwise be the case.
The work and inspection and servicing requires professional knowledge which cannot be distilled into the pages of this booklet. You are advised to let only properly trained and qualified people do this work. Such people are available at all Hymer Service Stations.
Experience and regular technical instruction as well as the right facilities and tools for the job guarantee up to date care for your vehicle.
The customer service booklet certifies the service work which has been undertaken on each occasion.

Please take note of the service work set out in the service booklet and make sure, in the interest of your own safety (inspection of brakes/greasing/servicing) that it is carried out at the appropriate regular intervals by authorised personnel.
The service records act as evidence in the event of later damage or warranty claims.
Official Inspection.
Please note that Hymermobiles registered in the Federal Republic of Germany have to undergo, once every 2 years, an official inspection (para 29 STVZO) TUV DEKRA. In other countries the appropriate regulations will apply (MOT after 3 years).
The gas system has to be checked once every 2 years by a qualified gas appliance specialist. The obligatory test, when completed and passed will be set out by a qualified tester on a gas test certificate. The gas test plate must be displayed on the rear of the vehicle.
+++
Spare Parts.
Our Agents and Service Centres are always ready to provide you with spare parts. You may also obtain spare parts through the factory.
Before starting a journey you should take some spare parts with you:
- Fuses
- Windscreen wiper Arms/Blades/Rubber.
- Battery Main Switch (Hymermobile)
- Bulbs
- Steadies
- Waterpump
- Waste Water Connector
Tip: Please give the part number and type of vehicle when ordering.
When adding accessories please make sure that these don't have to be registered for TUV inspection, also, watch the general loading of the vehicle. The Dealer will be pleased to help.
The firm of Hymer AG can take no responsibility for possible danger or damage whether to persons or property form accessories not offered for sale by the factory, or fitted at the factory or by an authorised Dealer or Agent.
+++
General.
Attention !! The Hymermobile should be on level ground.
Before jacking the vehicle the hand brake must be fully on.
Secure the vehicle against rolling by wedging the wheels.
Never attach the jack to the body of the vehicle.
Never jack up vehicle when steadies are down.
When changing a wheel on 550, 555, 560 (Merc) read instructions.
For other Hymers (non Mercs) follow instructions for the basic vehicle model.
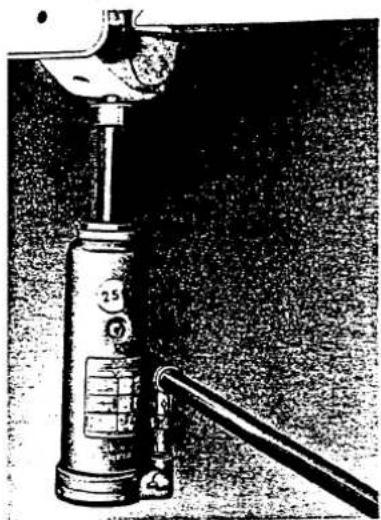
Attention !! On the 550, 555, 560 (Merc) vehicles, the original Daimler Benz jack has been replaced by a "Hymer Jack"
natural_image
Black-and-white photo of a vintage mechanical device with a lever and cylindrical body (no visible text or symbols)Fixing the jack.
Do not use the original Daimler-Benz fixing points - use the square holder on the chassis frame (see picture)
Picture 33. Bottle Jack
| Cooker | ||
| Fault | Cause | Remedy |
| Ignition cutout fails to engage (flame does not continue to burn when regulator control is released) | Cooker blind is too near the front | Push the blind to the rear by hand until it can be operated freely |
| Ignition cutout defective | Consult a professional | |
| Flame goes out when set on low | Ignition cutout probe out of place | Reset the probe correctly (do not bend). The probe tip should overtop the burner by about 5 mm. The probe neck should not be further than 3 mm from the burner ring; if necessary consult a professional |
Fridge and heating
If a fridge or heater proves defective, get in touch with the nearest service centre belonging to the appropriate manufacturer. The address list is amongst the literature you received with the appliance. Otherwise, send a short report detailing the fault, the number of the appliance and your correct address direct to TRUMA or Electrolux-Service.
| Boiler | ||
| Fault | Cause | Remedy |
Faults Guide
ATTENTION In the interests of your own safety, always let repairs and installations which involve the braking system be undertaken by authorised service personnel.
| Electrical Appliances | ||
| Fault | Cause | Remedy |
| Lighting system no longer functions effectivelyNo 220 V mains electricity despite connection. | Bulb defectiveBlown fuseSafety cutout switched out | Unscrew the housing of the affected light. Replace bulb. Check Voltage and Wattage are correctChange fuseSwitch safety cutout back on |
Electric step not functioning
12v main switch for 2nd batter not switched on
Switch main switch on
Blown Fuse.
Change Fuse.
2nd battery not being charged from mains
Charger fuse blown
Change fuse.
Charger faulty
Check safety cut out is on
Defective Relay
Consult professionals
Gas Appliances.
| Fault | Cause | Remedy |
| Smell of Gas/ High usage of Gas. | Leak in system | Attention !!Switch off appliance immediately, close valve on bottle or tank and open windows to ventilate vehicle.Get a professional to test the system.DO NOT use any electrical appliances or switches (eg Starter Motor) or any naked flame or spark (fridge etc) |
text_image
HYMER SERIEN-NR.Position of serial number plates. The plate is situated either to the left or right of the entrance door of the vehicle.

When referring the vehicle to the service station please quote the serial no.
| Type | Position of the outlet valves |
| Hymermobil 534 | Bench seat right hand side at back |
| Hymermobil 544 | Kitchen block, next to the toilet area |
| Hymermobil 564 | Wardrobe, at the bottom, floorboard with cover |
| Hymermobil 594 | Wardrobe, at the bottom, with cover |
| Hymermobil 644 | Bench seat right hand side, next to wardrobe |
| Hymermobil 654 | Rear, next to the toilet area |
| Hymermobil 694 | Bench seat right hand side at back, next to toilet area |
Hymermobil 594
text_image
Technical diagram of a vehicle interior layout with numbered compartments and control panels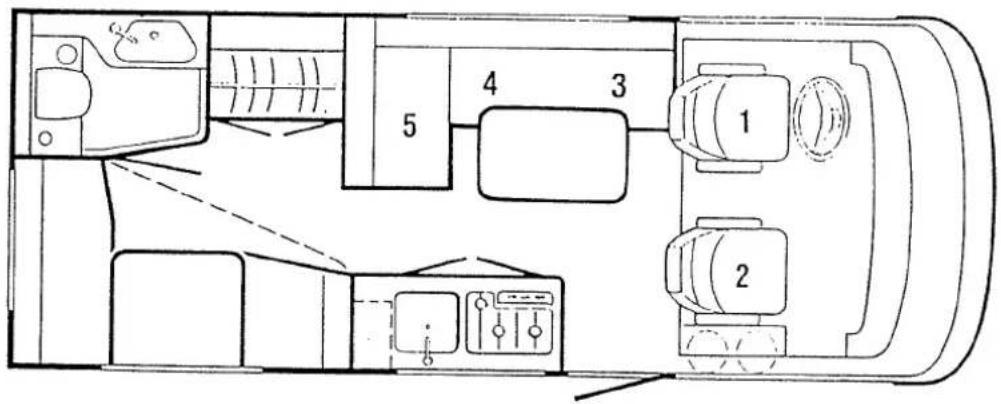
text_image
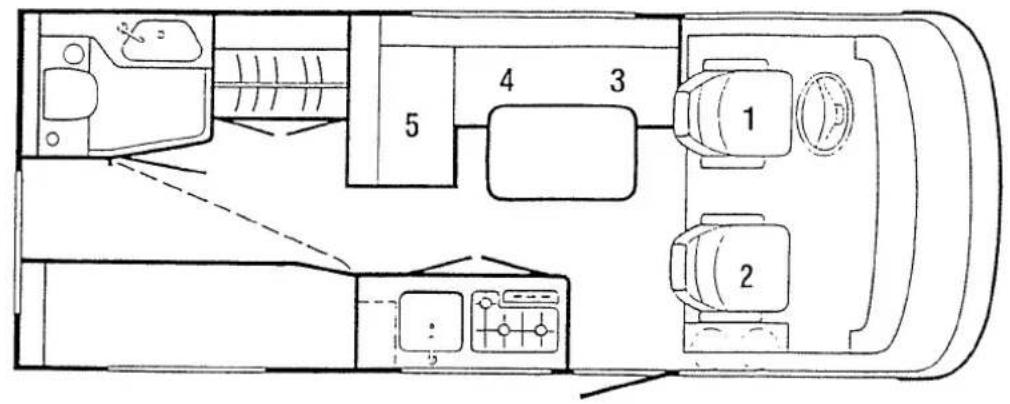
Technical diagram of a vehicle interior layout with numbered compartments and control panelsHymermobil 644
text_image
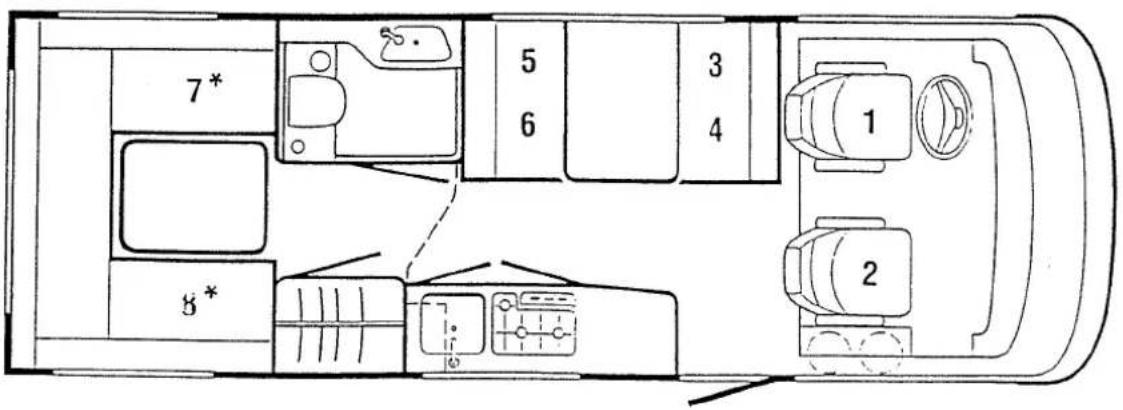
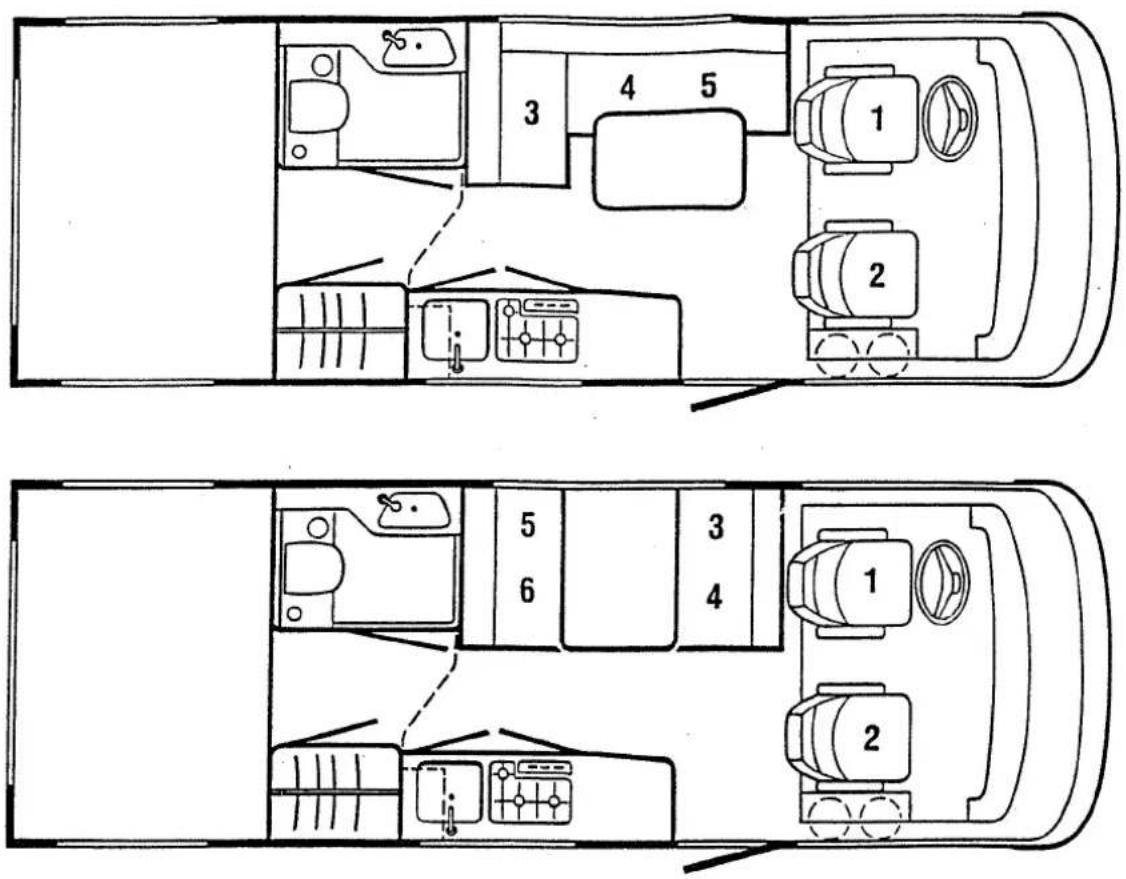
7* 5 6 3 4 1 2 8** Further seating, nevertheless not for more persons than are cited in clause 12 of the driving licence
Appendix A Seating Plan
text_image
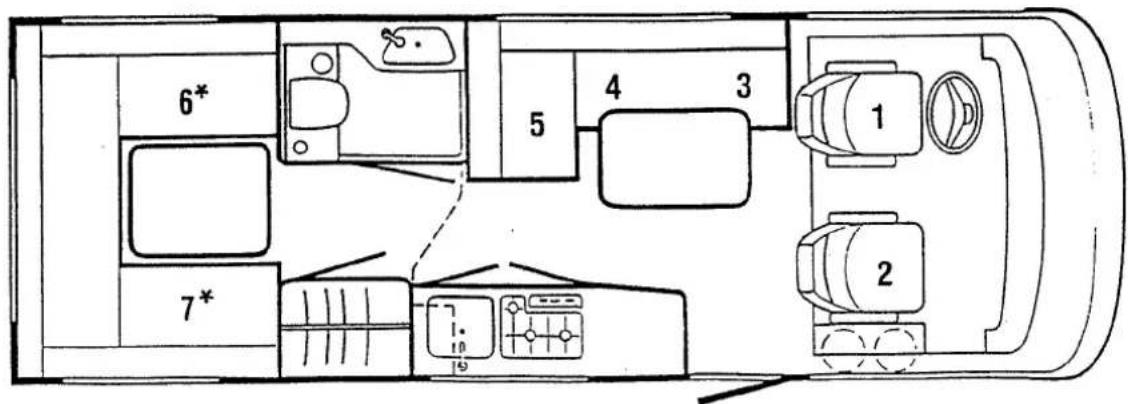
Diagram of a vehicle interior layout with numbered compartments and labeled fixturesHymermobil 644
text_image
6* 7* 5 4 3 1 2* Further seating, nevertheless not for more persons than are cited in clause 12 of the driving licence B-A04 - 10/92
Appendix B
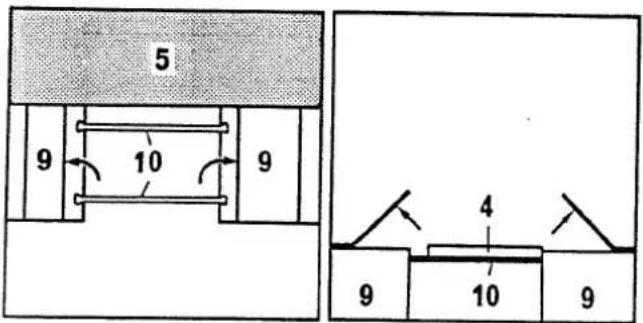
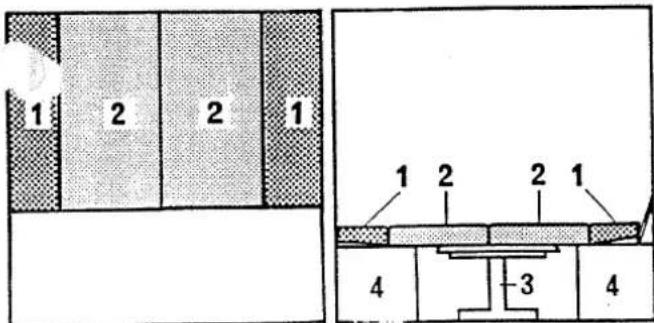
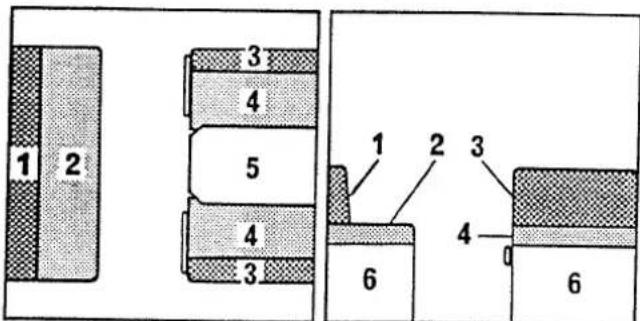
Conversion for Sleeping
Before the conversion

text_image
1 2 3 4 2 1 6 6 1 2 3 2 1 5 5During the conversion
text_image
5 3 5 6 6 3 5 5 5After the conversion
text_image
1 2 2 1 7 1 2 2 1 5 3 5| 1 | Back cushion | 5 | Bedding boxes |
| 2 | Seat cushion | 6 | Bedding box extensions |
| 3 | Table | ||
| 4 | Support bracket | 7 | Extra cushion |
Central seating group
Conversion to sleeping:
- Lift the table top gently at the front.
- Fold the table stand upwards and secure to the underside of the table top.
- Lift the table top upwards to about 45°, lift it out from its support bracket and set it to one side.
- Take off both seat cushions.
- Lay the table between the two bedding boxes.
-
Pull out the bedding box extensions.
-
Lay both of the seat cushions in the middle.
- Push the back cushions down between the seat cushions and the wall.
- Lay the extra cushion across the bedding box extensions.
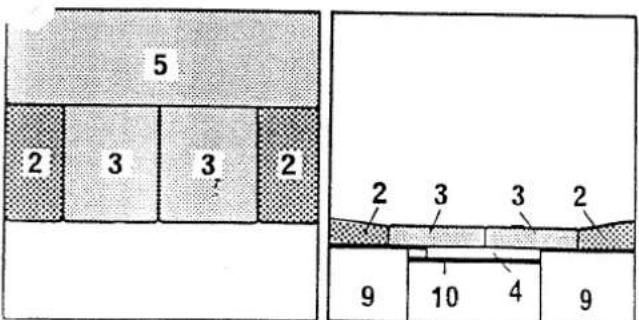
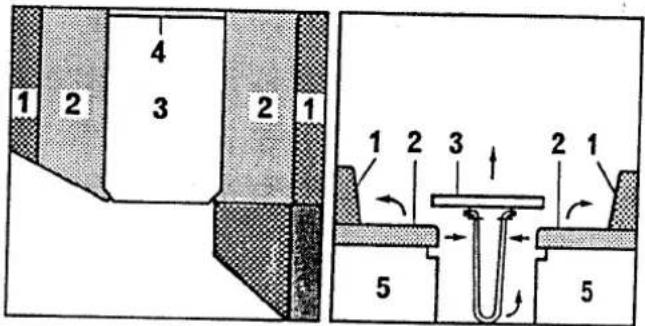
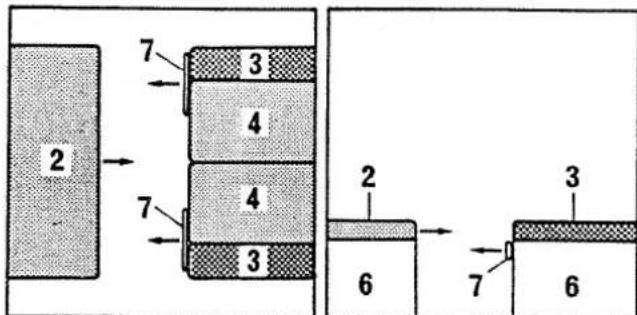
Appendix B Conversion for sleeping
Before the conversion
text_image
1 2 3 4 5 6 5 4 4 5 6 5 4 8 8During the conversion
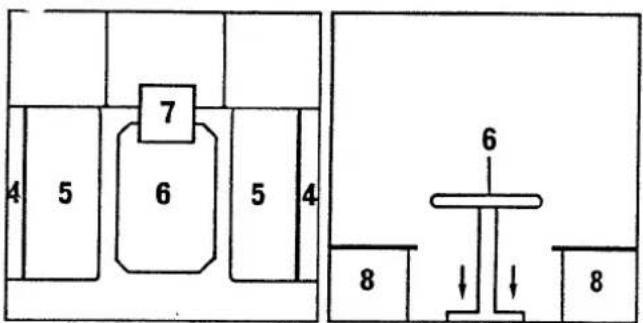
text_image
4 5 6 5 4 7 6 8 ↓ ↓ 8After the conversion
text_image
4 5 5 4 4 5 5 4 8 81 Back cushion 5 Seat cushion
2 Back cushion 6 Table
3 Back cushion 7 Extra board
4 Back cushion 8 Bedding boxes
Round seating group II
Conversion to sleeping:
- Lay the seat and back cushions to one side.
- Lay back cushions 1, 2 and 3 under the table.
- Let the table down to the level of the bedding boxes.
Take the extra board (7) out of the wardrobe and lay it between the rear bedding box and the table.
- Lay both of the seat cushions in the middle.
- Push the back cushions between the seat cushions and the exterior wall.
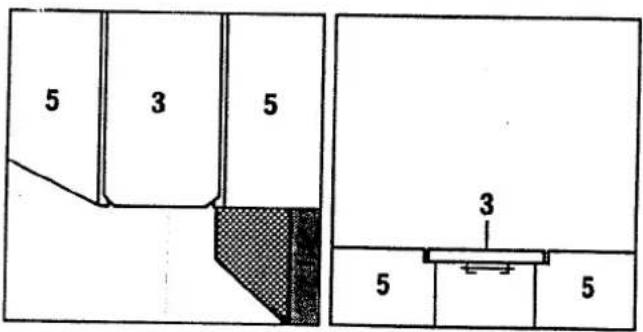
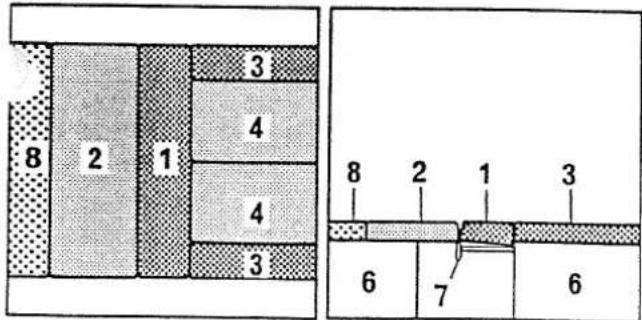
Before the conversion
text_image
1 2 3 4 5 6 7 8 9 2 6 4 2 9 3 9During the conversion
text_image
5 9 10 9 4 9 10 9After the conversion
text_image
5 2 3 3 2 2 3 3 2 9 10 4 9Round seating group 1
Conversion for sleeping
- Loosen the holding screws on the underside of the table (7), Lift the table up and lay to one side.
- Loosen the holding screws for the table support (8), lift the table support upwards out of its base and lay to one side.
- Lay all of the seat and back cushions to one side.
Take the bed support bars out of the wardrobe.
- Lift both of the bedding box lids up and lay both of the bed support bars crossways between the bedding boxes in the slots provided. Close the bedding box lids.
- Lay the table top across both of the bed support bars.
- Lay both of the seat cushions in the middle.
- Put the back cushions between the seat cushions and the exterior wall.
1 Back cushions, short 6 Extra cushion
2 Back cushions, long 7 Holding screws
3 Seat cushion, short 8 Holding screws
4 Table 9 Bedding boxes
5 Seat cushions, long 10 Bed support bars
10/92 - B-B05
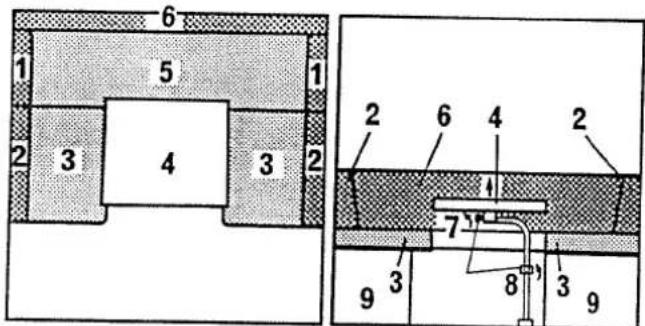
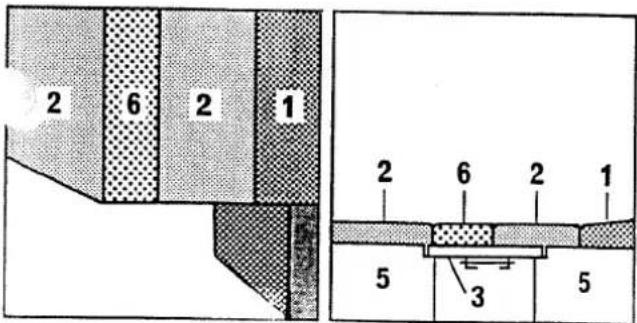
Appendix B
Conversion for Sleeping
Before the conversion
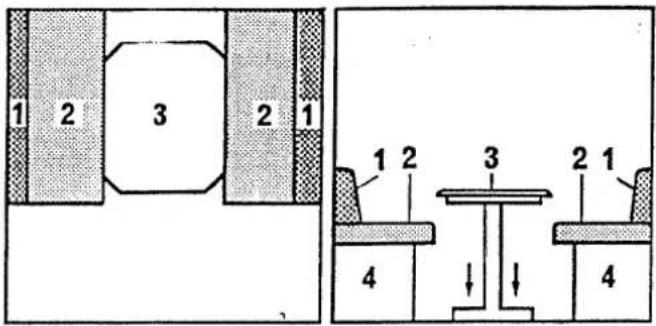
text_image
1 2 3 2 1 1 2 3 2 1 4 ↓ ↓ 4During the conversion
text_image
1 2 → 3 2 1 2 3 2 4 3 4After the conversion
text_image
1 2 2 1 1 2 2 1 4 3 41 Back cushion
2 Seat cushion
3 Table
4 Bedding box
Lengthways Seating group
Conversion to sleeping:
- Let the table down completely to the same level as the upper edge of the bedding box.
- lift the seat cushion gently and pull to the centre of the table.
Latch blocks may not be allowed to touch the table surface. Table must be adjusted to avoid this.
- Push the back cushions between the seat cushions and the wall.
Take away the seat and back cushions, lift the bedding box lids and lean them against the exterior wall. Lay the seat and back cushions in place again.
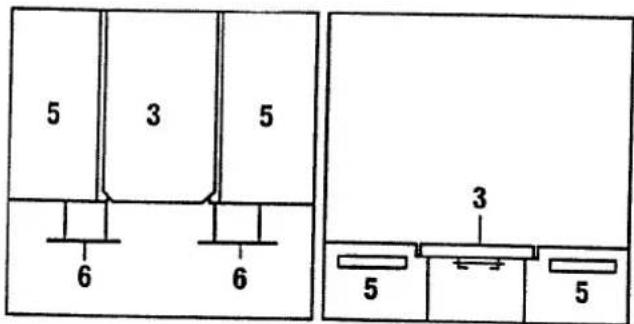
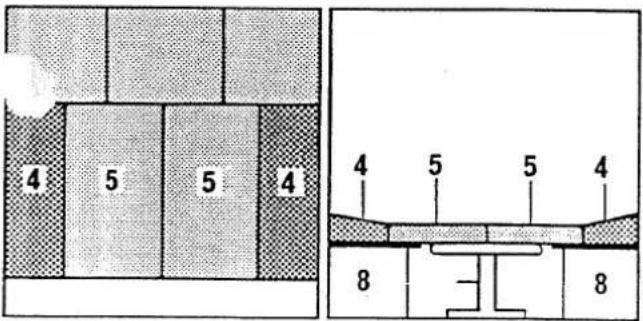
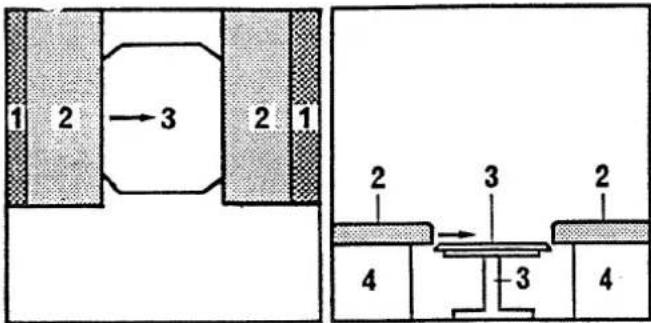
Appendix B Conversion for Sleeping
Before the conversion
text_image
1 2 3 4 2 1 1 2 3 2 1 5 5During the conversion
text_image
5 3 5 3 5 5 5After the conversion
text_image
2 6 2 1 2 6 2 1 5 3 51 Back cushion 4 Support bracket
2 Seat cushion 5 Bedding boxes
3 Table 6 Extra cushion
Facing seating group in rear of vehicle
Conversion to sleeping:
- Lift the table top gently at the front.
Fold the table stand upwards and secure to the underside of the table top. - Lift the table top upwards to about 45°, lift it out from its support bracket and set it to one side.
- Take off both seat cushions.
-
Lay the table between the two bedding boxes.
-
Push the longer back cushion down between the seat cushions and the wall.
- Lay the extra cushion between the seat cushions.
- The shorter back cushion is not used.
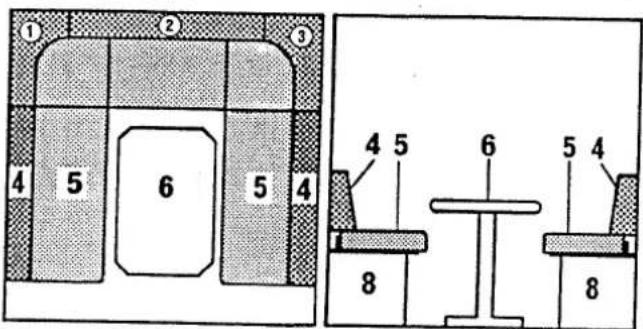
Appendix B
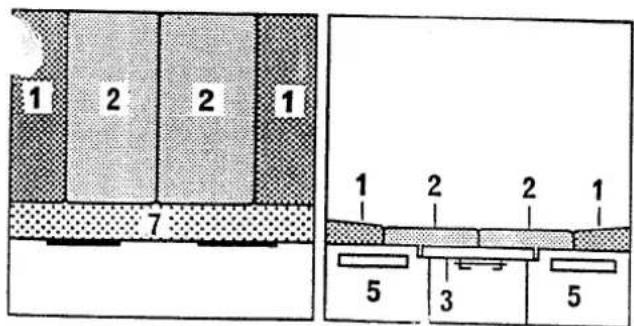
Conversion for Sleeping
Before the conversion
text_image
1 2 3 4 5 4 3 6 1 2 3 4 0 6During the conversion
text_image
2 7 3 4 7 4 3 2 6 7 3 6After the conversion
text_image
8 2 1 3 4 4 3 8 2 1 3 6 7 61 Back cushion, long 5 Table
2 Seat cushion, long 6 Bedding boxes
3 Back cushion, short 7 Bedding box
4 Seat cushions, short extensions
8 Extra cushions
Central Seating group with bench seat
Conversion to sleeping
- Convert central seating group for sleeping (see central seating group)
- Pull out both of the extensions to the central seating group bedding boxes as far as they will go.
- Pull out the seat cushion of the long seat opposite.
- Lay the back cushion from the long seat around the two cushions already laid down. The rubber pimples must be positioned towards the inside of the group, touching the cushions already laid down.
- Put the two extra cushions (from the wardrobe) between the seat cushion and the exterior wall.
Appendix E Fuse reference 12V
Hymermobil 594
| Fuse No. | Function |
| F2 | Lighting: bar, right hand seating groupfridge ignition, extractor |
| F3 | Lighting: driver's cab, front, left hand seating groupmirror cupboard, Thetford cassette, water pumps, 12 V socket in toilet, boiler, air circulation fan. |
Hymermobil 644
| Fuse No. | Function |
| F2 | Lighting: bar, rear, wardrobefridge ignition, extractor, boiler, air circulation fan |
| F3 | Lighting: driver's cab, front, left hand seating groupmirror cupboard, Thetford cassette, water pumps, 12 V socket in toilet. |
Hymermobil 654
| Fuse No. | Function |
| F2 | Lighting: seating group, front, driver's cab, shower mirror cupboard, Thetford cassette, water pumps |
| F3 | Lighting: bar, rear boiler, air circulation fan, fridge ignition, extractor. |
Appendix G Technical data
Hymermobil 644/654
| Manufacturer | Citroen | Citroen | Citroen | Citroen |
| Model | Petrol | Diesel | TD | TD |
| Type | C25/1400 | C25/1400 | C25/1400 | C25/1800 |
| Power/kW (PS) | 62 (84) | 54 (73) | 70 (95) | 70(95) |
| Capacity/cc | 1957 | 2482 | 2482 | 2482 |
| Length/mm | 6680 | 6680 | 6680 | 6680 |
| Width/mm | 2220 | 2220 | 2220 | 2220 |
| Height/mm | 2770 | 2770 | 2770 | 2770 |
| Wheelbase/mm | 3653 | 3653 | 3653 | 3653 |
| Tyre size | (1) | (1) | (2) | (2) |
| el type | Lead free | Diesel | Diesel | Diesel |
| Fuel tank capacity | 70 litres | 70 litres | 70 litres | 70 litres |
| Fuel consumption/l/100km | 14...16 | 10...13 | 10...13 | 10...13 |
| Top speed | 115 km/h | 110 km/h | 120 km/h | 120 km/h |
| Track width front/mm | 1682 | 1682 | 1692 | 1692 |
| Track width rear/mm | 1650 | 1650 | 1660 | 1660 |
| Turning circle/metres | 14.8 | 14.8 | 14.8 | 14.8 |
| Gear box - gears | 5 | 5 | 5 | 5 |
| No of cylinders | 4 | 4 | 4 | 4 |
| Compression ratio | 9.8:1 | 22.5:1 | 21.25:1 | 21.25:1 |
| Perm. gross weight/kg* | 3100 | 3100 | 3100 | 3100 |
| Perm. gross weight/kg** | 3500^(4) | |||
| Perm. trailer load/kg* | (3) | (3) | (3) | (4) |
| Perm. No of persons | 6 | 6 | 6 | 6 |
| Fresh water supply | 125 litres | 125 litres | 125 litres | 125 litres |
| Waste water tank | 100 litres | 100 litres | 100 litres | 100 litres |
| Gas supply | 2 x 11 kg | 2 x 11 kg | 2 x 11 kg | 2 x 11 kg |
| Additional battery A/H | 50 | 50 | 50 | 50 |
Standard
** Special equipment
(1) 185 R 14
(2) 195/75 R 16
(3) 2000 up to 10% gradient
(4) Perm. trailer load 1500 kg up to 10% gradient
Appendix G Technical data
Hymermobil 644/654
| Manufacturer | Fiat | Fiat | Fiat | Fiat | Fiat |
| Model | Petrol-Cat | Diesel | TD | TD | TD-Maxi |
| Type | Ducato 14 | Ducato 14 | Ducato 14 | Ducato 14 | Ducato 18 |
| Power/kW (PS) | 62 (84) | 55 (75) | 60 (82) | 70 (95) | 70(95) |
| Capacity/cc | 1971 | 2500 | 1930 | 2445 | 2445 |
| Length/mm | 6680 | 6680 | 6680 | 6680 | 6680 |
| Width/mm | 2220 | 2220 | 2220 | 2220 | 2220 |
| Height/mm | 2770 | 2770 | 2770 | 2770 | 2770 |
| Wheelbase/mm | 3653 | 3653 | 3653 | 3653 | 3653 |
| Tyre size | (1) | (1) | (1) | (2) | (2) |
| Fuel type | Super Lead free | Diesel | Diesel | Diesel | Diesel |
| Fuel tank capacity | 70 litres | 70 litres | 70 litres | 70 litres | 70 litres |
| Fuel consumption/l/100km | 11...14 | 10...13 | 10...13 | 10...13 | 10...13 |
| Top speed | 115 km/h | 110 km/h | 115 km/h | 120 km/h | 120 km/h |
| Track width front/mm | 1682 | 1682 | 1682 | 1692 | 1692 |
| Track width rear/mm | 1650 | 1650 | 1650 | 1650 | 1650 |
| Turning circle/metres | 14.8 | 14.8 | 14.8 | 14.8 | 14.8 |
| Gear box - gears | 5 | 5 | 5 | 5 | 5 |
| No of cylinders | 4 | 4 | 4 | 4 | 4 |
| Compression ratio | 9.5:1 | 22:1 | 21:1 | 18:1 | 18:1 |
| Perm. gross weight/kg* | 3100 | 3100 | 3100 | 3100 | 3500 |
| Perm. gross weight/kg** | 3500^(4) | ||||
| Perm. trailer load/kg* | (3) | (3) | (3) | (3) | (4) |
| Perm. No of persons | 6 | 6 | 6 | 6 | 6 |
| Fresh water supply | 125 litres | 125 litres | 125 litres | 125 litres | 125 litres |
| Waste water tank | 100 litres | 100 litres | 100 litres | 100 litres | 100 litres |
| Gas supply | 2 x 11 kg | 2 x 11 kg | 2 x 11 kg | 2 x 11 kg | 2 x 11 kg |
| Additional battery A/H | 50 | 50 | 50 | 50 | 50 |
* Standard
** Special equipment
(1) 185 R 14
(2) 195/75 R 16
(3) 1700 up to 10% gradient
(4) Perm. trailer load 1500 kg up to 10% gradient