Reserve 27089 - Ur INVICTA - Gratis brugsanvisning og manual
Find enhedens vejledning gratis Reserve 27089 INVICTA i PDF-format.

Brugerspørgsmål om Reserve 27089 INVICTA
0 spørgsmål om dette apparat. Besvar dem du kender, eller stil dit eget.
Stil et nyt spørgsmål om dette apparat
Download vejledningen til din Ur i PDF-format gratis! Find din vejledning Reserve 27089 - INVICTA og tag din elektroniske enhed tilbage i hånden. På denne side er alle dokumenter nødvendige for brugen af din enhed offentliggjort. Reserve 27089 af mærket INVICTA.
BRUGSANVISNING Reserve 27089 INVICTA
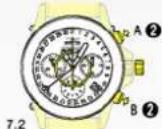
PRESENTATION
text_image
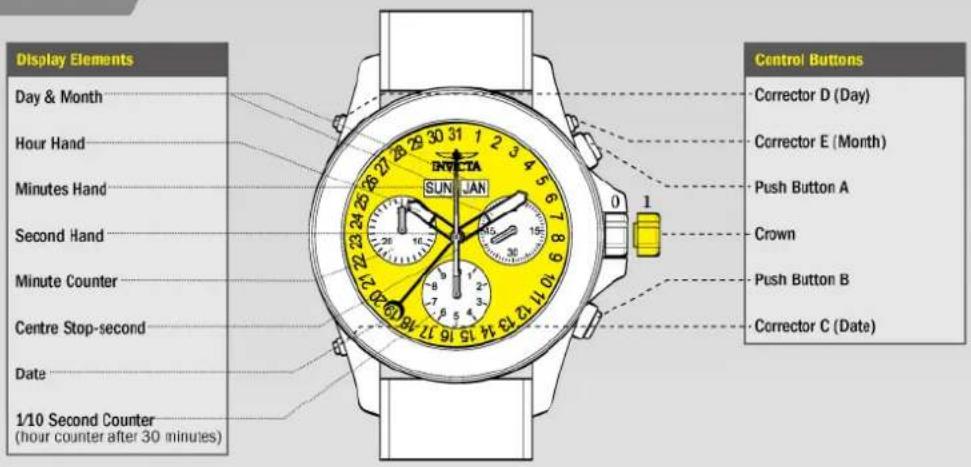
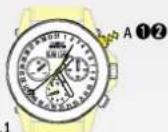
Display Elements Day & Month Hour Hand Minutes Hand Second Hand Minute Counter Centre Stop-second Date 1/10 Second Counter (hour counter after 30 minutes) SUNIAN INTUETA Control Buttons Corrector D (Day) Corrector E (Month) Push Button A Crown Push Button B Corrector C (Date)SETTINGS
Setting the Time
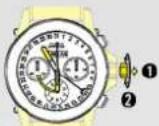
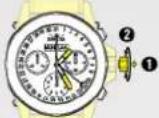
① Pull out the crown to position 1 (the watch stops).*
② Turn the crown until you reach the correct time 8:45.
③ Push the crown back into position 0."
Please note:
* In order to set the time to the exact second, 1 must be pulled out when the second hand is in position «60» (1).
Once the hour and minute hands have been set,
③ must be pushed back into position 0 at the exact second.
1.1
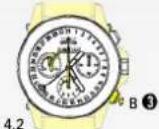
Setting the Date (Quick Mode)
Example after a change of month: - Date on watch: 31
- Current date: 1
① Press the corrector C once to adjust the date 1 day forward.
Please note:
The date for the following day must be set during the date changing phase between 9:00 PM and 00:20 AM.

Setting the Time, Date, Day of Week
and Month
Example:
- On the watch: 10 / MON/ JAN / 1:25 AM
- Current: 20 / [HU] / [OCT] / 8:30 PM
Please note:
* To set your watch to the exact second, please refer to the chapter entitled «setting the time».
** Please observe the AM/PM clock rhythm.
* To set your watch to the exact second, please refer to the chapter entitled «setting the time».
** Please observe the AM/PM clock rhythm.
3.1
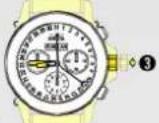
① Pull out the crown to position 1 (the watch continues to run).*
② Tum crown until the current time is shown.**

4 Press the corrector C to gradually advance the date hand.
5 Press the corrector D to gradually advance the day of week.
⑥ Press the corrector E to gradually advance the month.
3.2

③ Push crown to position 0 (watch continues to run).*

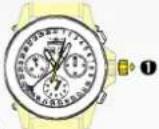
Chronograph: Accumulated Timing
Example:
① Start: (start timing)
② Stop: (e.g. 15 min 5 sec following ①)
③ Restart (timing is resumed)
*① Stop: (e.g. 13 min 5 sec following ③) = 28 min 10 sec (The accumulated measured time is shown)*
⑤ Reset: The 3 chronograph hands are returned to their zero position.
5.1
Please note:
Following 4 the accumulation of the timing can be continued by pressing push button A (Restart / Stop, Restart / Stop, ...)
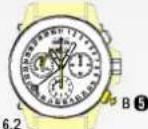
Chronograph: Intermediate or Interval Timing
Example:
① Start: (start timing)
② Display interval: e.g. 10 minutes 10 seconds (timing continues in the background)
- Making up the measured time: (the 3 chronograph hands are quickly advanced to the ongoing measured time).
- Stop: (Final time is displayed)
⑤ Reset: The 3 chronograph hands are returned to their zero position
Please note:
- Following ③, further intervals or intermediates can be displayed by pressing push button B (display interval / make up measured time, ...)
6.1
FUNCTIONS
Chronograph: Basic Function
(Start / Stop / Reset)
Example:
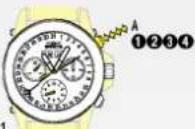
① Start:
Press push button A.
② Stop:
to stop the timing, press push button A once more and read the 3 chronograph counters: 4 min / 38 sek / 7/10 sec
③ Zero positioning: Press push button B. (The 3 chronograph hands will be reset to their zero position).
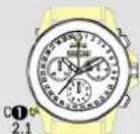
① Pull out the crown to position 1 (all 3 chronograph hands are in their correct or incorrect zero position).
7.3
③ Returning the crown to position 0 Termination of the chronograph hands adjustment (can be carried out at any time).
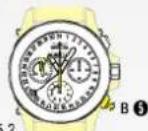
② Keep push buttons A and B depressed simultaneously for at least 2 seconds (the centre stop-second rotates by 360°—corrective mode is activated).
Adjusting the centre stop second
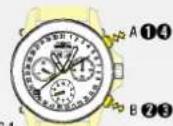
Single step A 1 x short
Continuous A long
Adjusting the next hand B
Adjusting the 1/10 second counter hand (position 6h)
Single step A 1 x short
Continuous A long
Adjusting the next hand B
Adjusting the minute counter (position 9h)
Single step A 1 x short
Continuous A long
CALIBRATION
Adjusting the Chronograph Hands to Zero Position
Example:
One or several chronograph hands are not in their correct zero position and have to be adjusted (e.g. following a battery change).