
MS2522 - Symaskine JANOME - Gratis brugsanvisning og manual
Find enhedens vejledning gratis MS2522 JANOME i PDF-format.


Brugerspørgsmål om MS2522 JANOME
0 spørgsmål om dette apparat. Besvar dem du kender, eller stil dit eget.
Stil et nyt spørgsmål om dette apparat
Download vejledningen til din Symaskine i PDF-format gratis! Find din vejledning MS2522 - JANOME og tag din elektroniske enhed tilbage i hånden. På denne side er alle dokumenter nødvendige for brugen af din enhed offentliggjort. MS2522 af mærket JANOME.
BRUGSANVISNING MS2522 JANOME
INSTRUCTION BOOK
MODEL MS 2522
IMPORTANT SAFETY INSTRUCTIONS
Your sewing machine is designed and constructed only for HOUSEHOLD use. Read all instruction before using this sewing machine.
DANGER — To reduce the risk of electric shock:
- An appliance should never be left unattended when plugged in. Always unplug this appliance from the electric outlet immediately after using and before cleaning.
- Always unplug before relamping. Replace bulb with same type rated 15 Watts.
- Do not reach for the appliance that has fallen into water. Unplug immediately.
- Do not place or store appliance where it can fall or be pulled into a tub or sink. Do not place in or drop into water or other liquid.
WARNING — To reduce the risk of burns, fire, electric shock,
or injury to persons.
- Do not allow to be used as a toy. Close attention is necessary when this appliance is used by or near children.
- Use this appliance only for its intended use as described in this manual. Use only attachments recommended by the manufacturer as contained in this manual.
-
Never operate this appliance if it has a damaged cord or plug, if it is not working properly, if it has been dropped or damaged, or dropped into water. Return the appliance to the nearest authorized dealer or service center for examination, repair, electrical or mechanical adjustment.
-
Never operate the appliance with any air opening blocked. Keep ventilation openings of the sewing machine and foot controller free from accumulation of lint, dust, and loose cloth.
- Never drop or insert any object into any opening.
- Do not use outdoors.
- Do not operate where aerosol (spray) products are being used or where oxygen is being administered.
- To disconnect, turn all controls to the off ("O") position, then remove plug from outlet.
- Do not unplug by pulling on cord. To unplug, grasp the plug, not the cord.
- Keep fingers away from all moving parts. Special care is required around the sewing machine needle.
- Always use the proper needle plate. The wrong plate can cause the needle to break.
- Do not use bent needles.
- Do not pull or push fabric while stitching. It may deflect the needle causing it to break.
- Switch the sewing machine off ("O") when making any adjustment in the needle area, such as threading needle, changing needle, threading bobbin, or changing presser foot, and the like.
- Always unplug the sewing machine from the electrical outlet when removing covers, lubricating, or when making any other adjustments mentioned in the instruction manual.
SAVE THESE INSTRUCTIONS
TABLE OF CONTENTS
SECTION 1. KNOW YOUR MACHINE
Locate and Identify the Parts 2\~3
SECTION 2. PREPARE YOUR MACHINE FOR SEWING
Set Up the Machine 4\~8
- Plug in the Machine and Switch on the Power ..... 4
- Foot Control Use 4
- Set the Speed Range Switch 4
- Set the Pressure Dial 5
- Adjust the Presser Foot Lever 5
• Use the Seam Guides 5
- Accessory Storage Box 6
• Free Arm Sewing: the Removable Extension Table... 6\~7
Know What the Presser Feet Will Do 8\~11
- Check Your Presser Foot 8
- Change the Presser Foot 8\~9
- Presser Foot Types 9\~11
Choose Your Needle and Thread 12
- Needle, Threading and Fabric Chart 12
- Check Your Needle 12
• To Change Your Needle 12
Prepare the Bobbin 13\~14
• To Remove the Bobbin from the Machine ..... 13
Horizontal Spool Pin 13
Additional Spool Pin 13
• Wind the Bobbin 14
- Insert the Bobbin into the Bobbin Holder ..... 15
Prepare Your Top Thread....16\~19
- Thread Your Needle 16
• Pick Up Your Bobbin Thread 17
- Adjust the Top Thread Tension .... 18\~19
Stitch Selector 19
Stitch Length Control 20
Adjusting Stretch Stitch Balance 20
Stitch Width Control 21
Reverse Stitch Control 22
Starting To Sew 22
SECTION 3. LEARN THE STITCHES
Practical Stitch Chart 23\~27
Straight Stitches 28\~32
- Straight Stitch 28\~29
- Topstitching 30
Dropping the Feed Dogs 30
- Quilting 31
Darning 32
Straight Stretch 32
Zigzag Stitches 33\~40
- Basic Zigzag 33
- Satin Stitch 34
- Applique 35
- Bar Tacking 35
- Monogramming 36
• Embroidery 36
- Sew a Button 37
• Overcasting Stitch 38
- Rick-Rack Stretch 38
- Three-Step Zigzag 39
• Overcast Stretch Stitching 40
- Sering or Pine Leaf Stretch Stitching.... 40
Blind Hemming 41
Lace Work 42
Automatic Buttonhole 43\~45
Manual Buttonhole 46\~47
Corded Buttonholes 48
Sew in a Zipper 49\~50
Shell Stitching 51
Two-Point Shell Stitching 51
Smocking 52
Stretch Patching 52
Fagoting Stitch 53
Herring Bone Stretch 53
Elastic Stretch Stitch 54
Box Stitching 54
Decorative Stretch Patterns 55
Decorate with Geometric Patterns 56
Twin Needle Stitching 57
SECTION 4. PERFORMANCE PROBLEMS CHART
What to Do When 58\~59
SECTION 5. CARE FOR YOUR MACHINE
Replace the Light Bulb 60
Clean the Bobbin Holder 60
Clean the Hook Race and Feed Dogs 61
Oiling the Machine 61
SECTION 1. KNOW YOUR MACHINE
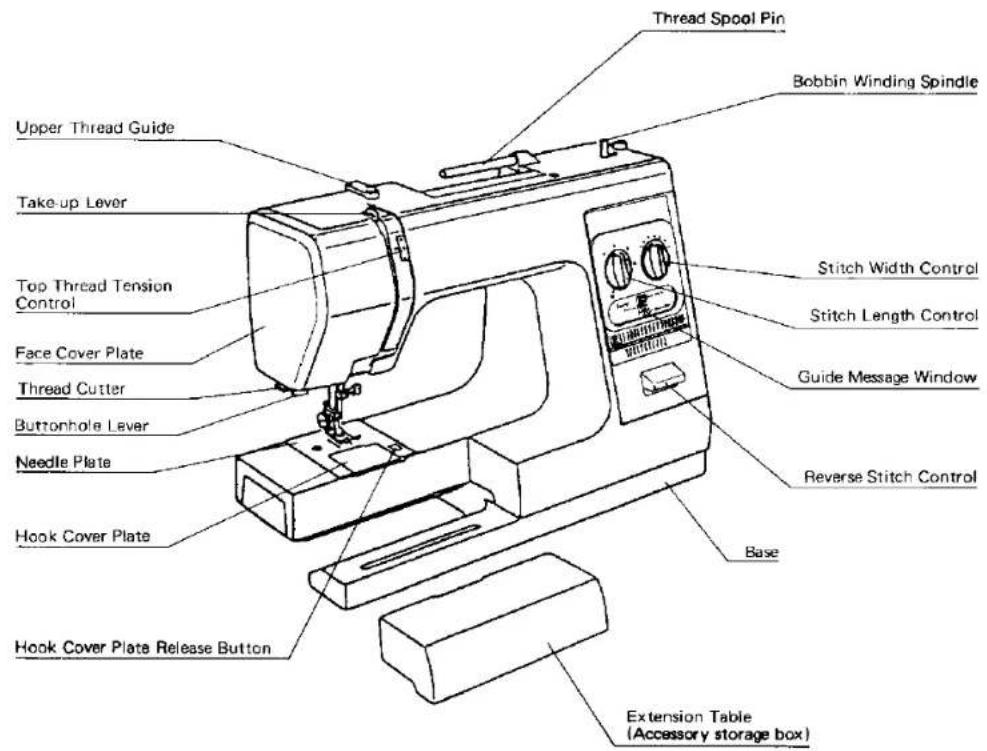
Locate and Identify the Parts
text_image
Thread Spool Pin Bobbin Winding Spindle Upper Thread Guide Take-up Lever Top Thread Tension Control Face Cover Plate Thread Cutter Buttonhole Lever Needle Plate Hook Cover Plate Hook Cover Plate Release Button Stitch Width Control Stitch Length Control Guide Message Window Reverse Stitch Control Base Extension Table (Accessory storage box)SECTION 1. KNOW YOUR MACHINE
text_image
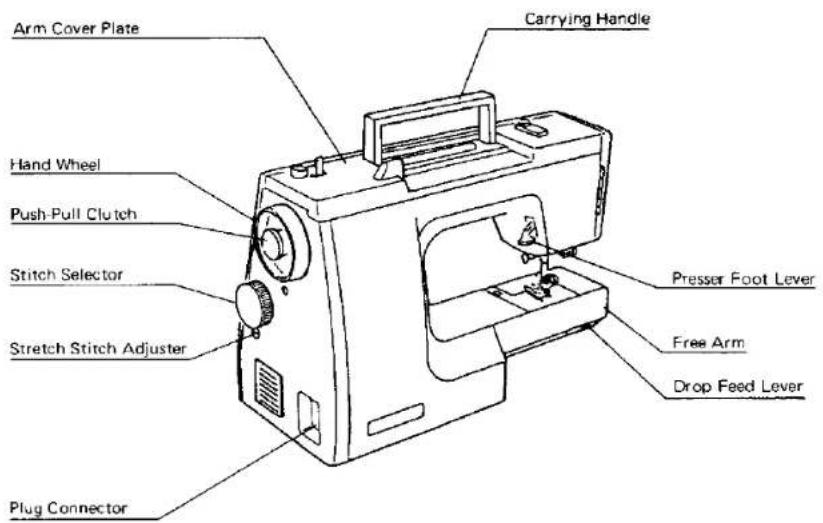
Arm Cover Plate Carrying Handle Hand Wheel Push-Pull Clutch Stitch Selector Stretch Stitch Adjuster Plug Connector Presser Foot Lever Free Arm Drop Feed Lever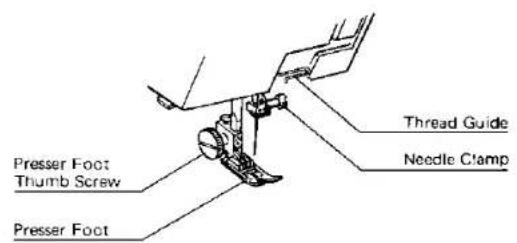
text_image
Presser Foot Thumb Screw Presser Foot Thread Guide Needle Clamp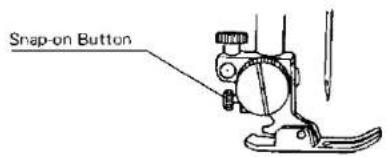
text_image
Snap-on ButtonSECTION 2. PREPARE YOUR MACHINE FOR SEWING
Set Up the Machine
• Plug in the Machine and Switch on the Power
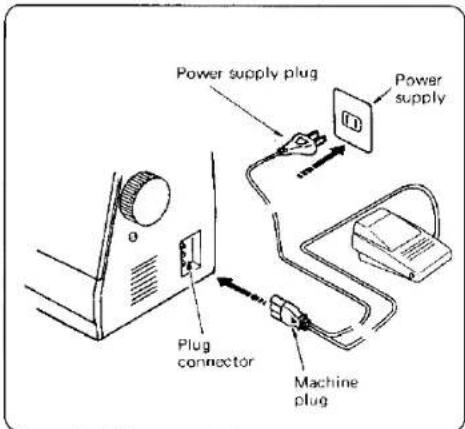
text_image
Power supply plug Power supply Plug connector Machine plug-
Insert the machine plug into the three prong outlet, as shown. It will only fit one way.
-
Insert the power supply plug into the outlet.
- Foot Control Use
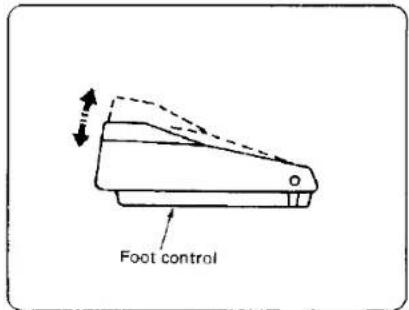
text_image
Foot controlThe foot control regulates the speed at which you sew.
To increase speed, gently press down with the ball of your foot.
To decrease speed, release your foot pressure slightly.
NOTE: The foot control is sensitive and will increase or decrease your sewing speed immediately. Practice on a scrap of fabric to regulate your sewing speed to your taste and needs.
- Set the Speed Range Switch
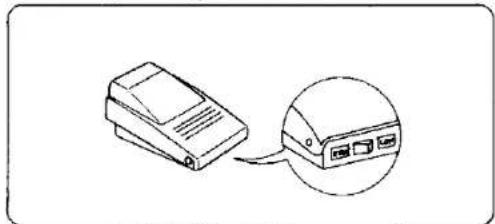
natural_image
Diagram of a device with an attached cable and a close-up view of its internal components (no text or symbols)Sewing speed range can be varied by the control which is located on foot control.
For HIGH speed range, set the switch at "HIGH" mark.
For LOW speed range, set the switch at "LOW" mark.
* Do not move the switch when machine is running.
SECTION 2. PREPARE YOUR MACHINE FOR SEWING
- Set the Pressure Dial
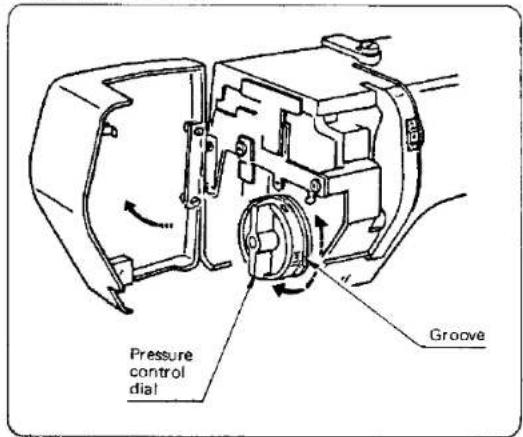
text_image
Pressure control dial GrooveThe pressure control dial is located inside the face cover plate.
Set the dial aligning the setting mark on the dial with the groove as follows.
3 ..... most sewing
2 ..... applique and Cut-Out work
1 . . . . . basting, sewing chiffon, lace, organdy and other lightweight fabrics.
Also for velours and knits (with more stretch).
0 ..... manual darning and embroidery
NOTE: The pressure dial should be reset at 3 after changing pressure, so the machine is ready for most normal sewing the next time you use it.
- Adjust the Presser Foot Lever
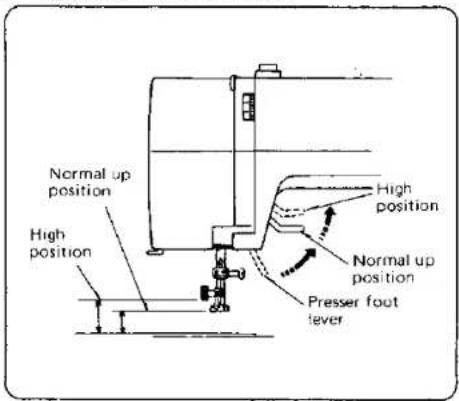
text_image
Normal up position High position High position Normal up position Presser foot leverThe Presser Foot Lever raises and lowers your presser foot.
You can raise it about 0.6 cm higher than the normal up position for easy removal of the presser foot or to help you place heavy fabrics under the presser foot.
• Use the Seam Guides
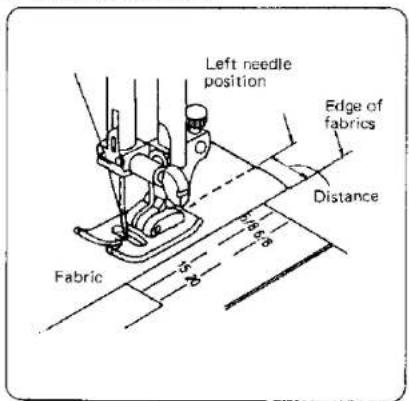
text_image
Left needle position Edge of fabrics Distance FabricThe seam guides on the needle plate are engraved to help you measure seam width.
• The number indicates the distance between the left needle position and the line.
| Number | 15 | 20 | 4/8 | 5/8 | 6/8 |
| Distance (cm) | 1.5 | 2.0 | 1.3 | 1.6 | 1.9 |
SECTION 2. PREPARE YOUR MACHINE FOR SEWING
Set Up the Machine (Continued)
- Accessory Storage Box
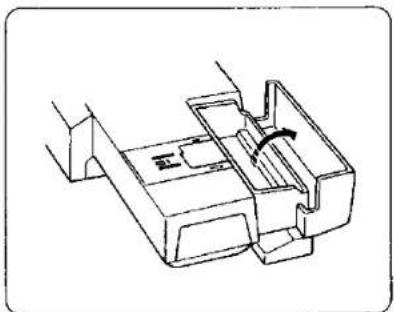
natural_image
Technical line drawing of a mechanical component with a curved arrow indicating rotation (no text or symbols)The lid of the accessory storage box lifts open toward you.
Sewing accessories are conveniently located in the box.
• Free-Arm Sewing: the Removable Extension Table
To remove:
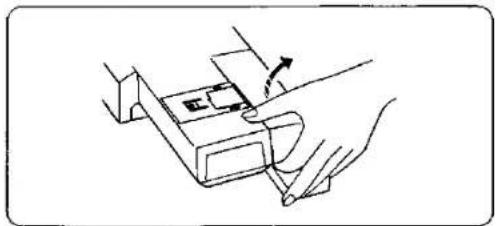
natural_image
Line drawing of a hand holding a small mechanical component with an arrow indicating motion (no text or symbols)To Remove the Extension Table (for free-arm sewing)
- Grip the table with your index finger and thumb, as shown.
- Pull it gently toward you. The extension table will snap out.
To Attach:
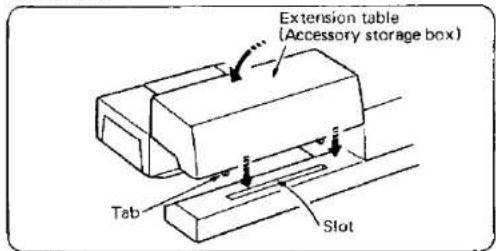
text_image
Extension table (Accessory storage box) Tab SlotTo Attach the Extension Table (for flat-bed sewing)
- Fit the tabs into the slot, as shown.
- With your thumb and index finger, gently snap in.
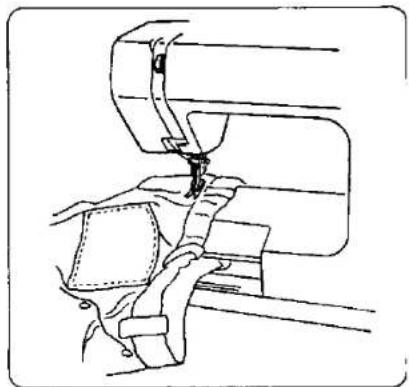
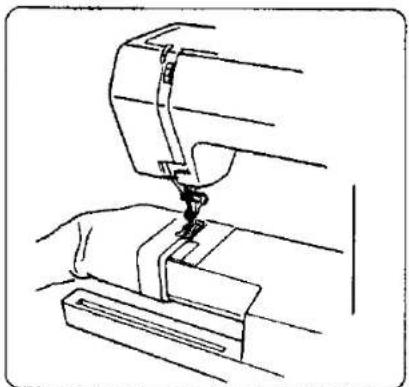
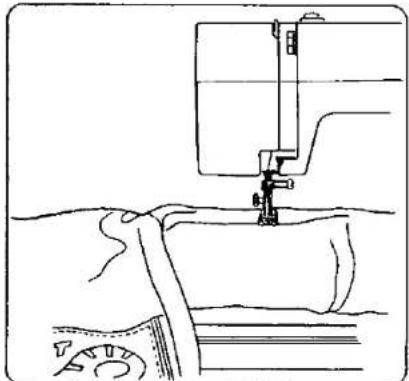
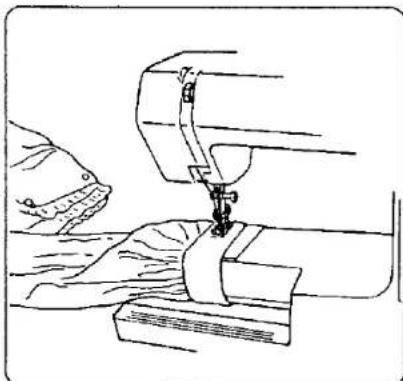
Your sewing machine can do free arm sewing. This feature makes sewing easy for:
natural_image
Line drawing of a sewing machine needle stitching fabric (no text or symbols)* Bar tacking to reinforce pockets, plackets and waistlines on ready-made or homemade garments to avoid fabric bunching around the needle.
SECTION 2. PREPARE YOUR MACHINE FOR SEWING
natural_image
Line drawing of a sewing machine needle stitching fabric (no text or symbols)* Stitching sleeves, waistbands, pants legs, or any circular garment area.
natural_image
Line drawing of a sewing machine needle stitching fabric (no text or symbols)* Darning socks or mending knees, elbows, or areas of wear in children's clothes.
natural_image
Line drawing of a sewing machine needle stitching fabric, with hands operating (no text or symbols)* Sewing buttons on sleeves, waistbands, etc.
SECTION 2. PREPARE YOUR MACHINE FOR SEWING
Know What the Presser Feet Will Do
- Check Your Presser Foot
The Presser feet are an important feature of this machine. You need to know what each foot does in order to use them effectively.
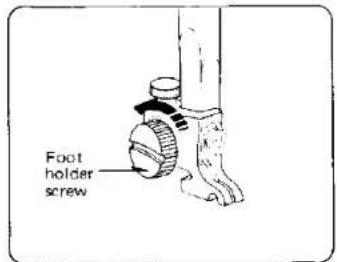
Your presser foot is held in place by a Foot Holder. Each presser foot merely snaps on the foot holder, which is seldom removed.
If you need to remove or attach the foot holder, here is what you do:
To Remove:
text_image
Foot holder screwTo Remove:
Turn the screw toward the back of the machine. Use the large screw driver.
To Attach:
text_image
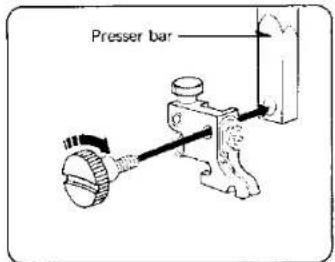
Presser barTo Attach:
- Match the hole in the foot holder with the threaded hole in the presser bar.
- Fit the foot holder screw into the hole.
- Tighten the screw by turning it toward you.
• Change the Presser Foot
Use the correct presser foot for the stitch you wish to sew. Consult the Stitch Pattern Chart and the detailed directions for sewing with the various presser feet.
To Snap Off:
natural_image
Technical line drawing of a sewing machine with no visible text or symbols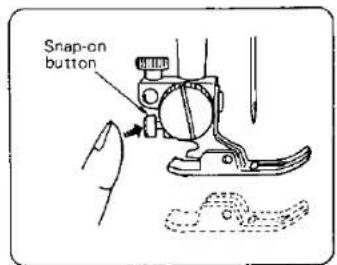
text_image
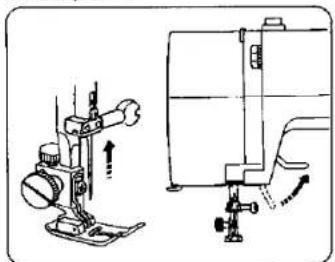
Snap-on buttonTo Snap Off the Presser Foot:
- Raise the needle bar to its highest position by turning the hand wheel toward you.
- Raise the presser foot.
- Press the snap-on button on the back of the foot holder. The presser foot will drop off.
SECTION 2. PREPARE YOUR MACHINE FOR SEWING
To Snap On
text_image
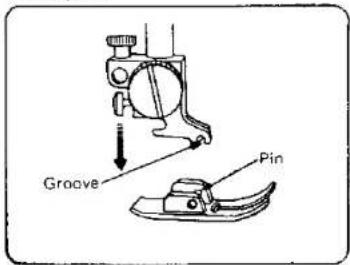
Groove PinTo Snap On the Presser Foot:
- Place the presser foot so the horizontal pin on the foot lies just under the groove of the foot holder.
- Lower the presser foot holder to lock the presser foot in place.
NOTE: If you do not hear the presser foot snap in place, press down on the presser foot holder firmly until you hear the snap.
- Presser Foot Types
Zigzag Foot
text_image
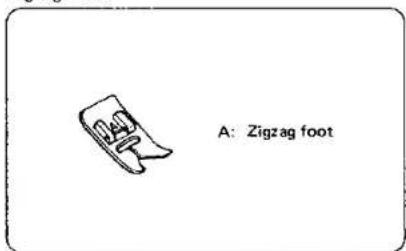
A: Zigzag footUse this foot for both straight and zigzag stitching.
Uses: Zigzag stitching (see page 33),
Bar tacking (see page 35).
Button sewing (see page 37),
Rick-rack stretch (see page 38),
Three-step zigzag (see page 39).
Serging (see page 40),
Overcast stretch (see page 40).
Lace work (see page 42),
Two-point shell stitching (see page 51),
Smocking (see page 52),
Stretch patching (see page 52),
Fagoting (see page 53)
Herring bone stretch (see page 53),
Elastic stretch (see page 54).
Box stitching (see page 54),
Decorative stretch stitching
(see page 55).
Twin needle stitching (see page 57).
Straight Foot
text_image
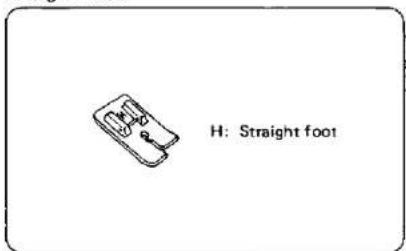
H: Straight footUse this foot exclusively for straight stitching using center needle position only.
Uses: Straight stitching (see page 28),
Topstitching (see page 30),
Quilting (see page 31),
Straight stretch (see page 32).
SECTION 2. PREPARE YOUR MACHINE FOR SEWING
Know What the Presser Feet Will Do (Continued)
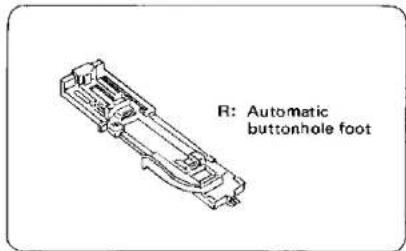
Automatic Buttonhole Foot
text_image
R: Automatic buttonhole footInsert the button you use into the button-hole foot, the length of buttonhole will be set automatically.
Uses: Automatic Buttonhole (see page 43).
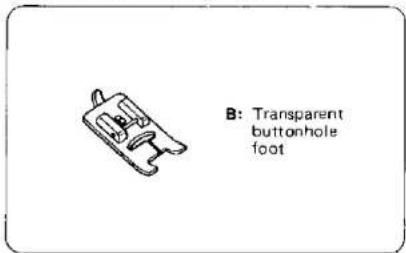
Transparent Buttonhole Foot
text_image
B: Transparent buttonhole footWhen the button you use is larger than 2.5 cm in dia, use this buttonhole foot.
Uses: Manual Buttonhole (see page 46).
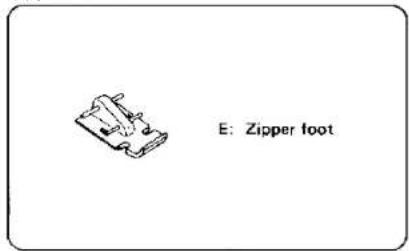
Zipper Foot
text_image
E: Zipper footThis foot can be set to sew on each side of your zipper. The edges of the foot guide the zipper and keep the seam straight.
Uses: Zipper application (see page 49).
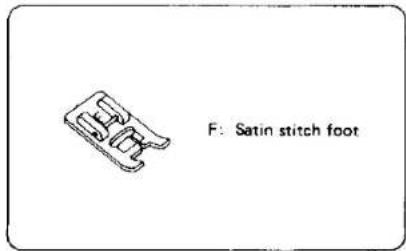
Satin Stitch Foot
text_image
F: Satin stitch footUse this transparent foot for satin stitch and outlining applique.
Uses: Satin stitch (see page 34), Applique (see page 35),
Monogramming (see page 36),
Shell stitching (see page 51),
Geometric decorative stitching (see page 56).
Twin needle stitching (see page 57).
SECTION 2. PREPARE YOUR MACHINE FOR SEWING
Blind Hem Stitch Foot
text_image
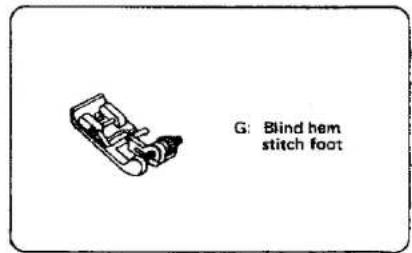
G: Blind hem stitch footUse this foot for perfect blind hemming. The foot has ridges on the bottom to keep the fabric from slipping and a guide screw on top to guide the folded edge of your hem.
Uses: Blind hemming (see page 41).
Overedge Foot

text_image
C: Overedge footThis foot is especially constructed for stitching and/or overcasting seams. The small brush and wire guides help control the fabric, hold the raw edge in place and keep it from puckering, especially when sewing on knit fabrics.
Uses: Overcasting stitch (see page 38), Serging (see page 40).
Quilter
text_image
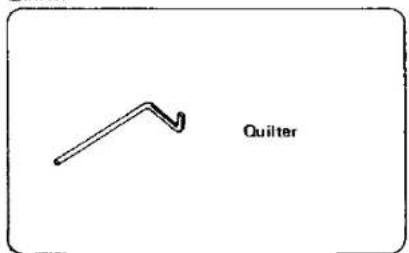
QuilterThis attachment turns your zigzag foot into a quilting foot.
Uses: Straight stitching (see page 31).
SECTION 2. PREPARE YOUR MACHINE FOR SEWING
Choose the Needle and Thread
- Needle, Thread and Fabric Chart
| FABRICS | THREADS | NEEDLE SIZE | |
| LIGHT WEIGHT | Crepe de Chine, Voile Lawn, Organdy, Georgette, Tricot | Fine SilkFine CottonFine SyntheticFine Cotton Covered Polyester | 9 or 11 |
| MEDIUM WEIGHT | Linens, Cotton, Pique Serge, Double Knits, Percale | 50 Silk50 to 80 Cotton50 to 60 SyntheticCotton Covered Polyester | 11 or 14 |
| HEAVY WEIGHT | Denim, Tweed, Gabardine, Coating, Drapery and Upholstery Fabric | 50 Silk40 to 50 Cotton40 to 50 SyntheticCotton Covered Polyester | 14 or 16 |
NOTE:
* In general, fine threads and needles are used for sewing thin fabrics, and thicker threads and needles are used for sewing heavy fabrics. Always test thread and needle size on a small piece of fabric which will be used for actual sewing.
* Use the same thread for needle and bobbin.
*When sewing stretch, very fine fabrics and synthetics, use a BLUE TIPPED needle. The blue tipped needle effectively prevents skipped stitches.
*When sewing very fine fabrics, sew over a piece of paper to prevent yarn distortion.
- Check Your Needle

- Never use a bent needle or one with a dull point. The exact length of your needle is shown at left. Be sure you never use one in your machine that is not this exact length.
- A damaged needle can cause permanent snags or runs in knits, fine silks and silk-like fabrics.
* Always buy a good quality thread. It should resist tangling and be strong, smooth and consistent in thickness.
• To Change the Needle
text_image
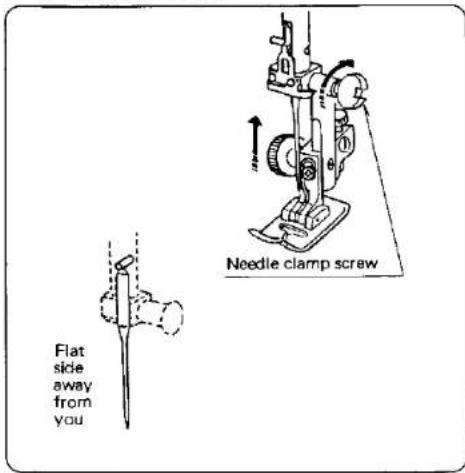
Flat side away from you Needle clamp screwNOTE: Raise the needle bar to its highest position by turning the hand wheel toward you.
- Loosen the needle clamp screw by turning it toward you.
- Remove the needle by pulling it downward.
- Insert the new needle into the needle clamp with the flat side away from you.
- Push the needle up as far as it will go.
- Tighten the needle clamp screw firmly with the large screwdriver from your accessory storage box.
SECTION 2. PREPARE YOUR MACHINE FOR SEWING
Prepare the Bobbin
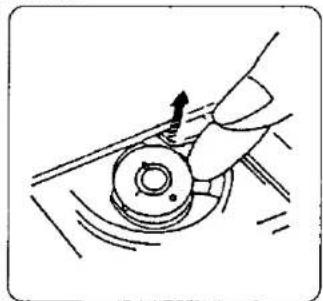
• To Remove the Bobbin from the Machine
natural_image
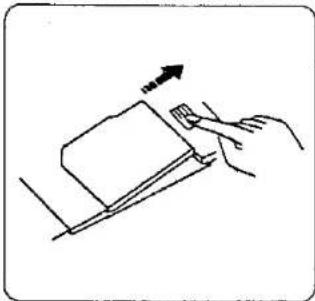
Simple line drawing of a hand pressing down on a piece of paper with an arrow indicating motion (no text or symbols)① Remove the cover plate by sliding the hook cover plate release button to the right.
natural_image
Illustration of a hand turning a circular component with an arrow indicating rotation (no text or symbols)② Take out the bobbin.
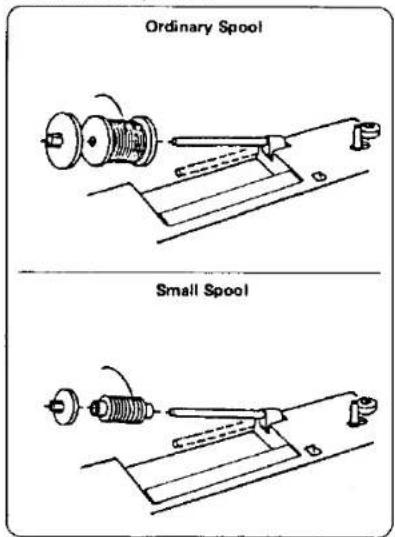
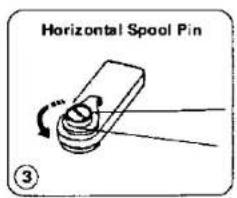
• Horizontal Spool Pin
text_image
Ordinary Spool Small SpoolTilt up the spool pin. Place the spool of thread on the spool pin with the thread coming off the spool as shown.
Attach the large spool holder pressing it firmly against the thread spool.
- The small spool holder is used with narrow or small thread spools.
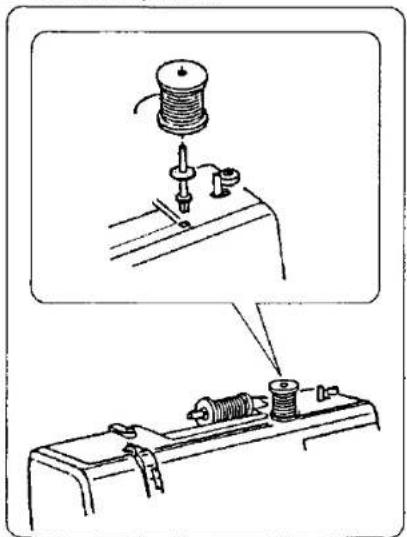
• Additional Spool Pin
text_image
Diagram showing a mechanical setup with a spring and labeled components, including a magnified view of the component.The additional spool pin is used to wind extra bobbins without unthreading the machine.
To use, insert the additional spool pin in the hole. Place the felt and the spool on the pin.
SECTION 2. PREPARE YOUR MACHINE FOR SEWING
Prepare the Top Thread
• Bobbin Winding
text_image
Horizontal Spool Pin ③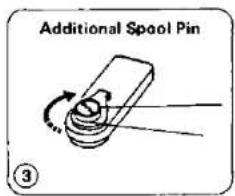
text_image
Additional Spool Pin ③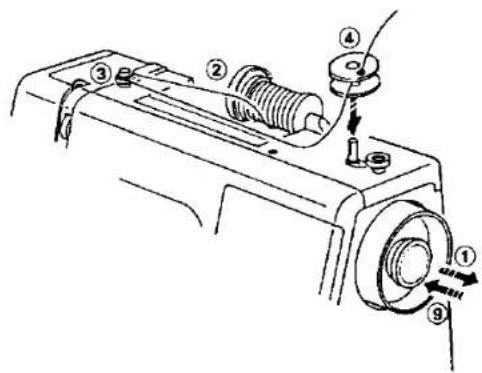
text_image
Technical diagram of a mechanical device with numbered components and directional arrows indicating motion or force① Pull the clutch knob away from the machine to disengage clutch.
② Draw the thread from the spool.
③ Guide the thread around the bobbin winder thread guide.
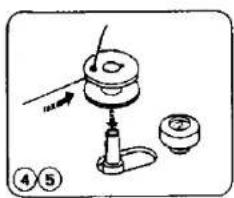
④ Insert the thread through the hole in the bobbin, threading from the inside to the outside.
⑤ Put the bobbin on the bobbin winding spindle, and push it to the right.
⑥ With the free end of the thread held in your hand, depress the foot control.
⑦ Stop the machine when it has made a few turns, and cut the thread close to the hole in the bobbin. Depress the foot control again. When the bobbin is fully wound, it will stop automatically.
⑧ Return the bobbin winder to its original position by moving the spindle to the left, and cut the thread as shown.
⑨ Push in the clutch knob to engage clutch.
* The machine will not sew until the clutch knob is pushed in.
text_image
Diagram showing a mechanical device with labeled parts and directional arrow, likely illustrating a motion or assembly process.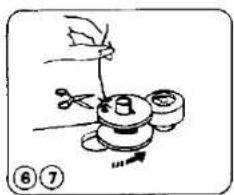
text_image
8 ⑥⑦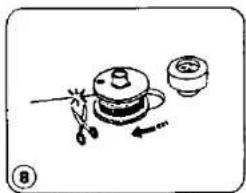
natural_image
Simple line drawing of a cooking setup with a pot, saucer, and cup (no text or symbols)SECTION 2. PREPARE YOUR MACHINE FOR SEWING
- Insert the Bobbin into the Bobbin Holder
natural_image
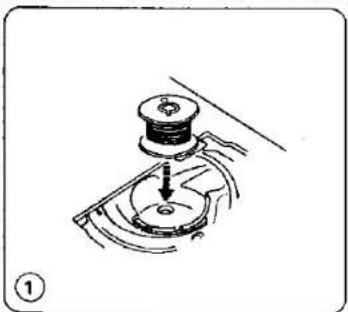
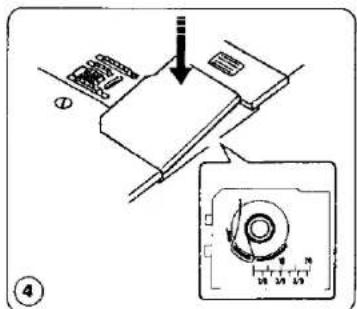
Diagram of a mechanical component with a downward arrow indicating motion (no text or symbols)- Put the bobbin into the bobbin holder so that the thread feeds counter-clockwise (left).
text_image
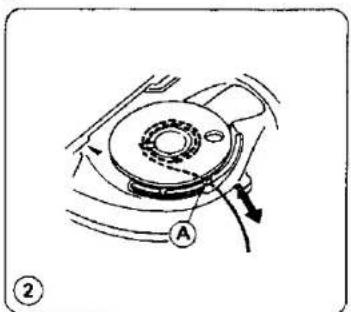
Diagram of a mechanical component with labeled parts and directional arrow, marked as figure 2- Pull about 10 cm of thread toward you through the tension slot Ⓐ.
text_image
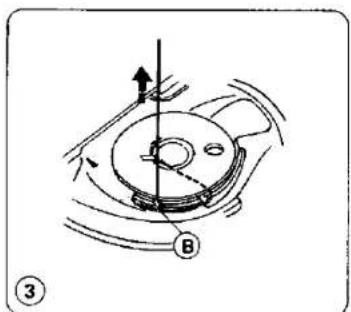
Diagram showing a rotating mechanical component with labeled point B and directional arrow, marked as figure 3.- Then pull the thread clockwise toward the back of the machine through the slot Ⓑ.
text_image
Technical diagram showing a mechanical assembly with a magnified inset of a circular component labeled '10-24.5' and scale markings.- Slide the bobbin cover plate while pushing it down slightly over the bobbin. Allow about 10 cm of thread to show above the needle plate.
SECTION 2. PREPARE YOUR MACHINE FOR SEWING
Prepare the Top Thread (Continued)
- Thread the Needle
text_image
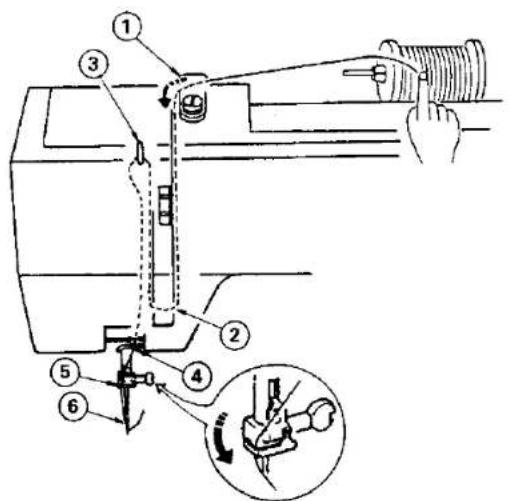
Technical diagram of a sewing machine with numbered components and a close-up inset showing the mechanism.The numbered steps above follow the numbers on the illustrations.
Dotted lines show places where the thread loops and then is pulled tight.
text_image
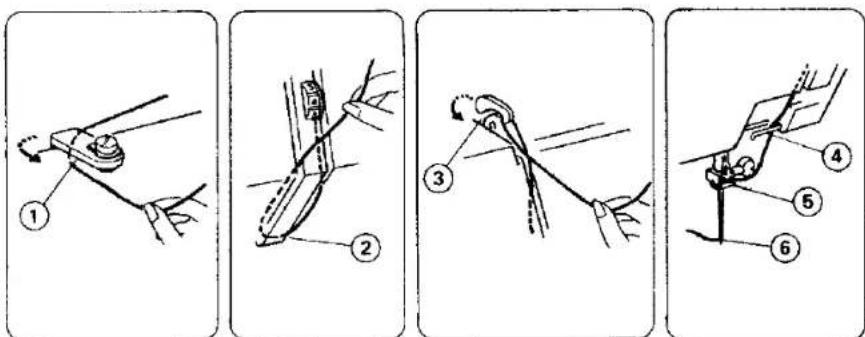
Diagram illustrating four steps of a mechanical tool or assembly, labeled 1 to 6, with numbered annotations indicating each step.Raise the take-up lever to its highest position by turning the hand wheel toward you.
Raise the presser foot lever.
Place the spool on the spool pin as shown, with thread coming from the back of the spool.
- Draw thread into thread guide using both hands.
- While holding thread near spool, draw thread down into the tension area and then around the check spring holder.
- Firmly draw thread up and through take-up lever from right to left.
- Draw thread down and slip it through the thread guide.
- Thread then is slipped into needle bar thread guide.
- Thread needle from front to back.
NOTE: You may want to cut the end of thread with sharp scissors for easier needle threading.
SECTION 2. PREPARE YOUR MACHINE FOR SEWING
• Pick Up the Bobbin Thread
natural_image
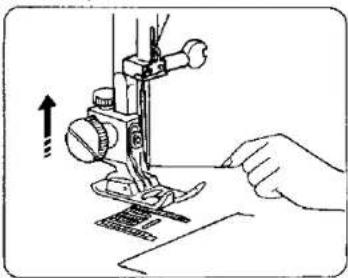
Illustration of a hand using a sewing machine to press fabric (no text or symbols visible)- Raise presser foot lever. Hold needle thread loosely in left hand and rotate hand wheel toward you one complete turn.
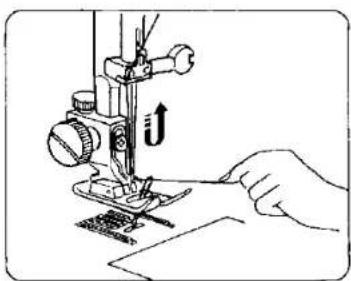
natural_image
Illustration of a sewing machine needle stitching fabric, with a hand holding the blade (no text or symbols)- Bring bobbin thread up by pulling top thread.
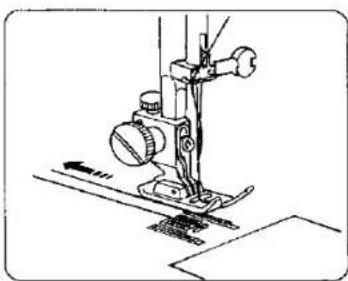
natural_image
Line drawing of a sewing machine needle and fabric (no text or symbols)- Pull both threads under and to the back of the presser foot, leaving 10 to 15 cm of thread clear.
SECTION 2. PREPARE YOUR MACHINE FOR SEWING
Prepare Your Top Thread (Continued)
- Adjust the Top Thread Tension
text_image
Top side of fabric Top thread Bobbin thread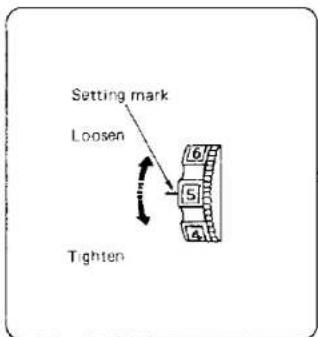
text_image
Setting mark Loosen TightenFor Straight Stitch
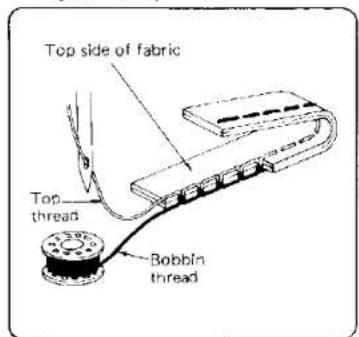
The ideal straight stitch will have threads locked between the two layers of fabric, as shown above, magnified to show detail.
If you look at the stitch, front and back, you will notice that there are no gaps, that each stitch is smooth and even.
When adjusting top thread tension, the higher the number, the tighter the top thread.
Choose the Correct Tension:
The best tension will depend on;
— the stiffness and thickness of the fabric
— the number of fabric layers
— the type of stitch
text_image
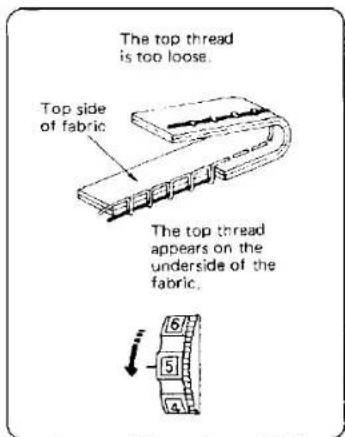
The top thread is too loose. Top side of fabric The top thread appears on the underside of the fabric.Tension is too loose:
The top thread shows through the bottom of the fabric. The bottom side of the stitch will feel bumpy.
text_image
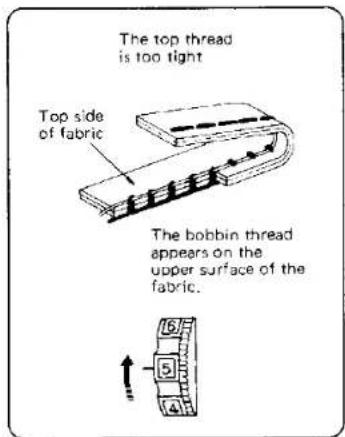
The top thread is too tight Top side of fabric The bobbin thread appears on the upper surface of the fabric.Tension is too tight:
The bobbin thread will come through the top of the fabric. The top side of the stitch will feel bumpy.
SECTION 2. PREPARE YOUR MACHINE FOR SEWING
Stitch Selector
For Zigzag Stitch
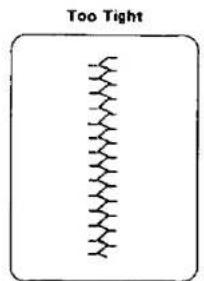
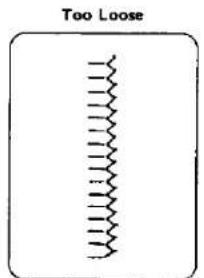
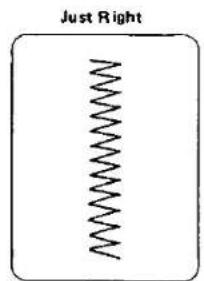
In the correct zigzag stitch, the bobbin threads will not show on top of the fabric and the top threads will show slightly on the under side. See below for the correct appearance. To match this appearance, adjust your top thread tension.
text_image
Too TightTop Side of Fabric
Too Tight:
— The points of the zigzag will pull together on top of the stitch.
text_image
Too LooseUnder Side of Fabric
Too Loose:
- The top thread will loop through the points on the bottom of the stitch and will be pulled almost together.
text_image
Just RightTop Side of Fabric
text_image
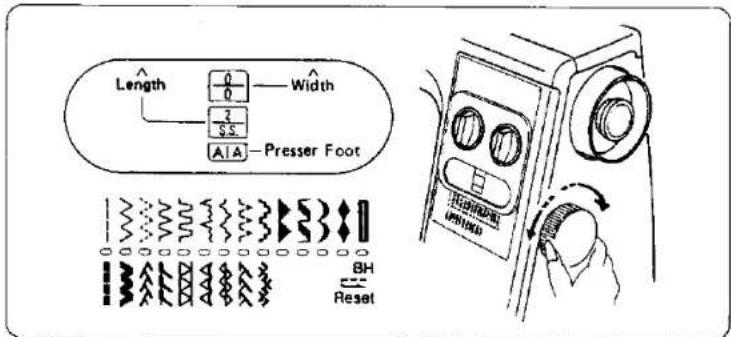
Length 0 Width 2 S.C. A:A Presser Foot BH ResetThe stitch selector control determines the stitch you select.
Simply turn this control until the desired stitch is indicated by the red indicator on the stitch indicator panel. The bottom row of stitches is selected when the stitch length control is set at the stretch stitch position.
Suitable width, stitch length and foot are shown in the guide message window.
When you select the desired stitch by turning the stitch selector, the information in the window will change automatically.
Please use the colour in the guide window which corresponds to the colour of the stitch you select.
NOTE: To avoid needle or fabric damage, be sure your needle is up and out of fabric when selecting a stitch.
SECTION 2. PREPARE YOUR MACHINE FOR SEWING
Stitch Length Control
text_image
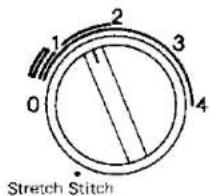
1 2 3 4 0 Stretch StitchThe stitch length control regulates the length of stitch, and also has a stretch stitches setting.
The higher the number, the longer the stitch.
0 means no feed.
To select Stretch Stitches, set this control at Stretch Stitch.
NOTE: When you select decorative stitches or built-in buttonhole make sure that you do not set the stitch length control at "Stretch Stitch".
Adjusting Stretch Stitch Balance
text_image
Diagram illustrating electrostatic induction with labeled charges and directional arrows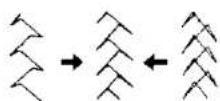
Feather stretch
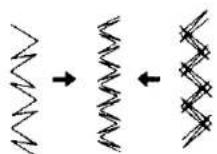
Rickrack stretch
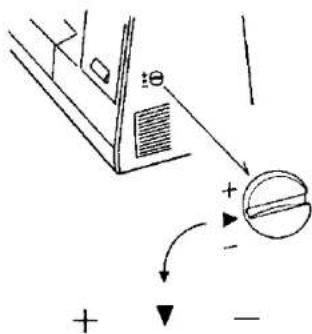
In stretch stitch sewing, the stretch stitch adjuster should usually be in a neutral position (between "+" and "-" or ▶ position). When sewing some fabrics, you may need to adjust this control to balance the stitches for appearance sake.
If design seems open like the illustrations to the left, adjust the control slightly toward “—” until design looks like the center design.
If the design appears to be closed as in the right hand illustrations, turn the control toward "+" until stitching is as you desire.
Stitch Width Control
text_image
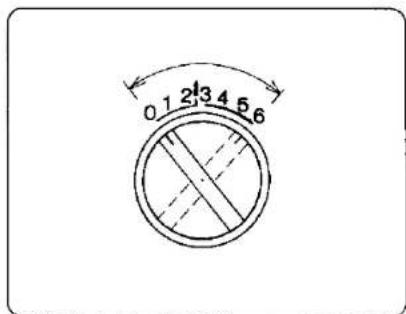
0.1 2 3 4 5.6The stitch width control regulates the width of the stitch you select.
The higher the number, the wider the stitch. The “†” mark is the maximum width for twin needle stitches.
SECTION 2. PREPARE YOUR MACHINE FOR SEWING
SECTION 2. PREPARE YOUR MACHINE FOR SEWING
Reverse Stitch Control
natural_image
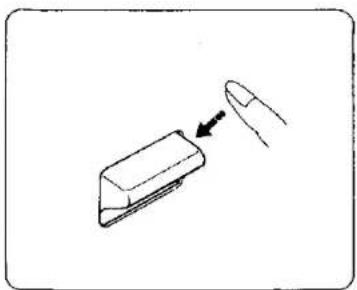
Simple line drawing of a rectangular object with an arrow pointing to it, no text or symbols present.To reverse stitch, hold down this control during sewing.
Release to sew forward again.
Starting To Sew
Now that you are familiar with the controls on your machine and with the accessories provided for the machine, you are ready to start to sew with your sewing machine. Below are some good habits to follow each time you sit down to sew:
- Inspect the needle. It should be straight, properly set and sharp on the point. It should be the correct size for the fabric and thread being used. Do not be afraid to change your needle frequently. Many of the new fabrics made of synthetic blends tend to dull the needles more easily than fabrics made of natural fibers.
- Before placing the material on the machine, see that the ends of the threads have been drawn about 10 cm to the rear of the machine. Hold on to threads during the sewing of the first 3 or 4 stitches of the seam.
- Test the machine stitch on a scrap of fabric you plan to use. The fabric should be double thickness. Adjust the machine for the length of stitch and tension suitable to your fabric.
- Fabric should be placed under the presser foot with the bulk of the material to the left of the needle and the right edge of the material placed on the 5/8" seam marking on the needle plate when making a simple seam.
- Run the machine at a slow even speed. The more pressure you put on the foot control, the faster the machine will sew.
- Fasten each seam by back tacking at the beginning and end of the seam.
- Always finish sewing each seam with the needle at its highest point.
- Guide the fabric gently with your hand in front of the needle. Never pull or hold the fabric in such a way that the normal feeding is altered.
- When turning the hand wheel manually, always turn it toward you.
Practical Stitch Chart
| Stitch | Stitch Selection | Foot and Other Attach. | Needle | Thread Tension | Stitch Length | Stitch Width | Uses | Refer to Page |
| STRAIGHT | Straight QuiltZipper foot QuiltZipper foot | Check Chart on p. 12 | 2~6 | 2~4 | 0 | Regular seams, zippers, topstitching, darning, etc. | 28~32 | |
| STRAIGHT STRETCH | Straight | Check Chart on p. 12 | 2~6 | Stretch Stitch Position | 0 | Use on knits and other stretch fabrics, good for topstitching. | 32 | |
| ZIGZAG | Zigzag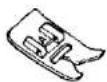 | Check Chart on p. 12 | 3~8 | 1~4 | 1~6 | Finish edges, buttons, satin stitch, applique, monogram, embroidery, sewing bar tacks. | 33~37 | |
| RICK-RACK STRETCH | Zigzag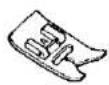 | Check Chart on p. 12 | 2~6 | Stretch Stitch Position | 2~6 | Decorate garments with one row or several. | 38 | |
| BLIND HEM STITCH | Blind hem stitch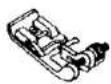 | Check Chart on p. 12 | 2~6 | 1~3 | 2~3 | Use for finishing seams. | 41 |
SECTION 3. LEARN THE STITCHES
Practical Stitch Chart (Continued)
| Stitch | Stitch Selection | Foot and Other Attach. | Needle | Thread Tension | Stitch Length | Stitch Width | Uses | Refer to Page |
| OVERCAST STRETCH | Zigzag | Check Chart on p. 12 | 2~6 | Stretch Stitch Position | 3~6 | Use for swimwear, ski pants and other garments that require stretch. | 40 | |
| THREE-STEP ZIGZAG | Zigzag | Check Chart on p. 12 | 2~6 | 0.5~1 | 5~6 | Use for finishing seams. | 39 | |
| SMOCKING STITCH | Zigzag | Check Chart on p. 12 | 2~6 | Stretch Stitch Position | 3~6 | Use in smocking or as a decorative stitch. | 52 | |
| SHELL STITCH | Satin | Check Chart on p. 12 | 4~9 | 1~2 | 3~6 | Finish hems, sleeve and neck openings. Use on nylon tricot and other lingerie to overcast and seam.Do shell tucking on blouses and lingerie. | 51 | |
| SERGING | Overedge | Blue (11) on p. 12 | 3~6 | Stretch Stitch Position | 6~6 | Finish hems, sleeve and neck openings. Use on nylon tricot and other lingerie to overcast and seam.Do shell tucking on blouses and lingerie. | 40 |
SECTION 3. LEARN THE STITCHES
| Stitch | Stitch Selection | Foot and Other Attach. | Needle | Thread Tension | Stitch Length | Stitch Width | Uses | Refer to Page |
BOX STITCHING | Zigzag | Check Chart on p. 12 | 3~8 | 1~2 | 3~6 | Use for overlapping seams. | 54 | |
| ELASTIC STRETCH[8084] | Zigzag | Check Chart on p. 12 | 3~6 | Stretch Stitch Position | 3~6 | Use for applying elastic. | 54 | |
| FAGOTING[6047] | Zigzag | Check Chart on p. 12 | 3~8 | 0.5~2 | 5~6 | Join two folded edges for decorative open-work appearance. | 53 | |
| STRETCH PATCHING[CHSC] | Zigzag | Check Chart on p. 12 | 2~6 | Stretch Stitch Position | 5~6 | Use for patchwork quilting. | 52 | |
| TWO-POINT SHELL STITCHING[99CC] | Zigzag | Check Chart on p. 12 | 3~8 | ~2 | 3~6 | Do shell tucking on blouses and lingerie. This stitch can also be used as a single overlock stitch as well. | 51 |
SECTION 3. LEARN THE STITCHES
Practical Stitch Chart (Continued)
| Stitch | Stitch Selection | Foot and Other Attach. | Needle | Thread Tension | Stitch Length | Stitch Width | Uses | Refer to Page |
| HERRING BONE STRETCH | Zigzag | Check Chart on p. 12 | 2~6 | Stretch Stitch Position | 3~6 | Use as hemming stitch for blankets, tablecloth and draperies. | 53 | |
| STRETCH STITCH DECORATIVE | Zigzag | Check Chart on p. 12 | 2~6 | Stretch Stitch Position | 3~6 | Use in smocking or as a decorative stitch. | 55 | |
| DECORATIVE GEOMETRICS | Satin | Check Chart on p. 12 | 3~8 | 0.5~1 | 3~6 | Decorate garments with one row or several, one stitch or a combination. | 56 | |
| AUTOMATIC BUTTONHOLE | Automatic buttonhole | Check Chart on p. 12 | 2~6 | Zone | 3~6 | Buttonholes: also corded buttonholes. | 43~45 |
SECTION 3. LEARN THE STITCHES
| Stitch | Stitch Selection | Foot and Other Attach. | Needle | Thread Tension | Stitch Length | Stitch Width | Uses | Refer to Page |
| MANUAL BUTTONHOLE |  | Check Chart on p. 12 | 2~6 | Zone | 3~6 | Buttonholes: also corded buttonholes. | 46~47 | |
| SATIN STITCH | Satin 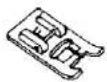 | Check Chart on p. 12 | 3~8 | 0.5~1 | 2~6 | Use for applique work, also as decorative finish for placemats, blankets, collars, cuffs and pockets. | 34 | |
| TWIN NEEDLE STITCHES | 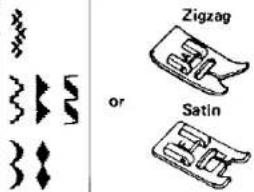 | Twin Needle | 3~7 | Stretch Stitch Position or 0.5~1 | Use for sewing parallel rows of straight or decorative stitches adding an exquisite touch to table linen and clothing.The following are also usable for twin needle stitches. | 57 | ||
SECTION 3. LEARN THE STITCHES
Straight Stitches
- Straight Stitch
text_image
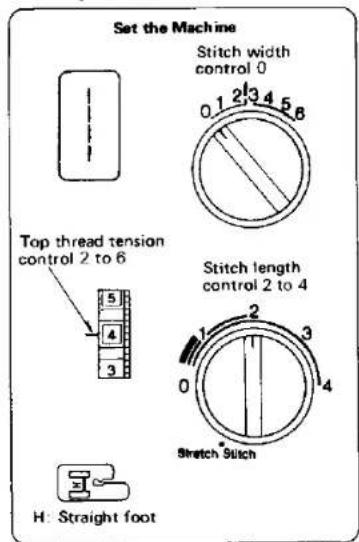
Set the Machine Stitch width control 0 0.1 2/3 4 5.6 Top thread tension control 2 to 6 5 4 3 Stitch length control 2 to 4 1 2 3 0 4 Stretch Stich H: Straight foot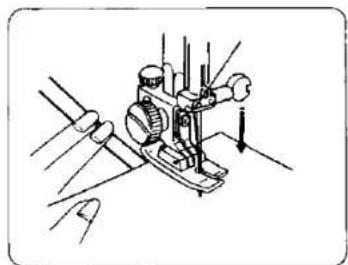
natural_image
Mechanical assembly diagram showing a motor with rotating arms and guide rails (no text or labels)Raise the presser foot and position the fabric next to a stitching guide line on the needle plate.
Lower the needle into the fabric. Lower the presser foot and smooth the threads toward the back. Depress the foot control.
Gently guide the fabric along the guide line letting the fabric feed by itself.
natural_image
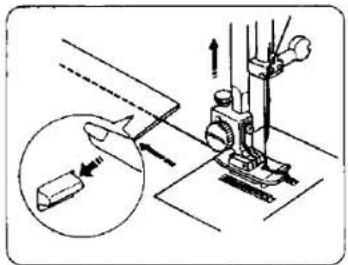
Technical illustration of a sewing machine needle and base assembly (no text or symbols)For fastening the ends of seams, press the reverse stitch lever and sew several reverse stitches.
Raise the presser foot and remove the fabric, drawing the threads to the back.
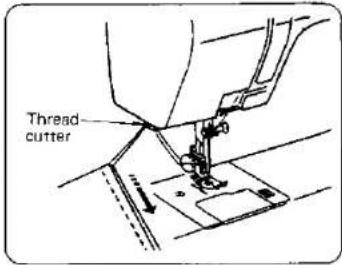
text_image
Thread cutterThe threads are cut the proper length for starting the next seam.
SECTION 3. LEARN THE STITCHES
Changing the Sewing Direction
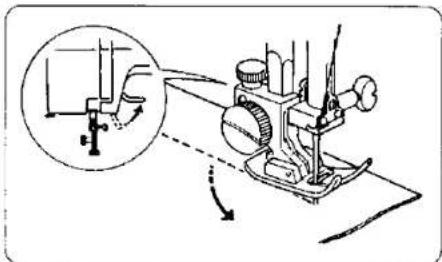
text_image
Technical diagram of a sewing machine with an inset showing mechanical components and directional arrows indicating motion or assembly.Stop the machine and turn the balance wheel toward you to bring the needle down into the fabric.
Raise the presser foot.
Pivot the fabric around the needle to change sewing direction as desired. Lower the presser foot and continue sewing.
SECTION 3. LEARN THE STITCHES
Straight Stitches (Continued)
- Topstitching
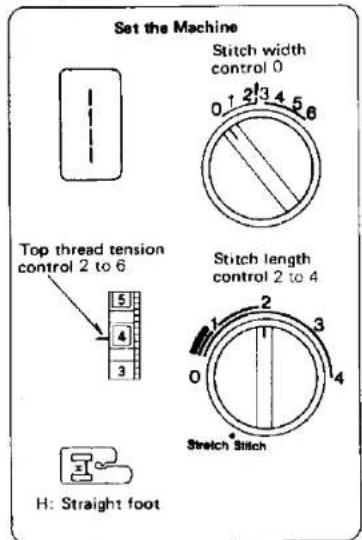
text_image
Set the Machine Stitch width control 0 0.1 2 3 4 5 6 Top thread tension control 2 to 6 5 4 3 H: Straight foot Stitch length control 2 to 4 1 2 3 0 4 Stretch StitchThe Stitch and Its Uses
Topstitching emphasizes the lines of your garment and keeps seams and edges flat and crisp.
Accent suits or blouses with one or two rows of topstitching around the outer edges of cuffs, lapels or collars.
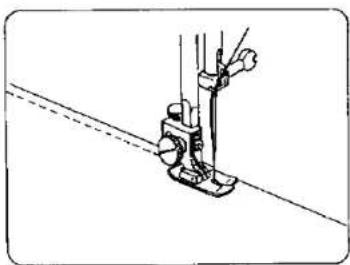
natural_image
Technical line drawing of a mechanical clamp or bracket assembly (no text or symbols)Here's How
- Lower the presser foot.
- Keep the edge of the fabric next to the right edge of the presser foot.
-
Evenly guide the fabric along this edge to produce an even row of topstitching 1 cm from the edge.
-
Dropping the Feed Dogs
text_image
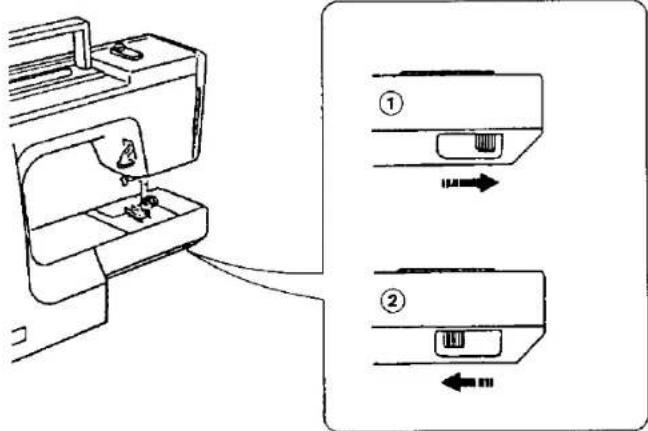
Diagram showing a sewing machine with two labeled parts (① and ②) and directional arrows indicating movement or force.The drop feed lever is located underneath the free arm bed on the back side of the machine.
① To raise the feed dogs, push the lever in the direction of the arrow as illustrated. Then turn the handwheel.
* Feed dogs must always be up for normal sewing.
② For dropping the feed dogs, push the lever in the direction of the arrow as illustrated.
SECTION 3. LEARN THE STITCHES
- Quilting
text_image
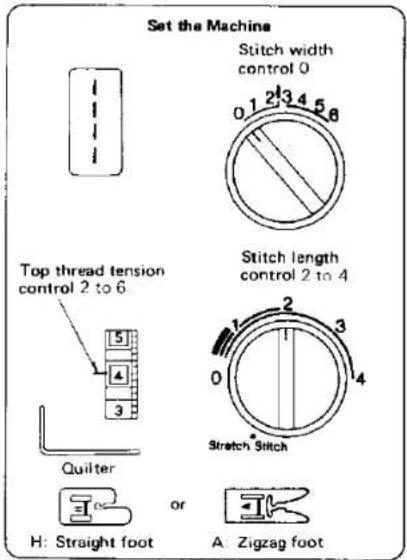
Set the Machine Stitch width control 0 0.1 2 3 4 5 6 0.1 2 3 4 5 6 Top thread tension control 2 to 6 Quilter H: Straight foot or A: Zigzag foot Stitch length control 2 to 4 Stretch StitchThe Stitch and Its Uses
Quilting is stitching two layers of fabric together with batting in between to add dimension and warmth.
Traditionally, quilting has been used for bed covers, but now it is used everywhere.
You can use quilting on entire garments or parts of garments, such as yokes, pockets, cuffs and collars. It is also popular for table fashions. In addition to straight stitch quilting, you can quilt with decorative stitches or stitch pattern combinations.
text_image
Quilter holding screw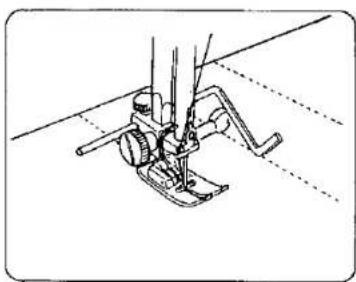
natural_image
Technical line drawing of a sewing machine needle and foot (no text or symbols)Here's How
To do quilting successfully, follow these simple steps:
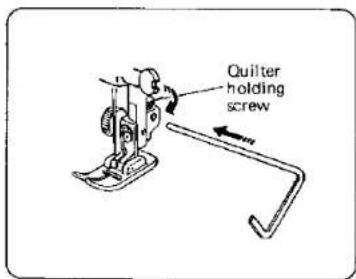
- Loosen the quilter screw on the back of the presser foot as shown.
- Slide the quilting guide into the opening under the screw to the width between lines of quilting stitches you desire.
- Tighten the screw.
- Sew the first row of stitching.
- Sew other rows, guiding the quilting guide over the previous row of stitching.
NOTE: When you are quilting large areas, tack the layers together with the basting stitch. Then quilt from the center out.
Another quilting variation:
Instead of quilting with rows of straight stitches, you can bartack your quilt at regular intervals.
Set up the machine as if you were going to sew a button (see page 37). Position you fabric and bartack.
SECTION 3. LEARN THE STITCHES
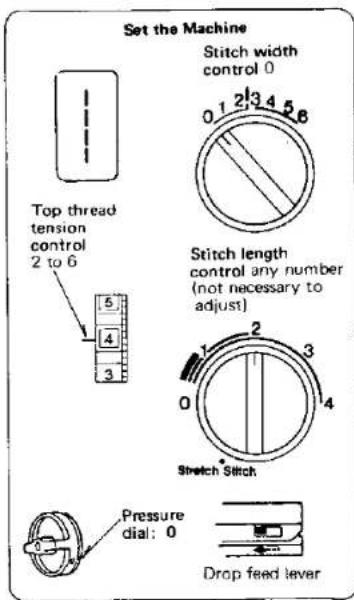
Darning
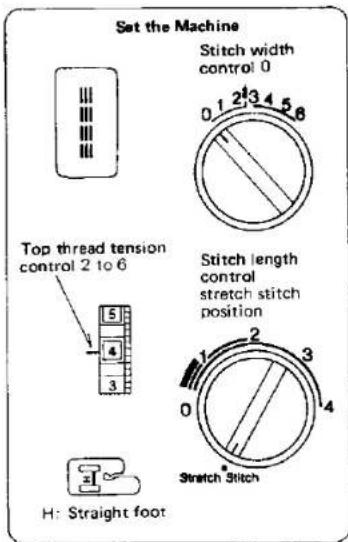
Straight Stretch
text_image
Set the Machine Stitch width control 0 0 1 2 3 4 5 6 Top thread tension control 2 to 6 5 4 3 Stitch length control any number (not necessary to adjust) 1 2 3 0 4 Stretch Stitch Pressure dial: 0 Drop feed lever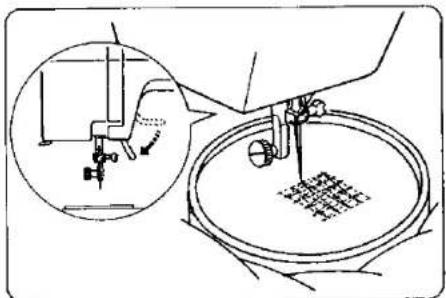
natural_image
Technical illustration of a sewing machine needle stitching a circular base, with an inset showing the mechanism (no text or symbols present)Here's How
- Drop the feed dogs. (see page 30).
- Remove presser foot and foot holder (see page 8), stretch fabric between embroidery hoops with hole centered.
- Draw the bobbin thread up through the fabric by holding the top thread and taking one stitch at the spot where you wish to start darning.
- Lower the presser bar and sew at a slow speed.
- Move the fabric back and forth slowly until you have covered the darning area.
- Turn the fabric half turn and sew another layer of stitching over the first layer.
NOTE: If your fabric is thin or badly damaged, use a separate piece of fabric under the hole to reinforce it. - When you finish darning, remove the darning plate and replace foot holder and foot.
text_image
Set the Machine Stitch width control 0 0 1 2 3 4 5 6 0 1 2 3 4 5 6 Top thread tension control 2 to 6 5 4 3 H: Straight foot Stitch length control stretch stitch position 1 2 3 4 0 Stretch StitchThe Stitch and Its Uses
This stitch is the stretch variation of the straight stitch, especially developed for knits and stretch fabrics.
This stitch can also be used for topstitching on all fabrics.
text_image
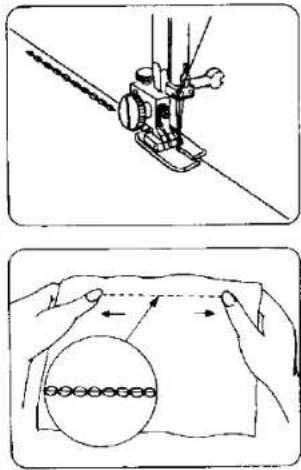
Technical diagram showing two steps of a mechanical assembly: top view with tool and motion, bottom view with magnified circular detail.Stretch stitching was developed to be used on stretch fabrics and knits. It can be used on other fabrics as well. It works well on curved seams and on any garments that will receive a great deal of strain (ie. children's clothes).
The stretch stitch does not actually stretch as it is being sewn, but is stitched in a forward and back motion (sometimes called a "reverse-action" stitch), so that it will give when the fabric stretches instead of breaking.
Zigzag Stitches
- Basic Zigzag
text_image
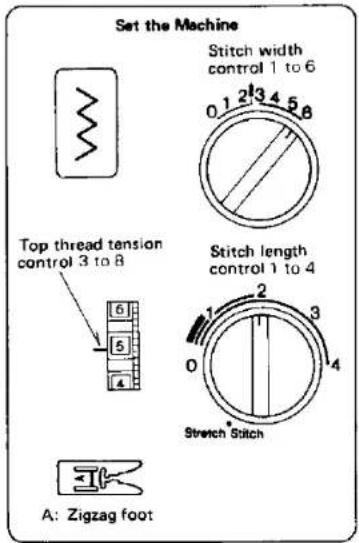
Set the Machine Stitch width control 1 to 6 0.1 2↑3 4 5 6 Top thread tension control 3 to 8 Stitch length control 1 to 4 6 5 4 0 1 2 3 4 Stretch Stitch A: Zigzag footThe Stitch and Its Uses
The zigzag stitch is one of the most common and most versatile stitches on your machine. It can be a utility stitch for sewing buttons, buttonholes, hemming, overcasting, mending and darning. It can also be used to decorate with trims, appliques and cut-out work or as a decorative stitch.
natural_image
Line drawing of a sewing machine needle stitching fabric (no text or symbols)Here's How
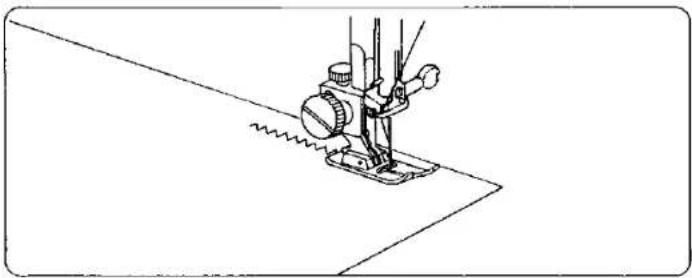
The are many ways to sew a zigzag stitch.
Consult the specific variations for detailed directions.
Satin Stitch page 34.
Applique Work page 35,
Bar Tacking page 35,
Monogramming page 36,
Embroidery page 36,
Button Sewing page 37,
Overcasting page 38.
SECTION 3. LEARN THE STITCHES
Zigzag Stitches (Continued)
- Satin Stitch
text_image
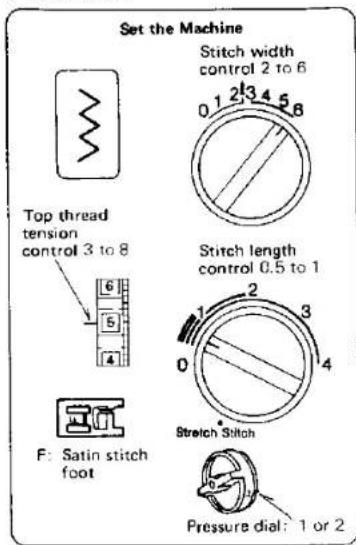
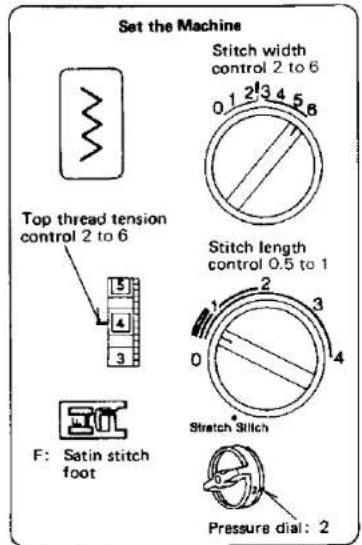
Set the Machine Stitch width control 2 to 6 0 1 2 3 4 5 6 0.5 to 1 Stitch length control 0.5 to 1 1 2 3 0 4 Stretch Stitch F: Satin stitch foot Pressure dial: 1 or 2The Stitch and Its Uses
The Satin stitch is a versatile and often used decorative stitch, but it can also be used to overcast a raw edge (for example, blankets, linens, tablecloths and napkins).
The Satin stitch is especially attractive in applique.
text_image
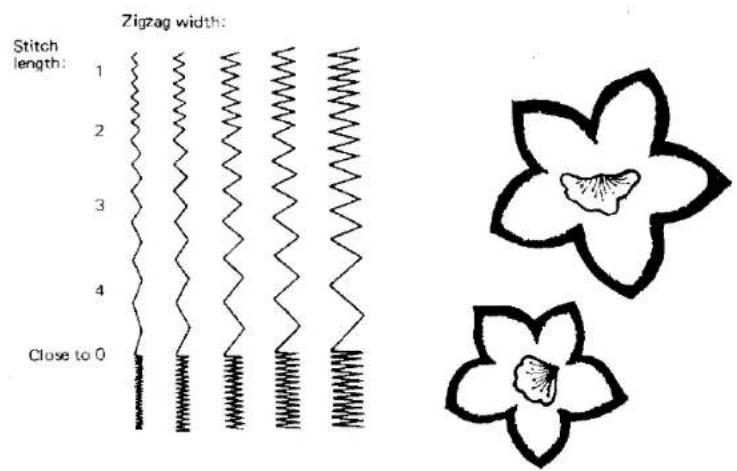
Zigzag width: Stitch length: 1 2 3 4 Close to 0Here's How
Once your machine is set up to stitch, you may want to experiment on a fragment of the fabric you are planning to use. To tight satin stitch may pucker some light weight fabrics.
- Applique
text_image
Set the Machine Stitch width control 2 to 6 0 1 2 3 4 5 6 Top thread tension control 2 to 6 Stitch length control 0.5 to 1 F: Satin stitch foot Stretch Stitch Pressure dial: 2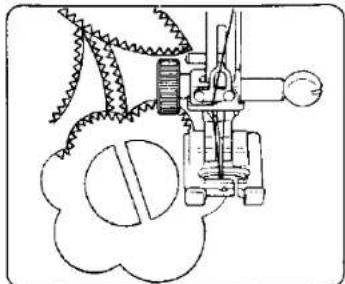
natural_image
Pure mechanical diagram showing a lever and gear assembly without any text, numbers, or symbolsBaste (or fuse with iron-on fabric joiner) applique pieces on the fabric. Stitch around the applique making sure the needle falls along the outer edge of the applique.
When sewing corners, lower the needle down into the fabric. Raise the presser foot and pivot the fabric to the right or left.
- Bar Tacking
text_image
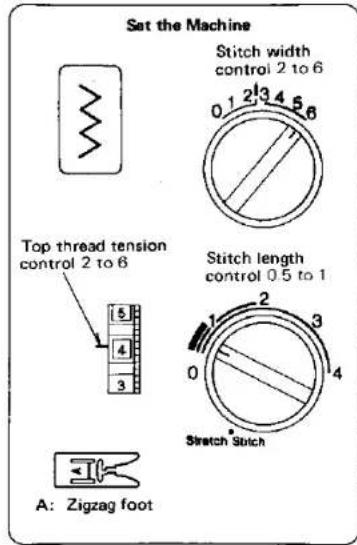
Set the Machine Stitch width control 2 to 6 0 1 2 3 4 5 6 Top thread tension control 2 to 6 5 4 3 A: Zigzag foot Stitch length control 0.5 to 1 1 2 3 4 Stretch Stitch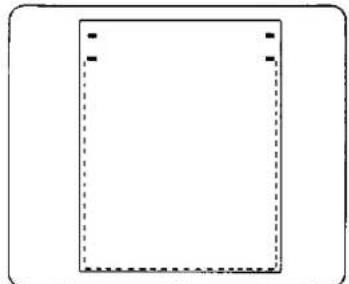
natural_image
Simple geometric diagram with a rectangle and dashed inner lines, no text or symbols present.This stitch is similar to a very short satin stitch and is used to reinforce points of strain such as corners or pockets and straps on lingerie.
Sew 4 to 6 zigzag stitches.
SECTION 3. LEARN THE STITCHES
Zigzag Stitches (Continued)
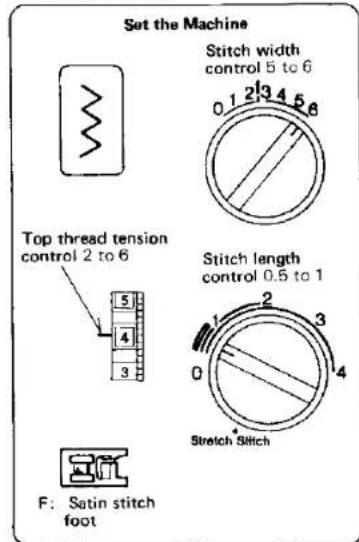
- Monogramming
text_image
Set the Machine Stitch width control 5 to 6 0 1 2 3 4 5 6 Top thread tension control 2 to 6 5 4 3 F: Satin stitch foot Stitch length control 0.5 to 1 1 2 3 4 Stretch Stitch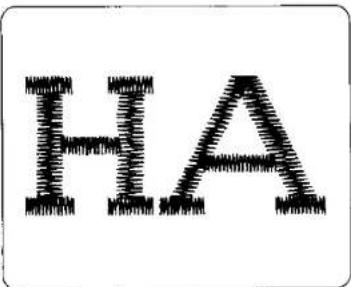
text_image
HAHere's How
- Set the same as satin stitch.
- Back the fabric with paper or interfacing.
- Draw the letters on the fabric with tailor's chalk.
- Satin stitch, adjusting the stitch width as necessary to form each pattern.
- If using paper, carefully remove it when you have finished sewing.
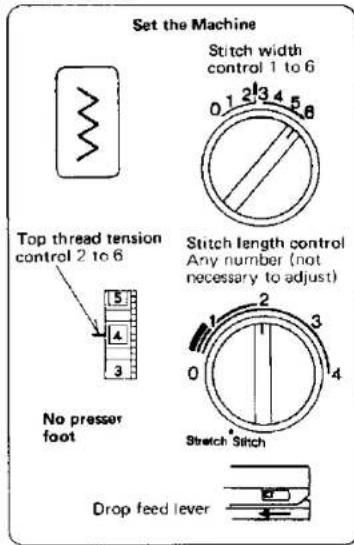
- Embroidery
text_image
Set the Machine Stitch width control 1 to 6 0 1 2 3 4 5 6 Top thread tension control 2 to 6 No presser foot Stitch length control Any number (not necessary to adjust) Stretch Stitch Drop feed lever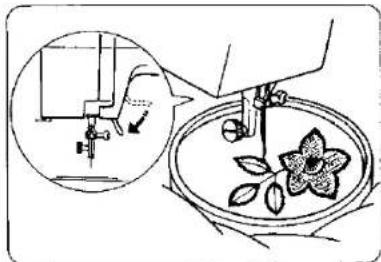
natural_image
Illustration of a sewing machine stitching a flower in a bowl, with an inset showing the same setup (no text or symbols)Here's How
- Drop the feed dogs (see page 30).
- Remove foot holder (see page 8).
- Adjust the stitch width as desired (see page 21).
- Draw the design on to the fabric with tailor's chalk.
- Stretch the fabric between embroidery hoops and place under the needle.
- Lower the presser foot lever to engaged the top thread tension.
- Holding the top thread in your left hand, rotate the hand wheel toward you one complete turn. Pull the top thread to draw the bobbin thread through to the surface of the fabric.
- Using a medium speed, stitch along the marked outline, guiding the fabric carefully by hand.
- Sew a Button
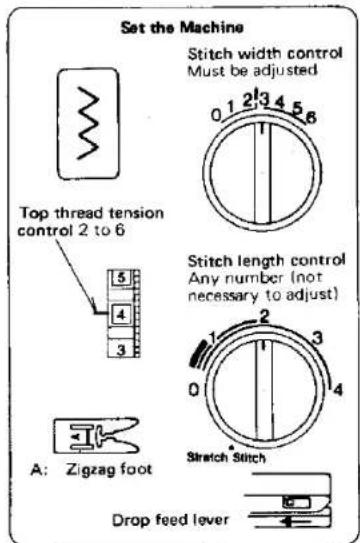
text_image
Set the Machine Stitch width control Must be adjusted 0 1 2 3 4 5 6 Top thread tension control 2 to 6 5 4 3 A: Zigzag foot Stitch length control Any number (not necessary to adjust) 1 2 3 0 4 Stretch Stitch Drop feed lever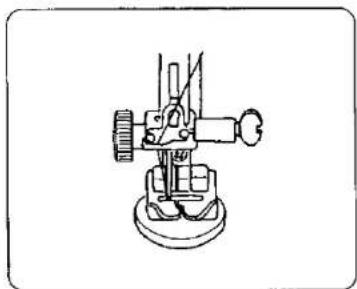
natural_image
Line drawing of a mechanical device with gears and a base (no text or symbols)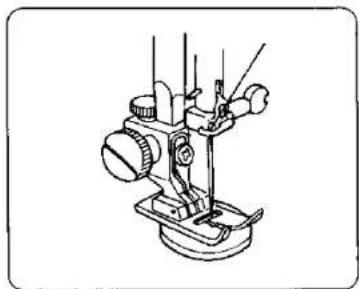
natural_image
Line drawing of a mechanical device with no visible text or symbols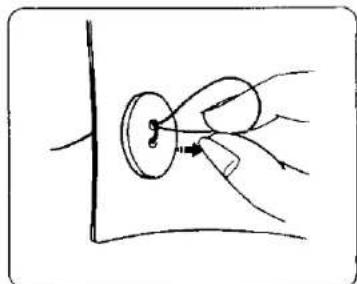
natural_image
Hand holding a small object with a string, pointing at it (no text or symbols visible)Drop the feed dogs (see page 30).
- Match the center of the button holes to the center of the slot on the presser foot.
- Adjust the stitch width so that needle will drop in each hole.
- Lower the foot to hold the button in place.
Turn the hand wheel by hand so that needle will enter either hole of the button. - Stitch several times.
To strengthen the shank, cut the threads leaving a 20 cm tail. Bring the needle thread down through the hole in the button and wind it around the shank.
Draw the thread to the bottom side and knot.
SECTION 3. LEARN THE STITCHES
Zigzag Stitches (Continued)
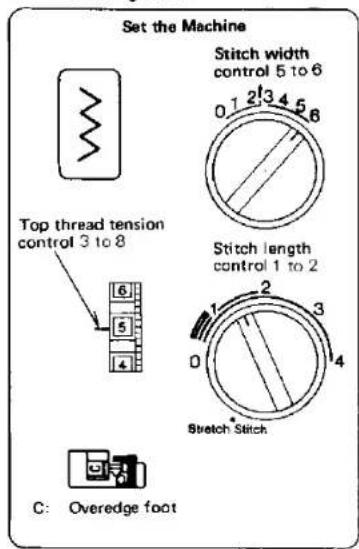
• Overcasting Stitch
text_image
Set the Machine Stitch width control 5 to 6 0 1 2 3 4 5 6 Top thread tension control 3 to 8 Stitch length control 1 to 2 6 5 4 1 2 3 4 0 Stretch Stitch C: Overedge foot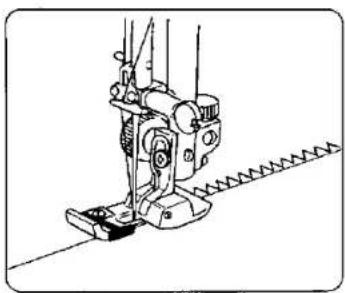
natural_image
Line drawing of a sewing machine needle and chain (no text or symbols)Helpful Hints
Start overcasting about 0.3 cm inside the raw corner of your seam. If you start right at the edge, the fabric will bunch up and the stitches will become tangled.
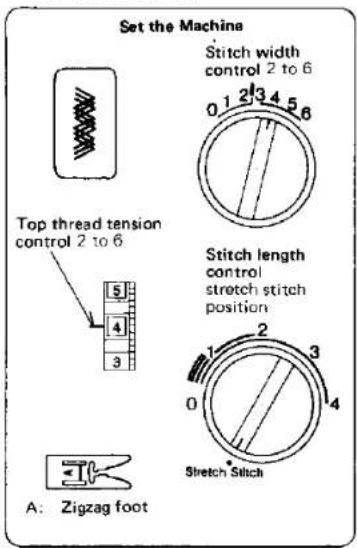
- Rick-Rack Stretch
text_image
Set the Machine Stitch width control 2 to 6 0 1 2 3 4 5 6 Top thread tension control 2 to 6 5 4 3 Stitch length control stretch stitch position 1 2 3 0 4 Stretch Stitch A: Zigzag foot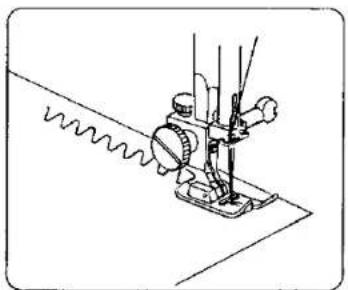
natural_image
Line drawing of a sewing machine needle stitching fabric (no text or symbols)The Stitch and Its Uses
Sew on stretch fabrics in any area that you might use a zigzag stitch.
This stitch can be used as a decorative top stitch as well.
The Stitch and Its Uses
This zigzag variation is very useful in garment construction and in finishing raw edges of any sewing project.
• Three-Step Zigzag
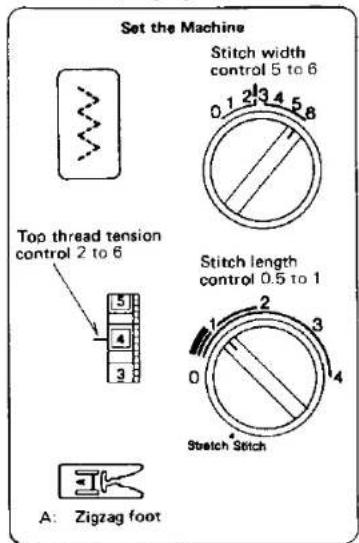
text_image
Set the Machine Stitch width control 5 to 6 0 1 2 3 4 5 6 Top thread tension control 2 to 6 5 4 3 A: Zigzag foot Stitch length control 0.5 to 1 1 2 3 4 0 Sbetch Stitch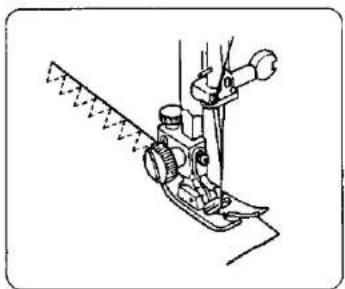
natural_image
Line drawing of a sewing machine needle and foot (no text or symbols)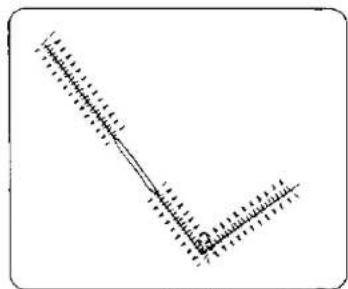
natural_image
Simple line drawing of a right angle with dashed lines indicating direction (no text or symbols)Seam Finishing (Overoasting)
Place the fabric under the presser foot so that the edge will be slightly inside the right hand side of the presser foot.
Guide the work so sthe right-hand stitches fall at the edge of the fabirc.
Mending
Position the tear under the needle so that the stitching will catch both sides.
The Stitch and Its Uses
The three-step zigzag is a combination zigzag and straight stitch. You may use the three-step zigzag everywhere you would use the basic zigzag stitch. It has more strength, elasticity, and is flatter than a regular zigzag.
The three-step zigzag stitch is especially useful for:
- mending
- sewing patches smoothly and securely
- repairing straight tears
- finishing seams
SECTION 3. LEARN THE STITCHES
Stretch Stitches (Continued)
• Overcast Stretch Stitching
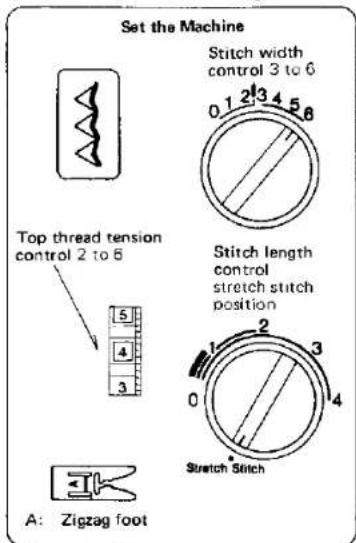
text_image
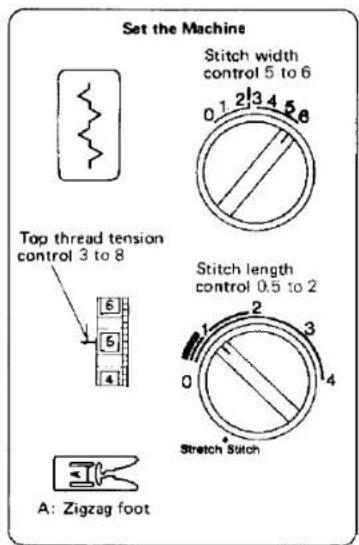
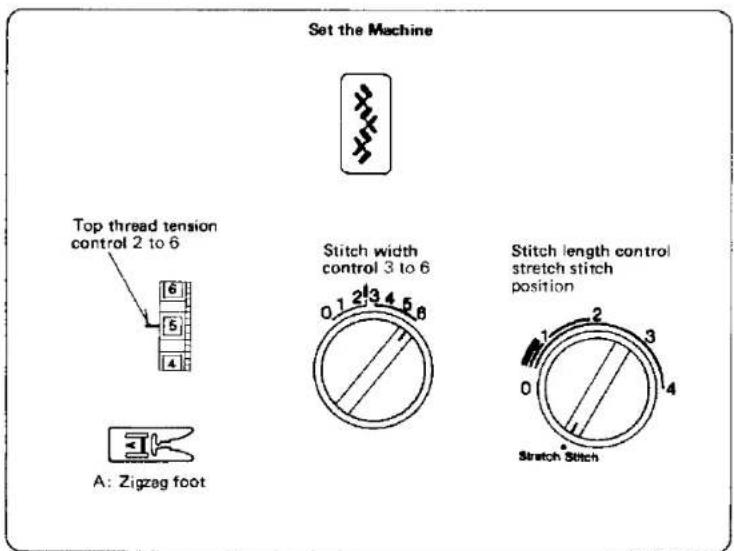
Set the Machine Stitch width control 3 to 6 0.1 2 3 4 5 6 Top thread tension control 2 to 6 Stitch length control stretch stitch position 1 2 3 0 4 Stretch Stitch A: Zigzag footThe Stitch and Its Uses
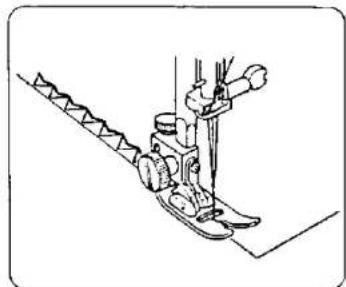
This stitch can be used for sewing a seam with an overcast finish.
The seam is formed and finished in one operation. It can be used when you are making swimwear, ski pants and other garments that require stretch.
natural_image
Line drawing of a sewing machine needle with base mount (no text or symbols)Here's How
Place the raw edge of the fabric to the LEFT of the needle as shown.
Stitch so the needle pierces the fabric just short of the outside edge.
Or, place your fabric to allow a 1.5 cm seam, then trim seam allowance after.
Raw or worn edges of older garments can be overcast to prevent further raveling.
NOTE: Use a blue stretch fabric needle, which effectively prevents skipped stitches.
• Serging or Pine Leaf Stretch Stitching
text_image
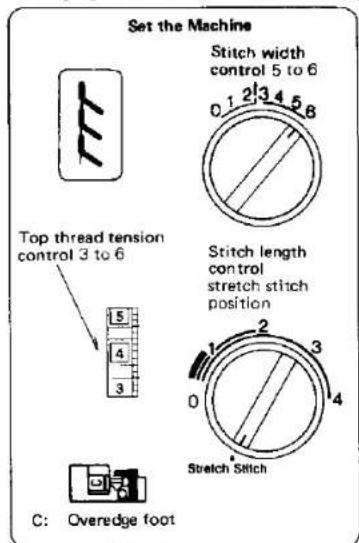
Set the Machine Stitch width control 5 to 6 0.1 2/3 4 5 6 Top thread tension control 3 to 6 Stitch length control stretch stitch position 5 4 3 1 2 3 0 4 Stretch Stitch C: Overedge footThe Stitch and Its Uses
Use this stitch when you want a narrow seam that you do not need to press open flat. It is ideal for 0.6 cm seams on knits or on medium to heavyweight woven fabrics where you want a narrow seam. It is also great for making elastic swim wear.
natural_image
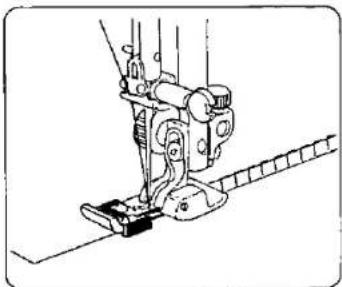
Technical line drawing of a sewing machine mechanism (no text or symbols)Here's How
Place the fabric under the presser foot so that the stitches are made over the edge.
NOTE: When using stretch knit fabric, use a blue stretch fabric needle which effectively prevents skipped stitches.
Blind Hemming
text_image
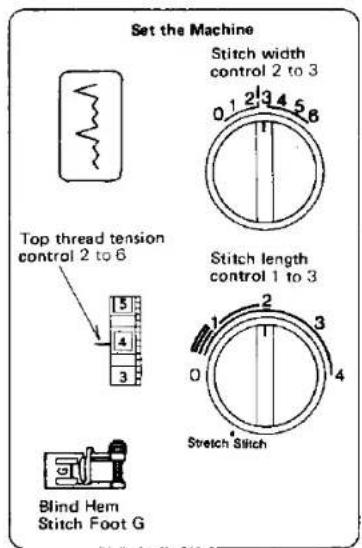
Set the Machine Stitch width control 2 to 3 0 1 2 3 4 5 6 Top thread tension control 2 to 6 Stitch length control 1 to 3 Blind Hem Stitch Foot G Stretch Stitch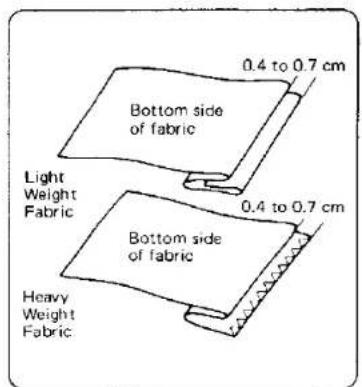
text_image
Bottom side of fabric 0.4 to 0.7 cm Light Weight Fabric 0.4 to 0.7 cm Heavy Weight Fabric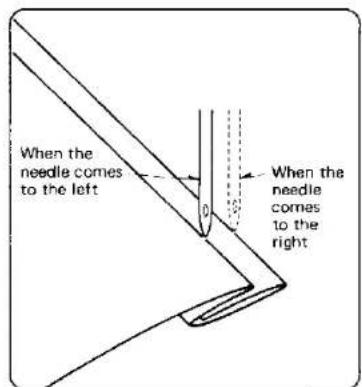
text_image
When the needle comes to the left When the needle comes to the right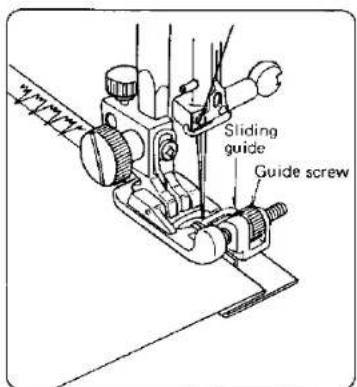
text_image
Sliding guide Guide screw- Finish the raw edge of your hem any way you desire. (see overcasting page 38).
- Measure, turn up your hem and pin.
NOTE: For light weight fabrics, you may need a double fold.
- Fold the material (bottom side out) on the edge to be stitched, as shown, leaving 0.4 to 0.7 cm of the finished hem edge showing.
- Place garment under presser foot in such a manner that straight stitches will be sewn on extended edge. The zigzag stitch should just catch the fold of the garment.
- After hemming, press both sides of the finished hem. The top side of the garment will show only the blind stitches.
SECTION 3. LEARN THE STITCHES
Lace Work
text_image
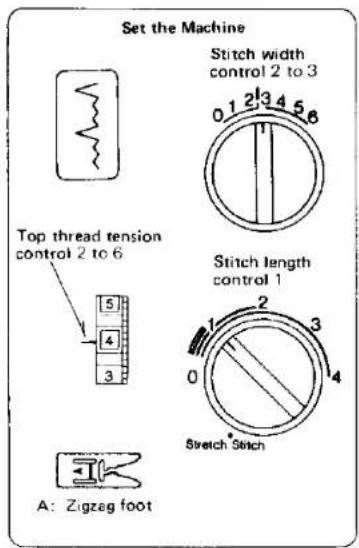
Set the Machine Stitch width control 2 to 3 0 1 2 3 4 5 6 Top thread tension control 2 to 6 1 2 3 4 5 6 3 A: Zigzag foot Stitch length control 1 1 2 3 0 4 Stretch Stitch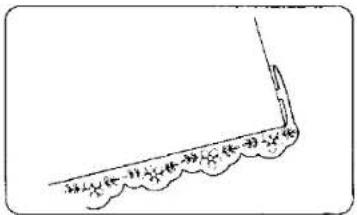
text_image
34.15 34.16 34.17 34.18 34.19 34.20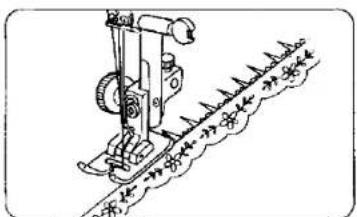
natural_image
Technical line drawing of a sewing machine needle with thread pattern (no text or symbols)Lace adds a fanciful, feminine touch to blouses and lingerie. Table linens and pillows become more elegant when trimmed with lace.
Turn raw edge of fabric under at least 1.5 cm. Place lace underneath and topstitch using stretch blind hem stitch.
Trim excess fabric close to stitching.
SECTION 3. LEARN THE STITCHES
Automatic Buttonhole
text_image
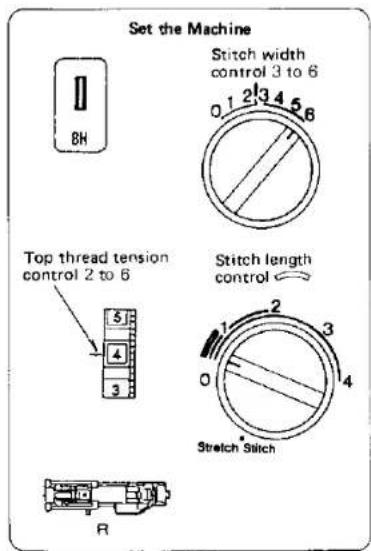
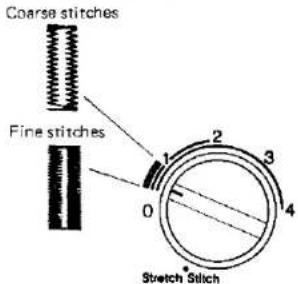
Set the Machine BH Stitch width control 3 to 6 0 1 2 3 4 5 6 Top thread tension control 2 to 6 Stitch length control 5 4 3 1 2 3 4 Stretch Stitch RThe length of buttonhole can be adjusted in the area of ☐.
text_image
Coarse stitches Fine stitches 0 1 2 3 4 Stretch Stitch* The size of buttonhole is automatically set by placing the button in the automatic buttonhole foot (R).
* The button holder of the foot takes a button size up to 2.5 cm (1") in diameter.
* Make a test buttonhole on a sample duplicating the fabric, interfacing and seams of the actual garment.
* Place the button on the fabric sample and mark the top and bottom to determine the position of buttonhole.
* Use the interfacing on the stretch fabrics.
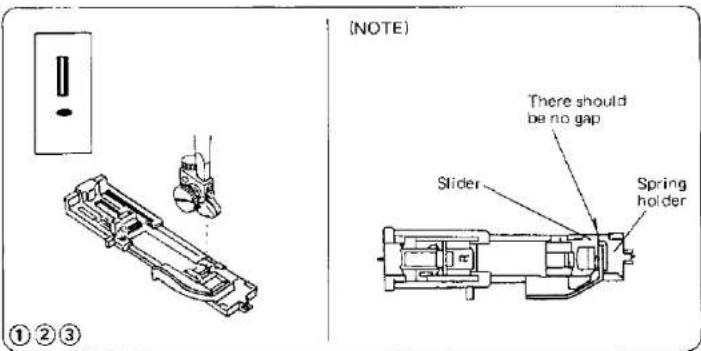
text_image
(NOTE) There should be no gap Slider Spring holder ①②③① Turn the balance wheel toward you to raise the needle to its highest position. Raise the presser foot lifter.
② Set the pattern indicator at "BH" by turning the pattern selector dial.
* If the red indicator is already on at "BH", reset the machine in accordance with the instructions on page 45.
③ Attach the automatic buttonhole foot (R).
NOTE: There should be no gap between the slider and spring holder of the foot as shown above.
SECTION 3. LEARN THE STITCHES
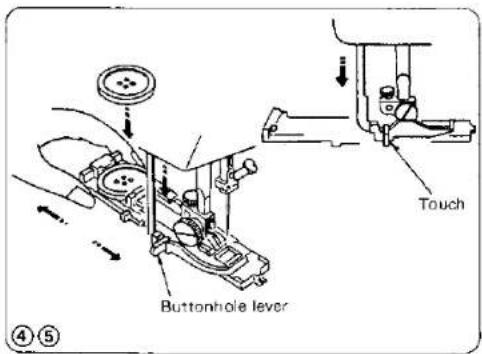
text_image
Buttonhole lever Touch ④⑤④ Pull the button holder to the back, and place the button in it. Push back the button holder toward you as far as it will go.
⑤ Pull the buttonhole lever downward as far as it will go.
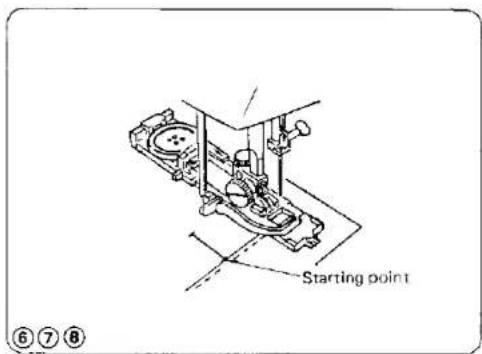
text_image
Starting point ⑥⑦⑧⑥ Insert fabric under the foot. Turn the balance wheel slowly towards you with your right hand until the needle goes down and continue turning balance wheel until the take-up lever is at its highest position.
⑦ Remove the fabric to the left to draw both threads to the left.
⑧ Insert the garment under the foot, and lower the needle at the starting point. Then lower the automatic buttonhole foot.
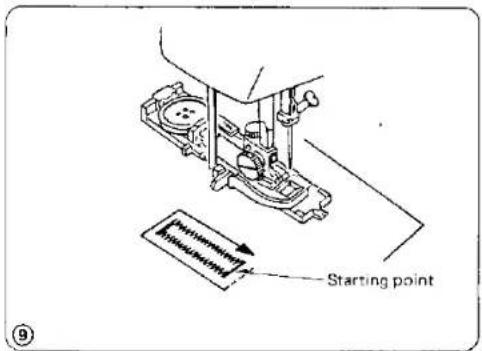
text_image
Starting point⑨ Sew slowly and stop the machine at the starting point when a buttonhole is completed.
* The front bartack and left row first, then the back bartack and right row.
natural_image
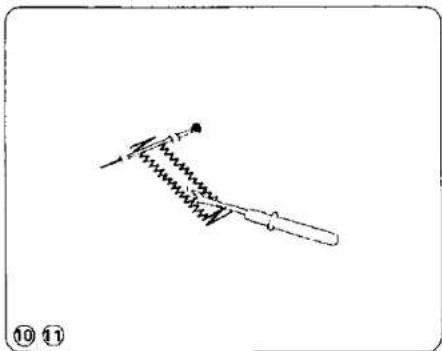
Simple line drawing of a mechanical component or tool with zigzag lines and a handle, no text or symbols present.⑩ Cut the both needle and bobbin threads leaving about 10 cm (4") thread ends. Draw the needle thread to wrong side of fabric by pulling the bobbin thread. Then, knot the threads.
⑪ Insert a pin inside the bartack.
Then cut the opening with a seam ripper.
Take care not to cut the stitches.
text_image
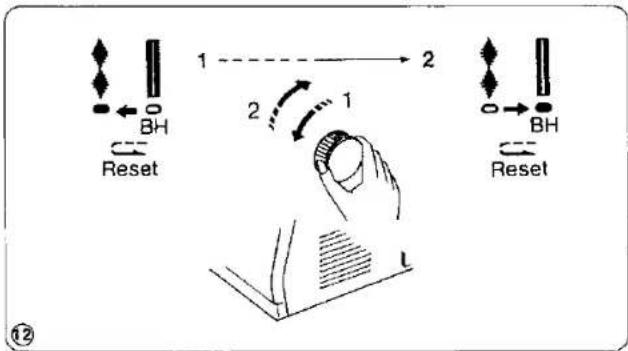
1 2 Reset 1 2 Reset L⑫ To repeat buttonhole sewing. After a buttonhole is sewn, move the indicator to pattern "1" (♦) by turning the pattern selector dial in the direction of arrow 1, then return the indicator back to "BH" by turning the dial in the direction of arrow 2 to reset for sewing the next buttonhole.
natural_image
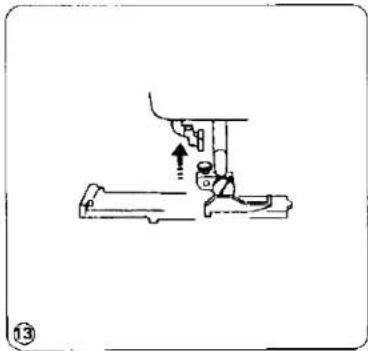
Line drawing of a sewing machine needle and foot assembly (no text or symbols)⑬ When buttonhole sewing is finished, push the buttonhole lever upward as far as it will go.
SECTION 3. LEARN THE STITCHES
Manual Buttonhole
text_image
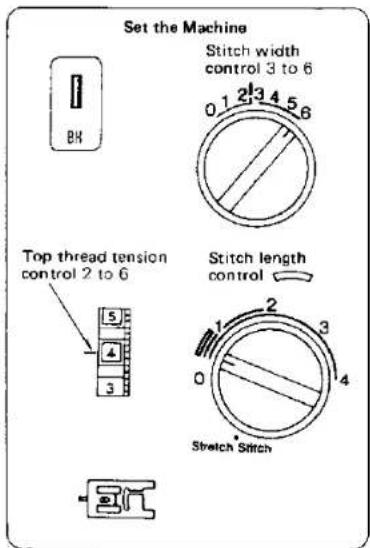
Set the Machine Stitch width control 3 to 6 0 1 2 3 4 5 6 BH Top thread tension control 2 to 6 Stitch length control 1 2 3 0 4 Stretch Stitch* If the diameter of the button is more than 2.5 cm (1"), a buttonhole must be made manually as follows:
text_image
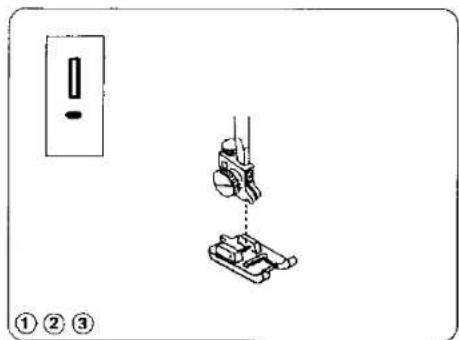
① ② ③① Turn the balance wheel toward you to raise the needle to its highest position. Raise the presser foot lifter.
② Set the pattern indicator at "BH" by turning the pattern selector dial.
* If the red indicator is already on at "BH", reset the machine in accordance with the instructions on page 45.
③ Attach the buttonhole foot (B).
natural_image
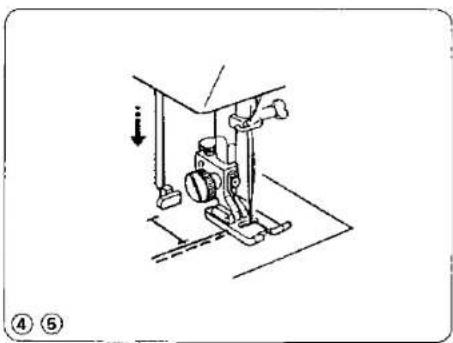
Technical line drawing of a sewing machine with no visible text or symbols④ Pull the buttonhole lever downward as far as it will go.
⑤ Lower the needle into the garment where the buttonhole is to start, and lower the foot.
SECTION 3. LEARN THE STITCHES
text_image
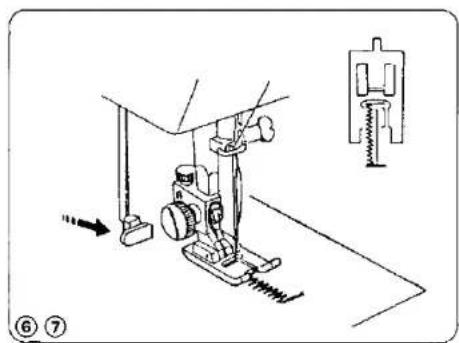
Technical diagram showing sewing machine operation with labeled parts and directional arrows⑥ Sew the front bartack and left row, then stop the machine after sewing the desired total length of buttonhole.
⑦ Pull the buttonhole lever toward you.
text_image
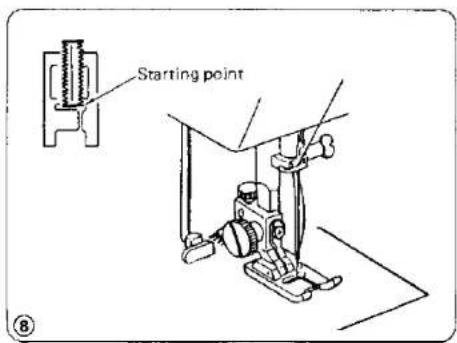
Starting point⑧ Sew the back bartack and right row, then stop the machine at the starting point.
* To cut the opening and to reset for sewing the next buttonhole, refer to the instructions on page.
SECTION 3. LEARN THE STITCHES
Corded Buttonholes
text_image
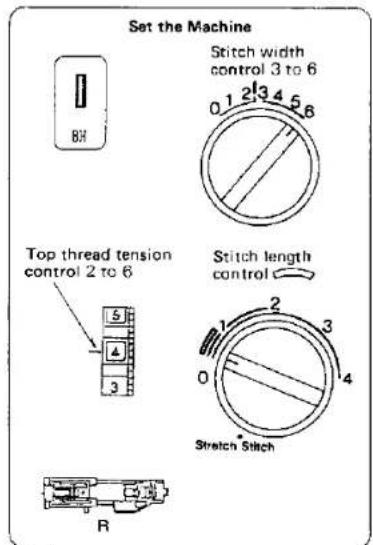
Set the Machine Stitch width control 3 to 6 0.1 2.3 4 5 6 Top thread tension control 2 to 6 Stitch length control 1 2 3 0 4 Stretch Stitch R* Set the stitch width in accordance with the thickness of the cord used.
* To cut the opening and to reset for sewing the next buttonhole, refer to the instructions on page 45.
text_image
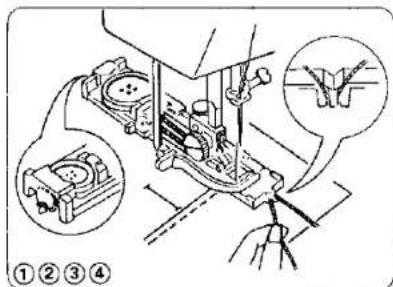
Technical diagram showing mechanical assembly with numbered components and magnified views of a component① With the buttonhole foot raised, hook the filler cord on the cord spur at the back of the buttonhole foot.
② Bring the ends toward you under the buttonhole foot until they clear the front end.
③ Hook the filler cord into the forks on the front of the R foot to hold them tight.
④ Lower the needle into the garment where the buttonhole will start and lower the foot.
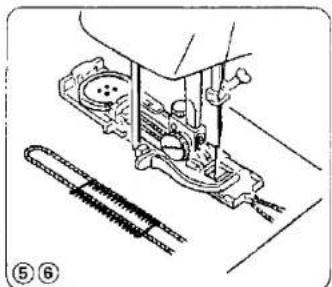
⑤ Sew the buttonhole according to the buttonhole sewing instructions on p. 43 to 47. Each side of the buttonhole and the bartacks will be sewn over the cord.
⑥ Remove the fabric from the machine and cut the sewing threads.
⑦ Pull the left end of the filler cord to tighten it.
⑧ Thread the end through a darning needle, draw to the bottom side of the fabric and cut.
natural_image
Technical line drawing of a sewing machine with threads and gears (no text or symbols)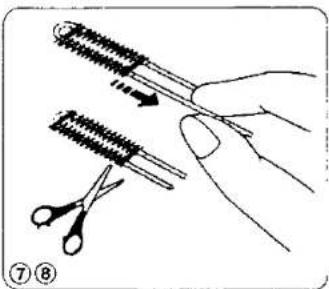
natural_image
Illustration of a hand using scissors to cut a screwdriver, showing the process (no text or symbols)Sew in a Zipper
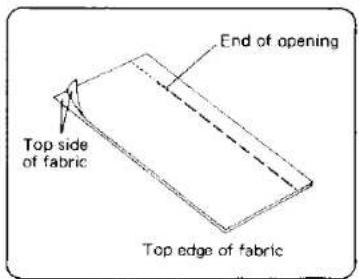
Fabric Preparation:
Put the top sides of the fabric together and sew to the end of the zipper opening. Use the reverse to lock the stitches.
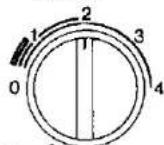
Sew the zipper opening with stitch length at "4" and top thread tension at "3".
text_image
End of opening Top side of fabric Top edge of fabricSet the Machine
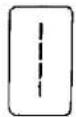
Stitch width control 0
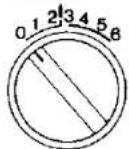
Top thread tension control 2 to 6
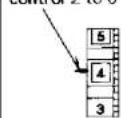
Stitch length control 2

E: Zipper foot
text_image
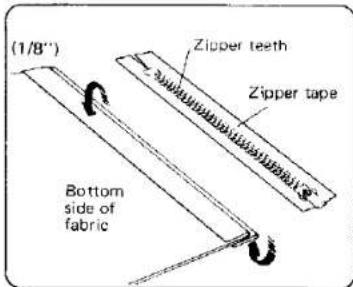
(1/8") Zipper teeth Zipper tape Bottom side of fabricTo Sew:
- Reset stitch length at 2 and top thread tension at 2 to 6. Fold back the left seam allowance as shown.
- Turn under the right seam allowance to form a 0.2 to 0.3 cm fold.
- Place the zipper teeth next to the 0.2 to 0.3 cm fold and pin in place.
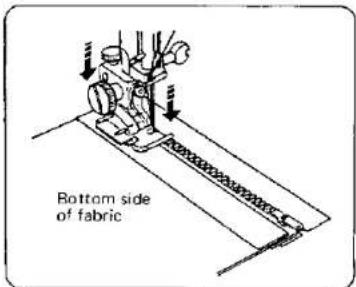
text_image
Bottom side of fabric- Attach the presser bar to the right pins on the zipper foot.
- Lower the zipper foot on the top side at the bottom of the zipper so that the needle pierces the fold and the zipper tape.
- Sew through the fold and the zipper tape to the point where the slider begins.
- Lower the needle to hold the fabric and raise the presser foot.
text_image
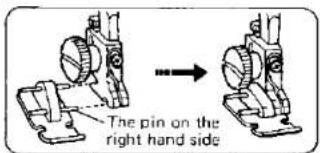
The pin on the right hand sideTo attach the zipper foot:
- To sew on the left side of the zipper, attach the presser bar to the right pins on the zipper foot.
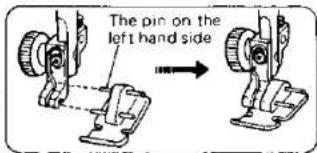
text_image
The pin on the left hand side- To sew on the right side of the zipper, attach the presser bar to the left pins on the zipper foot.
SECTION 3. LEARN THE STITCHES
Sew in a Zipper (Continued)
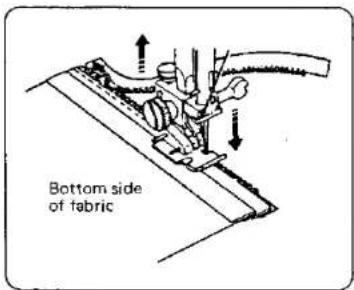
text_image
Bottom side of fabric- Open the zipper.
- Lower the presser foot and stitch the rest of the seam.
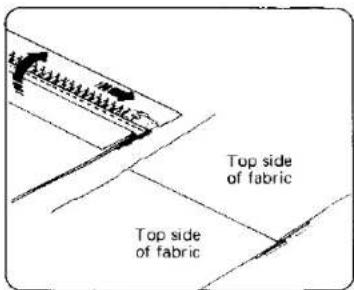
text_image
Top side of fabric Top side of fabric- Close the zipper and turn the fabric top side up.
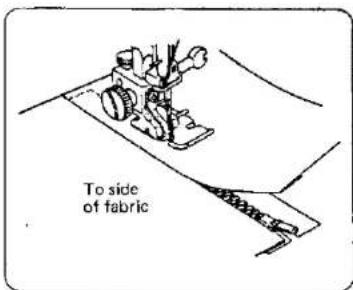
text_image
To side of fabric- Remove the zipper foot and attach the presser bar to the left pins on the zipper foot.
- Stitch across and below the bottom of the zipper.
- Turn the corner and continue to guide the foot along the zipper teeth, as shown.
Stitch through the fabric and zipper tape.
text_image
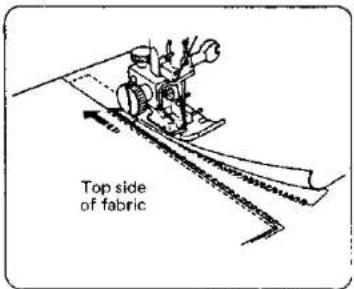
Top side of fabric- Stop about 5 cm from the top of the zipper.
- Lower the needle into the fabric and raise the presser foot.
- Remove the basting stitches and open the zipper.
- Lower the foot and stitch the rest of the seam. Make sure the fold is even.
Shell Stitching
text_image
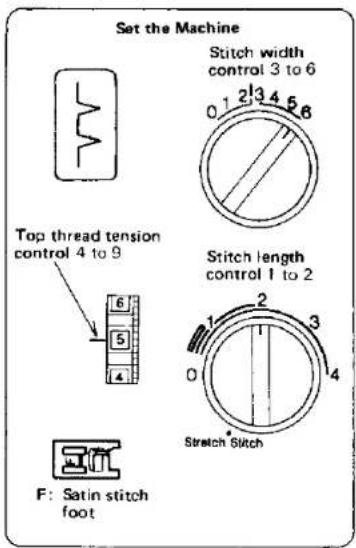
Set the Machine Stitch width control 3 to 6 0.1 2/3 4 5 6 Top thread tension control 4 to 9 6 5 4 Stitch length control 1 to 2 1 2 3 0 4 Stretch Stitch F: Satin stitch footThe Stitch and Its Uses
The Shell Stitch is formed by sewing a blind hem over folded fabric. Several rows of shell stitching are called shell tucks.
Shell stitching can be used to finish hems, sleeve and neck openings.
Shell tucking can be used to create scalloped tucks on blouses and lingerie.
natural_image
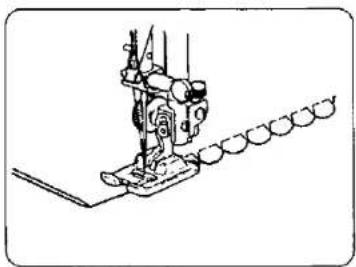
Line drawing of a sewing machine needle stitching a chain of circular objects (no text or symbols)Here's How
- For best effect:
— set the stitch length as you desire.
— you may need to tighten the top thread tension slightly.
... allow the needle to just clear the folded edge of the fabric when it zigzags.
- If you sew rows of shell stitches, space the rows 1.5 cm apart.
You can sew Shell Stitch on knits or soft silky wovens in any direction.
Two-Point Shell Stitching
text_image
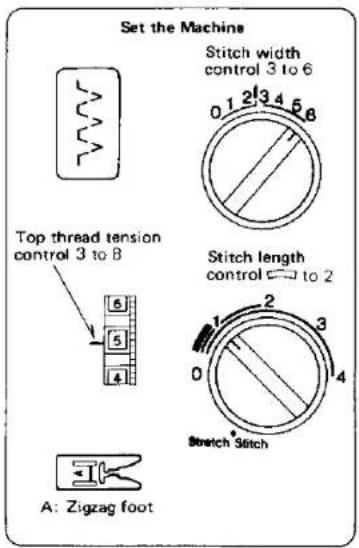
Set the Machine Stitch width control 3 to 6 0 1 2 3 4 5 6 8 Top thread tension control 3 to 8 6 5 4 A: Zigzag foot Stitch length control → to 2 1 2 3 0 4 Stretch Stitch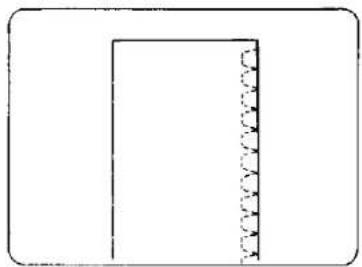
natural_image
Simple line drawing of a rectangular frame with a vertical seam and dotted lines on the right side (no text or symbols)This stitch can also be used as a single overlock stitch as well.
SECTION 3. LEARN THE STITCHES
Smocking
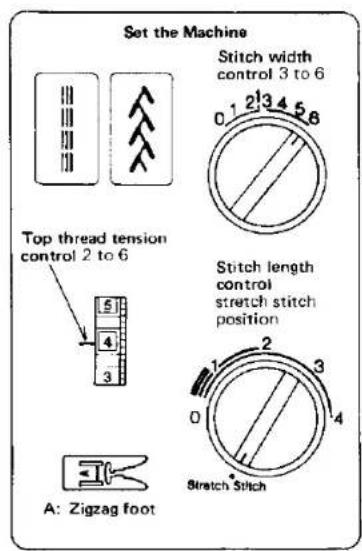
text_image
Set the Machine Stitch width control 3 to 6 0.1 2 3 4 5 6 Top thread tension control 2 to 6 5 4 3 A: Zigzag foot Stitch length control stretch stitch position 1 2 3 0 4 Stretch StitchStretch Patching
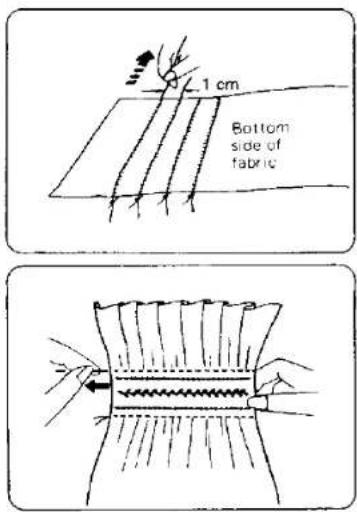
text_image
1 cm Bottom side of fabricWith the stitch length at "4", sew straight stitching lines 1 cm apart across the area to be smocked.
Knot the threads along one edge. Pull the bobbin threads and distribute the gathers evenly. Secure the threads at the other end. Sew the decorative stitch between the gathering stitches. Pull out the gathering stitches.
NOTE: Loosen the top thread tension to make gathering easier.
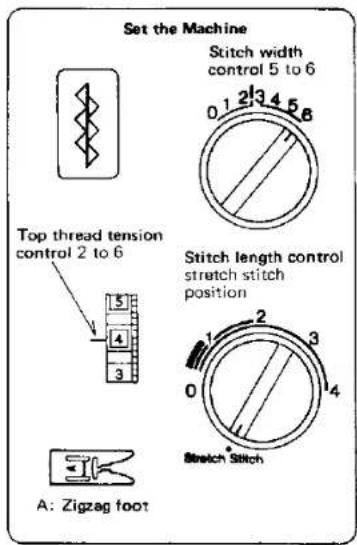
text_image
Set the Machine Stitch width control 5 to 6 0.1 2/3 4 5 6 Top thread tension control 2 to 6 5 4 3 A: Zigzag foot Stitch length control stretch stitch position 1 2 3 0 4 Stretch Stitch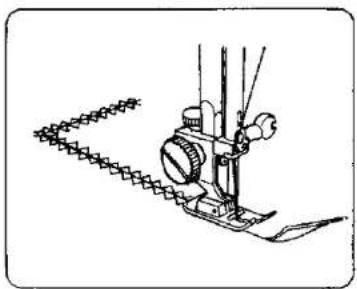
natural_image
Line drawing of a sewing machine needle and chain, no text or symbols presentThe Stitch and Its Uses
For patching worn out elbows or knees.
Fagoting Stitch
text_image
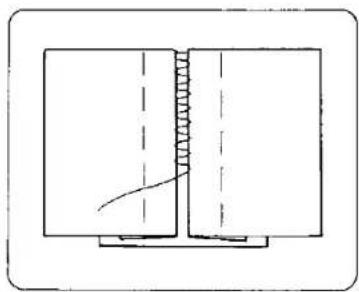
Set the Machine Stitch width control 5 to 6 0.1 2 3 4 5 6 Top thread tension control 3 to 8 6 5 4 A: Zigzag foot Stitch length control 0.5 to 2 1 2 3 4 0 Stretch StitchThe Stitch and Its Uses
Use this stitch to join two pieces of fabric to create an open work appearance and add design interest.
natural_image
Pure technical diagram showing a mechanical joint or connection with dashed centerlines and curved internal lines (no text or symbols)Here's How
- Fold under each fabric edge 1.5 cm and press.
- Pin the two edges to paper or tear-away backing 0.2 to 0.3 cm apart.
- Sew slowly, guiding the fabric so the needle catches the folded edge on each side.
Herring Bone Stretch
text_image
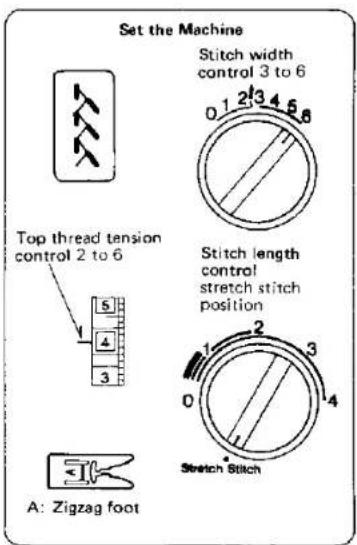
Set the Machine Stitch width control 3 to 6 0.1 2/3 4 5 6 Top thread tension control 2 to 6 Stitch length control stretch stitch position A: Zigzag foot Stretch StitchThe Stitch and Its Uses
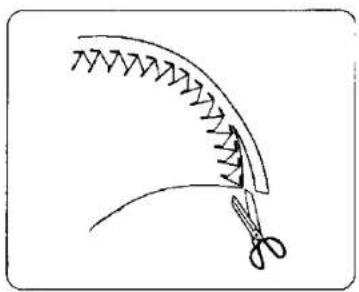
Use as hemming stitch for blankets, tablecloth and draperies.
natural_image
Simple line drawing of a sewing machine needle with scissors (no text or symbols)Here's How
Place the fabric top side up, and sew 1 cm from the edge.
Trim close to stitching. The stitch will prevent raveling.
SECTION 3. LEARN THE STITCHES
Elastic Stretch Stitch
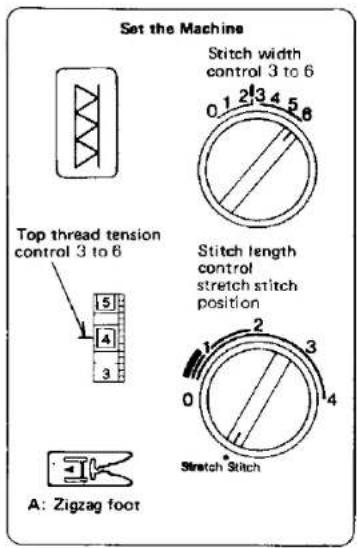
text_image
Set the Machine Stitch width control 3 to 6 0.1 2 3 4 5 6 Top thread tension control 3 to 6 Stitch length control stretch stitch position A: Zigzag foot Stretch Stitch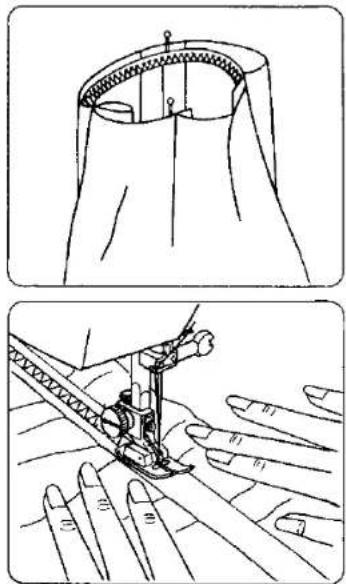
natural_image
Technical line drawing of a sewing machine stitching fabric, showing front and side views (no text or symbols)Choose this stitch to attach elastic to garments.
- Mark the elastic into quarters and match these to the center front, center back and side seams.
- Place the middle of the elastic under the center of the presser foot and stitch into place, making sure the elastic is evenly distributed.
Box Stitching
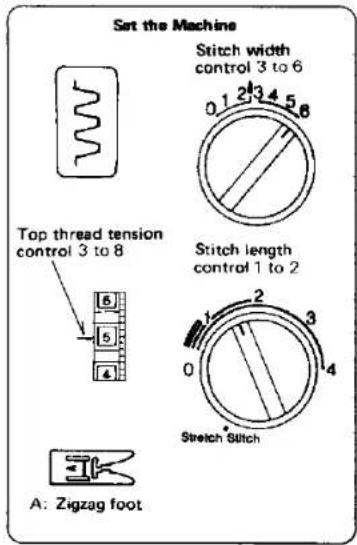
text_image
Set the Machine Stitch width control 3 to 6 0.1 2 3 4 5 6 Top thread tension control 3 to 8 Stitch length control 1 to 2 A: Zigzag foot Stretch Stitch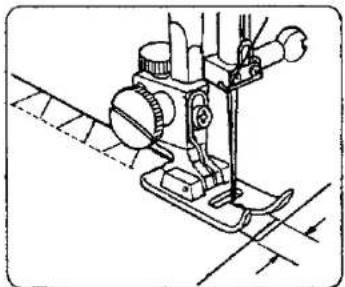
natural_image
Technical line drawing of a sewing machine needle and foot (no text or symbols)Use this stitch to join heavy weight interlining.
Overlap two raw edges together and use this stitch to join them.
Decorative Stretch Patterns
text_image
Set the Machine Top thread tension control 2 to 6 6 5 4 A: Zigzag foot Stitch width control 3 to 6 0.1 2/3 4 5.8 Stitch length control stretch stitch position 1 2 3 0 4 Stretch Stitch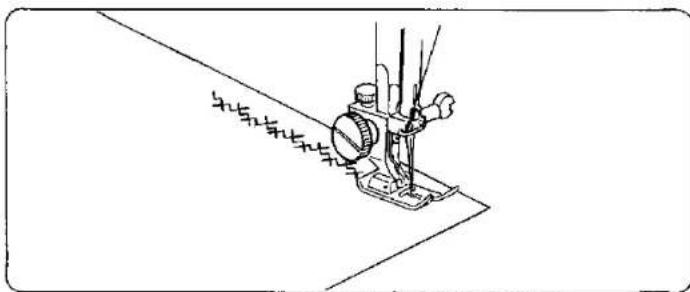
natural_image
Line drawing of a sewing machine needle stitching fabric (no text or symbols)The Stitch and Its Uses
Decorative stretch patterns can be used for adding creative and personalised touch to the items you sew for your home and family.
You can decorate children's clothes, women's blouses, curtains, etc.
SECTION 3. LEARN THE STITCHES
Decorate with Geometric Patterns
text_image
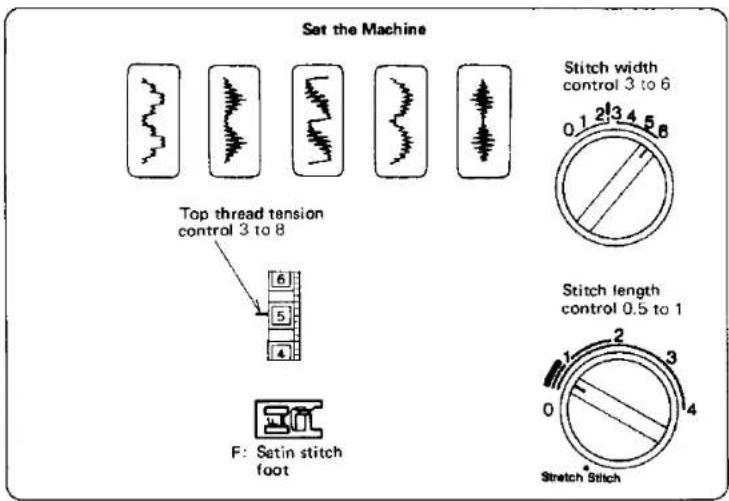
Set the Machine Top thread tension control 3 to 8 6 5 4 F: Setin stitch foot Stitch width control 3 to 6 0.1 2 3 4 5 6 Stitch length control 0.5 to 1 1 2 3 0 4 Stretch StitchThe Stitches and Their Uses
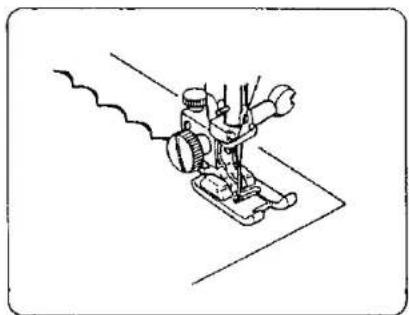
These stitches are purely decorative.
You can sew one row or several or vary the stitch width and length for special effects.
Experiment on a scrap of fabric to see what special effects are possible.
natural_image
Line drawing of a sewing machine on a cutting board (no text or symbols)Here's How
- Adjust the stitch width and length as you desire.
- Practice the stitch on a scrap of fabric.
- Mark the lines for decoration on the fabric, using a washable fabric marker.
- Lower the needle at the starting point.
- Lower the presser foot.
- Gently guide the fabric along the maked line.
SECTION 3. LEARN THE STITCHES
Twin Needle Stitching
text_image
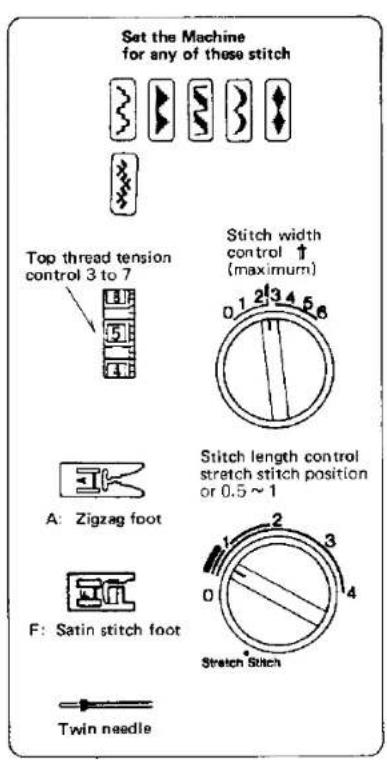
Set the Machine for any of these stitch Top thread tension control 3 to 7 Stitch width control ↑ (maximum) 0.1 2 3 4 5 6 A: Zigzag foot F: Satin stitch foot Stitch length control stretch stitch position or 0.5 ~ 1 0 1 2 3 4 Stretch Stitch Twin needle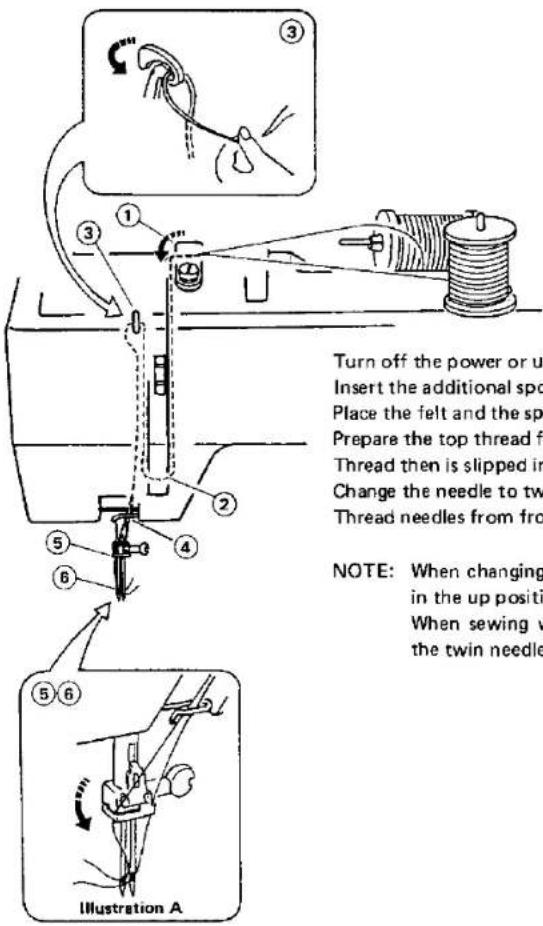
text_image
Turn off the power or up Insert the additional spot Place the felt and the spot Prepare the top thread for Thread then is slipped in Change the needle to two Thread needles from fro NOTE: When changing in the up position When sewing v the twin needle Illustration ATurn off the power or unplug the machine.
Insert the additional spool pin in the hole. (see page 13).
Place the felt and the spool on the additional spool pin. (see page 13). Prepare the top thread for additional spool pin. (see page 16).
Thread then is slipped into needle bar thread guides as illustration A. Change the needle to twin needle. (see page 12). Thread needles from front to back.
NOTE: When changing the direction of sewing, turn the hand wheel so needles are in the up position.
When sewing with twin needle do not use a stitch width which goes past the twin needle mark (↑).
SECTION 4. PERFORMANCE PROBLEMS CHART
What to Do When
| PROBLEM | PROBABLE CAUSE | CORRECTION |
| Irregular Stitches | Incorrect size needle.Improper threading.Loose upper thread tension.Pulling fabric.Loose presser foot.Unevenly wound bobbin.Nicks or burrs at hole of needle plate. | Choose correct size needle for thread and fabric.Rethread machine.Tighten upper thread tension.Do not pull fabric; guide it gently.Reset presser foot.Rewind bobbin.Replace needle plate, or polish off burrs completely. |
| Breaking Needle | Pulling fabric.Incorrect size needle.Incorrect setting of needle.Loose presser foot. | Do not pull fabric; guide it gently.Choose correct size needle for thread and fabric.Reset needle.Reset presser foot. |
| Bunching of Thread | Upper and lower threads not drawn back under presser foot before starting seam. | When starting a seam be sure to draw both threads under and back of presser foot about 10 cm and hold until a few stitches are formed. |
| Puckering | Incorrect thread tension.Using two different sizes or kinds of thread.Bent or blunt needle.Loose presser foot.Fabric too sheer or too soft. | Reset thread tension.Upper thread and bobbin thread should be same size and kind.Insert new needle.Reset presser foot.Use underlay or tissue paper. |
SECTION 4. PERFORMANCE PROBLEMS CHART
| PROBLEM | PROBABLE CAUSE | CORRECTION |
| Skipping Stitches | Incorrect size needle.Bent or blunt needle.Incorrect setting of needle.Tight upper thread tension. | Choose correct size needle for thread and fabric.Insert new needle.Reset needle.Loosen upper thread tension. |
| Breaking Upper Thread | Starting to stitch too fast.Improper threading.Tight upper thread tension.Incorrect size needle.Sharp eye in needle.Nicks or burrs at hole of needle plate. | Start to stitch at a medium speed.Rethread machine.Loosen upper thread tension.Choose correct size needle for thread and fabric.Insert new needle.Replace needle plate, or polish off burrs completely. |
| Breaking Bobbin Thread | Improper bobbin threading.Lint in bobbin holder or hook race. | Check bobbin threading.Clean bobbin holder and hook race. |
| Fabric not Moving | Darning plate in place.Stitch Length set at 0.Thread knotted under fabric.Push-pull clutch is disengaged. | Remove darning plate.Adjust Stitch Length Control.Place both threads back under presser foot before beginning to stitch.Push in the clutch. |
| Machine Jamming Knocking Noise | Thread caught in hook race.Lint in bobbin holder or hook race. | Disassemble and clean hook race.Clean bobbin holder and hook race. |
SECTION 5. CARE FOR YOUR MACHINE
Replace the Light Bulb
natural_image
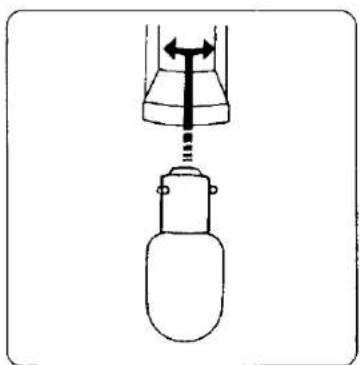
Simple line drawing of a lamp with a handle and base, showing internal components (no text or symbols)- Unplug the machine and open the face cover plate.
CAUTION! The light bulb could be HOT. Protect your fingers when you handle it.
- Push the bulb up and turn the bulb counter-clockwise to remove it.
- Put the new bulb in by pushing it up and turning it clockwise.
Clean the Bobbin Holder
To insure that your machine operates at its best, you need to keep the essential parts clean at all times.
The bobbin area can collect dust and lint. Your machine can become sluggish or knock loudly if a thread is caught.
natural_image
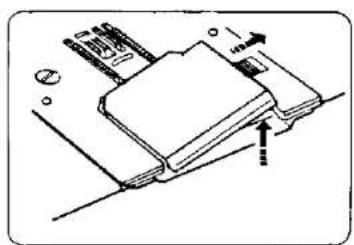
Diagram of a mechanical assembly with arrows indicating motion or force direction (no text or symbols)Follow these directions:
- Turn off the power or unplug the machine.
- Remove the bobbin cover plate by firmly pulling it toward you.
- Remove the bobbin.
natural_image
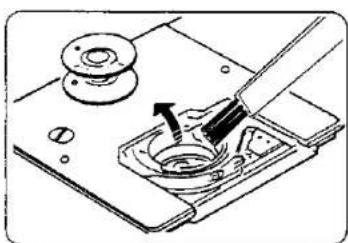
Diagram of a mechanical device with a tool interacting with a bowl (no text or symbols visible)- Brush or vacuum the dust and lint out of the bobbin holder.
- Replace the bobbin.
natural_image
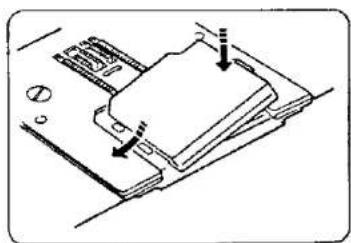
Diagram of a mechanical assembly with arrows indicating motion or force direction (no text or symbols)- Slide on the bobbin cover plate by pushing it into the grooves.
SECTION 5. CARE FOR YOUR MACHINE
Clean the Hook Race and Feed Dogs
natural_image
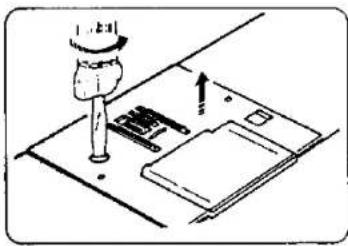
Diagram of a mechanical assembly with a tool and parts on a base plate (no text or symbols)- Unplug the machine and remove the presser foot and needle.
- Remove the bobbin cover plate.
- Remove the screw on the left side of the needle with the large screw driver.
- Remove the needle plate.
natural_image
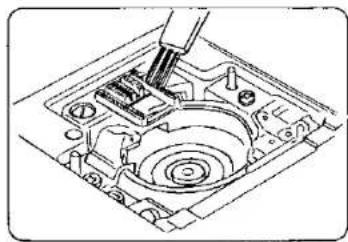
Technical line drawing of a mechanical assembly with no visible text or symbols- Use the ling brush to clean the feed dogs, hook race and bobbin holder. Also use a soft, dry cloth.
natural_image
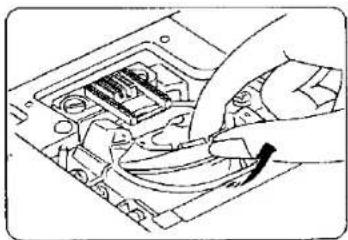
Line drawing of a hand inserting a component into an electronic device (no text or symbols visible)- Take out the bobbin. Lift up the bobbin holder and remove it.
text_image
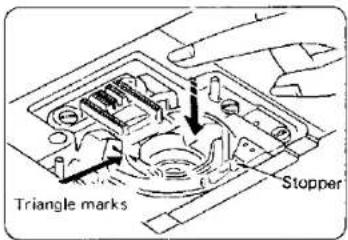
Triangle marks Stopper- Line up the triangle, marks and position the bobbin holder so the notch fits next to the stopper in the hook race.
Oiling the Machine
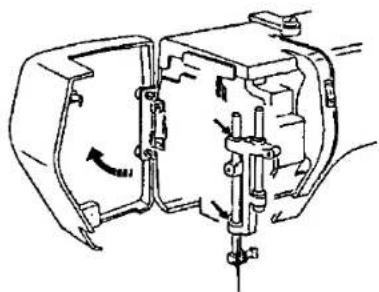
Open face cover plate and oil two points as shown below at least once a year. One or two drops of oil is sufficient.
Remove excess oil, otherwise it may stain fabrics.
natural_image
Technical line drawing of a mechanical assembly with no visible text or symbolsIn case machine is not used for an extended time, oil it before sewing. Use good quality sewing machine oil.
No other oiling is required
Above points are only area which require oiling on this machine.
654-800-209 (E-N)