PKELKN16 - Kniv Nutrichef - Gratis brugsanvisning og manual
Find enhedens vejledning gratis PKELKN16 Nutrichef i PDF-format.

Brugerspørgsmål om PKELKN16 Nutrichef
0 spørgsmål om dette apparat. Besvar dem du kender, eller stil dit eget.
Stil et nyt spørgsmål om dette apparat
Download vejledningen til din Kniv i PDF-format gratis! Find din vejledning PKELKN16 - Nutrichef og tag din elektroniske enhed tilbage i hånden. På denne side er alle dokumenter nødvendige for brugen af din enhed offentliggjort. PKELKN16 af mærket Nutrichef.
BRUGSANVISNING PKELKN16 Nutrichef
nutrichef™
natural_image
Nutrichef electric shaver device mounted on a wooden stand, no visible text or symbols on the device itself.About NutriChef
A mission born out of need
NutriChef was created on the principle that healthy home cooking should be attainable to all, regardless of skill level and economic status. Starting in 2014, we noticed the disconnect in our lives and in the lives of those around us. We were so busy, always rushing forward, and our health and personal lives suffered. We needed to find some way to slow down and put our health first, all without sacrificing convenience or taste. Could we somehow create healthier versions of our favorite foods, easily in our own kitchens? The answer was a resounding yes, and NutriChef was born.
We create products that make life a little easier and a little healthier
Our brand was created out of a desire to provide an alternative to fast food convenience and reintroduce people to home cooking. A healthy home-cooked meal is what brings families and friends together. We believe strongly in the value of simple pleasures. An evening spent cooking and sharing a meal of wholesome, nourishing foods is a memory in the making.
We believe a moment shared is priceless
Today, we have built upon our original mission and now in addition offer products that make the art of entertaining a simpler one. Entertaining and hosting family and friends are one of the great joys of life. Why waste a moment stuck in the kitchen? We offer products that free you up to socialize, while never sacrificing quality or taste.
TABLE OF CONTENTS
FEATURES AND TECHNICAL SPECS 4
IMPORTANT SAFETY INSTRUCTIONS 5
ADDITIONAL SAFETY PRECAUTIONS 6
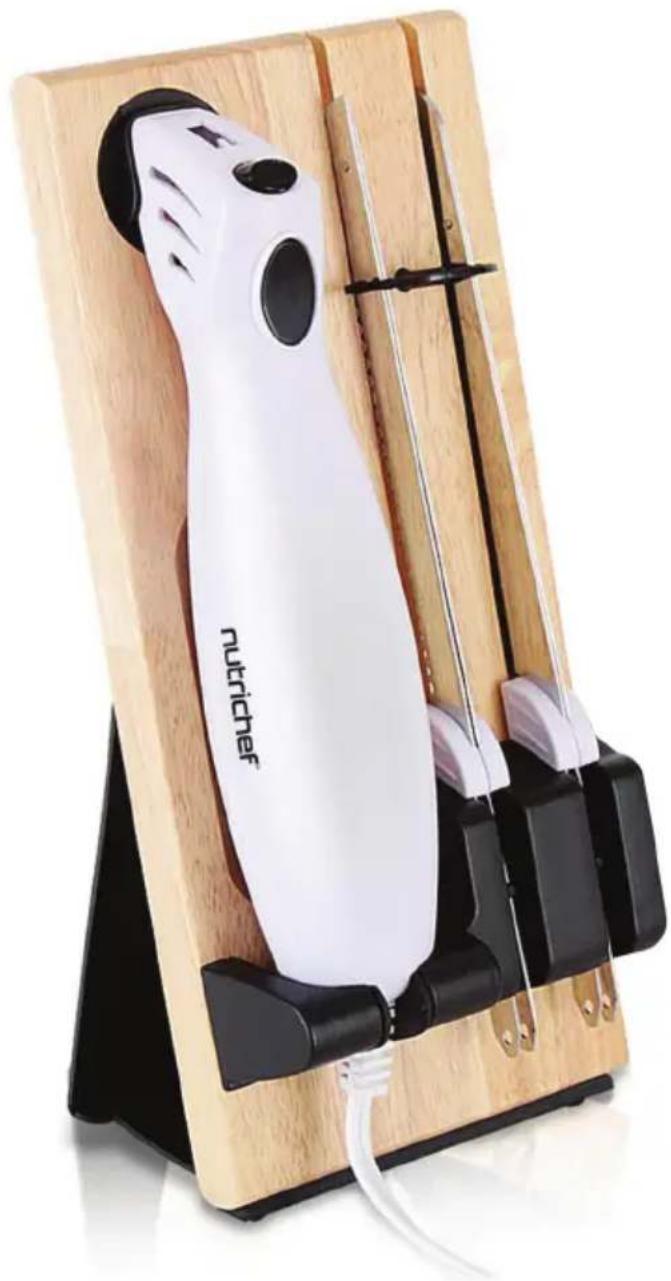
ELECTRIC KNIFE INCLUDES SOLID WOOD STORAGE TRAY 6
BEFORE USE 7
ASSEMBLY OF THE WOOD STAND FOR COUNTERTOP USE 7
REMOVING BLADE FROM WOOD STAND 7
GETTING TO KNOW YOUR ELECTRIC KNIFE 8
HOW TO USE 8
HINTS FOR USE 9
REMOVAL OF BLADES FROM POWER HANDLE 10
INSERTING THE BLADES INTO THE POWER HANDLE 10
CARE, CLEANING, AND STORAGE 11
REGISTER PRODUCT 11
IMPORTANT SAFETY INSTRUCTIONS READ CAREFULLY AND KEEP FOR FUTURE REFERENCE

natural_image
White electric guitar with a textured handle and metal blade, labeled 'nutrichef' (no additional text or symbols visible)Features:
- Plug it In and Slice it Up!
• Electric Kitchen Knife for Carving and Slicing
• Powerful Motorize Knife for the Perfect Slice
• Elegant Wooden Tray for Safe Storage
• Safely Lock Keep Blades in Place - Two Stainless Steel Blades for Meat Carving and Bread Slicing
- Ergonomically Designed Handle for Comfortable Handling
- Comes with Hand Crafted Premium Hardwood Butcher Block
• The Ultimate Carving Tool for Roasts, Turkey and Ham
What's in the Box:
• Electric Knife
• (2) Cutting Blades
- Wood Storage Stand
Technical Specification:
• Power Output: 100 Watt MAX
• Construction Material: 420 Stainless Steel
- Butcher Block Dimension (L x W x H): 5.5" x 3.5" x 12.5" -inches
- Butcher Block Weight: 1.45 lbs.
• Power Cord Length: 3.3' ft.
• Power Supply: 120V
• Woodstand Length: 17.2" -inches
• Total Unit Length: 10.5" -inches (with Blade Inserted)
California Prop 65 Warning
! WARNING:
This product may expose you to chemicals, which is known to the state of California to cause cancer, birth defects and other reproductive harm. Do not ingest.
For more info go to: www.P65warnings.ca.gov
BEFORE USE, PLEASE READ AND FOLLOW ALL SAFETY RULES AND OPERATING INSTRUCTIONS.
IMPORTANT SAFETY INSTRUCTIONS
This product is for household use only. Before using, ensure the voltage of your power source matches the voltage indicated on the appliance rating plate.
Follow basic safety precautions to reduce the risk of personal injury or property damage:
- Read this manual carefully before use.
- To protect against electric shock, never immerse the power handle, cord, or plug in water or any other liquid. Do not operate the knife in or under running water. Unplug the appliance when not in use, during cleaning, and when changing blades.
- Avoid contact with moving parts.
- Do not use the appliance if the cord or plug is damaged.
- Using attachments not recommended by the manufacturer may result in fire, electric shock, or injury.
- Use the appliance only for its intended purposes, such as cutting meats, thick bread, and cheese.
- Do not attempt to slice bones, frozen foods, or other hard items.
- Never apply excessive pressure when slicing.
- Do not use the same blades on raw and cooked meats without thorough washing to prevent contamination.
- Keep the cord away from table or counter edges and hot surfaces.
- Blades are sharp; handle them carefully.
• Always handle & store blades with the cutting edge turned away from you. - Persons with reduced physical, sensory, or mental capabilities, or those with limited experience, may use the appliance if supervised or instructed on safe use.
- Use the appliance only for its intended purpose.
- Keep hands, hair, clothing, and utensils away from moving blades to prevent injury or damage to the appliance.
ADDITIONAL SAFETY PRECAUTIONS
- Do not place heavy objects on the cable or position heat sources close to it.
- Before performing any cleaning or maintenance, unplug the appliance from the power outlet.
- Avoid using aerosol sprays (e.g., insecticides, hairspray) near the appliance, as they may damage the housing.
- Do not connect this appliance to a programmer, timer, remote control system, or any device that can switch it on automatically.
- Avoid using the appliance in damaged power outlets or with damaged cables.
- Do not disconnect the plug by pulling on the cord. Firmly hold the plug when unplugging to prevent electric shock, short circuits, or fire hazards.
- Do not disassemble or repair the unit, as this may cause electric shock or personal injury and will void the warranty.
- Keep the appliance away from flammable objects.
- Do not insert objects into the slots of the appliance.
- Before connecting to a power outlet, ensure the voltage is correct as indicated on the product label and that the installation complies with current regulations.
- Avoid touching the power connection with wet hands.
• Always unplug the unit from the power outlet when unattended and before placing it on the storage rack. - Turn off the appliance before unplugging the power cord.
Electric Knife Includes Solid Wood Storage Tray
The ultimate carving tool for roasts, turkey, and ham. Provides consistent slices with minimal effort. Comes with 2 sets of full-sized serrated blades: a bread blade and a carving blade.

natural_image
White plastic object with black circular eyes and pointed tip, resembling a stylized pen or tool (no text or symbols visible)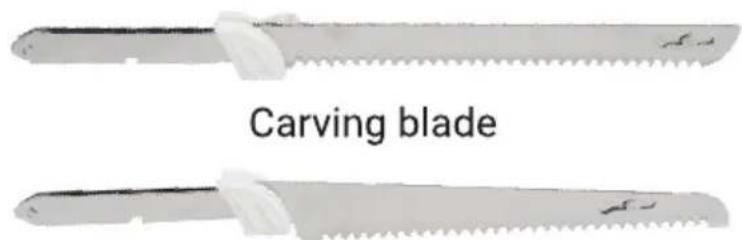
text_image
Carving bladeBread blade
BEFORE USE
Before the first use and after each subsequent use, wash the knife blades in warm, soapy water and dry thoroughly. Blades are sharp; handle with care. Wipe the handle with a damp cloth to clean.
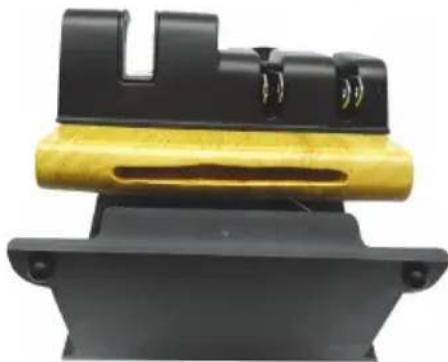
ASSEMBLY OF THE WOOD STAND FOR COUNTERTOP USE
The wood stand can be stored flat inside a drawer or assembled for countertop storage. To set up for countertop use, slide the black tab into the slot underneath the wood stand, and place it on a flat surface.
natural_image
Stacked mechanical components with black and yellow colors, no visible text or symbolsREMOVING BLADE FROM WOOD STAND
Choose the blade you want for slicing meat or cutting bread. While holding the wood stand steady, pull the black tab between the knife blades toward you and twist it left or right into a vertical position, then release.
Remove the desired blade.
Afterward, pull the black tab again and rotate it back to the horizontal position over the remaining blade, ensuring it fits into the tab's slot to secure it in place.

natural_image
White cat-shaped object mounted on a wooden stand with black clips, no visible text or symbolsIMPORTANT NOTES
• Maximum continuous use time is 5 minutes.
- Only handle blades by the plastic guards or the blunt edge. Blades are extremely sharp; keep fingers away from cutting edges.
- Keep plastic sheaths on the blades when not in use.
- Please save these instructions.
GETTING TO KNOW YOUR ELECTRIC KNIFE
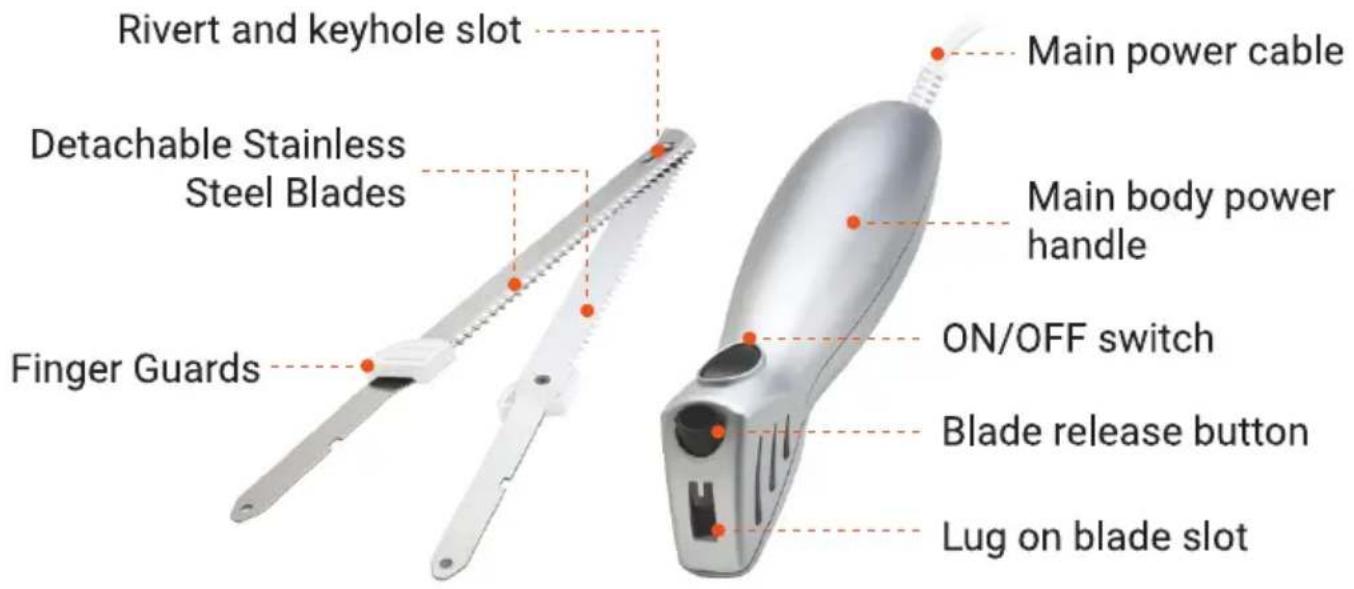
text_image
Rivert and keyhole slot Detachable Stainless Steel Blades Finger Guards Main power cable Main body power handle ON/OFF switch Blade release button Lug on blade slotBLADE ASSEMBLY
Hold the blades by the non-serrated ends with the plastic guards on either side. Ensure that the serrated edges are aligned on the same side. Slide the rivet of one blade into the keyhole slot of the other blade.

text_image
Rivet and keyhole slotHOW TO USE
- Plug the knife into a power outlet.
- Ensure that the food to be carved is secure, for example, with a carving fork.
- Press and hold the ON/OFF switch.
- Guide the blades through the food, keeping body parts, clothing, and utensils away from the moving blades. It is unnecessary to use a sawing motion or excessive pressure.
- To stop the blades, release the ON/OFF button.
NOTE:
This electric knife is designed to cut through "ready-to-roast" joints and can also handle thick bread, cheese, and meats with ease.
If the blade release button is accidentally pressed during operation, the blades will disengage, which may cause the knife to stall or cut improperly. Keep your hand positioned behind the blade release button while operating. Children must not operate this appliance.
HINTS FOR USE
- Carve on a wooden board, as glass or plastic cutting boards may be scratched by the knives.
- Use a carving fork to hold the food securely.
- Before carving cooked meats, allow them to rest for at least 15 minutes after removing them from the oven to let the juices set. This makes slicing easier and results in cleaner cuts.
- Do not cut through hard objects, such as bones or frozen foods, as this may damage or break the blades.
- The carving blade is versatile and can be used for carving turkey, chicken, ham, or roasts, as well as vegetables like eggplants and squashes, and fruits such as pineapples and melons.
- The slicing blade is specifically designed for breads and loaves, ideal for slicing fresh bread, bagels, sandwich buns, meatloaf, and cake loaves like banana bread.
- When carving turkey or chicken thighs, legs, and wings, cut through the joints rather than the bones, pulling at the parts while cutting to loosen the joint.
- For best results when cutting through thick bread, hold the knife at a slight angle while cutting. Once you've cut through the crust, continue slicing with the knife blade parallel to the bread.
- When cutting meat, it is recommended to tilt the meat during the final cutting motion to prevent cutting through the chopping board.
REMOVAL OF BLADES FROM POWER HANDLE
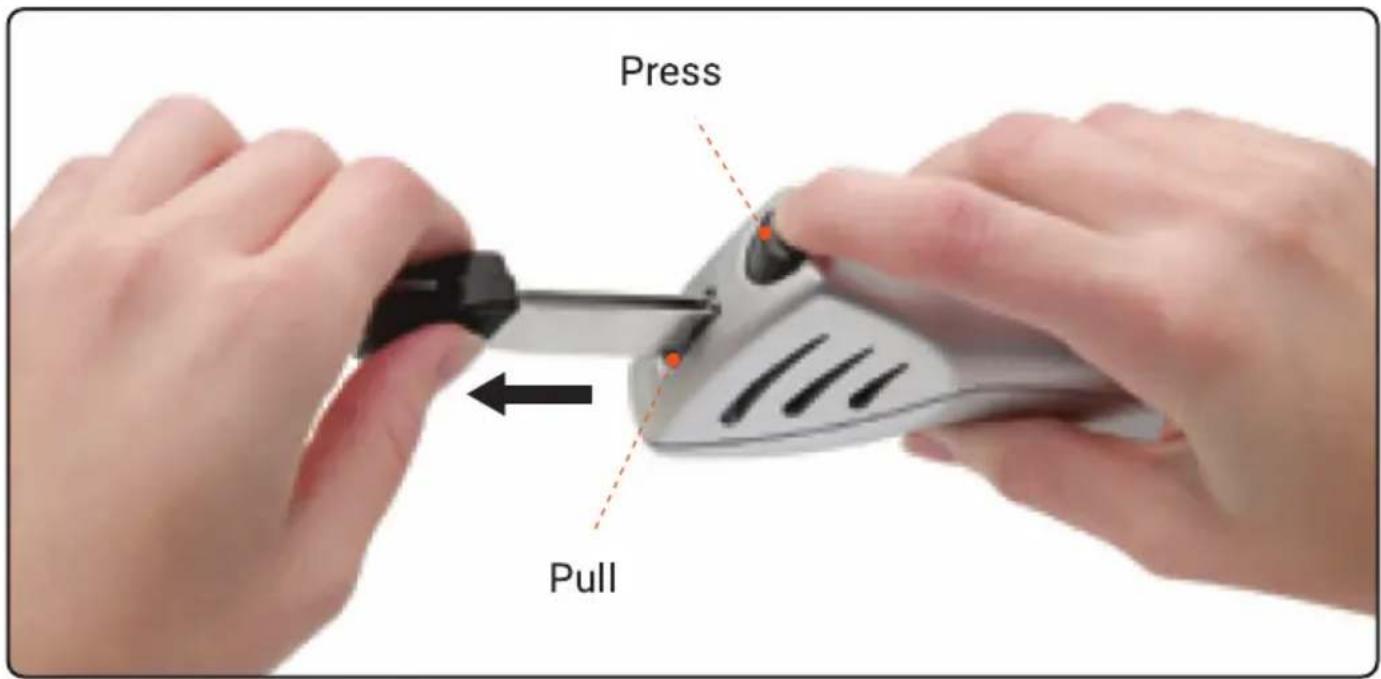
text_image
Press Pull- Unplug the knife.
- Holding the plastic guards, press the blade release button on the power handle body.
- Pull the blades away from the power handle body.
- Separate the blades by sliding the rivet from one blade out of the keyhole slot of the other blade.
INSERTING THE BLADES INTO THE POWER HANDLE
- Ensure the knife is unplugged.
- Hold the assembled blades by the plastic guard in one hand (with serrated edges facing down) and the motor unit in the other hand with the power button in the uppermost position.
- Carefully insert the blades (serrated edges facing down) into the slot on the power handle, with the buttons facing upward, and push gently until they click securely.
NOTE: The blades should be approximately 2 inches (5 cm) apart and positioned on either side of a small lug where they enter the power handle. Take extra care to ensure the blades remain connected at the tip.

text_image
Blade insertion slots LugCARE, CLEANING, AND STORAGE
- Ensure the power outlet is switched off, then unplug the product before removing the blades and/or cleaning.
- Remove the blades.
- Separate the blades by sliding the rivet from one blade out of the keyhole slot of the other blade.
- Carefully wash the blades in warm, soapy water.
- Dry thoroughly and carefully slide the plastic safety sheath over the blades.
- Wipe the power handle with a damp cloth.
Never immerse the power handle in water or any other liquid.
- To store the power cord when not in use:
Once the wood stand is assembled, slide the wires into the space behind the wood stand (within the black plastic area) for safety.
Register Product
Thank you for choosing Nutrichef. By registering your product, you ensure that you receive the full benefits of our exclusive warranty and personalized customer support. Complete the form to access expert support and to keep your Nutrichef purchase in perfect condition.

text_image
Start HereModel Number: PKELKN16
nutrichefkitchen.com/pages/register
nutrichef™

text_image
QR code image containing encoded data, no visible human-readable textQuestions or Comments?
We are here to help!
Phone: 1.718.535.1800
nutrichefkitchen.com/ContactUs