PRJSM1006 - Projektorskærm Pyle - Gratis brugsanvisning og manual
Find enhedens vejledning gratis PRJSM1006 Pyle i PDF-format.


Brugerspørgsmål om PRJSM1006 Pyle
0 spørgsmål om dette apparat. Besvar dem du kender, eller stil dit eget.
Stil et nyt spørgsmål om dette apparat
Download vejledningen til din Projektorskærm i PDF-format gratis! Find din vejledning PRJSM1006 - Pyle og tag din elektroniske enhed tilbage i hånden. På denne side er alle dokumenter nødvendige for brugen af din enhed offentliggjort. PRJSM1006 af mærket Pyle.
BRUGSANVISNING PRJSM1006 Pyle
User Guide
Features:
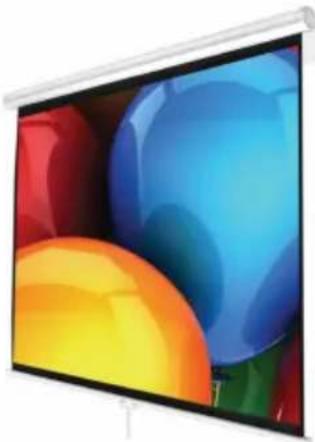
- Matte white projector screen
• Auto-locking roll-down feature - Adjustable screen height – screen can be adjusted and stopped at any point
• Viewing Area Dimensions:
• PRJSM1006: 59.8 in. x 79.9 in.
• PRJSM9406: 50.3 in. x 67.3 in.
• PRJSM7206: 42.5 in. x 56.6 in.
- Projection viewing surface easily pulls down and retracts
- Black masking border for optimal image focus and alignment
- Provides clear and vivid image and video display
- Two top loops that hook onto screws, nails, bolts, etc.
- Easy operation and durable construction
- Designed for ceiling and wall mounting
• Premium matte fabric viewing surface - Simple installation and operation
• Perfect for home or office use - Pull down and project
Installation Instructions
Install the screen in an area that is easily viewable from anywhere in the room. Ensure the position, angle, and location of the screen is correct before installation. Placing it in the right area will help prolong its lifespan. This projector screen can be installed on a wall or ceiling (optional).
California Prop 65 Warning
! WARNING:
This product may expose you to chemicals, which is known to the state of California to cause cancer, birth defects and other reproductive harm. Do not ingest.
For more info go to: www.P65warnings.ca.gov

Questions? Comments?
We are here to help!
Phone: (1) 718-535-1800
PyleUSA.com/ContactUs

Visit Our Website
SCAN ME
PyleUSA.com
natural_image
Large screen displaying a colorful abstract image with no visible text or symbols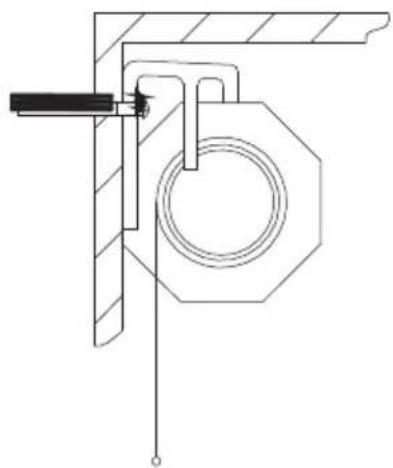
natural_image
Technical line drawing of a mechanical assembly with a hexagonal nut and mounting bracket (no text or symbols)Wall Installation
Place the projector screen on the wall and ensure it is level.
Mark the positions of the two hanging rings with a pencil.
Once the positioning is marked, carefully hammer the nails into the wall at the marked points. Then, hang the projector screen on the nails.
natural_image
Pure technical line drawing of a mechanical lifting or lifting device without any text, numbers, or symbolsCeiling Installation
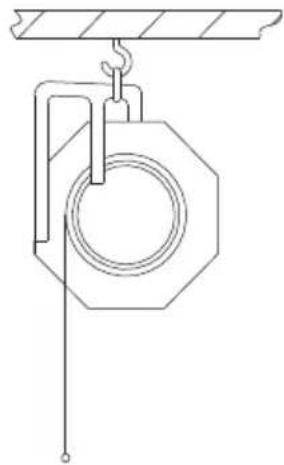
When installing the screen on the ceiling, follow the same steps as the wall installation.
Be sure to check what material you're nailing into and confirm it can support the weight of the projector screen.
Note: Make sure the projector screen is installed with enough vertical clearance so that the entire screen can be pulled down fully. After using the screen, check the fabric for dust or dirt. If needed, clean it gently with a soft brush.
Instructions:
- Open Screen: This projector screen has a self-locking mechanism. Simply pull the screen down to your desired position and release it gently. Once released, the screen will slightly retract upward and lock into place. It is now ready for projection.
- Close Screen: When you're ready to close the screen, slowly pull it down.
You will hear or feel the self-locking mechanism release. While keeping your hand on the screen, gently guide it back into its retracted position.
Register Product
Thank you for choosing PyleUSA. By registering your product, you ensure that you receive the full benefits of our exclusive warranty and personalized customer support. Complete the form to access expert support and to keep your PyleUSA purchase in perfect condition.
Start Here
text_image
QR code image containing encoded data, no visible human-readable textModel Number: PRJSM1006
PRJSM9406
PRJSM7206
PyleUSA.com/pages/register