OP500UK - Multikoger NINJA - Gratis brugsanvisning og manual
Find enhedens vejledning gratis OP500UK NINJA i PDF-format.


Brugerspørgsmål om OP500UK NINJA
0 spørgsmål om dette apparat. Besvar dem du kender, eller stil dit eget.
Stil et nyt spørgsmål om dette apparat
Download vejledningen til din Multikoger i PDF-format gratis! Find din vejledning OP500UK - NINJA og tag din elektroniske enhed tilbage i hånden. På denne side er alle dokumenter nødvendige for brugen af din enhed offentliggjort. OP500UK af mærket NINJA.
BRUGSANVISNING OP500UK NINJA
Meet our most versatile Ninja® Foodi® accessory, the 2 Tier Reversible Rack
Get the most out of your 2 Tier Reversible Rack
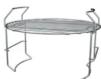
Higher Position
Grill chicken, steak, seafood and more.
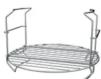
Lower Position
Steam vegetables and sides
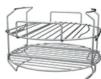
Full Assembly Increase capacity to cook up to 8 chicken breasts or salmon fillets at once.
2 Tier Reversible Rack Assembly

1. Place the Reversible Rack in the pot in the lower position.
Note: For easier cleaning, coat the rack with cooking spray before placing food.
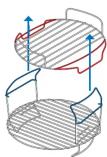
2. Drop top layer through reversible rack handles.
Note: Place ingredients on the lower layer before adding the top layer.

3. Top layer will fit securely into handle slots.
2 Tier Reversible Rack Usage
Create deluxe 360 meals by placing proteins on the top layer, sides on the lower layer, and grains on the bottom of the pot.
For best results, use the top layer for crisping, lower layer for oven roasting, and bottom of the pot for wetter ingredients.
When air crisping 2 layers, allow 5-15 minutes for the lower layer to crisp before adding the top layer.
Basket Assembly, Hints & Tips
Pressure Cooking Tips

selected pressure level, and can take up to 20 minutes.
Natural release is used for large or delicate foods and any starchy ingredients.
Quick release is used for smaller foods or ingredients that are sensitive to overcooking. DO NOT quick release pressure when cooking starchy or foamy foods. To quick release the pressure, turn the Pressure Release Valve to the VENT position and allow pressure to release until the float valve drops
Note: Steam exits from the top of the Pressure Release Valve. DO NOT reach over the valve.

If the unit is not coming to pressure, check that the silicone ring is fully installed by pressing it into place all around the metal ring rack. (See image below.)
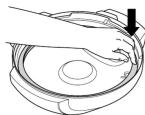
Cook & Crisp™ Basket Assembly

1. Place diffuser on a flat surface.

2. Place basket on diffuser

3. Press down firmly.

To convert oven recipes, use the Bake/Roast function and reduce the cook temperature by 5°C.

Any liquid can be used for pressure cooking. Use broths or sauces instead of water to infuse additional flavour. Always use a minimum of 250ml of liquid. Depending on your recipe, you may need up to 750ml.

When switching from the pressure lid to the crisping lid after pressure cooking, empty the pot of any remaining liquid for best crisping results.
Please make sure to read the enclosed Ninja* Instructions prior to using your unit.
NINJA Foodi MAX
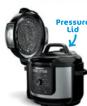
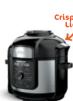
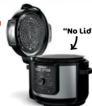
Why are there 2 lids?
We're glad you asked. The 2-lid design allows you to pressure cook and crisp in the same pot.
Use both lids to unlock a world of delicious. TenderCrisp meals
Let's get cooking & crisping
ressure Co
Steam
Slow Cook Yogurt
Air Crisp
Bake/Roas
Grill
Dehydrate
Grill
Dehydrate
First time pressure cooking?
Try this water test to practice using pressure.
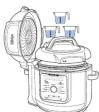
Add 750ml water
to cooking pot.
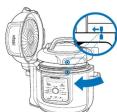
Install Pressure Lid by aligning the arrows on the lid and base, then turning clockwise until lid clicks into place.
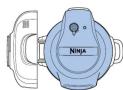
Pressure Lid is locked when it has clicked into place and the Ninja logo is facing you.

Turn Pressure Release Valve to SEAL.
Note: Valve will be loose when fully installed.

Use the START/STOP dial to select PRESSURE. Press TEMP and set to HI. Press TIME and set to 2 minutes. Press START/STOP button to begin.

The display showing PRE and some steam release indicate pressure is building. When fully pressurised, countdown will begin.

When your Foodi® beeps and the display reads DONE, turn valve to VENT for quick release. Note: Valve will be loose when fully installed.
For more accessories, visit ninjakitchen.eu
OPSOUK_QGG_MP_190625_MVIII 2019 SharkNGo to ninjakitchen.eu for how-to-videos
Now, let's get cooking ↗
Using the Control Panel
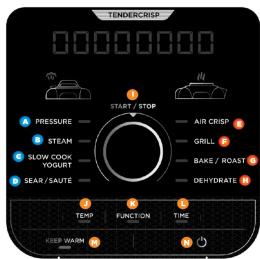
COOKING FUNCTIONS
TENDERISING FUNCTIONS
A B C D
E F G H
• • • •
OPERATING BUTTONS
START/STOP dial/button: Turn the dial to choose a cooking function, cook temperature and cook time. Press the button to start cooking. Pressing the button while the unit is cooking will stop the current cooking function.
J TEMP: Press TEMP and turn the START/STOP dial to adjust cook temperature in 5-degree increments or to adjust pressure level.
K FUNCTION: Press FUNCTION and turn the START/STOP dial to choose a cooking function.
TIME: Press TIME and turn the START/STOP dial to adjust the cook time.
Note: To adjust settings while cooking, press the TEMP or TIME button, then use the START/STOP dial to choose desired temperature or time.
KEEP WARM: After pressure cooking, steaming, or slow cooking, the unit will automatically switch to Keep Warm mode and start counting up. Keep Warm will stay on for 12 hours, or you may press KEEP WARM to turn it off.
N POWER: The Power button turns the unit on and off and stops all cooking functions.

Using the Pressure Lid
PRESSURE


STEAM


Reversible Rack in lower position
Lock Pressure Lid and turn valve
No temp adjustment available
1 minute to 30 minutes
unit will switch to I/FEER/WARM
No pressure release
SLOW COOK
Cook foods
a lower temperature for
ger periods of time
[Non-Text]
ck Pressure Li
HI or LO 4 hour
12 hours
KEEP WARM and
No pressure release
YOGURT
homemade y
urt
m = 311
m = 311
m = 311
[Non-Text]
Vogaz
图
图
Unit will display "BOIL" while
Once cooled, unit will prompt
No lid necessary using Pressure Lim turn valve to VEN


Using the Crisping Lid
TEMP
广力云智慧零售收银系统
TIME
广力云智慧零售收银系统
CHECK
OD
SHAKI
SS
ess and
ch with li
o no oil
m = 311
m = 311
m = 311
m = 311
m = 311
AIR CRISP
Give foods c


BAKE/ROAST


wn food
m = 311
m = 311
m = 311
GRILL Cook at hig
heat to carai
nelise an


vegetabl
m = 311
m = 311
DEHYDRATE
ehydrate me
ts, fruits


2 Tier Reversible Rack with top layer installed
Adjust temp from 30°C to 90°C
4 hours to 12 hours





Mærke : NINJA
Model : OP500UK
Kategori : Multikoger