
Pro HAC-HFW2231RP-Z-IRE6-DP-27135 - Overvågningskamera Dahua Technology - Gratis brugsanvisning og manual
Find enhedens vejledning gratis Pro HAC-HFW2231RP-Z-IRE6-DP-27135 Dahua Technology i PDF-format.


Brugerspørgsmål om Pro HAC-HFW2231RP-Z-IRE6-DP-27135 Dahua Technology
0 spørgsmål om dette apparat. Besvar dem du kender, eller stil dit eget.
Stil et nyt spørgsmål om dette apparat
Download vejledningen til din Overvågningskamera i PDF-format gratis! Find din vejledning Pro HAC-HFW2231RP-Z-IRE6-DP-27135 - Dahua Technology og tag din elektroniske enhed tilbage i hånden. På denne side er alle dokumenter nødvendige for brugen af din enhed offentliggjort. Pro HAC-HFW2231RP-Z-IRE6-DP-27135 af mærket Dahua Technology.
BRUGSANVISNING Pro HAC-HFW2231RP-Z-IRE6-DP-27135 Dahua Technology
HDCVI Camera User's Manual
Table of Contents
1 General Introduction....I
1.1 Overview
1.2 Features....
2 Framework and Dimensions....2
3 Device Cable Structure 3
4 Installation....5
5 Menu....7
5.1 HCVR Settings 7
5.2 Set Audio Coax 7
5.3 Menu Operation 8
Appendix Maintenance....10
Welcome
Thank you for purchasing our HDCVI camera!
This user's manual is designed to be a reference tool for your system.
Please read the following safeguard and warnings carefully before you use this series product!
Please keep this user's manual well for future reference!
Important Safeguards and Warnings
Electrical safety
- All installation and operation here should conform to your local electrical safety codes.
- The power shall conform to the requirement in the SELV (Safety Extra Low Voltage) and the Limited power source is rated DC 12V or AC24V in the IEC60950-1. (Power supply requirement is subject to the device label).
- Please install easy-to-use device for power off before installing wiring, which is for emergent power off when necessary.
- Please check if the power supply meets the requirements of working voltage of the camera before operating the device (The material and length of the power supply cable will influence terminal voltage value).
- Please prevent the line cord from being trampled or pressed, especially the plug, power socket and the junction from the device.
Environment
- Please don't aim the device at strong light (such as lighting, sunlight and so on) to focus.
- Please transport, use and store the device within the range of allowed humidity and temperature.
- Please do not allow water and other liquid falling into the camera in case that the internal components are damaged.
- Please keep the sound ventilation in case of heat accumulation.
- Heavy stress, violent vibration or water splash are not allowed during transportation, storage and installation.
- Please pack the device with standard factory packaging or material with same quality when transporting the device.
- It is recommended to use the device together with lightning protection device to enhance lightning protection effect.
- It is recommended to GND the device to enhance device reliability.
- It is advised to use qualified video transmission cable to improve video quality. It is recommended to use 75-3 coaxial cable or higher standard.
Warning
- Please use the standard accessories provided by manufacturer and make sure the device is installed and fixed by professional engineers.
- Please prevent the device surface from the radiation of laser beam when using laser beam device.
- Please do not provide two or more power supply modes for the device, otherwise it may cause damage to the device.
Statement
- Please refer to the actual product for more details; the manual is just for reference.
- The manual will be regularly upgraded according to the product update; the upgraded content will be added in the manual without prior announcement.
- Please contact the customer service for the latest procedure and supplementary documentation.
- The company is not liable for any loss caused by the operation which is not followed by the manual.
- Please refer to the company's final explanation if there is any doubt or dispute.
1 General Introduction
1.1 Overview
This series megapixel HD camera conforms to the HDCVI standard. It supports video signal high-speed long distance transmission without any delay. It can be controlled by the HCVR conforming to the HDCVI
1.2 Features
- Adopt high performance CMOS image sensor, megapixel definition.
- For 720P series, it supports RG59 coaxial cable transmission without any loss. The distance is over 800m. For 1080P, 4M and 4K series, it supports RG59 coaxial cable transmission without any loss. The distance is over 500m.
● High speed, long distance real-time transmission.
● Support HDCVI HD video and CVBS analog SD video output.
● Support 3D noise reduction, excellent low illuminance performance.
● Support ICR switch to realize surveillance both in the daytime and at night.
● Support OSD menu adjustment parameters.
• Support smart IR function.
● Support WDR/DWDR function.
● Support DC 12V power supply (Some models support DC 12V/AC 24V)
● Support IP67 compliance. - Some models support IK10 compliance.
- It can be applied to environments which requires high definition image, such as banking, supermarket, telecom, government, school, airport, factory, hotel, museum and etc.
2 Framework and Dimensions
Note:
It fails to support OSD menu operation when it outputs SD video; it realizes zoom and focus operation via UTC when it outputs SD video for motorized vari-focal bullet.
See Figure 2-1 for the dimension of model A. The unit is mm.
![273.2 [10.76°] 174.7 [6.88°]](/content/2026/05/872105/images/30bab2d2266dbc7d929cd0b90dc060a854f38c23d9826ff00c94aeabdd8ab003.jpg)
Figure 2-1
![95.0 [3.74"] 95.0 [3.74"]](/content/2026/05/872105/images/37a7b251ad397014d7cf256af1328c4b7a153b2e179e86a87048c97f8466fabb.jpg)
See Figure 2-2 for the dimension of model B. The unit is mm.
![213.0 [8.39°] 133.1 [5.24°]](/content/2026/05/872105/images/f560bbb158641a58c557c6097572c2364cbbeb4b86d16cef19e17ebe1f62417f.jpg)
![90.4 [3.56°] 90.4 [3.56°]](/content/2026/05/872105/images/1749a0a7a05ad54b764f72483dd3106f0753e630d6ee720c8de0c5bf9640fcff.jpg)
3 Device Cable Structure
Please refer to Figure 3-1 for DC 12V power input port.

Figure 3-1
Please refer to Figure 3-2 for DC 12V/AC 24V power input port.

Figure 3-2
Please refer to Figure 3-3 for video output port.
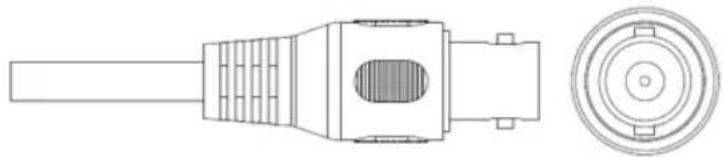
Figure 3-3
Please refer to Figure 3-5 for alarm function port.
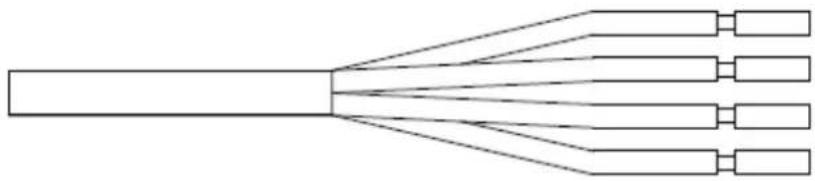
Figure 3-5
Please refer to sheet 3-1 for description of alarm cable.
| Color | Port | Function |
| Red | ALARM_IN | Alarm input port, it is to receive the signal of external alarm. |
| Black | ALARM_GND | Alarm GND |
| Orange | ALARM_NC | Alarm output common contact, on-off value alarm output. |
| Green | ALARM_NO | Alarm output normally open contact, on-off value alarm output. |
Sheet 3-1
©
- If it is model B, then loosen the screws on the bracket, adjust the camera to specific monitoring direction via rotating bracket and camera body, and then fix the screws firmly.
Step 3
Connect the video output port of the device to the back-end HCVR device, and connect power port to power supply.
Step 4
Adjust camera zoom and focus.
After image displays on the back-end encoding device, adjust the lens angle to proper monitoring location and adjust the focal length of the lens to make image clear.
For model A, it can realize coaxial control via five-direction button, which is shown in Figure 4-2.
- Long press the middle button for 5 seconds to realize HD/SD switch.
- Short press the middle button to enter OSD menu, short press the middle button again to confirm after entering OSD menu, up and down buttons are used to select menu options, left and right buttons are used to adjust parameter value.
- When the OSD menu is not enabled, you can adjust zoom via up and down buttons, adjust focus via left and right buttons.
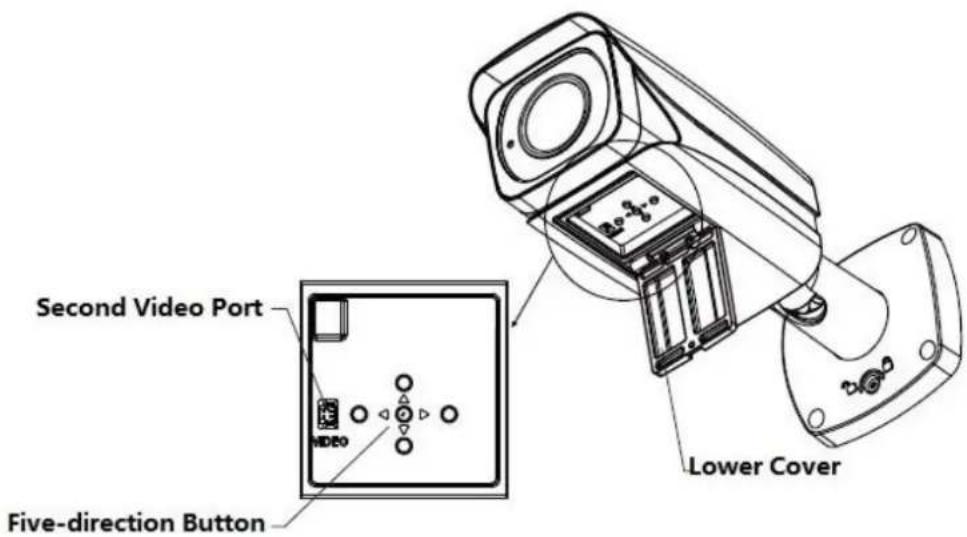
Figure 4-2
So far, device installation and cable connection have been completed, you can check monitoring image via back-end encoding device.
5 Menu
5.1 HCVR Settings
This HDCVI camera series can adjust OSD menu via coaxial control. After connected the camera to the HDCVI series HCVR, from Main Menu->Setting->System->PTZ, you need to select the channel number for access and set control mode as HDCVI and the protocol as HD-CVI. Click "Save" button to save current setup. See Figure 5-1.
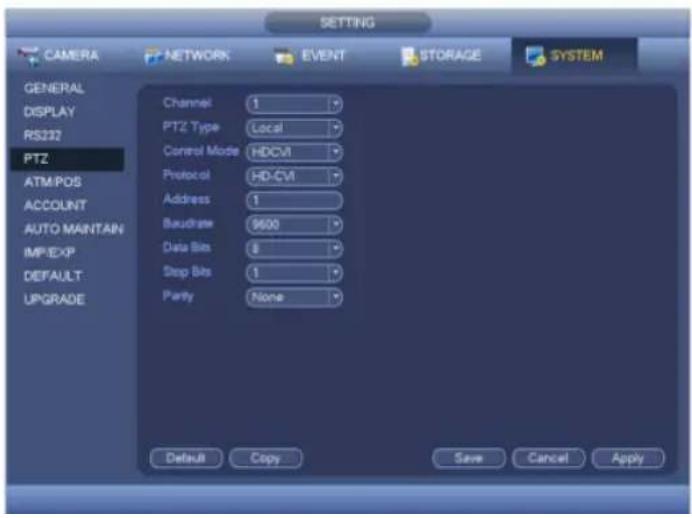
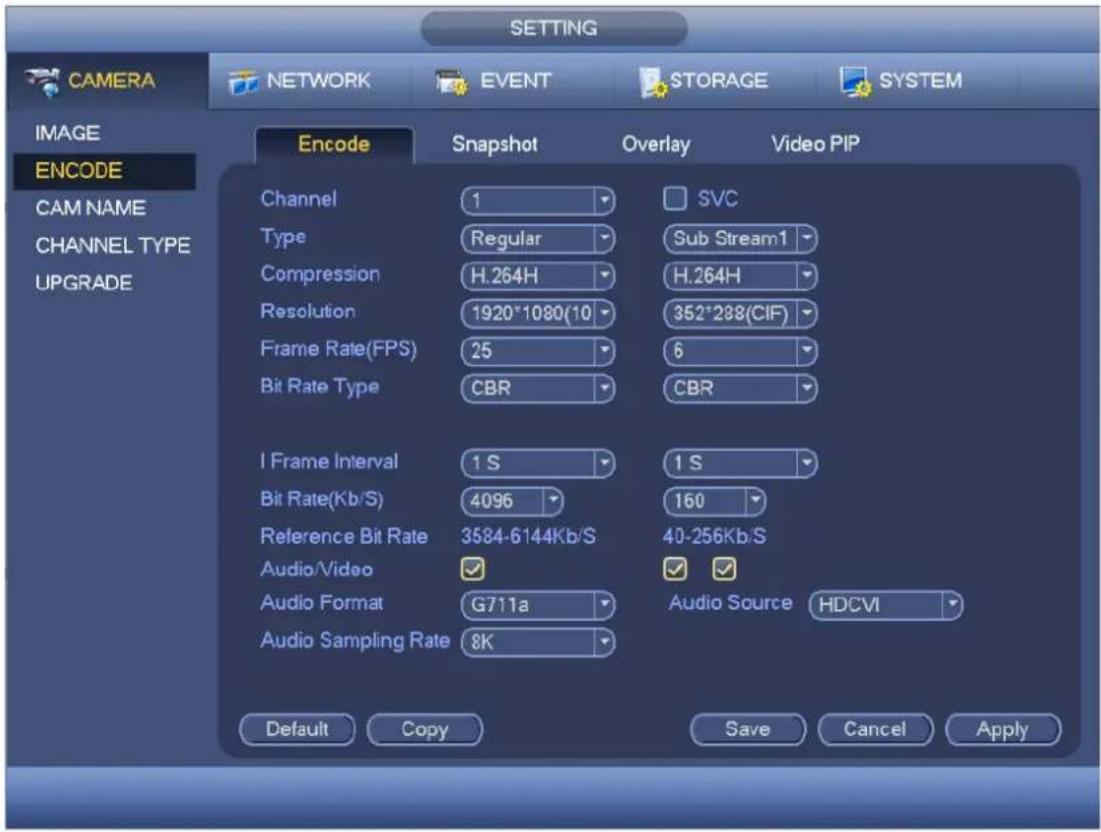
Figure 5-2
5.3 Menu Operation
Click the right mouse button and select "PTZ Control", then you will see the "PTZ Setup" menu, which is as shown in Figure 5-3 and Figure 5-4.

Figure 5-3
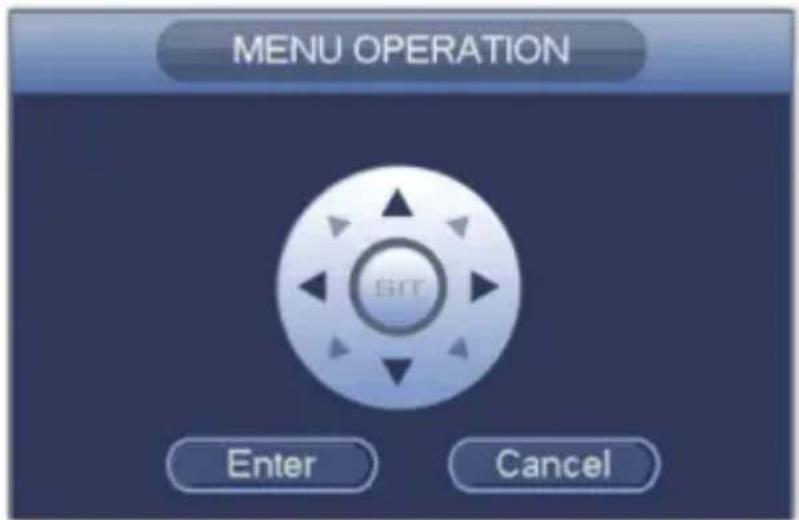
Figure 5-4
See Sheet 4-1 for the details of button functions.
| Button | Function | |||
 | + |  | Open menu | |
 | [WAD2] | Select menu item | ||
 | [53ZS] | Select menu value | ||
 | [HTSW] | Adjust lens zoom and auto trigger focus | Note:Some of the buttons can only be applied for the motorized vari-focal camera. | |
| [XXGW] | [70CA] | Adjust lens focus | ||
 |  | Auto focus under current zoom rate | ||
 | Lens reset | |||
Sheet 5-1
If there is “←”, click the “Confirm” button in “Menu Operation” interface to go to the 2nd menu. Click “Return” button to go back to the previous menu interface.
Appendix Maintenance
Attention:
Please maintain the device according to the following instructions in order to ensure the image effect and long-term stable operation of the device.
Maintenance for lens and mirror surface
The lens and mirror surface are covered with antireflection coating, so it may produce hazardous substance and lead to performance reduction or scratch, dimness etc when it is stained with dust, grease, fingerprint and so on, please refer to the following methods to deal with once dirt is found:
Stained with dirt
Use oil-free soft brush or hair dries to remove it gently.
Stained with grease or fingerprint
Use soft cloth to wipe the water drop or oil gently to make it dry, then use oil-free cotton cloth or paper soaked with alcohol or detergent to wipe from the lens center to outward. It is ok to change the cloth and wipe several times if it is not clean enough.
Camera Body Maintenance
Use a soft dry cloth to clean the camera body when it is dirty, in case the dirt is hard to remove, use a clean dry cloth soaked with mild detergent and wipe gently, make it dry later. Don't use volatile solvent like alcohol, benzene, thinner and etc or strong detergent with abrasiveness, otherwise it will damage the surface coating or reduce the working performance of the device.
Maintenance for Dome Cover
Dome cover is an optical device, please don't touch or wipe cover surface directly during installation and use, please refer to the following methods to deal with once dirt is found:
Stained with dirt
Use oil-free soft brush or hair dries to remove it gently.
Stained with grease or fingerprint
Use soft cloth to wipe the water drop or oil gently to make it dry, then use oil-free cotton cloth or paper soaked with alcohol or detergent to wipe from the lens center to outward. It is ok to change the cloth and wipe several times if it is not clean enough.
Note
- This manual is for reference only. Slight difference may be found in the user interface.
- All the designs and software here are subject to change without prior written notice.
- All trademarks and registered trademarks mentioned are the properties of their respective owners.
- If there is any uncertainty or controversy, please refer to the final explanation of us.
- Please visit our website or contact your local service engineer for more information.


- TABLE OF CONTENTS
- WELCOME
- IMPORTANT SAFEGUARDS AND WARNINGS
- ELECTRICAL SAFETY
- ENVIRONMENT
- WARNING
- STATEMENT
- 1 GENERAL INTRODUCTION
- 1.1 OVERVIEW
- 1.2 FEATURES
- 2 FRAMEWORK AND DIMENSIONS
- NOTE
- 3 DEVICE CABLE STRUCTURE
- STEP 3
- STEP 4
- 5 MENU
- 5.1 HCVR SETTINGS
- 5.3 MENU OPERATION
- APPENDIX MAINTENANCE
- MAINTENANCE FOR LENS AND MIRROR SURFACE
- CAMERA BODY MAINTENANCE
- MAINTENANCE FOR DOME COVER
Mærke : Dahua Technology
Model : Pro HAC-HFW2231RP-Z-IRE6-DP-27135
Kategori : Overvågningskamera