SB100 - Ukategoriseret SINGER - Gratis brugsanvisning og manual
Find enhedens vejledning gratis SB100 SINGER i PDF-format.

Brugerspørgsmål om SB100 SINGER
0 spørgsmål om dette apparat. Besvar dem du kender, eller stil dit eget.
Stil et nyt spørgsmål om dette apparat
Download vejledningen til din Ukategoriseret i PDF-format gratis! Find din vejledning SB100 - SINGER og tag din elektroniske enhed tilbage i hånden. På denne side er alle dokumenter nødvendige for brugen af din enhed offentliggjort. SB100 af mærket SINGER.
BRUGSANVISNING SB100 SINGER
SINGER\*
INSTRUCTION BOOK SB100
Your new Singer SB100 compact knitting machine
- Firstly familiarise yourself with the parts and accessories packed with your machine.
Remove the machine and accessories from the box and lay them on a table.
Keep the box and packaging as a storage carton to avoid the machine getting damaged or dirty when not being used.
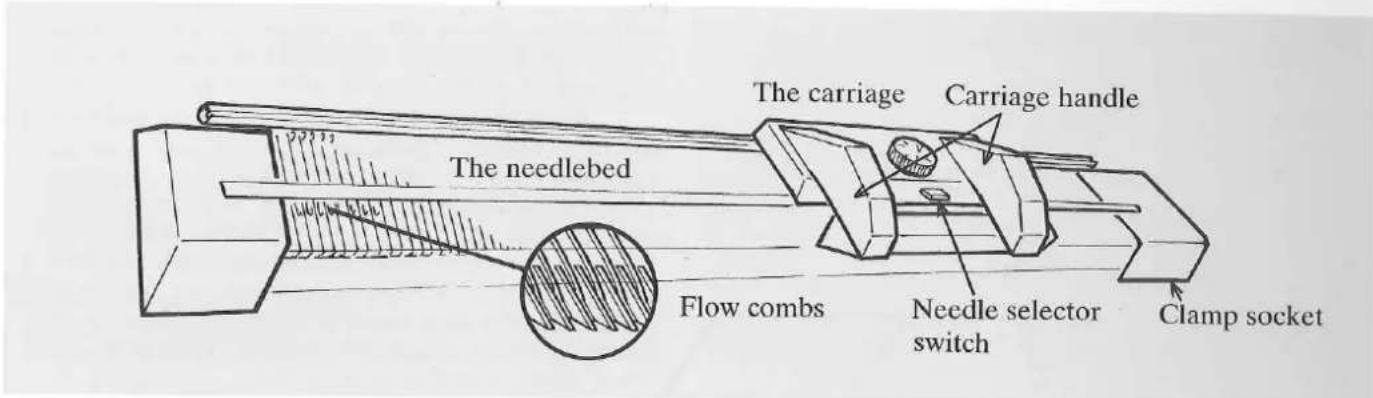
text_image
The needlebed Flow combs The carriage Carriage handle Needle selector switch Clamp socket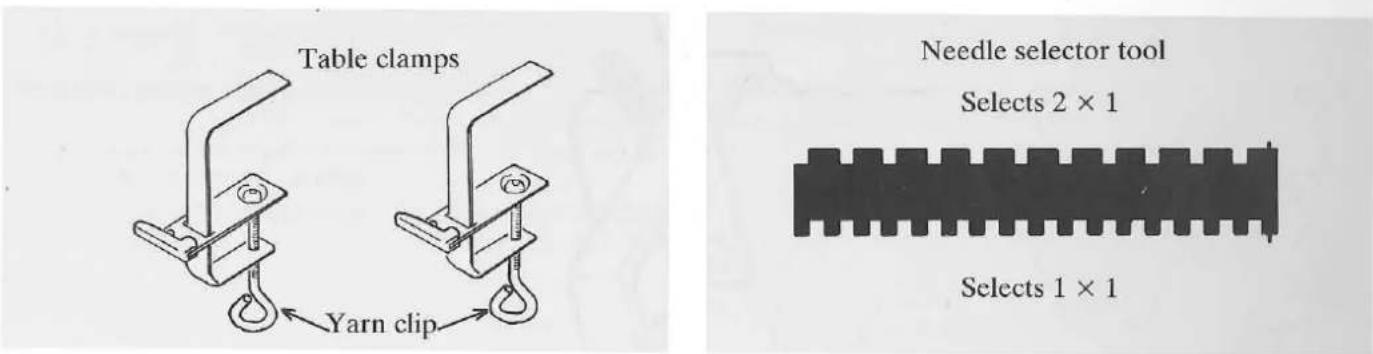
text_image
Table clamps Yarn clip Needle selector tool Selects 2 × 1 Selects 1 × 1
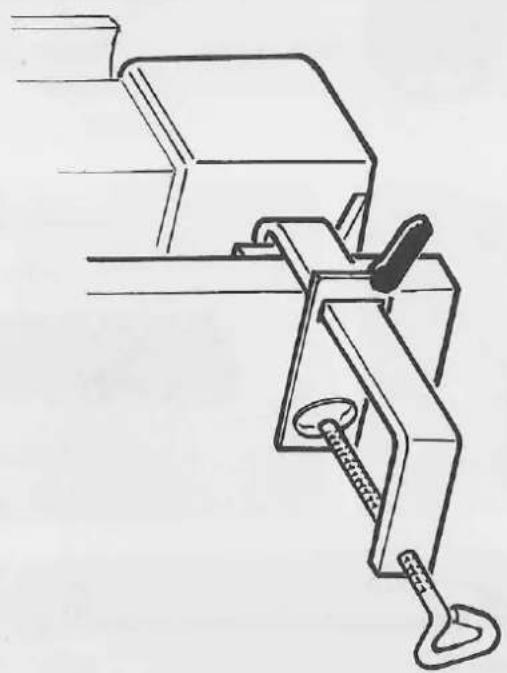
text_image
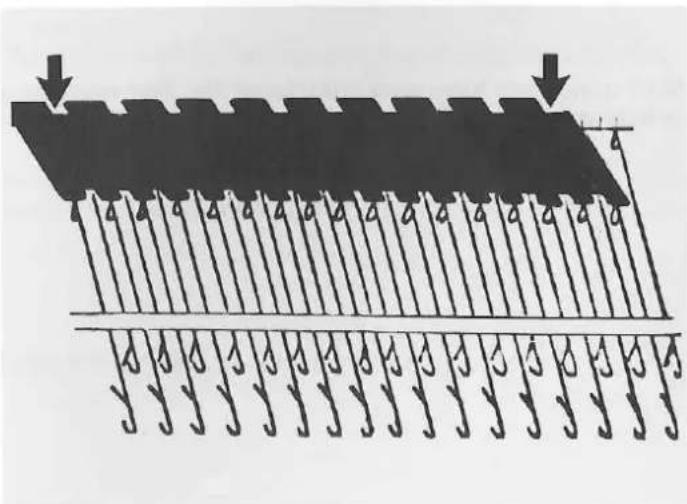
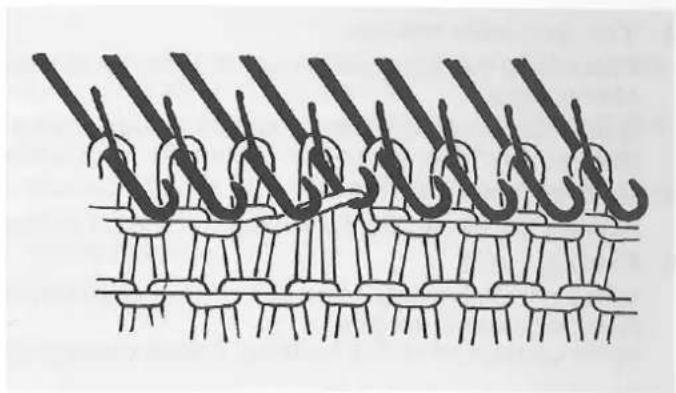
Needles Hook Latch Butt 1 × 2 Eyelet tool Front rail pusher Latch tool Edge weights- Now remove the elastic bands from the carriage. These are used to avoid damage to the machine in transit. To remove or replace the carriage onto the machine, simply slide it on or off the rear runner on the needle bed.

natural_image
Technical line drawing showing a mechanical assembly with a cylindrical component and a tool, no text or symbols present.Setting up the machine
-
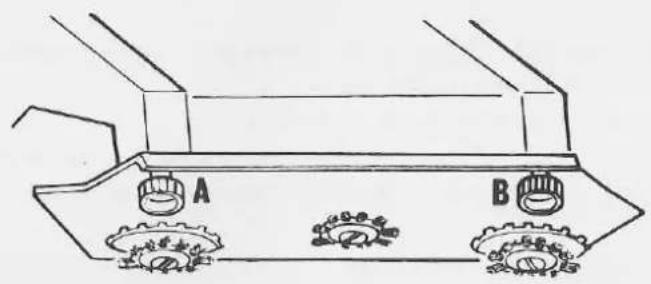
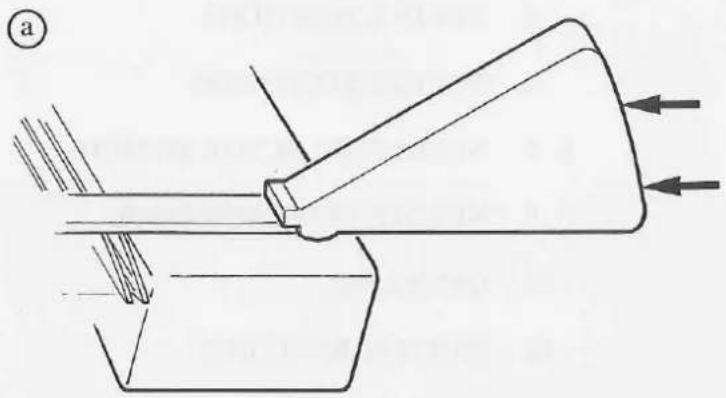
Lay the machine on a table with the Singer logo facing you.
-
Bring the clamp sockets at each end in line with the front edge of the table.
-
Using the clamps supplied, fix the machine securely to the table at each end as shown below:
natural_image
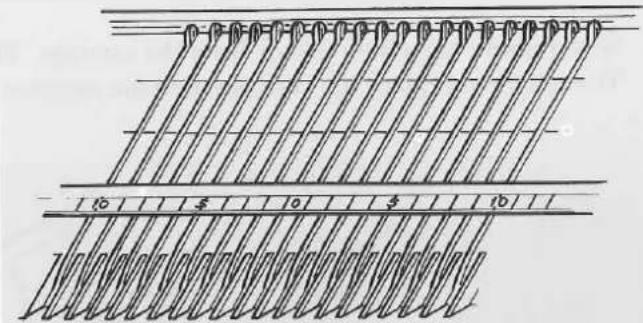
Technical line drawing of a mechanical clamp or clamping device (no text or symbols)The needle bed
Along the front of the needle bed there is a graduated scale of numbers. This will be used to centre your knitting. The numbers indicate the needle numbers from '0' in the centre.
Always start your knitting by selecting needles each side of centre '0'. This will help you when increasing and decreasing.
Example: If you were asked to select 40 needles, you would select 20 each side of centre '0'.
natural_image
Pure electrical circuit lines without any symbolsNeedle positions
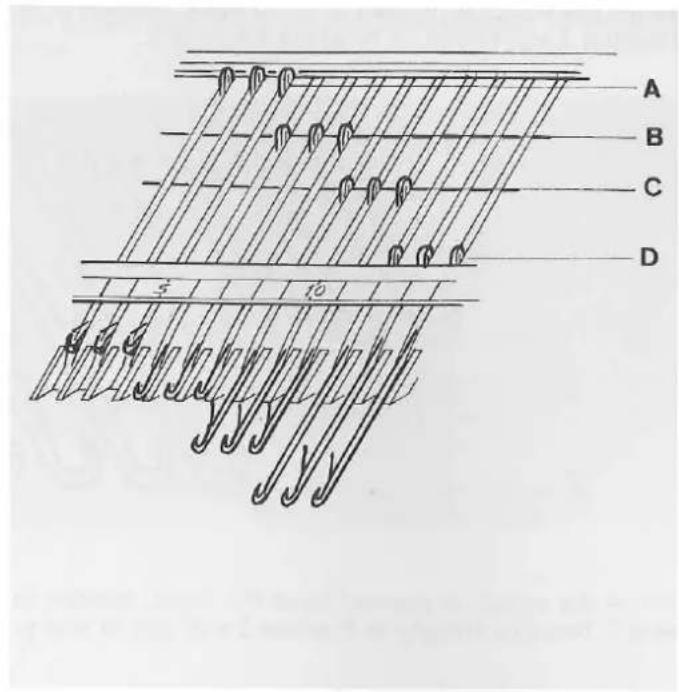
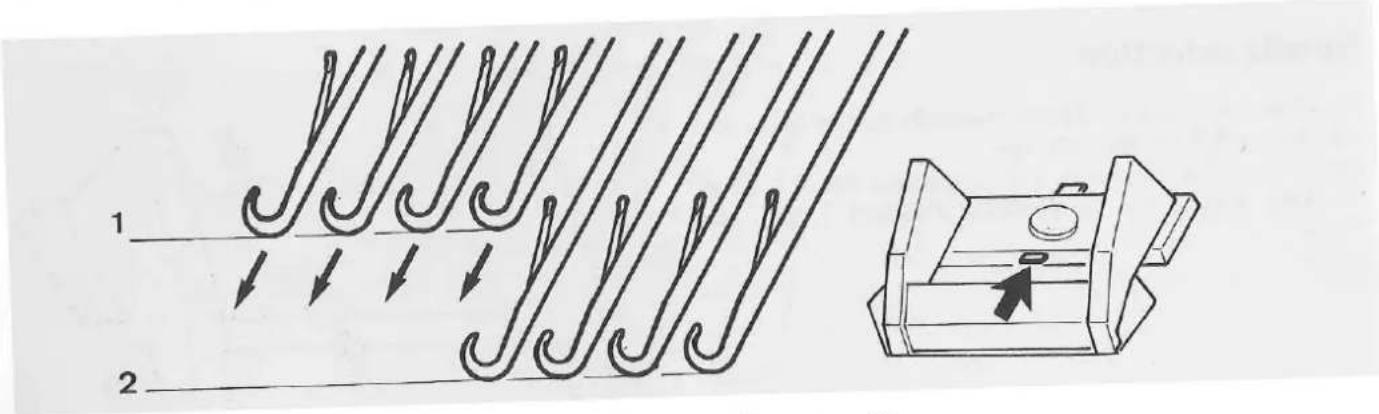
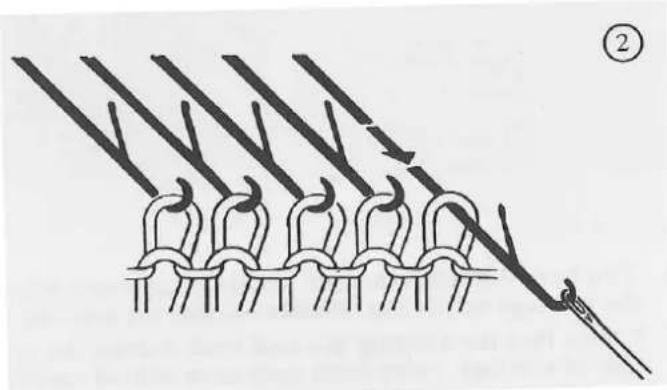
There are 4 needle positions:
A. This is when the needle butts are at the back of the needle bed. This is called NON WORKING POSITION.
B. In this position the butts of the needles are slightly forward and the hooks of the needles are in line with the front of the needle bed (the flow combs). This is called WORKING POSITION 1, and is the rear line indicated across the needle bed.
C. In this position the needles are even further forward, this time the tip of an open latch lays slightly behind the flow combs. This is called WORKING POSITION 2, and is the line indicated towards the front of the needle bed.
D. Here the needles are all the way forward and the butts are up against the front slide rail. This is called HOLDING POSITION, and is used to hold stitches without knitting them when shaping necks, etc.
text_image
A B C D 5 10Needle selection
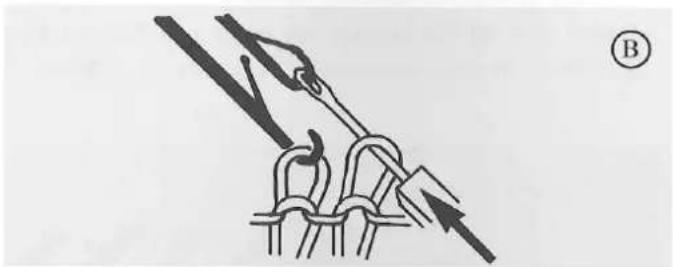
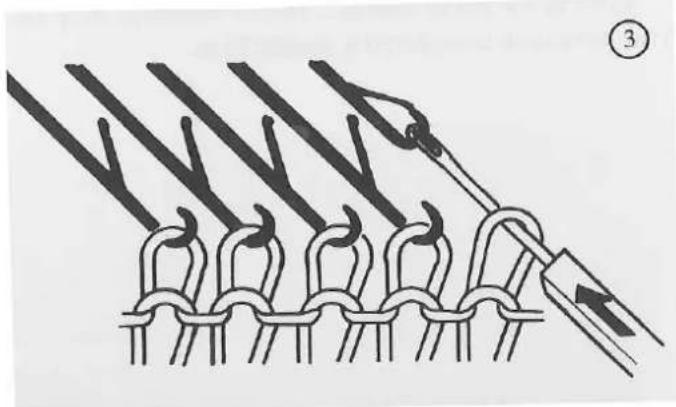
Needles can be selected both manually and by using the selector switch on the carriage.
Using the selector switch you can move needles from Working Position 1 to Working Position 2 and vice versa.
natural_image
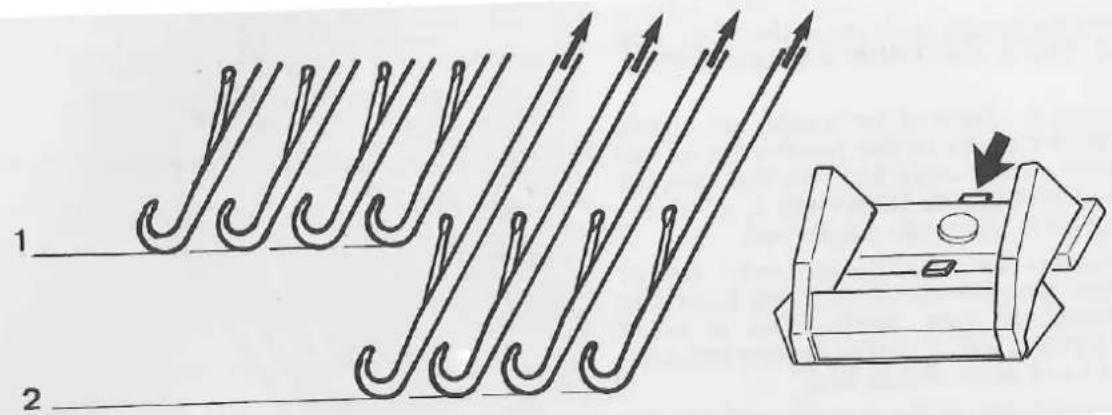
Technical line drawing of a mechanical component with arrows indicating direction (no text or symbols)When the switch is pressed in at the back, needles in Working Position 1 stay in Position 1 and needles in Working Position 2 will return to Working Position 1.
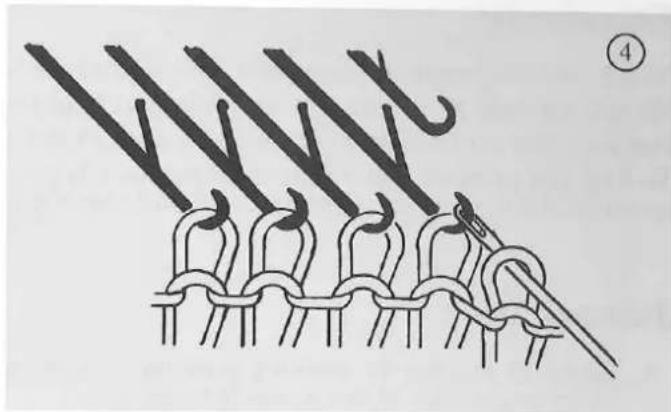
text_image
Diagram showing two types of hook-like structures with arrows indicating direction, alongside a mechanical component with an arrow pointing to a circular feature.When the switch is pressed in at the front, needles in Working Position 1 will come forward to Working Position 2. Needles already in Position 2 will stay in that position.
text_image
Diagram illustrating a mechanical or electrical component with numbered parts and directional arrows indicating flow or movement.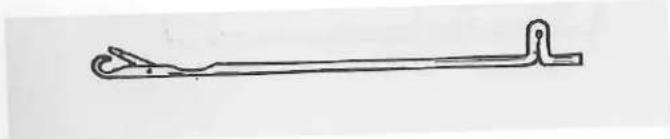
natural_image
Simple line drawing of a long handle with a clip and hook (no text or symbols)The needles
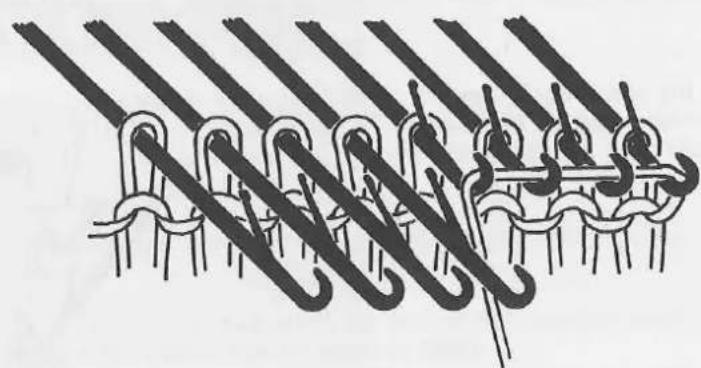
There are 3 main parts to each needle. The Butt, the Hook and the Latch.
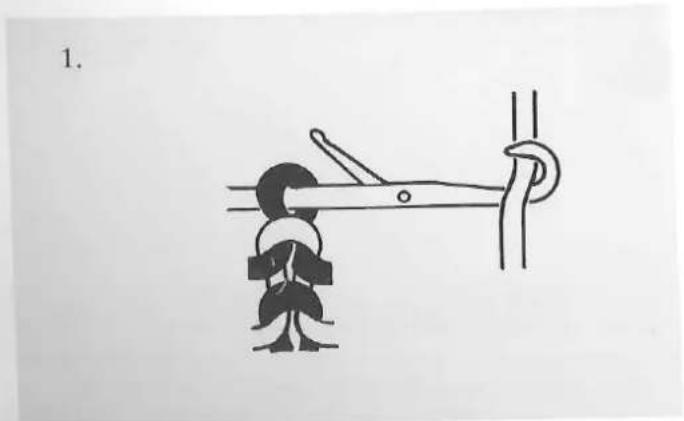
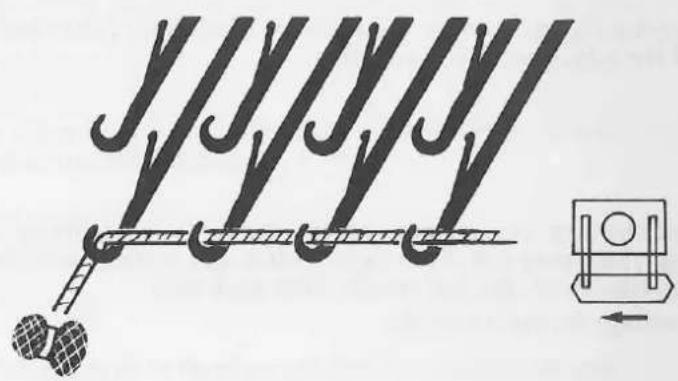
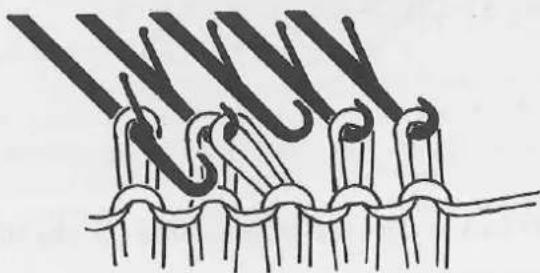
Stitch formation
As you knit with the carriage, stitches are formed as follows:
The last stitch goes behind the latch of the needle. The yarn for the next stitch lays over the hook.
The needle starts its downward movement and the previous stitch closes the latch.
natural_image
Simple line drawing of a rope knot with a hook and rope tied at the end (no text or symbols)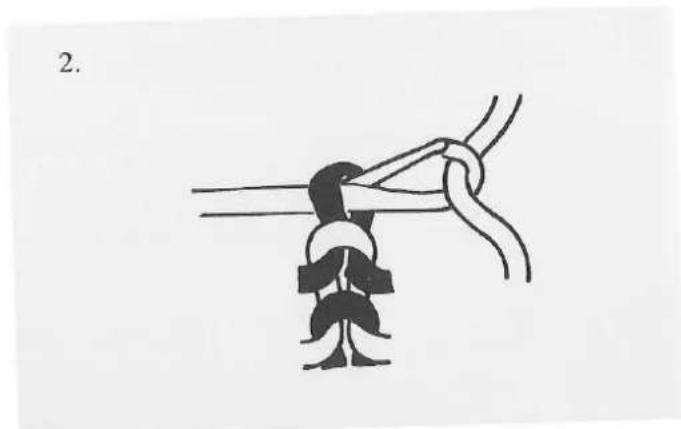
natural_image
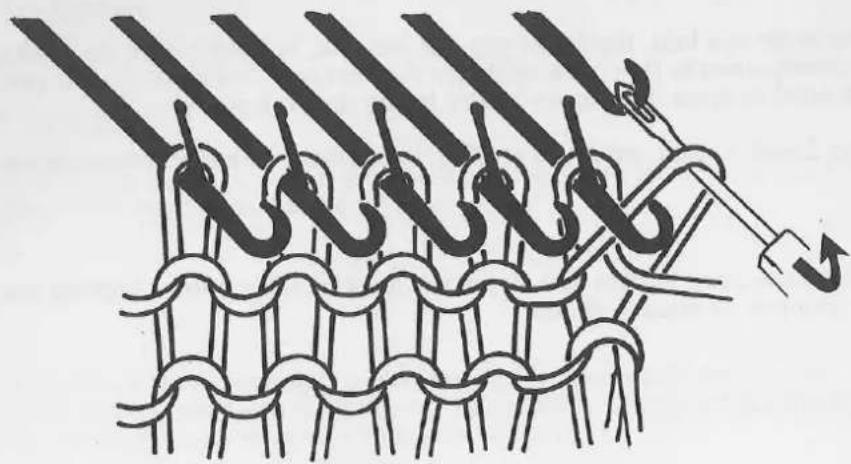
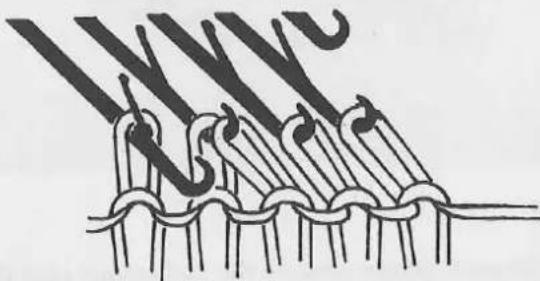
Simple line drawing of a rope knot with a loop, no text or symbols presentThe needle moves further back. The previous stitch slips over the hook and is held by the loop of the new stitch.
The new stitch has now replaced the previous one on the needle and waits for the next passage of the carriage.

natural_image
Illustration of a hand holding a tool with a curved object inserted, no text or symbols present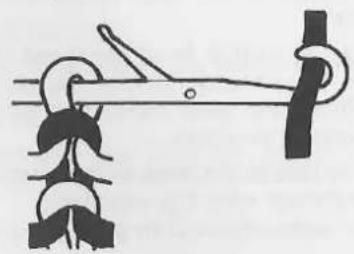
natural_image
Simple line drawing of a mechanical linkage with two hanging weights (no text or symbols)Stitch sizes
Casting on (most yarns)
Stitch size 1
Other:
Very Fine Yarns
Stitch size 1-2
Fine Yarns
Stitch size 3-4
4 Ply or equivalent
Stitch size 5-6
Thick Yarn
Stitch size 7-8
Double Knitting Yarn
Stitch size 9-10
Chunky
Stitch size 10-12
(over alternate needles)
Above are examples of the approximate stitch size numbers required for different yarns.
Use this as a guide only and always test the yarn first, before knitting a garment to find the best size for the type of yarn, and to check that the tension produced corresponds with the tension measurement given in your pattern.
Remember:
The larger the number on the stitch size dial, the larger the stitches formed. So the thicker the yarn, the higher the number you will use.
Exercise 1
(No yarn is used)
- Using the black plastic needle selector, bring alternate needles at the centre of the needle bed forward into working position 1.
Now bring the needles in between those you have already selected to position 1 as well.
You have now selected 34 needles into working position 1, i.e. 17 each side of centre 0.
natural_image
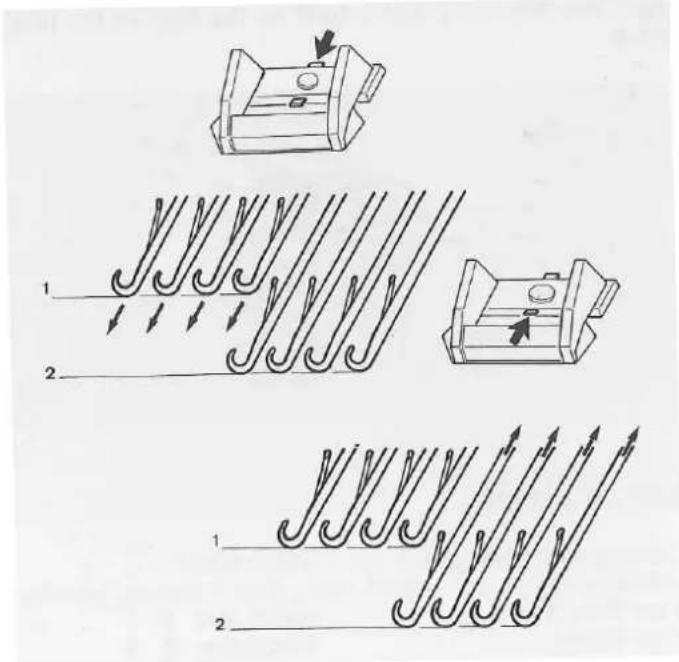
Diagram of a fishing rod with multiple fishing hooks and a central gait, showing no text or symbols.- Press the needle selector switch in at the back of the carriage and gently move the carriage across the needles you selected.
The needles remain in position 1. You will always press the switch at the back to put the needles back to position 1.
-
Now press the switch in at the front of the carriage and move the carriage across the needles in position 1. They have now moved to position 2, your normal knitting position.
-
Press the switch at the back of the carriage again and pass the carriage ever the needles.
They have now returned to position 1.
text_image
Diagram illustrating fluid flow through a coiled structure with labeled components and directional arrowsRemember
Press the switch at the back to bring the needles back.
Press the switch at the front to bring them forward.
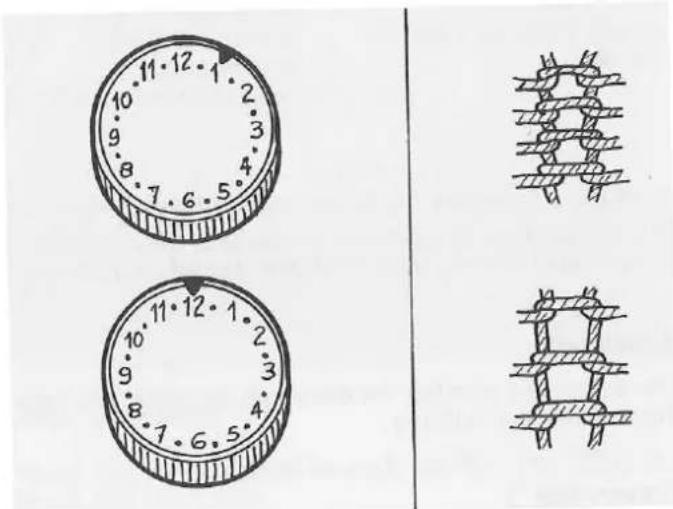
- Set the stitch size dial to number 1.
Take carriage across needles.
See how when the carriage has returned the needles to position 1, the hooks of the needles are in line with the front of the needle bed.
- Now set the stitch size to number 12 on the dial.
Take the carriage across again.
This time, using a larger stitch size, the hooks of the needles lay further back. This allows a larger stitch to be formed.
text_image
10 11 12 1 2 9 3 8 4 7 6 5 10 11 12 1 2 9 3 8 4 7 6 5Well done, you have now completed the first exercise and now understand the needle positions, the selector switch and the stitch size (tension) dial.
Exercise 2
(one colour 4 ply yarn is used)
Casting on:
- Set stitch size dial to number 1, and push selector switch in at back of carriage.
- At the centre of the needle bed, using your black 1 × 1 needle selector tool, bring alternate needles to working position 2. Open all latches.
- Lay the yarn across the selected needles and fix the end of the yarn into the yarn clip on the clamp on the carriage side of the machine.
natural_image
Diagram of a mechanical or electrical assembly with multiple curved components and a small inset device (no text or symbols)Take the other end down over the end needle but do not pull tightly or the stitches cannot form.
Place the cone or ball of yarn on the floor in front of you, and take the carriage gently across, letting the yarn roll gently through your fingers as it forms the stitches across the row.
- Now, using the black selector tool, bring the needles in between those which have already knitted, into working position 2.
- Open the latches, lay yarn across again, this time in the opposite direction. As you do so, do not leave a loop at the edge or the carriage may jam. Take carriage across.
- Now bring the needles you first selected back again to position 2.
Check that the previous formed stitches on those needles are behind the latches and that the latches are open. Lay yarn and take carriage across. - Bring the other needles back again, check again as you did on the last row, lay the yarn and take the carriage across.
- You have now produced a closed edge cast on and are ready to begin to knit in stocking stitch. Break off the end of the yarn approximately 6" (15 cms) from end of the knitting. Remove the other end of the yarn from the clamp.
Remember
Latches must always be open with previous stitches behind them, before knitting the row.
If this is the first time you have used a knitting machine, don't worry if you did not manage to cast on the first time. Below are some hints to help you, so read these through and if necessary, try a cast on again before moving on to Exercise 3.
(To remove knitting, gently lift the stitches off the needle hooks).
Dropped stitches
These are caused when the previous stitches are not behind the open latches before knitting the next row. OR if a latch was left closed before knitting the row.
Loops at edge of knitting
This is usually caused when laying the yarn across the needles. Make sure (after each row) that the yarn for the next row wraps neatly around the edge needle to avoid this.
Carriage sticks
Once the carriage has started the row you cannot reverse the direction halfway across. Later when knitting stocking stitch or cables, the carriage may jam if too tight a stitch size is being used for the type of yarn. Always make sure that the carriage clears the end needle after each row.
Important: Never force the carriage across if it sticks.
The cast on looped and did not form
The stitch size dial must be on number 1 for casting on or the size is too loose to knit correctly.
Yarn caught on carriage brushes
Unwind the yarn from the brushes and allow it to hang down at the edge of the knitting. To avoid this, hold the yarn downwards slightly as the carriage passes the end needle. The yarn will then be free and ready to be laid across the needles for the next row.
Exercise 3
(continue with 4 ply yarn)
- If you removed the knitting from your machine at the end of the last exercise, cast on again following instructions in Exercise 2 from number 1-8.
-
Press selector lever in at the front of the carriage and without laying any yarn, take the carriage gently across the needles.
-
The needles have been brought to working position 2. Check that the stitches are behind the open latches and that all latches are open.
- Set stitch dial to 5. Clip the yarn end into the yarn clip on the clamp as before and lay the yarn across from the carriage side. Don't pull on the yarn tightly or stitches will not form.
- Take carriage across, letting the yarn pull gently through your fingers as it forms the stitches along the row.
- Repeat to complete 20 rows of stocking stitch.
Note:
You will find that the more you knit, the faster you will become, but don't push the carriage across too quickly as at normal speed the latches usually stay open ready for the next row, but if you go too quickly the latches will tend to close and you will need to open them again before laying the yarn across.
Now repeat Exercises 2 and 3 again, until you are fully conversant with the basic workings of your machine.
Remember:
Stitches must lie behind the open latches and all latches must be open before knitting the row. If you remember this you will not get dropped or missed stitches.
Exercise 4
In this next exercise you will learn how to increase stitches for garment shaping.
- Complete a closed edge cast on.
- Bring needles to working position 2 by passing the carriage over the needles with needle selector pressed in on the front of the carriage.
- Knit 20 rows in stocking stitch.
- First you will learn a quick increase. This method is used when an increase is required on the side of the carriage only.
- Bring one needle from non working position on side of carriage to working position 2. Open the latch.
- Lay yarn across needles, making sure that the yarn is placed over the new needle in working position 2.
- Take carriage across and knit one row.
- Now continue to increase stitches at the carriage side in the same way.
- Increase 10 times altogether.
Another method of increasing can be used when it is necessary to increase a stitch at both ends in the same row. We recommend you use a light coloured yarn for this to make it easier to identify the loop until you become conversant with this method.
- Bring a needle at both sides of the knitting from non working position to working position 1.
- Pick up the lower loop of the first stitch using the single eyelet tool and lift it up on to the hook of the needle.
- Bring the needle to working position 2 at each end. Check that the loops are placed behind the open needle latches and that the latches are open.
natural_image
Diagram of a knitted fabric pattern with coiled threads and a hook, no text or symbols present- Lay yarn across and knit.
- Repeat increasing one stitch at each end of every alternate row 10 times altogether.
Exercise 5
Later on you will learn how to produce Italian Decreasing for raglan designs, but in this exercise you will learn the simple method of decreasing.
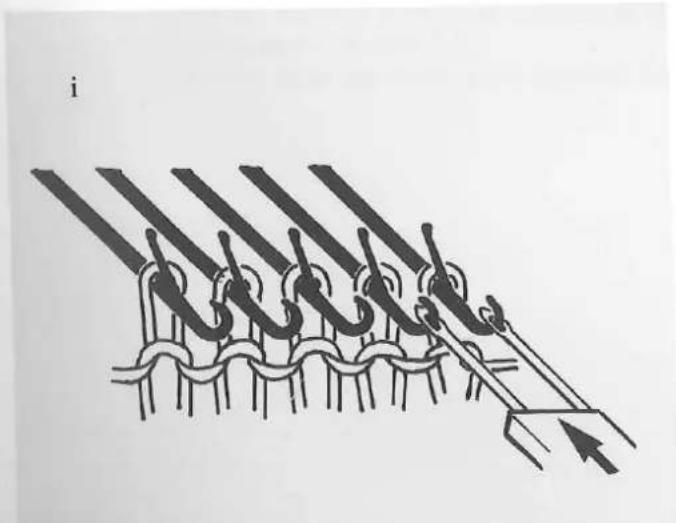
- Using your eyelet tool, place the double end on to the end of two needles hooks (see figure i).
Hold the tool level with the needles and not at an angle to them. - Now push the tool, keeping it level, right back until the stitches move onto the tool from the needles. Now with the 2 empty needles in working position 1, place the eyelets of the tool over the hooks of the needles, lift the tool to allow the stitches to slip over back onto the needles (see figure ii).
natural_image
Diagram of a mechanical or electrical component with multiple curved rods and a lever, no text or symbols present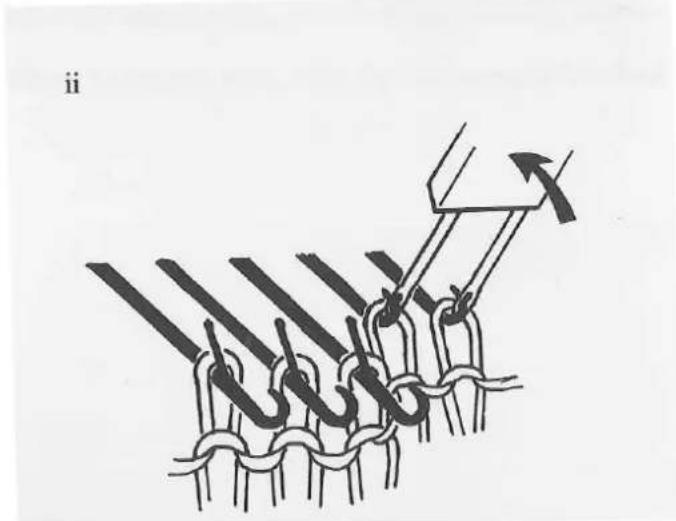
natural_image
Diagram of a mechanical or electrical component being inserted into a coiled spring, showing rope routing and directional arrows (no text or symbols)The end needles are now in working position 1 and the stitches are in front of the open latches on these 2 needles.
- You will now move the end stitch onto the needle next to it, thus ending with 2 stitches on one needle.
A. Place the single eyelet onto the end needle hook. Hold the knitting back towards the needle bed with your other hand and bring the tool towards you until the needle is as far forward as it will go. Remember to hold the tool level as if it is an extension to the needle.
natural_image
Diagram of a rope knotting technique with arrows indicating direction (no text or symbols)B. Now push back on the needle with the tool. The needle latch has closed and the stitch is now on the eyelet tool. Don't drop it off the end.
natural_image
Diagram of a rope knot with a hook and connecting rod, no text or symbols presentC. Take the eyelet tool with the stitch on it, carefully across to the next (inside) needle, hook it over the hook of the needle and lift the stitch over onto it.
natural_image
Diagram of a rope knot with arrows indicating direction and a circular symbol (no text or labels)Now check that the emptied needle is out of working position in position A (non working position). Lay the yarn and continue to knit.
Decreasing can be performed either at just one side or on both sides each row.
Repeat this exercise to get used to using your eyelet tool.
Exercise 6
The increasing and decreasing methods you have learnt in Exercises 4 and 5 are, of course, used when shaping garments, usually at armholes or on sleeves.
Garments, usually at armholes of on-sleeves. You will also decrease stitches at neck openings but first you will need to learn how to perform "Partial" knitting. "Partial" knitting is the term used when only knitting part of the garment. For example, at a "V" neck you will only knit one side at a time, decreasing at the centre of the needle bed for the "V" shaping and at the armhole edge at the same time.
-
Bring needles on opposite side of the carriage from '0' in the centre to the edge into holding position, pushing the knitting backwards to the needlebed as you go. Remember holding position is when the butts of the needles are right up against the front slide rail and the needles are as far forward as they will go. You now have half of your needles in holding position. The half nearest the carriage are still in working position 2.
-
As you knit, lay the yarn over the needles in working position 2. As you pass the carriage across, take it over on to the needles in holding position if necessary but don't worry, the needles in holding position will not knit.
-
Knit 2 rows. As you can see, only the needles in working position 2 are knitting. You have divided for the neck and are now working on half of the needles only.
-
Now decrease one stitch at each end of the knitting you are now working on.
-
Continue decreasing on every other row until the last stitch remains. Remove the last stitch from the needle, thread the end of yarn through the loop of the stitch and pull to close.
-
Return all empty needles to non working position after each decrease.
-
Return needles in holding position to working position 2. Check that all the latches are open and that stitches are behind the latches. Continue to knit, decreasing as before in numbers 4-6.
natural_image
Diagram of interlocking cable bundles with hooks and rods (no text or symbols)Note
You may find it helpful to hang an edge weight onto the knitting at the centre to avoid the bulking up which will occur as you knit up one side.
Exercise 7
(Main 4 ply yarn, plus a small amount of colours 2 and 3)
At the base of a garment you will usually have a hem or rib (welt). This exercise shows you how to make a simple hem.
- Knit 4 cast on rows using colour 2.
Stitch size 1, ending with needles in working position 2.
- To do this...
Take carriage across on the fourth row with needle selector pressed in at the front.
- Break off yarn.
Stitch size 6. Knit 1 row in colour 3 with yarn end at side of carriage. Leave yarn ends 2 and 3 hanging at sides.
- Using main yarn, knit 19 rows.
Press needle selector switch on back of carriage.
Knit 1 row.
- Using the single end of your eyelet tool, pick up the loops of main colour, from inbetween the loops of your first row knitted in colour 3 and place them on the needles in working position 1, thus forming a hem.
natural_image
Diagram of knitted fabric with interwoven strands and a central hook (no text or symbols)-
You have 2 stitches on each needle. Press the selector switch on the front of the carriage and without yarn take the carriage across the needles holding the knitting back towards the needle bed with your other hand.
-
Check that the knitting lies well back behind the open latches of the needles. Break off yarn, then starting at side of carriage, relay main yarn from side of carriage and knit 6 rows.
-
Pull the row of colour 3 out from your knitting.
Your first rows in colour 2 (waste knitting) drop off.
You have now completed a simple hem.
Exercise 8
Continental or "mock" ribs as they are often called are produced in the same way as hems.
For a 1 × 1 rib effect you will use alternate needles only. Other rib variations will be explained later.
First let's knit a Continental 1 × 1 rib.
First let's knit a Continental 1 × 1 Nb.
1. Cast on in colour 2 as for Exercise 7, but on the 4th cast on row leave the selector switch depressed at the back of the carriage to leave the needles in working position 1.
2. Using the single end of your eyelet tool, transfer every alternate stitch on to its adjacent needle. Hold the knitting back against the needle bed with your other hand while performing this operation to avoid dropped stitches.
3. Return empty needles to non working position.
Adjust stitch size dial to number 3 (half as many needles need only half the tension).
Bring needles to working position 2.
4. Keeping needle selector switch depressed at front of carriage knit 1 row with colour 5 as before.
5. Change to main colour and knit 39 rows.
Depress switch at back of carriage and knit 1 row, returning needles to working position 1.
6. Now, using the single end of your eyelet tool, pick up the loops of main colour from in between the loops made in colour 3, and place them on the empty needles, bringing them forward to working position 1.
7. Bring needles to working position 2.
Check that all stitches are well back behind the open latches and that all latches are open.
8. Change stitch size dial number 6.
Break off yarn to start again at carriage side.
Knit 10 rows.
9. Remove row of colour 3 from the knitting.
Your first rows in colour 2 drop off.
Your first rows in colour 2 drop off. Well done. You have now completed your first rib. Later, when the knitting is removed from the machine, put a ruler or knitting needle through the hem of the rib and pull downwards slightly. This will ease the rib into shape.
Exercise 9
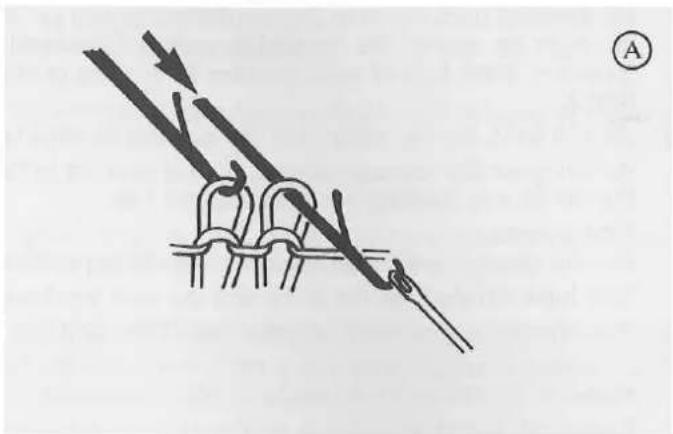
For this exercise you will use your eyelet tool again, just as you did for decreasing in Exercise 5. This time, however, you will be using it to cast off.
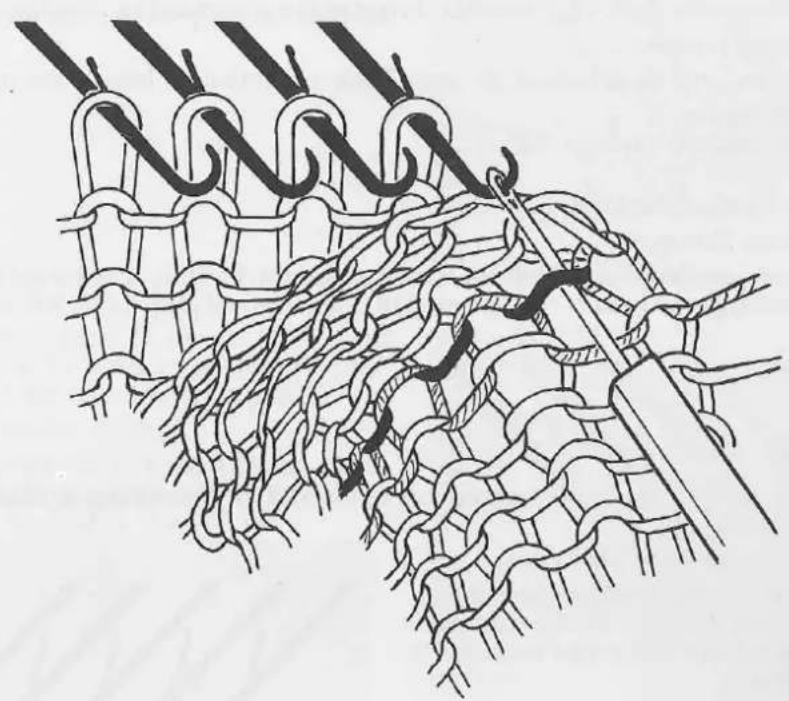
- Bring all needles back to working position 1.
- Place the single eyelet over the hook of the last needle in working position nearest to the carriage. Bring the needle forward with the eyelet tool until it is right out towards you.
natural_image
Diagram of a knotted structure with multiple curved bands and a connecting rod, no text or symbols present- Now push it right the way back into non working position letting the stitch slide from the needle on to the eyelet tool.
natural_image
Diagram of a mechanical assembly with multiple spring-like components and a tool interacting with them (no text or symbols)-
Take the eyelet tool off the needle hook and place it on to the hook of the next needle.
-
Now slip the stitch on to the needle then bring the needle forward to working position 2.
There are now 2 stitches on the needle in working position 2.
-
Check that the stitches are behind the open latch of the needle.
-
Now, lay the yarn over the hook of that needle and bring the needle back to working position 1, allowing the yarn to knit the two stitches together.
You have now cast off one stitch.
To avoid too tight a cast off, pull the knitting downwards slightly beneath the stitch you have knitted manually as you go, to slacken the tension.
text_image
Diagram illustrating a knitting process with labeled steps and a numbered circle marker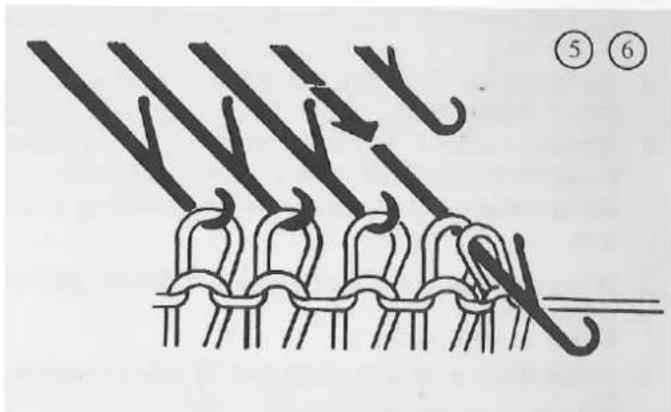
text_image
Diagram showing a patterned structure with numbered callouts (⑤ and ⑥) indicating specific parts or steps.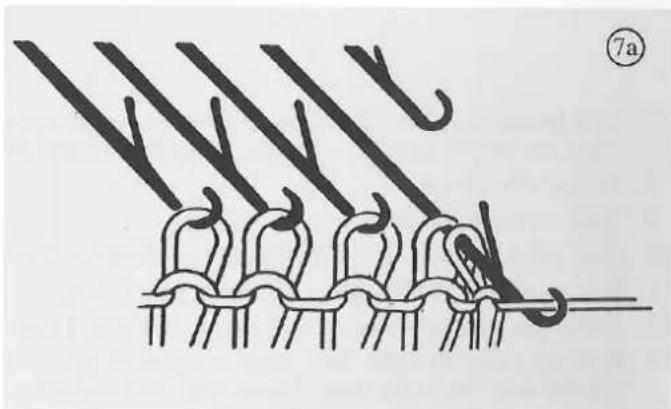
natural_image
Diagram of knitted fabric with curved threads and a hook, no text or symbols present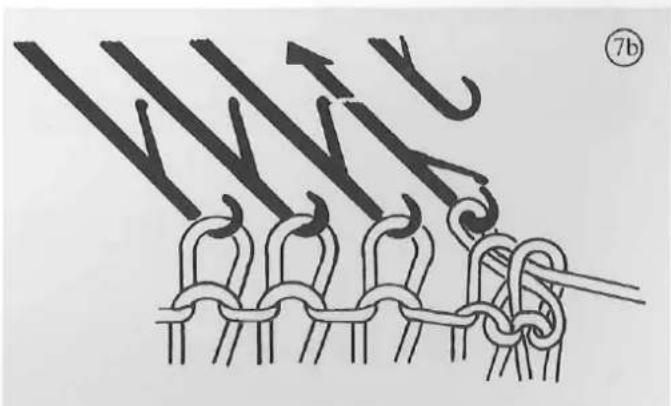
text_image
7b-
Repeat numbers 2-7 until only one stitch remains.
-
Remove the last stitch from the machine, pulling downwards as you do so to enlarge the loop of the stitch.
Pull the end of yarn through the loop, pull and close.
exercise 10
The new completed exercise 9 and covered the basic workings of your new machine.
u have now completed exercise 9 and covered the suit.
will now use all you have learnt so far and help you to produce your first garment for your first garment we have chosen a small child's 19" (48 cm) 'V' neck jumper; knitted in stocking stitch. knit this garment you will need approximately 250 grammes of yarn (4 ply) in your main colour, plus a small quantity of colour 2 (for waste knitting) and colour 3 for your separation rows.
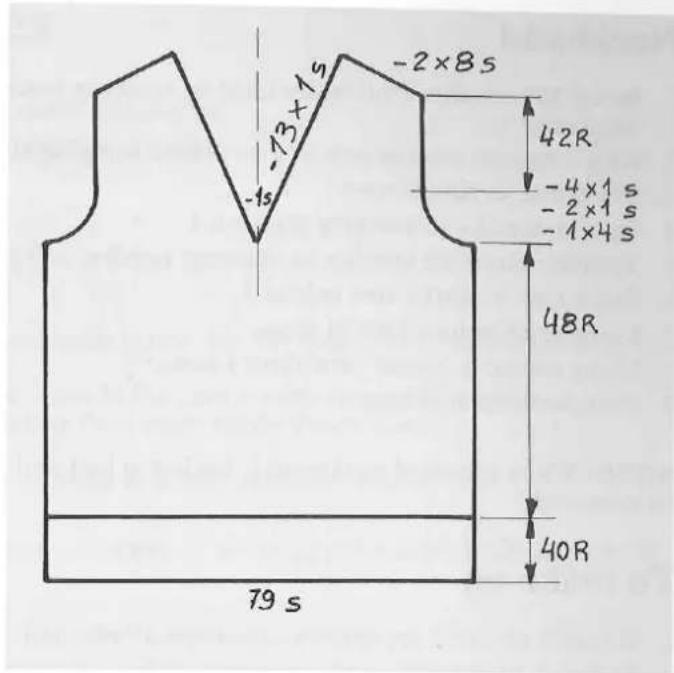
umper back
- Bring 79 needles to working position 1. Return alternate needles to non working position.
- Stitch size 1. Using colour 2 (waste yarn) knit 4 cast on rows selecting alternate needles each row as before.
- Set stitch size to 6. Bring needles to working position 2. Knit 4 rows.
- Return needles to working position 1, and transfer every alternate stitch on to its adjacent needle. Bring empty needles back to non working position.
- Bring needles to working position 2. Break off 2nd colour yarn. Knit 1 row in colour 3.
- Using main yarn and stitch size 3, knit 40 rows in rib.
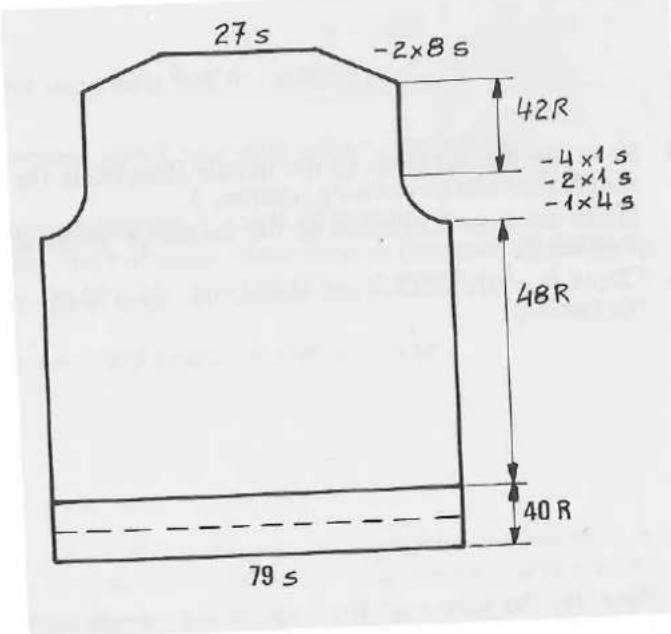
text_image
27 s -2×8 s 42R -4×1 s -2×1 s -1×4 s 48R 40 R 79 s- Lift loops of main colour from in between those of the row knitted in colour 3 (separation row), and place then on empty needles – bringing them forward to working position 2.
- Stitch size dial 6.
- Knit straight for 48 rows.
- Cast off 4 stitches at the beginning of the next 2 rows.
- Decrease one stitch each end every row twice.
- Decrease one stitch each end every 2nd row 4 times.
- Decrease one stitch each end every 2nd row 4 times.
- Knit 42 rows straight. Use edge weights if necessary to avoid each way, a little way from the top at each end and move up every 10 rows.
- Cast off 8 stitches at beginning of the next 4 rows.
- Cast off the remaining 27 stitches.
Jumper front
- Knit as back from 1 - 10 inclusive.
- Decrease one stitch at each end and transfer centre stitch on to its adjacent needle. Return the centre needle now empty to non working position.
- Work on half the stitches on the side nearest the carriage placing the other 34 needles into holding position.
NOTE: Steps 4 - 6 are knitted simultaneously. - At armhole edge, decrease one stitch every row once.
- At armhole edge decrease one stitch every 2nd row 4 times.
- At neck edge (centre) decrease 1 stitch every 4th row 13 times.
- At beginning of every 2nd row, at armhole edge, cast off 8 stitches. Do this twice.
- Return other needles to working position 2 and repeat steps 4 - 8 reversing shapings.
text_image
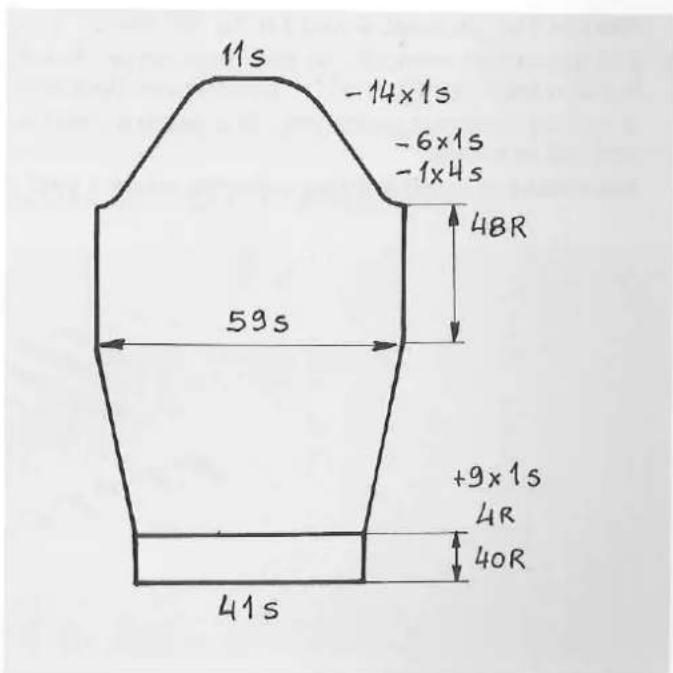
-2×8s -13×1s -1s 42R -4×1s -2×1s -1×4s 48R 40R 79 sJumper sleeves (Knit 2 the same)
- Bring 41 needles to working position 2.
- Return alternate needles to non working position. Stitch size 1.
- Cast on as before using colour 2. Transfer alternate stitches to their adjacent needles and return empty needles to non working position.
- Knit 1 row in colour 3. Stitch size 3.
- Using main yarn knit 40 rows rib.
- Lift loops of main colour up to form hem filling empty needles and bringing them forward to working position 2.
- Stitch size 6. Knit 4 rows.
- Increase one stitch at each end of this and every following 5 rows. Increase 9 times altogether.
Remember:
To increase at both ends at once use single end of eyelet tool and pick up first loop under each stitch and hook on to next outside needle bringing it from non working position to working position 2.
text_image
11s -14x1s -6x1s -1x4s 4BR 59s +9x1s 4R 40R 41s- There are now 59 stitches.
Knit 48 rows straight. - Cast off 4 stitches at the beginning of next 2 rows.
- Decrease one stitch at each end every 2nd row 6 times.
- Decrease one stitch each end of every row 14 times.
- Cast off the remaining 11 stitches.
Neckband
- Bring 163 needles (full bed width) to working position 1. Return alternate needles to non working position. Stitch size 1.
- Knit 4 cast on rows in colour 2 as before bringing alternate needles forward.
- Stitch size 6. Knit 5 rows.
- Return needles to working position 1.
- Transfer alternate stitches to adjacent needles and take empty needles back to non working position.
- Stitch size 3. Knit 1 row colour 3.
- Using main colour knit 24 rows.
- Using colour 2 (waste yarn) knit 4 rows.
- Remove from machine.
NOTE: When attached neckband is folded in half and slip stitched into place. The last rows in colour 2 can then be removed.
To make up
- Remove colour 3 separation yarn from all ribs and neckband, dropping cast on in colour 2 from knitting.
- Pull ribs downwards to shape using a ruler or knitting needle inserted into the hem.
- Press lightly with a warm iron over a damp cloth, unless otherwise specified by yarn manufacturer.
- Sew up shoulder seams, side and sleeve seams.
- Sew in sleeves, matching the shoulder seam to centre of sleeve cap and matching side and sleeves seams.
NOTE: The garment is eased to fit the sleeve.
NOTE: The garment is eased to fit the sleeve. 6. Pull neckband vertically to ease into shape. Sew band round neck, commencing with ends at the "V". Fold band in half and slip stitch in place unravelling waste yarn as you go. Make a mitre at centre of the "V". You have now completed your first garment, and now the more you practice the more proficient and confident you will become.
For details of other knitting patterns, contact your nearest Singer stockist.
More advanced techniques
We will now move on to show you a few of the more advanced techniques. Practice these now and refer back should you wish to use them at any time.
Buttonholes
a) Round
These are used for small buttons in stocking stitch or cardigan bands. On the row before the button hole row, knitting needles back to working position 1.
Use the single end of your eyelet tool and transfer one stitch in the centre onto the needle next to it.
Bring the needles back out to working position 2 including the empty needle (latch open).
It will knit on the next row.
Break the yarn to enable you to lay the yarn from the carriage side and continue to knit.
b) Horizontal
Lay a 2nd colour yarn over the hooks of the needles corresponding to the required width of the buttonhole.

natural_image
Diagram of a coiled spring with rope routing (no text or symbols)Lower the needles by pulling on the butt to close the latches and to knit the auxiliary yarn.
natural_image
Diagram of interwoven mechanical parts with directional arrows indicating movement (no text or symbols)Reset those needles into position 2.
Continue to knit in main yarn.
When the garment is finished and pressed, gently remove the 2nd colour yarn finishing the open stitches off by hand, with a sewing needle and matching yarn, loosely as you go.
Italian decrease
To produce a fancy decrease on raglan sleeve shaping you will perform the decrease not at the edge but inside the edge of the knitting as follows:
- Bring 4 end needles from position 2 to position 1, using the eyelet tool as you did with 2 needles in the simple decrease.
natural_image
Diagram of interwoven mechanical components with no visible text or symbols- Transfer the 3rd stitch in, onto the next inside needle.
natural_image
Diagram of interwoven textile fibers with coiled threads (no text or symbols)- Now using the double end of your eyelet tool, move the last 2 stitches in, to close the edge.
natural_image
Diagram of interwoven textile or mesh structure with curved threads and no visible text or symbols- Bring the needles back out to working position 2, check that the empty end needle is back in non working position.
Knit 3 rows and repeat.
Picot hem
In exercise 7 you made a simple full needle hem. In order to produce a hem with a picot edge, knit half the number of rows in main yarn required. Bring needles to working position 1. Transfer every alternate stitch on to its adjacent needle but leave the empty needles in working position 1. Bring needles to working position 2 and knit the other half plus one extra row.
A picot edge will be formed when the hem is turned up by following the instructions given for a simple hem.
Cables
In order to produce cables you will need to purchase a second eyelet tool with a double end. Use a looser stitch size to avoid tightness from twists (suggested stitch size 7-8).
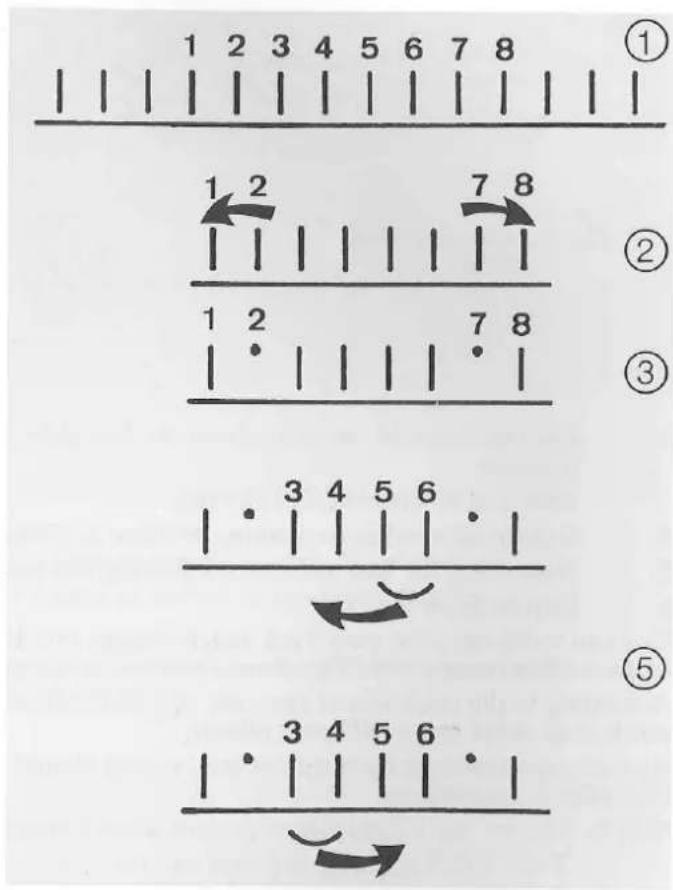
- Select the area where you wish to produce the cable and arrange needles as shown in figure 1.
- Transfer stitch on needle 2 to needle 1 and stitch on needle 7 to needle 8. Bring needles 1 and 8 back to working position 2 with stitches behind the open latch.
- Return empty needles 2 and 7 to non working position.
- Using both double ended eyelet tools transfer the stitches on needles 3 and 4 to the tool on the left and 5 and 6 on to the tool on the right.
- Now bring stitches 5 and 6 across to the left and lift them on to needles 3 and 4. Then move stitches from needles 3 and 4 across to needles 5 and 6.
- Bring all needles forward to working position 2. Making sure that the stitches slip behind the open latches and knit 6 rows.
- Repeat from 4 - 6 to top of garment. A longer cable may be produced or a shorter one, just change the number of rows knitted in between each twist.
- (Optional) After garment is completed pick up the loops formed at each side of the cable on the wrong side of the knitting as follows:
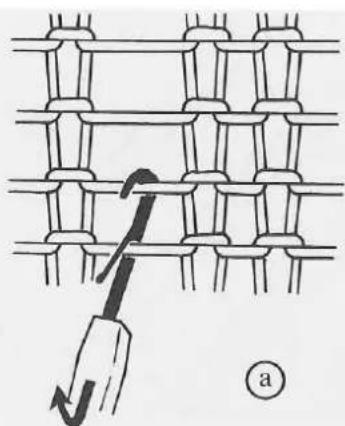
natural_image
Diagram of a hook insertion into a grid structure, showing structural deformation (no text or symbols)- Insert latch tool hook.
And slide through as shown.
In figure (a). Pick up the next loop and with one loop in front of and one behind the latch, pull through and repeat. This will form a purl stitch running vertically each side of the cable.
- Fasten last loop at top of knitting.
text_image
1 2 3 4 5 6 7 8 ① 1 2 7 8 ② 1 2 7 8 ③ 3 4 5 6 ⑤ 3 4 5 6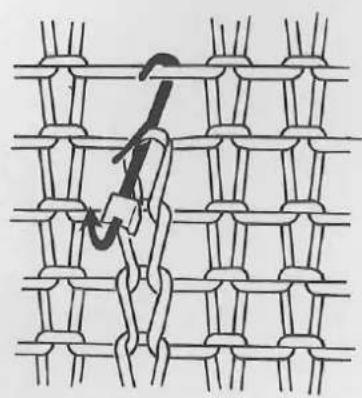
natural_image
Diagram of a woven textile or mesh structure with interlacing strands and a central hook (no text or symbols)Pattern knitting
Tuck Stitch
For Tuck Stitch pattern knitting, we recommend that you use 2/3 ply yarn. Stitch size 4-6.
NOTE: Purl side is the right side.
- Cast on and knit 10 rows.
- All needles are in working position 2.
METHOD:
A Tuck Stitch is formed by knitting on some needles but leaving the rest in holding position. The needle positions are then changed every few rows.
EXAMPLE:
Row 3 and 4
Row 1 and 2

text_image
Handwritten mathematical expression with grid and cross symbols, possibly representing a pattern or puzzleRepeat
Repeat

Needle in holding position

Needle in working position 2
- On the first row, working from the left side, bring the 3rd and every following 3rd needle into holding position.
Knit 2 rows with needles like this.
- Return all needles to working position 2. (Stitches behind the latches).
- Now bring the 2nd and every following 3rd needle into holding position and knit 2 rows.
- Repeat from No. 3 to 5.
You can work out your own Tuck Stitch designs but do not select two or more needles into holding position next to each other on any row. The closest you can select needles is every alternate needle.
According to the thickness of the yarn, you can knit one, two, three or four rows with the same needles in holding position in order to get different effects.
At least one needle at each side of the knitting should be in working position 2 on every row in order to obtain a neat edge for sewing up.
NOTE: Do not use a Tuck Stitch pattern when following garment instructions for Stocking Stitch.
Tuck Stitch knitting will turn out shorter and wider than Stocking Stitch, so only use garment pattern instructions written for Tuck Stitches.
Slip Stitch
For Slip Stitch pattern knitting 2/3 or 4 ply yarns can be used for different effects. Refer to stitch size section.
NOTE: Purl side is the right side.
- Cast on and knit 10 rows.
- Bring all needles to working position 1.
- Needle selector switch IN at the back of the carriage.
METHOD:
The needles to knit are brought forward to working position 2. The remainder stay in position 1 to form the Slip Stitch.
EXAMPLE:
other
| Row | Column | Needle in working position 2 | Needle in position 1 | |-----|--------|-----------------------------|----------------------| | 1 | Row | Yes | No | | 2 | Row | Yes | No | | 3 | Row | Yes | No | | 4 | Row | Yes | No | | 5 | Row | Yes | No | | 6 | Row | Yes | No | | 7 | Row | Yes | No | | 8 | Row | Yes | No | | 9 | Row | Yes | No |- Bring needles X into working position 2. Repeat for 3 rows as shown on rows 1-3 above.
- Bring needles X into working position 2. Repeat for 3 rows as shown on rows 4-6 above.
- Repeat from row 1. (Nos. 4-5).
You can design your own Slip Stitch design, but we recommend that you always have at least one needle at each side of your knitting in working position 2 to obtain a neat edge for sewing up.
Why not try this diagonal design.
text_image
RepeatEither continue the diagonal design or reverse for a chevron effect.
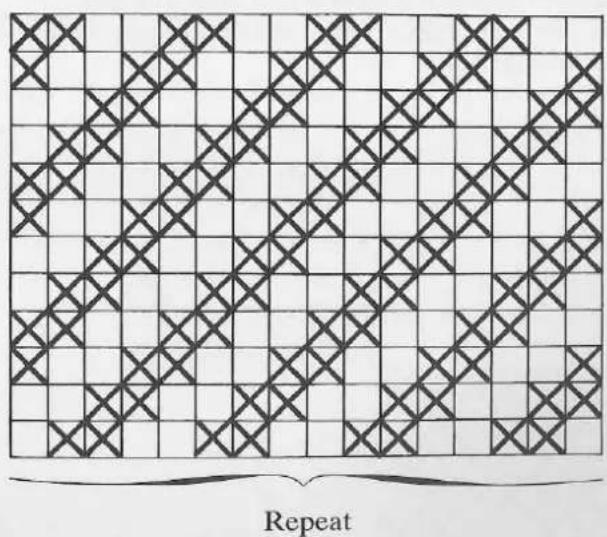
Fairisle
Using 2,4 ply yarns of different colours. Use one stitch size looser than used for Stocking Stitch.
- Cast on and knit 10 rows.
- Return all needles to working position 1. Needle selector switch IN at back of carriage.
METHOD:
Needles to knit on each row (either background colour or 2nd colour) are brought forward into working position 2.
Only one colour is knitted on each row.
scatter
| Row | Row 1 | Row 2 | Row 3 | Row 4 | Row 5 | Row 6 | Row 7 | Row 8 | Row 9 | Row 10 | Row 11 | Row 12 | |-----|-------|-------|-------|-------|-------|-------|-------|-------|-------|--------|--------|--------| | 1 | × | × | × | × | × | × | × | × | × | × | × | × | | 2 | × | × | × | × | × | × | × | × | × | × | × | × | | 3 | × | × | × | × | × | × | × | × | × | × | × | × | | 4 | × | × | × | × | × | × | × | × | × | × | × | × | | 5 | × | × | × | × | × | × | × | × | × | × | × | × | | 6 | × | × | × | × | × | × | × | × | × | × | × | × | | 7 | × | × | × | × | × | × | × | × | × | × | × | × | | 8 | × | × | × | × | × | × | × | × | × | × | × | × | | 9 | × | × | × | × | × | × | × | × | × | × | × | × | | 10 | × | × | × | × | × | × | × | × | × | × | × | × | | 11 | × | × | × | × | × | × | × | × | × | × | × | × | | 12 | × | × | × | × | × | × | × | × | × | × | | | | Repeat (repeated)- Bring needles as indicated above (X) into working position 2. Using 2nd colour, knit 1 row.
- Bring Needles as indicated in row 2 (X) into working position 2.
Using 2nd colour again, knit 1 row.
- Now return to row one of the Chart above. This time, bring needles that were previously left in position 1 (☐) to working position 2. Using main colour, knit 1 row.
- Go to row 2 again and bring needles (☐) to working position 2 again as in No. 5. Knit 1 row.
- Change to 2nd colour and follow rows 3 and 4 of Chart.
- Change to main colour and knit the background of rows 3 and 4.
- Continue reversing selection and yarn every 2 rows.
This design can be knitted as a single motif or continued right across your knitting.
It is not necessary to always knit two rows of each colour, but if you change your colour every row, you will need to break the yarn as it will not be on the carriage side.
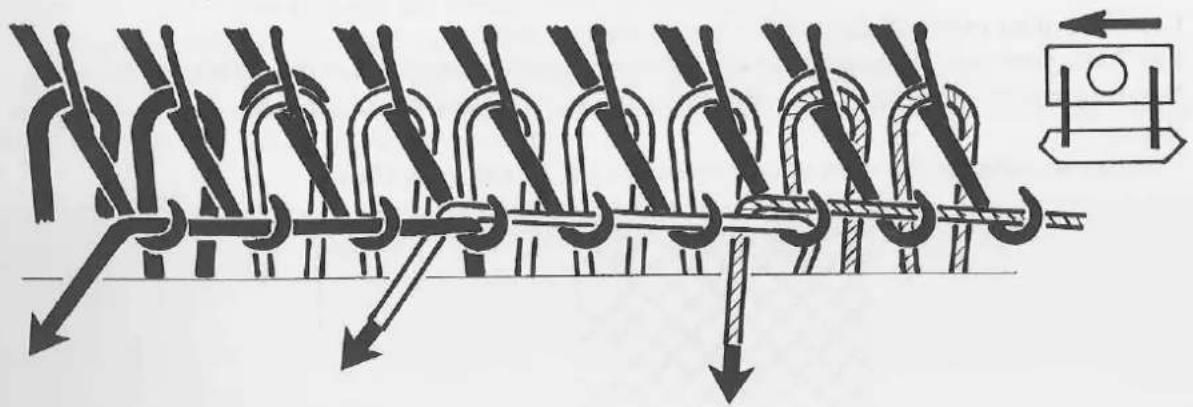
Intarsia knitting
Intarsia is the term used for colour pattern knitting without floats of yarns on the reverse side of the fabric.
Using 2 different colours
- Cast on and knit 10 rows.
- All needles are in working position 2.
- In this method, the two yarns are overlapped at the joining needle.
text_image
Diagram illustrating rope knotting steps with labeled arrows and a magnified inset showing a component.Both yarns should be laid over the needles in the same directions with the yarn ends at the carriage side.
EXAMPLE:
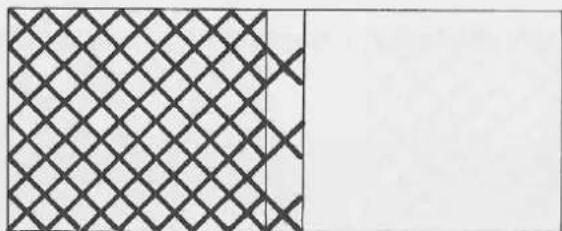
natural_image
Two adjacent rectangular panels: one with a diamond grid pattern on the left, the other empty (no text or symbols)- Lay first colour over half the needles on the carriage side.
- Lay 2nd colour over the needles on the other side overlapping yarns at the centre needle.
- Repeat each row remembering to always lay the yarns from the carriage side.
Repeat.
You can also change the sides of each colour to get a patchwork effect.
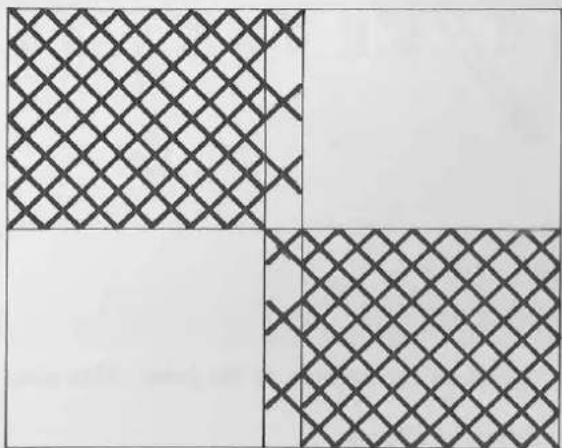
natural_image
Geometric pattern with four quadrants filled with diamond and crosshatch textures (no text or symbols)Intarsia using several colours
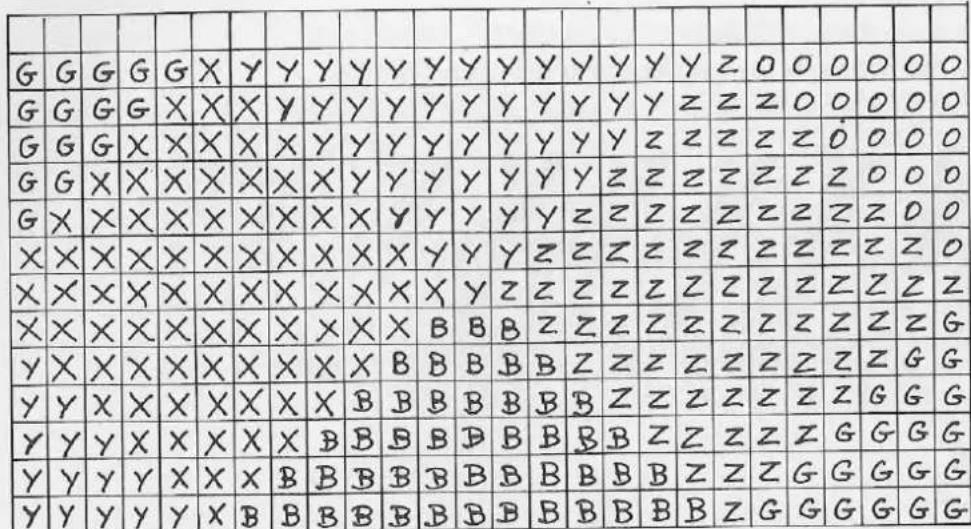
G = Green
B = Blue
Y = Yellow
X = Black
O = Orange
Z = White
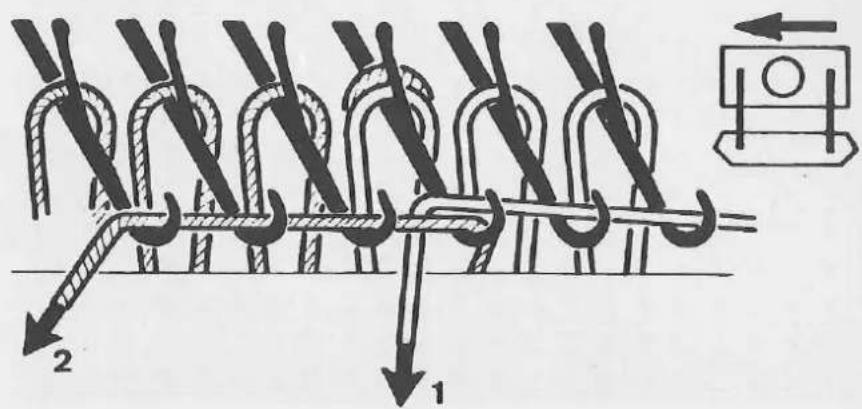
Lay yarns over needles from direction of carriage as shown above. Overlapping yarns over joining needles as follows:
text_image
Diagram illustrating how to tie a knot with multiple loops, showing directional arrows and a magnified inset of the loop.The Intarsia method shown so far, overlaps the colours at the joins. This gives a 'stitched together' look on the right side of the knitting.
You can use different methods for different effects.
Below we show you these and how they change the look of your patterning.
METHOD 2

text_image
Diagram illustrating rope knotting steps with labeled arrows and a control box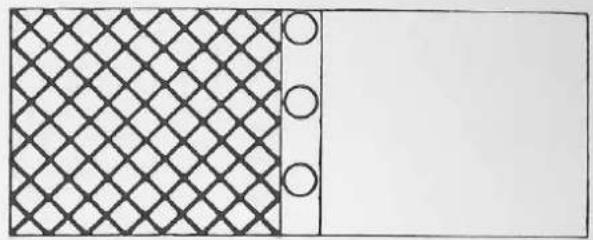
natural_image
Simple geometric diagram with a diamond pattern on the left and two circles on the right (no text or symbols)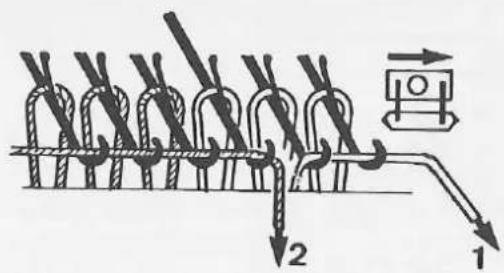
text_image
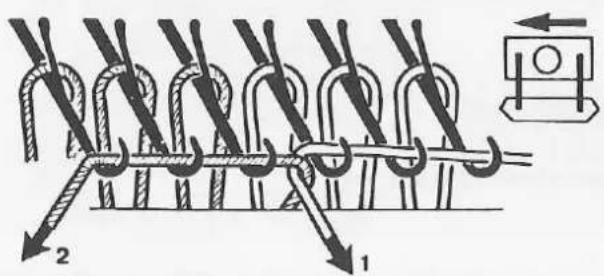
Technical diagram showing a coiled spring with labeled parts 1 and 2, indicating directional movement or force vectors.By not overlapping the yarns you can get a laced join effect.
METHOD 3
text_image
Diagram illustrating a rope knotting process with labeled parts 1 and 2, showing rope routing and directional arrows.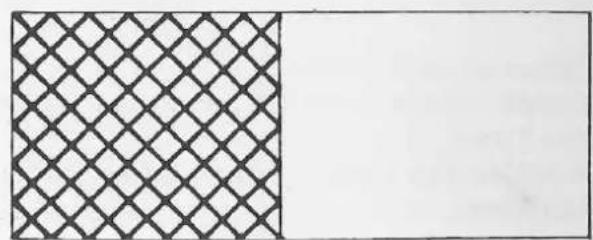
natural_image
Two adjacent rectangular panels: one with a diamond pattern on the left, the other empty (no text or symbols)By twisting the yarns under the needles between each row will give you a straight colour to colour join.
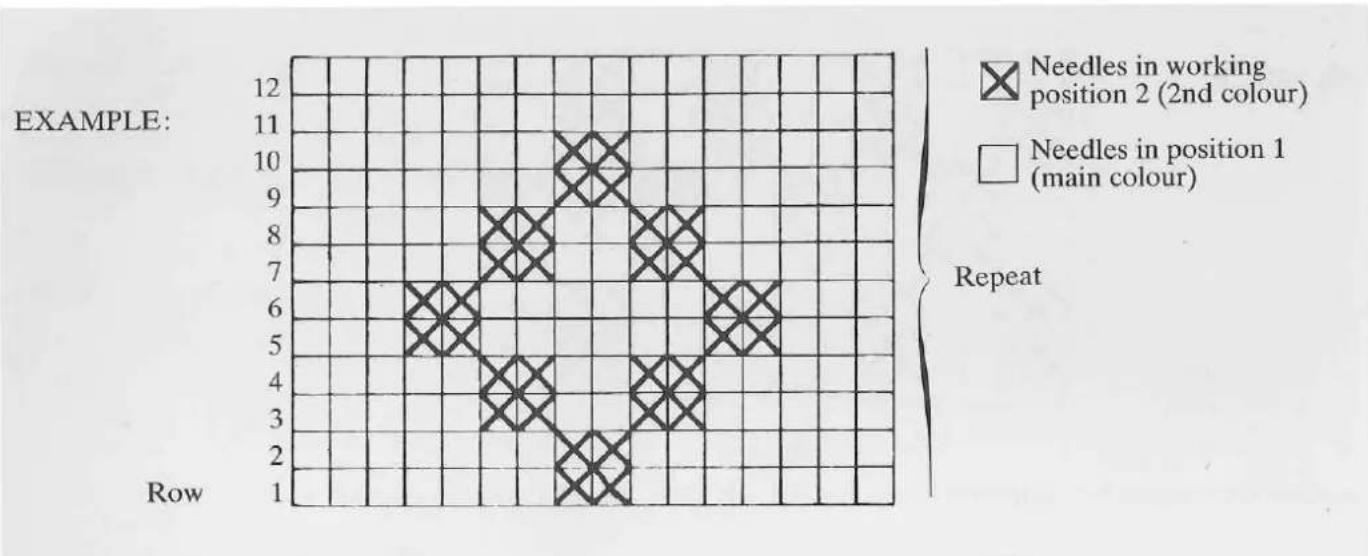
Open lace patterns
Just as holes were formed when you made a Picot edged hem, lace patterns are created by transferring stitches in the same way.
Here we show an example of how to create a lace motif. You can also repeat the design all over your garment.
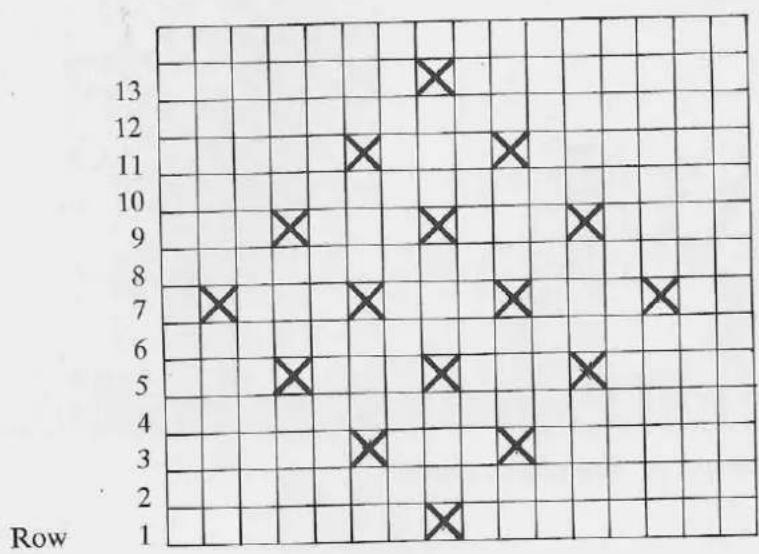
-
Cast on and knit 10 rows.
-
Transfer stitch as shown in Chart above (X) onto its adjacent needle.
Knit 2 rows.
- Row 3, transfer stitches as shown in Chart above (X) onto their adjacent needles.
Knit 2 rows.
- Continue following Chart until pattern is completed.
Try your own lace designs. You can transfer stitches in either direction (left or right) for different effects.
PLEASE NOTE: DO NOT transfer 2 stitches next to or above each other as too larger holes will be produced.
What to do if...
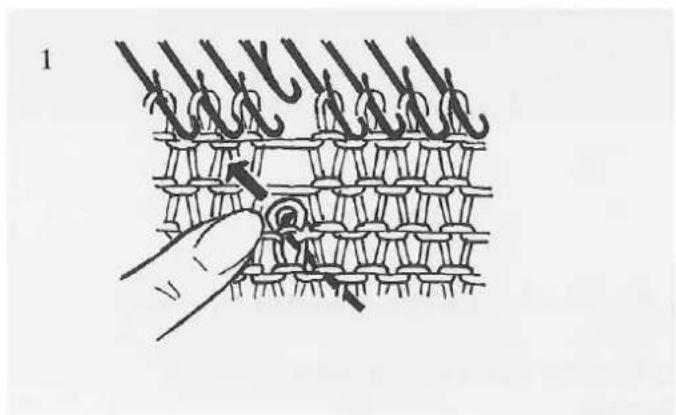
-
A needle jams and breaks: Turn to Section 'Care and Maintenance'.
-
You drop a stitch:
a) On one row:
Replace dropped stitch and the unknitted yarn onto the needle.
Pass the stitch behind the needle latch.
Place the yarn into the needle hook.
Move the needle back to form stitch.
natural_image
Diagram of interwoven mechanical linkages forming a mesh structure (no text or symbols)b) Several rows:
Insert the latch tool into the loop of the dropped stitch from the back of the knitting.
Push the tool up until the stitch slides behind the latch.
Take the yarn from the row above onto the hook of the tool.
Pull the tool downwards until the latch of the tool closes and a new stitch is formed.
When the last loop of yarn has been knitted, transfer the stitch onto the needle.
natural_image
Illustration of a hand pressing down on a knitted fabric with hook-like stitching (no text or symbols)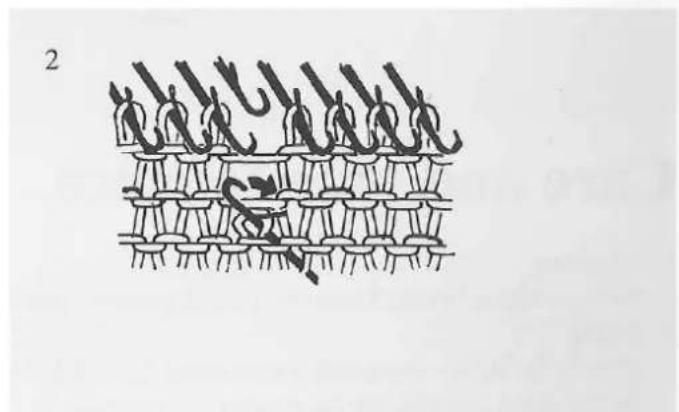
natural_image
Diagram of a knitted fabric pattern with repeating loops and a central knot (no text or symbols)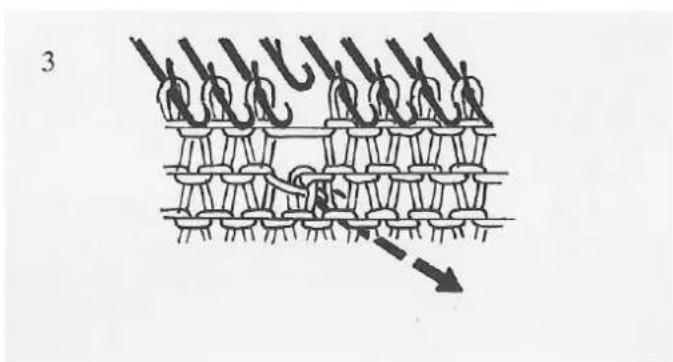
natural_image
Diagram of a knitted fabric pattern with hanging clips and a central seam, no text or symbols present
natural_image
Diagram of a knitted fabric with threads and a central knot, no text or symbols present- You are dropping edge stitches.
This is caused by the latch of the first needle closing before the yarn has been laid over, or the stitch is in front of the latch. Check that the latch is open before knitting and that the stitch is behind the latch.
- You drop other stitches:
Check that you have no broken needles or needles with bent latches. If you do, turn to Section 'Care and Maintenance'.
If not, the dropped stitch(es) will have been caused by the needle latches being closed or the previous stitches remaining in front of and not behind the open latches.
- Carriage hits needle butts:
Needles are not in alignment with the correct holding or working position.
- Carriage jams:
Release front carriage plate and remove from carriage.
Release jammed needles.
Move carriage to end of knitting. Attach carriage plate, align needles and resume knitting.
text_image
A BCare and maintenance
- Cleaning
Using a nylon brush, clean the needle grooves regularly in order to avoid deposits of fluff and dust.
- Oiling
Lightly lubricate the needle butts using SINGER Sewing Machine oil on a clean cotton cloth.
In the same way, lightly lubricate the underside of the carriage.
With needles in working position 2, take the carriage to and fro across the needles without using yarn.
Do not over-lubricate.
3. Changing a needle
(a) The front rail on the needle bed must be moved. Place the special tool provided at the end of the needle bed in line with the rail and push. Pull the rail out only as far as the damaged needle.
(b) The needle must be removed with the latch closed unless it is too damaged and then we recommend that you cut the end of the needle off using a pair of pliers.
(c) Lift the needle by the butt and pull it carefully out backwards, taking care not to damage the needle retaining spring.
(d) Open the latch of the new needle and place it in the needle groove.
(e) Slide it forward carefully and into position under the spring.
(f) Push the rail back to secure in place.
natural_image
Technical line drawing of a mechanical component with directional arrows indicating motion or force (no text or symbols)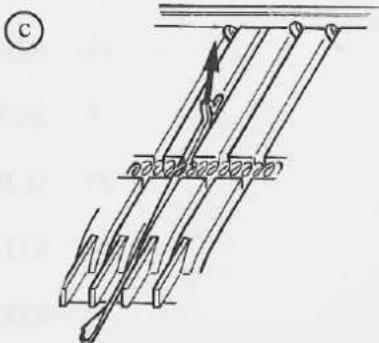
natural_image
Pure mechanical diagram showing a ladder with pulley and rope connections (no text or symbols)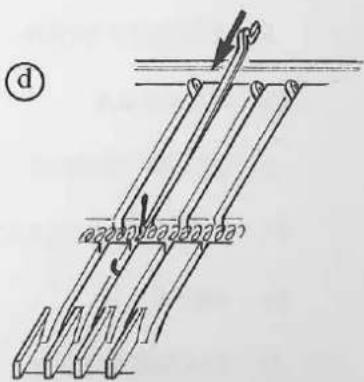
text_image
(d)NOTE
Take special care so as to not damage the retaining spring.
GLOSSARY
-
ACCESSORIES
-
BUTT
-
BUTTONHOLES
-
CABLES
-
CARE AND MAINTENANCE
3-4. CARRIAGE
-
CASTING OFF
-
CASTING ON
-
CHANGING A NEEDLE
-
CLAMP
-
CLAMP SOCKET
-
DECREASING
-
EDGE WEIGHTS
-
EYELET TOOL
-
FAIRISLE
-
FLOW COMBS
-
GARMENT SHAPING
-
HEM
-
INCREASING
25-26-27. INTARSIA
-
ITALIAN DECREASING
-
JUMPER PATTERN
-
LACE
-
LATCH
-
LATCH TOOL
-
MOCK RIB
22-28 *MOTIFS
-
NEEDLE
-
NEEDLE BED
1-4. NEEDLE BUTT
1-4. NEEDLE HOOK
1-4. NEEDLE LATCH
-
NEEDLE POSITIONS
-
NEEDLE SELECTION
3-5. NEEDLE SELECTOR SWITCH
1-5. NEEDLE SELECTOR TOOL
-
OPEN LACE
-
PARTIAL KNITTING
-
PATTERN
-
PICOT HEM
-
RETAINING SPRINGS
-
RIBS
-
SETTING UP
-
SLIP STITCH
-
STITCH FORMATION
-
STITCH SIZE DIAL
-
STITCH SIZES
-
STOCKING STITCH
-
TUCK STITCH
-
WELT
-
WHAT TO DO IF...
-
YARN CLIP