Strada 3.1 - Ukategoriseret Carnielli - Gratis brugsanvisning og manual
Find enhedens vejledning gratis Strada 3.1 Carnielli i PDF-format.


Brugerspørgsmål om Strada 3.1 Carnielli
0 spørgsmål om dette apparat. Besvar dem du kender, eller stil dit eget.
Stil et nyt spørgsmål om dette apparat
Download vejledningen til din Ukategoriseret i PDF-format gratis! Find din vejledning Strada 3.1 - Carnielli og tag din elektroniske enhed tilbage i hånden. På denne side er alle dokumenter nødvendige for brugen af din enhed offentliggjort. Strada 3.1 af mærket Carnielli.
BRUGSANVISNING Strada 3.1 Carnielli
Manuale delle istruzioni Instruction manual
natural_image
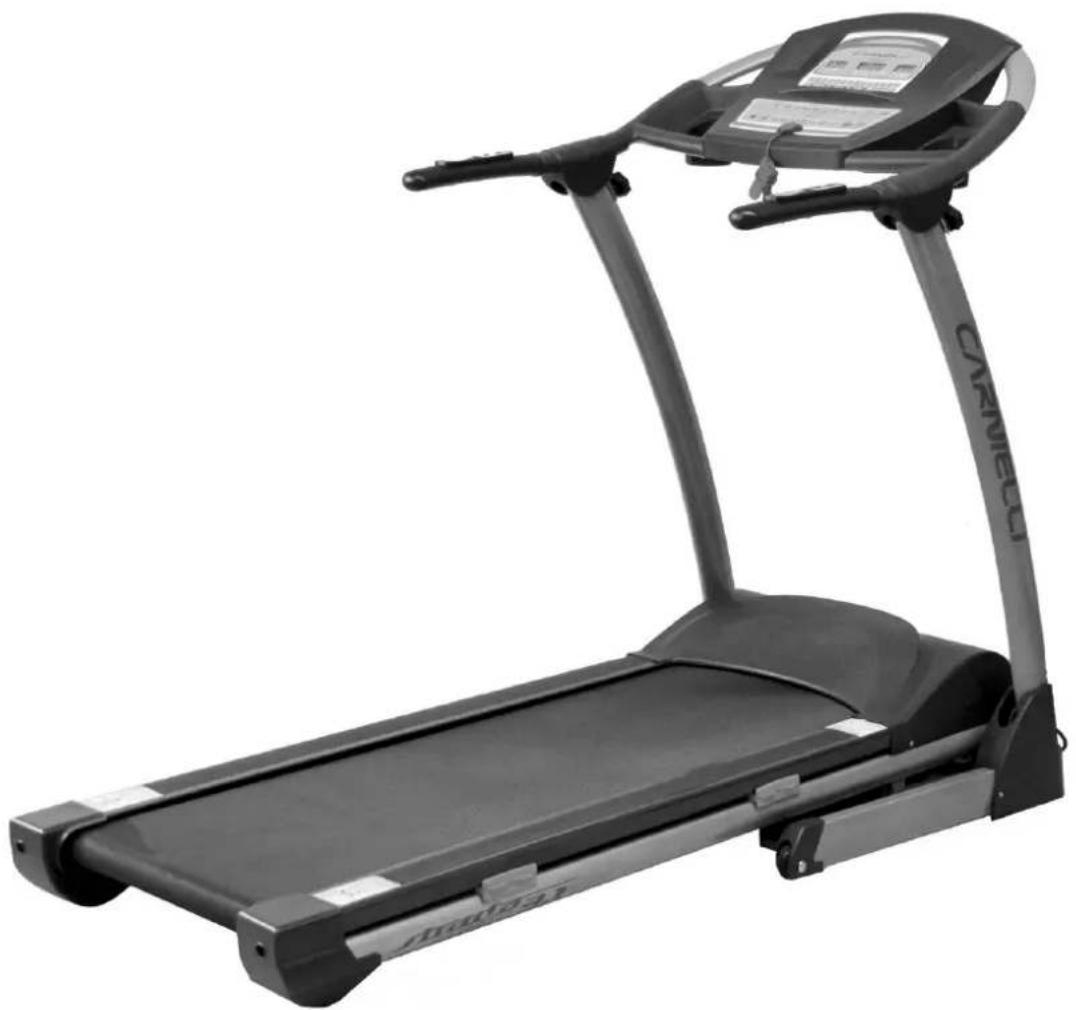
Black treadmill with visible branding and control panel, no text or symbols on the device itselfTapis Roulant STRADA 3.1
Vi ringraziamo per la fiducia accordataci, acquistando il Tapis Roulant STRADA 3.1.
Le brevi istruzioni che seguono hanno lo scopo di illustrarne le caratteristiche e le prestazioni, per consentirvi di trarre i migliori benefici, con vostra piena soddisfazione.
Prima di usare il Tapis Roulant leggete attentamente questo manuale, che vi consigliamo di conservare per i riferimenti futuri.
AVVISO IMPORTANTE: Questo modello di Tapis Roulant destinato ad un uso domestico. Non è adatto per l'uso in palestra e/o comunità o ad uso terapeutico.
Thank you for having chosen our Tapis Roulant STRADA 3.1 which we feel sure will give you complete satisfaction.
The short instructions which follow, together with specification and performance data, will enable you to obtain the maximum benefit from your purchase and lasting enjoyment. Please read this short manual carefully before putting your Tapis Roulant into use and keep by you for future reference.
IMPORTANT: Tapis Roulant is intended for use as a home trainer and is not suitable for use in gym clubs.
Per la vostra sicurezza leggere attentamente le istruzioni seguenti.
For your safety please read this page first
IMPORTANTE: Prima di iniziare qualsiasi programma di esercizio fisico è opportuno consultare il proprio medico.
L'attrezzo sportivo per l'allenamento domestico deve essere utilizzato solo per l'uso destinato, cioè l'allenamento del corpo di persone adulte.
E' fatto divieto d'uso dell'attrezzo in modo autonomo a tutti coloro che, per ragioni diverse, sono portatori di limiti fisici o di altra natura sia temporanei che permanenti se non permanentemente seguiti da personale professionalmente preparato per tale scopo.
Ogni altro uso non è permesso ed è inoltre pericoloso. Il costruttore non può essere reso responsabile di danni che si sono prodotti in seguito ad un uso inadeguato.
Voi vi allenate con un prodotto che per tecnica e sicurezza corrisponde agli ultimi ritrovati. Si sono evitate e sono state protette nel modo possibile le parti che possono essere fonte di ferite.
Prima di effettuare qualsiasi tipo di manutenzione descritta in questo manuale, assicurarsi di staccare il cavo di alimentazione. Non togliere la copertura del motore se non sotto esplicita richiesta da parte di personale autorizzato alle riparazioni. Manutenzione che vada al di fuori di quanto stabilito dal manuale dovrebbe essere effettuata esclusivamente da personale autorizzato.
L'esecuzione di riparazioni inadeguate e di modifiche alla costruzione (smontaggio di parti originali, montaggio di parti non consentite, ecc.) può risultare pericoloso per l'utente.
IMPORTANT: Before starting any physical exercise program you should seek medical advice.
Sports equipment for training at home must only be used for its designated use, which is to train adult bodies.
Persons affected for whatever reason by physical or other types of incapacity, whether temporary or permanent, must never be allowed to use the equipment unassisted except under the constant supervision of a person or persons trained professionally for the purpose.
Any other use is not permitted and is moreover dangerous. The manufacturer cannot be held liable for damage caused as a result of inappropriate use.
You are training with a product whose technology and safety meet the latest standards. Parts that could be a source of injury have been avoided and made as safe as possible.
Always unplug the power cord before performing the maintenance and adjustment procedures described in this manual. Do not remove the motor covering unless instructed to do so by an authorised service representative. Servicing other than the procedures in this manual should be performed by an authorized service representative only.
Inadequate repairs and modifications to the structure (removing original parts, mounting unauthorized parts, etc.) can be dangerous for the user.
Nel caso il Vostro tapis roulant necessiti di ulteriori servizi di manutenzione, si prega di rivolgersi ai centri di assistenza autorizzati.
I componenti danneggiati possono influire sulla vostra sicurezza e la durata dell'attrezzo. Quindi sostituire subito le parti danneggiate o usurate e mettere l'attrezzo fuori servizio fino al completamento della riparazione. In caso di bisogno usate solo parti di ricambio Carnielli Fitness.
In caso di dubbio o di domande rivolgetevi al vostro concessionario.
In caso di allenamento intenso e regolare controllate ogni mese o ogni due mesi tutte le parti dell'attrezzo, particolarmente le viti e i dadi.
Informate i presenti (specialmente i bambini) sulla possibilità di pericolo durante l'esercizio.
Sarà la responsabilità del proprietario del tapis roulant assicurarsi che tutti coloro che usufruiranno dell'attrezzo siano a conoscenza di tutte le precauzioni necessarie.
Tenere il tapis roulant dentro casa; non posizionarlo in un garage, né terrazzo o portico coperto, né vicino a fonti d'acqua o di calore, né in luoghi umidi o polverosi, né vicino a vetrate o direttamente esposto alla luce solare.
Tenere lontano da animali e bambini.
Non accendere il tapis roulant se si è in piedi sul tappeto.
Nell'utilizzo del tapis roulant, tenersi saldamente ai manubri.
Il tapis roulant raggiunge anche velocità elevate. Al fine di evitare grandi sbalzi si consiglia di aggiustare la velocità a piccoli intervalli.
Si consiglia di non utilizzare il tapis roulant vicino ad aerosol o in luoghi dove è presente ossigeno in quantità ingenti.
Non lasciare incustodito il tapis roulant quando è in funzione. Quanto il tapis roulant è spento togliere la chiave di sicurezza e spostare l'interruttore on/off in posizione "off". Per individuare l'interruttore on/off, fare riferimento alla sezione "SICUREZZA ELETTRICA" di questo manuale.
Nel piegare o spostare il tapis roulant, assicurarsi che il pomolo manubrio e la copertura del pomolo manubrio siano ben protetti. Fare riferimento alle istruzioni di piegatura per una chiusura sicura.
Tenere il cavo di alimentazione lontano da superfici calde.
Please refer to the customer service information contained in this manual should the treadmill require additional service.
Damaged components can jeopardize your safety and the duration of the equipment. Therefore, replace damaged or worn parts immediately and put the equipment out of service until repairs have been completed. In case of need, use only Carnielli Fitness parts.
If you have any doubts or questions, call your dealer.
In the case of regular, intensive training, every month or two check all the parts of the equipment especially the nuts and bolts.
Inform those present (especially children) about the possibility of danger during exercise.
It is the responsibility of the owner to be sure that all users of this treadmill are informed of all warnings and precautions.
Keep the tapis roulant inside the house; do not leave it in the garage, balcony or veranda. Keep it away from sources of heat; do not leave it in damp or dusty places, next to glass walls or under direct sunlight.
Keep pets and small children away from the treadmill at all times.
Never start the treadmill while you are standing on the walking belt.
Always hold the handrails while using the treadmill.
The treadmill is capable of high speeds. To avoid sudden jumps in speed, adjust the speed in small increments.
Do not operate when aerosol (spray) products are being used or where oxygen is being administered.
Never leave the treadmill unattended while it is running. Always remove the safety key and move the on/off switch to the "off" position when the treadmill is not in use. Refer to the precautions section of this manual for the location of the on/off switch
When folding or moving the treadmill, make sure that the safety lock is fully engaged. Refer to the folding instructions pages of this manual for safety lock operation.
Keep the plug and power cord away from heated surfaces.
Tenere lontano da acqua o altri liquidi tutti i componenti elettrici quali il motore, il cavo di alimentazione e l'interruttore on / off, onde evitare scosse. Non appoggiare oggetti sul manubrio, console computer o sul tappeto. Non appoggiare liquidi su qualsiasi parte della macchina.
Montare ed azionare il tapis roulant su una superficie solida e regolare.
Inserire sempre la chiave di sicurezza ed attaccare la clip ai vestiti intorno alla vita prima di iniziare l'esercizio. Se ci fossero dei problemi e fosse necessario spegnere il motore, tirare il cavo che a sua volta disinserirà la chiave di sicurezza dalla console. Per continuare l'esercizio, reinserire la chiave di sicurezza nella console.
Togliere la chiave e conservarla in un luogo sicuro quando il tapis roulant non è in uso. Tenere la chiave di sicurezza lontano dalla portata dei bambini.
Si consiglia di indossare un abbigliamento e scarpe adeguate per l'esercizio. Non indossare indumenti molto larghi o scarpe con suole di cuoio o con i tacchi. Si consiglia di tenere i capelli lunghi raccolti.
Tenere lontano dal tappeto vestiti larghi o asciugamani. Nel caso un oggetto dovesse rimanere impigliato nei rulli o nella cinghia, quest'ultima non si fermerà immediatamente. Nel caso un oggetto venga impigliato, spegnere immediatamente la macchina.
Per salire e scendere dal tapis roulant, mettersi a gambe divaricate a cavallo del tappeto, mettendo i piedi destro e sinistro sulle pedane di plastica laterali al tappeto (sia prima di iniziare l'esercizio che al termine).
Salire ed iniziare a camminare sulla superficie del tapis roulant a bassa velocità. Non scendere dal tapis roulant se il tappeto è ancora in movimento.
Si consiglia di non girarsi una volta che il tapis roulant è acceso. Mantenere il corpo e la testa sempre girati in davanti.
Non accendere il tapis roulant se qualcuno vi si trova sopra.
Non scuotere il tapis roulant, o salire sui manubri o sulla console.
Non sovraffaticarsi durante l'esercizio. In caso di malori, cessare immediatamente l'esercizio e consultare un medico.
Keep all electrical components, such as the motor, power cord and on/off switch away from water or other liquids to prevent shock. Do not set anything on the handrail, computer console or belt. Never place liquids on any part of the unit.
Assemble and operate the treadmill on a level, solid surface.
Always insert the safety key and attach the clip to your clothing at your waist before beginning your workout. If you should encounter problems and need to stop the motor quickly, simply pull on the cord to disengage the safety key from the console. To continue operation simply reinsert the safetykey into the console.
Remove the safety key and store it away in a safe place when the treadmill is not in use. Keep the safety key away from children.
Wear the proper exercise clothing and shoes for your workout. Do not wear loose clothing or shoes with leather soles or heels. Be sure to tie long hair back.
Keep all loose clothing and towels away from the running surface. The belt will not stop immediately if an object becomes caught in the rollers or belt. Should an object become caught, turn the unit off immediately.
Proceed with caution when getting on or off the treadmill. Use the handrails whenever possible. Only step onto the running surface when it is running at a very slow speed. Do not step off the treadmill while the belt is moving.
To get on or off the running surface, staddle the running surface by standing on the right and left plastic platforms on each side of the belt before starting the belt (to begin your workout) and after it has stopped (at the end of your workout).
Never attempt to turn around while on the treadmill with the belt running. Keep your head and body facing forward at all times.
Never turn on the treadmill while someone is standing on the running surface.
Do not rock the treadmill, stand on the handrails or computer console at any time.
Do not overexert yourself during your workout. Stop your workout immediately. If you feel any pain or discomfort consult your physician.
SICUREZZA ELETTRICA
Questo prodotto va messo a terra. Nel caso di malfunzionamento o guasti, la messa a terra è il percorso a più bassa resistenza per la corrente elettrica e che diminuisce quindi le probabilità di scosse. Questo prodotto è provvisto di un cavo compreso di un conduttore a terra e una spina a terra. La spina deve essere inserita nell'apposita presa, che deve a sua volta essere correttamente installata e messa a terra secondo le norme ed ordinanze locali.
ELECTRICAL SAFETY
This motorized treadmill must be grounded. Should it break or malfunction, grounding reduces the risk of shock. The treadmill is equipped with a power cord having an equipment-grounding conductor and a grounding plug. The plug must be inserted into an appropriate outlet that is properly installed and grounded in accordance with all local codes and ordinances.
IMPORTANTE: un'erronea installazione delle attrezzature per la messa a terra potrebbe portare ad un più alto rischio di scosse. Nel dubbio, consultare un clettricista o tecnico specializzato per assicurarsi che la messa a terra sia effettuata correttamente. Non cambiare o manomettere la spina in dotazione, nel caso non dovesse andar bene per la presa, chiamare un tecnico specializzato ad installare la presa corretta.
Questo prodotto fa uso di un circuito a 220 volts. Assicurarsi che il prodotto sia collegato ad una presa compatibile. Si raccomanda di non usare alcun dispositivo adattatore con questo prodotto.
IMPORTANT: Improper connection of the equipment grounding conductor can result in a risk of electric shock. If you are in a doubt as to whether the treadmill is properly grounded, check with a qualified electrician or service person. Do not modify the plug provided with the treadmill. If it does not fit the outlet then get a proper outlet installed bt a qualified technician.
This product is for use on a nominal 220 volts circuit. Make sure that the product is connected to an outlet having the same configuration as the plug. No adapter should be used with this product.
text_image
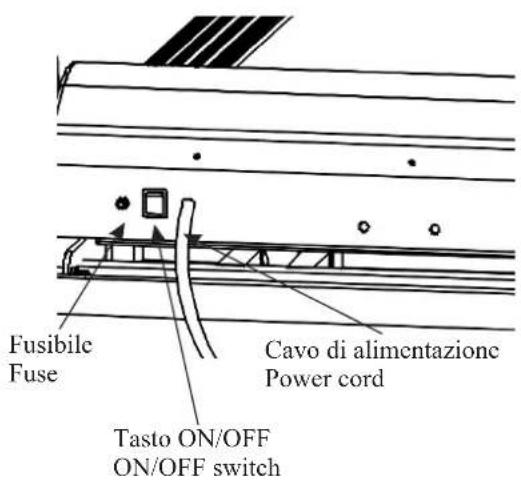
Fusibile Fuse Cavo di alimentazione Power cord Tasto ON/OFF ON/OFF switchSALVAVITA: Benché questo tapis roulant sia provvisto di salvavita interno, si consiglia ugualmente l'utilizzo di un salvavita esterno. Il tapis roulant si spegnerà automaticamente in caso di sovraccarico di corrente. Un fusibile si trova in basso nella parte anteriore della protezione motore (vedi figura). Nel caso il tapis roulant si spenga da solo, mettere l'interruttore on/off nella posizione "Off", staccare il cavo di alimentazione dalla presa di corrente e verificare se il fusibile è interrotto oppure no. Nel caso in cui sia necessario, sostituire il fusibile e verificare il funzionamento della macchina. Ora il tapis roulant dovrebbe funzionare.
SURGE PROTECTION: Although this treadmill is equipped with built in surge protection, an external surge protector is still recommended. The treadmill will shut off automatically if it encounters a surge in power. A fuse is located at the lower front of the motor covering (see picture). If the treadmill should shut down you should first, turn the on/off switch to the "off" position, unplug the power cord from the electrical outlet and check the fuse is interrupted or no. If you need, replace the fuse and verify the operation of the machine. The treadmill will now work properly.
MODELLO: STRADA 3.1
PESO MASSIMO
UTILIZZATORE: Kg 115
MODEL: STRADA 3.1
USER'S WEIGHT: 253lbs,
PRIMA DI INCOMINCIARE
Attenzione: c'è un limite massimo di peso per l'utilizzo di questo prodotto. Si sconsiglia l'uso di questo prodotto a persone il cui peso supera i 115 kg (253 libbre). Potrebbero rivelarsi considerevoli danni se il peso dell'utente supera il limite massimo suggerito. Il prodotto non è in grado di sostenere un peso superiore a quello prestabilito.
BEFORE BEGINNING
Please note that there is a weight limitation for this product. If you weigh more than 253 lbs (115 kg) it is not recommended that you use this product. Serious injury may occur if the user's weight exceeds the limit shown here. This product is not intended to support users whose weight exceeds this limit.
Gli attrezzi
Prima di iniziare il montaggio del Vostro tapis roulant, assicurarsi di avere a portata di mano gli attrezzi necessari per un corretto montaggio. Avere a disposizione tutti gli attrezzi necessari permetterà di risparmiare tempo e renderà più facile il montaggio.
Gather your tools
Before starting the assembly of your unit, make sure that you have gathered all the necessary tools you may require to assemble the unit properly. Having all of the necessary equipment at hand will save time and make assembly quick and hassle-free.
Sgombrate l'area di lavoro
Assicurarsi di avere uno spazio sufficiente per il montaggio corretto dell'unità, ed accertarsi che non vi siano oggetti nei paraggi che possano causare danni durante il montaggio. Non spostare, alzare o comunque movimentare il tapis roulant dal suo imballo prima di averlo assemblato correttamente. Fare molta attenzione alle dita durante le fasi di assemblaggio. Una volta che l'unità sarà completamente montata, assicurarsi che venga posizionata in un luogo sufficientemente ampio, da non ostruirne l'operazione. Lasciare libero uno spazio di almeno 2m (lunghezza) x 1m (larghezza) dietro il tapis roulant.
Clear your work area
Make sure that you have cleared away a large enough space to properly assemble the unit. Make sure space is free from anything that may cause injury during Assembly. Do not move treadmill out of the box until unit is assembled completely. Be careful not to pinch fingers during assembly. After the unit is fully assembled, make sure there is a comfortable amount of free area around the unit for unobstructed operation. Keep at least 2m(L) x 1m(W) safety area behing the treadmill.
Invitate un amico
Durante il montaggio sarà necessario spostare dei pezzi pesanti (più di 45.5 kg / 100 libbre). L'aiuto di un'altra persona può rendere il montaggio più sicuro e più facile. Invitate un amico ad AiutarVi nel montare il Vostro nuovo tapis roulant. A parte essere più sicuro, sarà anche più divertente!
Invite a friend
Some of the assembly steps may require some heavy lifting (in excess of 100lbs./45.5 kg). Assembly can be made much safer and easier with the help of another individual. Invite a friend to help with the assembly of your new exercise equipment. It is not only safe, but fun!

natural_image
Two technical line drawings of tools: a bent wrench and an adjustable wrench (no text or symbols)
natural_image
Technical line drawings of a pair of mechanical components, including a fan, blade, and bracket (no text or symbols)Italiano
English
DISEGNI A CONFRONTO
COMPARISON CHART
Per Vostra semplicità, abbiamo incluso la lista degli attrezzi usati per il montaggio di questo prodotto. I disegni qui di seguito sono stati inclusi per aiutarVi ad identificare alcuni dei pezzi che potreste non conoscere.
For your convenience, we have identified the hardware used in the assembly of this product. This chart is provided to help you identify those items that may be unfamiliar to you.
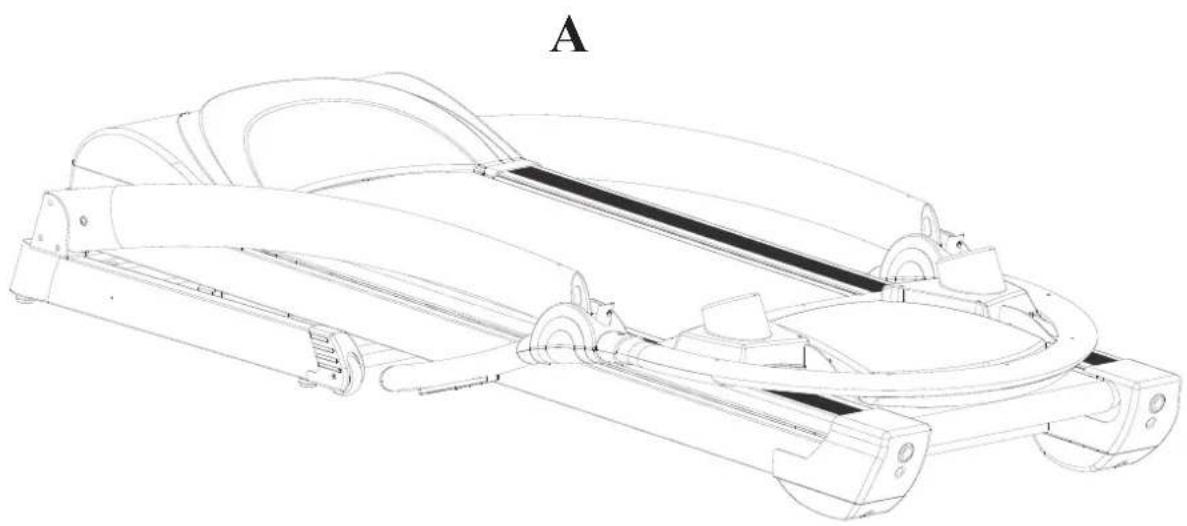
A. Telaio principale e computer pz.1
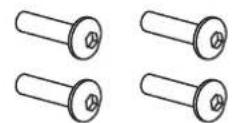
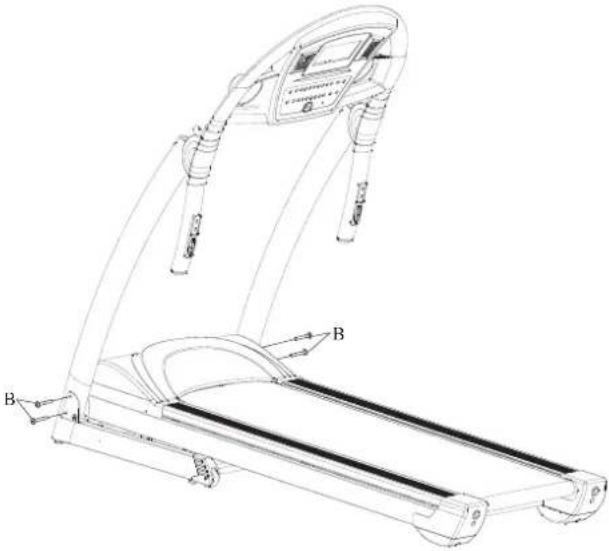
B. Vite M8 x 50 pz.4
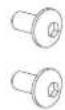
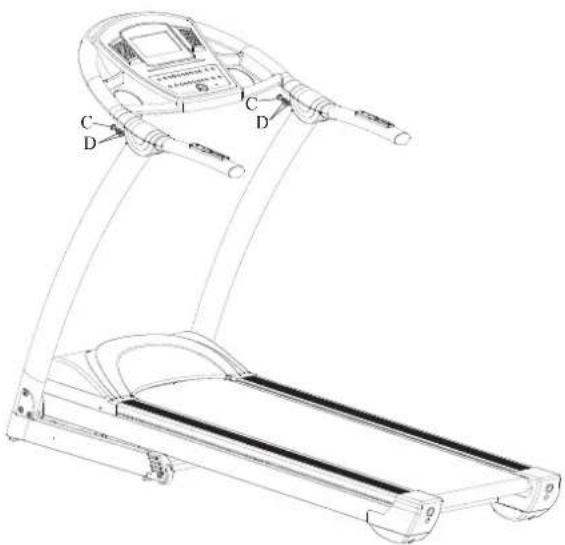
C. Vite "manopola" M8 x 10 pz.2
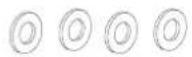
D. Rondella pz.4
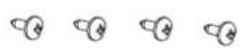
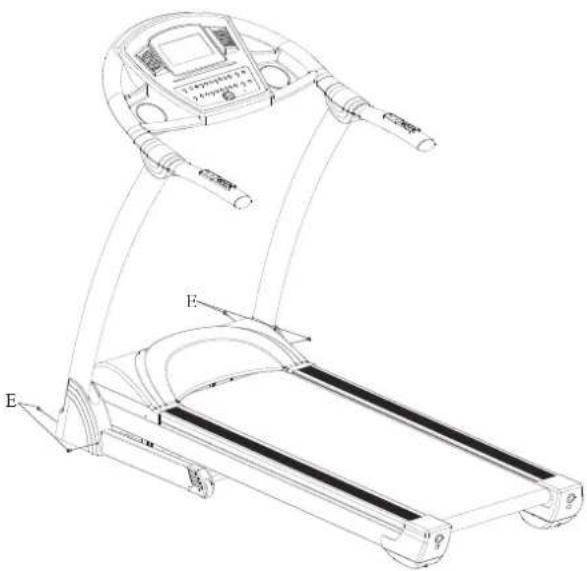
E. Vite M4 x 15 pz.4
F. Chiave a brugola pz.1
G. Chiave multifunzione pz.1
H. Chiave di sicurezza pz.1
I. Protezioni in plastica pz.2
A. Mainframe & computer pz.1
B. Bolt M8 x 50 pz.4
C. Bolt M8 x 10 pz.2
D. Washer 8 x 19 pz.4
E. Bolt M4 x 15 pz.4
F. Wrench pz.1
G. Wrench pz.1
H. Safety key pz.1
1. Side cap pz.2
natural_image
Technical line drawing of a mechanical device with multiple wheels and a central shaft (no text or symbols)Italiano
English
MONTAGGIO
ASSEMBLY
natural_image
Technical line drawing of a treadmill with labeled parts (no text or symbols present)Sollevare i supporti verticali e il computer; avvitare le viti (B) sulla parte laterale dei due piantoni con la chiave in dotazione (come indicato in figura).
Lift the upright handlebars, and then place Screw (B) to the bottom of the handlebars (as picture).
text_image
C D C DRuotare il computer e posizionarlo come indicato in figura; prestare molta attenzione al cavo di collegamento elettrico. Avvitare le viti “manopola”(C) con le rondelle (D) con la chiave in dotazione.
Place the console to the correct position. Attach the console to the upright by pressing both handlebars. Tighten Screw (C) and Washer (D) with Allen Key to secure the console.
text_image
Technical line drawing of a treadmill with labeled parts and motion indicatorsFissare le due protezioni in plastica laterali (I) con due viti (E).
Attach side cap(I) with bolt (E) at the bottom of the upright, and tighten them well.
text_image
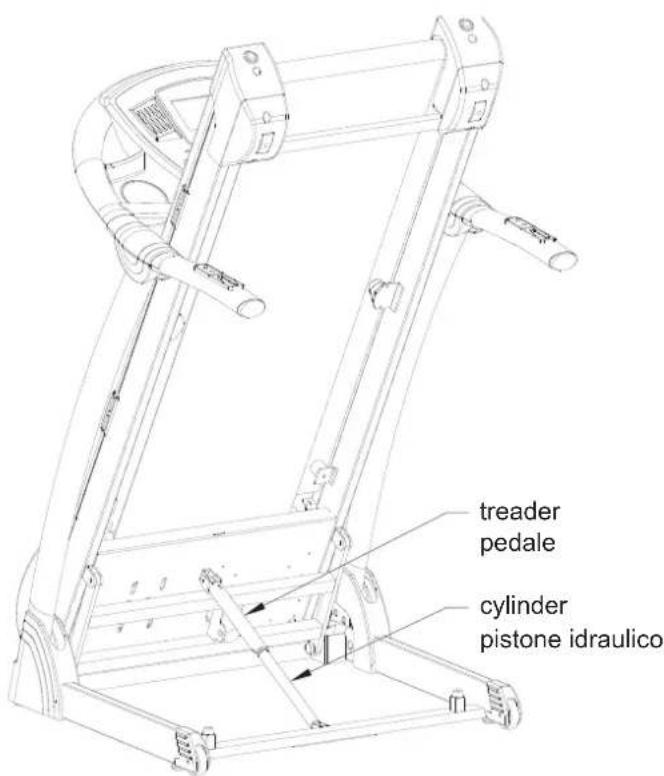
treader pedale cylinder pistone idraulicoIl tapis roulant è facilmente richiudibile dopo l'uso. Posizionare la chiave di sicurezza in posizione SAFETY KEY, spegnere il tapis roulant dall'interuttore generale, staccare il cavo di alimentazione dalla presa di corrente. Sollevare la parte posteriore del tapis roulant finchè il pedale inferiore (vedi figura) va a bloccare il movimento. Assicurarsi che la parte sollevata sia bloccata in modo corretto.
ATTENZIONE: prima di richiudere il Tapis Roulant assicurarsi che l'inclinazione della pedana sia a livello "0", per evitare danni irreparabili.
After assembly is complete, you may fold the machine into the upright position for storage. To hold the upper end of machine, sympleraise the deck until it locks in to position. Make sure you hear the click sound of the deck locking into position. This is to ensure the deck is locked in place and will not drop back down.
CAUTION: Make sure the Treadmill's elevation is at "0", before folding the deck. If the elevation is not at "0", it would cost damage to the mechanism.
Per ripristinare il tapis roulant premere con il piede il pedale inferiore (come da figura) ed abbassare la parte posteriore, utilizzando entrambe le mani, fino a toccare con le rotelline posteriori il pavimento.
Avviso: questa macchina è dotata di un sistema di sicurezza che facilita l'abbassamento della tavola del Tapis Roulant. Assicurarsi prima dell'apertura che non vi siano persone, animali domestici e/o oggetti sotto la tavola per evitare danni irreparabili.
To step on the treader and leave the deck lower to the floor (as showed in the pictures).
Notice: this machine has a built-in Safety unfolding feature to help the deck lower slowly. But you should be still always make sure there are no children or other things under the deck when lowering the deck, to avoid the danger happening.
Il tapis roulant è facilmente trasportabile. Assicurarsi di aver staccato il cavo di alimentazione dalla presa di corrente ed impugnare i manubri laterali; il tapis roulant potrà essere spostato con il minimo sforzo grazie alle rotelline nella base.
Hold the handlebar to move the treadmill. The transportation wheel is for easy movement.
text_image
CARNIELU Audio 3.1 1 2 3 SPID DRANGE RUN RUN 5 PROGRAM CALIFRS RUN 5 MINI WORT OUT WARM UP AUDIO MOUNTAIN CLAUDING BAR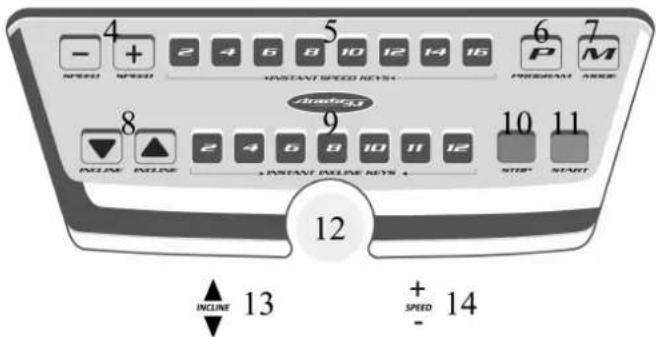
text_image
- 4 + 2 4 6 8 10 12 14 16 SPEED SPEED 5 P M INSTANT SPEED NOTE PROGRAM NOTE 8 9 INCOME INCOME + INSTANT INCOME NOTE + STOP START 12 + INCOME 13 + SPEED 14 -COMPUTER STRADA 3.1
Precauzioni e sicurezza
Tenersi saldamente ai manubri e posizionare i piedi sulle pedane laterali prima di azionare il Tapis Roulant (non rimanere in piedi sul nastro). Agganciare la SAFETY KEY CLIP (chiave di sicurezza) ai vestiti. Nel caso di una caduta o di una scivolata sul tappeto durante l'allenamento la clip permetterà alla chiave di sicurezza di staccarsi dalla sede facendo arrestare tempestivamente il tappeto. Riposizionare la chiave di sicurezza su SAFETY KEY per riavviare il Tapis Roulant. Salire sul tappeto e riprendere l'esercizio.
Legenda
Riferimenti alla figura.
-
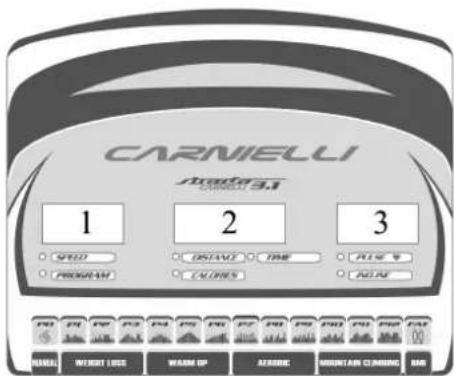
Display SPEEDà) / PROGRAM (Programma) che visualizza: a) la velocità di corsa del tappeto durante l'esercizio se il led SPEED è acceso. Il valore va da 1.0 a 16.0 km/h; b) il numero del programma.
-
Display DISTANCE (Distanza) / TIME (Tempo) / CALORIES (Calorie): a) visualizza la distanza percorsa durante l'esercizio con conteggio crescente o decrescente se il led DISTANCE è acceso. Il valore della distanza va da 0.00 a 99.99 km a crescere e da 99.00 a 0.00 km a decrescere (valore minimo 1.00km); b) visualizza il tempo di esercizio con conteggio crescente o decrescente se il led TIME è acceso. Il valore va da 00:00 a 99:59 mm:ss a crescere e da 99:00 a 00:00 mm:ss a decrescere (valore minimo 5 min.); c) visualizza il valore di caloric consumate durante l'esercizio con conteggio crescente o decrescente se il led CALORIES è acceso. Il valore va da 0 a 999 kcal a crescere e da 990 a 0 a decrescere kcal (valore minimo 50 kcal).
-
Display PULSE (Pulsazioni) / INCLINE (Inclinazione): a) visualizza il valore delle pulsazioni cardiache se il led PULSE è acceso. b) visualizza il livello di inclinazione del Tapis Roulant se il led INCLINE è acceso. Il valore dell'inclinazione può essere variato durante l'esercizio premendo i tasti INCLINE+ e INCLINE- e varia da 0 a 12.
-
Tasti SPEED+ e SPEED-: aumentano e diminuiscono la velocità su una scala da 1.0 a 16.0 km/h come indicato nel display I Premendo il tasto una volta la velocità aumenta o diminuisce di 0.1 km/h, per aumentare o diminuire velocemente tenere premuto per più secondi.
COMPUTER STRADA 3.1
Precautions and safety
Grip the handlebars solidly and set your feet on the side supports before starting up the Treadmill (never stand on the track).
Hook the SAFETY KEY CLIP to your clothing. If you fall or slip on the track while training, the clip will pull the safety key from its slot, thus stopping the treadmill.
Return the SAFETY KEY to its position to start up the treadmill once more.
Climb on the track and resume your workout.
Key
Reference to the figure.
- The SPEED / PROGRAM Display show:
a) the treadmill jogging speed if led SPEED is turned on. The speed ranges from 1.0 to 16.0 km/h;
b) the number of program.
-
The DISTANCE / TIME CALORIES Display show: a) the distance covered during the exercise session, counting up or down if led DISTENCE is turned on. The value ranges from 0.00 to 99.99 km when counting up and from 99.00 to 0.00 km when counting down. b) the exercise time, counting up or down if led TIME is turned on. The value ranges from 00:00 to 99:59 mm:ss when counting up and from 99:00 to 00:00 mm:ss when counting down. c) the calories consumed during the session, counting up or down if led CALORIES is turned on. This is an upward count with calories ranging from 0 to 999 kcal counting up and from 990 to 0 km when counting down.
-
Display PULSE / INCLINE: a) displays the pulse value if the PULSE led is turned on. b) displays the level of inclination of the Tapis Roulant if the INCLINE led is turned on. Inclination level varies from 0 to 12 and can be changed during exercise simply by pressing the buttons INCLINE+ and INCLINE-.
-
SPEED+ and SPEED- buttons: these buttons increase and decrease the speed on a scale from to016.0 km/h as indicated on display. Pressing one of the buttons once increases or decreases speed by 0.1 km/h, keep it pressed for a few seconds to increase or decrease the speed quickly.
-
SPEED 2-4-6-8-10-12-14-16: tasti di selezione rapida velocità; premendo un tasto la velocità aumenta o diminuisce fino a raggiungere il valore indicato e visualizzato nel display 1
-
Tasto PROGRAM (programma): a tapis roulant fermo serve per selezionare il programma desiderato.
-
Tasto MODE (Selezione): quando il tapis roulant è in funzione è possibile visualizzare le funzioni TIME, DISTANCE, CALORIES e SCAN (visualizza le varie funzioni ogni 5 secondi con led che lampeggia sul display 3. A tapis roulant fermo permette di impostare i valori obiettivo e i valori nel programma body fat.
-
Tasti INCLINE+ e INCLINE-: incrementa e diminuisce la pendenza su una scala da 0 a 12 come indicato nel display 3 Premendoli una volta si aumenta o diminuisce di un livello, per aumentare o diminuire velocemente tenere premuto per più secondi.
-
INCLINE 2-4-6-8-10-11-12: tasti di selezione rapida inclinazione; premendo un tasto l'inclinazione aumenta o diminuisce fino a raggiungere il valore indicato e visualizzato nel display 3.
-
Tasto STOP (Fine): interrompe il programma scelto.
II. Tasto START(Avvio) / PAUSE(pausa): permette di avviare il tapis roulant secondo le impostazioni date dall'utente; se premuto una seconda volta blocca il tapis roulant mantencendo i dati inseriti precedentemente.
-
SAFETY KEY (Chiave di sicurezza): posizionare la chiave di sicurezza ad attaccarla ai vestiti per utilizzare il Tapis Roulant.
-
INCLINE+ e INCLINE- sui maniglioni laterali: funzionamento come al punto 8
-
SPEED+ e SPEED- sui maniglioni laterali: funzionamento come al punto 4
-
SPEED 2-4-6-8-10-12-14-16: these are the speed shortcut buttons; pressing these buttons increases or decreases the speed until the indicated value is reached and shown on display 1
-
PROGRAM button (program): when the treadmill is in stop status, and not be in the pause status, then you press "Program" key, you can select exercise mode.
-
MODE button: when the treadmill is in action, you can select the TIME, DISTANCE, CALORIES and SCAN (display 3 flashes). When treadmill stop, allows to set the target values and values in the program body fat.
-
INCLINE+ and INCLINE-buttons: increases and decreases the inclination on a scale from 0 to 12 as indicated on the display
-
Press once to increase or decrease the level by one, hold the button pressed to rapidly increase or decrease the level.
-
INCLINE 2-4-6-8-10-11-12: these are the incline shortcut buttons; pressing these buttons increases or decreases the incline until the indicated value is reached and shown on display 3
-
STOP button: interrupts the selected program.
-
START button: when the treadmill is in stop status, if you press "Start/Pause" key, the machine will operate after 5 seconds delay. If you press again, it'll be in the pause status, and save the exercise data. If you press once again, it'll run in the way which the user sets previously.
-
SAFETY KEY: to use the treadmill, set the safety key in the slot and connect it to your clothing.
-
INCLINE+ and INCLINE- on side handles: these buttons operate as indicated at point 8
-
SPEED+ and SPEED- on the side handles: these buttons operate as indicated at point4.
Istruzioni di funzionamento (Leggere attentamente prima dell'utilizzo)
Consigli di sicurezza
Accendere il Tapis Roulant e posizionare la chiave di sicurezza su SAFETY KEY 12'apparecchio non funziona se la chiave di sicurezza non si trova nella posizione corretta e la console emetterà dei segnali acustici. Agganciare la clip della chiave di sicurezza all'utente prima di iniziare l'esercizio e durante lo svolgimento dell'allenamento: nel caso l'utente scivoli dal Tapis Roulant la chiave si sposterà dalla propria sede arrestando sia il computer che il nastro del Tapis Roulant.
Selezione programmi
La consolle ha 14 programmi: P0 programma manuale che include: funzionamento normale oppure il conto alla rovescia di tempo, distanza o calorie; P1-P2-P3-P4-P5-P6-P7-P8-P9-P10-P11-P12: programmi con profili preimpostati e variazione automatica della velocità e dell'inclinazione; F1: programma di calcolo dell'indice di massa grassa.
Instructions on the use (Read carefully before use)
Safety advice
Turn on the Tapis Roulant and place the safety key on SAFETY KEY 12 position. If the safety key The machine does not work if the safety key is not placed in the correct position the console will beep. Attach the safety key clip to the clothes of user before starting and during the exercise: in case the user slips from the belt the key will move from the correct position arresting the computer and the Tapis Roulant belt.
Program selection
The console has 14 programs: P0 manual program included: normal mode, time counter-back, distance counter-back and calories counter-back modes; P1-P2-P3-P4-P5-P6-P7-P8-P9-P10-P11-P12: programs with pre-imposed profiles and automatic speed and incline variation; F1: this program calculates the fat mass index
Modo di utilizzo (Leggere attentamente prima dell'utilizzo)
Posizionare la chiave di sicurezza in posizione SAFETY KEY. Il computer emette un segnale acustico. Per avviare il programma in modalità manuale, senza alcun obiettivo impostato, premere il tasto START. Premere il tasto PROGRAM per selezionare uno dei programmi tra P0,P1,P2,P3,P4,P5, P6,P7,P8,P9, P10,P11,P12,F1, premere MODE per confermare Modo manuale con conto alla rovescia: premere i tasti SPEED+/- per impostare il tempo di esercizio oppure premere il tasto MODE e successivamente i tasti SPEED+/- per impostare il valore della distanza di esercizio oppure premere il tasto MODE e successivamente i tasti SPEED+/- per impostare le caloric. Durante l'esercizio il tempo, la distanza o le calorie impostati verranno visualizzati in modo decrescente; raggiunto il valore 0 il Tapis Roulant si arresterà terminando l'esercizio.
How to use (Read carefully before use)
Place the safety key on the SAFETY KEY position. The computer will emit a sound signal. Select program: in the stop status, press PROGRAM button can select: P0,P1,P2,P3,P4,P5,P6,P7,P8,P9, P10,P11,P12,FAT, press MODE button to confirm. Manual mode with count down: press SPEED+/- can set time count down value; press MODE button can into set distance mode, press SPEED+/- can set distance count down value; press MODE button can into set speed mode, press SPEED+/- can set speed value. Press START button, the treadmill will run with target speed of speed windows value. Press SPEED+/- to adjust speed. Again press STOP key the speed will slow down until stop. When the set time or distance count down to zero, the treadmill will stop, again press start key, the treadmill will start running.
Nella tabella seguente sono riportati i valori minimi e massimi preimpostati nel computer:
F1 [SEX] (sesso): uomo 01 - donna 02
F2 [AGE] (età): 10 ÷ 99 [anni]
F3 [HEIGHT] (altezza): 100 ÷ 199 [cm]
F4 [WEIGHT] (peso): 20 ÷ 150 [kg]
The following table shows the maximum and minimum pre-set values of the computer:
F1 [SEX]: man 01 - woman 02
F2 [AGE]:1[yea99]
F3 [HEIGHT]:1[0m] 199
F4 [WEIGHT]:0=[klg]0
Programmi preimpostati: dopo aver selezionato un programma da P1 a P12, premere i tasti SPEED+/- per impostare il tempo dell'esercizio. Premere il tasto START per avviare il programma e i tasti SPEED+/- per variare la velocità. I programma sono già impostati con variazioni automatiche di velocità e inclinazione. Quando il tempo arriva a zero il tapis roulant si spegne.
Programma F1: in modalità “stop” premere il tasto PROGRAM e selezionare il programma body fat. Il display visualizza il parametro da impostare mentre il display 3 visualizza la funzione riferita al parametro come da tabella. Premere i tasti SPEED +/- per modificare il valore di ciascuna funzione e il tasto MODE per confermarlo e passare al successivo. Quando compare la dicitura “---” sul display 3 posizionare le mani sugli hand-pulse per almeno 8 secondi, fino a quando sul display 3erra visualizzato il valore dell'indice di massa grassa.
Auto mode: press PROG button to select exercise program(1\~12 modes are auto-mode), and the "Program" window will display, press SPEED+/- can set time count down value.
Press START key, the treadmill will run, the speed according to program speed table.
Press SPEED+/- to adjust speed. When the time count down to zero, treadmill will stop.
F1 mode: again press STOP button the speed will slow down until stop. At stop state, press program key can select body fat. The display shows the value, the display 3 the function of input value as chart. Press SPEED +/- button to modify each functions and MODE button to confirm. When display window 3 "05", get into body fat test the user must hold the handle pulse inductor, wait for about 8 seconds, the display 3 shows body fat test value.
Pulsazioni cardiache
Impugnare saldamente entrambi gli hand-pulse con le mani: i sensori sono composti ciascuno da 2 parti in metallo. Posizionare le mani sulle placche metalliche per ottenere il dato di pulsazioni cardiache. Per una migliore rilevazione è consigliabile utilizzare il tapis roulant a bassa velocità del nastro o in condizione di non corsa (con i piedi appoggiati sulle pedane laterali). Il valore sarà visualizzato sul display PULSE.
NOTA BENE: i valori di calorie consumate e FAT sono puramente indicativi e il valore di pulsazioni cardiache può discostarsi dal valore reale: sono dati non utilizzabili per scopi medici. I valori sono influenzati dalle caratteristiche fisiche della persona che utilizza la strumentazione.
Pulse rate
Please use both hands to gently hold the Hand Pulse Sensors. There are 2 sensors and 2 pieces of metal part each sensor. Each hand must gently hold both metal pieces to trigger the measuring. The pulse rate will show in the PULSE display. Please utilized the hand pulse with a low speed of the treadmill or place feet on side rails.
NOTE: readings related to calories burned and FAT are for workout purposes only. Heart rate readings may be imperfect and should not be relied upon as a substitute for medical advice. Readings are affected by the user's physical characteristics.
Tabella indicativa di FAT [%]:
| Sesso / FAT [%] | Basso Medio / basso | Medio Medio / alto | ||
| Uomo < 13 | 13 ÷ 25.8 | 26 ÷ 30 > 30 | ||
| Donna | < 18 | 18 ÷ 25.8 | 26 ÷ 40 > 40 |
Body fat advice reference table FAT [%]:
| Sex / FAT [%] Low | Low / Medium Medium | Medium Medium / High | ||
| Male < 13 13 ÷ 25.8 | 26 ÷ 30 > 30 | |||
| Female | < 18 | 18 ÷ 25.8 | 26 ÷ 40 > 40 |
Tabella di variazione della velocità e dell'inclinazione dei programmi da P1 a P12 Table of speed and incline variation from P1 to P12 programs
| 1 | 2 | 3 | 4 | 5 | 6 | 7 | 8 | 9 | 10 | 11 | 12 | 13 | 14 | 15 | 16 | ||
| P1 | VELOCITÀI SPEED | 1.0 | 3.0 | 3.0 | 7.0 | 5.0 | 5.0 | 9.0 | 5.0 | 5.0 | 5.0 | 9.0 | 9.0 | 9.0 | 5.0 | 3.0 | 1.0 |
| INCLINAZIONE INCLINE | 0 | 1 | 2 | 3 | 4 | 5 | 6 | 6 | 4 | 4 | 4 | 4 | 5 | 3 | 3 | 0 | |
| P2 | VELOCITÀI SPEED | 1.0 | 2.0 | 5.0 | 5.0 | 7.0 | 7.0 | 9.0 | 5.0 | 5.0 | 5.0 | 3.0 | 3.0 | 9.0 | 9.0 | 5.0 | 2.0 |
| INCLINAZIONE INCLINE | 0 | 1 | 2 | 2 | 3 | 3 | 2 | 2 | 3 | 3 | 2 | 2 | 3 | 2 | 2 | 0 | |
| P3 | VELOCITÀI SPEED | 1.0 | 3.0 | 5.0 | 7.0 | 9.0 | 9.0 | 11.0 | 13.0 | 13.0 | 13.0 | 11.0 | 9.0 | 7.0 | 5.0 | 3.0 | 1.0 |
| INCLINAZIONE INCLINE | 0 | 0 | 2 | 2 | 4 | 4 | 3 | 3 | 3 | 3 | 4 | 3 | 2 | 1 | 1 | 0 | |
| P4 | VELOCITÀI SPEED | 1.0 | 3.0 | 5.0 | 5.0 | 7.0 | 7.0 | 9.0 | 9.0 | 9.0 | 11.0 | 11.0 | 13.0 | 13.0 | 13.0 | 5.0 | 3.0 |
| INCLINAZIONE INCLINE | 0 | 5 | 5 | 5 | 5 | 5 | 4 | 4 | 4 | 4 | 4 | 3 | 3 | 2 | 2 | 0 | |
| P5 | VELOCITÀI SPEED | 1.0 | 3.0 | 7.0 | 1.0 | 2.0 | 7.0 | 9.0 | 1.0 | 3.0 | 5.0 | 11.0 | 1.0 | 3.0 | 7.0 | 13.0 | 5.0 |
| INCLINAZIONE INCLINE | 0 | 0 | 4 | 4 | 0 | 0 | 3 | 3 | 0 | 0 | 2 | 2 | 0 | 0 | 1 | 0 | |
| P6 | VELOCITÀI SPEED | 1.0 | 5.0 | 7.0 | 3.0 | 7.0 | 9.0 | 3.0 | 7.0 | 11.0 | 5.0 | 7.0 | 13.0 | 3.0 | 5.0 | 13.0 | 7.0 |
| INCLINAZIONE INCLINE | 0 | 2 | 2 | 0 | 3 | 3 | 0 | 4 | 4 | 0 | 5 | 5 | 0 | 6 | 6 | 0 | |
| P7 | VELOCITÀI SPEED | 3.0 | 5.0 | 7.0 | 9.0 | 11.0 | 13.0 | 9.0 | 5.0 | 7.0 | 9.0 | 11.0 | 11.0 | 13.0 | 11.0 | 7.0 | 5.0 |
| INCLINAZIONE INCLINE | 0 | 3 | 3 | 3 | 2 | 2 | 2 | 5 | 5 | 3 | 3 | 3 | 3 | 4 | 4 | 0 | |
| P8 | VELOCITÀI SPEED | 3.0 | 7.0 | 13.0 | 13.0 | 7.0 | 13.0 | 13.0 | 13.0 | 7.0 | 7.0 | 13.0 | 13.0 | 13.0 | 13.0 | 7.0 | 5.0 |
| INCLINAZIONE INCLINE | 0 | 4 | 4 | 3 | 5 | 5 | 2 | 2 | 5 | 5 | 5 | 1 | 1 | 1 | 1 | 0 | |
| P9 | VELOCITÀI SPEED | 3.0 | 5.0 | 9.0 | 9.0 | 5.0 | 9.0 | 9.0 | 5.0 | 9.0 | 11.0 | 11.0 | 5.0 | 9.0 | 9.0 | 11.0 | 3.0 |
| INCLINAZIONE INCLINE | 0 | 1 | 2 | 3 | 4 | 3 | 2 | 2 | 1 | 1 | 2 | 3 | 5 | 4 | 3 | 0 | |
| P10 | VELOCITÀI SPEED | 3.0 | 5.0 | 9.0 | 9.0 | 11.0 | 5.0 | 9.0 | 11.0 | 11.0 | 5.0 | 9.0 | 9.0 | 5.0 | 9.0 | 9.0 | 3.0 |
| INCLINAZIONE INCLINE | 0 | 1 | 2 | 3 | 4 | 7 | 8 | 7 | 8 | 7 | 8 | 7 | 5 | 3 | 2 | 0 | |
| P11 | VELOCITÀI SPEED | 3.0 | 5.0 | 7.0 | 7.0 | 5.0 | 9.0 | 9.0 | 5.0 | 9.0 | 8.0 | 5.0 | 11.0 | 11.0 | 11.0 | 11.0 | 3.0 |
| INCLINAZIONE INCLINE | 0 | 3 | 3 | 2 | 3 | 3 | 2 | 2 | 2 | 4 | 4 | 6 | 3 | 2 | 2 | 0 | |
| P12 | VELOCITÀI SPEED | 3.0 | 5.0 | 9.0 | 9.0 | 5.0 | 10.1 | 10.1 | 5.0 | 13.0 | 13.0 | 13.0 | 5.0 | 13.0 | 13.0 | 13.0 | 3.0 |
| INCLINAZIONE INCLINE | 0 | 3 | 3 | 2 | 3 | 3 | 2 | 2 | 2 | 4 | 4 | 4 | 6 | 3 | 2 | 0 | |
natural_image
Close-up of hands adjusting a black metal panel edge (no text or symbols visible)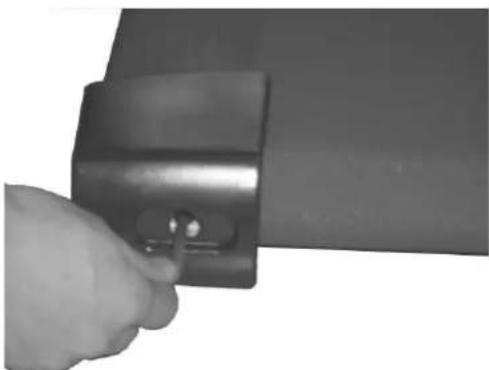
natural_image
Close-up of a hand holding a metallic mechanical clip or bracket, no visible text or symbols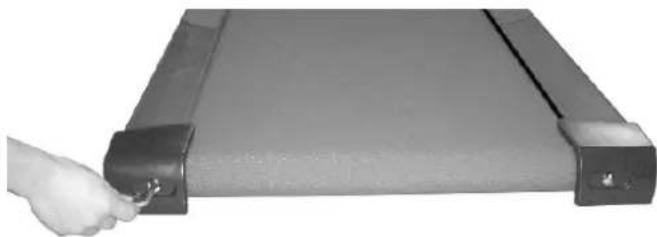
natural_image
Hand holding a rolled-up document or scroll with a black handle, no visible text or symbolsREGOLAZIONE DELLA CINGHIA
Il tapis roulant deve essere posto su una superficie piana. Se la superficie è leggermente inclinata il nastro del tapis roulant tende a spostarsi lateralmente.
Per la regolazione utilizzare la chiave in dotazione ed agite seguendo le istruzioni riportate di seguito.
Accendere il tapis roulant, impostarlo sul programma manuale a 4 km/h, premere START.
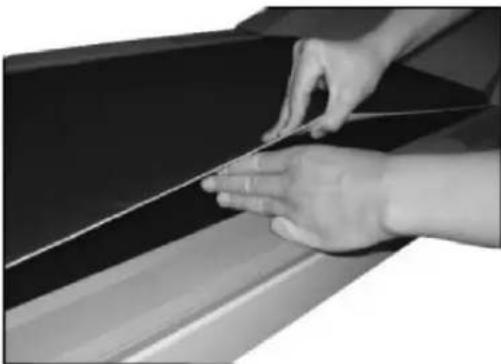
Utilizzare la chiave in dotazione per eseguire le regolazioni nella parte posteriore del tapis roulant come da figura.
Se il nastro tende a spostarsi verso sinistra girare la vite di sinistra in senso orario di ¼ di giro. Attendere alcuni minuti e verificare se il nastro risulta centrato. Ripetere l'operazione fino a quando risulta allineato correttamente.
Se il nastro tende a spostarsi verso destra girare la vite di destra in senso orario di ¼ di giro. Attendere alcuni minuti e verificare se il nastro risulta centrato. Ripetere l'operazione fino a quando risulta allineato correttamente.
Se il nastro tende a slittare durante la corsa è opportuno tenderlo; girare la vite di sinistra e la vite di destra in senso orario di ¼ di giro. Attendere alcuni istanti e verificare che il nastro sia correttamente teso.
Se il nastro risulta troppo teso girare la vite di sinistra e la vite di destra in senso antiorario di ¼ di giro. Attendere alcuni istanti, se necessario ripetere l'operazione.
Occorre fare attenzione nei punti 5 - 6 a ruotare entrambe le viti dello stesso numero di giri, in modo che il rullo posteriore resti perfettamente allineato rispetto alla tavola.
BELT ADJUSTEMENT
The treadmill should be placed on a level surface. If the treadmill is not level the belt will continuously track to the low side of the treadmill. For the belt adjustment read the instruction below.
Start the treadmill in manual program and set at 4 km/h.
Using an allen key wrench.
If the belt moving to the left turn the left adjust bolt clockwise 14 of a turn. Continue adjustments at 1/4 of a turn until belt return to center.
If the belt moving to the right turn the right adjust bolt clockwise 14 of a turn. Continue adjustments at 1/4 of a turn until belt return to center.
If the running belt slips when used, use the supplied allen key wrench to turn the left and the right tension bolts clockwise 14 of a turn at a time until the belt no longer slips.
If the belt is too tight, turn the left and the right tension bolts anticlockwise 14 of a turn at a time until the belt is correctly adjust.
Take attention when you turn the right and the left bolts; turn both of them of a same number of turn.
MANUTENZIONE
Per contribuire a garantire una lunga durata del Vostro tapis roulant è opportuno eseguire la manutenzione ordinaria.
MAINTENANCE
It is possible to take good care of your treadmill deck (the walking surface underneath the belt), apply white mineral oil or quality silicon spray.
OGNI SETTIMANA
Togliere con un panno umido i depositi di polvere, sporco o eventuali tracce di sudore dal tapis roulant. Non usare detersivi sotto il nastro di corsa. Fare attenzione a non gettare acqua o lasciare filtrare umidità nel vano motore e tra il bordo del pannello del display e la console. Ispezionare il nastro per assicurarsi che scorra diritto e senza intoppi.
EVERY WEEK
To remove with a humid the powder placed, dirt or eventual traces of sweat from the tapis roulant. Not use to clean washing powder under the race tape. To make attention not to throw water or to leave to filter humidity between the edge of the panel of display and the console. To inspect the tape in order to make sure itself that it slides straight and without difficulties.
OGNI MESE
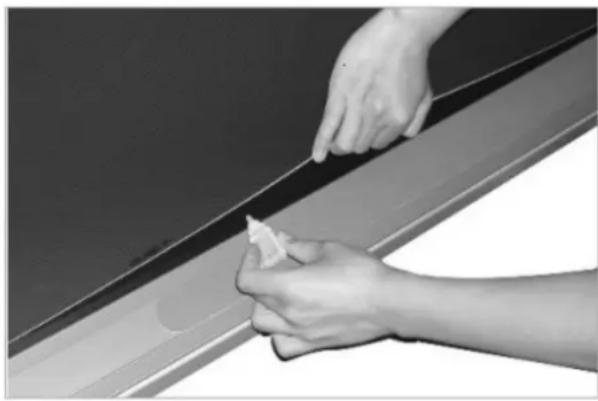
Passare l'aspirapolvere per togliere la polvere o lo sporco che possono formarsi sotto o ai lati del tapis roulant. Controllare i componenti della struttura portante per verificare che le viti di montaggio non siano allentate, e se necessario stringerle. È importante, per una migliore resa del tapis roulant, lubrificare la tavola applicando del comune olio di vaselina o del silicone spray. Il lubrificante va inserito fra il nastro e la tavola, nelle parti di contatto e soggette a maggior usura. Per la frequenza di lubrificazione attenersi alla tabella seguente. Dopo aver inserito l'olio avviare il tapis roulant in modalità manuale e lasciarlo correre ad una velocità di circa 4 km/h per almeno 15 minuti, in modo tale che il nastro venga lubrificato in tutta la sua superficie.
EVERY MONTH
To pass the vacuum cleaner in order to remove the powder or the dirt that can be formed under or to sides of tapis roulant. To control the components of the carrying structure in order to verify that the assembly lives are not loosened, and if necessary to tighten them. For a better efficiency of tapis roulant it is important to lubricate the table applied of mineral white oil or silicone spray. The lubrication must be made between the tape and the table, in the parts of contact and subject to greater usury. Before every lubrication clean up well the tape and table of Tapis Roulant. Please refer to the following table for the refill schedule.
Once the oil has been refilled, run the moving sidewalk in manual mode at about 4 km/h for at least 15 min to lubricate the belt.
natural_image
Close-up of hands installing or adjusting a wall trim component (no text or symbols visible)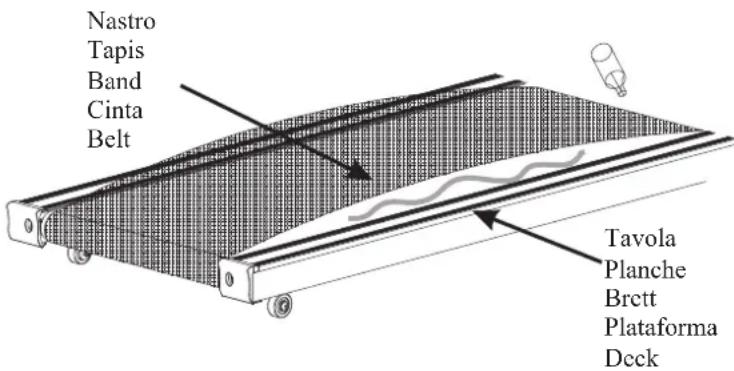
text_image
Nastro Tapis Band Cinta Belt Tavola Planche Brett Plataforma Deck| Tipo di utilizzoFrequency of use | Ore di utilizzo settimanaliHours a week | LubrificazioneLubrification |
| Utilizzo leggeroLow | Inferiore a 3 oreLower than 3 | Annualeonce a year |
| Utilizzo medioMedium | 3 - 5 ore3 - 5 | Ogni 6 mesionce every 6 months |
| Utilizzo intensoHigh | Più di 5 ore5 or higher | Ogni 3 mesionce every 3 months |
FARE ESERCIZIO ENTRO LA VOSTRA "ZONA OBIETTIVO"
EXERCISING IN YOUR TARGET ZONE
INDIVIDUARE LE PULSAZIONI
FINDING YOUR PULSE
Per stabilire se il Vostro battito cardiaco rientra nella Vostra “zona obiettivo” sarà necessario controllare il Vostro battito. Il modo più semplice è quello di sentire le pulsazioni della carotide: l’arteria ad ambo i lati del collo che si trova tra la trachea ed i muscoli del collo. Contate il numero di battiti in dieci secondi e poi moltiplicate per sei. In questo modo otterrete il numero di pulsazioni al minuto.
To make sure yor heart is beating in its target zone, you'll need to know how to monitor your heart rate. The easiest way is to feel the pulse in the carotis artery on either side of your neck, between the windpipe and the large neck muscles. Count the number of beats in ten seconds, then multiply by six. This gives you the number of beats per minute.
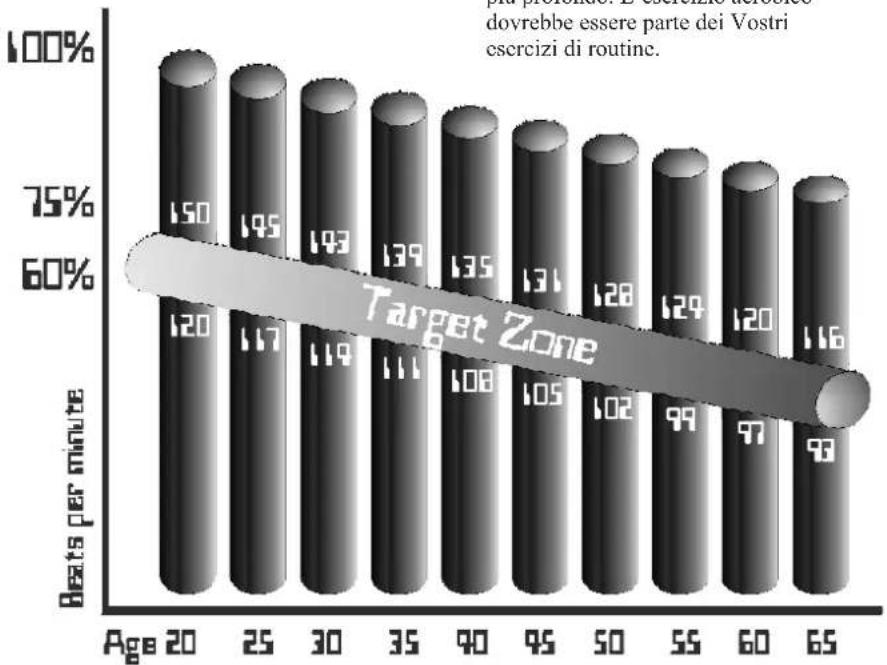
Quanti battiti dovrebbe avere il Vostro cuore durante l'esercizio fisico? Un numero sufficientemente alto che Vi permetta di raggiungere e rimanere entro i limite della "zona obiettivo", e cioè un numero di battiti al minuto che dipende notevolmente dalla Vostra età e condizioni fisiche. Il grafico che segue è stato inserito per aiutarVi a stabilire quale sia la vostra "zona obiettivo".
How fast should your heart beat during aerobic exercise? Fast enough to reach and stay in its "target zone", a range of beats per minute that is largely determined by your age and physical condition. To determine your target zone, consult the chart we have provided.
L'esercizio aerobico si riferisce a qualsiasi tipo di attività che favorisca il passaggio di ossigeno ai muscoli tramite il cuore ed i polmoni. Vi aiuterà a tenere più in forma i vostri polmoni ed il Vostro cuore: il muscolo più importante di tutto il Vostro corpo. La fitness aerobica si raggiunge mettendo in funzione tutti i muscoli principali del corpo: braccia, gambe o glutei per esempio. Il Vostro cuore batte velocemente ed il respiro diventa più profondo. L'esercizio aerobico dovrebbe essere parte dei Vostri esercizi di routine.
Aerobic exercise is any sustained activity that sends oxygen to your muscles via your heart and lungs. It will improve the fitness of your lungs and heart: your body's most important muscle. Aerobic fitness is promoted by any activity that uses your large muscle groups - arms, legs or buttocks, for example. Your heart beats quickly and you breath deeply. An aerobic exercise should be part of your entire exercise routine.
bar
| Age | Deaths per minute | |---|---| | 20 | 150 | | 25 | 145 | | 30 | 143 | | 35 | 139 | | 40 | 135 | | 45 | 131 | | 50 | 128 | | 55 | 124 | | 60 | 120 | | 65 | 116 |Heart Rate Chart
Metodo di riscaldamento e defaticamento
Un buon programma di allenamento deve comprendere degli esercizi aerobici di riscaldamento e di defaticamento. Si consiglia di svolgere l'intero programma almeno due o tre volte a settimana, riposando per un giorno tra un allenamento e l'altro. Dopo alcuni mesi l'attività fisica si può intensificare fino a quattro o cinque volte a settimana.
L'attività aerobica: consiste in qualsiasi attività fisica sostenuta che faccia arrivare ossigeno ai muscoli attraverso il cuore e i polmoni. L'attività aerobica migliora lo stato di forma dei polmoni e del cuore. Il miglioramento dal punto di vista aerobico viene favorito da qualsiasi attività che coinvolga i muscoli maggiori, come ad esempio quelli delle gambe, delle braccia e delle natiche. Il cuore batte più velocemente e si respira più a fondo. Gli esercizi aerobici dovrebbero sempre far parte dell'intero programma di allenamento.
Il riscaldamento: è una parte importante dell'allenamento. Ogni sessione dovrebbe cominciare con una fase di riscaldamento, per preparare l'organismo ad uno sforzo maggiore, riscaldando e facendo tendere i muscoli, aumentando il flusso circolatorio e la frequenza cardiaca e facendo arrivare più ossigeno ai muscoli. Alla fine dell'allenamento è necessaria una fase di defaticamento eseguendo questi esercizi per ridurre l'indolenzimento dei muscoli stanchi.
Warming up and winding down
A good training programme must include aerobic exercises for warming up and winding down. It is advisable to perform the complete programme at least two or three times a week, with one day of rest between one training session and the next. After a few months of physical activity, training can be increased to four or five times a week.
Aerobic activity: is any sustained physical activity that sends oxygen to the muscles through the heart and lungs. Aerobic activity improves the condition of the lungs and heart. Improvement from the aerobic point of view is favoured by any activity involving the major muscles, such as those of the legs, arms and buttocks. The heart beats more rapidly and breathing becomes deeper. Aerobic exercises should always form part of the overall training programme.
Warming up: is an important part of training. Each session should commence with a warm-up, in order to prepare the body for greater effort: warming up and stretching the muscles, stepping up the blood circulation and heart rate and sending oxygen to the muscles. At the end of training a winding down phase is necessary, during which the exercises are performed to prevent contracted muscles from aching.
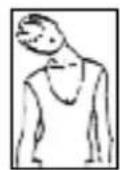
A
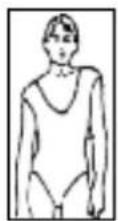
B
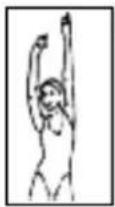
C
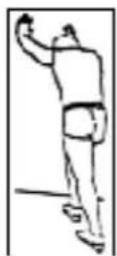
D
E
F
G
H
Rotazione della testa: (A) ruotare la testa verso destra per alcuni secondi, fino a quando non si sente il muscolo teso sulla parte sinistra del collo; ruotare quindi la testa indietro per lo stesso tempo, tendendo il mento verso l'alto e aprendo la bocca. Ruotare la testa a sinistra per alcuni secondi e quindi abbassare la testa verso il toracc per lo stesso tempo.
Elevazione delle spalle: (B) sollevare la spalla destra verso l'orccchio per alcuni secondi. Sollevare quindi la spalla sinistra per lo stesso tempo abbassando contemporaneamente la spalla destra.
Stretching dei muscoli dei fianchi: (C) aprire lateralmente le braccia e sollevarle fino a sopra la testa. Alzare quanto più possibile verso l'alto il braccio destro per alcuni secondi. Ripetere l'operazione con il braccio sinistro.
Stretching del polpaccio / tendine d'Achille: (D) appoggiarsi contro il muro con la gamba sinistra in avanti rispetto alla destra e le braccia protese in avanti. Mantenere diritta la gamba destra e appoggiare il piede sinistro sul pavimento; piegare quindi la gamba sinistra e sporgersi in avanti muovendo il bacino verso il muro. Mantenere per un po' questa posizione e quindi ripetere dal lato opposto contando fino a 15.
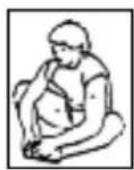
Stretching dei muscoli dell'interno coscia: (E) sedersi con le piante dei piedi unite e le ginocchia rivolte verso l'esterno. Avvicinare quanto più possibile i piedi all'inguine. Spingere piano le ginocchia verso il pavimento. Mantenere la posizione per 15 secondi.
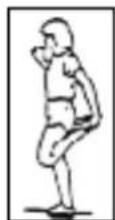
Stretching del quadricipite: (F) con una mano appoggiata al muro per mantenersi in equilibrio, afferrare da dietro il piede destro e sollevarlo. Portare quanto più possibile il tallone vicino alle natiche. Mantenere la posizione per 15 secondi e ripetere l'operazione con il piede sinistro.
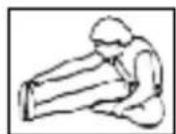
Stretching del tendine della fossa poplitea: (G) stendere la gamba destra. Appoggiare la pianta del piede sinistro contro l'interno coscia destro. Tendere in avanti quanto più possibile la punta del piede. Mantenere la posizione per 15 secondi e quindi ripetere dal lato opposto.
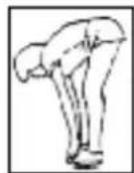
Toccare la punta dei piedi: (II) piegarsi lentamente in avanti dalla vita in su, facendo rilassare la schiena e le spalle, fino a raggiungere la punta dei piedi. Tendersi quanto più possibile verso il basso e mantenere la posizione per 15 secondi.
Rotating the head: (A) turn the head to the right for a few seconds, until you can feel the muscle stretching on the left side of your neck; then tilt the head back for the same amount of time, with chin up and mouth open. Turn the head to the left for a few seconds and finally tilt forward, chin on chest, for the same amount of time.
Raising the shoulders: (B) raise the right shoulder toward the ear for a few seconds. Then raise the left shoulder for the same amount of time, simultaneously lowering the right shoulder.
Stretching the flank muscles: (C) spread the arms out sideways and raise until above the head. Reach up with the right arm as far as possible for a few seconds. Repeat the operation with the left arm.
Stretching the calf/achille's tendon: (D) with arms forward, place the hands on a wall, standing with the left leg further forward than the right. Keeping the right leg straight and resting the left foot on the floor, bend the left leg and lean forward, so that the pelvis moves toward the wall. Hold this position for a count of 15, then repeat with the left leg straight.
Stretching the muscles of the inner thigh: (E) sit down with the soles of the feet together and the knees turned outwards. Draw the feet as far as possible toward the groin. Now push the knees gently downwards. Hold the position for 15 seconds.
Stretching the quadriceps: (F) with one hand placed against the wall for balance, grasp the right foot from behind and pull upwards, pulling the heel as close to the buttocks as possible. Hold this position for 15 seconds, then repeat the exercise with the left foot.
Stretching the hamstrings: (G) sitting on the floor, stretch out the right leg and place the sole of the left foot against the inner right thigh. Stretch the toes of the right foot as far forward as possible. Hold the position for 15 seconds, then repeat with the left leg straight.
Touching the toes: (H) bend slowly forwards from the waist, relaxing your back and shoulders, until you can touch your toes. Stretch down as far as possible, holding the position for 15 seconds.
Operazioni di smontaggio
Le operazioni di smontaggio dell'attrezzo devono essere eseguite seguendo, in modo rigoroso, ma nel senso inverso, quelle descritte nelle operazioni di montaggio.
Operazioni di demolizione
Le operazioni di demolizione dell'attrezzo devono essere eseguite da personale autorizzato e preparato allo scopo. Le operazioni di demolizione dell'attrezzo devono essere eseguite seguendo, in modo rigoroso, ma nel senso inverso, quelle descritte nelle operazioni di montaggio.
Modo di smaltimento dei ricambi dell'attrezzo e dell'imballo
Tutti i componenti dell'attrezzo soggetti ad usura e ricambio devono essere trattati in conformità alla classificazione che gli stessi hanno nelle legislazioni specifiche di ogni singola nazione.
Per poter effettuare qualsiasi spedizione del prodotto al negoziante o alla casa produttrice in caso di riparazione e/o sostituzione si consiglia di tenere l'imballo originale del Tapis Roulant.
Dismantling
The equipment must be dismantled using strictly the same sequence of operations as described for assembly, proceeding in reverse order.
Demolition
Demolition of the equipment must be undertaken by authorised personnel authorised and equipped for the purpose. The equipment must be dismantled using strictly the same sequence of operations as described for assembly, proceeding in reverse order.
Disposal of parts and packaging
All components of the equipment subject to wear and replacement must be disposed of in conformity with their classification in the specific legislation for each individual country.
natural_image
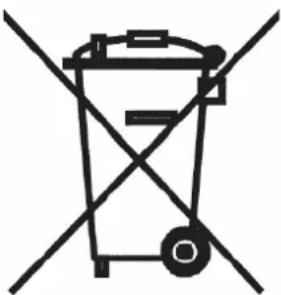
Symbol of a trash bin crossed with no text or labelsInformazione Agli Utenti
Ai sensi dell'art. 13 del DECRETO LEGISLATIVO 25 luglio 2005 n.
151 “Attuazione delle direttive 2002/95/CE, 2002/96/CE e 2003/108/CE, relative alla riduzione dell'uso di sostanze pericolose nelle apparecchiature elettriche ed elettroniche, nonchè allo smaltimento dei rifiuti”.
Il simbolo del cassonetto barrato sull'apparecchiatura indica che il prodotto alla fine della propria vita utile deve essere raccolto
separatamente dagli altri rifiuti. L'utente dovrà, pertanto, conferire l'apparecchiatura giunta a fine vita agli idonei centri di raccolta differenziata dei rifiuti elettronici e elettrotecnici, oppure riconsegnarla al rivenditore al momento dell'acquisto di una nuova apparecchiatura di tipo equivalente, in ragione di uno a uno.
L'adeguata raccolta differenziata per l'avvio successivo
dell'apparecchiatura dimessa al riciclaggio, al trattamento e allo smaltimento ambientale compatibile contribuisce ad evitare possibili effetti negativi sull'ambiente e sulla salute e favorisce il riciclo dei materiali di cui è composta l'apparecchiatura.
Lo smaltimento abusivo del prodotto da parte dell'utente comporta
l'applicazione delle sanzioni amministrative di cui al D.Lgs. n. 22/1997" (articolo 50 e seguenti del D.Lgs. n. 22/1997).
Information To The Users
According to art. 13 of the LAW DECREE dated 25th July 2005 No. 151 “Putting into effect directives 2002/95/CE, 2002/96/CE and 2003/108/CE, regarding the reduction in the use of dangerous substances in electrical and electronic appliances and waste disposal” the symbol of the crossed waste bin on the appliance indicates that the product, at the end of its useful life must be collected separately from other waste.
The user shall therefore, take the appliance to the differentiated waste disposal centres for electro technical and electronic wastes once its useful life is over, or return it to the retailer at the time of purchase of a new appliance or similar, exchanging one for the other.
An adequate differentiated waste collection of the discharged appliance for the recycling and environmentally friendly treatment and disposal of the good will contribute to avoiding possible negative effects on the environment and on health, and will favour the recycling of the materials which make up the appliance itself. The improper disposal of the product by the user will imply the application of administrative sanctions as by Law decree n. 22/1997" (article 50 and subsequent Law decree n. 22/1997).
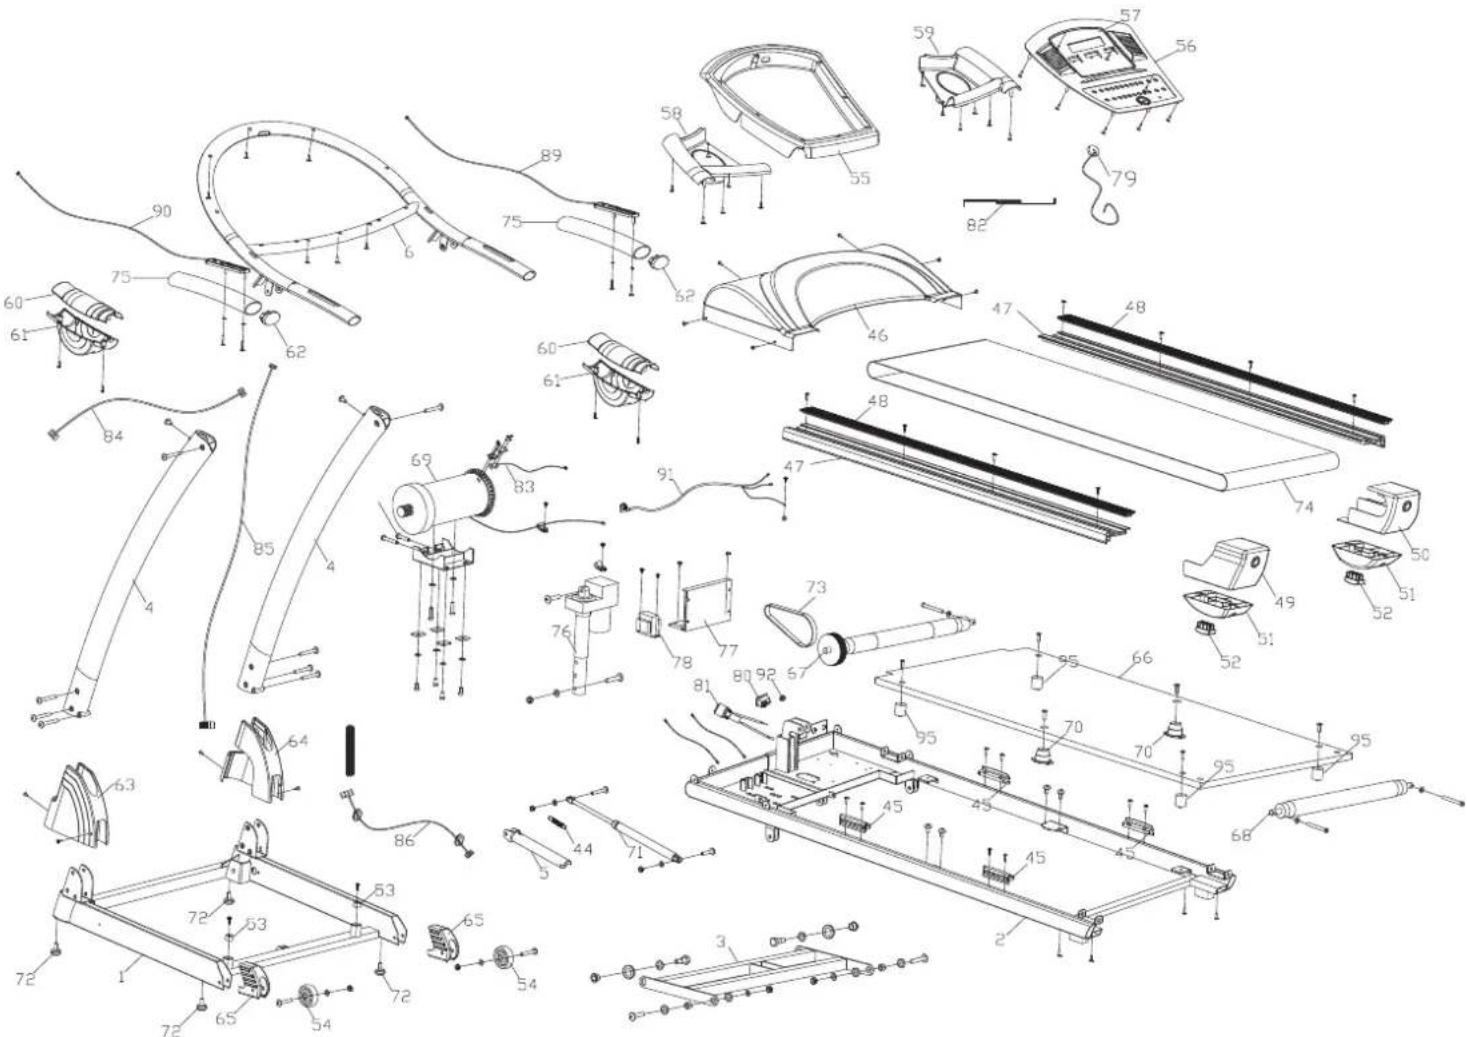
N° Descrizione N° Description
1 Telaio di base 1 Base frame
2 Telaio principale
3 Telaio per inclinazione
4R Montante dx
4L Montante sx
5 Pedale per chiusura
6 Telaio consolle
45 Elastomero arancione
46 Protezione motore
47 Paia pedane laterali
48 Striscia antiscivolo
49-50 Set protezioni posteriori sinistra - destra
51 Tappo per protezione posteriore
52 Tappo quadrato
53 Elastomero telaio di base
54 Rotellina
55 Protezione console
57 Console
58 Protezione console sx
59 Protezione console dx
60 Protezione manubrio sx
61 Protezione manubrio dx
62 Tappo manubrio
63 Protezione laterale sx
64 Protezione laterale dx
N° Descrizione
65 Protezione telaio di base
66 Tavola
67 Rullo anteriore
68 Rullo posteriore
69 Motore
70 Elastomero rosso
71 Pistone idraulico
72 Piedino regolabile
73 Cinghia di trasmissione
74 Nastro
75 Manicotto
76 Motore d'inclinazione
77 Scheda motore
78 Trasformatore
79 Chiave di sicurezza
80 Tasto ON/OFF
81 Fusibile e porta fusibile
82
83 Sensore di velocità
84-85-86 Cablaggio
89 Set ricevitore di pulsazioni e tasti speed
90 Set ricevitore di pulsazioni e tasti incline
91 Cavo di alimentazione
95 Elastomero
2 Main frame
3 Incline bracket
4R Up right post right
4L Up right post left
5 linking parts
6 Cross bar tube
45 Cushion
46 Motor up cover
47 Side rail
48 Garnishry
49-50Rear cover (left - right)
51 End cap
52 Square cover
53 Taper cushion
54 Wheel
55 Computer cover
57 Panel
58 Basket (left)
59 Basket (right)
60 Handle bar cover (Left)
61 Handle bar cover (right)
62 Tube cover
63 Button frame cover (Left)
64 Button frame cover (right)
N° Description
65 Tube cover
66 Running board
67 Front roller
68 Rear roller
69 Motor
70 Red cushion
71 Cylinder
72 Foot mat
73 Belt
74 Running belt
75 Foam
76 Incline motor
77 Control board
78 Transformer
79 Safety key
80 Switch
81 Fuse holder
82
83 Sensor
84-85-86 Connect wire L1-L2-L3
89 Speed handle pulse
90 Incline handle pulse
91 Power cable
95 Columniform cushion