Zido Keyboard Caddy 169BK - Support clavier Ergotron - Gratis brugsanvisning og manual
Find enhedens vejledning gratis Zido Keyboard Caddy 169BK Ergotron i PDF-format.

Brugerspørgsmål om Zido Keyboard Caddy 169BK Ergotron
0 spørgsmål om dette apparat. Besvar dem du kender, eller stil dit eget.
Stil et nyt spørgsmål om dette apparat
Download vejledningen til din Support clavier i PDF-format gratis! Find din vejledning Zido Keyboard Caddy 169BK - Ergotron og tag din elektroniske enhed tilbage i hånden. På denne side er alle dokumenter nødvendige for brugen af din enhed offentliggjort. Zido Keyboard Caddy 169BK af mærket Ergotron.
BRUGSANVISNING Zido Keyboard Caddy 169BK Ergotron
Universal Keyboard & Mouse Caddy Compact Keyboard & Mouse Caddy
Assembly Instructions

ANTHRO
Technology Furniture®
Hello! Thank you for choosing Anthro.
Before beginning, please take a moment to review the parts listtobesureyourshipmentiscomplete.Also,reviewthe instructions of all Anthro products you are planning to include in this installation.
An electric drill and 18 " drill bit may be required for this assembly although some Anthro products are predrilled to accept these caddies. A 532 " Hex Driver, (provided with your cart) plus a Philips screwdriver & an adjustable wrench (not included) are required for this assembly.
SAVE THESE INSTRUCTIONS!
Questions? 1-800-325-3841
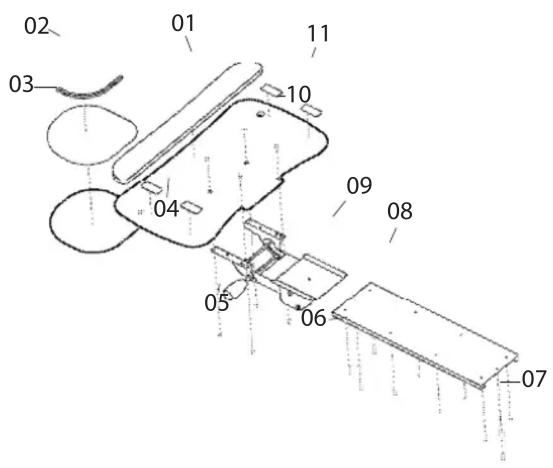
Component list for part # UKMCBK, 169BK
01 – Wrist Rest.....Qty. 1 .....575-5001-01
02- Mouse Rail......Qty. 1 .... 575-5001-02
03- Mouse Pad Qty. 1 575-5001-03
04- Caddy Platform.....Qty. 1 ..... 575-5001-04
05- Acorn Nuts Qty. 4 325-5023-00
06- Wood Screws
3/4" (for UKMCBK)......Qty. 10......325-5106-00
1/2" (for 169BK)......Qty. 8 ......325-5008-00
07- Rubber Bumpers ....Qty. 2 ....175-5130-03
08- Caddy Tray
For UKMCBK......Qty. 1 ...... 225-5046-00
For 169BK......Qty. 1 .... 575-5001-12
09- Caddy Mechanism
For UKMCBK......Qty. 1 .... 575-5001-09
For 169BK.....Qty. 1 .....575-5001-13
10- Caddy Screws ....Qty. 4 ....575-5001-10
11- Keyboard Pads ....Qty. 4 ....575-5001-11
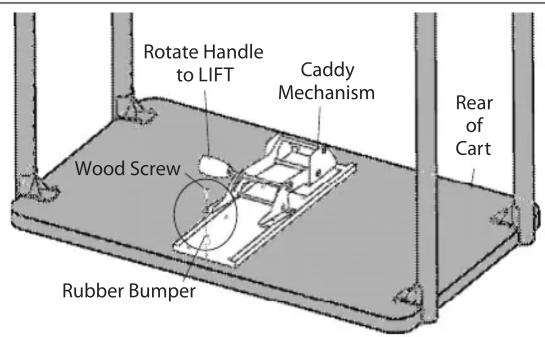
Step 1
Carefully rotate your Cart upside down. For predrilled Carts: align the tray with the holes on the cart shelf. Attach the tray using wood screws (8 for the Compact; 10 for the UKMC) leaving open the holes at the center front and back. Insert one wood screw through a rubber stop and install towards the rear of the cart.
If your cart shelf is not predrilled: use the tray as a template and mark the hole locations. Carefully drill all holes using a 18 " drill bit (1/2" deep for compact, 3/4" deep for others). TIP: Use a small amount of masking tape to mark the depth on your drill bit. Now install the tray as described above.
Slide the Caddy Mechanism into the Tray and push to the rear. If needed, rotate the mechanism handle to lift the mechanism to slide it back. Finally, install the remaining wood screw and rubber bumper into the tray.

^3/_4 " Wood Screw 325-5106-00
^1/_2 " Wood Screw 325-5008-00

Rubber Bumper 175-5130-03

Universal Keyboard & Mouse Caddy Compact Keyboard & Mouse Caddy
Assembly Instructions, cont.
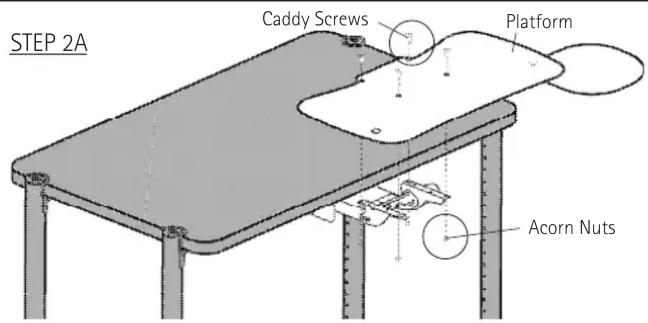
Step 2 (requires the adj wrench & screwdriver)
Carefully rotate your cart back onto its casters.
Pull the mechanism to the front and place the platform onto the mechanism. Secure the platform using the four philips screws and the acorn nuts.
Finally, install the mouse rail and pad.
Congratulations! Your assembly is complete.

(#10-24) Caddy Screw
575-5001-10

(#10-24) Acorn Nut
325-5023-00
STEP 2B
KB Pads
Mouse Rail & Pad
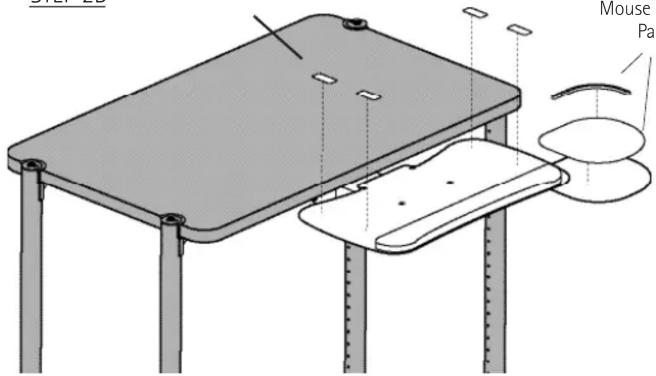
Congratulations! Your assembly is complete.
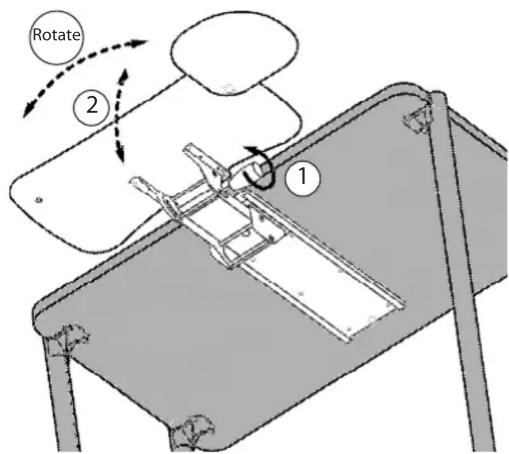
Adjusting your Keyboard & Mouse Caddy
Adjust the Platform height & angle: 1. Rotate the Handle counterclockwise. 2. Reposition the Shelf, then retighten the Handle.
Adjust the Platform rotation: 1. Firmly grasp the Platform, then rotate to the desired angle.