Heritage R101 - Romaskine York Fitness - Gratis brugsanvisning og manual
Find enhedens vejledning gratis Heritage R101 York Fitness i PDF-format.

Brugerspørgsmål om Heritage R101 York Fitness
0 spørgsmål om dette apparat. Besvar dem du kender, eller stil dit eget.
Stil et nyt spørgsmål om dette apparat
Download vejledningen til din Romaskine i PDF-format gratis! Find din vejledning Heritage R101 - York Fitness og tag din elektroniske enhed tilbage i hånden. På denne side er alle dokumenter nødvendige for brugen af din enhed offentliggjort. Heritage R101 af mærket York Fitness.
BRUGSANVISNING Heritage R101 York Fitness
natural_image
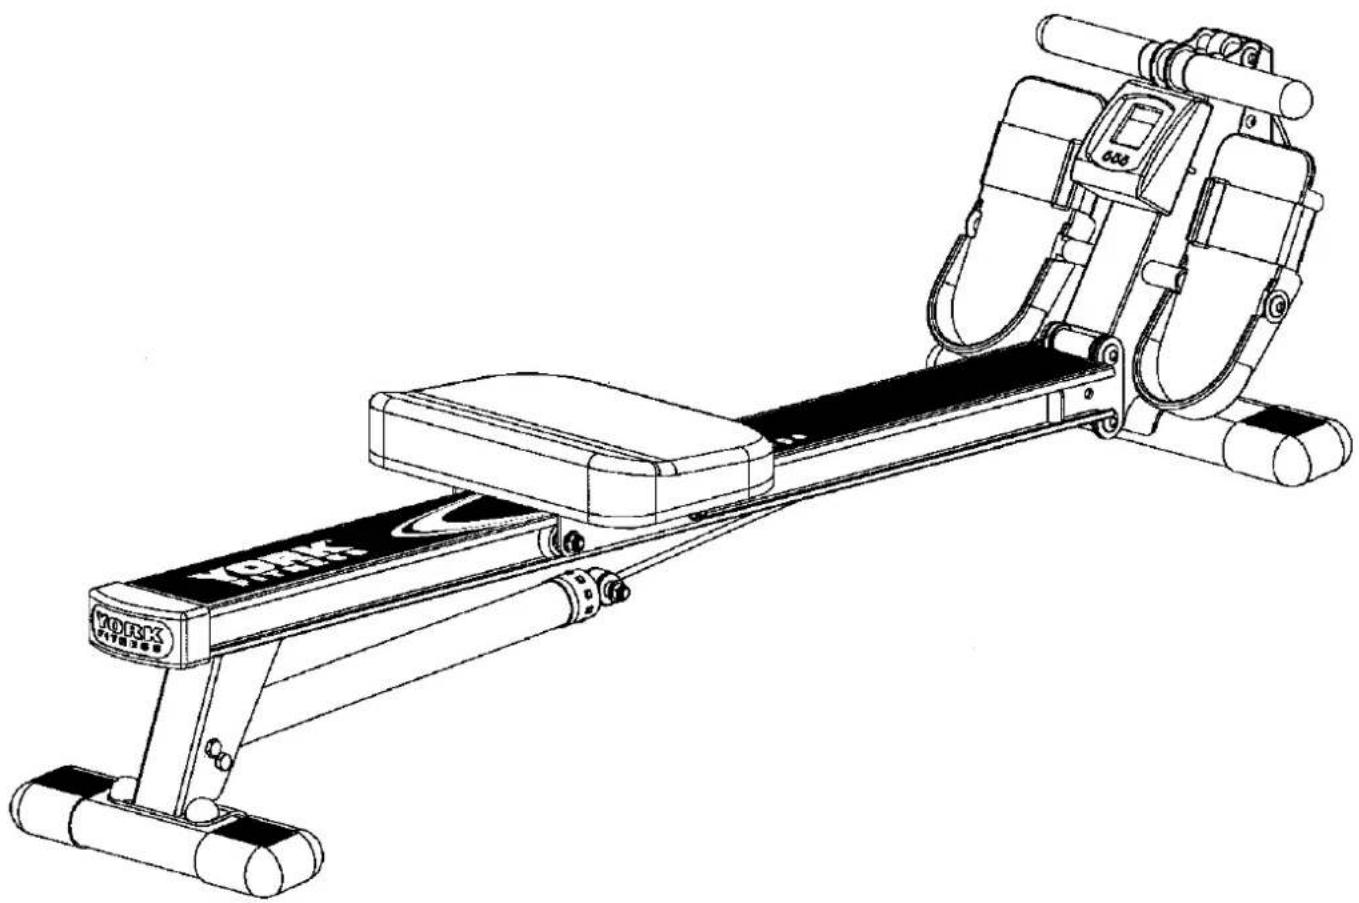
Line drawing of a stationary exercise machine with levers and wheels (no text or symbols)heritage r101
Owner's manual
yorkfitness.com
28/04/2008
BEFORE ASSEMBLY
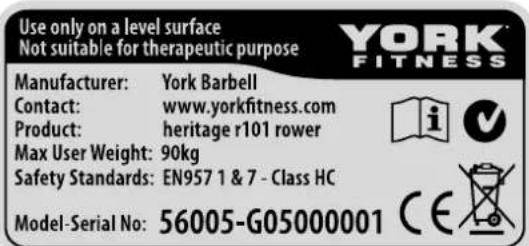
Congratulations on purchasing the York Fitness R101 Multi Use Rower. As well its primary use as a rowing machine, the R101 also functions as a multi purpose exercise machine on which upper and lower body exercises can be performed. Please see page 7 for an exercise guide. The maximum user weight is 90kg.
Please read this instruction manual in full before assembly and use of the product. If you follow the instruction's carefully you should have no problems with assembly. The instruction manual is set out in a series of easy to follow, step-by-step instructions. Please complete the instructions in the order in which they appear.
Each instruction contains:
● The name and an image of each part to be used.
● The quantity of each part required.
● Diagrams showing exactly how each part is put together
- A description of the steps to follow.
To assemble this product you will need the following tools:
1 x Spanner
2 x Allen Keys
WARNING:
WARNING: YOU ARE RESPONSIBLE FOR YOUR OWN SAFETY!!
- The instructions must be read in full before assembly and / or use of this product.
- The safety level of this equipment can only be maintained only if it is regularly examined for wear and tear.
- It is important that you keep these instructions for further reference.
- Replace defective components immediately, and / or keep the equipment out of use until it is repaired.
- Never use the equipment in any other manner other than the ways explained in these instructions and / or any wall-chart supplied.
- Use only the adjustment settings as described in the instructions. Always use the correct adjustment pin / fixing.
- Always ensure that the equipment has adequate space all around it (at least 60cm on all sides)
- Always check that any pins / fixings are tight and secure before use and / or after adjustment.
- Always wear suitable clothing and footware e.g. tracksuit / shorts / training shoes.
- Never overload the equipment – the maximum user load is displayed on the product label.
- Never leave any adjustment devices projecting from the product.
- Injuries to health may result from incorrect or excessive training.
- Check that any of the adjustment advices are not projecting.
- Remove all personal jewellery before exercising.
- After eating, allow 1-2 hours before exercising as this will help to prevent muscle strain.
- Always consult your doctor before undertaking any exercise program.
- Always assemble the product on a level surface.
- Parents and others in charge of children should be aware of their responsibility, because the natural play instinct and the fondness of experimenting of children can lead to situations and behaviour for which the training equipment is not intended.
WARNINGS:
- If children are allowed to use the equipment, their mental and physical development and above all their temperament should be taken into account. They should be controlled and instructed in the correct use of the equipment. The equipment is under no circumstances suitable as a children's toy.
- Always use the product on a level surface, ensure that the product is stable before use.
- This product's resistance is governed by a hydraulic cylinder, ensure that the handle is returned to its location smoothly.
- Losing grip or suddenly releasing the handle could result in an uncontrolled return, ensure there is free space around the product.
- You may want to use training gloves to increase your grip of the handle - caution, the handle can become slippery with sweat etc.
- You may want to store this product away to save space - be aware of moving mechanical parts which could cause injury.
- Always hold the product along the main body away from moving parts when moving the product - if necessary ask for help.
- If you are going to store the product in an upright position, you should use a suitable binding as an extra precaution.
- Do not store the product where small children can access it - moving components could cause serious harm.
CARE & MAINTENANCE
- No wet cleaning of electrical components - Unplug before any care and maintenance.
- Use a warm damp cloth to keep the product clean.
- The safety level of the equipment can be maintained only if it is regularly examined for damage and wear. This includes any ropes, pulleys, nuts, bolts, moving parts, bushes, chains, wheels, bearings & connection points etc.
- Components such as pulleys, bearings and cables are always more susceptible to wear. Special attention should be taken to inspect all of these parts before use.
- Always replace damaged / worn components with original parts from the manufacturer.
CUSTOMER SUPPORT:
- Should you require any assistance regarding this product please contact your local YORK distributor using the contact details found on the Warranty page, towards the back of this manual.
- To help us assist with your enquiry, please have the Model-Serial No. of your product to hand when you call. This can be found on the following sticker, located on the frame of your product (in some cases the sticker could be located on the underside):
- If you need spare / missing parts, please have the Part No. ready. This can be found using the Parts List and Parts Drawing contained in this instruction manual.
GENERAL
WE RECOMMEND YOU HAVE SOMEONE ASSIST YOU IN LIFTING AND ASSEMBLING YOUR YORK R101 ROWER.
FOLLOW THESE INSTRUCTIONS CAREFULLY AND IT WILL MAKE IT EASIER FOR YOU TO ASSEMBLE YOUR R101 ROWER.
ASSEMBLY INSTRUCTIONS
INSTRUCTION 1
- Ask someone to help you remove all the parts of your YORK R101 ROWER from the carton and place them on the floor carefully.
- Rotate the front pulling wheel bracket forwards and align the holes on the bracket to the holes on the seat track bracket.
- Secure the bracket to seat track by using metal pivot shaft and two allen head bolts.
⑪
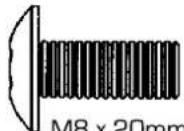
M8.x 20mm
ALLEN HEAD BOLT x 2
10
METAL PIVOT SHAFT x 1
FRONT PULLING
WHEEL BRACKE
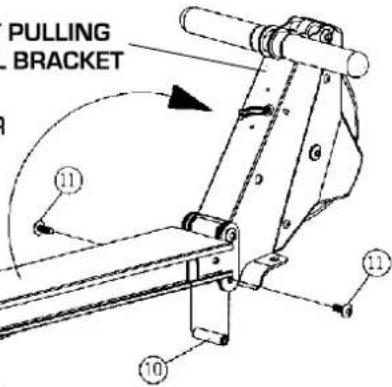
SEAT TRACK
UNDERVIEW
FRONT
STABILIZER
(LONG)
METALPIVOTSHAFT
INSTRUCTION 2
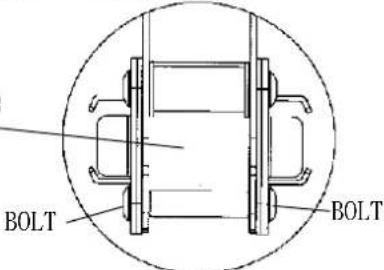
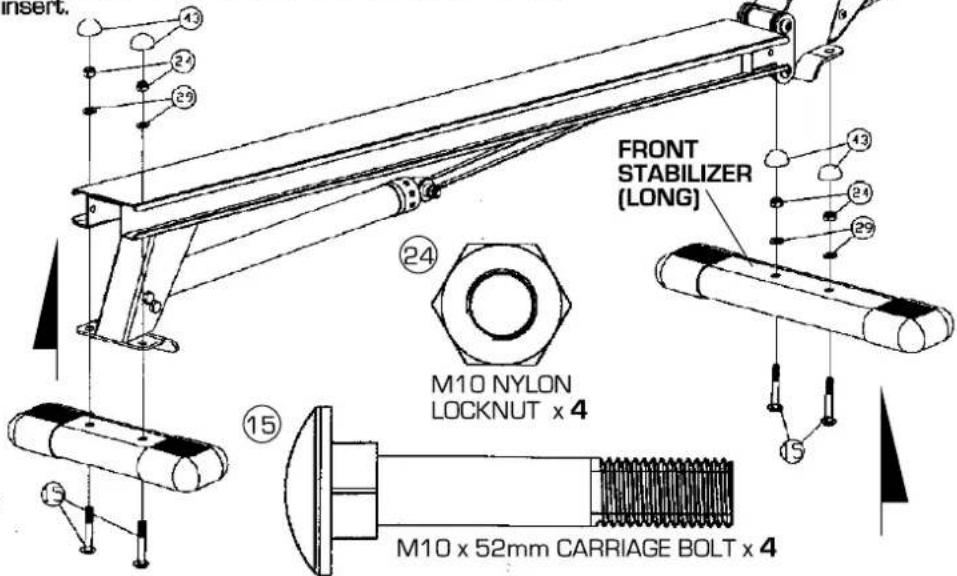
● Fix the front stabilizer to the main frame and secure, using two carriage bolts, washers and nylon locknuts.
● Fix the plastic caps onto the locknut heads.
● Fix the rear stabilizer to the main frame and secure, using two carriage bolts, washers and nylon locknuts.
● Fix the plastic caps onto the locknut heads.
NOTE: This equipment has been supplied with some nylon locknuts. It is essential that the nuts are Fully Tightened onto the bolts, so that the bolt penetrates through the nylon insert.
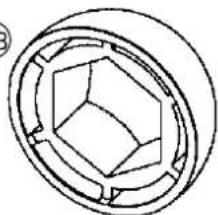
43
natural_image
Pure geometric diagram of a circular mechanical component with hexagonal cutouts (no text or symbols)PLASTIC NUT CAP x 4
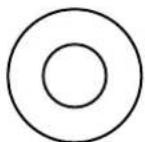
29

10.5mm x 23mm x 1.5mm
FLAT WASHER x 4
INSTRUCTION 3
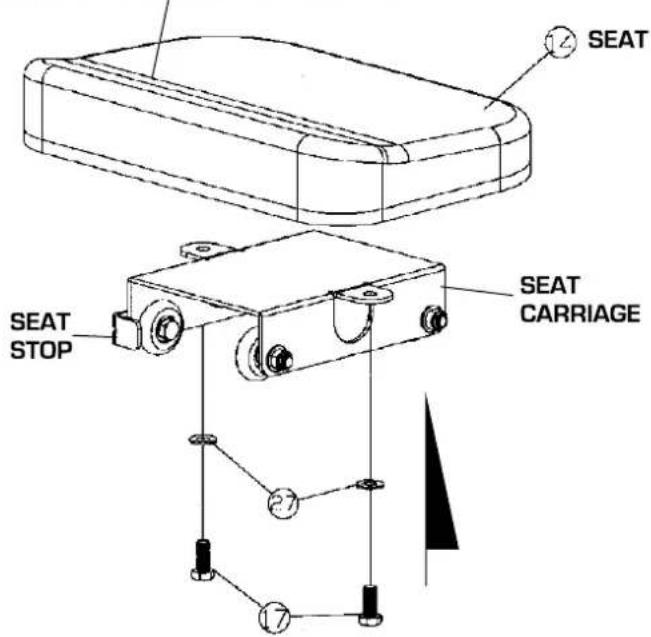
- Attach the rower seat to the seat carriage and secure, using two hex head bolts and washers.
NOTE: MAKE SURE the high part of the seat towards the seat stop.
⑰
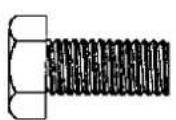
M8 x 16mm
HEX HEAD BOLT x 2
27
8.5mm x 18mm x 1.5mm FLAT WASHER x 2
MAKE SURE THE HIGH PART OF
THE SEAT TOWARDS THE SEAT STOP.
INSTRUCTION 4
- Slide the seat with carriage onto the runners.
NOTE: MAKE SURE the high part of the seat towards the back.
● Bolt the seat stop bracket through the hole in the runners. Reach underneath the rower to tighten the bolt.
NOTE: MAKE SURE the bolt and seat stop bracket goes through the last hole at the end of the main frame. - Attach the rear end cap onto the main frame.
MAKE SURE the high part of the seat towards the back
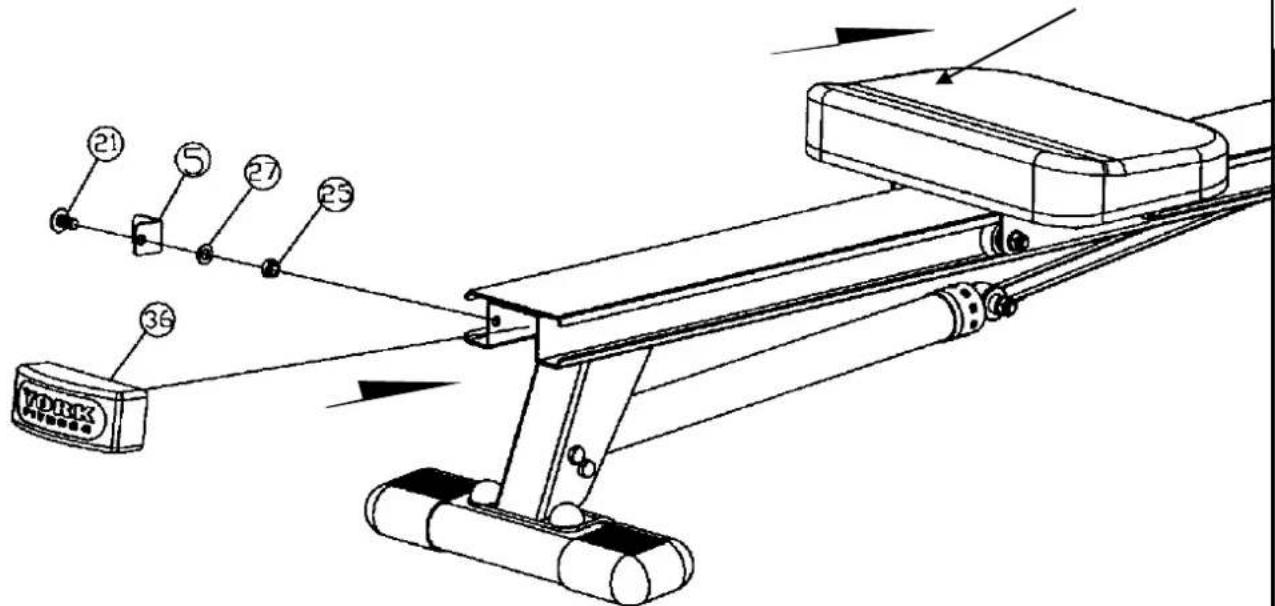
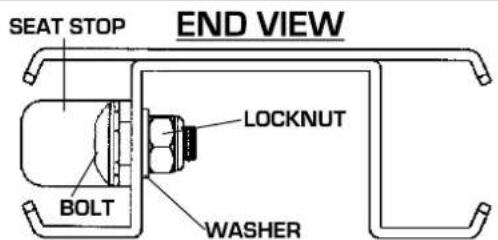
21
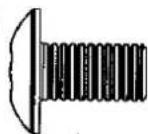
M8 x 15mm
ALLEN HEAD BOLT x 1
27

8.5mm × 18mm × 1.5mm
FLAT WASHER x 1
25
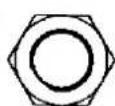
M8 NYLON
LOCKNUT x 1
INSTRUCTION 5
- Insert two batteries (AA size 1.5V) into the compartment in the back of the computer.
- Attach the bottom console to the main frame and secure, using two machine screws.
- Connect the sensor wire sockets that come out of the main frame to the computer wire plugs on the back of computer console.
- Attach the top computer onto the bottom console securely.


M5 x 6mm MACHINE SCREW x 2

INSTRUCTION 6
- Slide the pedal pivot rod through the main frame holes until an equal amount of the rod protrudes from each side.
- Slide the spacer and pedal onto the pivot rod from both ends and secure, using two allen head bolts and washers.
NOTE: The STRAP LOOPS should be fitted to the inside edge of the pedal for easy adjustment of the strap.
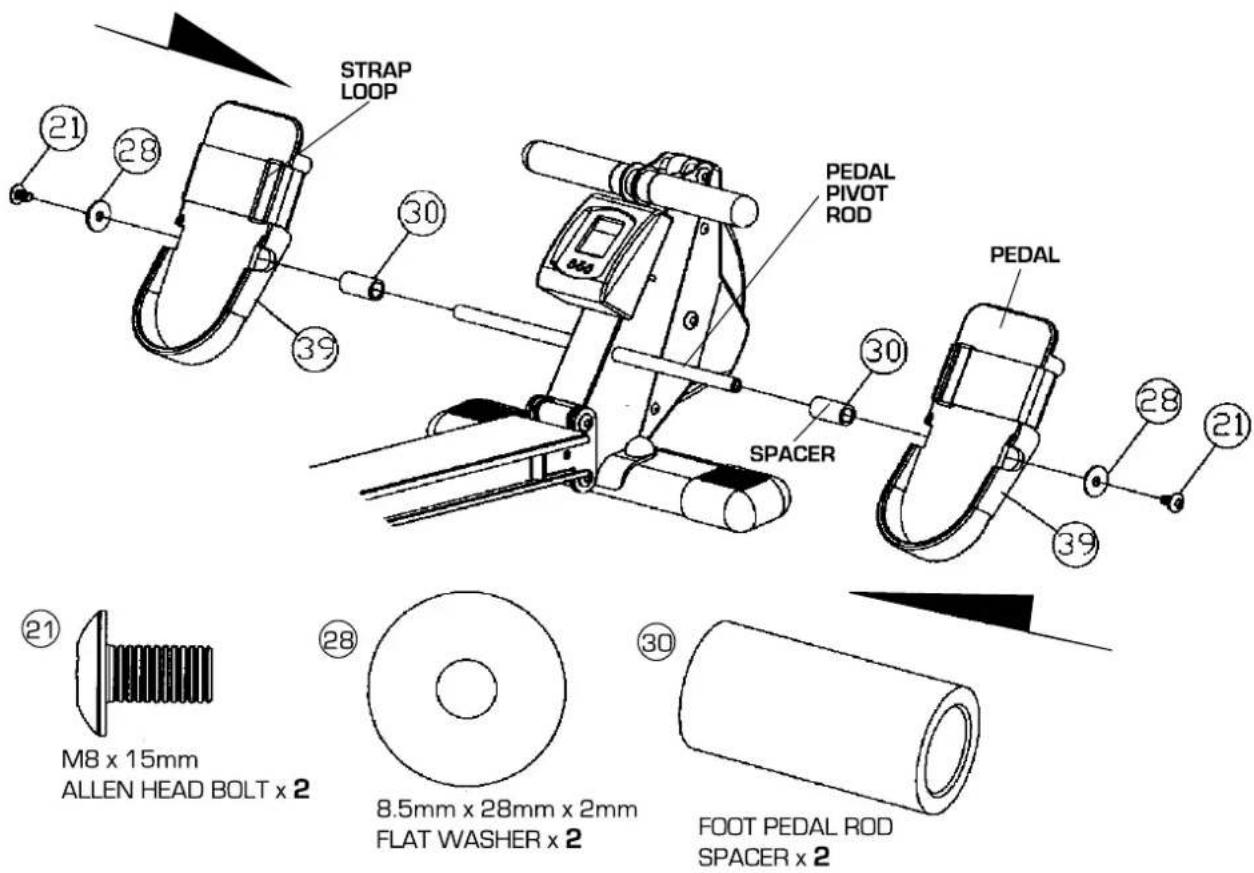
● Recheck that all of the bolts and nuts are tightened securely for your safety and comfort.
COMPUTER INSTRUCTION
Your computer is ideal for monitoring your performance and setting yourself targets. By measuring your performance you can ensure you exercise within your range. At the same time you can monitor closely your improving condition and fitness.
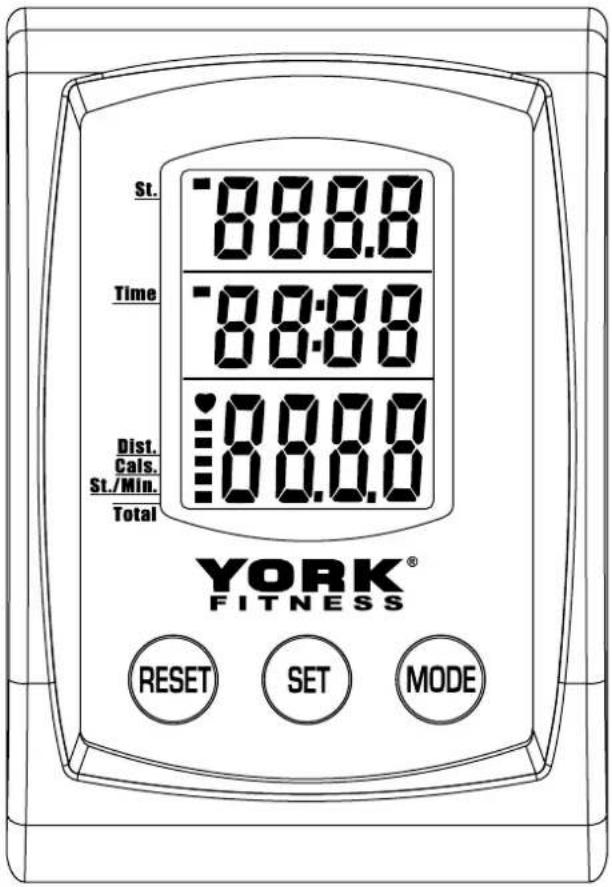
TO START/
Press SET key to activate the computer.
The computer will automatically start when you exercise.
FUNCTION KEYS
MODE:
Press the MODE key to alternate between options.
The selected function will "flash" when chosen in the following order:
STROKE ▶ TIME ▶ DISTANCE ▶ CALORIE ▶ STROKE/MIN. ▶ TOTAL COUNT.
SET:
Press the SET key to allow you to set the target values for STROKE or TIME or DISTANCE or CALORIE.
Please make sure computer is in the "STOP" status, before using this key. If you press this key continuously the digit value will increase quickly.
RESET:
Press the RESET key to reset all of the target values in computer.
SETTING FUNCTIONS
You can set a target STROKE or TIME or DISTANCE or CALORIE on your computer. When you start exercising the computer will begin to count down from your target to zero. When it reaches zero an alarm will beep.
STROKE
Counting commences when the YORK R101 is active. [Max. 9999]
PROGRAM 1. / TARGET STROKE
To set target stroke select 'STROKE' using 'MODE' key.
Enter desired stroke by pressing SET key. (Max. 9990)
TIME
Counting commences when the YORK R101 is active. (Max. 99:59 MIN).
PROGRAM 2. / TARGET TIME
To set timer countdown select "TIME" using MODE key.
Enter required time target by pressing SET key. (Max. 99:00 MIN).
Press MODE to change to next function if required.
DISTANCE
Distance is automatically displayed in KMS when the YORK R101 is in use. (Max. 99.99 KM).
PROGRAM 3. / TARGET DISTANCE
To set target distance select 'DISTANCE' function using MODE key.
Enter desired distance by pressing SET key. (Max. 99.90 KM).
Press MODE to change to next function if required.
CALORIES
Approximate calories consumed is displayed, once the YORK R101 is in use. [Max. 9999 CAL.]
PROGRAM 4. / TARGET CALORIES
To set target consumption select 'CALORIE' using MODE key.
Enter target calories to be consumed using SET key. (Max. 9990 CAL.)
(This data is a rough guide for comparison of different exercise sessions which can not be used in medical treatment.)
Press MODE to change to next function if required.
STROKE/ MIN.
The STROKE/MIN. is automatically calculated and displayed when the rower is in use.
STROKE/MIN. is based on the RPM of the drive wheel, the faster the wheel revolves the higher the value.
The STROKE/MIN. should be used as a guide to pace.
Press MODE to change to next function if required.
TOTAL COUNT
Accumulates total strokes completed will go back to zero when 'RESET' key is pressed. [Max. 9999]
NOTE:
-
When targets / limits have been reached an alarm will sound.
-
Without any signal for 4 minutes, the LCD display will shut off automatically, with all values set to zero.
Press any key or start rowing to reactivate.
-
The mode function will only work when all activity has stopped.
-
If the display becomes faint, replace the batteries.
-
Battery spec: 2 x AA size 1.5V.
EXERCISE GUIDE
Rowing is an extremely effective form of exercise.
It strengthens the heart, improves circulation, as well as exercising all the major muscle groups - back, waist, arms, shoulders, hips & legs.
For all exercise, you can increase or decrease the resistance using the dial on the hydraulic cylinder (Found underneath the rower).
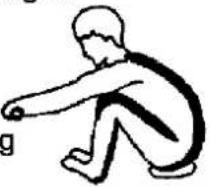
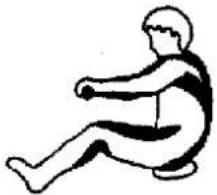
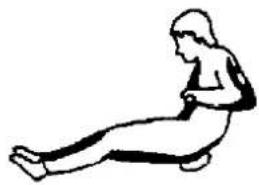
HOW TO ROW:
-
Take up the initial position leaning forward, knees bent and arms straight.
-
Push yourself backwards, straightening your back and legs at the same time.
-
Continue movement until you are leaning slightly backwards, bending the arms at the same time. Return to 1 and repeat.
1
natural_image
Simple line drawing of a person sitting and pointing at a small object (no text or symbols)2
natural_image
Simple line drawing of a person sitting on a bench (no text or symbols)3
natural_image
Simple line drawing of a person performing a seated exercise (no text or symbols)NOTE:-
This product is compliant with European Standards (EN-957)
The user must remain aware that if this product is not used correctly the potential for injury remains. There are many moving parts on this product, which the user must be aware of.
When moving the rower or adjusting position, the user should pay particular attention the seat & runner assembly.
- Please ensure that fingers are not placed inside of the runner assembly when moving the product.
- When adjusting your exercise position and you need to steady yourself by holding onto the rower, ensure that it is the underside of the seat upholstery that you are grasping.
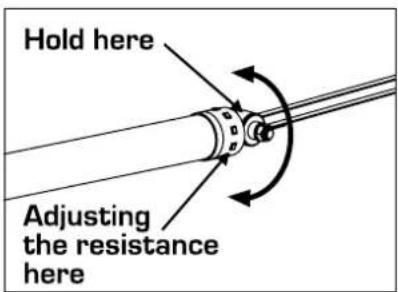
Adjusting the resistance
Hold the cylinder in the correct position while adjusting the resistance.
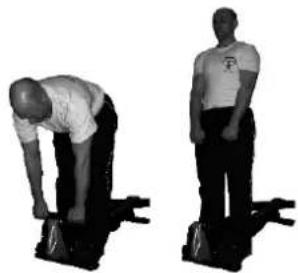
Stiff leg dead lift
- Place balls of both feet onto the rower for stability. Hold the handle with both hands.
- Whilst keeping a flat back and straight legs pull your body into a standing position.
- Ease back to the start position keeping a flat back and straight legs.
Standing upright row
- Place balls of both feet onto the rower for stability. Stand with good straight body position. Hold the handle with both hands.
- Pull upwards keeping the handle close to your body. Only pull the handle to chest height. Keep the elbows lifted towards the ceiling.
- Return to the start position with control.
natural_image
Two individuals performing a dumbbell exercise, one bending forward and the other standing upright (no text or symbols visible)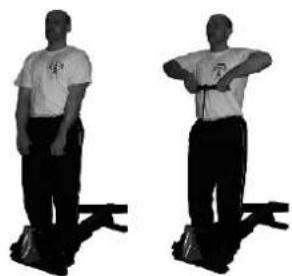
natural_image
Two individuals standing on identical foot bases, one with arms crossed and the other with a bandage (no text or symbols visible)Single arm row
- Place balls of both feet onto the rower for stability. Support your bodyweight with your left hand on the left knee. Having a good stance with allow you to feel balanced when completing the exercise.
- Hold the handle in your right hand.
- Keep a straight back as shown and pull the handle into the body. Release back to the start position.
- Repeat with your other arm.
Standing Bicep Curl
- Place balls of both feet onto the rower for stability. Hold the handle with both hands with palms facing upwards.
- Keeping the elbows close to the body pull the handle toward your face, working the bicep [front arm] muscles.
- Return to the start position keeping back straight and elbows into body.
Standing shoulder shrug
- Place balls of both feet onto the rower for stability. Hold the handle in both hands with palms facing inwards.
- With straight arms lift the shoulders upwards [towards your ears].
- Lower with control to the start position.
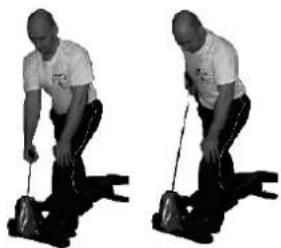
Deadlift
- Place balls of both feet onto the rower for stability. Hold the handle in both hands. Start in a squat position with a flat back.
- Keep the tension on the handle and stand up straight. Keep the movement slow and under control.
- Return to the start position.
Leg Press
- Start position with feet in the foot pedals, holding onto the handle with both hands.
- Keep the tension on the handle and stand up straight. Keep the movement slow and under control.
- Return to the start position.
Seated Bicep concentration curl
- Start position seated with both feet on front rower stabilizer. Hold onto the handle with both hands.
- Place the elbows on top of the knees for initial support and your back straight.
- Curl the bar towards your head keeping elbows in place if possible.
Seated Low Row
- Start position seated with both feet on front rower stabilizer. Hold onto the handle with both hands.
- Keep a straight back and pull the bar into the lower abdominal area.
- Release and return to the start position.
- Keep the legs still at all times concentrating on the upper-body doing the work.
For all exercises, aim to repeat 10-12 times
natural_image
Two individuals performing a resistance exercise using a pulley tool (no text or symbols visible)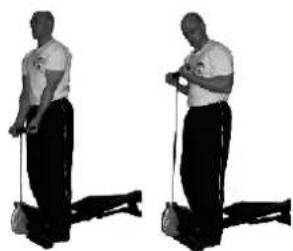
natural_image
Two individuals performing a resistance band exercise, viewed from behind (no text or symbols visible)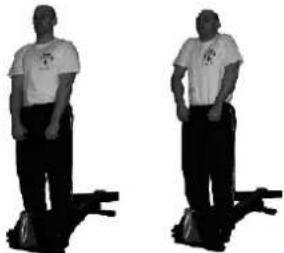
natural_image
Two identical black-and-white photos of a person standing on a platform, no text or symbols visible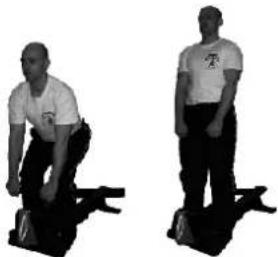
natural_image
Two individuals performing a physical exercise or martial arts stance, standing upright (no text or symbols visible)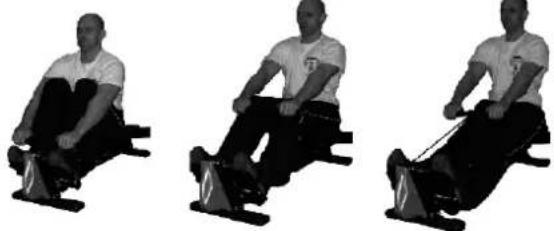
natural_image
Three sequential images of a man performing a row exercise on a stationary bike (no text or symbols visible)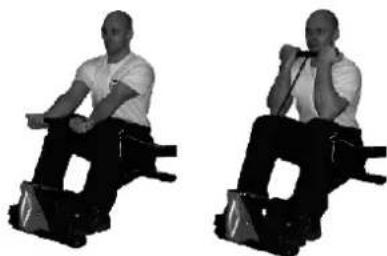
natural_image
Two identical black-and-white images of a man performing a seated exercise on a bench, no text or symbols visible.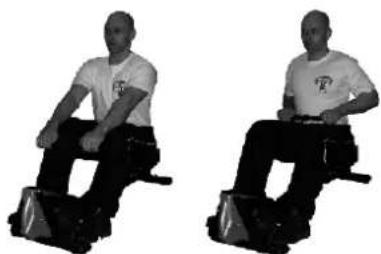
natural_image
Two individuals performing seated exercise on a fitness apparatus (no text or symbols visible)YOUR WARRANTY
This product is supplied with a standard warranty as follows:
- lifetime frame
• 12 month other parts
• 12 months labour
This product is warranted for use in a home, personal, family or household environment.
Please Note: Warranty details may vary from one market area to another.
Warranty Terms
York Barbell Ltd. warrants that the product you have purchased from an authorised York reseller is free from defects in materials and workmanship. The warranty is valid subject to normal and reasonable use in the environment as described above, and correct assembly of the product during the warranty period. The warranty period extends to the original purchaser only. It is not transferable to anyone who subsequently purchases the Product from you.
The warranty excludes normal wear and tear on parts.
Your sales receipt, showing the date of purchase of the product, is your proof of the date of purchase.
This warranty becomes valid only if the Product is assembled / installed according to the instructions / directions included with the product. This warranty does not extend to any product that has been damaged or rendered defective: (a) as a result of accident, misuse, abuse or lack of reasonable care; (b) by the use of parts not manufactured by York Barbell or sold by York Barbell; (c) by modification of the product; (d) as a result of service by anyone else other than York Barbell or an authorised York Barbell warranty service provider.
During the warranty period York Barbell will at no additional charge provide replacement part (s) or repair the product (at York Barbell's option) if if becomes defective, malfunctions or otherwise fails to conform with this warranty under normal non-commercial, personal, family or household use. In repairing the product, York Barbell may replace defective parts or at the option of York Barbell. York Barbell reserves the right to change manufactures of any part to cover any existing warranty. If the product must be returned, you must return the Product or defective part to York Barbell in its original container (or equivalent) with Proof of Purchase. Any evidence of alteration, erasing or forgery of proof of purchase documents will be cause to void this warranty. You must prepay any shipping charges and you are responsible for insuring any product or part that is returned. Should any product submitted for warranty service be found to be ineligible, an estimate of repair cost will be furnished and the repair will be made if requested, upon York Barbell's receipt of payment or acceptable arrangement of payment. Under no circumstances will ret be accepted without return authorisation by our Customer Service department.
To obtain warranty service you must provide the following information:
Name of Product, Product Code, Batch No, Date Purchased, and Nature of fault or part number required.
Neither dealer of this product nor any retail establishment selling this product has any authority to make any warranties or to promise remedies in addition to, or inconsistent with, those stated above. This warranty does not affect your statutory rights.
Please note that warranty terms may vary from one market are to another.
Contact Us
England
York Barbell (UK) Ltd. York Way, Daventry, Northants, England Nn11 4YB
Tel: (01327) 701800 Helpdesk Tel: (01327) 701824 Fax: (01327) 706704 email:helpdesk@yorkfitness.co.uk
Australia
Unit 1, Lot 2, Swaffham Road. Minto, N.S.W. 2566 Australia
Tel: (02) 9603 8333 Fax: (02) 9603 8555 email: service@yorkfitness.com.au
Other Locations
Please see website - www.yorkfitness.com
PARTS DRAWING
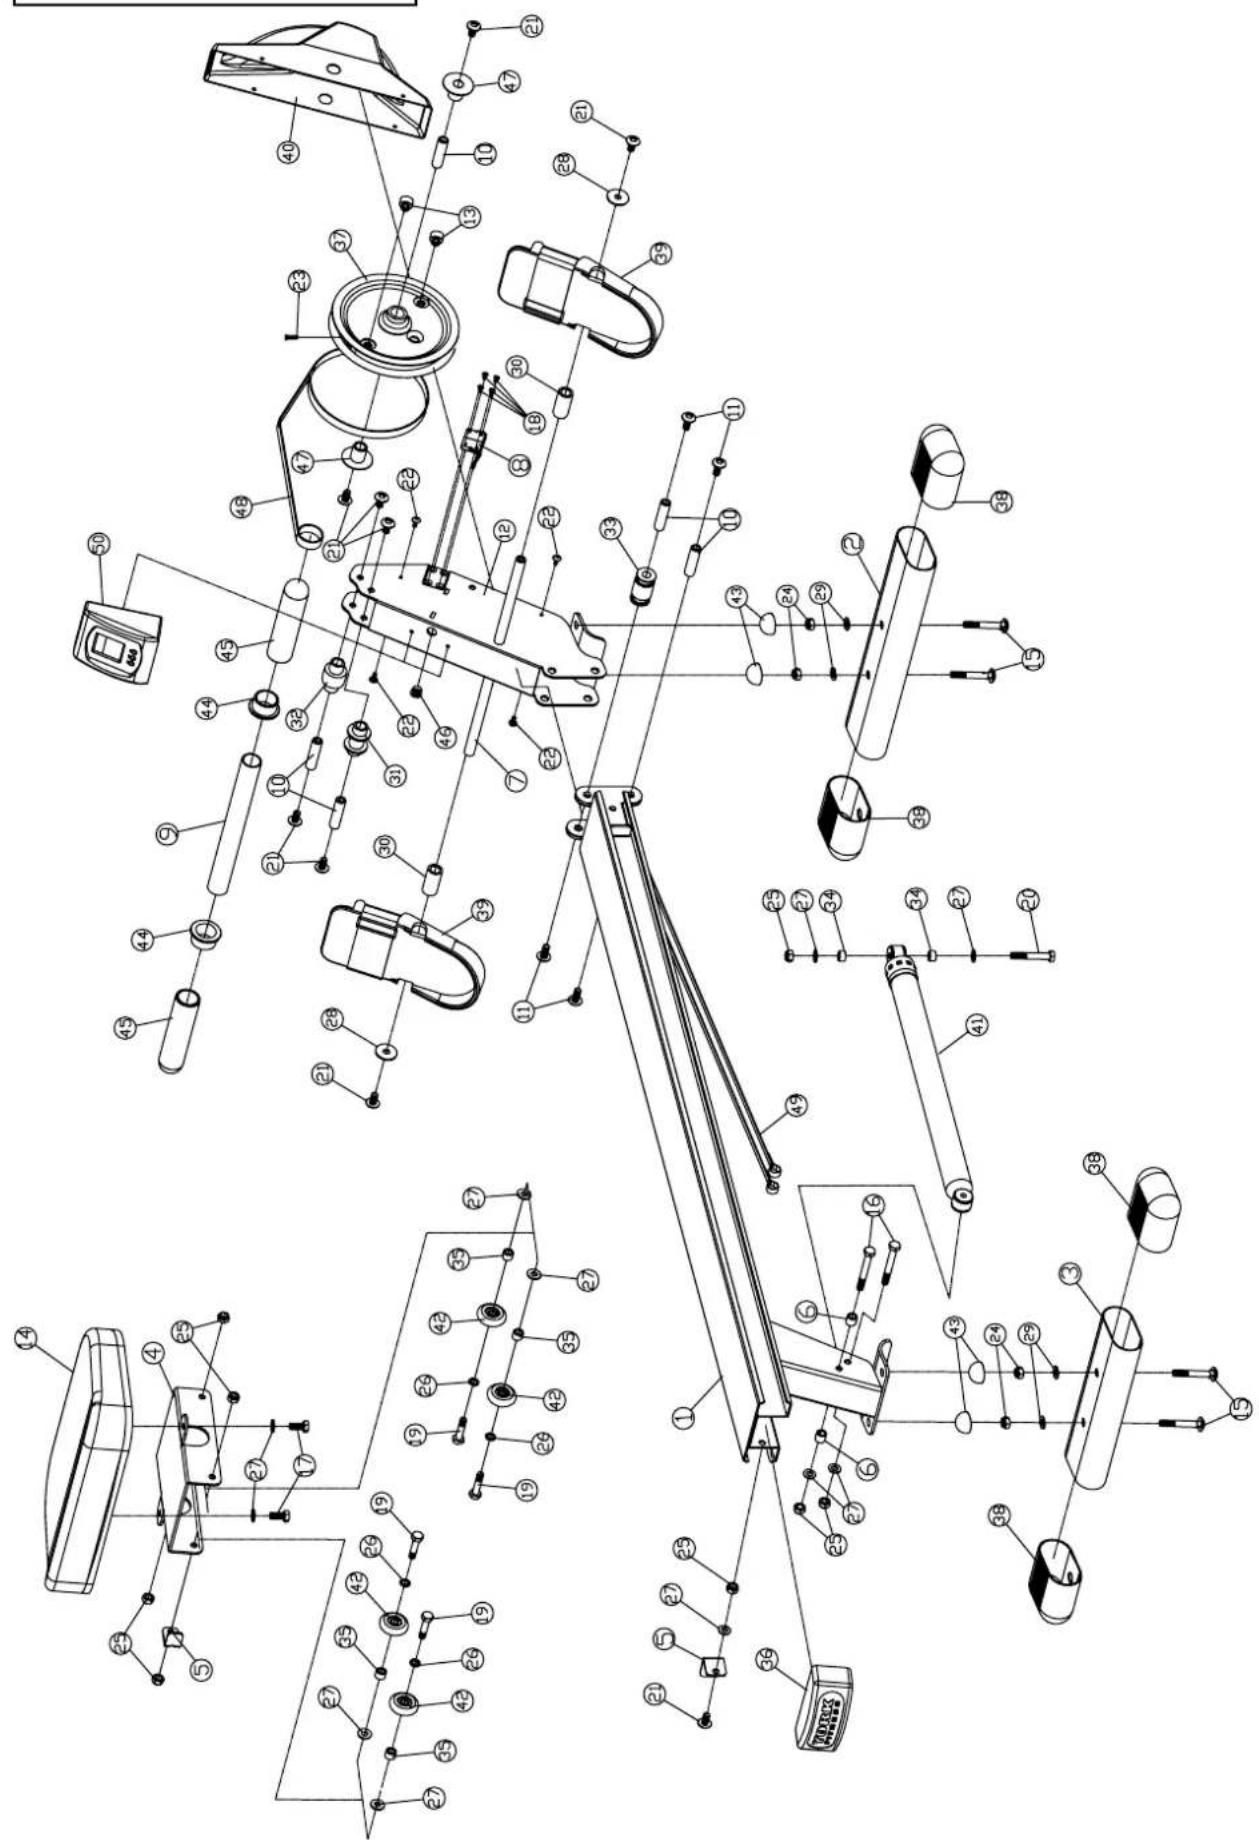
PARTS LIST
| Ref.PartNo.Q'tyPartdescription | |
| 156005-011ROWERSEATTRACK | |
| 256001-021FRONTSTABILIZER | |
| 356001-031REARSTABILIZER | |
| 456001-041SEATCARRIAGEBRACKET | |
| 556001-052STOPBRACKET | |
| 656001-062METALBUSHING | |
| 756001-071FOOTPEDALPIVOTROD | |
| 856001-081SENSORW/CABLE | |
| 956001-091PULLINGHANDLEBAR | |
| 1056001-105ROLLERPIVOTS HAFT(L=50mm) | |
| 1156001-114M8X20mmALLENHEADBOLT | |
| 1256001-121FRONTPULLING WHEELBRACKET | |
| 1356001-132MAGNET | |
| 1456001-141ROWERSEAT | |
| 1556001-154M10X52mmCARRIAGEBOLT | |
| 1656001-162M8X66mmHEX HEADBOLT | |
| 1756001-172M8X16mmHEX HEADBOLT | |
| 1856001-184M4X10mmSELITAPPING SCREW | |
| 1956001-194M8X34mmHEX HEADBOLT | |
| 2056001-201M8X45mmHEX HEADBOLT | |
| 2156001-219M8X15mmALLENHEADBOLT | |
| 2256001-224M5X6mmMACHINESCREW | |
| 2356001-231M4X15mmSELITAPPING SCREW | |
| 2456001-244M10NYLONLOCKNUT | |
| 2556001-258M8NYLONLOCKNUT | |
| 2656001-2648.5mmX13mm X2mmFLATWASHER | |
| 2756001-27118.5mmX18mm X1.5mm FLATWASHER | |
| 2856001-2828.5mm | X28mmX2mmFLATWASHER |
| 2956001-29410.5mmX23mm X1.5mm FLATWASHER | |
| 3056001-302FOOTPEDALROSPACER | |
| 3156001-311FRONTSTRAPROLLER | |
| 3256001-321REARSTRAPROLLER | |
| 3356001-511BOTTOMSTRAPROLLER | |
| 3456001-342CYLINDERSTRAPSPACER | |
| 3556001-354SEATCARRIAGEROLLERSPACER(L=11mm) | |
| 3656001-361ROWERSEATTRACKENDCAP | |
| 3756001-371PULLINGSTRAPDISCWHEEL | |
| 3856001-384STABILIZERENDCAP | |
| 3956001-392FOOTPEALREST(L&R) | |
| 4056001-401FRONTDISCWHEELCOVER | |
| 4156001-411ADJUSTABLESPRINGCYLINDER | |
| 4256001-424SEATCARRIAGEROLLER | |
| 4356001-434PLASTICNUTCAP | |
| 4456001-442HANDLEBARSPACER | |
| 4556001-452HANDLEBARGRIP | |
| 4656001-461CABLEWIRECLIP | |
| 4756001-472PULLINGSTRAPDISCWHEELBUSHING | |
| 4856001-481PULLINGSTRAP(L=1790mm) | |
| 4956001-521CYLINDERSTRAP(L=1680mm) | |
| 5056005-501COMPUTER | |