Ultima 390 - Telt SunnCamp - Gratis brugsanvisning og manual
Find enhedens vejledning gratis Ultima 390 SunnCamp i PDF-format.

Brugerspørgsmål om Ultima 390 SunnCamp
0 spørgsmål om dette apparat. Besvar dem du kender, eller stil dit eget.
Stil et nyt spørgsmål om dette apparat
Download vejledningen til din Telt i PDF-format gratis! Find din vejledning Ultima 390 - SunnCamp og tag din elektroniske enhed tilbage i hånden. På denne side er alle dokumenter nødvendige for brugen af din enhed offentliggjort. Ultima 390 af mærket SunnCamp.
BRUGSANVISNING Ultima 390 SunnCamp
WARRANTY
This Awning is covered by a 12 month warranty. The Company undertakes to replace or repair, free of charge, which the Company considers to be due to faulty workmanship or material within 12 months of the purchase date, except for:
- Defects arising from neglect, misuse or unauthorised modifications.
- Damage caused by storm, abuse, misuse, dropping or other similar damage caused by or as a result of failure to follow storage or erection instructions.
- Unauthorised alterations, additions or repairs.
- Transportation or shipment costs to and from the Manufacturer or their recognised agents, for repair or assessment against a warranty claim.
- Damage caused due to UV degradation.
- Materials and/or labour costs to renew, repair or replace components due to fair wear and tear or condensation.
- Awnings used on permanent sites or displays.
THIS DOES NOT AFFECT YOUR STATUTORY RIGHTS.
The Manufacturer and/or their recognised agents, directors, employees or insurers will not be held liable for consequential or other damages, losses or expenses in connection with or by reason of or the inability to use the awning for any purpose.
NOTE; Any claim(s) arising due to missing parts or faulty goods MUST be made before use. The manufacturer will not be responsible for any claims regarding missing parts or faulty items where the product has not been checked by the user prior to use.

natural_image
Abstract logo design with a blue triangular shape inside an oval (no text or symbols)SunnCamp
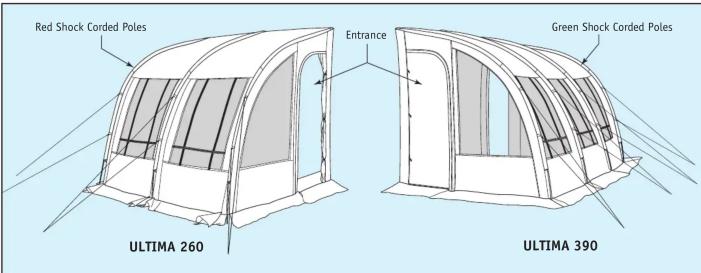
ULTIMA AWNINGS
Thank you for purchasing the Ultima 260/Ultima 390 Awning from SunnCamp.
Before erecting this awning, carefully read and understand these instructions. If there is anything you do not understand, contact your retailer for advice.
By following the instructions on erecting, dismantling, packing and storing the awning you will enjoy many years of trouble free camping.
PARTS LISTING
Your Ultima Awning consists of the following items and you should check everything is present before setting off
| Awning Flysheet 1 | |
| Awning Peg Bag 1 | |
| Adjustable Roof Tension Poles 2 | |
| Porch Poles | 2 |
| Adjustable Rear Support Poles | 2 |
| Repair Kit | 1 |
| Awning Carry-Bag | 1 |
| 260 MODEL ONLY | |
| Red Shock Corded Poles | 3 |
| 390 MODEL ONLY | |
| Green Shock Corded Poles | 4 |
It is a requirement of the warranty that you unpack and erect this Awning at home prior to proper use. This will enable you to familiarise yourself with the Awning and check all parts are present and in good condition.
If you find any part missing or a fault with your awning, contact the retailer before returning or using it.
SITE SELECTION
Choose a location where the ground is flat, smooth and dry. Attempt to position the awning entrance away from the direction of the wind. Do not position on sharp, rocky or rough ground.
GETTING STARTED
Unpack the awning and place the carry-bag somewhere safe. Separate all components and check that everything is present.
POLES
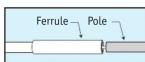
Take each Shock Corded Pole and slot together.
The Poles are folded down to aid storage. When fitting the
pole sections together, make sure that the pole body is fully inserted into its adjoining ferrule.
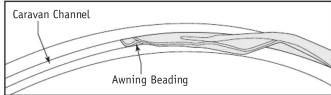
AWNING
Slide the beaded rear edge into the caravan's awning channel.
Insert each shock corded pole into a sleeve, plastic bung end first. The poles ends are held captive at the end of the sleeve by a reinforced pocket.

The other end of each pole is held captive by a pin on a ring fitted to the end of an adjustable webbing strap.
The ring is also used as the securing point for the awning peg. Starting with the pole at one end,
insert the ring pin into the end of the pole to bring t pole under tension.
Continue until all poles are inserted and under tension.
ROOF TENSION POLES
To improve the awning's rigidity, the two sets of adjustable roof tension poles and adjustable rear support bars will be inserted inside the awning once the main erection is complete.
Slot the first set of roof tension poles together. Make sure that the adjustable end section, fitted with a lock screw, is loosely fitted.
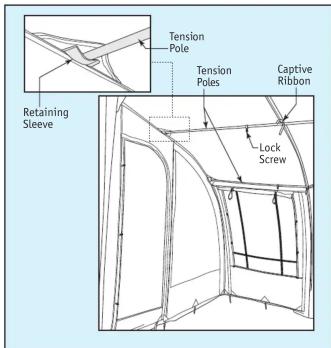
Next, insert the fixed end of the roof tension pole into the left hand upper retainer sleeve. Keep the pole captive within the retainer sleeve as you walk to the opposite side of the awning.
Raise the pole and insert the adjustable end section in to the right hand retainer sleeve. Carefully pull the pole and end section apart to bring them under tension, then lock in place by turning the lock screw clockwise.
Once in place, secure the tension pole with the captive ribbons using a bow. Next, fit the second adjustable roof tension pole to the lower retainer sleeves in the same way.
Finally, fit the two adjustable rear support bars, one to each rear corner of the awning. The pole's flattened top section must be inserted into the reinforced retaining pocket found at each top rear corner, behind the triangular reinforcing panel. Both poles should be extended then locked by turning the lock screw clockwise.
ENTRANCE
You should now ensure that all entrances to the awning are closed with all zips fully secured. If this is not done now, the awning will be out of alignment when fitting the awning pegs.
AWNING PEGS
Starting with the four corners, secure the awning to the ground using the awning pegs.
When inserting into the ground, the peg should be set at a 45 degree angle away from the awning. Pegs should be hammered into the ground using a suitable mallet and NOT pressed in with the foot. Most bent pegs are caused by using your foot rather than a mallet.
Peg removal can be made easier if you use a suitable extractor.
GUY ROPES

Secure each guy rope, positioning its awning peg at a suitable distance from the awning. Once in position, tighten the ropes equally to bring the awning into its natural shape. DO NOT over tighten. To tighten, Hold the
rope above the slider and pull the slider up. To release, again hold the rope above the slider and pull the slider down.
Remember that all guy ropes are a trip hazard especially in the dark.
FRONT ENTRANCE
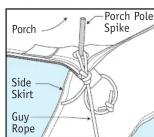
The entrances can be rolled up out of the way or you can raise one to create a porch. When closed, the zip cover/baffle must be carefully pressed into place ensuring the Velcro tabs are aligned and the skirt correctly positioned, secured by tent press should it rain.
pegs, to avoid water ingress should it rain. The awning is supplied with two porch poles which simply slot together.
When used as a porch, insert the spike end of the porch poles into the selected entrance's corner eyelets then hook a guy rope over the spike and secure to the ground with a tent peg. Adjust each guy rope tension to bring the porch square.
SIDE ENTRANCE
The side entrances are duel skinned with one mesh (fly screen) and one solid. One or both be rolled back and retained by a set of loops toggles.
When closed, the zip cover/baffle must be carefully pressed into place ensuring the Velcro tabs are aligned and the skirt correctly positioned, secured by awning pegs, to avoid water ingress should it rain.
WINDOWS
All windows have curtains that can be closed and are secured in place with hook and loop tape. When open, carefully roll the curtain and secure with toggle and loop.
SAFETY
It is advisable to have a 'Fire' bucket filled with water, placed outside the awning. Hopefully it will never be needed, but if it is, you will be glad you made the effort. The awning's fabric is fire retardant, NOT fire proof and therefore you must not smoke or use a naked flame in or near the awning. This includes the traditional 'camp fire'. Guy ropes can cause a trip hazard and should be marked so that passers by can see them.
Awning pegs are also a trip hazard and should not be left 'half in'.
CLEANING, STORING AND REPAIRS
Cleaning...
Both inside and outside of the awning should only be cleaned using fresh clean water and a damp cloth. Do not use detergents or chemical cleaners.
The inner ground sheet can be washed with a mild detergent.
Storing...
The awning is best stored in its original carry-bag, however, if the awning is dismantled when wet, you MUST not leave it stored until it has been thoroughly dried. After a wet pack-up, erect the awning as soon as possible and allow to fully dry naturally before repacking in the carry-bag.
If stored when wet, the awning will suffer from mildew and will become unusable.
Repairs...
Repairs to the awning should only be made by the manufacturer's recommended agents. Repairs made by an unauthorised party will make the manufacturers warranty void.
STORM AND WEATHER SUITABILITY
This awning is designed for light use in normal weather conditions. It is not suitable for storms, gales, sub zero or tropical conditions.
UV DETERIORATION
Prolonged exposure to direct sunlight can weaken the fabric of the awning. To avoid the risk of UV Deterioration, site the awning in a shaded area, where it will be protected from exposure to strong sunlight.
MOISTURE
Moisture collecting on the inside of the awning fabric is condensation caused by the occupier. It is NOT a sign of leakage.
Note that condensation or damage caused by it, is NOT covered by the manufacturer's warranty.
SEAMS
This awning has all its main seams hot air taped to help prevent leakage. The remaining seams should be treated with a seam sealant to maximize the awning's weatherproofing.
Seam sealant should also be applied to main seams where the tape has lost adhesion or has been damaged (tie points or suspension points for example).
Seam sealant is available from your SunnCamp stockist.
DISMANTLING
:To dismantle the awning, simply reverse the erection procedure.
All poles must be dismantled and the awning should be carefully rolled prior to placing back in the carry-bag.