
Diablo 900 XL - Telt Vango - Gratis brugsanvisning og manual
Find enhedens vejledning gratis Diablo 900 XL Vango i PDF-format.


Brugerspørgsmål om Diablo 900 XL Vango
0 spørgsmål om dette apparat. Besvar dem du kender, eller stil dit eget.
Stil et nyt spørgsmål om dette apparat
Download vejledningen til din Telt i PDF-format gratis! Find din vejledning Diablo 900 XL - Vango og tag din elektroniske enhed tilbage i hånden. På denne side er alle dokumenter nødvendige for brugen af din enhed offentliggjort. Diablo 900 XL af mærket Vango.
BRUGSANVISNING Diablo 900 XL Vango

natural_image
Two grayscale images: one showing a Vango logo and the other a camping tent with open windows (no text or symbols on the tent itself)Tent Pitching Instructions – Diablo 600XL & 900XL
FLYSHEET FIRST PITCHING
- Assemble poles and lay them parallel on the ground.
- Open out flysheet and position in required direction.
- Ensure the flysheet doors are mostly closed with only a small gap along the bottom when pitching the tent.
- Insert front 3 poles into pole sleeves, the poles are colour coded to match the coloured tab on the pole sleeve.
- On both sides of the tent, loosen the tension straps and locate the ends of each pole into the corresponding Ring & Pin.
- Tension the pole end straps and attach the pole clips
- Lay pole arches on the ground. The back of the tent should be down with the front of the tent face up.
- Peg out adjustable anchor straps at both corners of front end of tent using the pegs supplied.
- With one person at each side of the tent gather all the poles together and lift into the upright position
- "Walk" the tent back, away from pegged points, until the central tunnel takes shape. Insert pegs into the two Ring & Pins at the back of the tent at either side of the back door.
- Ensure the tent is in a straight line. The groundsheet should be flat and wrinkle free.
- Insert the medium and short poles into the pods. Attach ring and pin, lift up, attach clips and peg out the back of the pods.
- Insert the brow pole above the rear door (600XL only).
- Secure the tent using the pin pegs through the Ring & Pin system (see fig 2).
- Peg out ALL guy lines, ensuring that they are in line with the pole or seam they are attached to.
INNER ATTACHMENT
- Suspend the inners by attaching toggles on the inner tent through rings on the inside of the flysheet. Do the rear first and work towards the front of the tent.
- Once fully attached, the inners can be left in when pitching or striking the tent. However, it is advisable to remove the inners when striking the tent when wet.
TENSION BAND SYSTEM
- Remove Tension Band System from pockets and attach into the corresponding clips at the apex of the pole. Adjust the straps until they are taut.
- DO NOT OVER TENSION. Excess tension will alter the shape of the tent.
- Tension bands are designed to stabilise the tunnel structure of the tent. The bands are not required to be used in calm weather.

natural_image
Close-up of a mechanical component with a curved tool inserted into a ring (no visible text or symbols)Figure 1.
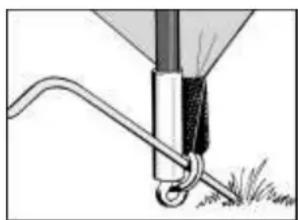
natural_image
Diagram of a cable or wire being inserted into a spring, with grass at the base (no text or symbols)Figure 2.
Ring & Pin System
- Locate one end of each pole onto the corresponding metal pin. The metal pin inserts into the hollow metal ferrule on the end of each pole. (See Figure 1). Push the pole into a curve from the opposite side, one at a time, and locate all pole ends onto the metal pins.
- Peg the corners of the tent through the metal rings using pin-pegs. It is important to drive the peg into the ground at a 45 degree angle to obtain the best grip. (See Figure 2).
IF YOU HAVE ANY PROBLEMS PLEASE CONTACT YOUR LOCAL RETAILER or
AMG Group Ltd., Kelburn Business Park, Port Glasgow, Scotland. PA14 6TD.
UK Consumer Hotline: 0844 811 0535
E-Mail: info@vango.co.uk
Calls to our Customer Hotline cost 5p per minute. Calls from mobile phones, cable networks or public payphones will generally cost more.
Mærke : Vango
Model : Diablo 900 XL
Kategori : Telt