
HGE 52301 B - Komfur Kaiser - Gratis brugsanvisning og manual
Find enhedens vejledning gratis HGE 52301 B Kaiser i PDF-format.

Brugerspørgsmål om HGE 52301 B Kaiser
0 spørgsmål om dette apparat. Besvar dem du kender, eller stil dit eget.
Stil et nyt spørgsmål om dette apparat
Download vejledningen til din Komfur i PDF-format gratis! Find din vejledning HGE 52301 B - Kaiser og tag din elektroniske enhed tilbage i hånden. På denne side er alle dokumenter nødvendige for brugen af din enhed offentliggjort. HGE 52301 B af mærket Kaiser.
BRUGSANVISNING HGE 52301 B Kaiser
Kaiser®
HGG5.. HGE5..
GASANDGAS-ELECTRICCOOKERS GAS-UNDGAS-ELEKTROHERDE ГАЗОВЫЕИГАЗО-ЭЛЕКТРИЧЕСКИЕПЛИТЫ
EN
USERMANUAL
DE
GEBRAUCHSANWEISUNG
RU
ИНСТРУКЦИЯПООБСЛУЖИВАНИЮИЭКСПЛУАТАЦИИ
EN
DEAR CUSTOMER,
thank you for purchasing this Kaiser product.
We are convinced that you have made the right choice. The appliance satisfies the high quality demands and corresponds to comprehensive international standards. Having been designed by the best European designers, the modern appearance of the cooker is sure to be a splendid interior decoration of your kitchen.
The cooker is intended to realize even your most complicated cookery projects.
Please read these instructions carefully before starting operation to be sure to obtain optimum performance. The following recommendations are aimed to protect you from possible inconveniences which can occur as a result of the wrong operation and, at the same time, reduce the consumption of electric energy. Proper operation and maintenance provide a longer service life of the unit and make cooking a pleasure.
The Kaiser cookers fulfill the main norms of safety, hygiene and environment protection in correspondence with the EU directives and are certified according to EU norms and standards (DIN ISO 9001, ISO 1400), standards of Russia (Gosstandart) and the CIS.
The company's policy is aimed at constant improvement of product quality. Modifications made to the design and equipment result in exclusively positive changes in operating qualities of the appliances. The right for changes in the products is reserved by the manufacturer.
We wish you an effective use of the Kaiser product.
Yours faithfully,
Kaiser
OLAN-Haushaltsgeräte
Berlin Germany
The appliances under present operating instructions are designed for domestic and not industrial use.
DE
LIEBE KUNDIN, LIEBER KUNDE,
wir danken Ihnen für den Erwerb unserer Technik.
Wir sind überzeugt, dass Sie eine richtige Wahl getroffen haben. Dieses Produkt entspricht den hohen Forderungen zur Qualität und den modernsten internationalen Standards. Das Gerät wird Ihnen Ihre Kochprojekte ermöglichen, während sein modernes Aussehen, das von den besten europäischen Designern entwickelt worden ist, zum Prachtstück Ihrer Küche wird.
Wir bitten Sie die Bedienungsanleitung vor der Nutzung aufmerksam zu lesen. Die Beachtung von Empfehlungen schützt Sie von eventuellen Unannehmlichkeiten, die als Folge der falschen Nutzung des Herds auftreten können, und ermöglicht Ihnen den Verbrauch von Elektroenergie zu reduzieren. Der Herd bringt Ihnen viel Vergnügen auf lange Zeit, wenn der Gebrauch der vorliegenden Bedienungsanleitung entsprechen wird.
Unsere Herde entsprechen den Hauptforderungen der Sicherheit, der Hygiene und des Umweltschutzes, laut den Direktiven der EU, was mit Zertifikaten DIN ISO 9001, ISO 1400, entsprechend den im Rahmen der EU geltenden Normen, bestätigt ist, und genauso auch den Anforderungen von Gosstandart in Russland und Standards anderer GUS Länder, was durch die Identifikationszertifikate bestätigt ist.
Mit den Gedanken der ständigen Verbesserung der Qualität unserer Herde sind Änderungen bei Design und Einrichtung, die nur zu positiven Veränderungen der technischen Eigenschaften führen, vom Hersteller vorbehalten.
Wir wünschen Ihnen die effektive Nutzung unseres Produkts.
Hochachtungsvoll
Kaiser OLAN-Haushaltsgeräte Berlin Germany
Wir Informieren Sie, dass unsere Geräte, die der Gegenstand der vorliegenden Bedienungsanleitung sind, sind ausschließlich für den häuslichen Gebrauch vorbestimmt.
RU
УВАЖАЕМЫЙ ПОКУПАТЕЛЬ,
благодарим Вас за приобретение нашей техники.
Мы уверены, что Вы сделали правильный выбор. Данный продукт, удовлетворяющий самым высоким требованиям и отвечающий мировым стандартам, позволит Вам легко воплотить все Ваши кулинарные способности, а его современный вид, разработанный лучшими европейскими дизанерами, великолепно украсит Вашу кухню.
Просим Вас внимательно прочитать инструкцию по обслуживанию и эксплуатации до пуска устройства. Соблюдение содержащихся в ней рекомендаций защитит Вас от возможных неприятностей при неправильной эксплуатации плиты, а также позволит Вам уменьшить расход электроэнергии. Если эксплуатация плиты будет соответствовать настоящей инструкции, наша плита будет радовать Вас долгое время.
Наши плиты полностью соответствует основным требованиям безопасности, гигиены и защиты окружающей среды, согласно директивам Европейского Союза, что подтверждено сертификатами DIN ISO 9001, ISO 1400, в соответствии с настоящими нормами, действующими на территории Европейского сообщества, а также полностью отвечают всем требованиям Госстандарта России и стандартов других стран CHГ, что подтверждается сертификатами соответствия.
С мыслью о дальнейшем повышении технических и эксплуатационных характеристик наших плит мы оставляем за собой право на внесение изменений в дизайн и устройство, влияющих только положительно на потребительские качества и свойства продукта.
Желаем Вам эффективного пользования продуктом нашей фирмы.
Уважающий Вас
Kaiser
OLAN-Haushaltsgeräte Berlin Germany
Информируем, что наши приборы, являющиеся предметом настоящей Инструкции, предназначены исключительно для домашнего пользования.
EN
CONTENTS
INSTALLATION INSTRUCTIONS 6
Installation 6
Connection 8
Adjustment to different gas types 12
Safety conditions 14
BRIEF DESCRIPTION 18
Location drawing 18
Control panel 20
EQUIPMENT 22
Gas cooking zones control 24
Gas oven control 28
Multifunction electrical oven control 30
Operation functions of the oven 32
Oven 36
Electronic sensor timer Touch control 38
PRACTICAL ADVICE 52
CLEANING AND SERVICING 60
ENVIROMENTAL COMPATIBILITY 70
DE
INHALTSVERZEICHNIS
FÜR DEN INSTALLATEUR 7
Aufstellen des Herdes 7
Gasherd anschließen 9
Anpassung an eine andere Gasart 13
Sicherheitsbedingungen 15
KURZBESCHREIBUNG
Gesamtansicht 19
Bedienblende 21
AUSSTATUNG
Gebrauch vom Gaskochfeld 25
Steuerung von Gasbackofen 29
Steuerung von Multifunktionselektrobackofen 31
Betriebsfunktion des Backofens 33
Gebrauch vom Backofen 37
Elektronische Zeitschaltuhr Touch control mit Sensorbedienung 39
PRAKTISCHE EMPFEHLUNGEN 53
PFLEGE UND WARTUNG 61
UMWELTVERTRÄGLICHKEIT 71
RU
ОГЛАВЛЕНИЕ
ИНСТРУКЦИЯ ПО МОНТАЖУ 7
Установка плиты 7
Подключение плиты 9
Приспособление к другому типу газа 13
Условия безопасности 15
КРАТКОЕ ОПИСАНИЕ 19
Внешний вид 19
Панель управления 21
ОБОРУДОВАНИЕ 23
Пользование газовой поверхностью 25
Управление работой газового духового шкафа 29
Управление работой многофункционального электрического духового шкафа 31
Рабочие функции духового шкафа 33
Пользование духовым шкафом 37
Сенсорное электронное программирующее устройство Touch control 39
ПРАКТИЧЕСКИЕ СОВЕТЫ 53
ОБСЛУЖИВАНИЕ И УХОД 61
ОХРАНА ОКРУЖАЮЩЕЙ СРЕДЫ 71
EN
INSTALLATION INSTRUCTIONS
INSTALLATION
Unhampered access to all control units as well as duly ventilation of the kitchen are primary installation requirements.
text_image
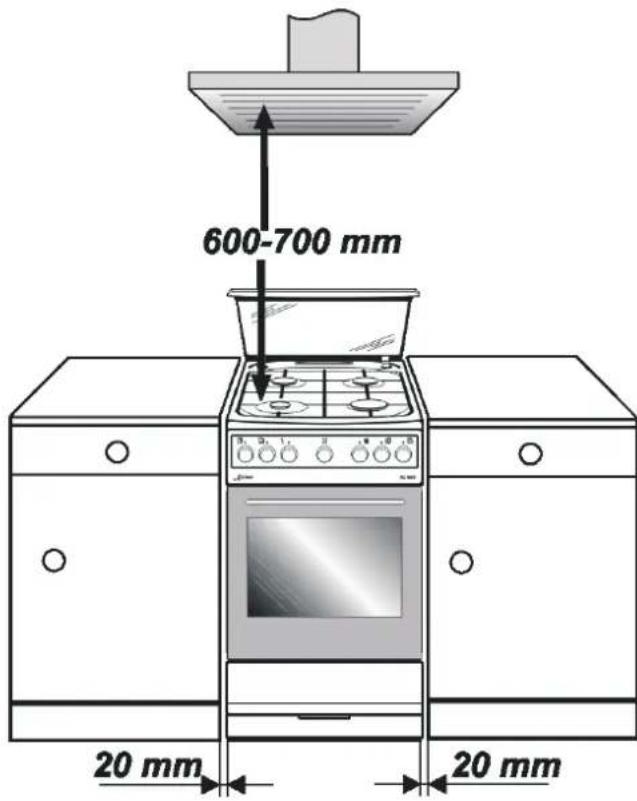
600-700 mm 20 mm 20 mmBefore using your new appliance, make sure to fit it properly. By fixing the adjustable feet in a proper position, you can keep the upper surface strictly horizontally and, thus, avoid backlash. For this purpose, take out the drawer at the bottom.
The cooker is intended to be build up into kitchen furniture, however, only up to the height of the working plate, i.e. fixing up higher than 850 mm from the floor level is unreasonable.
All materials used for furniture panels should be heat resistant at the temperature 100^ C minimum. Breach of this regulation can result in distortion or ungluing of panel coverings. To avoid heat distortion of the furniture panels, ensure that the space between the contact surfaces is not less than 2 cm.
text_image
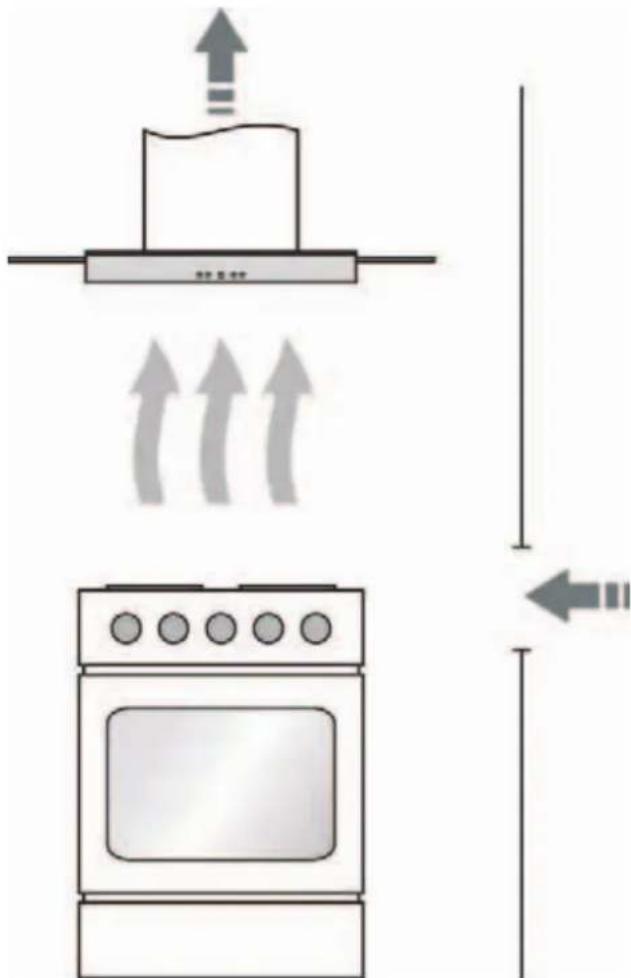
Diagram showing airflow or ventilation between a kitchen appliance and an oven, with arrows indicating direction of airflow.Please mount the fume extractor hood at about 600-700 mm above the cooking surface (see installation instructions for your fume extractor hood).
3,5 kWt gas cookers are provided with a connecting cable (cross-section - 3 x 1,5 mm², length - approx. 1,5 m) and a plug equipped with a safety stud.
Make sure that the AC outlet is isolated and not placed above the cooker.
After the cooker has been installed, check up if the electrical outlet is easy to access.
DE
FÜR DEN INSTALLATEUR
AUFSTELLEN DES HERDES
Der Küchenraum muss eine funktionstüchtige Ventilation haben und der Herd ist so aufzustellen, dass der Benutzer einen freien Zutritt zu allen Bedienelementen hat.
Vor dem Benutzen stellen Sie den Herd richtig auf, durch Drehen von Stützfüßen erreichen Sie die horizontale Lage der Oberfläche des Herdes. Dafür nehmen Sie den unteren Kasten heraus.
Der Herd darf in die Reihe von Möbel nur bis zu der Höhe der Arbeitsoberfläche der Möbel, d.h. 850 mm vom Fußboden eingebaut werden. Einbau über diese Höhe ist unzweckmäßig. Die Küchenmöbel soll Verkleidung haben, die für die Temperatur 100°C geeignet ist. Die Nichtübereinstimmung mit dieser Bedingung kann zur Deformation der Oberfläche oder Lösung der Verkleidung der Möbel bringen. Wenn Sie davon nicht überzeugt sind, über welche thermische Standhaftigkeit die Möbel verfügt, ist es notwendig, den Herd in die Möbel so einzubauen, dass der Abstand von 2 cm zwischen dem Herd und Möbel erhalten bleibt.
Der Höhenabstand zwischen den Kochstellenbrennern und der Abzugshaube soll ca. 600-700 mm betragen (siehe die Bedienungsanleitung für Ihre Abzugshaube).
Die Herdmodelle mit einer Leistung bis zu 3,5 kW sind mit einem Anschlusskabel versehen, das einen Querschnitt von 3 x 1,5 mm2 und eine Länge von ca. 1,5 m, sowie einen Schutzkontaktstecker hat.
Die Netzsteckdose muss mit einem Schutzkontaktdecke versehen und darf nicht über dem Herd angeordnet sein.
Es ist erforderlich, dass die Netzsteckdose für den Benutzer nach dem Aufstellen vom Herd zugänglich ist.
RU
ИНСТРУКЦИЯ ПО МОНТАЖУ
УСТАНОВКА ПЛИТЫ
Кухонное помещение должно обладать исправной вентиляцией, а плита должна быть установлена так, чтобы обеспечить свободный доступ потребителя ко всем элементам управления.
До начала пользования правильно установите плиту, вращением опорных ножек добейтесь горизонтального положения поверхности плиты. Для этого выньте нижний ящик.
Плита может быть встроена в ряд мебели только до высоты рабочей поверхности мебели, т.е. 850 мм от пола. Застройка выше этого уровня нецелесообразна.
Мебель для застройки должна иметь облицовку выдерживающую температуру 100°C. Несоответствие этому условию может привести к деформации поверхности или отклеиванию облицовки мебели. Если Вы не уверены , какой тепловой стойкостью обладает мебель, плиту следует встраивать в мебель сохраняя при этом расстояние около 2 см.
Расстояние между решетками горелок плиты и вытяжным устройством должно быть ориентировочно 600-700 мм (смотрите инструкцию к Вашему вытяжному устройству).
Модели плит мощностью в 3,5 кВт снабжены подсоединительным проводом с сечением 3 х 1,5 кв.мм, длиной прбл. 1,5 м и вилкой с защитным контактом.
Штепсельное гнездо электропроводки должно быть закрытым и не должно находиться над плитой.
После установки плиты следует обеспечить потребителю доступ к штепсельному гнезду электропроводки.
EN
CONNECTION
The serviceman should:
-
Possess an appropriate certificate.
-
Take into consideration the information re. the type of gas suitable for this cooker (registered at the switchboard panel and the data plate). This information should be compared with the gas supply requirements at the gas supply pipe.
-
Check up:
-
efficiency of ventilation (i.e. air interchange in the kitchen)
- leak-proof pipe junction
• operation efficiency of all control units of the cooker -
adjustability of the power line to the protective (zero) conductor.
-
Provide the User with the installation certificate as well as give instructions concerning operation of the coocker.

Attention! Connection to the gas cylinder or gas pipe is allowed to be carried out only by an authorized serviceman who should observe all safety regulations.
DE
GASHERD ANSCHLIESSEN
Der Installateur muss:
- Gasberechtigung besitzen.
- Die am Typenschild und am Etikett angeführten Informationen bezüglich Gasart zur Kenntnis nehmen, für welche der Herd ausgelegt ist. Die Informationen mit Gaslieferungsbedingungen am Installierungsort vergleichen.
-
Folgendes überprüfen:
-
Wirksamkeit der Lüftung, d.h. Luftwechsel im Aufstellungsraum,
• Dichtheit der Gasarmaturverbindungen, - Funktionsfähigkeit aller Funktionselemente des Herdes,
-
Ausrüstung der elektrischen Installation mit der Schutzleitung (Nullleitung).
-
Dem BENUTZER das Zeugnis des Herdanschlusses an die Gasinstallation ÜBERGEBEN und in die Bedienung dessen einweisen.
RU
ПОДКЛЮЧЕНИЕ ПЛИТЫ
Монтер должен:
- Обладать соответствующим сертификатом.
- Ознакомится с информацией, находящейся на заводской табличке плиты о типе газа, на который она настроена. Информацию сравните с условиями подачи газа в месте установки.
-
Проверить:
-
эффективность вентиляции, т.е. воздухообмена в помещении,
- плотность соединений газовой арматуры,
• эффективность действия всех функциональных элементов плиты, -
приспособление электропроводки к совместной работе с защитным (нулевым) проводом.
-
Выдать ПОТРЕБИТЕЛЮ свидетельство подсоединения газовой плиты и ознакомить его с обслуживанием.


Achtung! Der Herd darf an eine PROPAN-BUTAN-Flasche oder an die existierende Gasinstallation nur von einem befugten Installateur angeschlossen werden, der alle Sicherheitsvorschriften einhält.

Внимание! Подключение плиты к газобаллону с пропан-бутаном или к существующему газопроводу может быть совершено только сертифицированным специалистом, соблюдающим все правила безопасности.
EN
To connect the cooker to a gas cylinder, screw on a min. 0,5 m long metal junction pipe provided with an end junction hose (8 x 1 mm) onto the lead-in pipe. The gas-supply pipe must not get in contact with the protective metal elements on the cooker's rear wall. Check up if the junctions are leak-proof.
It is advisable to tighten the junctions by insulating teflon tape.
Overtightening (max. tightening torque - 20 Nm) or using glue can result in junction damage and lead to gas leak.
In plant, the gas cooker has been pre-adjusted for operating on AC power and single-phase current (230 volt \~ 50 Hz). First check up if the AC outlet complies with the cooker's electric capacity, and then plug in.
The power outlet should have a zero phase.

Cautions: CHECK UP LEAKPROOFNESS of the connection to the gas supply pipe or gas cylinder using soap suds only. Don't use open flame – danger to life!
DE
Bei dem Anschließen des Herdes an eine Gasflasche, schrauben Sie auf die Einführung 1/2" den min. 0,5M langen metallischen Anschlussstutzen mit einem Schlauch-Anschlussstutzen (8 x 1mm) an. Das Gasleitungsrohr darf mit metallischen Schutzelementen der Rückwand des Herdes nicht in Berührung kommen. Beachten Sie, dass der Anschluss dicht ist.
Es wird empfohlen, die Verbindungen mit Teflonband abzudichten.
Überspannen (max. Drehmoment – 20 Nm) bzw. Anleimen kann zu Schaden der Verbindungsstelle führen bzw. das Gasleck verursachen.
Der Herd ist werksseitig für die Versorgung mit Einphasenwechselstrom (230V \~50Hz) ausgelegt und mit der Anschlussleitung ausgestattet. Vor dem Anschließen des Herdes an die Steckdose überprüfen Sie, ob sie der elektrischen Leistung des Herdes entspricht.
Die Netzsteckdose, an die der Herd anzuschließen ist, muss unbedingt mit der Nullphase versehen sein werden.

Achtung! Nach dem Anschließen des Gerätes an das Gasnetz (bzw. die Gasflasche) mit Seifenwasser KONTROLLIEREN, ob der Anschluss DICHT ist bzw. Gas austritt. Auf keinen Fall einen Feuerzeug, einen Zündholz oder offene Flamme anderer Art benutzen.
RU
При подключении плиты к газобалону, на ввод 1/2" навинтите металлический концевой патрубок длиной мин. 0,5м со шланговым концевым патрубком 8 x 1мм. Подающая газ труба не должна касаться металлических элементов защиты задней стены плиты. Обратите внимание на сохранение плотности соединений.
Рекомендуется уплотнить соединения при помощи уплотняющей ленты из тефлона.
Перетяжка большим моментом (макс. 20нм) или использование кле я может вызвать повреждение соединения и его неплотность.
Плита настроена заводом на питание переменным, однофазным током (230В \~ 50Гц) и оборудована присоединительным проводом. До подсоединения плиты к розетке проверьте, соответствует ли она электрической мощности плиты.
Электрическая розетка, к которой будет подсоединена плита, должна быть оборудована нулевой фазой.

Внимание! После подключения прибора к газопроводу или газовому балону ПРОКОНТРОЛИРОВАТЬ
ГЕРМЕТИЧНОСТЬ соединений с помощью мыльной пены. Ни в коем случае не применять открытое пламя в любом виде.
EN
ADJUSTMENT TO DIFFERENT GAS TYPES
text_image
1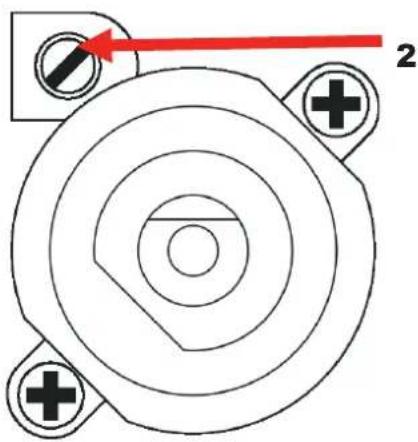
natural_image
Pure technical diagram of a mechanical component with concentric circles and mounting holes, no text or symbols present.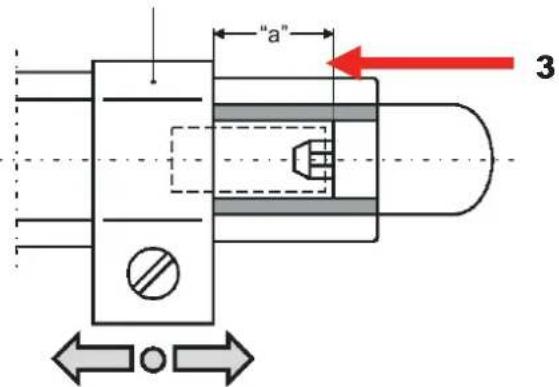
text_image
"a" 3The cookers are supplied with gas burners which the manufacturer has adjusted to natural gas used in your country. The type of gas is specified on the data plate as well as in the warranty of quality. The data plate is to find on the base or on the back of the cooker.
To adjust gas burners, remove knobs of the gas burners.
To adjust the gas burners of the oven, withdraw the bottom of the oven cavity.
To adjust the cooker to another type of gas:
- replace a nozzle (see table 1),
- adjust the lowerer pressure of the valves
- adjust air supply to the gas burners of the oven.
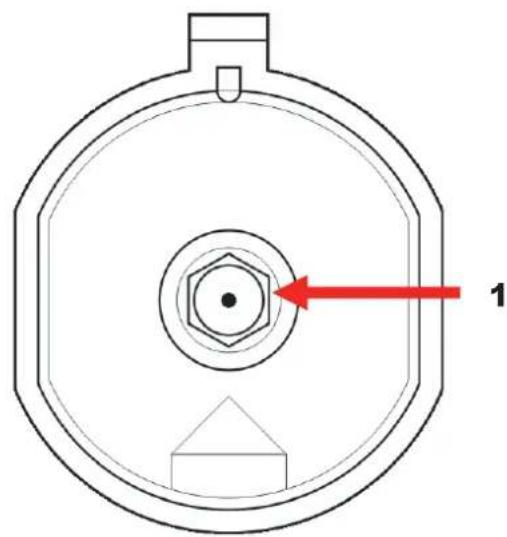
1 – To replace the nozzle: screw out the nozzle (use screw tip N° 7) and replace it with another one in compliance with the available type of gas (see the table 1).
2 – To adjust the burners: Switch on gas and select "Sparing flame". For adjustment, use a 2,5 mm-screw tip.
3 – To replace the nozzle in the oven: See table 1 "a" to adjust air supply correctly.
Table 1
| Type of gas | Burner: type / diameter | «a» | |||
| Small | Normal Big Oven | ||||
| Natural gas | 0,75 | 1,09 | 1,24 | 1,3 | |
| Liquid gas | 0,52 | 0,67 | 0,84 | 0,84 | |
| Gas supply | Adjusting from liquid gas to natural gas | Adjusting from natural gas to liquid gas |
| Full flame | Nozzle burner 1Replace in compliance with Table 1 | Nozzle burners 1Replace in compliance with Table 1 |
| Saving flame | Regulating needle 2Screw out slightly and adjust the flame size | Adjusting needle 2Screw in against the stop and check up gas supply |
Attention! (A hint for the serviceman) The adjustment of the cooker to another gas type should be registered at the connection place. Issue and attach a label with the gas type which the cooker has been adjusted to.
DE
ANPASSUNG AN ANDERE GASARTEN
Diese Herde sind mit Gasbrennern ausgestattet, die von der Herstellerfabrik zum Verbrennen des in Ihrem Land benutzten Erdgases angepasst sind. Der Gastyp ist in dem Typenschild, das an der Rückwand des Herdes angebracht ist, angegeben.
Um die Gasbrenner einzustellen, sind Drehregler der Gashähne abzunehmen.
Die Einstellelemente des Backofenbrenners sind nach dem Herausschieben des Backofenraumbodens zugänglich.
Um den Herd an eine andere Gasart anzupassen; sind folgende Tätigkeiten auszuführen:
- Düsen auswechseln (siehe Tabelle 1),
- reduzierten Ventildurchfluss nachstellen,
- Luftzufuhr zum Backofenbrenner nachstellen.
1 - Austausch der Brennerdüse – Düse mit dem Sondersteckschlüssel SW7 herausdrehen und gegen eine neue Düse austauschen, welche der Gasart entspricht (siehe Tabelle 1).
2 - Regulierung der Brenner erfolgt mittels eines 2,5 mm Regelschraubendrehers beim angezündeten Brenner, der auf „Sparflamme“ eingestellt ist.
3 - Austausch der Brennerdüse vom Backofen. Regulierung von Luftzufuhr (siehe Tabelle 1 «a»).
Tabelle 1
| Gasart | Düse Typ / Durchmesser | «a» | |||
| Spar | Normal | Stark | Backofenbrenner | ||
| Erdgas | 0,75 | 1,09 | 1,24 | 1,3 | |
| Flüssiggas | 0,52 | 0,67 | 0,84 | 0,84 | |
| Brenner | Umstellung vom Flüssiggas auf Erdgas | Umstellung vom Erdgas auf Flüssiggas |
| Volle Flamme | Brenndüse 1 gegen eine entsprechende gemäß der Tab.1 auswechseln | Brennerdüse 1 gegen eine entsprechende gemäß derTab.1 auswechseln |
| Spar flamme | Einstellnadel 2 ein wenig heraus-schrauben und die Flammengröße nachstellen | Einstellnadel 2 leicht bis zum Anschlag einschrauben und die Flammengröße überprüfen |

Achtung! (Hinweis für den Installateur) Die Umstellung des Herdes auf eine andere Gasart ist im Herdanschlusszeugnis zu vermerken.
Nach der Regulierung ist das Etikett mit dem Hinweis auf die Gasart, auf die der Herd angepasst wurde, aufzukleben.
RU
ПРИСПОСОБЛЕНИЕ К ДРУГОМУ ТИПУ ГАЗА
Плиты снабжены горелками, настроенными заводом-производителем на природный газ, используемый в Вашей стране. Тип газа указан на заводской табличке. Заводская табличка находится на задней стенке плиты.
Чтобы отрегулировать газовые горелки плиты снимите ручки кранов.
Чтобы отрегулировать газовые горелки духовки надо выдвинуть дно камеры духовки
Чтобы настроить плиту на горение другого типа газа, следует:
- заменить сопла (см. таблицу 1),
- отрегулировать пониженное давление клапанов,
- отрегулировать подачу воздуха горелки духовки.
1 - Замена инжектора – инжектор вывинтить при помощи торцевого ключа с насадкой 7 и заменить на новый, соответствующий типу газа (см. таблицу 1).
2 - Регулировку кранов нужно производить при зажженной конфорке в положении «экономное пламя», с использованием регулировочного винта величиной 2,5 мм.
3 - Замена инжектора духовки – регулировка подачи воздуха (см. таблицу 1 – «а»).
Таблица 1
| Тип газа | Горелка тип / диаметр | «а» | |||
| малая | Нормал. | Усилен. | духовки | ||
| Зприродный | 0,75 | 1,09 | 1,24 | 1,3 | 3 |
| Пропан-бутан | 0,52 | 0,67 | 0,84 | 0,84 | 10 |
| Подача газа | Настройка с пропан-бутана на природный газ | Настройка с природного газа на пропан-бутан |
| Большая подача газа | Сопло горелки 1 замените соответствующим Таблица 1 | Сопло горелки 1 замените соответствующим согласно табл. 1 |
| Экономная подача газа | Регулирующую иглу 2 легко вывинтите и отрегулируйте подачу газа | Регулирующую иглу 2 легко ввинтите до сопротивления и проверьте подачу газа |

Внимание! (к монтеру) Перенастройку плиты на другой тип газа обозначьте в свидетельстве подсоединения плиты.
После регулировки нужно разместить этикетку с указанием типа газа, на который настроена плита.
EN
SAFETY CONDITIONS
- Please, keep watch over children as long as the gas cooker is in operation. Children are unaware of operating rules. Hot gas burners, hot oven cavity, oven door pane, pans and pots with hot liquid on the grid above the burners can cause a skin-burn.
- Connection cords of electric appliances, e.g. a mixer, should not get in contact with hot parts of the cooker.
- Don't put inflammable materials into the bottom drawer of the cooker, since they can get inflamed while the cooker is in operation.
- Keep watching the cooker while frying: oils and fats can get inflamed due to overheating.
- If faults occur, further operation is not allowed until the appliance has been repaired by an authorized serviceman.
- Don't turn on the valve of the gas inlet or gas cylinder before you make sure that the gas burners are switched off.
- Keep the burners clean. The overflown food or residues must be immediately removed after the burners get cold.
- Don't put pans directly onto the burners.
- The weight of a pan put on the grid above a burner should not exceed 10 kg; the total weight of the pans over the four burners should be max. 40 kg.
- Don't strike the handles and the burners.
- Don't put more than 15 kg on the open oven door.
- Unauthorized persons are not allowed to carry on amedments or repair the cooker.
- It is not allowed to turn on the knobs of the burners if the electric ignition is out.
- Don't blow out the flame of the burner!
- Users are not allowed to adjust the cookers to different gas type on their own, move the cooker to another place or make changes in the gas supply system. These operations can be carried on only by an authorized serviceman.
SICHERHEITSBEDINGUNGEN
УСЛОВИЯ БЕЗОПАСНОСТИ
- Während des Gasherdbetriebs auf Kinder
aufpassen, weil sie über keine Kenntnisse hinsichtlich die Herdbedienung verfügen. Insbesondere heiße Kochstellenbrenner, Backofenraum, Rost, Türscheibe, Kochgeschirr mit heißer Flüssigkeit können bei Kindern Verbrennungen verursachen.
- Es ist zu beachten, dass kein Anschlusskabel anderer Elektrogeräte (wie z.B. eines Mixers) mit heißen Herdteilen in Kontakt kommt.
- Leichtentflammbare Materialien dürfen nicht in der Schublade aufbewahrt werden; während des Backofenbetriebes könnten sie aufflammen.
- Das Kochfeld während des Bratens nicht ohne Aufsicht lassen. Überhitzte Öle und Fette sind leichtentzündlich!
- Falls der Herd beschädigt wird, darf er erst wieder benutzt werden, nachdem die Beschädigung von einem qualifizierten Fachmann beseitigt ist.
- Den Gasabsperhahn an Gasanschlussstelle bzw. an der Gasflasche niemals öffnen ohne sicherzustellen, dass alle Gassperventile zugedreht sind.
- Gasbrenner nicht überfluten bzw. verunreinigen lassen. Beschmutzte Gasbrenner sofort nach dem Abkühlen reinigen und abtrocknen.
- Kein Geschirr direkt auf die Gasbrenner • aufstellen.
- Auf dem Rost über einem Gasbrenner kein Geschirr aufstellen, dessen Gewicht 10 kg überschreitet; das Gesamtgewicht vom Geschirr, das auf dem ganzen Rost aufgestellt ist, darf nicht mehr als 40 kg sein.
• Drehregler und Gasbrenner nicht aufschlagen.
- Keine Gegenstände auf die aufgeklappte Backofentür stellen, die schwerer als 15 kg sind.
- Es ist streng verboten, den Gasherd von nicht speziell ausgebildeten Personen zu modifizieren bzw. reparieren lassen.
- Es ist verboten, die Gasabsperhähne der Kochstellen und des Backofens zu öffnen, ohne ein angezündetes Streichholz oder Gaszünder in der Hand zu haben.
- Gasbrennerflamme nie durch Blasen löschen.
- Eigenwillige Anpassung vom Gasherd an einen anderen Gastyp, Verstellung des Herdes sowie Einführung von Änderungen in die Gasversorgungsleitung sind verboten. Diese Tätigkeiten dürfen ausschließlich von einem autorisierten Installateur durchgeführt werden.
- Пожалуйста, во время пользования плитой
следите за детьми, так как дети не знают принципов обслуживания плиты. Горячие горелки плиты, камера духовки, гриль, стекло дверцы, стоящая посуда с горячей жидкостью могут быть причиной ожога у ребенка.
- Подсоединительный электропровод механического оборудования напр. миксера не должен касаться горячих частей плиты.
- Не кладит е в выдвижно й ящик горючие материалы, так как во время пользования плитой они могут воспламениться.
- Не оставляйте плиту без присмотра во время жаренья. Масла и жиры могут воспламениться из-за перегрева!
- В случае повреждения плиты, дальнейшая эксплуатация разрешена только после полного устранения повреждений квалифицированным специалистом.
der Не открывайте кран на вводе газа или клапан на газобаллоне не убедившись предварительно в том, что все краны плиты закрыты.
- Избегайте заливать и загрязнять горелки. Загрязненные горелки следует очистить и высушить немедленно после охлаждения плиты.
- Не следует ставить посуду непосредственно на горелки.
- Посуда, стоящая на решётке над одной из горелок не должна превышать массу 10 кг, а общий вес посуды на всех решётках массу свыше 40 кг.
- Не следует стучать по ручкам и горелкам.
- Не следует ставить предметы массой больше 15 кг на открытую дверцу духовки.
- Запрещается совершать модификацию и ремонт плиты лицами, без профессиональной подготовки.
- Запрещается открывать краны плиты без включенного электроподжига или зажженой спички.
- Запрещается задувать пламя горелки.
- Запрещается самостоятельно совершать настройку плиты на другой тип газа, переносить плиту на другое место, а также совершать изменения в системе питания. Эти операции могут быть совершены только квалифицированным специалистом.
EN
- Don't let children and persons who are not informed about the operation instructions to operate the cooker.
- Watch the pans while boiling in order not to extinguish the burners.
In case of gas leak, it is not allowed:
to strike a match, smoke, switch on and off an electric receiver (a door bell, a light switch) as well as use other electrical or mechanical appliances which can cause electric or chugging spark. In this case, immediately shut off gas supply (turn off the valve of the gas cylinder or the switch which cuts off the connection to the gas supply), air the room and contact an authorized person.
- Don't attach any cables to the gas appliance.
- If the gas leaking out of a nontight junction gets inflamed, immediately cut off the gas supply by turning off the valve of the gas cylinder or the switch which disconnects gas supply).
- In case of damage: air the room, disconnect the appliance from the power supply and repair the fault.
- If the gas leaking out of the nontight junction of the gas cylinder gets inflamed, wrap the cylinder with a wet blanket to extinguish the flame and turn off the valve (stopcock) of the gas cylinder. Further use of the damaged gas cylinder is not allowed.
- If you don't use the gas cooker for a few days, disconnect it from the gas supply by turning off the stop valve. In case of a gas cylinder, turn off the stopcock every time after the use.
The gas supply should provide the cooker with the type of gas it has been adjusted to in plant. Information about the gas type which the cooker has been adjusted to is registered on the data plate on the cookers back.
DE
- Kleinen Kindern und Personen, welche mit der Gebrauchsanweisung des Gasherdes nicht vertraut sind, den Gasherd nicht bedienen lassen.
- Während des Kochens beachten Sie, dass Übergelaufenes die Gasbrenner nicht ablöscht.
Im Falle eines Gasleckverdachtes ist folgendes untersagt:
Streichhölzer anzünden, Zigaretten rauchen, Elektrogeräte ein- und ausschalten (Klingel- und Lichtschalter) sowie sonstige elektrische und mechanische Geräte benutzen, die Elektro- und Schlagfunkentstehung verursachen können. In so einem Fall muss der Gasabsperrhahn der Gasanschlussleitung bzw. der Gasflasche sofort zugedreht und der Raum gelüftet werden; danach muss die Schadensursache von einem autorisierten Fachmann beseitigt werden.
- Keine Erdungsleitungen dürfen an die Gasanschlussleitung angeschlossen werden.
- Falls sich das aus einer undichten Gasinstallation entweichende Gas entzündet, ist der Gaszulauf mittels des Gasabsperrhahnes sofort abzusperren.
- In jeder Situation, wo eine technische Störung auftritt, ist der Herd von der Stromversorgung unbedingt zu trennen (wobei das obenangeführte Prinzip zu beachten ist) und die Störung bei einer autorisierten Reparaturstelle anzumelden.
- Falls sich das aus einem undichten Gasflaschenventil entweichende Gas entzündet, ist die Gasflasche mit einer feuchten Decke zu bedecken, um die Flamme zu löschen und die Gasflasche abzukühlen. Wiedergebrauch einer beschädigten Gasflasche ist streng verboten.
- Falls der Gasherd einige Tage nicht genutzt werden soll, ist der Hauptabsperrhahn der Gasanschlußleitung zuzumachen. Wenn der Gasherd von einer Gasflasche versorgt wird, muss das Gasflaschenventil nach jedem Gebrauch zugedreht werden.
Ihr Gasherd soll an die Gasanschlußleitung angeschlossen werden, welche mit der Gasart versorgt ist, für die Ihr Gasherd werksseitig ausgelegt ist. Die Information über die Gasart, an die Ihr Gasherd werksseitig angepasst worden ist, ist dem Typenschild zu entnehmen. Das Typenschild befindet sich auf der Rückwand des Gerätes.
RU
- Не допускайте к плите малых детей, а также лиц, не ознакомленных с руководством по эксплуатации плиты.
- Обратите внимание на момент кипячения, чтобы не залить горелки.
В случае подозрения утечки газа нельзя:
зажигать спички, курить, включать и выключать электроприемники (звонок или включатель освещения), а также пользоваться другими электрическими и механическими устройствами, вызывающими образование электрической или толчкообразной искры. В таком случае следует немедленно перекрыть подачу газа (перекрыть клапан на газобаллоне или кран, отсекающий подачу газа) и проветрить помещение, а затем вызвать лицо, имеющее право на устранение такого рода причин.
- Не следует подсоединять к газовой установке никаких проводов.
- В случае воспламенения газа, вытекающего из неплотной установки, следует немедленно перекрыть подачу газа при помощи запорного клапана на газобаллоне или крана, отсекающего подачу газа
- В каждом случае, вызванном техническими неисправностями, следует обязательно отключить электропитание плиты, предварительно проветрив помещение и устранить недостаток.
- В случае воспламенения газа, вытекающего из неплотного клапана на газобаллоне, следует: на баллон накинуть мокрое одеяло для охлаждения баллона, завернуть клапан на газобаллоне. Запрещается вторично эксплуатировать поврежденный баллон.
- В случае перерыва в пользовании плитой, продолжающегося несколько дней, следует перекрыть стопорный кран подачи газа, а при пользовании газобаллоном — каждый раз после использования.
Плита должна быть подсоединена к такому же типу газа, на который она настроена заводом. Информация о типе газа, на который плита настроена заводом, находится на заводской табличке на задней стенке плиты.
EN
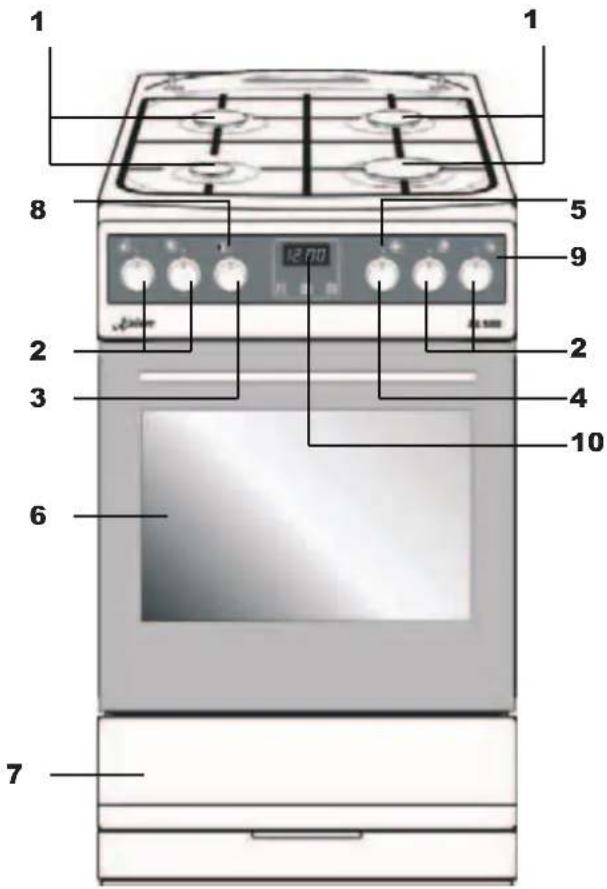
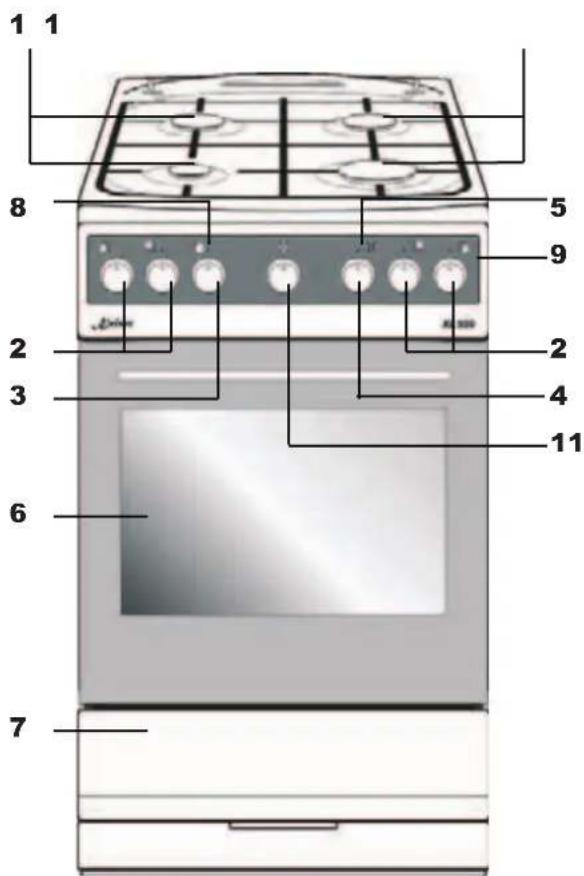
BRIEF DESCRIPTION
LOCATION DRAWING
Arrangement of functional assemblies
text_image
1 1 8 5 9 2 2 3 4 10 6 71 Gas burners
2 Knobs of the gas burners control
3 Knobs of the oven temperature control
4 Knobs of the oven operating functions
5 Pilot light ON / OUT (yellow)
6 Oven door
7 Drawer
8 Oven temperature - pilot light (red)
9 Control panel
10 Electronic timer
11 Timer
text_image
1 1 8 5 9 2 2 3 4 11 6 7Depending on the technical equipment, different models are provided with different control panels and relevantly arranged operating elements.
DE
KURZBESCHREIBUNG
GESAMTANSICHT
Anordnung von Funktionsbaugruppen
1 Gasbrenner
2 Drehregler für Kochstellbrennern
3 Backofen- Temperaturwähler
4 Drehregler des Backofenbetriebsfunktionen
5 Betrieb - Kontrollleuchte ON/OFF (gelb)
6 Backofen
7 Schublade
8 Backofentemperatur - Kontrolleuchte (rot)
9 Bedienblende
10 Digitale Zeitschaltuhr
11 Taimer
RU
КРАТКОЕ ОПИСАНИЕ
ВНЕШНИЙ ВИД
Примерное размещение функциональных узлов
1 Горелки плиты
2 Ручки нагревательных полей
3 Ручка терморегулятора духовки
4 Ручка режима работы духовки (рабочих функций)
5 Контрольная лампочка работы плиты (желтая)
6 Духовой шкаф
7 Выдвижной ящик
8 Контрольная лампочка температуры духовки (красная)
9 Панель управления
10 Программирующее устройство
11 Минутник
EN
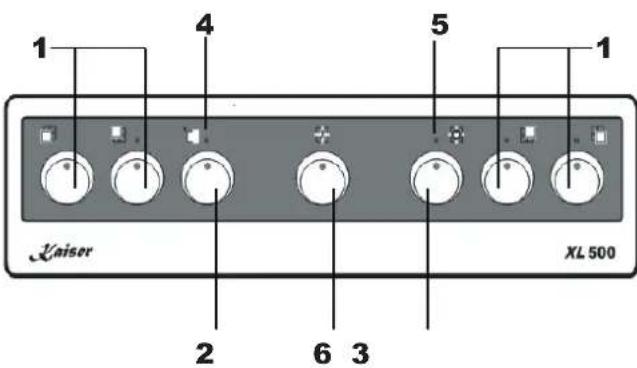
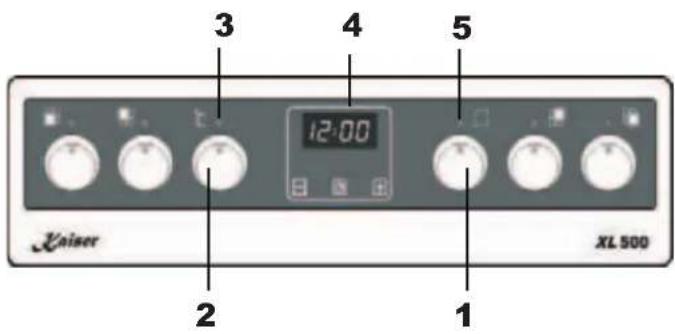
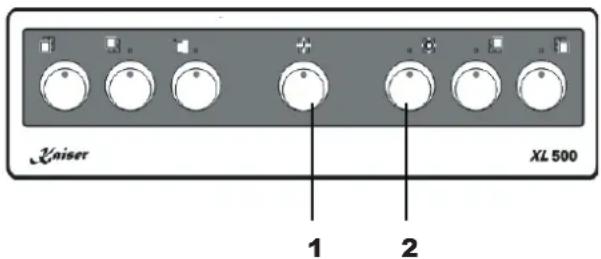
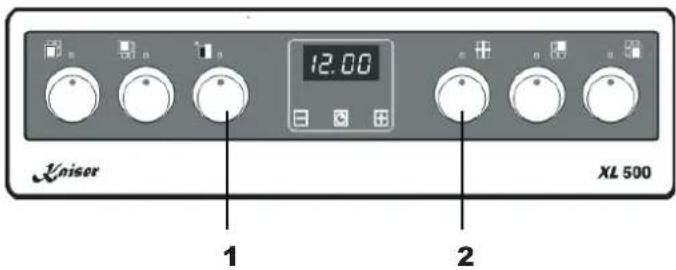
CONTROL PANEL
Models XL 500: Control Panel with mechanical Timer
text_image
1 4 5 1 X1500 2 6 3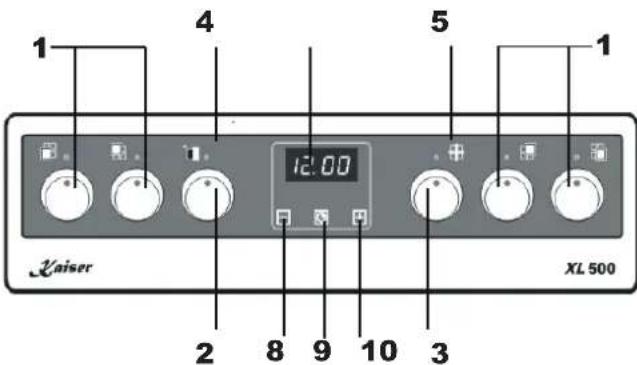
text_image
1 4 5 1 Kaiser XL 500 12:00 2 8 9 10 3Models XL 500: Control Panel with electronic sensor timer
7
- Knobs of gas burners
- Knob of the oven temperature control
- Knob of the oven operating functions
- Control light ON/OFF (yellow)
- Oven operation - Control light (red)
- Timer (if available)
- Digital programming device
- Button « - »
- Button "Function selection"
- Button « + »
DE
BEDIENBLENDE
Bedienblende von Modellen XL 500 mit Kurzzeitwecker
RU
ПАНЕЛИ УПРАВЛЕНИЯ
Панели управления моделей XL 500 с минутником
Bedienblende von Modellen XL 500 mit elektronischer Zeitschaltuhr mit Sensorbedienung
- Drehregler für Gasbrenner
- Drehregler "Backofentemperatur"
- Drehregler "Backofenbetriebsfunktionen" oder „Backofenlicht“
- Kontrollleuchte ON/OFF (gelb)
- Backofenbetrieb Kontrollleuchte (rot)
- Kurzzeitwecker (falls vorhanden)
- Digitale Zeitschaltuhr
- Drucktaste « - »
- Betriebdrucktaste
- Drucktaste « + »
Панели управления моделей XL 500 с сенсорным электронным программирующим устройством
1 Ручки управления газовыми горелками
2 Ручка "Терморегулятора духовки"
3 Ручка "Режим работы духовки" или „Освещение духовки“
4 Контрольная лампочка Вкл/Выкл (желт.)
5 Контрольная лампочка работы духовки (красн.)
6 Минутник (при наличии)
7 Дигитальное программирующее устройство
8 Кнопка « - »
9 Кнопка выбора функций
10 Кнопка « + »
EN
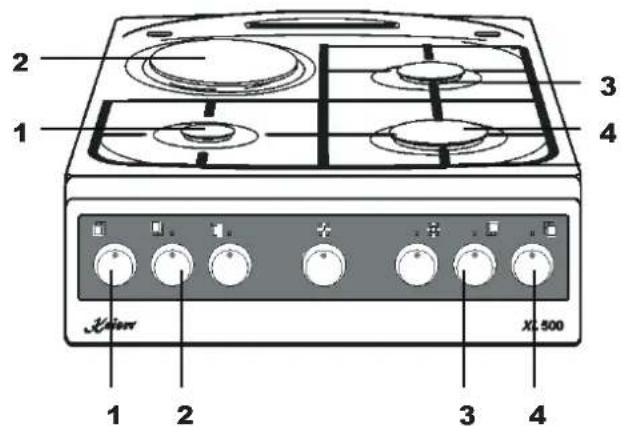
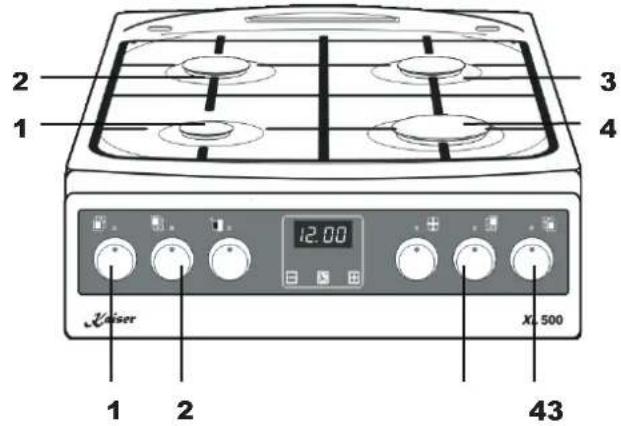
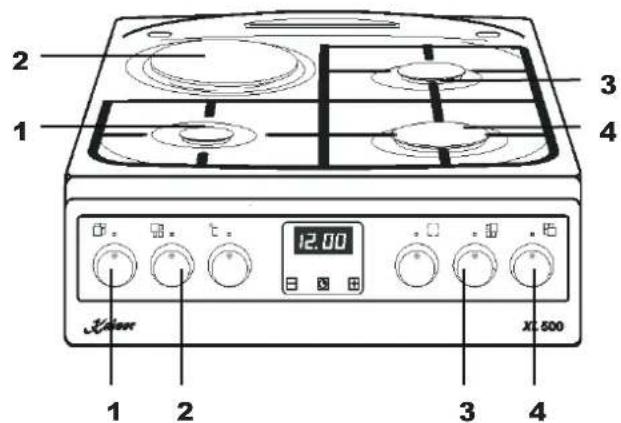
EQUIPMENT GAS BURNERS AND RELEVANT OPERATING ELEMENTS
HGG 50501*, HGG 50511*, HGG 50521*, HGG 50531*

text_image
2 1 4 3 X 500 1 2 3 41 - Knob of the gas burner in front (left) 1,0 kW
2 - Knob of the gas burner behind (left) 1,8 kW
3 - Knob of the gas burner behind (right) 1,8 kW
4 - Knob of gas burner in front (right) 2,8 kW
HGE 50301\*, HGE 50302\*
text_image
2 1 3 4 X:500 1 2 3 41 - Knob of the gas burner in front (left) 1,0 kW
2 - Knob of the electrical cooking zone behind (left)
∅180 mm 1,2 kW
3 - Knob of the gas burner behind (right) 1,8 kW
4 - Knob of the gas burner in front (right) 2,8 kW
HGE 50508...
text_image
2 1 3 4 12:00 X 500 1 2 431 – Knob of the gas burner in front (left)
1,0 kW
2 - Knob of the gas burners behind (left) 1,8 kW
3 - Knob of the gas burner behind (right) 1,8 kW
4 - Knob of the gas burner in front (right) 2,8 kW
HGE 50306...
text_image
2 1 3 4 12.00 X:500 1 2 3 41 - Knob of the gas burner in front (left) 1,0 kW
2 - Knob of the electrical cooking zone behind (left)
∅180 mm 1,2 kW
3 - Knob of the gas burner behind (right) 1,8 kW
4 - Knob of the gas burner in front (right) 2,8 kW
DE
AUSSTATUNG KOCHFELD MIT GASBRENNERN
HGG 50501\*, HGG 50511\*, HGG 50521\*, HGG 50531\*
1 - Drehregler für Gasbrenner vorne links
1,0 kW
2 - Drehregler für Gasbrenner hinten links
1, 8 k
3 - Drehregler für Gasbrenner hinten rechts
1, 8 k
4 - Drehregler für Gasbrennervorne rechts
2,8 kW
HGE 50301\*, HGE 50302\*
1 - Drehregler für Gasbrenner vorne links
1,0 kW
2 - Drehregler für Elektrokochfeld hinten links ∅180 mm 1,2 kW
3 - Drehregler für Gasbrenner hinten rechts
1, 8 k
4 - Drehregler für Gasbrennervorne rechts
2,8 kW
HGE 50508...
1 - Drehregler für Gasbrenner vorne links
1,0 kW
2 - Drehregler für Gasbrenner hinten links
1, 8 k
3 - Drehregler für Gasbrenner hinten rechts
1, 8 k
4 - Drehregler für Gasbrennervorne rechts
2,8 kW
HGE 50306...
1 - Drehregler für Gasbrenner vorne links
1,0 kW
2 - Drehregler für Elektrokochfeld hinten links ∅180 mm 1,2 kW
3 - Drehregler für Gasbrenner hinten rechts
1, 8 k
4 - Drehregler für Gasbrennervorne rechts
2,8 kW
RU
ОБОРУДОВАНИЕ ВАРОЧНАЯ ПОВЕРХНОСТЬ С ГАЗОВЫМИ ГОРЕЛКАМИ
HGG 50501\*, HGG 50511\*, HGG 50521\*, HGG 50531\*
1 - Ручка управления газовой горелкой
- передняя левая 1,0 кВт
2 - Ручка управления газовой горелкой
W - задняя левая 1,8 кВт
3 - Ручка управления газовой горелкой
W - задняя правая 1,8 кВт
4 - Ручка управления газовой горелкой
- передняя правая 2,8 кВт
HGE 50301\*, HGE 50302\*
1 - Ручка управления газовой горелкой
- передняя левая 1,0 кВт
2 - Ручка управления эл. нагревательным полем - заднее левое
Ø180 mm 1,2 кВт
3 - Ручка управления газовой горелкой
W - задняя правая 1,8 кВт
4 - Ручка управления газовой горелкой
- передняя правая 2,8 кВт
HGE 50508...
1 - Ручка управления газовой горелкой
- передняя левая 1,0 кВт
2 - Ручка управления газовой горелкой
W - задняя левая 1,8 кВт
3 - Ручка управления газовой горелкой
W - задняя правая 1,8 кВт
4 - Ручка управления газовой горелкой
- передняя правая 2,8 кВт
HGE 50306...
1 - Ручка управления газовой горелкой
- передняя левая 1,0 кВт
2 - Ручка управления эл. нагревательным
полем - заднее левое
Ø180 mm 1,2 кВт
3 - Ручка управления газовой горелкой
W - задняя правая 1,8 кВт
4 - Ручка управления газовой горелкой
- передняя правая 2,8 кВт
EN
GAS COOKING ZONES CONTROL

text_image
1 2 3 4 Xinser XL 500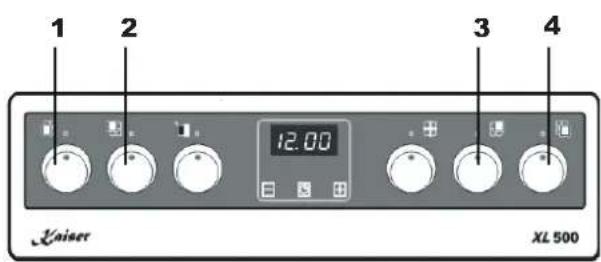
text_image
1 2 3 4 Kaiser XL 500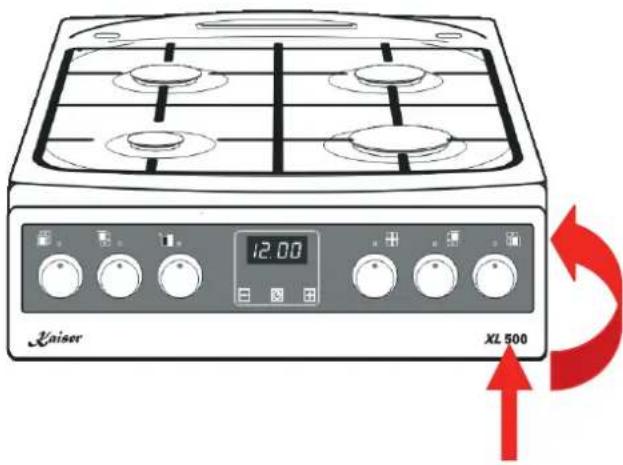
text_image
12:00 X2L 500Before using your new appliance, we ask you to do the following:
- Read carefully the operating instructions and safety conditions.
- Remove the packaging, empty the drawer, clean the oven cavity in order to eliminate preservative agents.
- Check up functional efficiency of the stop valves (installation junction and that of the cooker) as well as the other control units.
• Heat up the oven (at 250°C for 30 min.)
• Service the cooker only in case of duly ventilation.
The cooking zones control is achieved by means of knobs 1, 2, 3 and 4 set up on the control panel of the cooker.
All gas cookers XL 500 are provided with the system of electrical ignition operated by means of knobs.
To switch on a gas burner:
- Press the corresponding knob of the selected burner against the stop and turn it to the left up to the position strong gas supply.
- Keep the switch pressed till the burner ignites.
- After the burner has ignited, let the knob go and select the required flame volume (e.g. sparing flame).
- To switch off the burner after the food is ready turn on the knob to the right (position "off").
If your appliance is provided with gas control system for the burners and the oven, to ignite a burner press the knob against the stop and keep it in the position “strong gas supply” to activate the control system.

Attention! It is not allowed to adjust gas supply between the position burner off and the position strong gas supply

DE
GEBRAUCH VOM GASKOCHFELD
Bevor Sie den Herd zum ersten Mal in Betrieb nehmen, muss folgendes gemacht werden:
- Sich mit der Gebrauchsanweisung, und insbesondere mit den Sicherheitsbedingungen vertraut machen.
- Das Gerät auspacken, die Schublade leeren, den Backofenraum vom Korrosionsschutzmittel reinigen.
- Wirksamkeit von Gasabsperhähnen (an der Gasanschlussleitung und im Gasherd selbst) und anderen Steuerelementen überprüfen.
- Backofen durchwärmen (bei 250°C, ca. 30 min).
- Den Erstbetrieb nur bei ausreichender Belüftung durchführen.
Die Kochzonensteuerung erfolgt mittels Drehregler 1, 2, 3 und 4, die auf der Bedienblende des Herdes eingerichtet sind
Alle Gasherde XL 500 sind mit elektrischem Gaszünder-System in den Drehreglern ausgerüstet.
Um den Brenner anzuzünden:
- Den Drehregler des gewählten Brenners bis zum fühlbaren Anschlag hineindrücken und danach nach links bis zur Position Volle Flamme umdrehen,
- Den Drehregler zum Anschlag hineingedrückt halten, bis zum Gasaufflammen,
- nach dem Aufflammen des Gasbrenners den 'Drehregler loslassen und die gewünschte Flammengröße einstellen (z.B. Spar-Flamme).
- Nach dem Kochvorgang Kochstellenbrenner ausschalten, indem der Drehregler nach rechts umgedreht wird. (Position «Ausgeschaltet»).
Bei den Gasherdmodellen, deren Kochstellenbrenner mit einem Gasausflussschutz ausgerüstet sind, muss der Drehregler während des Anzündens ca. 2-10 Sekunden lang in der Position „Volle Flamme“ bis zum Anschlag hineingedrückt gehalten werden, damit der Gasausflussschutz anspringen kann.

Achtung! Es ist verboten, die Flammengröße durch die Wahl einer Drehknebelposition im Bereich zwischen der Position erlöschte Flamme ● und der Position Volle Flamme 🔒 einzustellen.
RU
ПОЛЬЗОВАНИЕ ГАЗОВОЙ ПОВЕРХНОСТЬЮ
Прежде чем приступить к первому использованию, следует:
- ознакомиться с руководством и условиями безопасности обслуживания.
- удалить упаковочный материал, опорожнить выдвижной ящик, вымыть камеру духовки с целью устранения консервирующих веществ.
- проверить эффективность функционирования клапанов (установки и плиты), а также других элементов управления.
- нагреть духовку (при 250°C в течение 30 мин.)
- совершать операции обслуживания только при исправно действующей вентиляции.
Управление режимом работы нагревательных полей осуществляется поворотом ручек 1, 2, 3 и 4, установленных на панели управления кухонной плиты.
Все газовые плиты XL 500 оборудованы системой электроподжига в ручках.
Чтобы зажечь горелку нужно:
- нажмите на ручку выбранной горелки до упора и поверните ее влево до отметки большая подача газа,
- держите ручку нажатой до зажигания горелки,
- когда горелка загорится, отпустите ручку и установите требуемую величину пламени (например, Экономное пламя)
dənвыключить конфорку после приготовления продуктов, повернув ручку вправо (положение «выключено»).
В моделях плит, оснащенных газ-контролем горелок и духовки плиты, следует во время операции зажигания держать ручку нажатой до упора в течение 2-10 сек. в положении «большая подача газа», чтобы защита активировалась.

Внимание! Запрещается регулировать подачу газа между положением потушенная горелка ● и положением большая подача газа 🔍.
natural_image
Illustration of a stainless steel cooking pot on a stove (no text or symbols)
natural_image
Simple line drawing of a cooking pot with two crossed lines crossing over railway tracks (no text or symbols)EN
Correctly adjusted burners have a light blue flame with a distinct internal cone.
Flame volume is adjusted by knobs:

big flame
small flame ("sparingl")
burner is off (gas supply is stopped)
Knobs ensure gradual setting of flame volume.
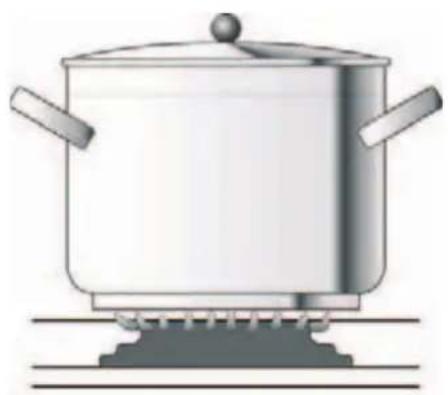
Remember that the diameter of the pan's bottom should be bigger than the diameter of flame in the burner. Pans should be covered with lids.
For effective cooking, the utensil's diameter should be 2,5-3 times bigger that that of the burner. Thus, following diameters correspond to the available burner types:
- Small – 90 mm to 150 mm,
• Normal – 160 mm to 220 mm,
• Strong – 200 mm to 240 mm
The utensils height should not exceed its diameter.
DE
RU
Richtig justierte Gasbrenner weisen eine hellblaue Flamme mit ausdrücklich sichtbarem Innenkegel auf.
Die Flammengröße hängt von der eingestellten Drehreglerposition ab:

volle
Flamme
kleine (lies „sparsame“) Flamme gelöschte Flamme (Gasausfluss gesperrt)
Die Flammenhöhe lässt sich, je nach Bedarf, stufenlos einstellen.
Es ist zu beachten, dass der Geschirrboden immer einen größeren Durchmesser als die Flammenkrone hat und das Geschirr selbst mit einem Deckel bedeckt sein sollte.
Es wird empfohlen, einen Geschirrdurchmesser zu wählen, der 2,5 - 3 mal größer ist, als der des Gasbrenners,
- für den kleinen Brenner - ein Geschirr mit einem Durchmesser von 90 bis zu 150 mm
- für den Mittelbrenner - ein Geschirr mit einem Durchmesser von 160 bis zu 220 mm,
- für den großen Brenner - ein Geschirr mit einem Durchmesser von 200 bis zu 240 mm.
Die Höhe des Geschirrs sollte nicht größer sein, als sein Durchmesser.
Правильно отрегулированные горелки имеют пламя светлоголубого цвета с отчетливо обозначенным внутренним конусом.
Настройка пламени зависит от установки положения ручки горелки:

ельшое пламя

маленькое пламя («экономное»)

конфорка погашена (перекрыт газ)
В зависимости от потребности можно плавно установить величину пламени.
Обратите внимание на то, чтобы диаметр дна посуды был всегда больше диаметра пламени горелки, посуда была накрыта крышкой.
Рекомендуется, чтобы диаметр посуды был 2,5 – 3 раза больше диаметра горелки, т. е. для следующих горелок
- малая — посуда диаметром с 90 до 150 мм,
- нормальная — посуда диаметром с 160 до 220мм,
- усиленная — посуда диаметром с 200 до 240 мм,
Высота посуды не должна быть больше ее диаметра.
EN
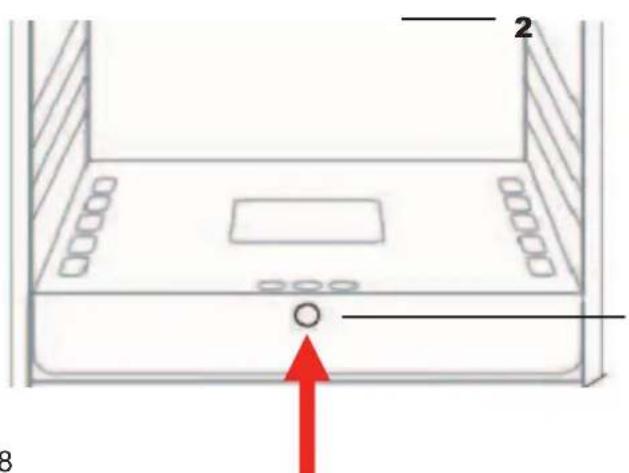
GAS OVEN CONTROL
text_image
V IV III II I
text_image
Kaiser 12:00 XL500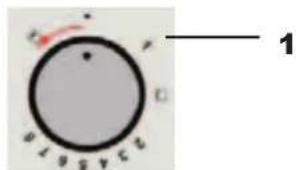
text_image
23456710 1| Position Stellung Положение | Temperature Temperatur Температура |
| 1 | 150° |
| 2 | 165° |
| 3 | 180° |
| 4 | 195° |
| 5 | 210° |
| 6 | 225° |
| 7 | 240° |
| 8 | 255° |
text_image
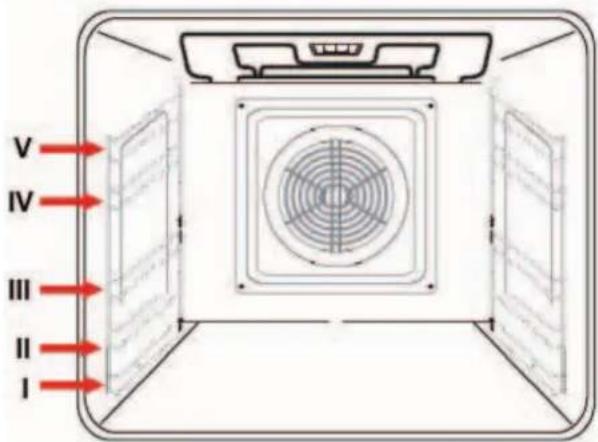
Diagram of a device interior with labeled components and a red arrow pointing to a circular component.The built-in ovens can be programmed to fulfil different operating functions according to the type of the cooker. The choice of the suitable oven equipment varies depending on the selected operating function. Thus, you can use a wire shelf or backing tray and place them at the optimal operating level within the oven. The operating levels are noted by figures I to IV respectfully. Oven operation functions are controlled by the knob 2 operation mode and knob 1 temperature control set up on the control panel.
The gas oven is equipped with a valve and possess a heat control mode and gas-leak protection mode. As it is mentioned below, to switch on the oven you should press the knob for 3 sec. This time is necessary for the control sensing element to get warmed up and, thus, activate the protective system. If the burner does not ignite within 10 sec., repeat the procedure 1 min. later again, i.e. after the oven has been ventilated.
To switch on the oven:
- Press the knob 1 oven temperature control against the stop, turn it to the left and select the required temperature.
- Observe the flame in the oven (distinct flame reduction means that the selected temperature has been reached). Temperature adjustment is only applicable provided that the oven door is closed.
To switch off the oven turn the knob to the right against the stop.
If the knobs of your cooker are not equipped with the ignition mode:
- Strike a match,
- Press the rotary handle 1 oven temperature control against the stop, turn it to the left and select the required temperature.
- Put the match to the opening 5 and wait for 3 sec. If the flame goes out, repeat the procedure in 3 sec.
Important! The activation of the oven is indicated by the red control light 3.
DE
RU
STEUERUNG VON GASBACKOFEN
Die in den Herden je nach Modell eingesetzten Backöfen erfüllen verschiedene Funktionen. Je nach Funktion, können verschiedene Ausrüstungsteile des Backofens genutzt werden, wie z.B. Rost und Backblech, die in richtige Höhe im Backofenraum anzubringen sind. Die Höhen im Backofen sind mit nacheinanderfolgenden Ziffern von I bis V bezeichnet.
Backofenbetriebsfunktionen werden durch Drehen von den auf der Bedienblende angebauten Drehreglern Temperaturregler 1 und
Beleuchtung 2 gesteuert.
Alle Backöfen sind mit Gashähnen ausgerüstet, die einen Temperaturregler und Gasausflussschutz besitzen. Beim nachstehend beschriebenen Anzünden vom Gasbackofen ist der Drehregler ca. 3 Sekunden lang hineingedrückt zu halten. Diese Zeit ist zur Erwärmung des Fühlelementes sowie zum Anspringen vom Gasausflussschutz nötig. Falls die Flamme erlischt, ist derselbe Ablauf erst nach 3 Sekunden zu wiederholen. Wenn die Flamme innerhalb von 10 Sekunden nicht angezündet worden ist, darf das Anzünden erst nach ca. 1 Minute, d.h. nach Durchlüftung des Backofenraumes wiederholt werden.
Um Backofen einzuschalten:
• 'Drehregler 1 bis zum fühlbaren Anschlag hineindrücken und nach links in die Position der entsprechend gewählten Temperatur umdrehen, nach dem Aufflammen noch ca. 3 Sekunden lang hineingedrückt halten. Falls die Flamme erlischt, ist die Tätigkeit nach 3 Sekunden zu wiederholen.
- Flamme beobachten (Flammenverminderung ist ein Zeichen dafür, dass die gewünschte Backofentemperatur erreicht worden ist). Die Temperaturregelung ist nur bei geschlossener Backofentür einsetzbar.
Die Backofenabschaltung erfolgt durch die Umdrehung des Drehreglers bis zum Anschlag nach rechts.
Wenn Ihr Backofen nicht mit Einhandzündung eingerichtet ist:
- ein Streichholz aufflammen, - 'Drehregler 1 bis zum fühlbaren Anschlag hineindrücken und nach links in die Position der entsprechend gewählten Temperatur umdrehen,
- das Streichholz an die Zündöffnung 5 anlegen und den 'Drehregler noch ca. 3 Sekunden lang nach dem Aufflammen hineingedrückt halten. Falls die Flamme erlischt, ist die Tätigkeit nach 3 Sekunden zu wiederholen.

Wichtig! Die Einschaltung vom Backofen wird durch Aufleuchten von roten Kontrolllampe 3 signalisiert.
УПРАВЛЕНИЕ РАБОТОЙ ГАЗОВОГО ДУХОВОГО ШКАФА
Духовки, установленные в кухонных плитах, в зависимости от типа плиты, обладают различными рабочими функциями. В зависимости от реализируемой рабочей функции можно пользоваться оборудованием духовки, напр. решёткой или противнем, помещая их на соответствующих рабочих уровнях духового шкафа. Рабочие уровни духовки обозначены поочередно цифрами от I до V.
Управление режимом работы духового шкафа осуществляется поворотом ручек
терморегулятора 1 и 2 освещения духовки, установленных на панели управления кухонной плиты.
Все духовки оснащены газовыми кранами с терморегулятором и защитой от утечки газа. Во время зажигания духовки, как описано ниже, следует поддержать ручку нажатой около 3 с. Это время, необходимо для того, чтобы разогрелся чувствительный элемент и подействовала защита. Если горелка гаснет, повторите процедуру по истечении 3 сек. Если горелка не загорается в течение 10 сек., повторите процедуру зажигания по истечении 1 мин., т.е. после проветривания духовки.
Чтобы включить духовку:
- нажмите на ручку терморегулятора духовки 1 до упора и поверните ее влево до отметки выбранной температуры, держите ручку нажатой до зажигания горелки Если горелка гаснет, повторите процедуру по истечении 3 с.
наблюдайте за пламенем (четкое уменьшение пламени обозначает достижение требуемой температуры духовки). Регулирование температуры возможно только при закрытой дверце духовки.
Выключение духовки осуществляется поворотом ручки 1 до упора направо.
Если Ваша духовка не оборудована электроподжигом в ручке:
- зажгите спичку,
- нажмите на ручку 1 до сопротивления и поверните ее влево до отметки соответственно выбранной температуры,
• поднесите спичку к зажигательному
отверстию 5 и подержите ручку нажатой ок. 3 сек. Если горелка гаснет, повторите процедуру по истечении 3 сек.

Важно! Включение духовки сигнализируется включением контрольной лампы 3 красного цвета.
EN
text_image
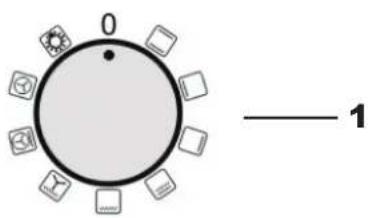
3 4 5 12:00 2 1 Xaiser XL500MULTIFUNKTION ELECTRICAL OVEN CONTROL
Oven operation functions are controlled by the knob 1 operation mode and knob 2 temperature control set up on the control panel.
The graphic symbols on the knobs indicate the selected operation modes.
To switch off the oven, set up the knob 1 operating mode and the knob 2 temperature control in position «0».
For more comfort, you can use the electronic timer and automatic programmer 4, which enables to run the oven in automatical, half automatical or manual cycle.
text_image
0 — 1
Important! The activation of the oven is indicated by yellow 3 and red 5 control lights.
text_image
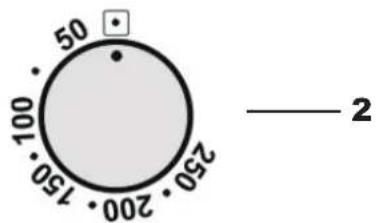
50 100 250 200 150 — 2After the selected oven temperature has been reached, the red control light goes out.
If it is necessary to put the dish into a pre-heated oven, do it after the red control light has gone out.
The red control light can also be on if the knob is set in the position to illuminate the oven. In this position, however, the heating element of the oven is off.
DE
STEUERUNG VON MULTIFUNKTIONS-ELEKTROBACKOFEN
Backofenbetriebsfunktionen werden durch Drehen von Drehregler Betriebsart 1 und Drehregler Temperaturregler 2 auf der Bedienblende gesteuert
Die graphischen Symbole neben den Drehreglern zeigen die gewählten Backofenbetriebarten.
Zum Abschalten des Backofens Drehregler Betriebsart 1 und Drehregler Temperaturregler 2 in die Position 0 bringen.
Für mehr Komfort können Sie die Elektronische Zeitschaltuhr* 4 benutzen, die ermöglicht den Backofen im automatischen, halbautomatischen und manuellen Zyklus zu betreiben.

Wichtig! Die Einschaltung vom Backofen wird durch Aufleuchten von gelben 3 und roten 5 Kontrolllampen signalisiert.
Wenn die rote Kontrollleuchte erlischt, signalisiert es, dass die voreingestellte Backofentemperatur erreicht worden ist.
Wenn ein Kochrezept empfiehlt, die Speise in den vorgewärmten Backofen hineinzulegen, so ist es nach dem Erlöschen der roten Kontrollleuchte zu tun
Die rote Kontrollleuchte kann auch bei der Einstellung des Drehreglers in der Position
Innenbeleuchtung des Backofens leuchten, jedoch sind die Heizkörper bei dieser Drehreglerposition immer ausgeschaltet.
RU
УПРАВЛЕНИЕ РАБОТОЙ МНОГОФУНКЦИОНАЛЬНОГО ЭЛЕКТРИЧЕСКОГО ДУХОВОГО ШКАФА
Управление режимом работы духового шкафа осуществляется поворотом ручек выбора режима работы 1 и терморегулятора 2 духовки, установленных на панели управления кухонной плиты.
Графические обозначения установленные рядом с ручками управления показывают выбранные параметры работы духовки.
Для отключения духовки установить ручки выбора режима работы 1 и терморегулятора 2 в положении 0.
Для большего ком форта Вы также можете использовать электронное программирующее устройство* 4, дающее возможность управлять работой духовки в автоматическом, полуавтоматическом и ручном режимах.

Важно! Включение духовки сигнализируется включением контрольных ламп желтого 3 и красного 5 цветов
После того как Ваша духовка достигнет установленной температуры красная лампа погаснет.
Если кулинарные рецепты рекомендуют ставить блюдо в прогретую духовку, делайте это после выключения красной контрольной лампы.
Контрольная лампа может также светиться в положении ручки Освещение духового шкафа

но в этом положении нагревательные нты всегда выключены.
EN
OPERATION FUNCTIONS OF THE OVEN
CONVENTIONAL COOKING
A classical system in which top and bottom heat are used to cook a single dish.
Place the food in the oven only after the cooking temperature has been reached, i.e. when the heating indicator goes out.
If you want to increase top or bottom temperature towards the end of the cooking cycle, set the temperature control to the right position. It is advisable to open the oven door as little as possible during cooking.
natural_image
Diagram of a server rack with airflow arrows indicating data flow or ventilation (no text or symbols)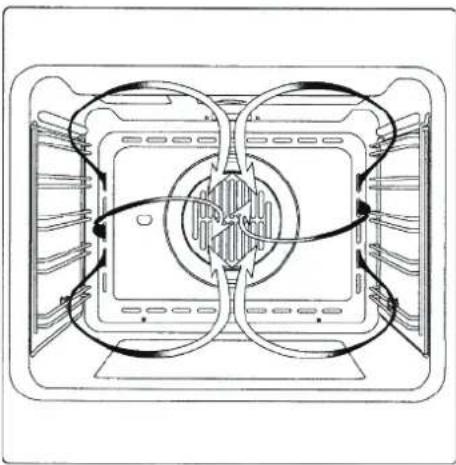
natural_image
Technical line drawing of a mechanical or electrical component with symmetrical internal structure and no visible text or symbols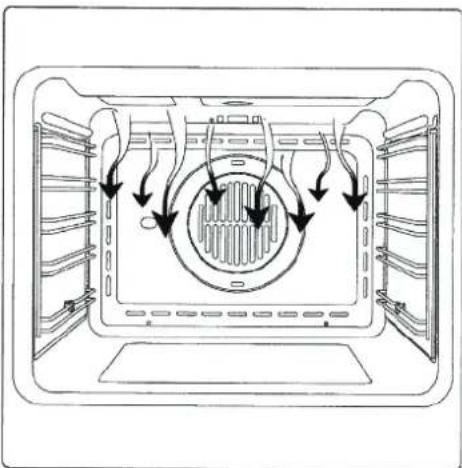
natural_image
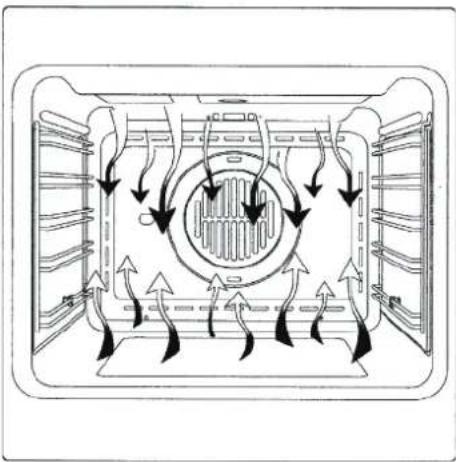
Diagram of a microwave oven interior showing airflow direction and ventilation slots (no text or labels)FAN COOKING
For this type of cooking, a fan fixed at the back ensures the circulation of hot air inside the oven, thus, creating uniform heat. In this way, cooking time is much shorter than usually. This method is perfect for cooking dishes on more than one shelf, especially if the food is of different kind (fish, meat etc.)
DEFROSTING

By selecting one of the fan cooking functions and setting the temperature control at zero, the fan enables cold air to circulate inside the oven. In this way, frozen food can be rapidly defrosted.
Usually, it is not necessary to pre-heat the oven, but we recommend doing so when cooking pastries.
GRILL COOKING
This function is used to grill or brown food.
Place the shelf with the food to be cooked at the 1st or 2nd level from the top.
Pre-heat the oven for 5 minutes. Set the temperature control at a temperature between 50^ and 200^ .
BETRIEBSFUNKTIONEN DES BACKOFENS
KONVENTIONELLES BACKEN


Ein klassisches System, bei dem Unter- oder Oberhitze verwendet werden, welches für die Zubereitung nur eines Gerichts geeignet ist.
Die Speisen sollten möglichst erst dann eingeschoben werden, wenn der Backofen bereits die vorgegebene Temperatur erreicht hat, d. h. nach Erlöschen der Kontrolllampe.
Wenn die Unter- oder Oberhitze gegen Ende des Backvorgangs erhöht werden muss, ist der Schalter in die jeweilige gewünschte Position zu bringen. Während des Backvorgangs sollte die Backofentür möglichst wenig geöffnet werden.
UMLUFTBACKEN


Bei dieser Backofenfunktion bringt der Ventilator, der sich im hinteren Backofenteil befindet, heiße Umluft in den Backofen und verteilt diese gleichmäßig, wobei die Zubereitungszeit geringer als beim konventionellen Backen ist. Diese Methode eignet sich zum Garen auf mehreren Einschubhöhen, auch von Speisen unterschiedlicher Art (Fisch, Fleisch usw.).
AUFTAUEN

Falls eine der Umluftfunktionen ausgewählt und der
Temperaturregler auf Null gestellt wird, führt der Ventilator Kaltluft in den Backofen und fördert das schnelle Auftauen der Tiefkühlkost.
Ein Vorheizen des Backofens ist eigentlich nicht notwendig, aber für Patisserie dennoch empfehlenswert.
GRILLEN


Diese Funktionen werden zum Grillen oder Bräunen von Speisen benutzt.
Der Rost mit der Speise wird in der 1. oder 2. Schiene von oben eingeschoben.
Den Backofen 5 Minuten vorheizen. Den
Drehregler Temperaturregler auf
Temperaturen von 50° bis 200° einstellen.
РАБОЧИЕ ФУНКЦИИ ДУХОВОГО ШКАФА
ОБЫЧНОЕ ПРИГОТОВЛЕНИЕ


Классическая система, при которой применяется верхний или нижний нагрев, пригодна для приготовления только одного блюда. Блюда должны помещаться в духовку, по возможности, лишь после достижения заданной температуры, т.е. когда погаснет контрольная лампочка.
Если к концу процесса приготовления блюда Вы желаете повысить температуру верхнего или нижнего нагревателя, установите переключатель на соответствующую желаемую функцию. В течение выпекания дверцу духовки рекомендуется открывать как можно реже.
ПРИГОТОВЛЕНИЕ С ОБДУВОМ


При этом режиме приготовления, находящийся в дальней части духовки вентилятор, осуществляет циркуляцию горячего воздуха, равномерно его распределяя, тем самым сокращая время приготовления по сравнению с обычным приготовлением. Этот метод подходит для одновременного приготовления разных видов блюд (рыба и мясо и т.д.) при разных высотах положения противня.
ОТТАИВАНИЕ

При включенном обдуве и установленном на ноль терморегуляторе, вентилятор осуществляет циркуляцию холодного воздуха, обеспечивая тем самым быстрое оттаивание замороженных продуктов.
Предварительный прогрев духовки необязателен, однако при выпечке кондитерских изделий рекомендован.
ГРИЛЬ


Этот режим используется для приготовления на гриле или подрумянивания блюд.
Решетка с приготавливаемым блюдом устанавливается на 1-й или 2-й уровень сверху. Прогреть духовку в течение 5 минут. Ручку
терморегулятора установить на температуру от 50° С до 200° С.
EN
SPIT \*
Some ovens are completely equipped with stick engine and rotary spit for spit roast. The spit* allows to roast food in the oven rotary. It serves primarily for roasting barbeque, fowl, sausages and similar dishes. Switching the spit on and off occurs simultaneously with switching on and off of
the Grill functions

ATTENTION! No separate control knob is assigned to the spit on the control panel.
COOLING FAN
The cooling fan* is positioned in the upper part of the oven and serves to cool the inside surfaces of the furniture as well as the oven door. It switches on automatically as soon as the temperature of the outer surface of the oven exceeds 60°C.
If you set up the oven temperature at 200^ C, the fan starts in 10 min.
It switches off automatically after the temperature of the outer surface of the oven has fallen below 60^ C.
After the oven heated up to 200^ C has been switched off, the fan stops in approx. 30 min.
text_image
Xinser XL 500 1 2MECHANICAL TIMER \*
To use the device: turn the knob 1 clockwise as far as it will go and set the required time between 0 and 60 minutes.
The mechanical Timer does not control the oven operation and only serves as a signal device which indicates the end of the operating function.
OVEN LIGHT
The oven is equipped with oven light. The oven light is on as long as the oven is switched on. If you want to check up the food after having cooked it, set the knob 2 oven operating mode in the light position.
DE
RU
DREHESPIESS \*
Einige Backöfen sind komplett mit Stabmotor und Drehspieß für Spießbraten ausgestattet.
Der Spieß* erlaubt es, Speisen im Backofen rotierend zu rösten. Er dient hauptsächlich zum Rösten von Schaschliks, Geflügel, Würstchen u.ä. Speisen. Die Ein- und Ausschaltung vom Spießantrieb erfolgt gleichzeitig mit der Ein- und
Ausschaltung von Grillfunktionen

oder

ACHTUNG! Dem Spieß ist kein separater Steuerdrehregler an der Bedienblende zugeordnet.
KÜHLVENTILATOR
Der Kühlventilator* befindet sich auf der oberen Seite des Backofens und dient zur Kühlung sowohl der Einbaumöbel als auch der Backofentüre. Der Ventilator schaltet sich selbsttätig ein, wenn das äußere Gehäuse des Backofens eine Temperatur von 60°C überschreitet.
Wird der Backofen z.B. auf 200°C eingestellt, schaltet sich die Kühlung nach etwa 10 Min ein. Der Ventilator schaltet sich selbsttätig aus, wenn das äußere Gehäuse des Backofens eine Temperatur von 60°C unterschreitet.
Wenn z.B. der Backofen nach Betrieb bei 200°C ausgeschaltet ist, schaltet sich die Kühlung nach etwa 30 Min. aus.
MECHANISCHER KURZZEITWECKER \*
Um in Betrieb zu nehmen: den Drehregler 1 bis zum Anschlag im Uhrzeigersinn drehen, und dann auf die gewünschte Zeit zwischen 0-60 Minuten einstellen.
Der mechanische Kurzzeitwecker kann die den Betrieb des Backofens nicht steuern und dient nur als eine Signaleinrichtung, die an die Ausführung erinnert.
INNENBELEUCHTUNG
Der Backofen ist mit Innenbeleuchtung ausgestattet. Die Innenbeleuchtung bleibt während des Betriebes vom Backofen aktiv. Wenn Sie nach Zubereitung Ihr Gericht kontrollieren möchten, stellen Sie den Drehregler Backofenbetriebsart 2 in die Position Licht.
ВЕРТЕЛ \*
Некоторые духовки оборудованы вертелом, приводимым во вращение эл. мотором, Благодаря вертелу* возможна вращательная обжарка блюд в духовке. Служит главным образом для обжарки домашней птицы, шашлыков, колбасок и других блюд. Включение и выключение привода вертела происходит одновременно со включением и выключением
функций гриля

ИЛИ

ВНИМАНИЕ! Вертел не имеет отдельной ручки управления.
ОХЛАЖДАЮЩИЙ ВЕНТИЛЯТОР
Охлаждающий вентилятор* находится на верхней части духовки и служит для охлаждения как встроенной мебели, так и самой дверцы духовки. Вентилятор включается автоматически при достижении температуры внешней поверхности духовки 60° С. Например, при установке духовки на 200° С вентилятор включится приблизительно через 10 мин. При понижении температуры внешней поверхности духовки ниже 60° С вентилятор автоматически отключается. Например, после выключения духовки, установленной на 200° С, вентилятор выключится приблизительно через 30 мин.
МЕХАНИЧЕСКИЙ МИНУТНИК \*
Для приведения в действие повернуть ручку переключателя 1 по часовой стрелке до упора, а затем установить на желаемое время в пределах от 0 до 60 минут.
Минутник не управляет работой плиты, а является лишь сигнализатором, напоминающим о выполнении.
ОСВЕЩЕНИЕ ДУХОВКИ
Духовка оснащена системой освещения. Свет остается включенным во время работы духовки. Если вы хотите проконтролировать состояние блюда после его приготовления установите ручку выбора режимов духовки 2 в положение Свет.
EN
OVEN
To switch on the oven you only need to:
text_image
XNISER 12.00 XL 500 1 2- Select the required function with the knob 2 oven operating mode.
- Set the required temperature with knob 1 temperature regulator.
The activation of the oven is signaled by yellow and red control lights.
If the red control light goes out, it means that the selected oven temperature has been reached. Now you can put in the food.

text_image
Technical diagram of a mechanical assembly with numbered components and directional arrows indicating motion or force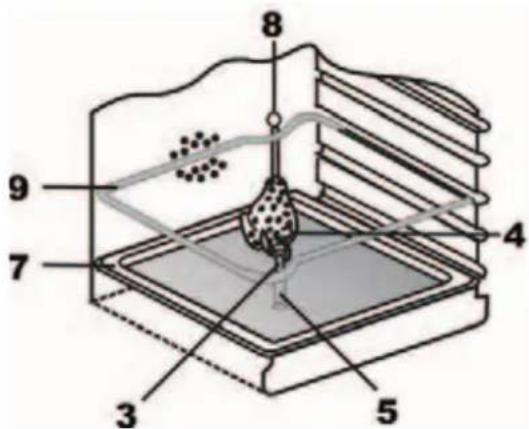
text_image
Labeled diagram of a scientific apparatus with numbered components, likely illustrating a scientific or engineering setup.The choice of the suitable oven equipment varies depending on the selected operating function. Thus, you can use a wire shelf or backing tray and place them at the optimal operating level I to IV within the oven.
PREPARING THE FOOD TO BE COOKED IN THE SPIT \*
Keep to the following procedure:
- Spear the food on the handle of the spit 3 and fix it by means of forks 4,
- Screw on handle 5, if required,
- Arrange the spit frame 9 at level III in the oven,
- Shift the end of the spit 3 into the drive coupling 8; the spit frame hook should be fixed in the groove of the spit clutch metal part,
- Screw out the handle 5,
- Pu in the metal tray 7 at the lowest level of the oven and close the oven door.
To take food out of the oven, use the handle 5 implicitly to avoid skin-burns.
*- if available
DE
GEBRAUCH VOM BACKOFEN
Zum Backen genügen wenige einfache Handgriffe.
- Gewünschte Backfunktion mit dem Drehregler 2 Backofenbetriebsart wählen. (Nicht für Gasbackofen)
- Gewünschte Temperatur mit dem Drehregler 1 Temperaturregler wählen.
Die Einschaltung vom Backofen wird durch Aufleuchten von gelben und roten Kontrolllampen auf der Bedienblende signalisiert.
Wenn die rote Kontrollleuchte erlischt, signalisiert es, dass die voreingestellte Backofentemperatur erreicht worden ist, jetzt können Sie Ihre Speise einschieben.
Je nach Funktion, können verschiedene Ausrüstungsteile des Backofens genutzt werden, wie z.B. Rost und Backblech, die in richtige Höhe von I bis V im Backofenraum anzubringen sind.
RU
ПОЛЬЗОВАНИЕ ДУХОВЫМ ШКАФОМ
В несколько простых движений Вы можете начать процесс приготовления.
- Ручкой 2 режима работы духовки, выберите желаемый режим приготовления.(Не относится к газовой духовке)
- Ручкой 1 терморегулятора ,выберите желаемую температуру приготовления.
Включение духовки сигнализируется включением контрольных ламп желтого и красного цветов на панели управления.
После того как Ваша духовка достигнет установленной температуры красная лампа погаснет и Вы можете ставить в нее блюдо, которое хотите готовить
В зависимости от реализуемой рабочей функции можно пользоваться оборудованием духовки, напр. решёткой или противнем, помещая их на соответственных рабочих уровнях от I до V духового шкафа.
GRILLEN AM DREHESPIESS \*
Um dies zu tun ist wie folgt vorzugehen:
- die Speise auf den Stiel vom Spieß 3 aufspießen und sie darauf mit Hilfe von Gabeln 4 fixieren,
• bei Bedarf den Handgriff 5 aufschrauben,
- den Spießrahmen 9 an der Höhe „III“ im Backofen einordnen,
- Das Endstück vom Spieß 3 in die Antriebskupplung 8 hineinschieben; dabei ist zu beachten, dass der Spießrahmenhaken in die Rille des Spießgriffmetallteils eingreift,
• den Handgriff 5 herausschrauben,
- das Blechtablett 7 in den Backofenraum in niedrigster Höhe hineinschieben und die Backofentür anlehnen.
Beim Herausnehmen von Speisen benutzen Sie unbedingt den Handgriff 5, um eine Verbrennung zu vermeiden.
ПРИГОТОВЛЕНИЕ НА ВЕРТЕЛЕ \*
Для этого необходимо следующее:
- надеть блюдо на вертел 3 и застопорить блюдо при помощи вилок 4,
- при необходимости надеть ручку 5 на вертел,
- рамку 9 поставить в духовку на уровень „III“,
- конец вертела 3 вставить в муфту привода 8, обращая внимание на то, чтобы выемка рамки попала в канавку металлической части держателя вертела,
• вывернут ь ручку 5,
- вставить противень 7 на самый низкий уровень духового шкафа и прикрыть дверцу.
При вынимании блюда во избежание ожёга обязательно использовать ручку 5.
EN
ELECTRONIC SENSOR\* TIMER Touch control
text_image
1 0:00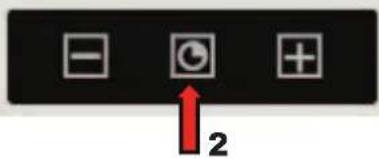
text_image
- + 2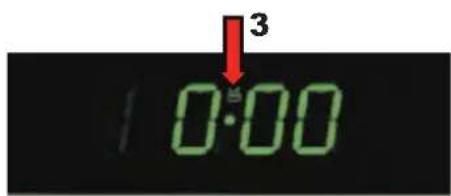
text_image
3 0:00
natural_image
Three white square icons on a black background: minus sign, refresh circle, and plus sign (no text or symbols)
text_image
02:15
text_image
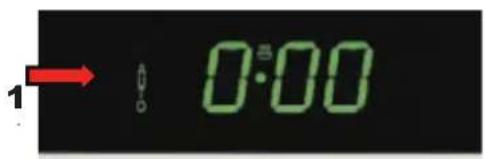
- + 4 + 5The symbols 1 (AUTO) and 0.00 start to flash if the device is switched on for the first time.
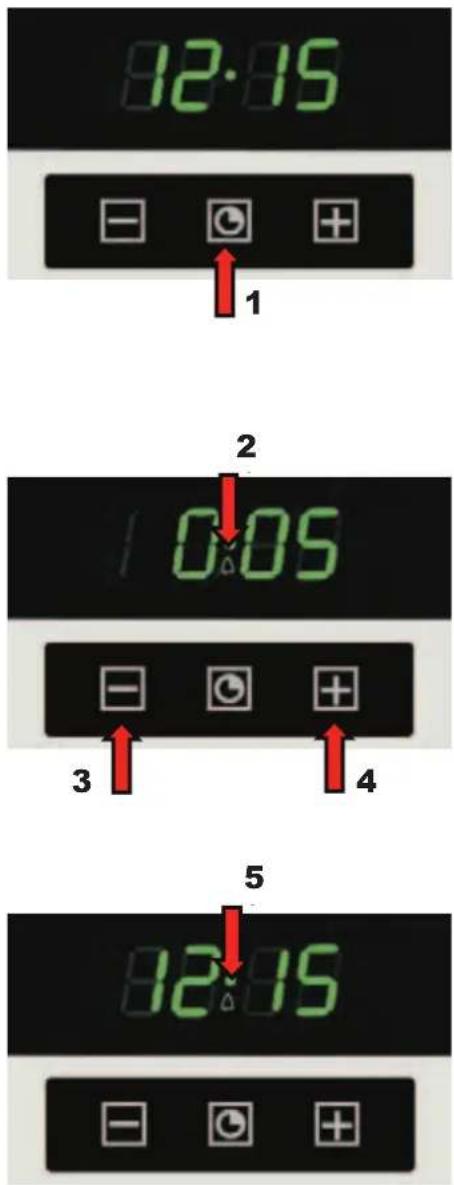
Setting the clock
To set the current day time:
- Press the middle key 2 for at least 3 seconds.
The symbol meal preparation 3 appears on the display
- By pressing keys 4 or 5 (- or +) you can set the time.
After a few seconds the set time is confirmed by the acustic signal and the figures stop to flash.
The required time can be also set afterwards. Therefore you have to:
- Press the keys 4 and 5 (- or +) simultaneously for 3 seconds. The time is set as described.

Important! If you set the time anew, previous time programs are cancelled automatically.
* - if available
DE
ELEKTRONISCHE ZEITSCHALUHR Touch control MIT SENSOR - BEDIENUNG \*
Wird die Uhr zum ersten Mal eingeschaltet, blinken die Symbole 1 (AUTO) und 0.00.
Uhrzeiteinstellung
Zur Einstellung der aktuellen Uhrzeit:
- Auf die mittlere Taste 2 mind. 3 Minuten lang drücken.
Auf dem Display erscheint das Symbol Gerichtzubereitung 3.
- Mit den Wahltasten 4 (- oder +) die gewünschte Uhrzeit einstellen.
Nach wenigen Sekunden wird die eingestellte Zeit durch ein akustisches Signal bestätigt und die Symbole hören auf zu blinken.
Die eingestellte Uhrzeit kann auch anschließend verändert werden. Dafür muss man:
- Die Wahltasten 4 und 5 (- oder +) gleichzeitig 3 Sekunden lang gedrückt halten und die Uhrzeit dann wie oben beschrieben reguliert.

Wichtig! Bei der Änderung der eingestellten Uhrzeit werden alle vorher gewählten Programme gelöscht.
* - falls vorhanden
RU
СЕНСОРНОЕ ЭЛЕКТРОННОЕ ПРОГРАММИРУЮЩЕЕ УСТРОЙСТВО Touch control\*
При первом включении часов начинают мигать символы 1 (AUTO) и 0.00.
Установка текущего времени
Чтобы установить текущее время:
- Нажмите на среднюю кнопку 2 в течение 3-х секунд.
На дисплее появится символ Приготовление 3.
- С помощью кнопок выбора 4 или 5 ( - или + ) установите желаемое время.
Через несколько секунд акустический сигнал подтвердит установленное время, символы перестанут мигать.
Установленное время можно изменить. Для этого:
- Кнопки выбора 4 и 5 (- или +) нужно держать одновременно нажатыми в течение 3-х секунд и установить время, как описано выше.

Важно! При изменении установленного времени таймер будет установлен заново, а все выбранные режимы приготовления будут отменены.
* - если имеется
EN
Electronic countdown timer
The countdown timer is independent of all other timer functions, and can be used even if the oven is switched off.
text_image
82:15 - + 1 2 0:05 - + 4 3 5 12:15 - +To switch on the countdown timer
- Press the middle key 1 for 3 seconds.
The symbol countdown timer 2 appears on the display
- Press the keys 3 or 4 (- or +) to set the countdown time and wait for a few seconds.
After a moment, the countdown timer starts the countdown and the current time of day and the symbol countdown timer 5 appear.
The end of the countdown is indicated by the acustic signal - a double tone with the interval of 2 seconds. At the same time, the symbol countdown timer 5 flashes.
• To switch off the timer press any key.
The symbol countdown timer 5 goes out.
DE
RU
Elektronischer Kurzzeitwecker
Der Gebrauch vom elektronischen Kurzzeitwecker ist von anderen Funktionen unabhängig und kann auch bei ausgeschaltetem Backofen verwendet werden.
Zum Einschalten des Kurzzeitweckers:
• Die mittlere Taste 1 3 Sekunden lang gedrückt halten.
Электронный минутник
Электронный минутник работает назависимо от других функций. Им можно пользоваться даже если духовка выключена.
Чтобы включить минутник:
- Нажмите на среднюю кнопку 1 в течение 3-х секунд.
Auf dem Display erscheint das Symbol Kurzzeitwecker 2.
- Mit den Wahltasten 3 oder 4 (- oder +) die gewünschte Zeit einstellen.
На дисплее появится символ минутника 2.
- С помощью кнопок выбора 3 или 4 ( - или + ) установите желаемое время.
Nach wenigen Sekunden beginnt der Kurzzeitwecker die Rückzählung. Gleichzeitig erscheinen auf dem Display die aktuelle Tageszeit und das entsprechende Symbol Kurzzeitwecker 5.
Nach Ablauf der eingestellten Zeitdauer ertönt ein doppelter Signalton mit dem Intervall von 2 Sekunden und blinkt das Symbol Kurzzeitwecker 5.
- Um den Kurzzeitwecker auszuschalten eine beliebige Taste drücken.
Das Symbol Kurzzeitwecker 5 erlischt.
Через несколько секунд таймер начнет обратный счет и вернется нормальная индикация времени с символом минутника 5, указывая на то, что идет обратный счет.
По окончании обратного счета духовка подает двойной звуковой сигнал с интервалом в 2 секунды и мигает символ минутника 5.
- Нажав любую кнопку, отключите минутник.
Символ минутника 5 погаснет.
EN
Setting the cooking time
The oven switches off automatically after the required cooking time is over.
Before setting the cooking time, you should select the oven operating function and the temperature (see chapter "Cooking")
text_image
3 dur 2 - ● + 1- Press the middle key 1 for 3 seconds.
- Press key 1 again.
Symbols 2 and 0.00 appear on the display alternately and symbol 3 (AUTO) flashes.
text_image
0:30 - + 4 5- Use keys 4 or 5 (- or +) to set the required cooking time. A few seconds later the countdown of the cooking time starts.
text_image
6 12:15Symbol 6 ( AUTO ) appears on the display to confirm the successful setting. The current time appears again.
The end of the countdown is indicated by a double acustic signal at intervals of 2 seconds. The flashing symbols inform you that the oven is switched off completely.
- Press any key to switch off the buzzer. The symbols disappear.
DE
Einstellen der Betriebsdauer
Der Vorgang im Backofen soll nach einer gewünschten Dauer automatisch abgeschaltet werden.
Bevor die Dauer der Gerichtszubereitung eingegeben wird, müssen Sie die Backofenfunktion und die Temperatur der Zubereitung einstellen (siehe Kapitel „Gebrauch vom Backofen“).
• Die mittlere Taste 1 3 Sekunden lang. Drücken.
• Die mittlere 1 Taste erneut drücken.
Auf dem Display erscheinen abwechselnd die Symbole 2 und 0.00 und das Symbol 3 (AUTO) blinkt.
- Mit den Wahltasten 4 oder 5 (- oder +) stellen Sie die gewünschte Dauer der Gerichtzubereitung ein. Nach einigen Sekunden beginnt die Rückzählung der Zeitdauer.
Auf dem Display erscheint Symbol 6 (AUTO), was die erfolgreiche Einstellung bestätigt, und die aktuelle Uhrzeit erscheint wieder.
Nach Ablauf der eingestellten Zeitdauer ertönt ein doppelter Signalton mit dem Intervall von 2 Sekunden und die Symbole blinken, um Sie zu informieren, dass alle Vorgänge im Backofen abgeschaltet sind.
- Um den Signalton auszuschalten, eine beliebige Taste drücken. Der Vorgang wird durch Erlöschen der Symbole bestätigt.
RU
Установка продолжительности приготовления
Духовка должна автоматически отключиться по истечении желаемого промежутка времени.
Прежде чем задать продолжительность приготовления, Вы должны установить режим работы духовки и температуру приготовления. (см. раздел "Пользование духовым шкафом").
- Нажмите на среднюю кнопку 1 в течение 3-х секунд.
• Нажмите снова на среднюю кнопку 1.
На дисплее появятся попеременно символ 2 и 0.00 и замигает символ 3 (AUTO).
- С помощью кнопок выбора 4 или 5 (- или + ) установите желаемое время. Через несколько секунд начнется отсчет времени приготовления.
На дисплее появится символ 6 (AUTO), подтверждающий успешное программирование, а также вернётся показание текущего времени.
По истечении времени приготовления духовка подает двойной звуковой сигнал с интервалом в 2 секунды и замигают символы, информируя, что все функции работы духовки отключены.
- Нажав любую кнопку, отключите зуммер. Символы погаснут.
EN
Setting the end of cooking time
The oven must switch off after the set end time.
Before setting the end of cooking time you have to set the oven operating function and the temperature (see chapter cooking)
text_image
3 End 2 - + 1- Press the middle key 1 for 3 seconds
- Press key 1 again twice consecutively
The symbol 2 and 0.00 appear on the display alternately and the symbol 3 (AUTO) flashes..
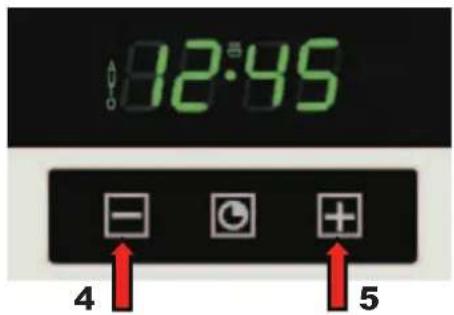
text_image
12:45 - + 4 5- By using the choose keys 4 or 5 (- or +) you set the wanted end of the preparation. After a few seconds the program is activated.

Important! You should set a time that differs from the current day time.
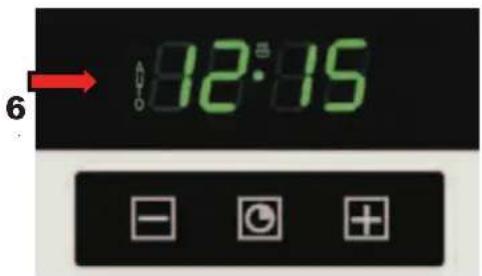
text_image
6 82:50Symbol 6 (AUTO) appears on the display to confirm the successful setting. The current time appears again.
After the set end time is reached a double tone with the interval of 2 seconds sounds and the symbols flash to inform you that all processes in the oven are switched off.
- Press any key to silence the buzzer.
The oven beeps three times and the symbols disappear to confirm this process.
DE
Einstellen der Endzeit
Der Backofen wird in eingegebener Endzeit ausschalten.
Bevor die Endzeit eingegeben wird, müssen Sie die Backofenfunktion und die Temperatur der Zubereitung einstellen (siehe Kapitel „Gebrauch vom Backofen“).
• Die mittlere Taste 1 3 Sekunden lang drücken.
• Die mittlere Taste 1 erneut zwei Mal hintereinander drücken.
Auf dem Display erscheinen abwechselnd die Symbole 2 und 0.00 und blinkt das Symbol 3 (AUTO).
- Mit den Wahltasten 4 oder 5 (- oder +) die gewünschte Endzeit der Gerichtszubereitung einstellen. Nach wenigen Sekunden wird das Programm aktiviert.

Wichtig! Sie sollen die Zeit eingeben, die sich von der aktuellen Uhrzeit unterscheidet!
Auf dem Display erscheint das Symbol 6 (AUTO) als Bestätigung der erfolgreichen Programmierung und die aktuelle Tageszeit wird wieder angezeigt.
Wenn die eingegebene Endzeit erreicht ist, ertönt ein doppelter Signalton mit dem Intervall von 2 Sekunden und die Symbole blinken, um Sie zu informieren, dass alle Vorgänge im Backofen abgeschaltet sind.
- Um den Signalton auszuschalten, drücken Sie eine beliebige Taste.
Der Vorgang wird durch Erlöschen der Symbole bestätigt.
RU
Установка времени окончания приготовления
Духовка должна автоматически отключиться в заранее заданное время.
Прежде чем задать время окончания работы, Вы должны установить режим работы духовки и температуру приготовления. (см. раздел "Пользование духовым шкафом").
- Нажмите на среднюю кнопку 1 в течение 3-х секунд.
- Нажмите снова два раза последовательно на среднюю кнопку 1.
На дисплее появятся попеременно символ 2 и 0.00 и замигает символ 3 (AUTO).
- С помощью кнопок выбора 4 или 5 ( - или + ) установите желаемое время окончания приготовления. Через несколько секунд программа будет активирована.

Важно! Вы должны задать время, отличающееся от текущего!
На дисплее появится символ 6 (AUTO), подтверждающий успешное программирование, а также вернётся показание текущего времени.
По достижению запрограммированного времени духовка подает двойной звуковой сигнал с интервалом в 2 секунды и замигают символы, информируя, что все функции работы духовки отключены.
- Нажав любую кнопку, отключите зуммер.
Символы погаснут.
EN
Setting cooking time and the end time
You can combine both functions (cooking time and the end of cooking time) to set the start and end times for cooking. In this way, you can program your electronic oven to cook while you are out or to defrost food ready for you to cook when you get back. A great help in the kitchen!
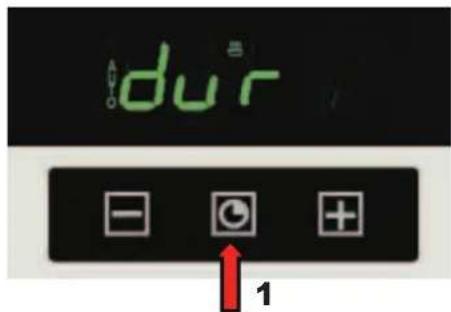
text_image
dur - ● + 1The programming sequence of these two functions is arbitrary. You can first program the cooking time 1 and then the end of cooking time 2 or the other way round.
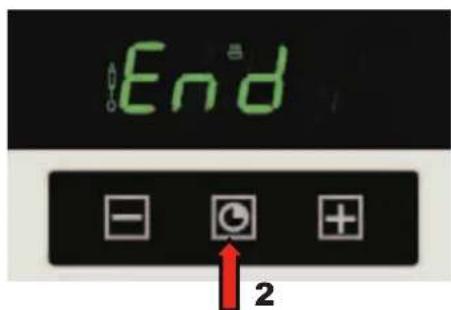
text_image
End - + + 2Example: You would like to start cooking a dish 30 minutes before you get home so that it will be ready by your arrival at 12:55.
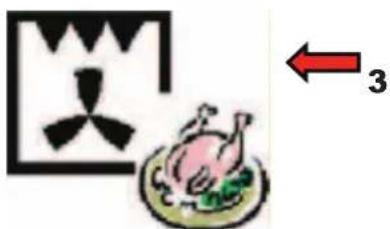
text_image
Diagram showing a wind turbine blade symbol above a roasted chicken on a plate, with a red arrow labeled '3' pointing to it.Before you set the cooking time and the end of the cooking time, you should select the oven function 3 ant the temperature (see chapter "Multifunction oven control").
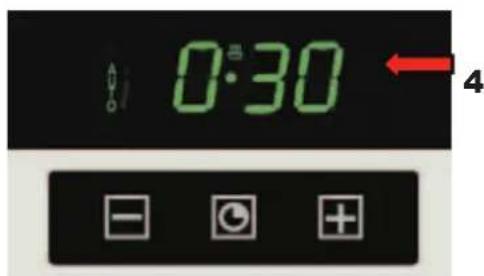
text_image
0:30 4Set the cooking time 4 (in our example - 30 minutes).
Now you should program the required end of cooking time. (See chapter "Setting cooking time").
DE
RU
Einstellen der Betriebsdauer und Endzeit
Установка времени продолжительности и окончания приготовления
Sie können die beiden Funktionen Betriebsdauer und Endzeit kombinieren, wobei Sie eine gewünschte Zeit eingeben, um den Backofen ein- und auszuschalten. So können Sie den Backofen für die Zubereitung von Speisen in Ihrer Abwesenheit programmieren oder das Auftauen von Speisen zum Zeitpunkt Ihrer Rückkers einstellen. Eine große Hilfe in Ihrer Küche!
Вы можете комбинировать функции времени приготовления и времени окончания приготовления, задавая желаемое время включения и выключения духовки. Таким образом, Вы можете запрограммировать процесс приготовления в Вашей духовке на то время, когда Вас нет дома или же процесс размораживания продуктов к Вашему приходу. Неплохая помощь на кухне.
Die Programmierfolge von diesen beiden Funktionen ist nicht entscheidend. Sie können zuerst Betriebsdauer 1 und dann Endzeit 2 programmieren, oder umgekehrt.
Не важно в каком порядке Вы программируете эти две функции. Сначала время приготовления 1 и затем время окончания 2, или наоборот.
Beispiel: Sie möchten die Gerichtszubereitung 30 Minuten vor Ihrer Rückkehr nach Hause beginnen, so, dass zu Ihrer Ankunft um 12:55 die Speise fertig ist.
Например: Вы хотите начать готовить блюдо за 30 минут до возвращения домой, чтобы к Вашему приходу в 12:55 оно было готово.
Bevor die Dauer der Gerichtszubereitung und die Endzeit eingegeben werden, stellen Sie die Backofenfunktion 3 und die Temperatur der Zubereitung ein (siehe Kapitel „Gebrauch vom Backofen“).
Прежде чем задать продолжительность приготовления и время окончания работы, Вы должны установить режим работы духовки 3 и температуру приготовления. (см. раздел "Пользование духовым шкафом").
Geben Sie die Betriebsdauer der Gerichtzubereitung 4 ein (in unserem Beispiel - 30 Minuten).
Задайте продолжительность приготовления 4 (в нашем примере - 30 минут).
Dafür muss die gewünschte Betriebsdauer programmiert werden (siehe Kapitel „Einstellen der Betriebsdauer“)
Для этого запрограммируйте желаемую продолжительность приготовления. (см. раздел "Установка продолжительности приготовления").
EN
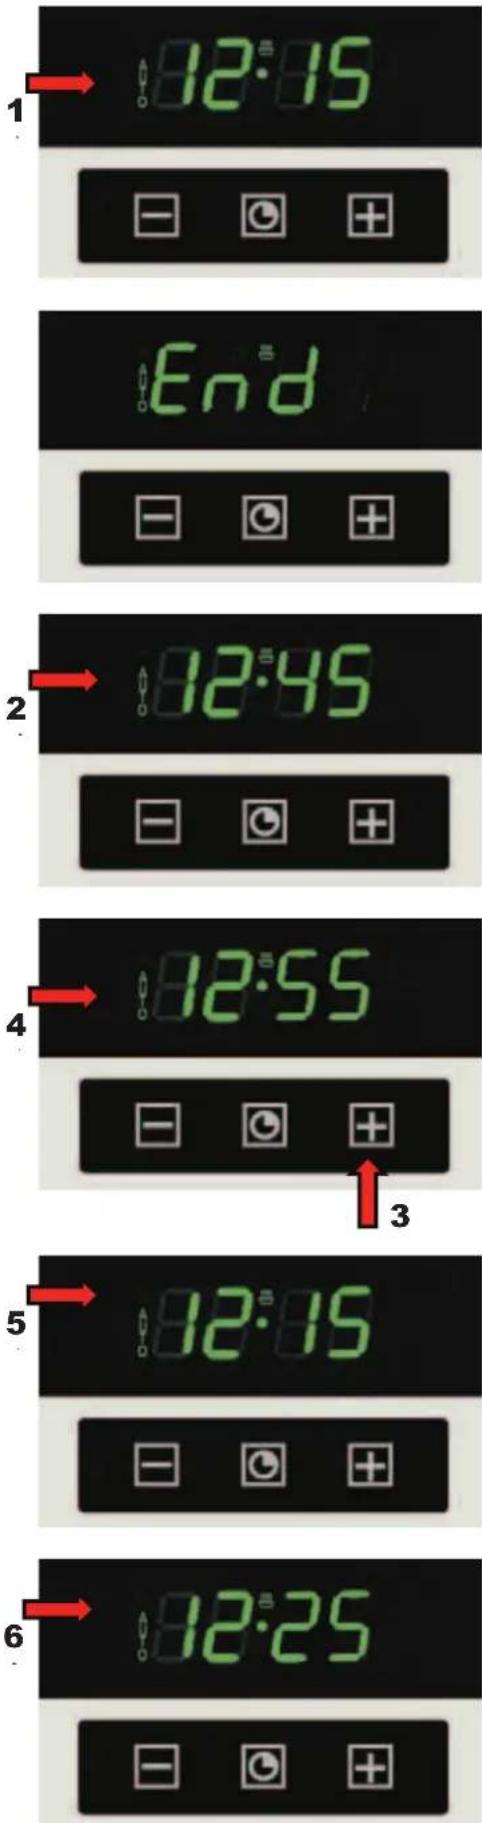
text_image
1 82:15 End 2 82:45 3 82:55 5 82:15 6 82:25Symbol 1 (AUTO) appears on the display to confirm a successful programming of the cooking time. The current day time appears again.
Now set the required end time (see chapter „Setting the end time“).
The end time (2) appears on the display which corresponds to the current day time plus the cooking time (in our example 12:45, i.e. plus 30 minutes).
- Set the required end time by key 3 (+).
A few seconds later, this time will be registered 4 (in our example - 12:55, i.e. we have put off the end time for 10 minutes).
The oven is in a standby mode now.
The current day time is displayed 5 (in our example 12:15).
In our example, the oven should switch on at 12:25 (6) with the functions “Grill + Hot air circulation” and switch off at 12:55 according to your setting.
DE
RU
Auf dem Display erscheint das Symbol 1 (AUTO), das eine erfolgreiche Programmierung der Betriebsdauer bestätigt. Auf dem Display wird wieder die aktuelle Tageszeit angezeigt.
Programmieren Sie jetzt die gewünschte Endzeit (siehe Kapitel „Einstellen der Endzeit“).
На дисплее появится символ 1 (AUTO), подтверждающий успешное программирование продолжительности приготовления, а также вернётся показание текущего времени.
Теперь запрограммируйте желаемое время окончания процесса приготовления (см. раздел "Установка времени окончания приготовления").
Auf dem Display erscheint die Endzeit (2), die der aktuellen Tageszeit plus Betriebsdauer entspricht (in unserem Beispiel 12:45, das heißt plus 30 Minuten).
На дисплее появится время окончания приготовления (2), равное текущему времени, плюс время продолжительности приготовления (в нашем примере 12:45, т.е. плюс 30 мин.).
- Mit der Wahltaste 3 (+) stellen Sie die gewünschte Endzeit ein.
- Используя кнопку выбора 3 (+) установите желаемое время окончания приготовления.
Nach wenigen Sekunden wird diese Zeit registriert 4 (in unserem Beispiel - 12:55, d. h. die Endzeit wurde um 10 Minuten verschoben).
Через несколько секунд таймер зарегистрирует это значение 4 (в нашем примере - 12:55, т.е мы сдвинули время окончания приготовления на 10 мин.).
Der Backofen ist im Zustand der Erwartung Die aktuelle Tageszeit wird angezeigt 5 (in unserem Beispiel 12:15).
Духовка перейдет в режим ожидания. Высветиться текущее время 5 (в нашем примере - 12:15).
In unserem Beispiel soll der Backofen um 12:25 (6) bei den Funktionen „Grill + Thermozirkulation“ eingeschaltet und um 12:55 ausgeschaltet werden, gemäß Ihrer Programmierung.
В нашем примере духовка должна включится в 12:25 (6)в режиме "гриль + обдув" на 30 минут и выключится в 12:55, соответственно заданной Вами программе.
EN
Adjusting beep volume
To adjust beep volume:
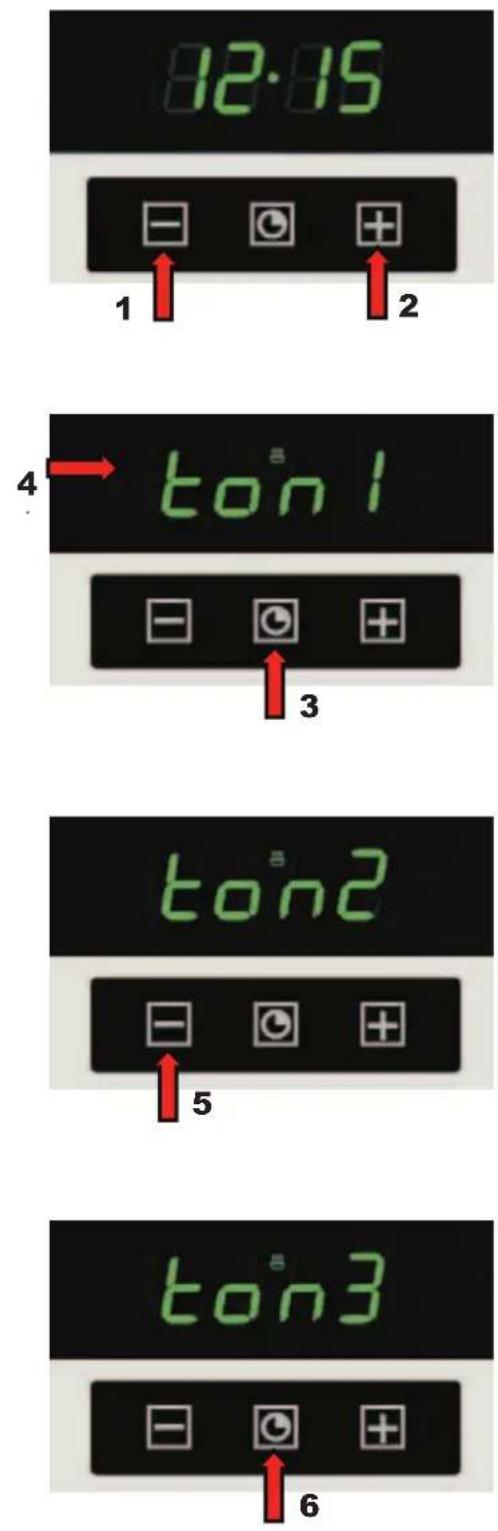
text_image
82·15 - + - 1 2 4 ton 1 - + - 3 ton2 - + - 5 ton3 - + 6- Press the keys 1 and 2 (- or +) simultaneously.
The dot which separates the hours from the minutes flashes.
- Press the middle key 3.
The flashing symbol 4 appears (ton1) - (loud sound).
If you prefer to select middle sound (ton2) or low sound (ton3):
- Press key -5again.
To save the selected volume
- Press the middle key 6.
DE
Toneinstellung des Warnsignals
Um die Lautstärke des Warnsignals einzustellen:
- Drücken Sie gleichzeitig die Wahltasten 1 und 2 (- oder +).
Der Punkt zwischen Stunden- und Minutenanzeige fängt an zu blinken.
- Dann drücken Sie die mittlere Taste 3.
Eine blinkende Überschrift 4 erscheint (ton1) - (lauter Ton).
RU
Установка громкости предупредительного сигнала
Чтобы установить громкость предупредительного сигнала:
- Нажмите одновременно на кнопки выбора 1 и 2 (- и +).
Замигает средняя точка, разделяющая часы и минуты
- Затем нажмите на среднюю кнопку 3.
Появится мигающая надпись 4 (ton1) - (громкий тон).
Wenn Sie ( ton2 ) -(mittlerer Ton) oder ( ton3 ) - (leiser Ton) wählen möchten:
• Die Wahltaste 5 ( - ) erneut drücken.
Если Вы хотите выбрать (ton2) - (средний тон) или (ton3) - (тихий тон):
- нажмите снова на кнопку выбора 5 (-).
Um die gewählte Lautstärke zu speichern
• Die mittlere Taste 6 drücken.
Чтобы запомнить выбранную громкость,
- нажмите на среднюю кнопку 6.
EN
PRACTICAL ADVICE
Recommended cooking modes
Oven light
Innenbeleuchtung
Освещение духовки
Griddle 150°C
Unterhitze 150°C
Жарение 150°C
Baking 200°C
Ober- und
Unterhitze 200°C
Выпечка 200°C
Fan 180°C
Heißluft 180°C
Обдув 180°C
Pizza 230°C
Pizza 230°C
Пицца 230°C

natural_image
Simple icon showing a sun with rays and a light bulb, no text or symbols present.
natural_image
Illustration of two fried eggs on a plate, no text or symbols present
natural_image
Illustration of a sliced bread next to a black square (no text or symbols)
natural_image
Symbolic image showing a black radiation warning symbol inside a square frame and a red-orange food item with green base (no text or numbers)
natural_image
Illustration of a pie with a tomato and a radiation symbol (no text or labels)Please find the optimal cooking modes on the inner glass surface of the oven door
The depicted food types are purely indicative and show the kind of food you can cook by means of that function. To discover the tremendous variability of the oven capacities, don't hesitate to experiment with all the cooking modes on the basis of your own cooking experience.
Baking
- It is advisable to bake pastry and cakes on the authorized baking trays which are provided as oven equipment.
- You can also use unauthorized baking dishes and trays which should be placed on the wire shelves. In this case, baking dishes made of black plate or golden plated metal are recommended. The above mentioned baking cups and dishes have a better heat conductivity which results in reduced baking time and energy saving.
- Bake pastry and cakes in a pre-heated oven.
- The oven is to be thoroughly pre-heated, if you bake heavy cakes which have a big mass and rise weakly. For cakes that rise quickly, use a slightly pre-heated oven.
- After you have switched off the oven, check the cake quality with a wooden rod. (If the cake is well-baked, the rod remains dry and clean).
- After the oven has been switched off, let the cake in for 5 minutes.
DE
PRAKTISCHE EMPFEHLUNGEN Empfohlene Zubereitungsbetriebsarten
RU
ПРАКТИЧЕСКИЕ СОВЕТЫ
Рекомендуемые режимы приготовления
Super grill 250°C Supergrill 250°C Супер гриль 250°C
Single grill 250°C Grill Einfach 250°C Гриль 250°C
Grill & fan 210°C Grill m. Heißluft 210°C Гриль с обдувом 210°C
Defrost 60°C Defrost 60°C Размораживание 60°C

natural_image
Illustration of red chili peppers on a blue background with a black crown (no text or symbols)
natural_image
Simple line drawing of a box with a fried egg and a red-and-white outline (no text or symbols)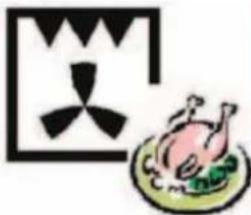
natural_image
Simple illustration of a chicken on a plate with a decorative fan symbol above (no text or symbols)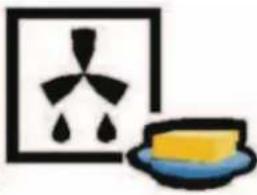
natural_image
Simple icon showing a leaf with raindrops next to a plate of cheese (no text or symbols)Die empfohlenen Zubereitungsbetriebsarten finden Sie auf der Innentür des Backofens.
Diese Symbole stellen nur eine Orientierungshilfe dar, welche Typen von Produkten bei jenem oder anderem Programm zubereitet werden können. Um die Vielseitigkeit von diesem Backofen zu erkennen, fürchten Sie nicht, mit allen Funktionen zu experimentieren, nutzen Sie dabei Ihre eigene Erfahrung in der Küche
Backen
- Es wird empfohlen, das Gebäck und die Kuchen auf dem Backblech zu backen, das als Herdausrüstung mitgeliefert ist.
- Es kann auch auf handelsüblicher Kuchenformen und Backblechen gebacken werden, die dann auf dem Rost aufzustellen sind. In diesem Fall werden Kuchenformen aus schwarzem Blech bzw. mit Elektroplattierung (Farbe gold) empfohlen. Solche Backformen besitzen eine bessere Wärmeleitfähigkeit: Die Backzeit wird dadurch kürzer, die Energie kann damit gespart werden.
- Manche Backwaren werden in einem vorgewärmten Backofen gebacken.
- Die Vorheizung des Backofens ist nur für schwere Backwaren erforderlich, die eine ziemlich große Masse haben und schwach aufgehen. Die Gebäcke, die schnell aufgehen, sind in einem nur schwach vorgewärmten Backofen anzuordnen.
- Beim Backofenabschalten ist die Teigqualität mit einem Holzstäbchen zu überprüfen (soll der Teig gut ausgebacken sein, bleibt das Holzstäbchen nach dem Einstechen trocken und sauber.)
- Nach der Backofenabschaltung sollte das Gebäck noch 5 Minuten drin bleiben.
Предлагаемые режимы Вы можете найти также на внутреннем стекле двери духовки.
Эти символы лишь образно показывают, какие типы пищи могут быть приготовлены в том или ином режиме. Чтобы познать многогранность этой духовки, не бойтесь экспериментировать со всеми функциями, опираясь на собственный опыт на кухне.
Выпечка кондитерских изделий
- Рекомендуется выпечка теста на противнях, составляющих заводское оборудование духовки.
- Выпечка возможна также в формах и на противнях, которые следует устанавливать на решетке. В этом случае рекомендуется употребление форм из черной жести или форм с гальванопокрытием (золотого цвета). Эти формы лучше проводят тепло и сокращают время выпечки, экономя при этом электроэнергию.
- Некоторые из выпекаемых изделий требуют предварительно прогретой камеры духовки.
- Предварительный нагрев духовки следует применять исключительно в случае тяжелого теста большого объёма и слабоподнимающегося. Быстро поднимающееся тесто следует устанавливать в слабо разогретую духовку.
- После отключения духовки, рекомендуется проверка качества выпеченного теста при помощи деревянной палочки (в случае правильной выпечки, после накола теста, палочка должна быть сухой и чистой).
- Выпеченное изделие, следует оставить в духовке, после ее отключения, еще на протяжение 5 минут.
EN
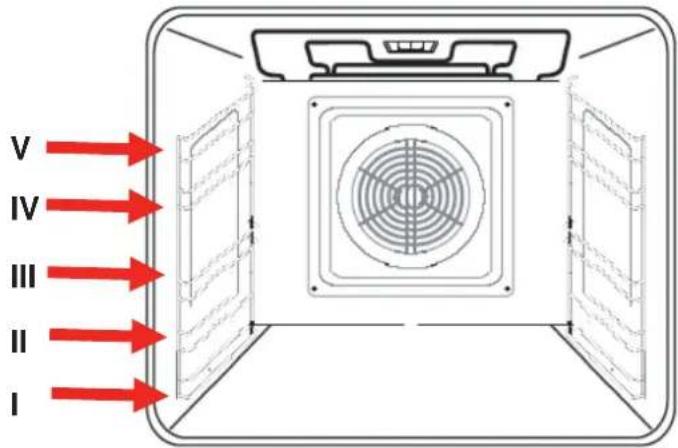
text_image
V IV III II IBaking parameters for conventional heating are summarized in Table 1, and for hot air circulation in Table 2.
If you use hot air circulation function, no preheating is necessary.
If air circulation function is used while baking a cake, the baking tray should be put at level III from the oven bottom. In case you bake two cakes simultaneously, use levels II and IV.
Baking parameters for conventional heating Table 1
Gebäckparameter bei Nutzung Konventioneller Beheizung
Tabelle 1
Параметры выпечки с
конвенционным нагревом.
Таблица 1
| Kind of doughGebäckartТип теста | LevelHöheРаб. уровень | TemperatureTemperatur °CTемпература °C | Baking time, min.Backzeit, min.Время, мин. |
| Cakes in cups and dishes | Formgebäck | Выпечка в формах | |
| Meringue / Schaumgebäck / Безе | 2-3 | 80-100 | |
| Sand paste /Sandkuchen / Песочная баба | 2-3 | 160-180 | 40-70 |
| Yeasted dough / Hefekuchen / Дрожжевая баба | 2-3 | 170-180 | 50 |
| Tart /Torte / Торт | 2-3 | 160-180 | |
| Sponge cake / Biskuitkuchen / Бисквит | 2-3 | 160-180 | 10-25 |
| Shortcrust for fruit tart / Mürberteig für Obsttorte /песочное тесто для фруктового торта | 2-3 Heat | / Erhitzter /разогр. 200-220 | |
| Cakes on baking trays | Gebäck auf dem Blech | Выпечка на противнях | |
| Crumbly yeasted dough cake / Hefestreusel /Дрожжевая хала | 2-3 | 170-190 | 30 |
| Éclairs / Eclairs / Эклеры | 2-3 | 200-225 | 30-40 |
| Fruit cake / Obstkuchen / Сладкий пирог сфрукт. | 2-3 | 170-190 | 30 |
| Crumbly sweet cake / Streuselkuchen /Сладкий пирог с крошкой | 2-3 | 170-190 | 20 |
Backparameter bei Nutzung konventioneller Beheizung sind in der Tabelle 1 zusammengefasst, und für Thermozirkulation in der Tabelle 2.
Beim Gebrauch von Thermozirkulation ist keine Backofenvorwärmung erforderlich.
Beim Backen mit Thermozirkulation ist Aufbacken von Teig in der Höhe III von unten empfohlen; beim gleichzeitigen Backen auf zwei Backblechen – in der Höhe II und IV.
Примерные параметры выпечки с использованием конвенционального нагрева приведены в Таблице 1, а с использованием термоциркуляции в Таблице 2.
При использовании термоциркуляции, не требуется предварительный разогрев духового шкафа.
Для выпечки теста с применением термоциркуляции, рекомендуется выпечка на III уровне снизу духовки, а в случае одновременной выпечки - на двух уровнях - рекомендуются уровни II и IV.
Baking parameters for fan cooking Table 2
Backparameter bei Nutzung der Heißluft.
Tabelle 2
Параметры выпечки с термоциркуляцией.
Таблица 2
| Kind of dough / Gebäckart / Тип теста | Temperature °CTemperatur °CTемпература °C | Baking time, min.Backzeit, min.Время, мин. |
| Cakes in cups and dishes / Formgebäck/ Выпечка в формах | ||
| Meringue / Schaumgebäck / Безе | 80 | 60-70 |
| Sandn paste / Sandkuchen / Песочная баба | 150 | 65-70 |
| Yeasted dough / Hefekuchen / Дрожжевая баба | 150 | 60-70 |
| Tart / Torte / Торт | 150 | 25-35 |
Cakes on baking trays
Gebäck auf dem Blech
Выпечка на противнях
| Yeasted dough / Hefekuchen / Дрожжевое тесто | 150 | 40-45 |
| Crumbly sweet cake / Streuselkuchen / Сладкий пирог с крошкой | 150 | 20-30 |
| Fruit cake / Obstkuchen / Сладкий пирог с фруктами | 150 | 40-55 |
| Sponge cake / Biskuitkuchen / Бисквит | 150 | 30-40 |
EN
Roasting and Stewing Meat
Please remember:
- Roast or stew meat joints bigger than 1 kg in the oven. Smaller pieces are to be cooked on the cooking zones.
- To prevent the meat from getting dry, place a plate of water at the lowest level below the wire shelf with the roasted food and refill water while cooking.
- Use pans with heat-resistant handles.
Roasting and stewing parameters at conventional heating are shown in Table 3, those with hot air circulation - in Table 4.
Note! The given parameters refer to roasting on the grid. If you use closed pans, select the temperature 200^ C.
Remember to turn over the joint as soon as the half of the selected cooking time has passed.
Roasting bigger meat joints is more effective.
Baste the joint with gravy while roasting.
It is advisable to place a plate of water at the lowest level below the wire shelf with the roasted meat and refill water while cooking. (Don't sprinkle water over the joint of meat)
Baking and roasting parameters introduced in this chapter can be amended according to own cooking experience.
DE
RU
Braten und Schmoren von Fleisch
Es wird folgendes empfohlen:
- Braten bzw. Schmoren von über 1 kg Fleischstücken im Backofen. Kleinere Fleischstücke sind auf Kochzonen vorzubereiten,
- beim Braten von Fleisch auf dem Rost wird empfohlen, auf der niedrigsten Ebene (unter dem Rost mit Gericht) ein Blech mit etwas Wasser zu stellen, während der Zubereitung wird Wasser nachgefühlt,
- zum Braten sollten Gefäße mit temperaturbeständigen Griffen benutzt werden.
Zubereitungsparameter für Braten und Schmoren von Speisen bei Nutzung konventioneller Beheizung sind in der Tabelle 3, und für Thermozirkulation in der Tabelle 4 dargestellt.
Жарение и тушение мяса
Рекомендуется следующее:
- жарение и тушение в духовке блюд массой превышающей 1 кг. Меньшие порции следует подготовить на варочной поверхности,
- в случае жарения мяса на решетке, рекомендуется установка на самом низком уровне (под решеткой с блюдом) противня, содержащего небольшое количество воды, которую пополняют во время жаренья,
- для жарения, следует применять емкости (кастрюли) с жаростойкими ручками,
Примерные параметры условий жаренья и тушения блюд с использованием конвенционального нагрева приведены в таблице 3, а с использованием термоциркуляции в таблице 4
Bemerkung! Die dargestellten Parameter betreffen das Braten auf dem Rost. Bei der Verwendung von geschlossenen Gefäßen ist die Temperatur auf 200°C einzustellen.
Nach Ablauf der Halbzeit, die für das Braten vorbestimmt ist, sollte das Fleisch umgewendet werden.
Es ist günstiger größere Fleischportionen zu braten.
Während des Bratens das Fleisch mit der Bratensoße begießen.
Es ist empfohlen ein Blech mit etwas Wasser auf der niedrigsten Höhe (unter dem Gitter mit Gericht) einzuschieben, und während des Bratens das ausgedampfte Wasser ergänzen (nicht das Fleisch begießen).
Die in diesem Kapitel dargestellten Parameter hinsichtlich des Backens und des Bratens können Sie aufgrund eigener Erfahrungen verbessern.
Примечание! Приведенные параметры касаются жарения на решетке. В случае применения закрытых емкостей (кастрюль), температуру следует установить на уровне 200°C.
По истечении половины времени, предназначенного для зажаривания, мясо следует переворачивать на другой бок.
Более выгодным является зажаривание больших порций мяса.
Во время жарения поливать мясо вытопившимся соусом.
Рекомендуется установка на самом низком уровне (под решеткой с блюдом) противня, содержащего небольшое количество воды, которую пополняют во время жаренья (мясо водой не поливать).
Параметры, приведённые в этой главе, касающиеся выпечки и жарения, рекомендуется корректировать, основываясь на собственном опыте
Roasting parameters for conventional heating
Table 3
Bratparameter bei Nutzung Konventioneller Beheizung
Tabelle 3
Параметры жарения с
конвенционным нагревом.
Таблица 3
| Kind of meatFleischgattungВид мяса | AdviceEmpfehlungenРекомендации | LevelHöheРаб. уровень | Temperature °CTemperatura °C | Roasting time minBratzeit min.Время, мин. |
| Stewed Beef / Rindfleisch geschmort / Тушеная говядина | 2-3 | 225-250 | ||
| Underdone Roastbeef / Roastbeef blutig / Ростбиф кровавый | pre-heated oven erhitzter Backofen разогретая духовка | 3-4 | 225-250 | |
| Juicy roastbeef / Roastbeef saftig / Ростбиф сочный | pre-heated oven erhitzter Backofen разогретая духовка | 3-4 | 225-250 | |
| Well-done Roastbeef / Roastbeef angebraten / Ростбиф подрумяненый | pre-heated oven erhitzter Backofen разогретая духовка | 3-4 | 225-250 | 10-11 |
| Pork / Schweinefleisch / Свинина | 2-3 | 150-170 | ||
| Veal / Kalbfleisch / Телятина | 2-3 | 150-170 | 45-120 | |
| Lamb / Lammfleisch / Баранина | 2-3 | 150-170 | ||
| Game / Wildfleisch / Дичь pre-heated oven erhitzter Backofen разогретая духовка | 2-3 | 170-190 | 60-110 | |
| Fowl / Geflügel, Hähnchen / Птица, цыплята | 2-3 | 160-180 | ||
| Canard / Enten / Утки pre-heated oven erhitzter Backofen разогретая духовка | 2-3 | 200-220 | 60-90 | |
| Goose / Gänse / Гуси | 2-3 | 160-180 | ||
| Stewed fowl / Geflügel geschmort / Тушеная птица | 2-3 | 210-225 |
Roasting parameters for fan cooking
Table 4
Bratparameter bei Nutzung der Heißluft
Tabelle 4
Параметры жарения с термоциркуляцией.
Таблица 4
| Kind of meatFleischgattungВид мяса | PortionПорция | Temperature °CTemperatura °C | Roasting time min.Bratzeit min.Время, мин. |
| Fowl / Hähnchen / Цыплята | 1 | 180 | |
| Game / Wildfleisch / Дичь 1-1,5 160 120-140 | |||
| Veal / Kalbfleisch / Телятина | 1 | 160 | |
| Pork / Schweinefleisch / Свинина | 1 | 175 | |
| Beef / Rindfleisch / Говядина | 1 | 160 | |
| Goose, canard / Gans, Ente / Гусь, утка | 1 | 175 | corr. massgem. Massecoot. macce |
Grill parameters
Table 5
Grillparameter Tabelle 5
Параметры жарения на
гриле. Таблица 5
| Kind of meatFleischgattungВид мяса | LevelHöheРаб. уровень | Grill time, minGrillzeit, minВремя, мин | |
| 1st side / 1.Seite / 1.сторона | 2nd side / 2.Seite / 2.сторона | ||
| Pork chop / Schweinskotelett / Свиная котлета | 4-5 | 8-10 | 6-8 |
| Pork minced schnitzel / Schweinschnitzel / Свиной шницель | 3-4 | 8-10 | |
| Cooked beef / Gekochtes RindfleischОтварное говяжье мясо | 3-4 | 10-12 | |
| Sausages / WürstchenКолбаски | 4-5 | 8-10 | |
| Barbeque / SchaschlikШашлыки | 4-5 | 7-8 | |
| Beef steak / RindsteakГовяжье жаркое | 4-5 | 6-7 | |
| Veal chop / KalbskotelettКотлета из телятины | 4-5 | 8-10 | |
| Veal steak / KalbssteakАнтрикот из телятины | 4-5 | 6-7 | |
| Lamb chop / LammkotelettКотлета из баранины | 4-5 | 8-10 | |
| Chicken – half / Hähnchen, HälfteЦыплята - половина | 3-4 | 25-30 | 25-30 |
| Fish / Fisch / Рыба | 4-5 | 6-7 | 4-5 |
| Filet / Filet / Филе | 4-5 | 4-7 | 6 |
| Trout / Forellen / Форель | 4-5 | 4-7 | 6 |
| Toasts / Toasts / Тосты | 4-5 | 2-3 | 2-3 |
| Sandwitch / Toasts, belegte / Тосты с начинкой | 3-4 | 6-8 | |
EN
CLEANING AND SERVICING
Oven
The inner walls of the oven are covered with easy-to-clean high quality enamel. The very smooth surface prevents greasy food rests from sticking to the oven walls, thus, making cleaning fast and easy. The acid-proof enamel surface provides a long-term effective performance of the oven.
Please clean the oven after every use.

IMPORTANT!!! Safety precaution: before cleaning the oven, disconnect the plug from the power socket or the power cable from the oven.
Clean the oven cavity and baking trays only with tepid water and a little bit of washing-up liquid. After having cleaned the oven, dry it with a dry cloth or just open the oven door.
Do not use acid or alkaline substances (lemon juice, vinegar, salt, tomatoes etc.) to clean the AAB coated oven surfaces and baking trays. Do not use chlorine based products, acids or abrasive products to clean the enamel surfaces of the oven.
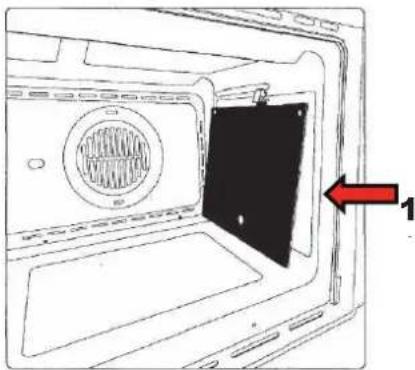
natural_image
Diagram of an open oven with a vent and door, showing internal structure without any text or symbolsSelf-cleaning catalytic panels \*
The Kaiser smooth-walled ovens are provided with inner self-cleaning catalytic panels 1.
The fine-pored enamel coating of the panels is highly ecological. At the oven temperature above 200°C, the enamel coating catalyzes grease and oil stains on its surface and gradually vaporizes them.
If the oven is still not clean enough after cooking very greasy food, operate the empty oven for 60 minutes (max.) at maximum temperature until it gets clean again.
Never wash or clean self-cleaning panels with abrasive, acid, or alkaline products.
DE
PFLEGE UND WARTUNG
Backofen
Die inneren Wände des Backofens sind mit hochwertiger pflegeleichter Emaille bedeckt. Die sehr glatte Oberfläche wirkt dem Erscheinen der restlichen Verschmutzungen auf den Wänden des Backofens sehr schnell entgegen und lässt sich einfach reinigen. Die antisäurehaltige Eigenschaft dieser Emaille erlaubt eine langfristige qualitativ hohe Nutzung Ihres Backofens.
Der Backofen ist nach jedem Gebrauch zu reinigen.

WICHTIG !!! Als Sicherheitsvorkehrung muss vor jeder Reinigung des Backofens immer das Stromnetz abgeschaltet werden.
Den Backofenraum und Backblechen nur mit lauwarmem Wasser mit ein wenig Geschirrspülmittel waschen. Nach dem Waschen ist der Backofenraum mit einem trockenen Lappen nachzuwischen oder bei geöffneter Tür trocknen zu lassen.
Zum Reinigen von Backofen und Backblech mit Antiannbrennbeschichtung AAB dürfen auf keinen Fall sauren oder alkalischen Substanzen verwendet werden (Zitronensaft, Essig, Salz, usw.). Chlorhaltige Produkte (Bleichmittel usw.) sind ebenfalls unbedingt zu vermeiden, dies gilt vor allem für die Reinigung der emaillierten Wände.
Selbstreinigende katalytische Platten \*
Unsere Backöfen mit glatten Wänden bieten die Möglichkeit, in der Muffel selbstreinigende Platten 1 zu montieren, mit denen die Wände verkleidet werden. Diese Spezialplatten, die vor den seitlichen Rahmen an den Wänden eingehängt werden, sind mit einem mikroporösen katalytischen Speziallack bedeckt, der oxidiert, die Öl- und Fettspritzer nach und nach verdampfen lässt, und so bei den Backvorgängen über 200°C eliminiert. Sollte der Ofen nach dem Backen sehr fetthaltiger Speisen nicht sauber sein, lässt man ihn maximal 60 Minuten lang leer bei Höchsttemperatur eingeschaltet. Die selbstreinigenden Platten dürfen weder gewaschen, noch mit scheuernden oder säurehaltigen bzw. alkalischen Produkten gereinigt werden.
RU
ОБСЛУЖИВАНИЕ И УХОД
Духовой шкаф
Внутренние стенки духовки покрыты высококачественной легкоочищающейся эмалью. Очень гладкая поверхность противодействует появлению на стенках духовки остаточных загрязнений и очень быстро и просто очищается. Антикислотное свойство этой эмали позволяет долгосрочно и качественно использовать Вашу духовку.
Чистите духовку после каждого использования.

Важно! В качестве меры предосторожности необходимо перед каждой чисткой духовки отключать ее от сети.
Духовой шкаф и противии мойте, используя только теплую воду с небольшим количеством жидкости для мытья посуды. После мытья вытрите духовой шкаф насухо или оставьте дверцу открытой для просыхания камеры.
Не применяйте для чистки духовки и противия с антипригарным покрытием ААВ кислото- или щелочесодержащих веществ (уксус, сок лимона, соль и т.д.). Ни в коем случае не применяйте также хлоросодержащие средства (отбеливающие и т.д.). Особенно это нужно иметь в виду причистке эмалированных поверхностей духовок.
Самоочищающиеся каталитические пластины. \*
На стенках духовки установлены пластины 1 со специальной экологической микропористой самоочищающейся каталитической эмалью. Эта эмаль при температуре типовой работы духовки свыше 200° С катализирует все находящиеся на ней жирные вещества и, испаряя, устраняет их. Единственные средства, необходимые для уборки духовки после каталитической очистки - это... щётка и совок. Если же после приготовления очень жирных блюд на стенках духовки все же остаются заметными следы масла и жира, оставьте пустую духовку включенной при максимальной температуре до тех пор, пока она полностью не очистится Самоощиющиеся каталитические пластины нельзя ни мыть, ни тем более чистить абразивными материалами и кислото - и щелочесодержащими средствами.
EN
Baking trays with AAB coating \*
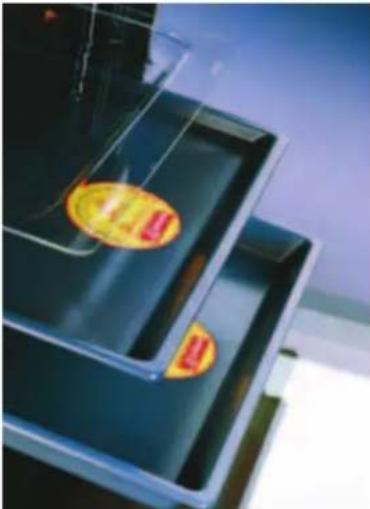
natural_image
Stacked blue rectangular containers with yellow and red labels, no visible text or symbolsThe Kaiser XL 500 ovens are provided with the AAB coated baking trays manufactured on the basis of state-of-art technologies. In comparison to usual coatings, the ABB coating is much more advantageous: it is durable, resistant to scratches, grease and oil stains do not stick to it. The remarkable anti-stick feature of the coating is based on “Lotus blossom” effect: oil and grease drip off without sticking and can be easily removed even by water without any detergents.
If you cook food on the ABB coated baking trays, please only use special wooden or plastic utensils.
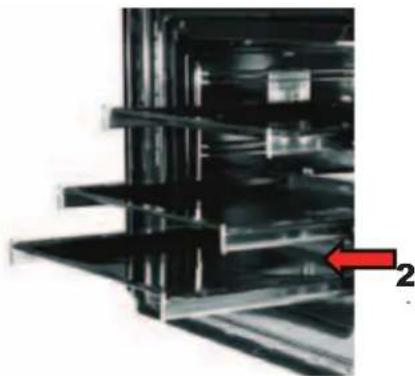
natural_image
Close-up of a metal shelving unit with shelves and structural beams, no visible text or symbolsTelescopes\*
The system of Telescopes 2 provided in the oven enables you to pull out all baking trays together or separately even while cooking a dish. This Kaiser innovation differs from all similar constructions to advantage: telescopic guides provide convenient and practical access to every level, enable you to check up and take out the food from any tray, thus, saving the heat in the oven and preserving the food on the other trays hot. A special anti-tilt system guarantees safety against overturning even if the telescopic guides are fully withdrawn. The maximum load amounts to 15 kg. You can easily dismantle the telescopes in order to clean them thoroughly. The construction is made of stainless steel, so corrosion protection is ensured.
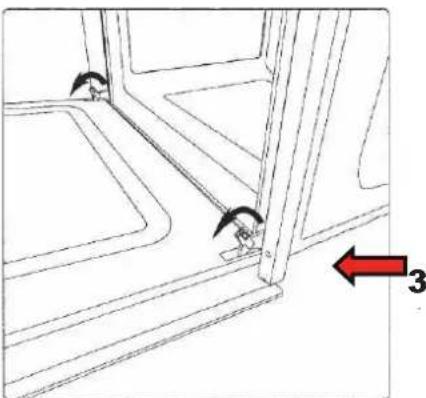
natural_image
Technical line drawing of a mechanical assembly with no visible text or symbolsRemoving the oven door
You can easily remove the oven door in order to clean it more thoroughly and get a better access to the oven cavity.
To do so, proceed as follows:
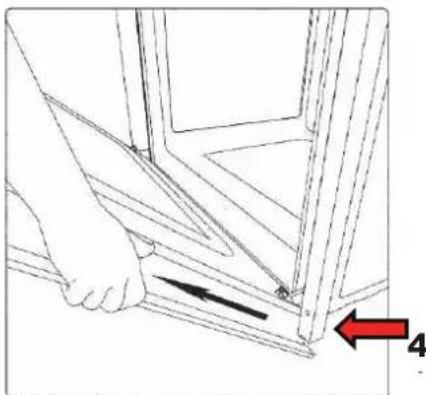
natural_image
Line drawing of a hand pressing down on a window frame with a red arrow indicating direction (no text or symbols)- Open the door against the stop.
• Fix the two levers 3 in the upper position. - Close the door against the first stop (caused by the raised levers).
- Carefully pull the door upwards and outwards to remove it from the mountings 4.
To mount the door:
- Fit the hinges into their mountings and fix the two levers in the lower position.
* - if available
* - - can be ordered in trade
Das Backblech mit der
Antianbrennbeschichtung AAB *
Die neusten Backbleche des Herdes XL 500 mit der Antianbrennbeschichtung AAB entsprechen den modernsten Technologien. Der neue Antihaftbelag ist viel vorteilhafter als übliche Beschichtungen. Das neue Backblech ist strapazierfähig, kratzfest und langlebig. Seine hervorragenden Antihaft-Eigenschaften hat es dem Lotusblüteneffekt zu verdanken – alles perlt spurlos ab und nichts kann anhaften. Fett, Reste vom Kuchen und etc. verbinden sich nicht mit der Oberfläche und lassen sich durch klares Wasser ohne Zusatz von Reinigungsmitteln mühelos entfernen.
Beim Nutzen des AAB Bleches benutzen Sie die Geräte aus Holz oder Kunststoff.
Teleskop\*
Das System Teleskop 2, mit dem Ihr Herd ausgestattet ist, ermöglicht Ihnen, alle Bleche sowohl zusammen als auch getrennt voneinander herauszuschieben, sogar während der Zubereitung eines Gerichtes. Die von Kaiser ausgefertigte Konstruktion unterscheidet sich von ähnlichen durch den bequemen und praktischen Zugriff zu jedem Blech und erlaubt Ihnen, die Backwaren von jedem Backblech herauszunehmen und zu kontrollieren, ohne den Ofen und die Gerichte auf den anderen Blechen abzukühlen. Die Schienen jedes Bleches halten einer Belastung von bis zu 15 kg stand im vollständig herausgeschobenen Zustand. Beim Säubern des Backofens lässt sich das System der Schienen leicht entfernen. Die Konstruktion ist in rostfreiem Stahl ausgeführt, was die Möglichkeit von Korrosionsbildung ausschließt.
Ausbauen der Ofentür
Um einen besseren Zugang zum Backofenraum zu schaffen sowie die Reinigung zu ermöglichen, kann die Backofentür mühelos ausgebaut werden. Dazu folgendermaßen vorgehen:
• die Tür ganz öffnen;
• die zwei auf Abb. dargestellten Hebel 3 anheben;
- die Tür wieder bis zur ersten, von den zwei zuvor angehobenen Hebeln bestimmten Einrastung schließen;
• die Tür nach oben und nach außen anheben und herausnehmen 4.
Um die Tür wieder einzubauen:
- die Scharniere wieder einsetzen und dann die zwei Hebel in Schließstellung bringen.
* - falls vorhanden
* - kann zusätzlich im Handel bestellt werden
Протвинь с антипригарным покрытием ААВ \*
Новые противни плит XL 500 с антипригарным покрытием ААВ изготовлен на основе новейших технологий. Это покрытие имеет гораздо больше преимуществ, чем обычные покрытия. Новый противень прочен и устойчив к царапинам, долговечен, замечательное качество антипригарного покрытия достигается благодаря эффекту цветов Лотоса: жир, остатки выпечки и т. д. не пристают к поверхности и их можно без труда удалить чистой водой даже без чистящих средств.
Если Вы готовите пищу на противне с антипригарным покрытием ААВ, рекомендуется использовать деревянные или специальные пластмассовые приборы.
Телескоп\*
Система Телескоп 2, которым оснащена Ваша духовка, позволяет Вам выдвигать все противник как совместно, так и по отдельности даже во время приготовления блюд. Данная конструкция отличается от аналогичных удобным и практичным доступом к любому противню и позволяет доставать и контролировать выпечку на любом из них, не охлаждая всю духовку и находящиеся на других противнях блюда. Направляющие каждого противня надёжно удерживают нагруженный весом до 15 кг. противень в полностью выдвинутом состоянии. При очистке духовки система направляющих легко снимается. Конструкция выполнена из нержавеющей стали, что исключает возможность появления коррозии.
Демонтаж дверцы духовки
Для получения лучшего доступа к духовому шкафу, а также для его очистки, дверца может быть очень легко демонтирована. Для этого необходимо:
• полностью открыть дверцу;
- приподнять два указанных на рисунке рычажка 3
- прикрыть дверцу до первого касания поднятых рычажков;
- приподняв дверцу, потянуть ее вверх на себя 4.
Чтобы вновь установить дверцу:
- вставить шарниры на прежнее место и защелкнуть рычажки.
* - если имеется
* - может быть дополнительно заказана в магазине
EN
Removing inner glass
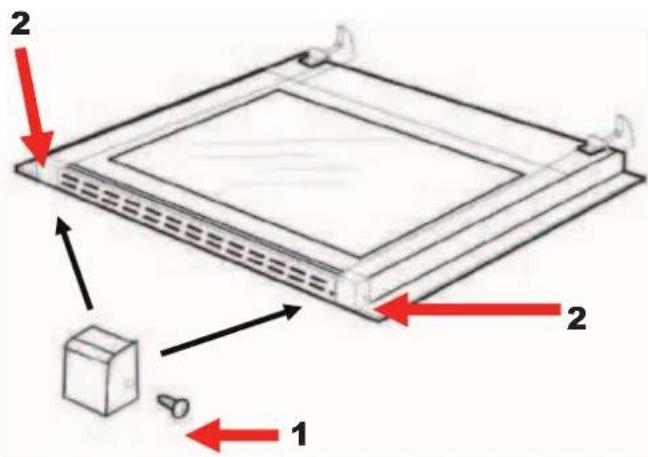
text_image
Diagram of a device with labeled components and directional arrows indicating flow or movement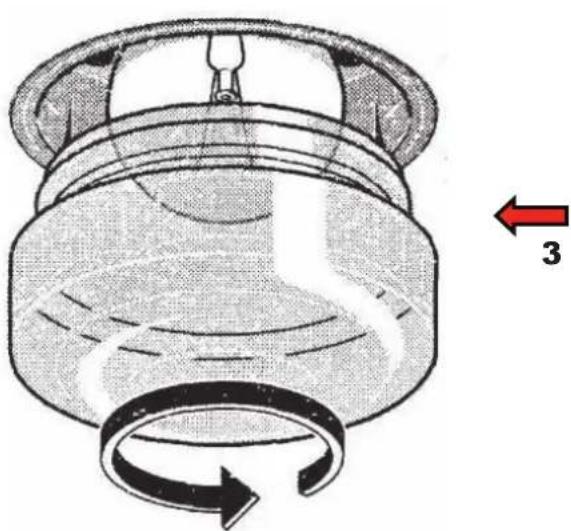
natural_image
Technical illustration of a mechanical component with a circular arrow indicating rotational motion (no text or symbols)To remove the inner pane, screw out the screw 1 and open the plastic latches 2 located in the upper corners of the door. Now pull the glass carefully to set it free from the second blocking device. Take the glass out. Insert the clean glass back carefully and lock it by means of the blocking device.
Replacing the oven light
The oven light 3 should have the following parameters:
a) temperature resistance – up to 300°C
b) power supply: see V/Hz indicated on data plate.
c) power input: 25W.
d) E 14 connection.

Attention! First of all disconnect the appliance from the power supply.
• to prevent damage, put a cloth into the oven
- screw out the glass cover of the light
- screw out the old bulb and replace it with the new one
- adjust the glass cover and remove the cloth
- connect the appliance to the mains electricity supply
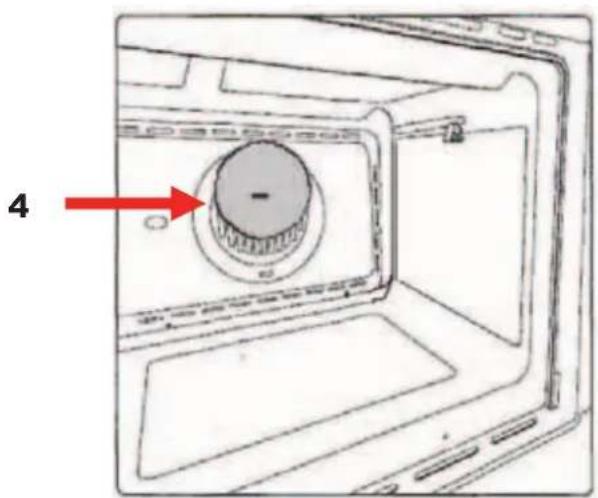
text_image
4Fan filter
In case your oven is equipped with the net filter which protects the fan from the drops of fat, take out the filter every time you use the oven intensively and wash it in hot water with washing-up liquids.
To withdraw the filter, pull the handle 4 upwards.
To mount the filter, insert its ledges into a label on the wall and carefully pull it downwards. The filter is fixed at the protective casing of the fan.
DE
Herausziehen der inneren Scheibe
Drehen Sie dazu die Schrauben 1 heraus und entfernen Sie die Kunststoffverschlüsse 2, die sich in den oberen Ecken der Backofentür befinden. Danach schieben Sie die Scheibe aus dem zweiten Verriegelungselement heraus und ziehen Sie sie heraus. Nach dem Reinigen schieben Sie die Scheibe zurück und verriegeln Sie sie, indem Sie die Verriegelungselemente erneut festschrauben.
Auswechslung der Ofenbeleuchtung
Die Ofenbeleuchtung 3 muss folgende Merkmale aufweisen:
a) hochtemperaturbeständig (bis zu 300°C)
b) Stromversorgung: siehe Anschlusswerte V/Hz auf dem Typenschild.
c) Leistung 25 W
d) Sockel E 14.

Achtung! Das Gerät zuallererst vom Stromnetz trennen.
- Zur Vermeidung von Schadensfällen, ist im Ofen ein Geschirrtuch auszubreiten
- Lampenabdeckung aus Glas abschrauben
- Alte Lampe abschrauben und mit einer neuen auswechseln
- Lampenabdeckung wieder anmontieren und Geschirrtuch entfernen
- Das Gerät erneut an das Stromnetz anschließen
Filter des Ventilators
Wenn Ihr Backöfen mit einem Filter ausgestattet ist, der einem Zweck dient, die Menge von zum Ventilatorpropeller gelangenden Fettpartikeln zu begrenzen, wird es empfohlen, nach jedem intensiven Backen den Filter herauszunehmen und ihn in heißem Wasser mit Spülmittel zu waschen. Um den Filter herauszunehmen, packen Sie seinen sichtbaren Griff und ziehen Sie ihn nach oben 4. Um den Filter wieder einzubauen, sind seine Anzapfungen in die Ausschnitte der Luftführung hineinzuschieben.
RU
Снятие внутреннего стекла
С этой целью следует вывинтить винт 1 и открыть пластмассовые защелки 2, расположенные в верхних углах дверцы. Затем стекло следует выдвинуть со второго блокирующего элемента и вынуть. После очистки стекло следует вставить и заблокировать, прикручивая блокирующий элемент.
Замена лампы освещения духовки
Освещение духовки 3 должно иметь следующие параметры:
a) Термостойкость (до 300° C)
b) Электропитание: параметры подключения V/Hz указаны в заводской табличке.
с) Потребляемая мощность 25 W.
d) Цоколь Е 14.

Внимание! Прежде всего отключить духовку от сети.
- Во избежание повреждений разложите в духовке кухонное полотенце
• Выкрутите стеклянный плафон - Выкрутите старую лампочку и вкрутите новую
- Вкрутите на место плафон и уберите полотенце
• Подключите духовку к электросети
Фильтр вентилятора
Если Ваша плита оборудована сетчатым фильтром, ограничивающим попадение капель жира на вентилятор, вынимайте фильтр после каждого интенсивного использования духового шкафа и мойте его горячей водой с моющими средствами.
Для изъятия фильтра нужно взяться за ручку 4 и потянуть вверх.
Для установки фильтра на место установите его выступы в вырезы на стенке и вставьте его движением сверху-вниз.
Фильтр крепится на защитном кожухе вентилятора.
EN
Cyclic inspection
Besides the current maintenance, the user should ensure:
- alternate check and maintenance of oven elements and assemblies,
- cyclic inspection by the customer service once in two years after the warranty has expired.
- Repair of faults.
Note! Care and servicing as well as all kind of reparations are to be carried out by authorized personnel only.

IMPORTANT!!!
The user is responsible for good working order and correct operation of the appliance. If the customer service is called because of an operating mistake, the servicing costs are carried by the user even if the warranty is still valid.
Damages caused by non-observance of the given instruction are not approved.
What to do, if?
In case of a damage:
- Switch off all oven operating functions (cooking zones, oven, light etc.)
- disconnect the appliance from the power supply
- contact the Customer Centre or another authorized organisation to order the servicing.
Some simple faults can be repaired by the user in correspondence with the recommendations in the present operating instructions.
Some troubles and faults can occur occasionally during the usage of the appliance. The user can repair some of the faults on his or her own by following the recommendations introduced in the Table below. Before contacting the customer service, check the following points consecutively:
DE
Periodische Besichtigung
Außer den laufenden Wartungsarbeiten ist der Benutzer zu folgenden Tätigkeiten verpflichtet:
- Periodische Überprüfung und Wartung von Herdelementen und Baugruppen,
- Nach Ablauf der Garantieperiode jede zwei Jahre den Herd vom Kundendienst durchsehen lassen.
- Beseitigung von entdeckten Störungen.
Anmerkung! Alle oben angeführten Einstell- und Nachstelltätigkeiten, sowie Reparaturen müssen durch eine Kundendienststelle oder einen autorisierten Installateur durchgeführt werden.

WICHTIG!!! Der Benutzer ist für den einwandfreien Zustand des Geräts und die fachgerechte Benutzung verantwortlich. Wenn der Kundendienst wegen eines Bedienfehlers gerufen wird, ist der Besuch auch während der Garantiezeit kostenpflichtig.
Schäden, die durch Nichtbeachtung dieser Bedienungsanleitung verursacht wurden, werden nicht anerkannt
Was ist, wenn ?
Bei jeder Störung:
- Betriebsfunktionen des Herdes (Kochplatte, Backofen, Beleuchtung und s. w.) abschalten,
• Stromversorgung abschalten, - Die Notwendigkeit der Reparatur melden (Service-Center bzw. eine andere Organisation, die entsprechende Rechte hat).
Einige einfache Fehler kann der Benutzer selbstständig, entsprechend den Empfehlungen der vorliegenden Bedienungsanleitung, beseitigen.
Bei der Benutzung des Gerätes können manchmal Probleme und Fehler auftreten. Einige geringere Fehler kann der Benutzer eigenständig beheben, indem er die Hinweise befolgt, die in der nachstehenden Tabelle angeführt sind. Bevor Sie sich an den Kundendienst wenden, sind folgende Punkte der Tabelle nacheinander zu überprüfen:
RU
Периодический осмотр
Кроме операций связанных с текущим уходом за плитой, следует:
- производить периодические проверки исправности органов управления и рабочих узлов плиты,
- после истечения срока гарантии, по крайней мере один раз в два года, следует поручить сервисному центру проведение технического осмотра плиты,
- устранять обнаруженные неисправности.
Примечание! Все ремонты и операции по регулировке, должны производиться сервисным центром или монтёром, обладающим соответствующей квалификацией.

Важно! Пользователь отвечает за безупречное состояние прибора и правильное обслуживание. Если по причине неправильного обслуживания вызывается служба Сервисного Центра, вызов платный, даже при ещё действующей гарантии. Поломки, которые вызваны несоблюдением настоящей Инструкции, не признаются.
Что делать, если ?
В случае любой неисправности, следует:
- отключить все элементы плиты (нагревательную поверхность, духовку, освещение и пр.),
- отключить электропитание,
- заявить о необходимости ремонта (в сервисный центр или другую организацию, обладающую соответствими правами).
Некоторые простые неисправности может самостоятельно устранять пользователь, согласно рекомендациям настоящего руководства.
В период эксплуатации электрической плиты появляются иногда проблемы и неполадки, некоторые из которых потребитель в состоянии удалить самостоятельно при условии соблюдения правил приведенных в таблице ниже. До вызова работника сервисного обслуживания, внимательно прочтите и выполните следующие рекомендации:
EN
| Fault | Cause | Remedial action |
| Cooker doesn’t switch on | Disturbance in power supply | Check the protection device of your home conduction. Replace if defective. |
| Interruption of the stream supply | Set the current time on the display again and switch on the oven | |
| Zeros flash on the display | Interruption of the stream supply | Set the current time on the display again |
| The oven light doesn’t go on | Disturbance in power supply | Check the protection device of your home conduction. Replace if defective. |
| Fault in the lamp | Check if the lamp of the oven light is faultless. If not – replace. | |
| The control lights don’t go on | Disturbance in power supply | Check the protection device of your home conduction. Replace if defective. |
| Fault in the lamp | Contact the customer service | |
| Clock is fast or runs behind | Too low tension in the house net | Check the tension of the conduction. If necessary – stabilize. |
IMPORTANT!!!
If the faults still cannot be repaired, contact the customer service.
DE
RU
| Störung | Mögliche Ursache | Hinweise |
| Der Herd funktioniert nicht | Sörung der Elektroversorgung | Prüfen der Schutzvorrichtung der häuslichen Leitung. Wenn fehlerhaft - ersetzen |
| Unterbrechung der Stromzufuhr | Erneut die aktuelle Zeit auf dem Display einstellen und den Herd in Betrieb nehmen | |
| Auf dem Display blinken Nullen | Unterbrechung der Stromzufuhr | Erneut die aktuelle Zeit auf dem Display einstellen |
| Die Ofenbeleuchtung funktioniert nicht | Sörung der Elektroversorgung | Prüfen der Schutzvorrichtung der häuslichen Leitung. Wenn fehlerhaft - ersetzen |
| Defekt der Lampe | Prüfen, ob die Lampe der Ofenbeleuchtung intakt ist. Wenn fehlerhaft – ersetzen | |
| Die Kontrollämpchen leuchten nicht | Störung der Elektroversorgung | Prüfen der Schutzvorrichtung der häuslichen Leitung. Wenn fehlerhaft - ersetzen |
| Defekt der Lampe | An den Kundendienst wenden | |
| Die Uhr geht vor oder nach | Zu niedrige Spannung im Netz des Hauses | Die Spannung im Netz prüfen. Falls notwendig - die Spannung stabilisieren |
| Проблемы | Возможные причины | Решения |
| Плита не работает | Нарушение электроснабженияПерерыв в подаче тока | Проверить предохранители домашней проводки. Неисправные - заменить новымиЗаново установить текущее время на дисплее и включить духовку |
| На дисплее мигают нули | Перерыв в подаче тока | Заново установить текущее время |
| Не действует освещение духовки | Нарушение электроснабженияДефект лампы | Проверить предохранители домашней проводки. Неисправные - заменить новымиПроверить исправность лампы освещения духовки. Неисправную заменить |
| Не горят контрольные лампы | Нарушение электроснабженияДефект лампы | Проверить предохранители домашней проводки. Неисправные - заменить новымиОбратиться в Сервисную службу |
| Часы спешат или отстают | Низкое напряжение в домашней сети | Проверить напряжение в сети. При необходимости стабилизировать напряжение |
WICHTIG !!!
Wenn trotz der Empfehlungen die Probleme nicht beseitigt werden konnten – wenden Sie sich an den Kundendienst.
ВАЖНО !!!
Если несмотря на рекомендации проблему не удалось устранить – обратиться в Сервисную службу.
EN
ENVIROMENTAL COMPATIBILITY
natural_image
Simple line drawing of a five-node recycling symbol (three chasing arrows, one unleaved) without any text or labels.The documentation provided with this oven has been printed on chlorine free bleached paper or recycled paper to show respect for the environment. The packaging has also been designed to avoid environmental impact. All materials, which make up the packaging, take into consideration the environment and can be re-used or recycled.
By recycling and reusing, you help to save raw materials and reduce the bulk of domestic and industrial waste.
Disposing of the packaging
Please dispose of the packaging of your appliance in an environment friendly way.
Recycled materials used for further packaging save raw materials and reduce waste volume.
natural_image
Symbol of a trash bin with crossed lines indicating no waste or discharge (no text or labels)Disposing of old appliances
The symbol on the appliance or on its packaging indicates that this appliance may not be treated as household waste. Instead, it shall be handed over to the authorized collecting centre for recycling old electrical and electronic appliances.
By ensuring this appliance is disposed of correctly, you help to prevent potential negative consequences for the environment and human health, which could otherwise be caused by inappropriate waste handling of this product.
For more detailed information on recycling of this appliance, please contact your local city office, your household waste disposal service or the shop where you purchased the product.

DE
UMWELTVERTRÄGLICHKEIT
Als Beitrag zum Umweltschutz wurde die Dokumentation dieses Geräts auf chlorfrei gebleichtes oder Recycling-Papier gedruckt.
Bei der Verpackung wurde auf deren Umweltverträglichkeit Wert gelegt; sie kann gesammelt oder recycelt werden, da es sich um umweltschonendes Material handelt.
Durch Recycling der Verpackung wird zur Reduzierung des Rohstoffverbrauchs und des Volumens von Industrie- und Hausmüll beigetragen.
RU
ОХРАНА ОКРУЖАЮЩЕЙ СРЕДЫ
В качестве вклада в охрану окружающей среды, вся документация к этому устройству была напечатана на отбеленной, не содержащей хлора или на пригодной ко вторичной переработке бумаге.
И при изготовлении упаковки был сделан акцент на соблюдение норм по охране окружающей среды. Она также может быть вторично переработана, поскольку изготовлена из безвредных для окружающей с реды материалов.
Возможность переработки упаковочного материала значительно снижает как потребление природно -сырьевых ресурсов, так и образование промышленного и бытового мусора.
Verpackungs-Entsorgung
Entsorgen Sie die Transportverpackung möglichst umweltgerecht.
Das Rückführen der Verpackungsmaterialien in den Materialkreislauf spart Rohstoffe und verringert das Müllaufkommen.
Утилизация упаковки
Утилизируйте упаковку по возможности более экологично.
Вторичная переработка материалов для упаковки экономит сырьё и уменьшает количество мусора.
Altgeräte-Entsorgung
Das Symbol auf dem Produkt oder seiner Verpackung weist darauf hin, dass dieses Produkt nicht als normaler Haushaltsabfall zu behandeln ist, sondern an einem Sammelpunkt für das Recycling von elektrischen und elektronischen Geräten abgegeben werden muss.
Durch Ihren Beitrag zum korrekten Entsorgen dieses Produkts schützen Sie die Umwelt und die Gesundheit Ihrer Mitmenschen.
Umwelt und Gesundheit werden durch falsches Entsorgen gefährdet.
Weitere Informationen über das Recycling dieses Produkts erhalten Sie von Ihrem Rathaus, Ihrer Müllabfuhr oder dem Geschäft, in dem Sie das Produkt gekauft haben.
Утилизация старых приборов
Такой символ на продукте или его упаковке указывает на то, что этот продукт, по приходу в негодность, нельзя рассматривать как обычный домашний мусор, его следует сдать в пункт сбора электрических и электронных устройств, для их вторичной переработки.
Вашим взносом в правильную утилизацию этого продукта Вы защищаете окружающую среду и здоровье Ваших ближних.
Неправильная утилизация угрожает окружающей среде и здоровью.
Дальнейшие сведения о вторичной переработке этого продукта Вы можете получить в городской администрации, службе вывоза мусора или в магазине, в котором Вы купили этот продукт.
УСЛОВИЯ ГАРАНТИИ
- Гарантия на исправное действие прибора действительна на период 12 месяцев со дня покупки прибора (подтверждена оттиском печати пункта розничной продажи и подписью продавца).
- Фирма - изготовитель обеспечивает безвозмездный ремонт в случае обнаружения в гарантийный период заводских дефектов (несоответствующая конструкция, монтаж, дефектные материалы и исполнение).
- Данная гарантия распространяется только на изделия, использующиеся в некоммерческих, личных, семейных или домашних целях. В противном случае гарантийный срок составляет 4 месяца с момента приобретения.
- Гарантийный ремонт выполняется бесплатно (включая стоимость работ, материалов и, при необходимости и с учетом действующего законодательства, перевозки) уполномоченной сервисной компанией на дому у потребителя или в мастерской, по усмотрению сервисной компании.
- Любые претензии по качеству изделия рассматриваются только после проверки качества изделия уполномоченной сервисной компанией и, при необходимости, после выдачи последней соответствующего заключения.
- Обмен прибора на свободный от дефектов в течение гарантийного срока осуществляется только в том случае, если на основании заключения эксперта невозможно произвести ремонт или если после 3-х ремонтов прибор остаётся неисправным.
- Обмен прибора на исправный производит только организация, продавшая товар.
- Ответственность по настоящей гарантии ограничивается, если иное не определено законом, указанными в настоящем документе обязательствами.
ГАРАНТИЯ НЕ РАСПРОСТРАНЯЕТСЯ:
- На изделия, отказы и неисправности которых вызваны транспортными повреждениями, неправильной установкой, небрежным обращением или плохим уходом, подключением к неправильному напряжению питания, использованием нерекомендованных чистящих и моющих средств, несоблюдением прилагаемой инструкции по эксплуатации или если изделие подвергалось ремонту или конструктивным изменениям неуполномоченными лицами, или если удален, не разборчив или изменен серийный номер изделия.
- На изделия, эксплуатировавшиеся с неустраненными недостатками или проходившие техническое обслуживание в компаниях, не являющихся нашими уполномоченными сервисными компаниями.
- На неисправности, которые вызваны независящими от производителя причинами, такими как: перепады напряжения питания, явления природы и стихийные бедствия, пожар, домашние и дикие животные, насекомые и т.п.
- На стеклянные и керамические поверхности, а также внешние элементы из пластмасс в случае, если дефект наступил по вине пользователя, после подписания потребителем акта приёмки—сдачи.
- На царапины, трещины и аналогичные механические внешние повреждения, возникшие в процессе эксплуатации.
- На такие повреждения деталей, вероятность которых существенно выше обычной по характеру их эксплуатации или которые произошли в результате естественного износа, (включая расходные материалы) таких как: лампы, фильтры и т. п., перемещаемые вручную пластмассовые детали.
- На такие виды работ как регулировка, чистка и прочий уход за изделием, оговоренный в Инструкции по эксплуатацию.
- А также по другим причинам, возникшим по вине покупателя и не вызванными заводом-изготовителем - могут устраняться исключительно за счёт покупателя.
Незаземленное оборудование является потенциально опасным. Производитель не несет ответственность за ущерб здоровью и собственности, если это вызвано несоблюдением норм установки или использованием неисправного оборудования
ГАРАНТИЙНЫЙ ТАЛОН
(Nr. соответствует номеру аппарата, смотри на задней обложке настоящей инструкции)
Данные гарантийные обязательства не ограничивают определенные законом права потребителей
Поздравляем Вас с приобретением бытовой техники отличного качества!
Пожалуйста ознакомьтесь с настоящим гарантийным свидетельством и проследите, чтобы оно было правильно заполнено и имело штамп магазина. При отсутствии штампа и даты продажи гарантийный срок исчисляется с момента изготовления изделия. Тщательно проверьте внешний вид изделия, все претензии по внешнему виду предъявляйте продавцу при принятии товара. Сохраняйте гарантийный талон и чек на проданное изделие. По вопросам неполного комплекта изделия и его замены обращайтесь в торговую организацию.
Для установки, подключения и по всем вопросам, связанным с техническим обслуживанием, обращаться только в авторизированные сервисные центры. Подробная информация об уполномоченных на обслуживание и ремонт сервисных центрах прилагается отдельным списком.
Мы сохраняем за собой право вносить изменения в конструкцию или технологию изготовления. Таковые изменения не влекут обязательств по изменению или улучшению ранее выпущенных изделий
ОТМЕТКА О ПРОДАЖЕ:
| ☐ | Электрическая плита | ☐ Холодильник |
| ☐ | Газовая плита | ☐ Стиральная машина |
| ИЗДЕЛИЕ ☐ | Встраиваемая поверхность | ☐ Посудомоечная машина |
| ☐ | Встраиваемая духовка | ☐ Вытяжка |
| ☐ Микроволновая печь |
| Модель: |
| Заводской No: |
| Название магазина: |
| Телефон: |
Дата продажи: " ____ " ____ 200__ г.
СВЕДЕНИЯ ОБ УСТАНОВКЕ:
Установлено: " ____ " ____ 200__ г.
Владелец (фамилия, имя, отчество)....
Адрес, телефон....
Подпись владельца......
Мастер (фамилия, имя, отчество)
Орг. установщик ....
Подпись мастера ....
Изделие продано в заводской упаковке или проверено в моем присутствии, Инструкция по эксплуатации получена. С правилами эксплуатации ознакомлен. Претензий по внешнему виду и комплектности не имею.
Подпись покупателя......
Представительство «Kaiser» в России по сервисному обслуживанию и работе с потребителями:
Тел/ факс : (495) 488-75-10, 488-76-10
www.kaiser.ru
E-Mail: service@kaiser.ru
Почтовый адрес: 127238, Москва, а/я 46.
Адреса и телефоны авторизированных сервисных центров, обеспечивающих гарантийное и послегарантийное обслуживание техники «Kaiser»:
1. Москва
Подключение и ремонт электрических плит, газовых плит, встраиваемых духовок и поверхностей, микроволновых печей, вытяжек, стиральных и посудомоечных машин: ООО «Кайзер Гарант», тел.: (495) 488-75-10, 488-76-10, Дмитровское шоссе, д.58
2. Санкт-Петербург
Подключение и ремонт электрических плит, встраиваемых духовок, поверхностей и вытяжек: Подключение и ремонт газовых плит, стиральных и посудомоечных машин, холодильников: ООО «ЭЛЕКТА», тел.: (812) 372-23-12, 372-23-13, 376-75-36 б-р Новаторов, д.11, лит. А, пом.17Н
-
Анапа: ИП Гладких Ю.И., тел.: (86133) 5-31-00, ул. Ленина, д.153, корп. 5
-
Архангельск: ИП «Сергушов А И. ул. Гагарина д.1 (8182) 27-60-66
-
Астрахань ЧП Кузнецов, тел.: (8512) 39-82-16, 36-83-37, ул. Яблочкова, 1-В ИП Савин, тел.: (8512) 38-28-67, 38-35-84, 25-12-32, ул. Сен-Симона, 42-46 ИП «Пушкин, тел.: (8512) 63-00-81, А.С.» ул. Епишина д.23
-
Барнаул: ООО «Рембыттехника», тел.: (3852) 77-23-23, 35-77-44, пр-т Калинина, д. 24а
-
Белгород: ООО «Выбор-Сервис», тел.: (4722) 36-92-90, 36-95-16, пр-т Гражданский, д. 32 ИП Кожевников, тел.: (4722) 55-97-87, ул. 5 Августа, д.36 к. 2
-
Бийск: ООО « Февраль», тел.: (3854) 33-52-16, 32-70-02, ул. Озерная, д.6-Б
-
Биробиджан: ООО «Сервис Центр», тел.: (42622) 23-2-21, 4-07-21, ул. Биршоссе 2км.-23а
-
Благовещенск: ООО «Олакс», тел.: (4162) 522-000. 524-000, 520-500, ул. Ленина, д.27
-
Братск: ИП Швецова, тел.: (3953) 45-98-96, ул. Пионерская, 23
-
Брянск: ООО «МТК-сервис», тел.: (4832) 75-69-00, 75-68-42, ул. Красноармейская, д.170
-
Великий Новгород: ЧП Смирнов, тел: (8162) 33-20-03, ул. Великая, д.22 ООО «Армос Сервис», тел.: (8162) 78-28-31, ул. Б. Санкт-Петербургская, д. 39 стр.11
-
Владивосток: Сервисный центр «ЧП Корнейчук», тел.: (4232) 43-61-33, 42-90-10, Народный проспект, 43/2 ООО «ВЛ Сервис», тел.: (4232) 45-94-70, 45-94-43, 49-93-97, ул. Гоголя, 4
-
Владимир: «Рост-сервис», тел.: (4922) 30-50-55, ул. Юбилейная, д.60 ООО «Мастер Сервис», тел.: (4922) 33-10-79, ул. Тракторная, д.8
-
Волгоград: ИП «Манахова Л.Р», тел.: (8442) 23-41-36, пр-кт Ленина д.58
-
Волгодонск: ИП Рягузов, тел.: 6-06-61, ул. Горького, 81-21 ИП «Ибрагимов М.А.» тел.: (8639) 25-29-29, ул. Карла Маркса д. 30
-
Волжский: ООО «Фирма Мир видео 1», тел.: (8443) 56-60-22, ул. Дружбы, 21
-
Воркута: МС «Сервис Центр», ул. Тиманская д. 8а
-
Воронеж: ООО «Технопрофсервис», тел.: (4732) 46-31-79, 56-74-61, ул. Проспект Труда, д. 91 «СП сервис», тел.: (4732) 39-29-45, 39-27-50, ул. Варейкиса, д.9, комн. 5 ИП Клецова, тел.: (4732) 26-31-14, 26-78-89, ул. Серафиновича, д. 32а
-
Глазов: ООО «Служба сервиса «Ваш дом», тел.: (34141) 4-07-37, ул. Калинина, д.6
-
Грозный: ООО «Техноплюс», тел.: (928) 735-30-53, пр.Кадырова, 179/14
-
Екатеринбург: ООО «Технопарк», тел.: (343) 212-52-77, ул. Радищева, 55 ООО «КАРДИНАЛ-ТЕХНОПЛЮС», тел.: (343) 245-73-06, 245-73-28, ул.Бебеля, 116
-
Иваново: ООО «Луч», тел.: (4932) 47-29-84, 47-23-23, 47-29-86, ул. Заводская, 13
-
Ижевск: Сервисный центр «Ваш дом», тел.: (3412) 94-86-86, ул. Кирова 172 ООО «Аргус-сервис», тел.: (3412) 30-79-79, 30-83-07, ул. М. Горького, д.76 ООО «Аргус-сервис», тел.: (3412) 30-79-79, 30-83-07, ул. Азина, 4 ЗАО «ДС», тел.: (3412) 431-662, ул. К. Маркса, 393 ООО «Гарант-Сервис», тел.: (3412) 22-63-36, 43-69-82, ул. К. Маркса, д.39
-
Иркутск: «Комту-Сервис», тел.: (3952) 54-68-54, 222-699, 222-732, ул. 4ая Советская 65 ООО «НПФ «ТИС», (3952) 51-36-93, 51-31-09, 33-38-59, 22-71-65, ул. Партизанская, 149 ИП Егорова, тел.: (3952) 79-91-50, 97-03-94, пер. Мопра, 1А
-
Йошкар-Ола: СЦ «Мидас», тел.: (8362) 41-77-43, 45-73-68, ул.Советская, 173
-
Калининград: ООО «РемТехСервис», тел.: (4012) 35-36-99, ул. Судостроительная, 75
-
Казань: ООО «АТремонтируем все», тел.: (843) 555-49-32,557-55-70, ул. Краснококшайская,д. 92
-
Калуга: ООО «Бинэс Сервис», тел.: (4842) 54-83-33, 54-82-22, ул. Суворова, д.25
-
Кемерово: ООО «Сибсервис», тел.: (3842) 36-12-22, ул. Дзержинского, 21-10 ООО «Альфа Сервис», тел.: (3842) 33-50-76, ул. Свободы д. 3
-
Киров: ООО «Вятка Сервис» тел.: (8332) 27-34-66, ул. Производственная, 24 ООО «ВГК-севис», тел.: (8332) 70-34-85, ул. Базовая, ООО «Квадрат Сервис», тел.: (8332) 513-555, ул. С.Халтурина д.12/1
-
Комсомольск на Амуре: ИП Касаткин, тел.: (4217) 27-55-88, 27-50-91, ул. Юбилейная, 10/3
-
Котлас: СЦ «Домотехника», тел.: (81837) 33-0-55, ул.Мира д. 99
-
Краснодар: ООО «ТОП ЧЭНП Лтд», тел.: (861) 259-55-73, 259-55-23, ул. Чапаева, д. 94 ИП Кузнецов С.В., тел.: (861) 271-36-11, ул. Горького, д.104
-
Красноярск: Сервисный центр «Близнецов», тел.: (3912) 27-67-20, 65-34-41, ул. Дудинская, д.12а
ООО «Единая Сервисная Компания», тел.: (391) 277-99-81, пр-кт имени Газеты Красноярский рабочий д. 160 стр.5
-
Курск: ЧП Сунцов, тел.: (4712) 52-13-40, 58-66-11, ул. Льва Толстого, д. 9
-
Липецк: ЗАО «СЦ» Фолиум», тел.: (4742) 31-20-42, 32-75-48, 33-15-35, Универсальный проезд 14 ООО «Том Сервис», тел.: (4742) 34-67-50, ул. Космонавтов, д. 10 ООО»Торговая сервисная Компания Быттехника», тел.: (4742) 28-10-65, ул. Семашко д.14
-
Лянтор: СЦ «Холод Сервис», тел.: (8-904) 48-92-094, ул. 7 мкр, стр. 69А
-
Магадан: ИП Самойлович, тел.: (4132) 605-844, ул. Парковая, 21
-
Махачкала: АСЦ «Техник ISE», тел.: (8722) 64-71-33, 64-28-95, пр-т Шамиля, д.20 ООО «Сервис Сити», тел.: (8722) 60-30-03, пр. Акушинского, д.1А
-
Майкоп: ЗАО з-д «Рембыттехника», тел.: (8772) 56-82-95, 53-06-39, 53-13-20, ул. Курганная, д. 328
-
Михайловск: ООО «Айова –Сервис», тел.: (6553) 5-93-79, ул. Коллективная, 1
-
Мурманск: ИП Саньков, тел.: (8152) 26-14-67, 8-815-226-14-67, 8-902-281-57-17, Северный проезд, д. 16-1 ИП «Корепанов А. Ю.», тел.: (81555) 66-10-6, ул. Зиновьева д.22а ИП «Порохов А. О.», тел.: (8152) 78-20-80, ул. Сафонова, д. 15а, офис 3
-
Набережные Челны: ООО «Элекам-Сервис Плюс», тел.: (8552) 59-78-84, Шишкинский б-р, д.8 (30/24)
-
Нальчик: ИП Мирзоева, тел.: (8662) 42-04-30, пр. Ленина, д.24
-
Нерюнгри: ПБОЮЛ Турчинский, тел.: (41147) 6-82-13, 6-89-71, ул. Чурапчинская, 18
-
Нижневартовск: ИП Шахматов, тел.: (3466) 64-22-63, 56-68-13, ул. Пионерская, д. 30, кор. А
-
Нижний Новгород: ИП «Корытина М.В.», тел.: (831) 416-31-41, 412-36-01, 412-00-29, 416-31-51, ул. Заярская, д. 18
-
Новороссийск: ООО «Мовик», тел.: (8617) 63-72-60, ул. Хворостянского, д.8
-
Новосибирск: ООО «Сибирский Сервис», тел.: (383) 292-47-12, 355-55-60, 357-19-95, ул. Котовского, 10/1
-
Новый Уренгой: ООО «Умная техника», тел.: (3494) 94-61-45, ул. 26-го съезда КПСС, д.10Б
-
Норильск: ИП Сергеенко, тел.: (3919) 48-10-43, ул. Комсомольская, д.48-22
-
Обнинск: ООО «Радиотехника», тел.: .(48439) 6-44-14, пл. Треугольная, д. 1
-
Омск: ООО «Бытовая техника», тел.: (3812) 57-95-40, 32-20-63, пр-т Космический, д.99/2 ООО «Бытсервис», тел.: (3812) 24-99-64, 48-38-03, ул.Чернышевского, д. 2, кор. 8
-
Орел: ООО «Металлоремонт», тел.: (4862) 41-17-97, ул. Игнатова, д.31
-
Оренбург: ООО «Ликос-Сервис плюс», тел: (3532) 57-24-91; 57-24-94; 57-26-68 ул. Невельская, 8А
-
Орск: ООО «Аста —Сервис» тел.: (3537) 25-98-03, 21-36-66, ул. Краматорская, д. 50
-
Пенза: ЗАО «Техсервис», тел.: (8412) 49-16-10, ул. Коммунистическая, д.28 ИП «Киреев А.В.», тел.: (412) 58-88-82, привокзальная площадь, ст. Пенза-1, д. 1 маг. «ЮСТ»
-
Петропавловск-Камчатский: ИП «Ермоленко Д.Н.», ул. Чубарова, 16, Здание гипермаркета Дружба
-
Пермь: ООО «Мария-М», тел.: (3422) 630-222, 631-116, ул. Тургенева, д.21, оф. 440
-
Петрозаводск: ЧП «Хоршунов», тел.: (8142) 70-23-42, ул. Мурманская, д.25Б
-
Псков: ООО «МиниМакс», тел.: (8112) 72-13-90, Рижский пр., д.49
-
Пятигорск: ИП «Соколов И.В.», тел.: (87933) 33-97-97, пр-т Калинина, 19 ИП «Чернявский Е.В.», тел.: (8793) 33-17-29, ул. 1-ая Набережная, д. 32 кор. 4
-
Радужный: ИП «Михайлов Н.Н.», тел.: (34668) 26-0-26, 5-й микрорайон, д.29
-
Ростов на Дону: ООО «Абрис Плюс», тел.: (863) 244-35-90, пр. Буденовский, 72А
-
Рязань: ИП Родионов, тел.: (4912) 24-60-12, 24-60-13, 24-60-14, ул. Новая, д.51Г
-
Самара: ООО «Фирма Сервис-Центр», тел.: (846) 263-75-75, 263-74-74, ул. Мичурина, д.15, офис 307
-
Саратов: ООО «Волга сервис», тел.: (8452) 52-37-52, ул. Московская, 134/146
-
Смоленск: СЦ «Гарант», тел.: (4812) 62-50-52, 64-78-00, 21-88-00, ул. Румянцева, д.19
-
Старый Оскол: ИП «Щуплов И.С», тел.: (4725) 22-05-41, 22-15-59, ул.Октябрьская, д. 5А
-
Сургут: Техцентр «ИнтерСервис», тел.: (3462) 25-25-63, 25-69-70, Комсомольский пр-т, д.44 ИП Полукаров, тел.: (3462) 66-70-79, 68-33-50, ул. Университетская, д.3-83 ИП «Лопатин А.А.», тел.: (3462) 25-79-35, ул. Югорская д. 20
-
Таганрог: ООО «Бест Сервис», тел.: (8634) 37-90-66, Смирновский д. 45
-
Тамбов: ООО ТТЦ «Атлант-Сервис», тел.: (4752) 72-63-46, 72-75-85, 71-91-19, ул. Московская, д. 23А
-
Тверь: ООО «Стеко-сервис», тел.: (4822) 32-00-23, пр-т Чайковского, д.100
-
Тольятти: ООО «Элро Сервис», тел.: (8482) 77-32-55; 63-63-59, Московский пр-т, 8 «Г»
-
Томск: ООО «Академия Сервис», тел.: (3822) 49-15-80, 49-28-08, пр. Академический 2, блок А ООО «ГлавбытСервис», тел.: (3822) 26-64-62, 44-03-07, ул. Некрасова, д.12 ООО «Сибирский Сервис», тел.: (3822) 42-29-80, 41-44-24, ул. Елизаровых, д.17 СЦ Технолюкс-сервис, тел.: (3822) 72-75-78, пр. Мира, 76
-
Тула: ООО «Дуэт Сервис», тел.: (4872) 56-17-37,55-60-96, Красноармейский пр-кт, д. 26
-
Тюмень: ООО «Аверс-Сервис», тел.: (3452) 39-12-18, 39-12-29, ул. Мельникайте, д.131 "А" ООО «Евросервис», тел.: (3452) 97-82-52, ул. М. Горького, 23А
-
Улан-Удэ: ИП Голева, тел.: (3012) 41-50-43, 41-50-45, 23-01-09, ул. Геологическая, 17
-
Ульяновск: ООО «Мастер-Сервис», тел.: (8422) 32-07-33, ул. Минаева, д. 42 ИП Липкин, тел.: (8422) 48-33-33, 48-46-90, Московское шоссе, 85
-
Уссурийск: Сервисный центр «ПОЛУКС», тел.: (4234) 32-10-35, 33-92-59, ул. Советская, д.29
-
Уфа: ИП «Шерышев Г.А.», тел.: (347) 274-13-69, ул.Новосибирская д.2а
-
Ухта: ООО «АВВА», тел.: (82147) 4-18-88, ул. Семяшкина, д. 8А
-
Хабаровск: ООО «Контур-сервис», тел.: (4212) 70-10-00, 75-21-37, ул. Ким-Ю-Чена – 43
-
Чебоксары: ООО «Центр Обслуживания Сложной Техники», тел.: (8352) 42-09-00, ул. Пирогова, д.20
-
Челябинск: ООО ТТЦ «Рембыттехника», тел.: (351) 749-20-20, 749-20-70, ул. Артиллерийская, 102
-
Череповец: ИП Волков, тел.: (202) 28-86-46, 28-10-03, ул. Командарма Белова, д.29, оф.2
-
Чита: ООО «Славел Сервис», тел.: (3022) 41-51-02, ул. Шилова, д. 100
-
Южно-Сахалинск: ООО «Контур-сервис», тел.: (4242) 43-40-73, 74-34-39, 74-37-43, ул. Пограничная 60
ИП «Савенко О.Н.», тел.: (4242) 42-99-54, 42-98-32, Коммунистический пр-кт, д. 21 ИП «Шубин», тел.: (4242) 27-41-49, 55-33-98, ул. Есенина, д. 5
- Якутск: АСЦ Быт – Сервис, тел.: (4112) 43-99-66, 31-05-67, ул. С. Халтурина, 45
- Ярославль: ЗАО «Фирма ТАУ», тел.: (4852) 266-537, Московский пр-то, д. 1А, стр. 5
Адреса и телефоны авторизированных сервисных центров, обеспечивающих гарантийное и послегарантийное обслуживание техники «Kaiser» в Украине:
-
Бердянск: ООО фирма «Дека» тел.: (06153) 385-14, 220-06, 4-32-31, ул. Энгельса, 42
-
Белая Церковь: СЦ «Еликон», тел.: (0446) (0456) 38-29-00, (068) 35-02-957 ул. Пятидесятилетие Победы 52 ООО «Дойчэлектросервис», тел.: (0446) (0456) 36-46-11, 33-32-95, б-р. 50-лет Победы, 137
-
Бердичев: СЦ «Евросервис», тел.: (04143) 4-06-36, ул. Ленина, 57
-
Винница: СЦ «Специалист», тел.: (0432) 57-91-91, 50-91-91, ул. Порика, 1
-
Горловка: СЦ «Техногарант», тел.: (0624) 52-77-77, 050 87-000-77 ул. П. Беспощадного, 26 СЦ «Эксперт- Сервис», (0624) 55-32-93, 050 347-44-01, ул. Гагарина, 53/1а
-
Днепропетровск: СЦ «Норд-Сервис», тел.: (056) 372-32-74, (095) 295-91-55 ул. Путиловская, 16 СЦ ООО «Дойчэлектросервис», тел: (056) 785-40-02, 778-56-63, ул. Короленко, 17 СЦ АСЦ «Яременко С.П.», тел.: (056) 796-95-65, (0562) 27-07-66, пр. Правды, 70-Б
-
Донецк: СЦ «Эксперт-сервис», тел.: (062) 345-61-90, 345-67-20, пр. Ильича, 103 СЦ «СПД Гордейчук», тел.: (062) 345-41-24, 345-35-16, пр. Ильича, 44 пр. Дзержинского, 4 СЦ «Тенносервис+» тел.: (062) 337-69-84, (062) 344-03-05, (062) 349-24-75, (062) 208-33-35, ф. (062) 345-06-07, пр-т. Павших Коммунаров, 188 СЦ «Норд-Сервис», тел.: (0622) 63-44-58, 66-70-96, ул. Кирова, 47 СЦ «Эксперт-Сервис», (062) 345-61-90, 345-67-20, ул. Складская, 5
-
Житомир: СЦ «Евросервис» тел.: (0412) 47-07-42, (093) 461-95-96, ул. Домбровского, 24 СЦ «Евросервис» тел.: (0412) 44-64-92, ул. Киевская, 37
-
Запорожье: СЦ «Альфа центр», тел.: (0612) 212-03-03, 212-06-08, ул. Дзержинского, 83 СЦ «Норд-Сервис», тел.: (0612) 59-05-38, ул. Товарищеская, 37а
-
Ивано-Франковск: «Бриз», тел.: (0342) 750-777, 55-95-25, 50-38-95, ул. Новая, 19А СПД Колодий тел.: (03422) 6-87-86, 6-15-82, (0342) 78-30-00, ул. Мира, 90
-
Керчь: СЦ «ФОКСКРЫМСЕРВИС», тел.: (06561) 2-30-62, ул. Советская, 15
-
Киев: СЦ «Амати-Сервис», тел.: (044) 396-50-01 369-50-01, ф. 369-5030, ул. Бориспольская, 9, корпус 57 ООО «Дойчэлектросервис», тел.: (044) 497-29-36, 497-34-55, 497-36-19, 408-66-60, 592-84-12, факс 497-36-03, бул. Лепсе, 55 ООО «ДТС» тел.: (044) 542-93-65, 542-79-40, ул. Кибальчича, 2-А
-
Кировоград: СЦ «Норд-Сервис», тел.: (0522) 37-87-00, пр. Коммунистический, 22/12
-
Краматорск: СЦ «Норд-Сервис», тел.: (06264) 5-92-71, 8-90-49, ул. Юбилейная, 70 СЦ «Эксперт-Сервис», тел.: (06264) 7-21-01, ул. 19 Партсъезда, 54 СЦ «Эльма-Сервис», тел.: (06264) 5-93-89, 5-90-07 бул. Краматорский, 3
-
Коростень: СЦ «Евросервис», тел.: (063) 875-69-39, 096 504-16-46 ул. Октябрьская, 68
-
Кременная: СЦ «ПРЕМЬЕР», тел.: (06454) 2-26-28 пл. Красная, 1
-
Кременчуг: СЦ «Атлант», тел.: (05366) 2-40-33, ул. Цюрюпы, 35
-
Кузнецовск: СЦ «Ребют», тел.: (03636) 3-94-06, ул. Победы, 19
-
Лисичанск: СЦ «ПРЕМЬЕР», тел.: (06451) 7-06-15, ул. Свердлова, 275
-
Луганск: СЦ «МИРТЕКС», тел.: (0642) 64-22-486 71-73-05 ул. Норинского, 1 16-я Линия, 7 СЦ «Восточный», тел.: (0642) 33-02-42, 33-11-86, ул. Ломоносова, 96-ж СЦ «Норд-Сервис», тел.: (0642) 33-13-28, (050) 686-95-40, ул. Переясловская,1
-
Луцк: СЦ «Сервис-Мастер», тел.: (0332) 78-56-25, пр-кт Перемоги, 24
-
Львов: СП «Трансбудсервис» тел.: (0322) 97-55-88, 39-92-75 факс: (0322) 97-55-57, ул. Винниченко, 30 СЦ «Миллениум», тел.: (032) 267-07-10, 267-63-26, ул. Курмановича 9 А
-
Макеевка: СЦ «Эксперт-Сервис», тел.: (06232) 6-53-72, (0623) 28-52-16, ул. Московская, 60
-
Мариуполь: СЦ «Эксперт-Сервис», тел.: (0629) 41-60-61, ул. Строителей, 132 СЦ «Норд-Сервис», тел.: (0629) 34-22-26, 34-22-76, ул. Фонтанная, 28
-
Марковка: СЦ «МИР ЭЛЕКТРОНИКИ», тел.: (06464) 9-14-27, 9-14-73, ул. Ленина, 31А
-
Николаев: ЧП «Дадашев А. О.», тел.: (0512) 25-23-35, 59-24-05, ул. Металлургов, 8
-
Новоград-Волынский: СЦ «Master», тел.: (04141) 5-20-10, ул. Вокзальная, 38
-
Одесса: СП «Трансервис», тел.: (048) 777-11-40, 784-56-26, ул. Новосельского 64 СЦ «Медтерм», тел.: (048) 751-06-84, 712-05-17, ул. Школьная, 25 (ЖМ Котовского)
-
Павлоград: СЦ «Пинфок», тел.: (05632) 311-93, ул. Ленинградская, ЗА
-
Первомайск: СЦ «Технолюкс», тел.: (05161) 5-23-63, ул. Грушевского, 19-А
-
Полтава: НПО «Промелектроника», тел.: (0532) 57-21-68, 57-21-66, 57-21-64, ул. Пролетарская, 22 ЧП «Ключан А.Г.», тел.: (0532) 58-20-95, (095) 466-63-25, ул. Щепотьева, 14
-
Прилуки: СЦ «Костюченко», тел.: (04637) 3-85-95, 3-17-67, 8 067 27-25-751, ул. Борцов революции, 83 СЦ «Амати-Сервис», тел.: (04637) 5-39-82, 093 753-38-28, 050 355-15-68, ул. Киевская, 371а
-
Ровно: СЦ «Фаворит-Сервис», тел.: (0362) 60-95-90, 60-95-92, 43-64-51, 43-64-52 ул. Фабричная, 20 (во дворе)
-
Рубежное: СЦ ПРЕМЬЕР, тел.: (06453) 5-03-43, ул. Менделеева, 61
-
Свердловск: СЦ БРТ, тел.: (06434) 2-25-37, 2-60-25, ул. Дзержинского, 1
-
Севастополь: «Диадема», тел.: (0692) 555-643, ул. Пожарова, 26 -Б
-
Северодонецк: СЦ «СРТ», тел.: (06452) 422-41, 4-30-30, 70-28-16, 4-00-60, ул. Маяковского, 13
-
Симферополь: ООО «Ассоциация Таир» тел.: (0652) 44-59-01, 44-59-61, ул. Замская, 43-А
СЦ «Гарант», тел.: (0652) 56-04-46, 56-04-49, ул. Ларионова, 38-А
СЦ «Норд-Сервис», тел.: (0652) 44-37-61, ул. Севастопольская, 41/4
СЦ «ФОКСКРЫМСЕРВИС», тел.: (0652) 52-05-65, 52-05-95, ул. Балаклавская, 68
-
Смела: СЦ «ТАСМ ЛТД», тел.: (04733) 4-60-96, ул. Свердлова, 75
-
Старобельск: СЦ ПРЕМЬЕР, тел.: (06461) 2-46-58, ул. Коммунаров, 34
-
Сумы: СЦ «Сигма-Сервис», тел.: (0542) 36-50-58, 21-06-81, ул. Прокофьева, 19 СЦ «Техносервис», тел.: (0542) 78-81-56, 61-99-94, (050) 307-10-52 ул. Кирова, 8
-
Троицкое: СЦ ПРЕМЬЕР, тел.: (06456) 2-17-82, пр-т. Победы, 54/2
-
Тернополь: СЦ «Норд-Сервис», тел.: (0352) 24-61-05, ул. Дорошенко, 8
-
Ужгород: ЧП «Практика», тел.: (0312) 65-55-55, (050) 540-58-05, ул. Легоцкого, 3 СЦ «Норд-Сервис», тел.: (03122) 3-55-59, (095) 295-91-31, ул. Лаврищева, 41 СЦ «Миллениум», тел.: (031) 266-12-97, ул. Гагарина 101
-
Умань: СЦ «СПД Штангей А.Н.», тел.: (04744) 5-22-00, ул. Советская, 28
-
Феодосия: СЦ «ФОКСКРЫМСЕРВИС», тел.: (06562) 3-12-84, ул. Базарная, 4
-
Харьков: СП «Трансервис», тел.: (057) 714-24-72, 758-85-63, ул. Иванова, 24 СЦ «Каскад-Сервис», тел.: (057) 712-51-81, 734-97-24, ул. Полтавский шлях, 3 «НЕО» тел.: (057) 763-09-12, 763-02-89. Коцарская, 43 СЦ «Осьмачко», тел.: (057) 758-10-39, 758-10-40, ул. Вернадского, 2 СЦ «ДИСА-СЕРВИС», тел.: (057) 343-87-39, (099) 777-89-74, пер. 23 Августа, 1
-
Херсон: СЦ «Норд-Сервис», тел.: (0552) 35-35-50, ул.40 лет Октября, 179
-
Хмельницкий: ООО «Тритон», тел.: (0382) 78-37-73, 78-37-55, ул. Курчатова, 18
-
Чернигов: СЦ «Вена-Сервис», тел.: (0462) 60-15-85, 65-30-61, ул. Проектная, 1 СЦ «Норд-Сервис», тел.: (0462) 67-40-20, 97-12-83, ул. Музыкальная 1 СЦ «Спутай В.А.», тел.: (068) 387-25-07, (063) 058-50-80, ул. Авиаторов, 19
-
Черкассы: СЦ «Офисная техника», тел.: (0472) 38-52-11, ул. 30 лет Победы, 15/1 СЦ «Норд-Сервис», тел.: (0472) 45-81-49, ул. Ильина, 55
-
Черновцы: СЦ «Блошко», тел.: (0372) 90-13-11, 55-48-69, (050) 434-55-29 (094) 991-33-11, ул. Л. Кобылицы, 105
-
Шостка: СЦ «Чуприн», тел.: (05449) 2-12-51, (050) 689-27-00, ул. Шевченко, 59
The manufacturer declines all responsibility for possible inaccuracies contained in this pamphlet, due to printing or copying errors. We reserve the right to make on our own products those changes to be considered necessary or useful, without jeopardizing the essential characteristics.
Die Herstellerfirma übernimmt keinerlei Verantwortung für eventuell in dieser Broschüre enthaltene Ungenauigkeiten, die auf Druckfehler zurückzuführen sind und behält sich das Recht vor an ihren Produkten alle für notwendig erachten Änderungen anzubringen, ohne die wesentlichen Eigenschaften zu Beeinflussen.
Фирма изготовитель не несет никакой ответственности за возможно содержащиеся в этой брошюре неточности, которые могут быть следствием опечаток типографии, и сохраняет за собой право вносить в дизайн и устройство своей продукции все необходимые изменения, которые не оказывают существенного влияния на потребительские качества и свойства продукта.
OLAN-Haushaltsgeräte, Berlin Germany
www.kaiser-olan.de