
E-65 - Orgel KAWAI - Gratis brugsanvisning og manual
Find enhedens vejledning gratis E-65 KAWAI i PDF-format.

Brugerspørgsmål om E-65 KAWAI
0 spørgsmål om dette apparat. Besvar dem du kender, eller stil dit eget.
Stil et nyt spørgsmål om dette apparat
Download vejledningen til din Orgel i PDF-format gratis! Find din vejledning E-65 - KAWAI og tag din elektroniske enhed tilbage i hånden. På denne side er alle dokumenter nødvendige for brugen af din enhed offentliggjort. E-65 af mærket KAWAI.
BRUGSANVISNING E-65 KAWAI
Organ
Playing the
Kawai Way
Kawai Electronic Organ
OWNER'S MANUAL
MODEL € 65

natural_image
Silhouette illustration of three figures in a traditional setting, no text or symbols presentKAWAI ORGANS

Published exclusively for Kawal Organs
Hal Leonard Publishing Corporation
Milwaukee, Wisc. 53213

bar
| Year | Value | |---|---| | 2018 | 1.5 | | 2019 | 3.0 | | 2020 | 1.5 | | 2021 | 3.0 | | 2022 | 1.5 | | 2023 | 3.0 | | 2024 | 1.5 | | 2025 | 3.0 | | 2026 | 1.5 | | 2027 | 3.0 | | 2028 | 1.5 | | 2029 | 3.0 | | 2030 | 1.5 | | 2031 | 3.0 | | 2032 | 1.5 | | 2033 | 3.0 | | 2034 | 1.5 | | 2035 | 3.0 | | 2036 | 1.5 | | 2037 | 3.0 | | 2038 | 1.5 | | 2039 | 3.0 | | 2040 | 1.5 | | 2041 | 3.0 | | 2042 | 1.5 | | 2043 | 3.0 | | 2044 | 1.5 | | 2045 | 3.0 | | 2046 | 1.5 | | 2047 | 3.0 | | 2048 | 1.5 | | 2049 | 3.0 | | 2050 | 1.5 | | 2051 | 3.0 | | 2052 | 1.5 | | 2053 | 3.0 | | 2054 | 1.5 | | 2055 | 3.0 | | 2056 | 1.5 | | 2057 | 3.0 | | 2058 | 1.5 | | 2059 | 3.0 | | 2060 | 1.5 | | 2061 | 3.0 | | 2062 | 1.5 | | 2063 | 3.0 | | 2064 | 1.5 | | 2065 | 3.0 | | 2066 | 1.5 | | 2067 | 3.0 | | 2068 | 1.5 | | 2069 | 3.0 | | 2070 | 1.5 | | 2071 | 3.0 | | 2072 | 1.5 | | 2073 | 3.0 | | 2074 | 1.5 | | 2075 | 3.0 | | 2076 | 1.5 | | 2077 | 3.0 | | 2078 | 1.5 | | 2079 | 3.0 | | 2080 | 1.5 | | 2081 | 3.0 | | 2082 | 1.5 | | 2083 | 3.0 | | 2084 | 1.5 | | 2085 | 3.0 | | 2086 | 1.5 | | 2087 | 3.0 | | 2088 | 1.5 | | 2089 | 3.0 | | 2090 | 1.5 | | 2091 | 3.0 | | 2092 | 1.5 | | 2093 | 3.0 | | 2094 | 1.5 | | 2095 | 3.0 | | 2096 | 1.5 | | 2097 | 3.0 | | 2098 | 1.5 | | 2099 | 3.0 | | 2100 | 1.5 | | Note: The data provided in the code is a random sample and may not match the actual data generated by the code using the given code format in the code editor's palette and palette.Congratulations
on the purchase of your new KAWAI ORGAN. This magnificent instrument will furnish you and your family with years of musical pleasure and trouble-free service. Your new KAWAI ORGAN not only offers you quality construction and organ tone of unsurpassed beauty, but it features completely up-to-date electronic techniques to provide you with one of the most dependable instruments in the world.
Table of Contents
Learn to Play The Kawai Way 2
A Brief Look at the Past and Present 2
How to Care for your Kawai Organ 2
The Keyboards and Pedals 4
Expression Pedal 4
Stop Tabs 4
The Families of Tone 4
Footage 4
Mechanical Controls....5
Upper Percussion Voices 5
Independent Speaking Voices 5
The Kawai Autorhythm 6
Additional Kawai Features....7
The Kawai One-Finger Electro-Chord 7
Registrations 8
Theme from Borodin's Polovetzian Dance 9
Holy, Holy, Holy 9
Liebestraum....10
Oh Marie 11
When the Saints Go Marching In....11
Carnival of Venice 12
The Cassette Recorder 13
© Copyright 1975 by HAL LEONARD PUBLISHING CORPORATION Made in U.S.A./International Copyright Secured/All Rights Reserved
Learn to Play The Kawai Way
Your KAWAI owner's manual will acquaint you with all the fascinating features of your new organ. How to use them is colorfully and clearly explained in KAWAI'S exclusive and extraordinary new organ approach ...THE KAWAI WAY. This remarkable three-part course is included with your organ purchase.
Part 1, designed as your introduction to organ playing, will get you involved immediately in the basics, while you enjoy the thrill of playing your favorite songs. Each new element of musical information is presented with a new song arrangement, a collection of twenty songs from ever-popular favorites and recent hits.
Part 2 of the KAWAI WAY presents more advanced materials that will help you add many more professional touches to your KAWAI ORGAN playing. All Part 2 instructions are carefully coordinated to a fabulous collection of 60 popular song arrangements, in standard sheet music form.
Part 3 consists of twenty more great songs which are coordinated to the special effects and rhythm guide, a section that shows you how to create and easily perform the incredible range of organ effects and special rhythms that are possible on your new KAWAI. You'll thrill your family and friends as you treat them to danceable selections with a Latin, Go-go, or Rock beat.
It's so much fun, it's hard to treat the KAWAI WAY as an organ course. But enjoy all the benefits while you gain a truly sound musical education. The KAWAI WAY will get every member of the family involved in organ playing, whether they try it on their own or with the support of a private or classroom organ teacher. The techniques, fresh graphics, and exciting popular music truly represent a unique breakthrough in learning.
Learn to play...the KAWAI WAY.
A Brief Look at the Past and Present
The first pipe organs were invented over two thousand years ago. Most organs of today have two keyboards but until around 400 years ago all organs had only one manual. As the organ grew in versatility, it also grew in size, weight and cost. As a matter of fact, by the end of the 19th century some organs had as many as six or seven keyboards. For a long period of time only the extremely wealthy could afford the cost and provide the necessary space for a fine organ.
Thanks to modern science, the problems of cost, weight, and space have been eliminated. Your new KAWAI is a completely transistorized and integrated solid-state instrument that makes use of the most advanced technological features of space age circuitry.
How to Care for your Kawai Organ
Here are some general rules to follow:
1) Always plug your KAWAI into a standard Volt AC line. Plugging into a DC outlet could cause damage.
2) To remove any greasiness from the cabinetry, keys, or pedals, use a damp cloth and a little mild soap. Be sure to wipe dry with a soft cloth.
3) When using wax from spray-on containers, be sure to spray the dust cloth. Wax which is sprayed directly on the keys or tabs could eventually cause sluggish action.
4) Do not expose your KAWAI to direct sunlight, cold drafts or radiator heat.

The Keyboards and Pedals
Your KAWAI ORGAN has two keyboards (which are also called manuals) each consisting of 37 keys. Generally, you'll play the melody of a song with your right hand on upper manual, and the accompaniment or background part with your left hand on the lower manual. In addition, your left foot is used to play the 13 pedals (pedalboard) which are located at the base of your organ. These pedals add the beautiful deep tones that will give your playing a lush professional fullness. The pedal's role in organ music is similar to that of a bass violin in an orchestra.
Expression Pedal
On your KAWAI the volume is controlled by the Expression Pedal. This pedal is found next to the pedalboard and is controlled with the right foot. Pressing the Expression Pedal forward with your toe will increase the volume. Pressing the Expression Pedal back with your heel will decrease the volume.
Stop Tabs
The "stops" or "stop tabs" on your KAWAI can be divided into two general groups: the "voice" or "speaking" tabs that produce the actual organ voices; and the "mechanical" or "non-speaking" tabs that produce no sound of their own but directly affect the sound of the speaking stops.
Hundreds of different effects are possible by a careful selection of voice and mechanical tabs. The art of utilizing these stops to obtain certain sounds and effects is called registration.
The Families of Tone
All traditional organ voices can be grouped into basic families of tone. On your KAWAI model you'll find three families: Flute, String and Reed. The tabs on your KAWAI have been color coded to help you to find these families of tone easily. For example, the white tabs represent the Flute tones, the red tabs indicate the Reeds, and the yellow tabs identify the Strings.
The Flute voices have a very mellow tone which is smooth and easy to listen to. The Reed family has great variety of sound. Some reeds have a very biting sharp sound while others are extremely mellow and rich. The Reeds are generally very good as solo voices.
The Strings add all the beautiful, lush, vibrant, qualities to your KAWAI that a string section adds to an orchestra.
Footage
By now you've probably noticed that there's a number after the name of each tab. Don't be confused by the markings 16, 8. These merely indicate the length of the pipe necessary to create that sound on a pipe organ. For example, a tab marked Flute 8 simply means that a pipe 8 feet long would be necessary to produce that particular sound on a pipe organ.
To demonstrate the tonal range and richness of sound available on your KAWAI, let's try the following experiment. First, play middle C using only the Flute 8. Listen carefully to the sound, and then turn off the Flute 8 and substitute the Flute 16. Notice that the sound becomes an entire octave lower.
After playing each of the Flutes alone, press them both at once. Each time you press a single key on the keyboard, you'll be producing two tones each an octave apart. Play four notes together and you'll actually be hearing eight tones.
Many solo voices, particularly those in the Reed and String families, have just one footage because the range of pitch plays a most important role. These tabs are principally used to create special effects and to augment the total sound of your KAWAI.
Mechanical Controls
(NON-SPEAKING CONTROLS)
The following is a list of mechanical or non-speaking controls which are found on your KAWAI ORGAN. These controls produce no sound of their own but affect the tone of the speaking voice tabs. The purpose, or effect of each stop is listed along with suggestions for its use.
PEDAL VOLUME
When using dainty and light solo registrations, it is often necessary to cut down the volume of the heavy pedal tones. Conversely, ensemble registrations require the use of a deep and full pedal sound. This feature allows you to select the proper amount of pedal volume for each type of set-up.
PEDAL SUSTAIN
This tab causes the sound of the pedals to linger and then gradually fade away. Useful in practically all types of music, it sustains each pedal tone about one second and makes your playing sound smoother.
REVERB
Reverberation, often called "echo", is the sound that reaches your ear after bouncing off the floor, ceiling and walls. If you've ever walked in a large empty room, you've heard the reverberation of your footsteps. However, in most furnished rooms most of the natural reverberation is soaked up. Because a certain amount of reverb is desirable in music, your KAWAI has an electronic unit which replaces the reverb lost in a furnished room. The degree of its use is a matter of individual preference.
VIBRATO
The Vibrato adds a wavering or pulsating effect to music which closely resembles the sound of the human voice and the orchestral string section. This is done electronically by varying the pitch of a tone up and down. With this feature, it's possible for you to almost completely change the character of an individual voice or ensemble registration.
Generally, when the Vibrato is activated, it is used throughout an entire song. However, by turning the Vibrato tab on and off during a song, you can create unusual and interesting variations in your playing.
MANUAL BALANCE CONTROLS
These controls are used to prevent the sound of one manual from overpowering the other. The LOWER MANUAL VOLUME controls the volume of the lower keyboard. Turn the dial control to the right, and you'll hear more volume on the lower manual; turn the dial to the left, and you'll hear less volume on the lower manual. Under normal playing conditions, the upper keyboard should be a little louder than the lower keyboard.
The TOTAL VOLUME dial controls the maximum volume for the entire organ (both keyboard and pedals).
Upper Percussion Voice
MANDOLIN
The Mandolin is an upper manual solo percussion voice. When you push this tab, the notes you play on the upper manual will repeat. This stop has a moderately rapid "decay" which perfectly imitates the delicate picking sound of the Mandolin.
Independent Speaking Voices
FLUTE 16
The tone color is the same as the Flute 8. However, this stop is one octave lower than the 8 pitch.
FLUTE 8
The Flute 8 is a popular, clear-toned solo voice which is relatively free of harmonics.
OBOE 8
This is an excellent solo voice. closely resembling the plantive voice of the orchestral oboe.
VIOLIN 8
The Violin 8 is basically a solo voice but it may be used in combinations to create beautiful ensemble sounds. It is particularly effective when used to contrast various flute combinations.
VIOLA 8
The Viola 8 is a basic solo voice which is extremely effective when used to contrast the various flute combinations.
The Kawai Autorhythm

FLASHING RED LIGHT
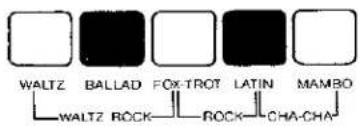

The KAWAI AUTORHYTHM is an exciting rhythm device which will provide authentic percussion instrument backgrounds to your playing. All you do is push the tab marked RHYTHMER. This tab is located to the left of the lower manual. Then push one of the rhythm buttons (marked WALTZ, BALLAD, FOX-TROT, LATIN or MAMBO), and you'll have a complete percussion section for any song you choose.
There are 3 controls which play an integral part in the operation of Autorhythm.
RHYTHMER VOLUME — This knob controls the volume of the rhythm section.
TEMPO — This knob is used to control the speed of the rhythm section. Find a tempo which is appropriate for the song and is comfortable for you.
FLASHING RED LIGHT — The flashing red light shows the downbeat or first beat of each rhythm pattern. To play a song, simply watch the light and start to play when it flashes.
Additional rhythms can be formed by pushing two rhythm buttons at the same time. When you push the buttons marked WALTZ and FOX-TROT, you'll get a WALTZ-ROCK rhythm; push the buttons marked FOX-TROT and LATIN and you'll get a ROCK rhythm; push the buttons marked LATIN and MAMBO and you'll get a CHA-CHA rhythm.
TO STOP THE AUTORHYTHM UNIT:
- Push the tab marked RHYTHMER to the OFF position ... or
- Use the switch located on the left side of the expression pedal. To use this foot switch, merely swing your foot to the left. This will automatically disengage the AUTORHYTHM unit.
Additional Kawai Features
HEADPHONE JACK
The HEADPHONE JACK is located under the right side of the lower keyboard. While other members of your family are watching television, reading, engaging in conversation, or sleeping, you'll be able to plug in a headphone set and play in complete privacy. The only one who'll hear you is you.
AC CONVENIENCE OUTLET
An AC CONVENIENCE OUTLET (maximum wattage 300) has been provided on the back of the KAWAI ORGAN. If you're using a cassette tape recorder or a music rack lamp, you may plug it into this outlet. The convenience outlet can be used even though the organ is turned off.
EXTERNAL SPEAKER OUTPUT
The EXTERNAL SPEAKER OUTPUT is located next to the AC convenience outlet. If you're planning to use any external speaker (including a Leslie speaker) with your KAWAI, please check with your KAWAI dealer before connecting your speaker to the organ.
The Kawai One-Finger Electro-Chord

With the fantastic KAWAI ONE-FINGER ELECTRO-CHORD you can create truly professional sounding rhythm patterns by just holding down one finger on your lower manual. Here's how it works:
- Press the tabs marked ELECTRO-CHORD and RHYTHMER to the ON position. These tabs are located to the left of the lower manual.
- Then when you press one of the rhythm buttons and play a ONE-FINGER CHORD, the chord, the proper pedals and the percussion section will play automatically in whatever rhythm you've selected until you play another one-finger chord.
The following diagram shows you the arrangement of one-finger chords on the lower manual of your organ.
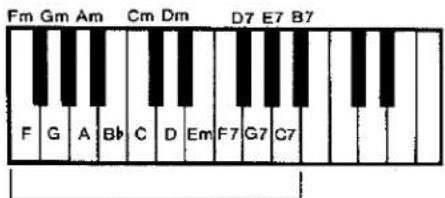
ONE-FINGER CHORD SECTION
© — 1973 — KAWAI PIANO (AMERICA) CORPORATION
Registrations
Organ REGISTRATION is the art of selecting the tabs which best produce a desired effect. The following Registration Chart shows 16 of the most common settings used by organists. After you're familiar with these settings, experiment on your own. You'll find an endless combination of registrations that can add a fantastic amount of variety to any song you play.
| Registrations | Upper: | Lower: | Pedal: | Misc: |
| 1. FLUTE ENSEMBLE | Flute 16, 8 | Flute 8 | Pedal Sustain On | Reverb |
| 2. THEATRE ORGAN | Flute 16 Violin 8 | Flute 8 | Pedal Sustain On | Vibrato |
| 3. FULL ORGAN | Flute 16, 8 Violin 8 Oboe 8 | Flute 8 Viola 8 | Pedal Sustain On | |
| 4. FULL ORGAN | Flute 16, 8 Violin 8 | Flute 8 Viola 8 | Pedal Sustain On | Vibrato |
| 5. FULL ORGAN | Flute 16, 8 Oboe 8 | Flute 8 Viola 8 | Pedal Sustain On | Vibrato |
| 6. CHURCH ORGAN | Flute 8 Oboe 8 | Viola 8 | Pedal Sustain Off | Vibrato |
| 7. CLASSICAL ORGAN | Flute 8 Violin 8 | Viola 8 | Pedal Sustain Off | Vibrato |
| 8. MANDOLIN | Mandolin | Flute 8 | Pedal Sustain On | |
| 9. CHURCH ORGAN | Oboe 8 Violin 8 | Flute 8 | Pedal Sustain On | Reverb |
| 10. STRINGENSEMBLE | Violin 8 | Viola 8 | Pedal Sustain On | Vibrato |
| 11. BALLAD | Flute 16 Violin 8 | Flute 8 | Pedal Sustain On | Vibrato |
| 12. FLUTE SOLO | Flute 8 | Flute 8 | Pedal Sustain On | Vibrato Reverb |
| 13. VIOLIN SOLO | Violin 8 | Viola 8 | Bass Sustain Off | Reverb |
| 14. OBOE SOLO | Oboe 8 | Flute 8 Viola 8 | Bass Sustain On | Vibrato Reverb |
| 15. ACCORDION | Flute 16 Oboe 8 | Flute 8 Viola 8 | Pedal Sustain On | |
| 16. BALLAD | Flute 8 Oboe 8 Violin 8 | Flute 8 Viola 8 | Pedal Sustain On | Vibrato |
The following songs demonstrate some of the registrations that you can create on your KAWAI ORGAN. Before you play each song, set up the tabs that are indicated at the beginning of each song.
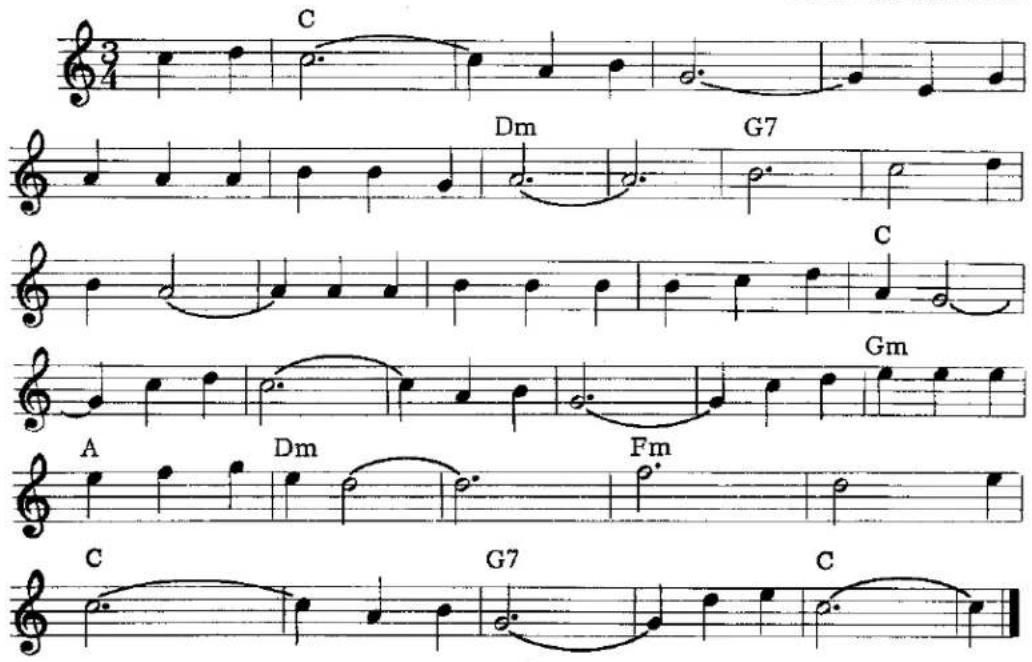
Theme from Borodin's Polovetzian Dance

Holy. Holy. Holy
CHURCH ORGAN
Upper: Flute 8
Oboe 8
Lower: Viola 8
Pedal: Pedal Sustain Off
Misc: Vibrato

Liebestraum
RHYTHM: WALTZ
STRING ENSEMBLE
Upper: Violin 8
Lower: Viola 8
Pedal: Pedal Sustain On
Misc: Vibrato


Oh Marie
RHYTHM: WALTZ
MANDOLIN
Upper: Mandolin
Lower: Flute 8
Pedal: Pedal Sustain On
When the Saints Go Marching In
FLUTE ENSEMBLE
Upper: Flute 16, 8,
Lower: Flute 8
Pedal: Pedal Sustain On
Misc: Reverb
RHYTHM: FOX-TROT

Carnival of Venice

The Cassette Recorder
If your KAWAI is equipped with a CASSETTE RECORDER, it will soon become an integral part of your musical enjoyment. The following instructions will acquaint you with its operation.
TO PLAY
To play a tape, simply snap the cassette tape into the tape machine and push the button marked ▶.
TO RECORD
To record, push and hold the red button (marked RECORD) and at the same time push the Play button (marked ▶). With these two buttons pushed in, you are now ready to record your playing. No microphone is necessary.
TO STOP
Whether you're in the process of recording, playing or rewinding a tape, whenever you want the tape stopped, push the stop button (marked—). Your cassette has a special clutch which prevents the tape from unwinding when you've reached the end of a cassette. However, it is still advisable to push the Stop button at that point to prevent excessive stress on the recorder that could cause trouble after an extended period of time.
TO REWIND
To rewind the cassette, press the button marked←. When it's been rewound to the place where the recording was started, or to where you'd like the tape stopped, push the Stop button (marked =).
FAST FORWARD
When you press the Fast Forward button (marked▶), the cassette machine will speed up and the tape will quickly advance forward.
NOTE: THIS BUTTON DOES NOT LOCK INTO PLACE BUT MUST BE HELD. WHEN THE BUTTON IS RELEASED, THE TAPE WILL STOP.
VOLUME CONTROL
The VOLUME CONTROL dial allows you to adjust the volume of the cassette at whatever sound level you choose. The higher the number on the dial, the louder the sound.
PITCH CONTROL
The PITCH CONTROL dial is located to the left of the cassette compartment. When you rotate this dial, you can raise the tone (sharp—#) or lower the tone (flat—b) of the cassette tape. This control enables you to tune the cassette to your KAWAI organ. It virtually eliminates the possibility of the cassette and organ being out of tune with one another.
KAWAI
Kawai Musical Instrument Manufacturing Co., Ltd./200 Terajima-cho/Hamamatsu/Japan
Kawai Piano (America) Corporation / 24200 South Vermont Avenue/Harbor City/California 90710/U.S.A.
- Kawai Electronic Organ
- OWNER'S MANUAL
- Congratulations
- Table of Contents
- Learn to Play The Kawai Way
- A Brief Look at the Past and Present
- How to Care for your Kawai Organ
- The Keyboards and Pedals
- Expression Pedal
- Stop Tabs
- The Families of Tone
- Footage
- Mechanical Controls
- (NON-SPEAKING CONTROLS)
- PEDAL VOLUME
- PEDAL SUSTAIN
- REVERB
- VIBRATO
- MANUAL BALANCE CONTROLS
- Upper Percussion Voice
- MANDOLIN
- Independent Speaking Voices
- FLUTE 16
- FLUTE 8
- OBOE 8
- VIOLIN 8
- VIOLA 8
- The Kawai Autorhythm
- TO STOP THE AUTORHYTHM UNIT:
- Additional Kawai Features
- HEADPHONE JACK
- AC CONVENIENCE OUTLET
- EXTERNAL SPEAKER OUTPUT
- The Kawai One-Finger Electro-Chord
- Registrations
- Oh Marie
- When the Saints Go Marching In
- The Cassette Recorder
- TO PLAY
- TO RECORD
- TO STOP
- TO REWIND
- FAST FORWARD
- VOLUME CONTROL
- PITCH CONTROL
- KAWAI
Mærke : KAWAI
Model : E-65
Kategori : Orgel