LES422A - Server Black Box - Gratis brugsanvisning og manual
Find enhedens vejledning gratis LES422A Black Box i PDF-format.

Brugerspørgsmål om LES422A Black Box
0 spørgsmål om dette apparat. Besvar dem du kender, eller stil dit eget.
Stil et nyt spørgsmål om dette apparat
Download vejledningen til din Server i PDF-format gratis! Find din vejledning LES422A - Black Box og tag din elektroniske enhed tilbage i hånden. På denne side er alle dokumenter nødvendige for brugen af din enhed offentliggjort. LES422A af mærket Black Box.
BRUGSANVISNING LES422A Black Box
LES422A Quick Start Guide
Step 12. Save and logout.
- If you have completed the configuration, click "Save" to save the configuration to the serial server.
- To logout, click the "Logout" button.

Step 13. Test and verify operation.
- Set up serial server as a TCP server on serial port 1.
- Set serial port to RS-232 on serial port 1.
- Set to 9600, 8, N, 1 on serial port 1.
- Loopback serial port 1 by connecting TD to RD.
- Open a DOS window and type "telnet x.x.x.x yyyy," where "x.x.x.x" is the IP address of the serial server and "yyyy" is the port number of the serial port.
- Type characters on the keyboard. The characters should appear in the window. If not, double-check your settings.

Great tech support is just 30 seconds away at 724-746-5500 or blackbox.com.
Customer Support Information Order toll-free in the U.S.: Call 877-877-BBOX (outside U.S. call 1-724-746-5500) FREE technical support 24 hours a day, 7 days a week: Call 724-746-5500 or fax 724-746-0746 Mailing address: Black Box Corporation 1000 Park Drive Lawrence, PA 15055-1018 Web site: www.blackbox.com E-mail: info@blackbox.com
© Copyright 2013. Black Box Corporation. All rights reserved. Black Box and the Double Diamond logo are registered trademarks of BB Technologies, Inc. UL is a registered trademark of Underwriters Laboratories. Any other trademarks mentioned in this manual are acknowledged to be the property of the trademark owners. LES422A Quick Start Guide, rev. 1

Step 1. Check for all required hardware.
Your package includes:
• 2-Port Hardened Serial Server
• CD-ROM containing software
• This Quick Start Guide
You will also need:
• Network and serial cables (not included)
• Power supply (not included)
Step 2: Install the hardware.
- Connect a 10- to 48-VDC (58 VDC max.) power supply (6.0 W required).
- Connect the network cable from the Hardened Serial Server to a network drop using a standard serial cable.
- Connect the serial device(s) to the (2) RS-232 DB9 serial connectors with a straight-through cable for a DCE device or a null-modem cable for a DTE device.
NOTE: UL® requires one conductor per terminal, 28 to 16 AWG copper-wire, tightening torque of 5 kg-cm, and 105°C rating sized for 60°C ampacity.
LES422A Quick Start Guide LES422A Quick Start GuideLES422A Quick Start Guide
Step 3: LED status.
| LED | Status |
| Ready | Blinks if system is operating correctly. |
| Port 1 | ON when port is open; blinks when data present on serial port. |
| Port 2 | ON when port is open; blinks when data present on serial port. |
| Link | ON when device is operating in 100BASE-TX mode. Blinks when data is present on the Ethernet link. |
Step 4: Mode switch.
| Hold in Mode switch for... | Result |
| 0 to 2 seconds | Initiates a hardware reset. |
| 2 to 10 seconds | Enters Console mode. |
| More than 10 seconds | Resets to factory defaults. |
Step 5. Install Black Box Hardened Serial Server software.
- Insert the included CD and it should autostart.
- Follow the prompts to install the software.
NOTE: Make sure you have administrative rights and disable firewalls.
Step 6. Set up Black Box Hardened Serial Server software.
- Open the software. "Click Start—>Programs—>Black Box—>Serial Server Software." The "Discovery" page opens.
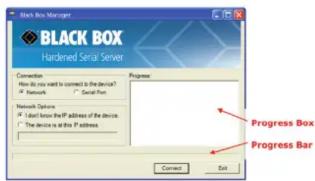
- To configure via the network, select "Network."
- If you know the IP address, select "The device is at this address" and type in the address. If not, select "I don't know the IP address of the device."
- Click "Connect."
OR
Step 6. Set up the Web interface.
- Open a browser and type the IP address of the Hardened Serial Server into the address bar.
- When the serial server is found, the "Configuration" window appears.
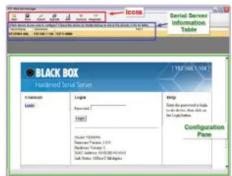
Step 7. Login.
- Click "Login." (The password is blank from the factory.)
- The "General" page appears.
Step 8. Set up the network.
- The Hardened Serial Server is set at the factory to receive an IP assignment from a DHCP server. If a DHCP server is not available on your network, it will default to 169.254.102.39.
- If this address does not work with your PC, change your network settings to:
- IP Address = 169.254.102.1
- Subnet Mask = 255.255.255.0
- Default Gateway = 169.254.102.100
- If you need to use different settings, refer to the user's manual for instructions.
Step 9. Set up the serial port parameters.
- Click "Port 1 Serial" to open the Serial Port Parameters page. Select the type of serial connection
between the serial server and the serial device (RS-232, RS-422, RS-485 2-wire, or RS-485 4-wire).
- Select the baud rate, data bits, stop bits, parity, and flow control needed to communicate with the serial device.
Step 10. Set up the port network parameters.
- Click "Port 1" network to open the "Port Network Parameters" page.
- Select the type of network protocol you want to use: TCP, UDP, VCOM, or Paired Mode.
- If you select TCP, choose whether the Hardened Serial Server will operate as a client or server, then configure the required IP address, port numbers, and other related parameters.
- If you select UDP, configure the IP addresses, ports and other related parameters for the devices you want receive from and send to.
- If you want the serial server to act as a virtual communications port for a computer, select VCOM. This allows your computer to connect to a serial device on the network as if it were connected to a physical COM port.
- If you want the serial server to operate in Paired mode with another serial server, select "Paired," then configure it as a client or server and set up the IP address, port numbers, and other related parameters (similar to setting up TCP).
Step 11. Set up advanced parameters.
- If you want to setup Advanced parameters, click "Advanced" on the Port Network Parameters page.
- If necessary for your application, select "I want to control how data packets are sent over the network," then set up the Character Count, Forced Transmit, Intercharacter Timeout, Delimiters, and Delimiter Removal as required.
- Click "Next."