LDD1671 - Fjernsyn Reflexion - Gratis brugsanvisning og manual
Find enhedens vejledning gratis LDD1671 Reflexion i PDF-format.

Brugerspørgsmål om LDD1671 Reflexion
0 spørgsmål om dette apparat. Besvar dem du kender, eller stil dit eget.
Stil et nyt spørgsmål om dette apparat
Download vejledningen til din Fjernsyn i PDF-format gratis! Find din vejledning LDD1671 - Reflexion og tag din elektroniske enhed tilbage i hånden. På denne side er alle dokumenter nødvendige for brugen af din enhed offentliggjort. LDD1671 af mærket Reflexion.
BRUGSANVISNING LDD1671 Reflexion
REFLEXION
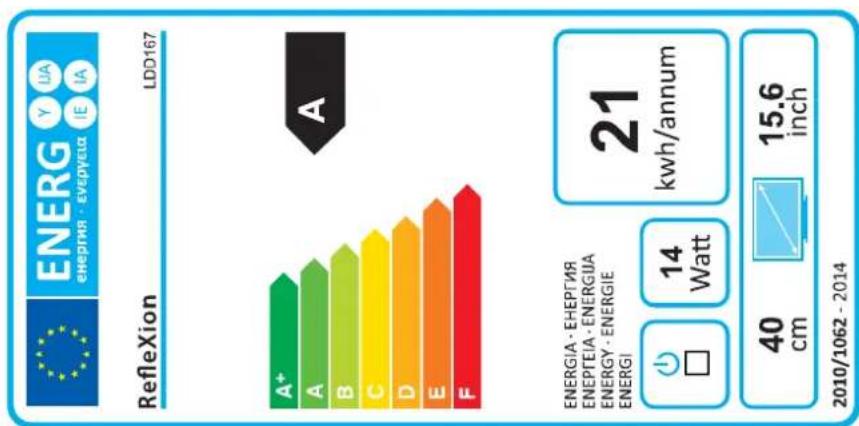
LED Fernseher LDD167

Deutsch
natural_image
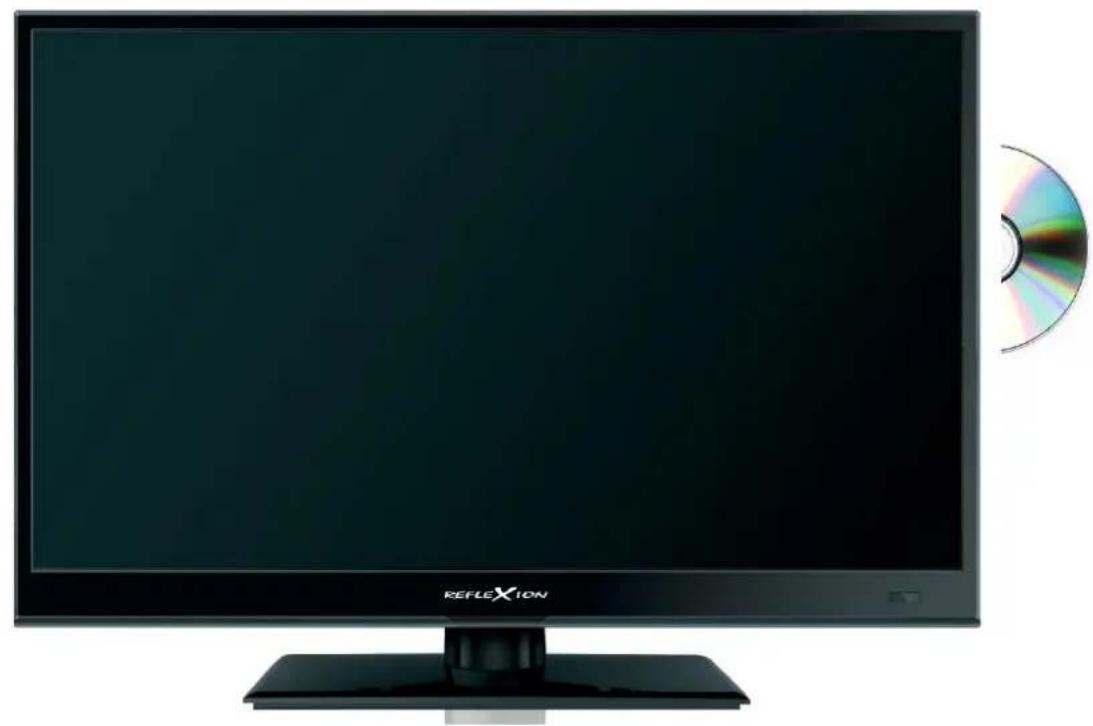
Front view of a black horizontal monitor with 'REFLEXION' branding and a CD/DVD on the right (no visible text or symbols on screen)Dieses Symbol warnt vor gefährlicher Spannung im Inneren des Gehäuses durch nicht isolierte Kabel. Ein Stromschlag kann so stark sein, dass es sehr gefährlich für den Benutzer sein kann. Öffnen Sie niemals das Gehäuse des Fernsehers.
Korrekte Entsorgung dieses Produktes
Dieses Symbol bedeutet, dass dieses Produkt oder die Batterie nicht im Haushaltsmüll entsorgt werden darf. Um die ordnungsgemäße Abfallbehandlung des Produktes und der Batterie sicherzustellen, entsorgen Sie diese bitte gemäß den örtlichen Gesetzen unter Voraussetzung für die Entsorgung von Elektrogeräten und Batterien. Damit helfen Sie, die natürlichen Ressourcen zu schonen und die Standards des Umweltschutzes bei der Behandlung und Entsorgung von Elektroschrott zu erfüllen.
Dieses Symbol bedeutet, dass elektronische Geräte am Ende ihrer Lebensdauer getrennt vom Hausmüll entsorgt werden müssen. Bitte entsorgen Sie dieses Gerät bei Ihrem örtlichen Recycling-Zentrum.


| Vorsicht | 03 |
| Sicherheitshinweis | 04 |
| Lieferumfang | 05 |
| Technische Daten | 05 |
| Montage der Basis | 06 |
| Produkteinführung | |
| Vorderansicht | 08 |
| Anschlüsse | 09 |
| Fernbedienung | 10 |
| Basisanschlüsse | |
| Stromanschluß | 12 |
| Anschluss des RF Kabels | 13 |
| Anschluss des Satellitenschüssel | 13 |
| Anschluss an eine HDMI Verbindung | 14 |
| Anschluss an eine SCART Verbindung | 14 |
| Anschluss an einen PC | 15 |
| Anschluss an eine Coaxial Eingang | 15 |
| Anschluss an eine Composite Video Verbindung | 16 |
| Anschluss an eine YPBPR Verbindung | 16 |
| Anschluss an einen Kopfhöer | 17 |
| Anschluss an einen USB | 17 |
| Anschluss an eine Common Interface | 18 |
| Wandmontage | 19 |
| Erstinstallation | 20 |
| Grundfunktionen | |
| Bild Menü | 23 |
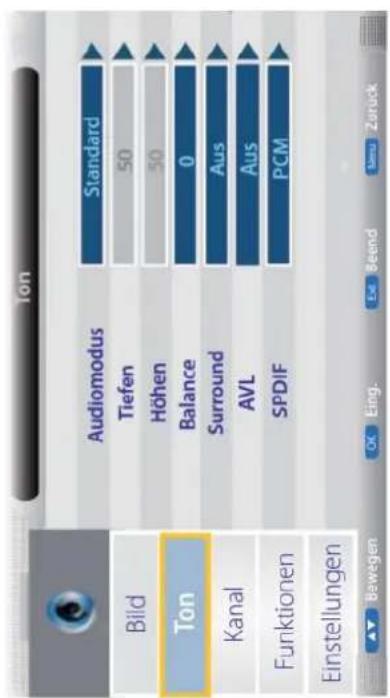
| Ton Menü | 24 |
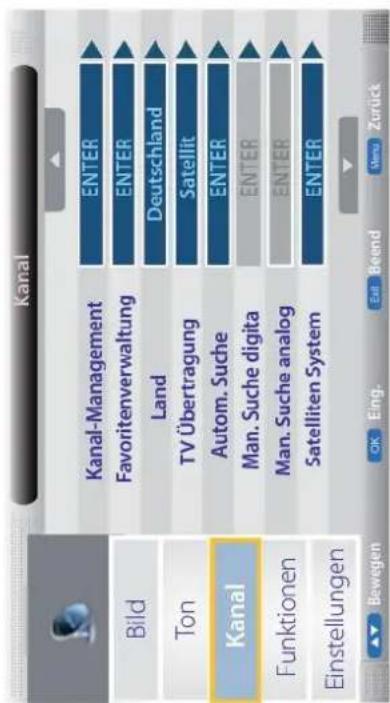
| Kanal Menü | 25 |
| Funktionen Menü | 30 |
| Einstellungen Menü | 32 |
| Multimediabetrieb | |
| Fotos | 34 |
| Musik | 34 |
| Film | 35 |
| E-Book | 35 |
| DVD Betrieb | |
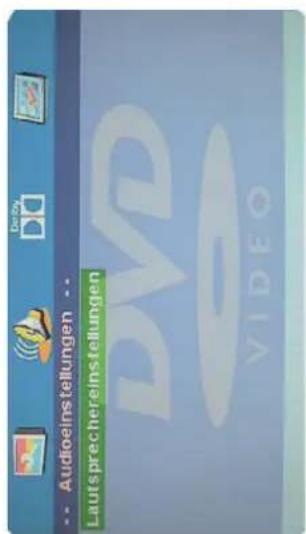
| Grundeinstellungen | 36 |
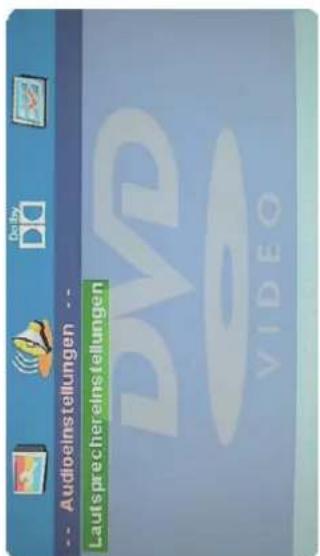
| Audioeinstellung | 38 |
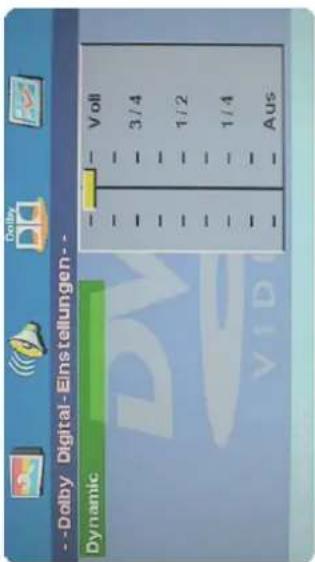
| Dolby Digital | 39 |
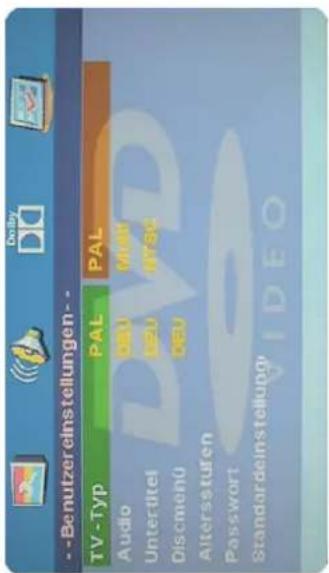
| Bevorzugte Einstellungen | 39 |
| Anhang | 42 |
| Fehlerbehebung | 44 |
| Konformitätserklärung | 45 |
- LED TV 5. YUV Adapter
- Netzteil
- 12 V KFZ-Anschlusskabel
- Auto DVB-T aktiv Antenne
- AV Adapter
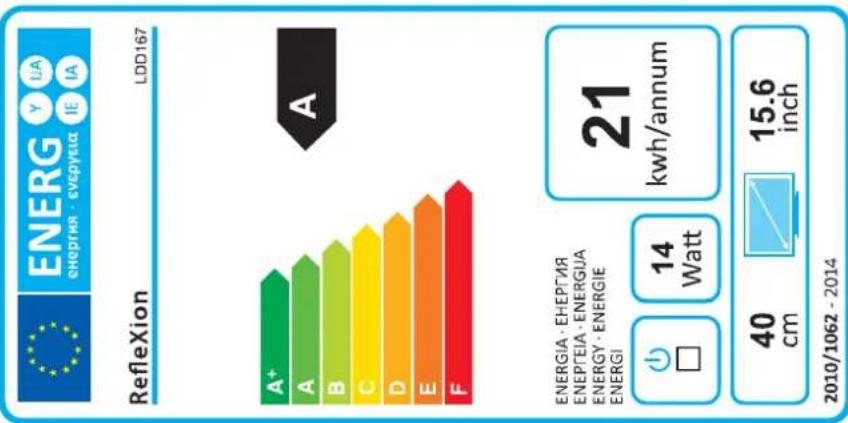
Technische Daten
| Display | LED Display (Pixelklasse 1) |
| Bildschirmgröße | 15,6" (40,0 cm) |
| Auflösung | 1366 x 768 (HD) |
| Kontrastverhältnis | 500 : 1 |
| Helligkeitswert | 200 cd/m2 |
| Betrachtungswinkel | 90° H / 60° V |
| Empfangsarten | DVB-S / DVB-S2 / DVB-T / DVB-C |
| Lautsprecher | 2x 3 Watt (Stereo) |
| Anschlüsse | RF Eingang (DVB-T & DVB-C)RF Eingang (DVB-S)PC Eingang (D-Sub)Audio Eingang koaxial (S/PDIF)PC Audio Eingang 3,5 mmKopfhörer Ausgang 3,5 mmHDMI EingangVideo / Audio (L/R) (mit Adapter)YUV (mit Adapter)USB 2.0 (Mediaplayer / Softwareupgrade)Scart |
| CI+ Schacht | ja (HD+ ready) |
| DVD-Player (seitlich integriert) | DVD-R/-RW/+R/+RW, VCD, CD, CD-R/-RW |
| Abspielformate Video/Foto/Audio | MPEG 1-4, VOB, AVI, XVID / JPEG / MP3, AC3, MP2, MPEG1, PCM, LPCM, OGG |
| Stromversorgung | AC 110V ~ 240V, 50/60 Hz / DC 12 Volt |
| Stromverbrauch Betrieb / Standby | max. 28 Watt / < 0,5 Watt |
| VESA Standard | 75 x 75 mm |
Um einen zuverlässigen und sicheren Betrieb dieses Gerätes zu gewährleisten, lesen Sie bitte sorgfältig diese Bedienungsanleitung, insbesondere die Sicherheitshinweise unten.
Elektrische Sicherheit
- Das Gerät kann nur mit der auf der Rückseite beschriebenen Spannung betrieben werden. Sollten Sie die Spannung nicht kennen, fragen Sie bitte einen Elektriker. - Um eine Überlastung zu vermeiden, betreiben Sie nicht zu viele weitere Geräte an der gleichen Steckdose.
- Verlegen Sie Stromkabel unbedingt immer so, dass niemand darüber stolpern kann. Das Kabel ist umengstalt und kieselst den Strom. Stellen Sie hütte keine Gegenstände
- Das Kabel ist unmittelte und isohlt den Strom. Stellen Sie bitte keine Gegenstände auf das Kabel, da dadurch die Schutzfunktion verloren gehen könnte. Vermeiden Sie große Belastungen des Kabels, insbesondere an Buchsen und Steckern. - Wenn Sie den Stecker aus der Steckdose herausziehen wollen, ziehen Sie immer am Stecker und nicht am Kabel. Das Kabel könnte ansonsten reißen.
- Wenn Sie das Gerät für längere Zeit nicht mehr nutzen, ziehen Sie unbedingt das Stromkabel ab.
- Für den Schutz des Gerätes während eines Gewitters oder wenn es längere Zeit unbeaufsichtigt ist, ziehen Sie bitte den Netzstecker aus der Steckdose und das Antennenkabel aus der Antennedose. Dies verhindert Schäden aufgrund von Blitz schlägen.
- Überlasten Sie keine Steckdosen, Verlängerungskabel oder sonstige Leitungen, da dies zu Bränden oder elektrischen Schocks führen kann. - In die Öffnungen des Gerätes dürfen keine Gegenstände eingeführt werden, da an einigen Stellen Strom fließt und der Kontakt Feuer oder einen Stromschlag hervorrufen kann.
- Entfernen Sie nie die Abdeckung - es befinden sich keine Teile im Inneren, die vom Benutzer selbst repariert werden können. - Betreiben Sie das Gerät nur mit dem mitgelieferten Netzteil.
• Betreiben Sie das Gerät nur mit dem mitgelieferten Netzteil.
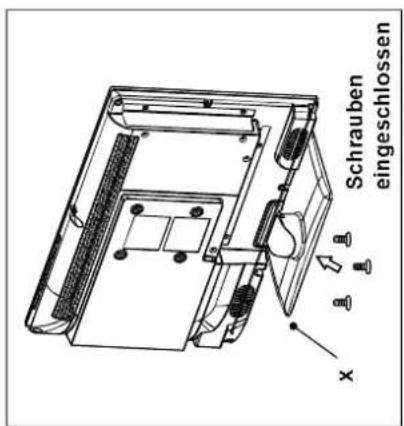
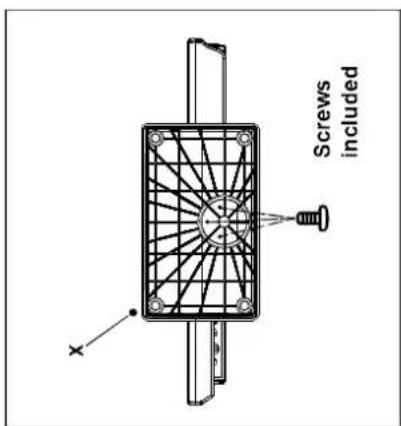
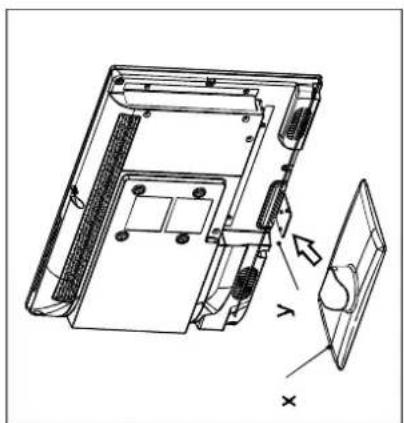
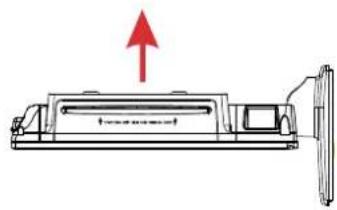
Die TV kann an der Basis befestigt werden (zugeführt).
Für die korrekte Montage, gehen Sie wie folgt:
a. Setzen Sie den TV-Bildschirm an der Seite auf eine flache, weiche Unterlage
(Decke, Schaum, etc.), um Beschädigungen oder Kratzer zu vermeiden.
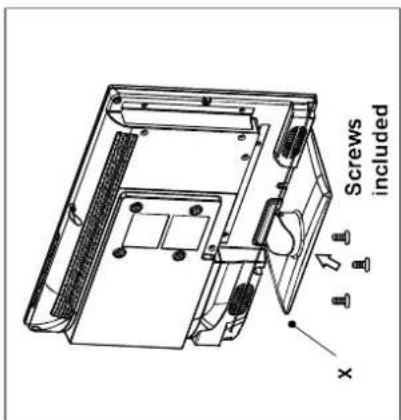
b. Stellen Sie die Basis (x) auf dem Hals (y) des TV-Gerätes, und dann sichern Sie sie mit den mitgelieferten Schrauben.
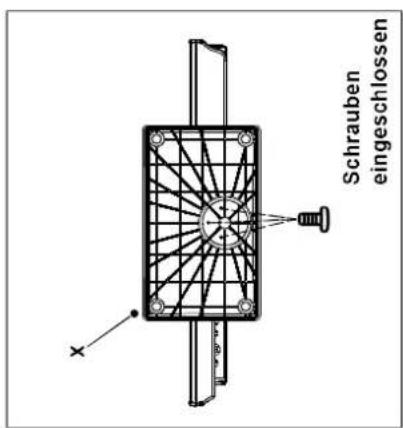
Hinweis:
Vor dem Anbringen der Basis, stellen Sie sicher, dass die gleiche korrekt positioniert wurde (siehe Abbildung).
natural_image
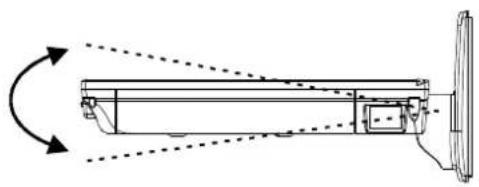
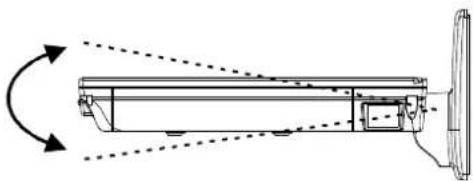
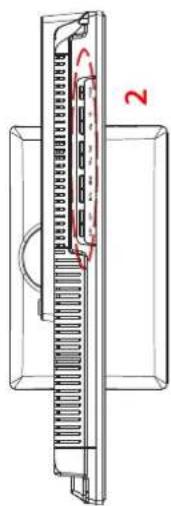
Technical line drawing of a vertical cylindrical device with directional arrows indicating rotation or movement (no text or symbols)Hinweis:
Versuchen Sie den nicht mit Gewalt, horizontal über die von der Basis erlaubte Position zu drehen.
Kippen Sie den Bildschirm nicht nach oben oder unten, um Schäden an der Basis zu vermeiden, da dies die Stabilität des Gerätes beeinträchtigen kann.

Vorderansicht
Seitenansicht
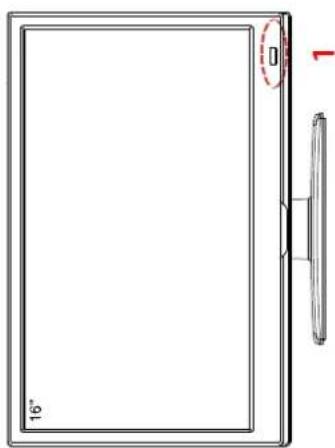
Insert disc with label side towards back


natural_image
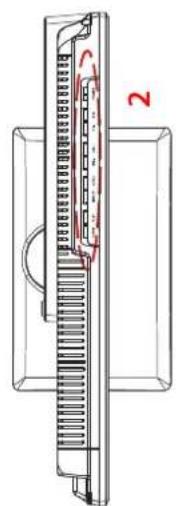
Technical line drawing of a computer chassis with ventilation slots and a labeled component (no text or symbols beyond label)Aufsicht
natural_image
Technical line drawing of a mechanical component with internal channels and a labeled section (no text or symbols)- Die Funktionen der Tasten an der Gehäuseseite:
The image contains no text. The horizontal lines are stylistic or background elements and must be ignored according to the rules.
EJECT PLAY INPUT MENU VOL- VOL+ CH- CH+ POWER
INPUT: Drücken Sie die Taste um das Menü anzuzeigen.
MENU: Drücken Sie die Taste um das Menü anzuzeigen.
CH +/- Schaltet die Programme AUF/AB.
VOL +/-: Regelt die Lautstärke LAUT/LEISER.
PLAY: Abspielen/Pause im DVD Betrieb.
EJECT: DVD auswerfen/laden.
POWER: Schaltet den Fernseher EIN/AUS (Stand-by).
Netzanschluß 12V/230V Netzteil oder 12Volt Boardspannung. Hauptschalter für die Stromversorgung
HDMI Eingang
Eingang für VGA Signale vom PC
Eingang für analogen Ton vom PC
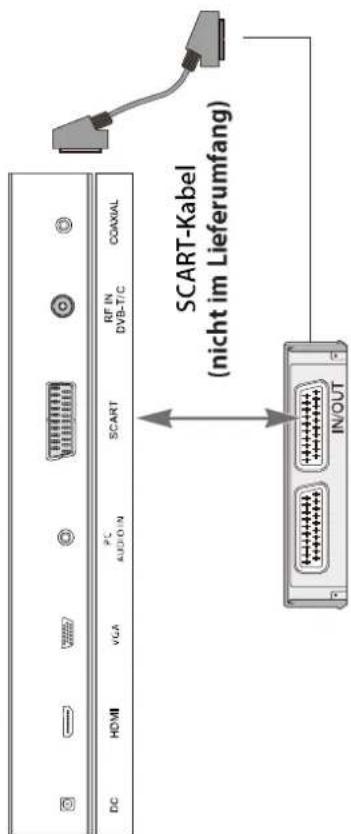
SCART Anschluss
DC:
NETZSCHALTER:
HDMI:
VGA:
PC AUDIO IN:
SCART:
Anschluss für DVB-T Antenne oder Kabelfernsehen Digitaler Audio-Ausgang (koaxial)
AV Eingang (FBAS/Audio Rechts/Links), über Adapterkabel Komponenteneingang (YPbPr), über Adapterkabel anschließen USB 2.0 Anschluss für Massenspeichergeräte
Eingang für Satellitenantenne (13/18V max. 500mA)
Steckplatz für Cl/Cl+ Slot
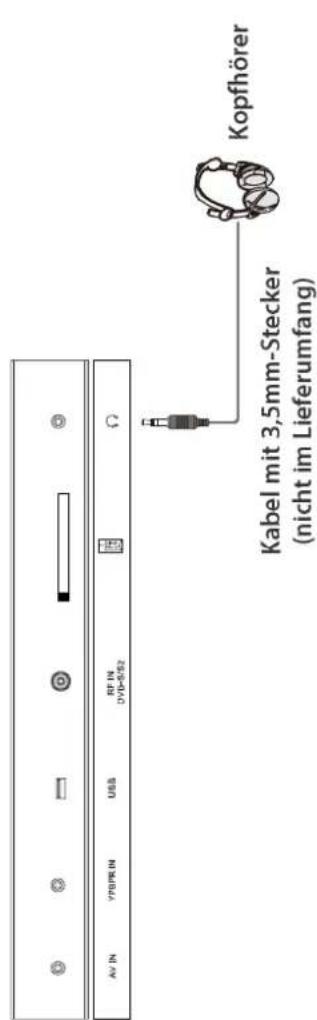
Ausgang für Kopfhörer mit 3,5mm Klinke
RF:
Digital Audio:
Mini AV:
Mini YPbPr:
USB:
DVB-S2:
Common Interface:
Headphone:
Hinweis:
Drücken Sie die Taste INPUT mehrfach, um die gewünschte Signalquelle auszuwählen. Nach einer kurzen Wartezeit schaltet der Fernseher auf die gewünschte Signalquelle um.
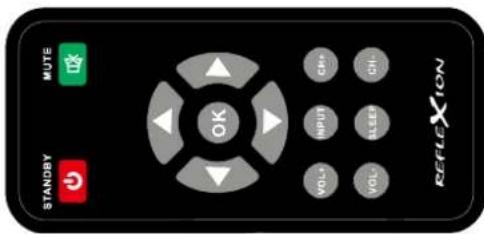
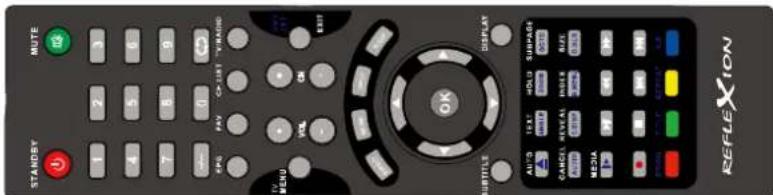
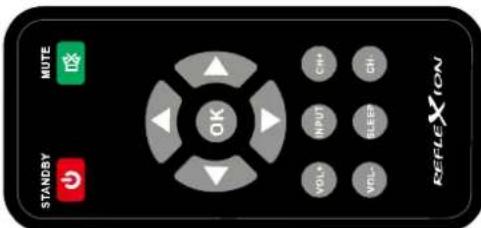
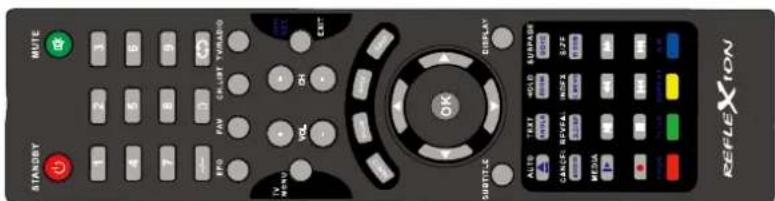
Fernbedinung
| STANDBY | MUTE |
| 1 | 2 |
| 4 | 5 |
| 7 | 8 |
| - | 0 |
| EPG | FAV |
| TV MENU | VOL |
| SUBTITLE | DISPLAY |
| AUTO | TEXT |
| CANCEL | REVEAL |
| AUDIO | D. DISP |
| MEDIA | H |
| PROG | TITLE |
| REFLEXION | |
POWER ⬇: Fernseher ein-/ausschalten. (Bereitschaft/Stand By)
MUTE ☒: Ton stummschalten.
Navigations- Einstellungen in Bildschirm- und
tasten: DVD Menüs auswählen/ändern Lautstärkeregelung/Programmwechsel.
OK: Auswahl bestätigen/Programmliste
VOL +/-: Lautstärke erhöhen/verringern.
CH +/-: Programme wechseln.
SLEEP: Ausschalttimer stellen.
INPUT: Signalquelle, USB-Media Player, Digitales
oder analoges Fernsehen wählen.
Zahlentasten: Eingabe von Programmnummern usw.
-/-: Wählen Sie 2-stellige oder 3-stellige Programm.
Zurück zum letzten Programmplatz.
EPG: Elektronischen Programmführer einblenden.
FAV: Favoritenliste anzeigen.
CH.LIST: Zeigt die Programmliste.
TV/RADIO: Zwischen TV und Radiosendern wechseln.
TV MENU: Öffnet das Einestellungsmenü.
EXIT: Das jeweilige Menü verlassen.
ASPECT: Bildformat umschalten.
NICAM/A2: TV Nicam/A2 wechseln.
SUBTITLE: Untertitel an/aus schalten.
DISPLAY: Informationen anzeigen
AUTO: Passen Sie auf die optimalen Display-Einstellungen im PC-Modus.
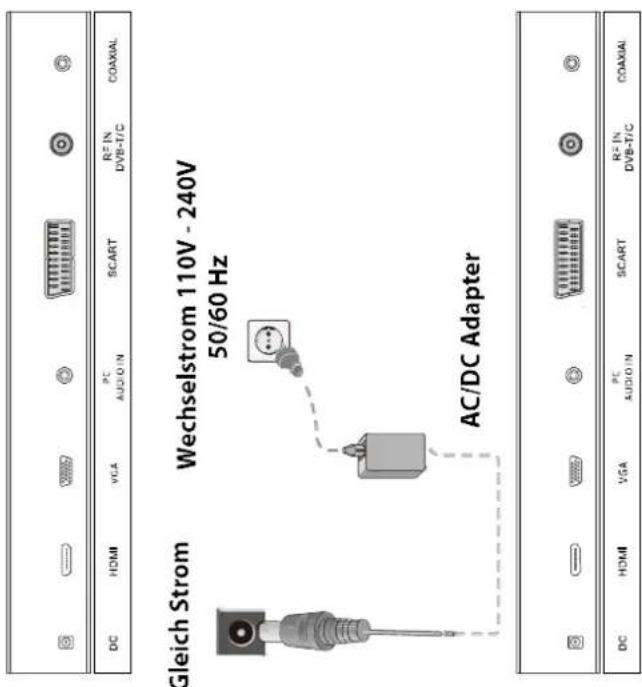
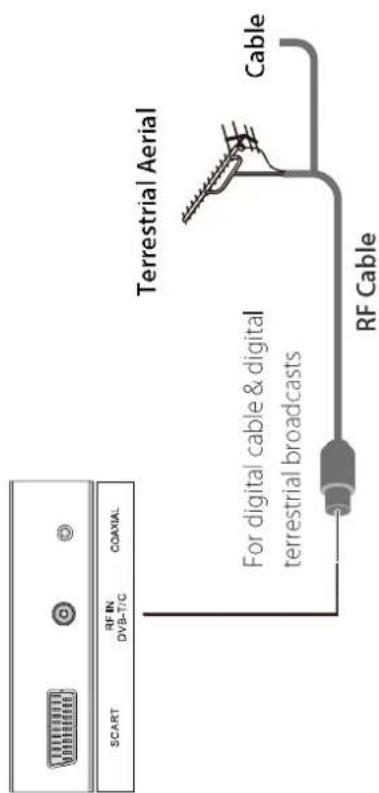
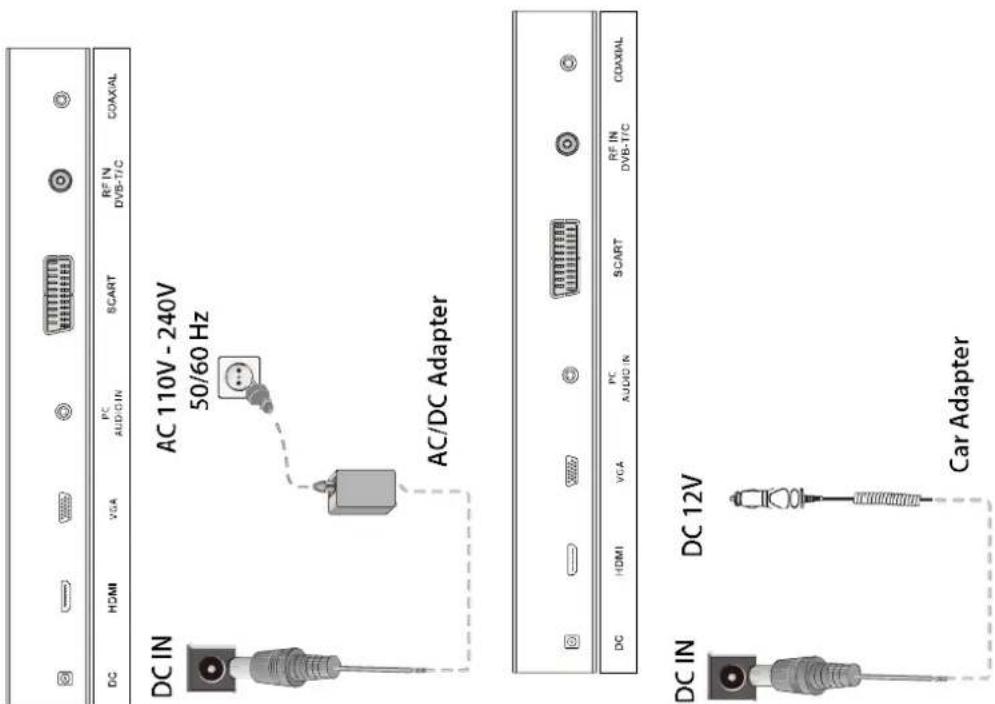
Anschluss des RF Kabels
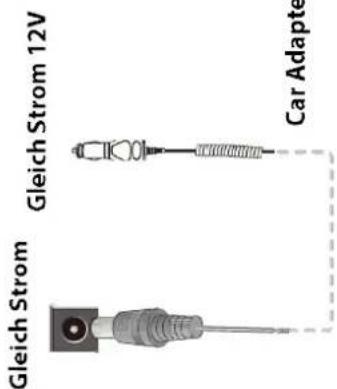
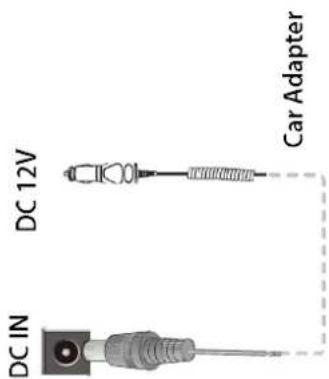
1. Verbinden Sie den Stecker des AC-Adapters mit der Buchse „DC IN“ und verbinden Sie den Adapter mit einer Steckdose.
2. Schalten Sie den Hauptschalter des LED TV an und drücken Sie dann die POWER Taste auf der Fernbedienung, um den Fernseher einzuschalten.
Hinwes:
Nutzen Sie ausschließlich den im Packungsinhalt mitgelieferten AC/DC Adapter & Car Adapter.
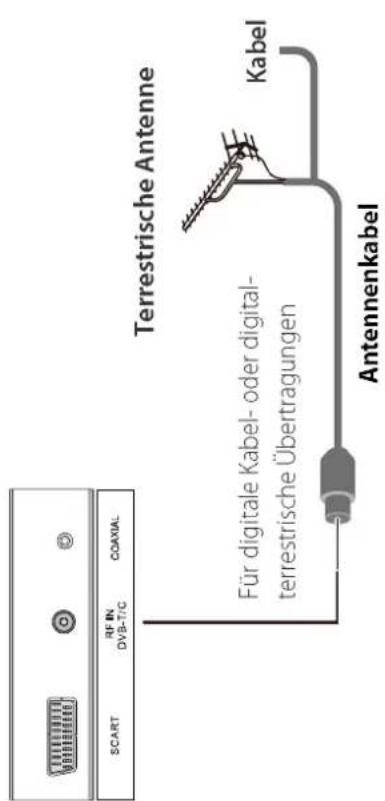
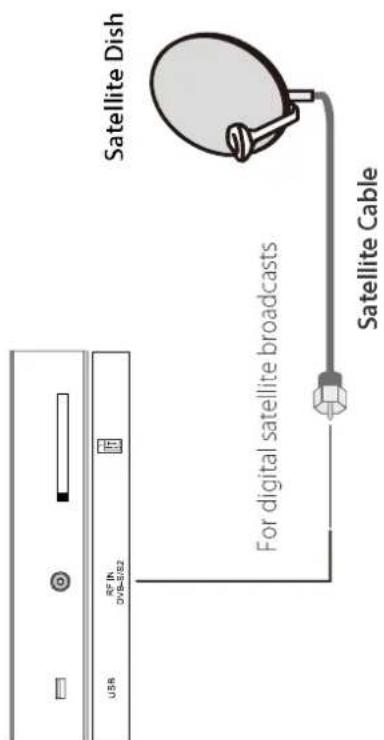
Anschluss des Satellitenschüssel
Verbinden Sie ein 75 Ohm Satellitekabel mit der „DVB-S/S2“ Buchse an der Rückseite des Fernsehers.
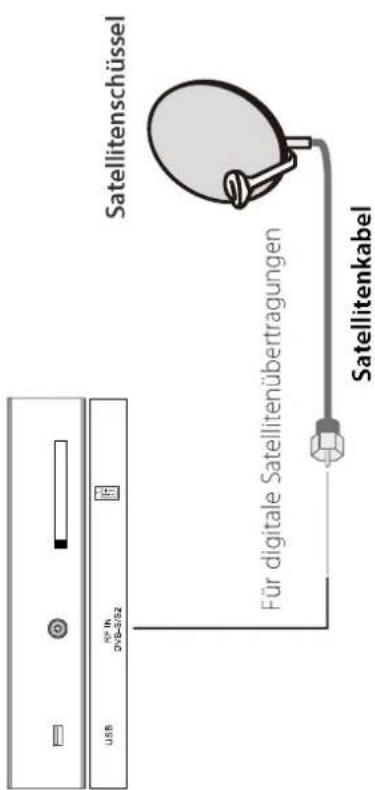
Hinwes:
Um Fernsehprogramme empfangen zu können, muss ein Signal erkannt werden.
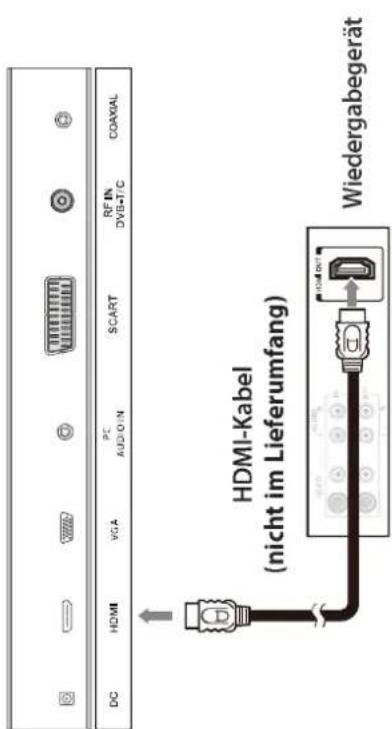
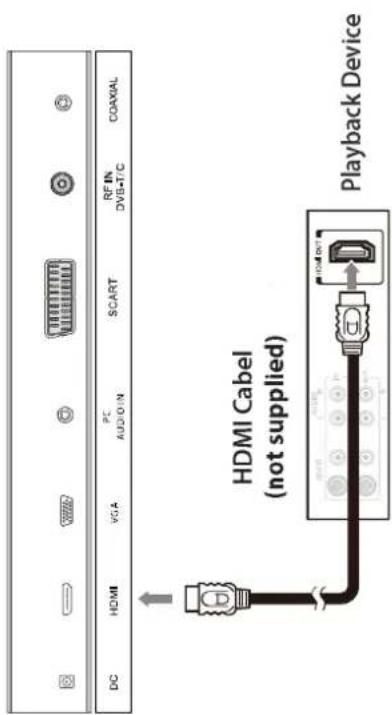
Anschluss an eine HDMI Verbindung
HDMI (High De. nition Multimedia Interface) ist die erste A/V Schnittstelle, die nicht komprimierte Standards unterstützt. Eine Buchse überträgt sowohl Video-als auch Audio Informationen.
Um dies zu nutzen, muss sich eine HDMI Output Verbindung am externen Gerät befinden.
1. Verbinden Sie den HDMI Ausgang am Fernseher und die DVD Set-Top-BOX mit einem HI
2. Drücken Sie wiederholt die SOURCE Taste auf der Fernbedienung, um HDMI zu wählen u
Sie die Auswahl mit der RETURN Taste.
1. Verbinden Sie den HDMI Ausgang am Fernseher und die DVD Set-Top-Box mit einem HDMI cable.
2. Drücken Sie wiederholt die SOURCE Taste auf der Fernbedienung, um HDMI zu wählen und bestätigen Sie die Auswahl mit der RETURN Taste.
- Drücken Sie wiederholt die SOURCE Taste auf der Fernbedienung, um PC/VGA zu wären und bestätigen Sie die Auswahl mit der ENTER Taste.
Hinweis:
Es wird keine zusätzliche Audio Verbindung benötigt.
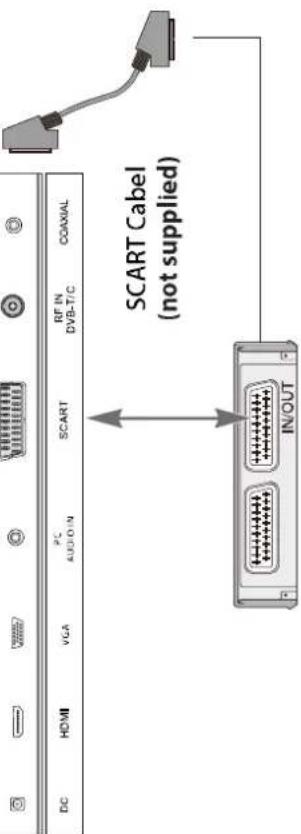
Anschluss an eine SCART Verbindung
-
Verbinden Sie den SCART Anschluss am externen Videorekorder mit dem SCART Anschluss am Fernseher. Benutzen Sie hierzu ein SCART Kabel.
-
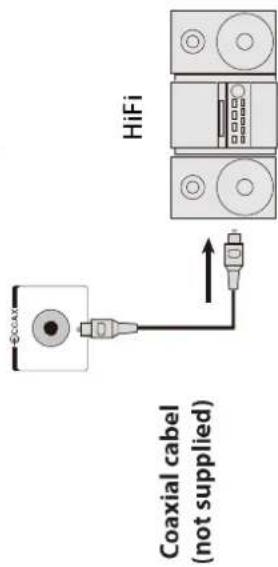
Verbinden Sie einen Verstäker mit einem Coaxial Kable mit dem Coaxial Ausgang an Ihrem Fernseher.
2. So können Sie den Ton über Ihre Heimkinoanlage genießen.
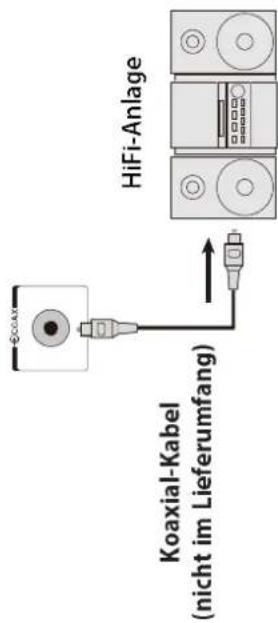
Anschluss an eine Coaxial Eingang
- Verbinden Sie einen Verstäker mit einem Coaxial Kable mit dem Coaxial Ausgang an Ihrem Fernseher.
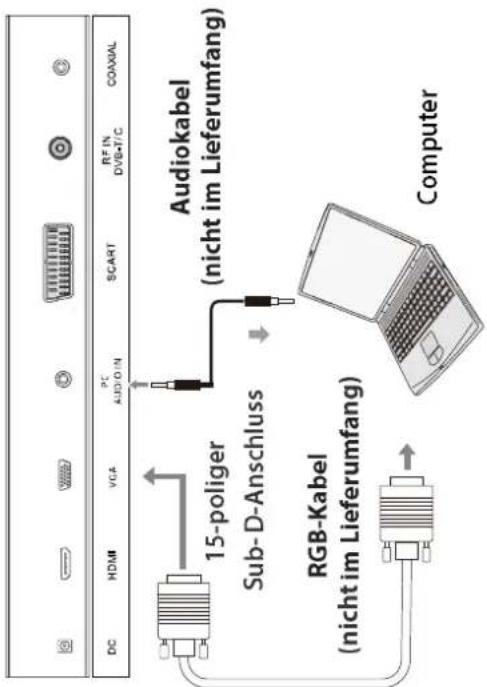
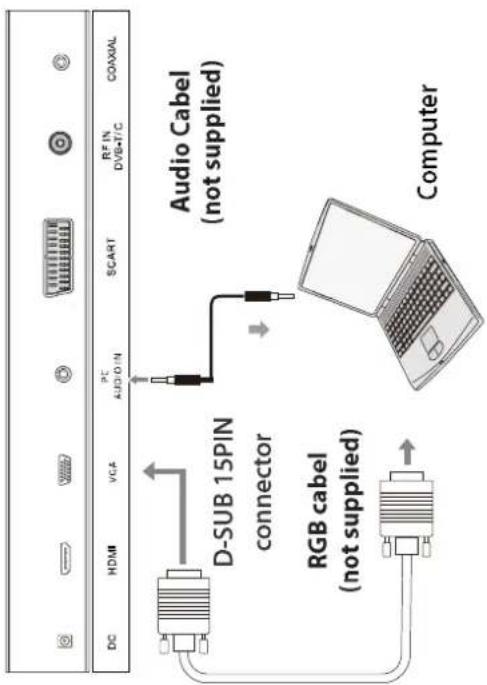
Anschluss an einen PC
-
Verbinden Sie den VGA Output an Ihrem PC und die VGA IN Buchse an der Rückseite Ihres Fernsehers mit einem VGA Kabel.
-
Verbinden Sie die LINE OUT Buchse Ihres Computers und die LINE IN Buchse an der Rückseite Ihres Fernsehers.
-
Drücken Sie wiederholt die SOURCE Taste auf der Fernbedienung, um PC/VGA zu wären und bestägen Sie die Auswahl mit der ENTER Taste.
-
Verbinden Sie den VGA Output an Ihrem PC und die VGA IN Buchse an der Rückseite Ihres Fernsehers mit einem VGA Kabel.
- Verbinden Sie die LINE OUT Buchse Ihres Computers und die LINE IN Buchse an der Rückseite Ihres Fernsehers.
- Drücken Sie wiederholt die SOURCE Taste auf der Fernbedienung, um PC/VGA zu wären um bestäigen Sie die Auswahl mit der ENTER Taste.
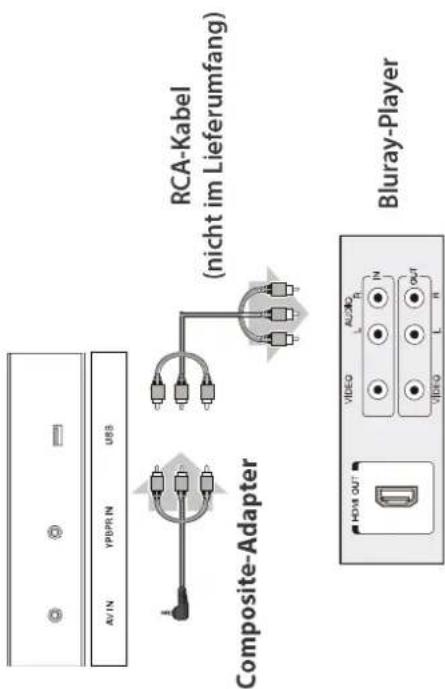
Anschluss an eine Composite Video Verbindung
- Verbinden Sie das Video und Audio Signal mit dem AV Konvertierungskabel und dem RCA Kabel.
-
Drücken Sie die SOURCE Taste auf der Fernbedienung, wären Sie die AV Eingangsquelle und bestäigen Sie mit der ENTER Taste.
-
Sie können einen Kopfhöer an Ihren LED Fernseher anschließen, wenn Sie ein Programm sehen wollen.
-
Schließen Sie einen Kopfhöer an die 3.5mm Minibuchse Ihres LED Fernsehers an.
Anschluss an einen USB
- Für den Anschluss erforderliches Kabel (dieses Kabel gehört nicht zum Lieferumfang dieses LED-Fernsehers)
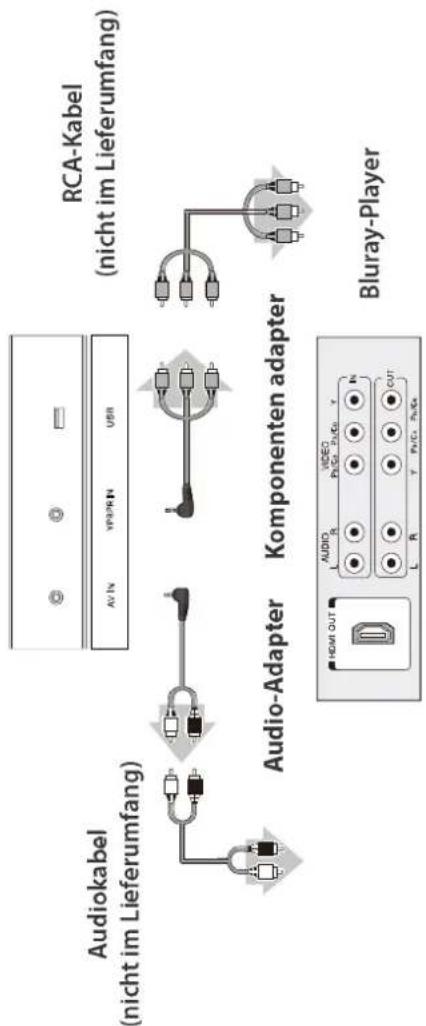
Anschluss an eine YPBPR Verbindung
- Verbinden Sie das YPBPR Signal mit dem YPBPR Konvertierungskabel und dem YPBPR Kabel.
- Verbinden Sie das Audio Signal mit dem AV Konvertierungskabel und dem RCA Kabel.
- Drücken Sie die SOURCE Taste auf der Fernbedienung, wälen Sie die YPBPR Eingangsquelle und bestägen Sie mit der ENTER Taste.
flowchart
graph TD
    A["Audiokabel (nicht im Lieferumfang)"] --> B["Audio-Adapter"]
    B --> C["Komponenten adapter"]
    C --> D["Bluray-Player"]
    D --> E["AC/IN  AV IN  YF/PR IN  USB  USR"]
    style A fill:#f9f,stroke:#333
    style B fill:#ccf,stroke:#333
    style C fill:#cfc,stroke:#333
    style D fill:#fcc,stroke:#333
    style E fill:#ffc,stroke:#333

Anschluss an eine Common Interface
Dieser Fernseher unterstützt den neuesten Common-Interface-Standard: Common Interface Plus.
Das Common Interface-Modul-Menü bietet Zugriff auf Software, die auf Ccmmon Interface (CI)-Modulen vorhanden ist. • In einigen Ländern oder Regionen steht diese Funktion möglicherweise nicht zur Verfügung • Je nach den Sendungen oder Diensten werden möglicherweise keine Video- oder Audiosig ausgegeben.
Zwar ermöglicht Ihnen das CI-Modul, einige Dienste anzuschauen, doch ist bei diesem Fernsehgerät nicht garantiert, dass Sie alle Dienste anschauen können (zum Beispiel verschlüsselte Pay-TV-Sender). Verwenden Sie nur das von Ihrem Sender zugelassene CIModul. Weitere Informationen und Nutzungsbedingungen der Dienste erhalten Sie von Ihrem Fachhändler oder Sender.
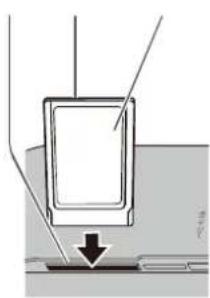
Die Smartcard in das CA-Modul einführen
Schieben Sie die Smartcard so weit wie möglich in das CAModul. Dabei muss die Seite mit dem goldfarbenen Chip zur gleichen Seite weisen wie die CA-Modul-Seite mit dem Anbieterlogo. Beachten Sie die Richtung des auf die Smartcard aufgedruckten Pfeils.
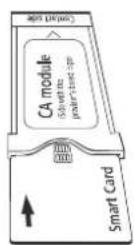
Hinweis:
Schalten Sie das Gerät stets mit dem Ein/Aus-Schalter aus, wenn Sie das CI-Modul einführen oder entfernen. Wenn eine Smartcard und ein Kartenleser im Paket geliefert werden, führen Sie zu den Kartenleser und dann die Smartcard in den Kartenleser ein. Führen Sie das Modul richtig herum ein.
natural_image
Diagram of a door handle assembly with arrows indicating direction (no text or symbols)Hinweis:
Bitte verwenden Sie eine für die Größe und das Gew Für die Montage sind es zwei Personen notwendig.
Bitte verwenden Sie eine für die Größe und das Gewicht des TV geeignete Wandhalterung.
Bitte verwenden Sie eine für die Größe und das Gewicht des TV geeignete Wandhalterung.
Bitte verwenden Sie eine für die Größe und das Gewicht des TV geeignete Wandhalterung.
Bitte verwenden Sie eine für die Größe und das Gewicht des TV geeignete Wandhalterung.
Bitte verwenden Sie eine für die Größe und das Gewicht des TV geeignete Wandhalterung.
Bitte verwenden Sie eine für die Größe und das Gewicht des TV geeignete Wandhalterung.
Bitte verwenden Sie eine für die Größe und das Gewicht des TV geeignete Wandhalterung.
Bitte verwenden Sie eine für die Größe und das Gewicht des TV geeignete Wandhalterung.
Bitte verwenden Sie eine für die Größe und das Gewicht des TV geeignete Wandhalterung.
Bitte verwenden Sie eine für die Größe und das Gewicht des TV geeignete Wandhalterung.
Bitte verwenden Sie eine für die Größe und das Gewicht des TV geeignete Wandhalterung.
Bitte verwenden Sie eine für die Größe und das Gewicht des TV g
Bitte verwenden Sie eine für die Größe und das Gewicht des TV g
Bitte verwenden Sie eine für die Größe und das Gewicht des TV g
Bitte verwenden Sie eine für die Größe und das Gewicht des TV g
Bitte verwenden Sie eine für die Größe und das Gewicht des TV g
Bitte verwenden Sie eine für die Größe und das Gewicht des TV g
Bitte verwenden Sie eine für die Größe und das Gewicht des TV g
Bitte verwenden Sie eine für die Größe und das Gewicht des TV g
Bitte verwenden Sie eine für die Größe und das Gewicht des TV g
Bitte verwenden Sie eine für die Größe und das Gewicht des TV g
Bitte verwenden Sie eine für die Größe und das Gewicht des TV g
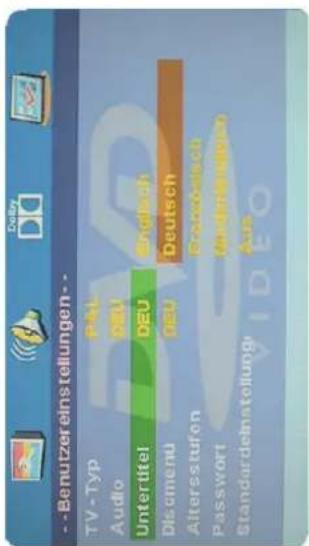
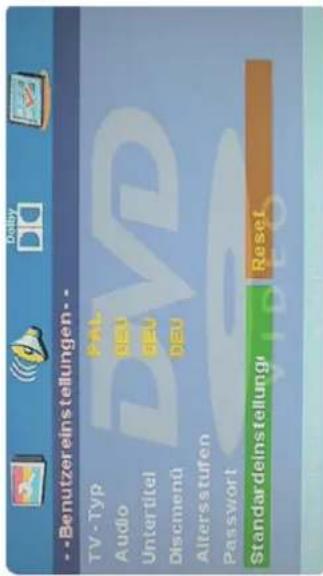
Erstmals Installation
Verbinden Sie das Gerät mit der Stromversorgung und schalten Sie den Fernseher ein; daraufhin erscheint das folgende Installationsmenü auf dem Bildschirm: Diese ist in 6 Schritte eingeteilt. Bitte wählen Sie Ihre persönlichen Einstellungen. Mit der grünen Taste gehen Sie zum nächsten Schritt, mit der roten Taste können Sie einen Schritt zurück gehen.
Aufstellung 1
ome Mode: • Zu Hause • Dynamisch
Aufstellung 2
Land:
wählen Sie das gewünschte Land aus. (Deutschland)
[Non-Text]
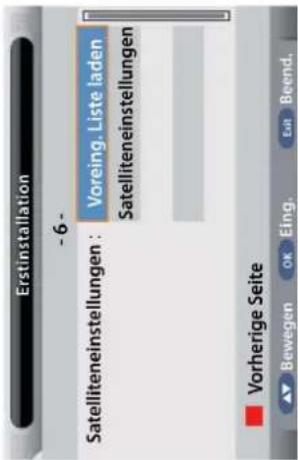
Satelliteneinstellungen:
wählen Sie die Voreing. Liste laden, oder Satelliteneinstellungen um
eigene Einstellungen vorzunehmen. Einzelheiten zu den Einstellungen
finden Sie unter „Grundfunktionen“ ab Seite 27.
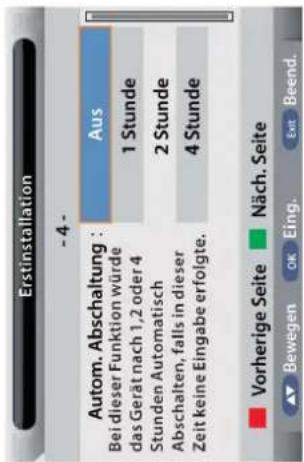
Aufstellung 4
Autom. Abschaltung:
wählen Sie den gewünschte
Abschaltzeit
(Aus, 1 Std., 2 Std. oder 4 Std.)
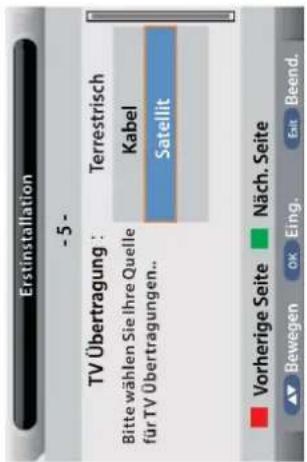
Aufstellung 5
TV Übertragung:
wählen Sie den gewünschten Betriebsmodus (Terrestrisch, Kabel, Satellit)
Aufstellung 6
Aufstellung 3
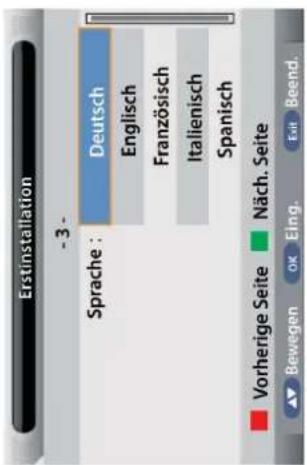
Sprache:
wählen Sie die gewünschte Sprache aus. (Deutsch)
EIN/AUS
| Eingang |
| DTV |
| ATV |
| AV |
| SCART |
| YPBPR |
| HDMI |
| PC |
| Medien |
| DVD |
bar
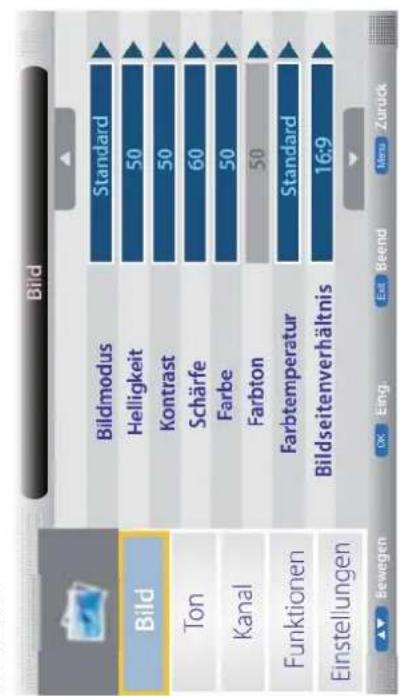
| Category | Value | |---|---| | Bildmodus | Standard | | Helligkeit | 50 | | Kontrast | 50 | | Schärfe | 60 | | Farbe | 50 | | Farbton | 50 | | Farbtemperatur | Standard | | Bildseitenverhältnis | 16:9 |Hauptmenü Betrieb
Drücken Sie die MENÜ Taste um in das Hauptmenü zu gelangen:
Bildmodus:
Standard, Mild und Benutzer.
Helligkeit:
Kontrast:
Regeln Sie die Schärfe (grau hinterlegt im VGA/PC Betrieb).
Regeln Sie die Farbe von farbig bis schwarz/weiß.
Regeln Sie den Farbton (nur im NTSC Modus).
Wählen Sie zwischen verschiedenen Farmtemperaturen
(Warm, Kalt, Standard).
Wählen Sie das Seitenverhältnis des Bildschirms
(4:3,16:9, Zoom 1, Zoom 2 oder Panorama).
Wenn das empfangene Sendesignal schwach ist, können Sie die
Rauschreduzierung aktivieren. Wahlen Sie hier zwischen
Aus, Niedrig, Mittel oder Hoch.
DNR:
- Verbinden Sie das Netzteil mit dem Fernseher und schalten Sie den
Netzschalter ein.
- Schalten Sie den TV ein -> Drücken Sie die Power Taste an der
Fernbedienung.
Eingangsquelle wählen
Drücken Sie die INPUT Taste um die Eingangsquelle zu wählen. Nutzen
Sie die ▲ / ▼ Tasten der Fernbedienung oder direkt am TV um eine
Quelle zu wählen. Drücken Sie OK um zu bestätigen, oder warten Sie
einige Sekunden.
Hinweis: Bevor Sie die Quelle wählen, vergewissern Sie sich, dass die
Quelle betriebsberiet ist, da sonst kein Signal übertragen wird.
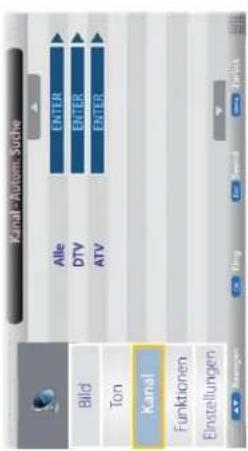
Hauptmenü: Bild | Ton | Kanal | Funktionen | Einstellungen
B
Bildmodus Standard
m = 311
Untermenü
das Menübild
ist ein Beispiel)
The Ground Truth image displays a single, solid horizontal line. According to Rule 2 (UNDERSCORE & LINE RULES), this is a stylistic or background line, not a placeholder underscore. Therefore, the OCR result must ignore it and output nothing or only meaningful text. The provided OCR content is "____", which consists of four underscores. This is an incorrect interpretation of the line as a placeholder, violating the rule that stylistic lines must be ignored. The OCR has hallucinated underscores where none should exist based on the GT's visual context. Hence, the OCR result is inconsistent with the Ground Truth.
The Ground Truth image displays a single, solid horizontal line. According to Rule 2 (UNDERSCORE & LINE RULES), this is a stylistic or background line, not a placeholder underscore. Therefore, the OCR result must ignore it and output nothing or only meaningful text. The provided OCR content is "____", which consists of four underscores. This is an incorrect interpretation of the line as a placeholder, violating the rule that stylistic lines must be ignored. The OCR has hallucinated underscores where none should exist based on the GT's visual context. Hence, the OCR result is inconsistent with the Ground Truth.
Nutzen Sie das
Menü mit Hilfe
der angezeigten
Hinweisen.
Drücken Sie ▲ / ▼ um im Menü zu navigieren, drücken Sie ▶ / OK Taste um in ein Unter-
menü zu gelangen. Im Untermenü nutzen Sie ▲ / ▼ um eine Funktion zu wählen. Drü-
cken Sie ▶ / OK um in das Untermenü zu gelangen, nutzen Sies ◀/▶ um die jeweilige
Einstellung zu ändern.
* Drücken Sie MENU / ◀ um einen Schritt im Menü zurück zu gehen.
* Drücken Sie EXIT um das Menu komplett zu verlassen.
HINWEIS: Das Menü wird automatisch beendet, wenn keine Tasten betätigt werden.
1. Bild Menü
- Audio Menü
- Kanal Menü (ATV/DTV Modus)
Audiomodus:
Tiefen:
Höhen:
Balance:
Lautsprecher.
Surround(Rundumklang): Surround Funktion ein- oder ausschalten.
AVL (Auto Lautstärke): Regelt automatisch die gleichbleibente Lautstärke
aller angeschlossenen Quellen.
Wählen Sie den SPDIF Modus den Fernsehers
AUS, PCM oder Auto.
Sperren:
Sie müssen "Sperren" aktivieren um diese
Funktion nutzen zu können. Drücken
Sie die GRÜNE Taste um einen Kanal
zu sperren. Vergeben Sie anschließend ein Passwort. Durch erneutes drücken wird diese Funktion wieder deaktiviert.
Überspringen:
Drücken Sie die GELBE Taste um einen Kanal zu markieren, den Sie überspringen möch-
ten, wenn Sie auf der Fernbedienung die Kanaltasten hoch und runter drücken.

Bewegen:
Drücken Sie die BLAUE Taste um einen
Kanal zu markieren. Nutzen Sie ▲ / ▼
um ihn an eine beliebige Position zu
verschieben. Bestätigen Sie mit OK.
Favoritenverwaltung:
Mit den Farbtasten können Favoriten
angelegt oder wieder entfernt werden.
Max. 4 Favoritenisten sind möglich. RED-Fav1, GREEN-Fav2, YELLOW-Fav3, BLUE-Fav4.
Manuelle Suche analog:
Wählen DTV type, Sie können wählen zwischen (DVB-T), Kabel(DVB-C) und Satellit (DVB-S2).
Wählen Sie das Land
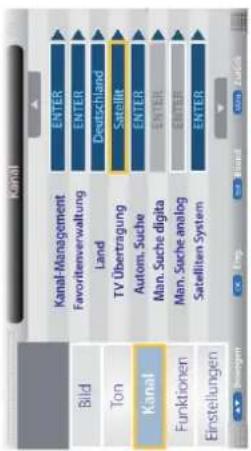
TV Übertragung:
Wenn die Kindersicherung aktiviert ist, geben Sie bitte das Passwort ein, um die automatische und manuelle Suche zu starten (Passwort: 0000).
Autom. Suche: Drücken Sie Die OK Taste um in den Auto Suche Modus zu wechseln, wählen Sie den Modus und drücken erneut OK.
Hinweis:
- ALL: Autosuche für DTV, ATV und
Radio.
DTV: Autosuche für DTV und Radio.
ATV: Autosuche für ATV.
- Drücken Sie die Menü Taste um den
Suchvorgang abzubrechen und zum vorherigen Vorschau-Menü zurückzukehren.
Color System: Rufen Sie mit der OK- bzw. Rechtsnavigationstaste das Untermenü auf, wählen Sie mit der Aufwärts-/Abwärtsnavigationstaste das gewünschte Farbsystem. Verfügbare Optionen: Auto, PAL, SECAM. Tonsystem: Rufen Sie mit der OK- bzw. Rechtsnavigationstaste das Untermenü auf, wählen Sie mit der Aufwärts-/Abwärtsnavigationstaste das gewünschte Klangsystem. Verfügbare Optionen: BG, DK, I, L, L'.
Satelliten System
Drücken Sie ▲ /▼ und wählen Sie "TV Übertragung", stellen Sie hier auf "Satellit".
Wählen Sie "Autom. Suche" wie folgt
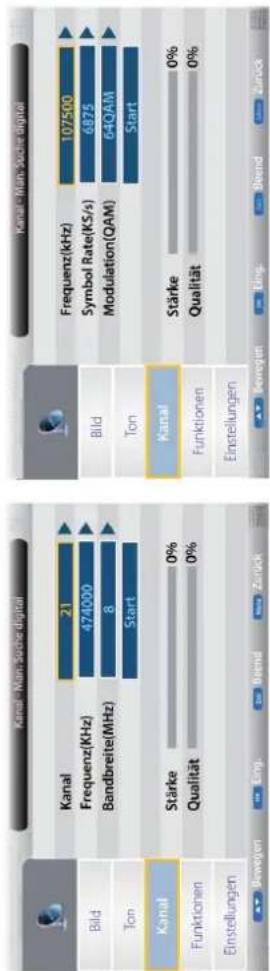
Manuelle Suche digital:
Drücken Sie ▲ / ▼ um zu dem "Kanal" Symbol zu gelangen, drücken Sie ◀/▶ um in die Einstellungen zu gelangen, anschließend gelangen Sie mit ▲ / ▼ zum "Start" Symbol. Drücken Sie ◀/▶ zur manuellen Suche.
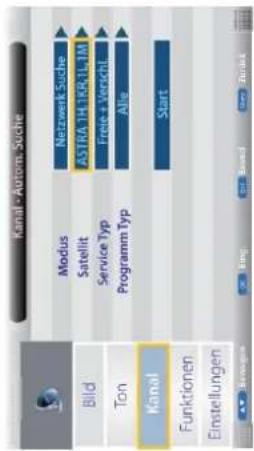
Hier werden die Vorgänge in der Satelliten Autom. Suche gezeigt:
| Option | Wert |
| Modus | Standard, Netzwerk Suche, Komplette Suche |
| Satellit | 65 Satelliten zur Suche (3 programmierbar) |
| Service Typ | All Services, Free Service |
| Programm Typ | Alle, nur TV |
Wenn TV Übertragung Kabel ist:
other
| Metric | Kanal - Man. Suche digital | | :--- | :--- | | Kanal | 21 | | Frequenz(KHz) | 474000 | | Bandbreite(MHz) | 8 | | Ton | Start | | Metric | Kanal - Man. Suche digital | | :--- | :--- | | Frequenz(kHz) | 107500 | | Symbol Rate(KS/s) | 6875 | | Modulation(QAM) | 64QAM | | Metric | Kanal | | :--- | :--- | | Stärke | 0% | | Qualität | 0% | | Category | Kanal - Man. Suche digital | | :--- | :--- | | Bild | | | Ton | Start | | Label | Kanal - Man. Suche digital | | :--- | :--- | | Frequenz(kHz) | 107500 | | Symbol Rate(KS/s) | 6875 | | Modulation(QAM) | 64QAM | | Label | Kanal | | :--- | :--- | | Stärke | 0% | | Qualität | 0% | | Category | Kanal | | :--- | :--- | | Gewegen | | | Eing. | | | Beend | | | Zurück | | Note: The chart displays two panels: the left panel shows 'Kanal' with Kanal at 21 and 'Frequenz(KHz)' at 474000; the right panel shows 'Kanal' with 'Frequenz(KHz)' at 107500 and 'Symbol Rate(KS/s)' at 6875. The 'Einstellungen' section contains 'Einstellungen' in both panels.Drücken Sie ▲ / ▼ und wählen Sie "TV Übertragung", stellen Sie hier auf "Satellit".
| Kanal | |
| Bild | Kanal-Management ENTER |
| Ton | Favoritenverwaltung ENTER |
| Kanal | Land Deutschland |
| TV Übertragung Satellit | |
| Funktionen | Autom. Suche ENTER |
| Einstellungen | Man. Suche digita ENTER |
| Man. Suche analog ENTER | |
| Satelliten System ENTER | |
Hier werden die Vorgänge in der Satelliten Liste gezeigt:
| Tasten | Aktion |
| oben | bewegt nach oben |
| unten | bewegt nach unten |
| links | wechsel zur Satellitenliste |
| rechts | wechsel zur Transponderliste |
| Menü | Zurück zum Menü |
| Exit | Verlässt das Menü |
| Grün | Satellit bearbeiten |
| Satellit | Transponder | ASTRA 1E,1G.3A | |||||
| 0002 | ASTRA | 1H,1KR,1... | 0001 | 11315 | H 22000 | ||
| 0003 | ASTRA | 2A,28.2D | 0002 | 11357 | H 22000 | LNB Typ | 973G/10600 |
| 0004 | ASTRA | 1E,1G.3A | 0003 | 11798 | H 27500 | LNB Power | Ein |
| 0005 | NILESAT | 101.10 | 0004 | 11836 | H 27500 | 22 KHz | Auto |
| 0006 | EUTELSAT | W3A | 0005 | 11876 | H 27500 | Toneburst | Keine |
| 0007 | EUTELSAT | W1 | 0006 | 11874 | H 27500 | DisEqCt.0 | Keine |
| 0008 | BADR-2,3,4 EURO | 0007 | 11954 | H 27500 | DisEqCt.1 | Keine | |
| 0009 | EUTELSAT | SES... | 0008 | 11992 | H 27500 | ||
| Stärke | 0% | Bearb. | |||||
| Qualität | 0% | Scannen | |||||
| Satellit | Transponder | ASTRA 1E,1G,3A | |||||
| 0002 | ASTRA | 1H,1KR,1... | 0001 | 11315 | H 22000 | ||
| 0003 | ASTRA | 2A,28,2D | 0002 | 11357 | H 22000 | LNB Typ. | 9750/10600 |
| 0004 | ASTRA | 1E,1G,3A | 0003 | 11798 | H 27500 | LNB Power | Ein |
| 0005 | NILESAT | 101,10 | 0004 | 11836 | H 27500 | 22 KHz | Auto |
| 0006 | EUTELSAT | W3A | 0005 | 11876 | H 27500 | Toneburst | Keine |
| 0007 | EUTELSAT | W1 | 0006 | 11874 | H 27500 | DisEqC1.0 | Keine |
| 0008 | BADR-2,3,4 EURO | 0007 | 11954 | H 27500 | DisEqC1.1 | Keine | |
| 0009 | EUTELSAT | SES... | 0008 | 11992 | H 27500 | ||
| Stärke | 0% | Hinzufügen | |||||
| Qualität | 0% | Lisch. | |||||
| Tasten | Aktion |
| oben | bewegt nach oben |
| unten | bewegt nach unten |
| links | wechsel zur Satellitenliste |
| rechts | wechsel zur Transponderliste |
| OK | aktivieren und deaktivieren eines Transponders |
| Menü | Zurück zur Satellitenliste |
| Exit | Verlässt das Menü |
| Rote | Transponder hinzufügen |
| Grüne | Transponder bearbeiten |
| Gelbe | Transponder löschen |
| Blaue | Transponder absuchen |
Hier werden die Vorgänge im Einstellungsmenü gezeigt:
| Tasten | Aktion |
| oben | bewegt nach oben |
| unten | bewegt nach unten |
| Menü | Zurück zur Transponderliste |
| Exit | Zurück zum Menü |
| Option | Value |
| LNB Typ | 9750/10600, 9750/10750, 05150, 05750, 09750, 10600, 10750, 11300, 11475, User Single, User Dual |
| LNB Power | Ein / Aus |
| 22KHz | Auto / Ein / Aus |
| Toneburst | Burst A, Burst B |
| DisEqC1.0 | Keine, LNB 1-4 |
| DisEqC1.1 | Keine (Aus), LNB1-16 |
| Motor | Keine, DisEqC1.2, DisEqC1.3 |
| Unicable | Ein / AusDie Einstellungen sind Abhängig von Ihrem System und müssen angepasst werden |
| Satellit | Transponder | ASTRA 1E,1G.3A | |||
| 0002 | ASTRA 1H,1KR,1... | 0001 | 11315 H 22000 | LNB Typ | 9750/10600 |
| 0003 | ASTRA 2A,2B,2D | 0002 | 11357 H 22000 | LNB Power | Ein |
| 0004 | ASTRA 1E,1G,3A | 0003 | 11798 H 27500 | 22 KHz | Auto |
| 0005 | NILESAT 101,10 | 0004 | 11836 H 27500 | Toneburst | Keine |
| 0006 | EUTELSAT W3A | 0005 | 11876 H 27500 | DisEqC1.0 | Keine |
| 0007 | EUTELSAT W1 | 0006 | 11874 H 27500 | DisEqC1.1 | Keine |
| 0008 | BADR-2,3,4 EURO | 0007 | 11954 H 27500 | ||
| 0009 | EUTELSAT SES... | 0008 | 11992 H 27500 | ||
4. Eigenschaften
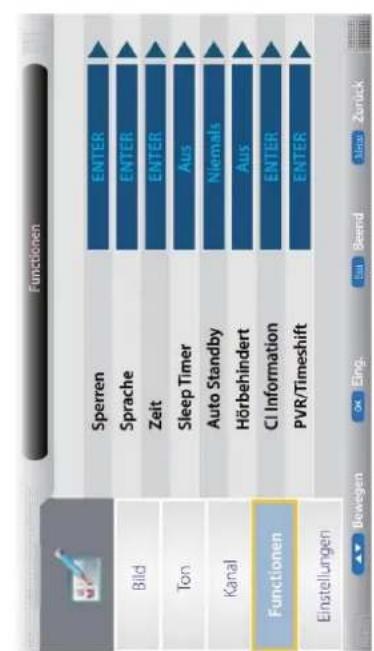
Sperren:
Dieses Menü ermöglicht es Ihnen, bestimmte Funktionen des Fernsehers zu sperren, so dass sie nicht benutzt oder gesehen werden können. Sperren Sie einzelne Programme, im Hotel Modus können hier komplette Menüs gesperrt werden. Wenn Sie das System-Menü gelangen wollen, wird nach einem Passwort gefragt. Standardpasswort: 0000.
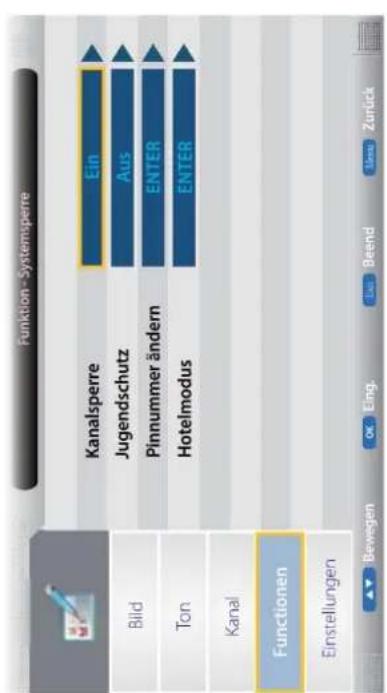
Kanalsperre - Aktivieren / Deaktivieren Sie die Sperren Funktionen.
Hinweis: Wenn die Funktion aktiviert ist, wird die Altersbeschränkung und das ändern des Passwortes gesperrt sein. Die Sendersuchfunktionen werden ebenfalls nicht abrufbar sein.
Jugendschutz - Aktivieren / Deaktivieren Sie die Altersbeschränkung.
Pinnummer ändern – Drücken Sie die OK Taste, geben zuerst den bisherigen Code ein, anschließend den neuen, und bestätigen sie erneut mit OK.
Hotel Modus
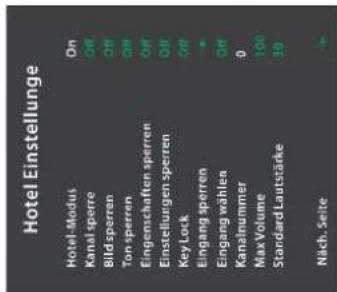
Hotel-Modus:
Kanal spetre.
Bid sperte
Top source
Eingenschafte
im Hotel Modus können hier komplette Menüs gesperrt werden. Wenn Sie das System-Menü gelangen wollen, wird nach einem Passwort gefragt. Standardpasswort: 0000.
Eingang sperten;
Lingang wöhlen:
Lingang Wang KAI
Kanalnummer:
Max Volume:
MAX VOLUME.
Standard Laufstärke:
Spatoon autobeton.
sperten aufleven.
(1) 2017年1月1日至2018年1月1日,公司与关联方累计发生关联交易的总金额为人民币45,000万元。
DataBase Exports
Database Export.
DateBase Import:
Information Service
vomenge Seite.
[Non-Text]
[Non-Text]
[Non-Text]
Sprache:
Sprache.
Zeit:
ZEN
[Non-Text]
6.1.2.3
Sleep Timer:
2024年1月1日
[Non-Text]
[Unreadable]
Auto Standby:
1
Horbenindert:
(二)本次股东大会采用现场会议和网络投票相结合的方式进行。
[Non-Text]
CL Information
Criminalisation:
(1) 2017年,公司与上海浦东发展银行股份有限公司签订了《关于使用部分闲置募集资金进行现金管理的协议》。
[Non-Text]
[Non-Text]
[Non-Text]
[Non-Text]
PVR/ Timeshift:

Aktivieren / Deaktivieren der Hotel-Modus-Funktion.
Deaktivieren Sie die Kanäle.
Deaktivieren Sie das Bildmet
Deaktivieren Sie die Sounds
Deaktivieren Sie die Funktion
Dockivision Sing der Sotun
Deaktivieren Sie das Setup
Deaktivieren Sie die Tasten
Decktuvieren Studio deступ
Deakheit sich die gewand
Wahlen Sie die Standardqu
Wöhlen Singhe Standweden
Wolfeff, die die Standogerd
Stellen Sie die max. Lautstär
Stellon Singler Standardlauts
Stellen Sie die Standardade
Deaktivieren Sie alle Sperrur
und die man, autista hat
und die max. Lausstände bet
Exportieren Sie alle Hotel-Eit
- 2017年1月1日
importieren Sie alle Hotels
Wählen Sie Vorherige Seite.
The following table is in English:
um zur vollengen Seite zur
广力云智慧零售收银系统
-
-
-
-
-
-
-
-
-
-
-
-
-
-
-
-
-
-
-
-
-
-
-
-
-
-
-
-
-
-
-
-
-
-
-
-
-
-
-
-
-
-
-
-
-
-
-
-
-
-
-
-
-
-
-
-
-
-
-
-
-
-
-
-
-
-
-
-
-
-
-
-
-
-
-
-
-
-
-
-
-
-
-
-
-
-
-
-
-
-
-
-
-
-
-
-
-
- 99.
-
-
-
-
-
-
-
-
-
-
-
-
-
-
-
-
-
-
-
-
-
-
-
-
-
-
-
-
-
-
-
-
-
-
-
-
-
-
-
-
-
-
-
-
-
-
-
-
-
-
-
-
-
-
-
-
-
-
-
-
-
-
-
-
-
-
-
-
-
-
-
-
-
-
-
-
-
-
-
-
-
-
-
-
-
-
-
-
-
-
-
-
-
-
-
-
Hier können Sie die ve
(1) _0 (2) _0 (3) _0 (4)
Hier können Sie die Ur
- 2017年1月1日
informationen automa
dienkämpfen Sie den C
Hier können Sie den St
Fornsebor nach einer k
Femisenter nach einem
Der TV schaltet sich au
Der TV Schaltet sich auf
Zeit nicht mehr bediet
Zelt nicht mehr dealer
Sie können wählen zw
sie kohnen warlich zu
Pay TV ist Bezahlfernse
(2) 1st December
entsprechender Smart
-
-
-
-
-
-
-
-
-
-
-
-
-
-
-
-
-
-
-
-
-
-
-
-
-
-
-
-
-
-
-
-
-
-
-
-
-
-
-
-
-
-
-
-
-
-
-
-
-
-
-
-
-
-
-
-
-
-
-
-
-
-
-
-
-
-
-
-
-
-
-
-
-
-
-
-
-
-
-
- 81.
-
-
-
-
-
-
-
-
-
-
-
-
-
-
-
-
-
-
-
-
-
-
-
-
-
-
-
-
-
-
-
-
-
-
-
-
-
-
-
-
-
-
-
-
-
-
-
-
-
-
-
-
-
-
-
-
-
-
-
-
-
-
-
-
-
-
-
-
-
-
-
-
-
-
-
-
-
-
bekommen. Dieser TV
C. 10-4
Smardcart auch HD+ t
keine Funktion.
- Einstellungen
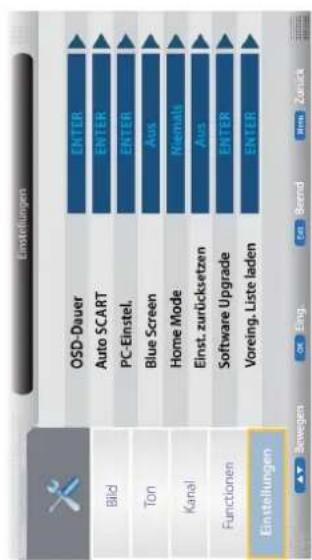
OSD-Dauer:
Programmwechsel ein.
Wechselt automatisch zur Scart-Quelle, wenn ein Gerät ange-
schlossen und eingeschaltet ist.
Ändern Sie die PC-Einstellungen im PC-Modus.
2. Wählen Sie aus, ob Sie Fotos, Musik, Filme oder eBooks (◄/►/OK) wiedergeben möchten.

- Drücken Sie ▲ / ▼ um den USB Stick auszuwählen und bestätigen Sie mit OK.
▲ / ▼ Datei/Ordner auswählen
▶II Ausgewählte Datei wiedergeben bzw. Abspielen der Wiedergabeliste starten
OK Ausgewählten Ordner öffnen, ausg wählte Datei zur Wiedergabeliste hinzufügen
GRÜN Alle Dateien im aktuellen Ordner zur Wiedergabeliste hinzufügen/entfernen
ROT Ausgewählte Datei löschen
Stellt die Bildschirmparameter automatisch ein.
Passen Sie die horizontale/vertikale Position des Bildschirms ein.
Passen Sie die Phase des Abtasttaktsignals des ADC relativ zu
dem Synchronisationssignal an, bis Sie ein stabiles Bild erhalten.
Stellen Sie die Pixeltaktfrequenz so ein, bis die Bildgröße für den
Bildschirm maximiert ist.
Aktiviert einen blauen Bildschirm beim Programmwechsel
Wählen Sie zwischen folgenden Modis: Home, Dynamic.
Einst. zurücksetzen: Setzt alle Einstellungen des TVs auf Werkseinstellung zurück.
Software Upgrade: Von Zeit zu Zeit wird es neue Firmware Updates geben, die
Verbesserungen am TV durchführt (Handling, weitere Optionen).
Besuchen Sie unsere Homepage für aktuelle Firmware-Updates.
Voreing. Liste laden: Laden Sie die Standard Proigrammliste (Werkssenderliste).
1. Fotos

natural_image
Weather-themed interface icons including play button, navigation bar, and menu bar (no readable text or symbols)Drücken Sie ◀/▶ um eine Option auszuwählen. Drücken Sie OK um es zu bestätigen.
Hinweis: Drücken Sie die OK Taste erneut, um die Leiste wieder einzublenden.
▶Ausgewähltes Foto anzeigen bzw. Abspielen der Wiedergabeliste starten. ■Stoppen und verlassen des Vollbildmodus.
Vorheriges/Nächstes Bild in der Wiedergabeliste anzeigen
(2) Bild drehen (90°, 180°, 270°, 0°)
Leiste zum Vergrößern des Bildes/Verschieben des vergrößerten Ausschnitts einblenden.
i Namen und technische Parameter des Fotos anzeigen
Zeigt die Fotoeinstellungen, wählen Sie hier Wiederholungsmodus, Hintergrundmusik, Musikquelle, Überblendzeit, Effekt. Wiedergabeliste anzeigen.
2. Musik
Drücken Sie ◀/▶ um eine Option auszuwählen. Drücken Sie OK um es zu bestätigen.
4. E-Book
![0.121 have 38 matchjes hat .robo hobb - in Kefilo - MAJECKI MAIN Type @majeckibigiat - to obtain the whole list Imajecki Robin Hobb - [The Tawny Man 01] - Fool's Ermand (v2.9) [ref].tar 409.53 KB Imajecki Robin Hobb - [The Tawny Man 01] - Fool's Ermand (covers & map).tar 255.8 KB Add/Del bookmark Gehe zu Seite Bookmark list Playlists Seite Seite In Beend.](/content/2026/05/862023/images/ac56593dc85de5e4810ae00d16ad8618c5b26be29bb8d93973074e6221818ad5.jpg)
▶Ausgewählten Titel anzeigen bzw. Abspielen der Wiedergabeliste starten. ■Stoppen und verlassen des Vollbildmodus. ◀◀▶▶Schneller Vor- oder Rücklauf. ◀◀▶▶Nächster oder vorheriger Titel.
Wählen Sie den Wiederholungsmodus. Wechselt das Fenster zwischen "Information" und "Playlist". Bildschirm abschalten (entspricht den Funktion der BLAUE)
◀◀ ▶▶ Schneller Vor- oder Rücklauf.
Nächster oder vorheriger Titel.


GELBE Taste: Anzeige der Lesezeichen-Liste. BLAUE Taste: Anzeige der Wiedergabeliste.
3. Film
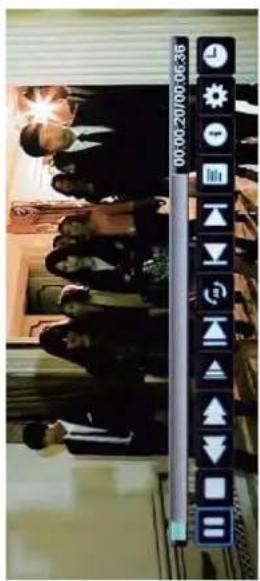
Drücken Sie ◀/▶ um eine Option auszuwählen. Drücken Sie OK um es zu bestätigen.
Hinweis: Drücken Sie die OK Taste erneut, um die Leiste wieder einzublenden.
▶II Ausgewählten Film anzeigen bzw. Abspielen der Wiedergabeliste starten. ■ Stoppen und verlassen des Vollbildmodus. ◀◀▶ Schneller Vor- oder Rücklauf
▶ Spielen Sie den Film in Zeitlupe.
Spielen Sie den Film im Schritt-Modus.
Stellen Sie die A-B-Wiederholung Spielmodus ein.
Nächster oder vorheriger Titel.
Wiedergabeliste anzeigen..
i Zeigt Informationen der aktuellen Datei an
Zeigt die Filmeinstellungen, wählen Sie hier Programm, Untertitel, Audio-, Wiederholungs-Modus.
Zu einer bestimmten Wiedergabeposition springen


3. Film
Zu einer bestimmten Wiedergabeposition springen
Zu einer bestimmten Wiedergabeposition springen
Zu einer bestimmten Wiedergabeposition springen
Zu einer bestimmten Wiedergabeposition springen
Zu einer bestimmten Wiedergabeposition springen
3. Film
Zu einer bestimmten Wiedergabeposition springen
Zu einer bestimmten Wiedergabeposition springen
Zu einer bestimmten Wiedergabeposition springen
Zu einer bestimmten Wiedergabeposition springen
Zu einer bestimmten Wiedergabeposition springen
Zu einer bestimmten Wiedergabeposition springen
Zu einer bestimmten Wiedergabeposition springen
Zu einer bestimmten Wiedergabeposition springen
Zu einer bestimmten Wiedergabeposition springen
Zu einer bestimmten Wiedergabeposition springen
Zu einer bestimmten Wiedergabeposition springen
图 1-2. 一个函数 f(x) = 12 时, f( x) = 2 ,且 f( x) = 2 。
Zu einer bestimmten Wiedergabeposition springen
Zu einer bestimmten Wiedergabeposition springen
Zu einer bestimmten Wiedergabeposition springen
Zu einer bestimmten Wiedergabeposition springen

natural_image
Pure black horizontal bar with no text or symbolsZu einer bestimmten Wiedergabeposition springen
Zu einer bestimmten Wiedergabeposition springen
Zu einer bestimmten Wiedergabeposition springen
Zu einer bestimmten Wiedergabeposition springen
natural_image
Pure black horizontal bar with no text or symbolsZu einer bestimmten Wiedergabeposition springen
Zu einer bestimmten Wiedergabeposition springen
Zu einer bestimmten Wiedergabeposition springen
Zu einer bestimmten Wiedergabeposition springen
Zu einer bestimmten Wiedergabeposition springen
Zu einer bestimmten Wiedergabeposition springen
图 1-2. 一个函数 f(x) = 12 时, f( x) = 2 ,且 f( x) = 2 。
Zu einer bestimmten Wiedergabeposition springen
Zu einer bestimmten Wiedergabeposition springen
Zu einer bestimmten Wiedergabeposition springen
Zu einer bestimmten Wiedergabeposition springen
natural_image
Pure black horizontal bar with no text or symbols图 1-2. 一个函数 f(x) = 12 时, f( x) = 2 ,且 f( x) = 2 。
Zu einer bestimmten Wiedergabeposition springen
Zu einer bestimmten Wiedergabeposition springen
Zu einer bestimmten Wiedergabeposition springen
Zu einer bestimmten Wiedergabeposition springen
Zu einer bestimmten Wiedergabeposition springen
Zu einer bestimmten Wiedergabeposition springen
Zu einer bestimmten Wiedergabeposition springen
natural_image
Pure black horizontal bar with no text or symbolsZu einer bestimmten Wiedergabeposition springen
Zu einer bestimmten Wiedergabeposition springen
Zu einer bestimmten Wiedergabeposition springen
图 1-2. 一个函数 f(x) = 12 时, y = -2 .
Zu einer bestimmten Wiedergabeposition springen
Zu einer bestimmten Wiedergabeposition springen
Zu einer bestimmten Wiedergabeposition springen
natural_image
Pure black horizontal bar with no text, symbols, or markings
natural_image
Pure black horizontal bar with no text or symbolsZu einer bestimmten Wiedergabeposition springen
Zu einer bestimmten Wiedergabeposition springen
Zu einer bestimmten Wiedergabeposition springen
Zu einer bestimmten Wiedergabeposition springen
Zu einer bestimmten Wiedergabeposition springen
Zu einer bestimmten Wiedergabeposition springen
Zu einer bestimmten Wiedergabeposition springen
natural_image
Pure black horizontal bar with no text or symbolsZu einer bestimmten Wiedergabeposition springen
Zu einer bestimmten Wiedergabeposition springen
图 1-2. 一个函数 f(x) = 12 时, f(x) = 2 。
Zu einer bestimmten Wiedergabeposition springen
Zu einer bestimmten Wiedergabeposition springen
Zu einer bestimmten Wiedergabeposition springen
natural_image
Pure black horizontal bar with no text or symbolsZu einer bestimmten Wiedergabeposition springen
natural_image
Pure black horizontal bar with no text or symbolsZu einer bestimmten Wiedergabeposition springen
Zu einer bestimmten Wiedergabeposition springen
Zu einer bestimmten Wiedergabeposition springen
Zu einer bestimmten Wiedergabeposition springen
Zu einer bestimmten Wiedergabeposition springen
Zu einer bestimmten Wiedergabeposition springen
Zu einer bestimmten Wiedergabeposition springen
natural_image
Pure black horizontal bar with no text, symbols, or markingsZu einer bestimmten Wiedergabeposition springen
图 1-2. 一个函数 f(x) = 12 时, f(x) = 2 。
Zu einer bestimmten Wiedergabeposition springen
Zu einer bestimmten Wiedergabeposition springen
Zu einer bestimmten Wiedergabeposition springen
natural_image
Pure black horizontal bar with no text, symbols, or markingsZu einer bestimmten Wiedergabeposition springen
Zu einer bestimmten Wiedergabeposition springen
natural_image
Pure black horizontal bar with no text, symbols, or markingsZu einer bestimmten Wiedergabeposition springen
Zu einer bestimmten Wiedergabeposition springen
Zu einer bestimmten Wiedergabeposition springen
Zu einer bestimmten Wiedergabeposition springen
Zu einer bestimmten Wiedergabeposition springen
Zu einer bestimmten Wiedergabeposition springen
Zu einer bestimmten Wiedergabeposition springen
Zu einer bestimmten Wiedergabeposition springen
图 1-2. 一个函数 f(x) = 12 时, f(x) = 2 。
Zu einer bestimmten Wiedergabeposition springen
Zu einer bestimmten Wiedergabeposition springen
图 1-2. 一个函数 f(x) = 12 时, f(x) = 2 。
Zu einer bestimmten Wiedergabeposition springen
natural_image
Pure black horizontal bar with no text or symbolsZu einer bestimmten Wiedergabeposition springen
Zu einer bestimmten Wiedergabeposition springen
Zu einer bestimmten Wiedergabeposition springen
Zu einer bestimmten Wiedergabeposition springen
Zu einer bestimmten Wiedergabeposition springen
图 1-2. 一个函数 f(x) = 12 时, f(x) = 2 。
Zu einer bestimmten Wiedergabeposition springen
Zu einer bestimmten Wiedergabeposition springen
natural_image
Pure black horizontal bar with no text or symbolsZu einer bestimmten Wiedergabeposition springen
Zu einer bestimmten Wiedergabeposition springen
Zu einer bestimmten Wiedergabeposition springen
Zu einer bestimmten Wiedergabeposition springen
图 1-2. 一个函数 f(x) = 12 时, f(x) = 2 。
Zu einer bestimmten Wiedergabeposition springen
Zu einer bestimmten Wiedergabeposition springen
Zu einer bestimmten Wiedergabeposition springen
natural_image
Pure black vertical bar with white horizontal stripe (no text or symbols)Zu einer bestimmten Wiedergabeposition springen
Zu einer bestimmten Wiedergabeposition springen
Zu einer bestimmten Wiedergabeposition springen
Zu einer bestimmten Wiedergabeposition springen
natural_image
Pure black vertical bar with white horizontal stripe (no text or symbols)Zu einer bestimmten Wiedergabeposition springen
Zu einer bestimmten Wiedergabeposition springen
Zu einer bestimmten Wiedergabeposition springen
natural_image
Pure black vertical bar with white horizontal stripe (no text or symbols)图 1-2. 一个函数 f(x) = 12 时, y = -2 , z = 0 .
Zu einer bestimmten Wiedergabeposition springen
Zu einer bestimmten Wiedergabeposition springen
Zu einer bestimmten Wiedergabeposition springen
图 1-2. 一个函数 f(x) = 12 时, f(x) = 2 。
natural_image
Pure black vertical bar with white horizontal stripe (no text or symbols)Zu einer bestimmten Wiedergabeposition springen
Zu einer bestimmten Wiedergabeposition springen
Zu einer bestimmten Wiedergabeposition springen
Zu einer bestimmten Wiedergabeposition springen
Zu einer bestimmten Wiedergabeposition springen
Zu einer bestimmten Wiedergabeposition springen
图 1-2. 一个函数 f(x) = 12 时, y = -2 , z = 0 .
Zu einer bestimmten Wiedergabeposition springen
natural_image
Pure black vertical bar with white horizontal stripe (no text or symbols)Zu einer bestimmten Wiedergabeposition springen
Zu einer bestimmten Wiedergabeposition springen
Zu einer bestimmten Wiedergabeposition springen
图 1-2. 一个函数 f(x) = 12 时, y = 0 , z = -2 .
图 1-2. 一个函数 f(x) = 12 时, y = 0 , z = -2 .
Zu einer bestimmten Wiedergabeposition springen
图 1-2. 一个函数 f(x) = 12 时, y = 0 , z = -2 .
Zu einer bestimmten Wiedergabeposition springen
图 1-2. 一个函数 f(x) = 12 时, y = 0 , z = -2 .
Zu einer bestimmten Wiedergabeposition springen
natural_image
Pure black vertical bar with white horizontal stripe (no text or symbols)Zu einer bestimmten Wiedergabeposition springen
Zu einer bestimmten Wiedergabeposition springen
natural_image
Pure black vertical bar with white horizontal stripe (no text or symbols)Zu einer bestimmten Wiedergabeposition springen
图 1-2. 一个函数 f(x) = 12 时, y = 0 , z = -2 .
Zu einer bestimmten Wiedergabeposition springen
图 1-2. 一个函数 f(x) = 12 时, y = 0 , z = -2 .
图 1-2. 一个函数 f(x) = 12 时, y = 0 , z = -2 .
Zu einer bestimmten Wiedergabeposition springen
natural_image
Pure black vertical bar with white horizontal stripe (no text or symbols)Zu einer bestimmten Wiedergabeposition springen
natural_image
Pure black vertical bar with white horizontal stripe (no text or symbols)Zu einer bestimmten Wiedergabeposition springen
图 1-2. 一个函数 f(x) = 12 时, f(x) = 12 时, f(x) = 12 时, f(x) = 12 时, f(x) = 12 时,
图 1-2. 一个函数 f(x) = 12 时, f(x) = 12 时, f(x) = 12 时, f(x) = 12 时, f(x) = 12 时,
Zu einer bestimmten Wiedergabeposition springen
Zu einer bestimmten Wiedergabeposition springen
图 1-2. 一个函数 f(x) = 12 时, f(x) = 12 时, f(x) = 12 时, f(x) = 12 时, f(x) = 12 时,
natural_image
Pure black vertical bar with white horizontal stripe (no text or symbols)
natural_image
Pure black vertical bar with white horizontal stripe (no text or symbols)Zu einer bestimmten Wiedergabeposition springen
图 1-2. 一个函数 f(x) = 12 时, y = -2 , z = 0 .
Zu einer bestimmten Wiedergabeposition springen
Zu einer bestimmten Wiedergabeposition springen
图 1-2. 一个函数 f(x) = 12 时, y = 0 , z = -2 .
Zu einer bestimmten Wiedergabeposition springen
图 1-2. 一个函数 f(x) = 12 时, y = 0 , z = -2 .
Zu einer bestimmten Wiedergabeposition springen
图 1-2. 一个函数 f(x) = 12 时, f(x) = 2 。
Zu einer bestimmten Wiedergabeposition springen
图 1-2. 一个函数 f(x) = 12 时, y = -2 , z = 0 .
Zu einer bestimmten Wiedergabeposition springen
Zu einer bestimmten Wiedergabeposition springen
图 1-2. 一个函数 f(x) = 12 时, y = 0 , z = -2 .
Zu einer bestimmten Wiedergabeposition springen
图 1-2. 一个函数 f(x) = 12 时, f(x) = 2 。
natural_image
Pure black vertical bar with white horizontal stripe (no text or symbols)Zu einer bestimmten Wiedergabeposition springen
natural_image
Pure black vertical bar with white horizontal stripe (no text or symbols)Zu einer bestimmten Wiedergabeposition springen
natural_image
Pure black vertical bar with white horizontal stripe (no text or symbols)图 1-2. 一个函数 f(x) = 12 时, f( x) = 2 ,且 f( x) = 2 。
Zu einer bestimmten Wiedergabeposition springen
图 1-2. 一个函数 f(x) = 12 时, f( x) = 2 ,且 f( x) = 2 。
Zu einer bestimmten Wiedergabeposition springen
natural_image
Pure black vertical bar with white horizontal stripe (no text or symbols)Zu einer bestimmten Wiedergabeposition springen
natural_image
Pure black vertical bar with white horizontal stripe (no text or symbols)图 1-2. 一个函数 f(x) = 12 时, y = -2 , z = 0 .
natural_image
Pure black vertical bar with white horizontal stripe (no text or symbols)图 1-2. 一个函数 f(x) = 12 时, y = -2 , z = 0 .
Zu einer bestimmten Wiedergabeposition springen
图 1-2. 一个函数 f(x) = 12 时, y = -2 , z = 0 .
natural_image
Pure black vertical bar with white horizontal stripe (no text or symbols)Zu einer bestimmten Wiedergabeposition springen
图 1-2. 一个函数 f(x) = 12 时, y = -2 , z = 0 .
Zu einer bestimmten Wiedergabeposition springen
E
Zu einer bestimmten Wiedergabeposition springen
图 1-2. 一个函数 f(x) = 12 时, f( x) = 2 ,且 f( x) = 2 。
Zu einer bestimmten Wiedergabeposition springen
图 1-2. 一个函数 f(x) = 12 时, f(x) = 12 时, f(x) = 12 时, f(x) = 12 时, f(x) = 12 时,
图 1-2. 用 R 表示, R = R( R^2) ,即, R = R( R^2) .
Zu einer bestimmten Wiedergabeposition springen
图 1-2. 一个函数 f(x) = 12 时, y = -2 .
Zu einer bestimmten Wiedergabeposition springen
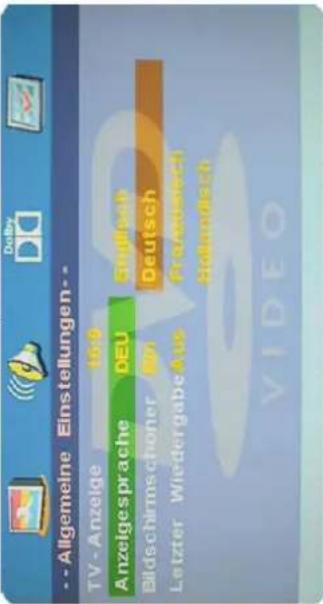
Menü Sprache
Wählen Sie hier die Menü Sprache.
Bildschirmschoner
Starten Sie den Bildschirmschoner. Er schaltet sich automatisch ein, wenn der Player längere Zeit nicht benutzt wird, um evtl. Schäden am TV Panel zu vermeiden.
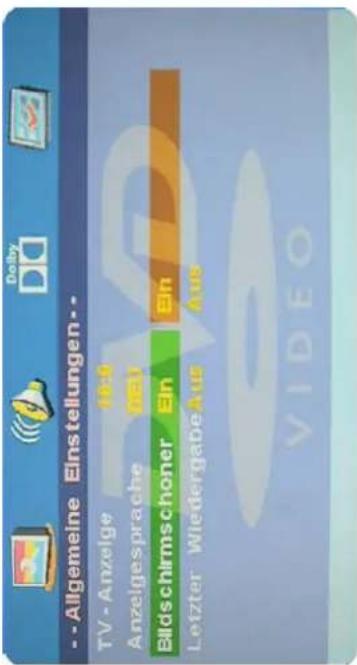
EIN: Starten Sie den Bildschirmschoner
AUC Framework on Go
AUS: Entfernen Sie den Bildschirmschoner
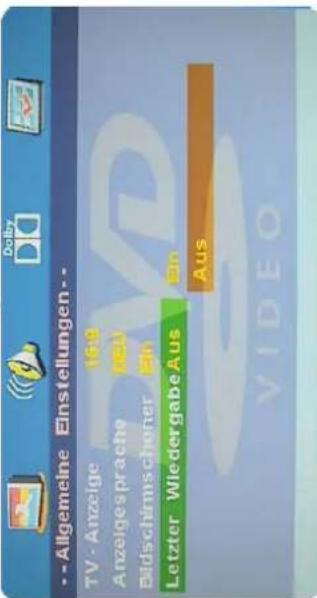
Letzte Wiedergabe
Wählen Sie zwischen Ein oder Aus.
Modus Ein: Die Einstellung wird gespeichert und das Gerät startet mit der gleichen Option, wie Sie es ausgeschaltet haben.
Modus Ein: Das Gerät geht zurück zur Standardeinstellung.
Drücken Sie die Taste INPUT, um den DVD-Modus auszuwählen. Wenn keine Disc im DVD-Player eingelegt ist, wird „NO DISC“ angezeigt. Legen Sie die CD mit der richtigen Seite in den CD-Schlitz ein. Die bespielte Fläche nicht berühren. Halten Sie die Disc an der Außenseite mit den Fingern fest. Der DVD Player wird automatisch die Disc in den Player ziehen. Um die CD auszuwerfen, drücken Sie die Auswurftaste auf dem Fernseher oder die „EJECT“-Taste auf der Fernbedienung.
DVD Einstellung
- Der Setup-Modus bietet das Menü für die Konfigurationen: Allgemeines Setup-Menü, Audio-Setup-Menü, Dolby Digital, Einstellungen, Bevorzugte Einstellungen. - Wählen Sie die einzelnen Punkte mit den Pfeiltasten und der OK Taste aus. - Drücken Sie auf die Setup Taste um in das Menü zu gelangen mit der Pfeiltaste nach rechts gelangen Sie in das Untermenü. - Drücken Sie die Setup Taste erneut um das Menü zu verlassen.
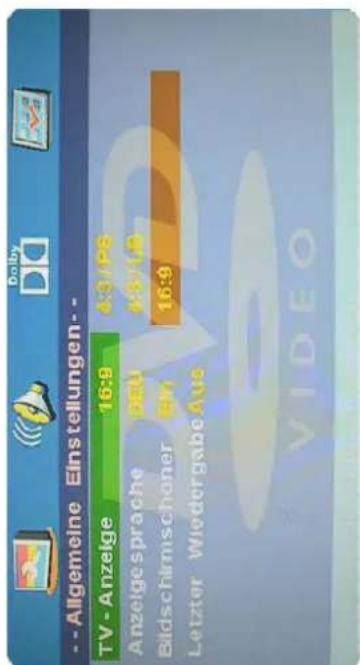
Allgemeine Einstellungen
• 4:3 Pan Scan
Breitbild-Sendungen werden auf dem Bildschirm angezeigt, aber einige Teile vom Bild werden automatisch abgeschnitten. • 4:3 Letter Box Breitbild-Sendungen werden auf dem Bildschirm angezeigt, aber mit schwarzen Balken am oberen und unteren Bildschirmrand. • Wide Einstellung für Breitbildfernseher.
Audio Einstellung
• Lautsprecher einstellen
Drücken Sie ▼ um die Lautsprecher Einstellungen auszuwählen, drücken Sie die OK Taste ▶ (Play) um in das Lautsprecher Menü zu gelangen.
Downmix
• LT/RT
Eine Disc mit einer Multikanal Tonspur wird als Ausgangssignal in den linken und rechten Kanal verteilt. Stereo Eine Disc mit einer Multikanal Tonspur wird als Ausgangssignal in Stereo umgewandelt.
Dolby Digital Setup
• Dynamisch
Diese Option wird verwendet, um das Kompressionsverhältnis zu steuern und somit den Klang zu verbessern.
Bevorzugte Einstellungen
Sie müssen 2x Stop drücken um in die Einstellungen zu gelangen.
• PAL
Diese Option wird gewählt, wenn der DVD-Player mit einem PAL TV-System verwendet wird (Standard in Europa).
- Multi
Der DVD Player wird den TV automatisch nach der eingelegten Disc einstellen. - NTSC Diese Option wird gewählt, wenn der DVD-Player mit einem NTSC-System verwendet wird.
Audio
Wenn mehrere Sprachen auf einer Disc verfügbar sind, können Sie die Sprache hier auswählen. Andernfalls wird die Standardsprache von der Disc wiedergegeben.

Untertitel
Wenn mehrere Untertitel auf einer Disc verfügbar sind, können Sie die Untertitel hier auswählen. Andernfalls wird der Standarduntertitel von der Disc wiedergegeben.
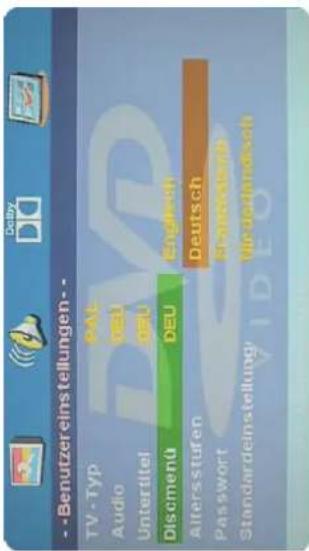
Disc Menü
Wenn mehrere Sprachen auf einer Disc verfügbar sind, können Sie die Sprache hier auswählen. Andernfalls wird der Standardsprache von der Disc wiedergegeben.
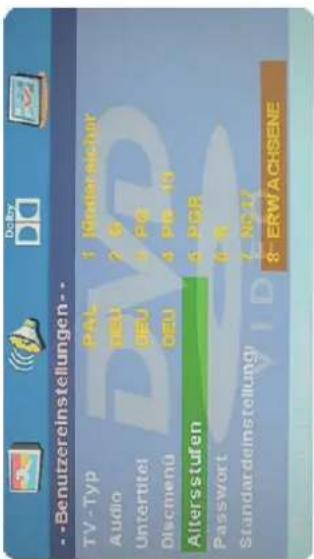
Kinderschutz
Wenn Sie die Disc mit Kindersicherung abspielen, können Sie eine Alterskontrolle nach einem gewünschten Grad auswählen. Wenn z.B. PG ausgewählt wird, kann keine DVD höher alt die PG-Klasse abgespielt werden.
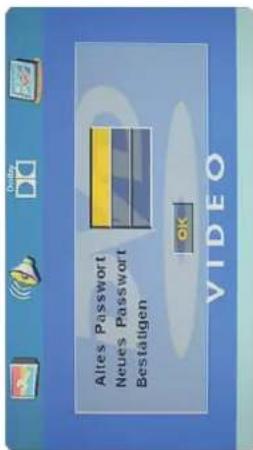
Passwort
Sie können das Passwort für die Altersfreigabe ändern. Gehen Sie dazu in das Passwortmenü.
Hinweis: Das Standard Passwort ist 123456.
Standard
Hier können Sie die original Standard Einstellungen wählen.
Unterstützte Dateiformate für den USB-Modus
| *.dat, *.mpg, *.mpeg | MPEG1, MPEG2 | MPEG1/2 Layer 1/2/3, AAC/HEAAC, LPCM/ADPCM AC3/EAC3 | 1080P@30fps 50Mbit/sec | |
| MPEG2, H.264, VC1, AVS, MVC | MPEG1/2 Layer 1/2/3, AAC/HEAAC, LPCM/ADPCM AC3/EAC3 | H.264:1080Px2@25fps 1080P@50fps MVC: 1080P@24fps Other: 1080P@30fps 50Mbit/sec | ||
| *.vob | MPEG2 | MPEG1/2 Layer 1/2/3, AC3, LPCM | 1080P@30fps 50Mbit/sec | |
| *.mkv | MPEG1, MPEG2, MPEG4, H.264, XviD, VC1, WMV3, Motion JPEG | MPEG1/2 Layer 1/2/3, LPCM, AAC/HEAAC, AC3/EAC3 | H.264:1080Px2@25fps 1080P@50fps Other: 1080P@30fps 50Mbit/sec | |
| *.mp4,*.mov | MPEG1/2 Layer 3, AC3/EAC3, AAC/HEAAC, LPCM/ADPCM | H.264:1080Px2@25fps 1080P@50fps Other: 1080P@30fps 50Mbit/sec | ||
| *.avi | MPEG1/2/4, H.264 XviD, VC1, WMV3, Motion JPEG Sorenson H.263 | MPEG1/2 Layer 1/2/3, WMA, AAC/HEAAC, LPCM/ADPCM, AC3/EAC3 | H.264:1080Px2@25fps 1080P@50fps Other: 1080P@30fps 50Mbit/sec | |
| *.flv | H.264, Sorenson H.263 | MPEG1/2 Layer 3 AAC/HEAAC, LPCM/ADPCM | H.264:1080Px2@25fps 1080P@50fps Other: 1080P@30fps 50Mbit/sec | |
| *.3gp,*.3g2 | MPEG4, H.264 | 1920x1080@30P 20Mbit/sec | ||
| *.asf, *.wmv | MPEG2/4, WMV3 XviD, VC1, H.264, | MPEG1/2 Layer 1/2/3, LCPM, AAC/HEAAC, WMA, AC3/EAC3 | 1080P@30fps 50Mbit/sec | |
| *.mp3 | MPEG1 Layer 1/2/3 (mp3) | |||
| *.wav | LPCM | |||
| *.WMA/ASF | WMA, WMA Pro | |||
| *.m4a,*.aac | AAC, HEAAC | |||
| *.ac3 | AC3, EAC3 | |||
| *.jpg,*.jpeg | Baseline JPEG | 7680x4320 resolution | ||
| *.png | Progressive JPEG | 1280x1024 resolution | ||
| *.bmp | Interlace | |||
| *.txt | UTF-8 | 1Mb | ||
| *.srt | UNICODE ASCII | |||
PC-Eingang - typische Anzeige
Die folgende Tabelle ist ein Beispiel für einige der typischen Arten der Videoanzeige. Einige, aufgrund der nativen Au.ösung des Displays, werden automatisch skaliert, um das richtige Bild zu ermöglichen.
Ihr TV-Gerät unterstützt möglicherweise nicht verschiedenen Auflösungen. Die unterstützten Auflösungen sind unten aufgeführt.
Wenn Sie Ihren Computer mit einem nicht unterstützten Modus einschalter wird eine Warnmeldung auf dem Bildschirm angezeigt.
| 1 | 640x480 | 60Hz | 7 | 1024x768 | 60Hz |
| 2 | 640x480 | 72Hz | 8 | 1024x768 | 70Hz |
| 3 | 640x480 | 75Hz | 9 | 1024x768 | 75Hz |
| 4 | 800x600 | 60Hz | 10 | 1280x1024 | 60Hz |
| 5 | 800x600 | 72Hz | 11 | 1280x1024 | 75Hz |
| 6 | 800x600 | 75Hz | 12 | 1366x768 | 60Hz |
AV-und HDMI-Signalkompatibilität (Eingangssignaltypen)
Hinweis: In einigen Fällen wird ein Signal auf dem LED-TV nicht richtig angezeigt. Das Problem kann eine Inkompatibilität mit den Standards des externen Geräts sein (DVD-Player, etc..).
Wenn ein Problem auftritt, wenden Sie sich an den Hersteller des externen Geräts.
| HDMI | 480I | 60Hz | O |
| 480P | 60Hz | O | |
| 576I | 50Hz | O | |
| 576P | 50Hz | O | |
| 720P | 50Hz | O | |
| 720P | 60Hz | O | |
| 1080I | 50Hz | O | |
| 1080I | 60Hz | O | |
| 1080P | 24Hz | O | |
| 1080P | 25Hz | O | |
| 1080P | 30Hz | O | |
| 1080P | 50Hz | O | |
| 1080P | 60Hz | O | |
| SCART | PAL | ○ | |
| NTSC 60 | ○ | ||
| RGB 50/60 | ○ | ||
| SECAM | ○ | ||
| AV | PAL 50/60 | ○ | |
| NTSC 60 | ○ | ||
| SECAM | ○ | ||
| YPbPr | 480I | 60Hz | ○ |
| 480P | 60Hz | ○ | |
| 576I | 50Hz | ○ | |
| 576P | 50Hz | ○ | |
| 720P | 50Hz | ○ | |
| 720P | 60Hz | ○ | |
| 1080I | 50Hz | ○ | |
| 1080I | 60Hz | ○ | |
Hinweis:
Gewicht und Abmessungen sind nicht die absolut exakten Werte.
Technische Details können jederzeit geändert werden (nach Hersteller) ohne vorherige
Ankündigung.
Konformitätserklärung
Hiermit wird die Übereinstimmung mit folgenden Richtlinien/N
Richtlinie zur elektromagnetischen Vert
Kein Bild
- Überprüfen Sie, ob das Antennenkabel korrekt angeschlossen ist.
- Überprüfen Sie, ob der richtige Eingang ausgewählt wurde; verwenden Sie die
Taste INPUT.
- Überprüfen Sie die Helligkeit- und Kontrasteinstellungen im Bildeinstellungen.
Kein Ton
- Überprüfen Sie, ob der Ton ausgeschaltet oder die Stummschaltung aktiviert ist
(MUTE).
- Erhöhen Sie vorsichtig die Lautstärke.
- Prüfen Sie, ob die Audio-Kabel an den korrekten Eingängen angeschlossen sind.
berprüfen Sie, ob das Antenne
Schlechte Bildqualität
- Prüfen Sie, ob der korrekte Eingang ausgewählt ist; verwenden Sie die Taste INPUT.
- Überprüfen Sie die Verbindung zum TV Fernsehgerät.
- Überprüfen Sie die Videoeinstellungen.
Bild zu gross/klein oder verzerrt
- Benutzen Sie die Taste ASPECT, um die Darstellung des Bildes zu ändern.
Fernbedienung arbeitet nicht
- Wechseln Sie die Batterien.
- Benutzen Sie die Fernbedienung in der spezi. zierten Reichweite (max. 5 Meter und 30°)
- Vermeiden Sie direkte Lichteinstrahlung in den Infrarotsensor.

LDD167 GEWÄHRLEISTUNG
Die Firma UltraMedia GmbH & Co.
Handels KG
Friedrich-Penseler-Str. 28
D-21337 Lüneburg
Tel.: +49/ (0) 4131/9239-20, Fax: +49/ (0) 4131/9239-55 (Mo.-Do.: 08:00-17:00, Fr.: 08:00-14:00)
www.ultramedia.de
service@ultramedia.de
übernimmt für dieses Produkt eine Gewährleistung für die Dauer von 24 Monaten ab Kaufdatum.
Ausgeschlossen von der Gewährleistung sind Verschleißteile, ästhetische Teile, Produkte mit beschädigtem Gewährleistungssiegel oder nicht lesbarer/vorhandener Seriennummer, sowie Schäden, die durch unsachgemäße Bedienung und/oder unsachgemäßem Gebrauch, durch den Gebrauch von nicht originalen Ersatzteilen, ungeeigneter Verpackung oder aus irgendeinem weiteren Grund verursacht werden, die den "Reflexion" Produkten nicht zuzuschreiben sind.
Auf Zubehörteile, wie z.B. die Fernbedienung, das Netzteil, etc. gewähren wir eine Garantie von 6 Monaten ab Kaufdatum.
Beachten Sie unbedingt die Warnhinweise in der Bedienungsanleitung.
Im Garantiefall senden Sie das Gerät, falls möglich, in der Originalverpackung mit komplettem Zubehör, einem Anschreiben von Ihnen mit Adresse und Telefon-/Faxnummer und/oder Email-Adresse und einer Kopie Ihres Kaufbeleges frei Haus (Absender übernimmt Fracht) an oben angegebene Adresse ein. Unfreie Pakete können nicht angenommen werden. Für Transportschäden von Geräten, die nicht in der Originalverpackung verschickt werden, übernimmt die UltraMedia GmbH keine Haftung! Vor einem eventuellen Versand des Gerätes setzen Sie sich bitte, sollten noch Fragen bestehen, mit uns unter der oben angegebenen Adresse, Tel.-, Faxnummer oder Mailadresse in Verbindung. Einige Probleme können auch durch den Servicesupport telefonisch oder per Email geklärt werden.
Nach erfolgter Reparatur senden wir Ihnen das Gerät frei Haus zurück.

English
LED Television LDD167

natural_image
Front view of a black horizontal monitor with 'RELXION' branding and a CD/DVD disc on the right (no text or symbols on screen)The lightning flash with arrowhead symbol, within an equilateral triangle is intended to alert the user to the presence of un-insulated "dangerous voltage" within the products enclosure that may be of sufficient magnitude to constitute a risk of electric shock to the persons.
Correct disposal of this Product
This symbol indicates that the relevant electrical product or battery should not be disposed of as general household waste in Europe. To ensure the correct waste treatment of the product and battery, please dispose them in accordance to any applicable local laws of requirement for disposal of electrical equipment or batteries. In so doing, you will help to conserve natural resources and improve standards of environmental protection in treatment and disposal of electrical waste (Waste Electrical and Electronic Equipment Directive).
This symbol means that electrical and electronic equipment, at their end of life should be disposed of separately from your household waste. Please dispose of this equipment at your local community waste collection/recycling center. In the USA there are separate collection systems for used electrical and electronic products. Please help us to conserve the environment we live in!


| Caution | 03 |
| Safety Information | 04 |
| Accessories | 05 |
| Specification | 05 |
| Installing the pedestal stand | 06 |
| Producte Information | |
| Front View | 08 |
| Connections | 09 |
| Remote Control | 10 |
| Basic Connection | |
| Connecting Power Cord | 12 |
| Connecting Power RF Cabel | 13 |
| Connecting Satellite Dish | 13 |
| Connecting to HDMI connector | 14 |
| Connecting to SCART connector | 14 |
| Connecting to a PC | 15 |
| Connecting to Coaxial Output | 15 |
| Connecting to Composite Terminal | 16 |
| Connecting to Component Terminal | 16 |
| Connecting to a Headphone | 17 |
| Connecting to an USB device | 17 |
| Connecting to a Common Interface | 18 |
| Wall Mount | 19 |
| Auto Installation | 20 |
| Basic Operation | |
| Picture Menu | 23 |
| Sound Menu | 24 |
| Channel Menu | 25 |
| Function Menu | 30 |
| Setup Menu | 32 |
| Multimedia Operation | |
| Photo | 34 |
| Music | 34 |
| Movie | 35 |
| eBook | 35 |
| DVD Operation | |
| General Setup | 36 |
| Audio Setup | 38 |
| Dolby Digital | 39 |
| Preference Setup | 39 |
| Appendix | 42 |
| Troubleshooting | 44 |
| Declaration of Conformity | 45 |
- LEDTV 5. Converter cable YUV
- Remote control 6. Power supply
- 2x Batteries 7. 12V car cable
- Auto active DVB-T Antenna
- Converter cable AV
Specifications
| Display | LED display (Pixel class 1) |
| Screen size | 15,6" (40,0 cm) |
| Resolution | 1366 x 768 |
| Contrast ratio | 500:1 |
| Brightness value | 200 cd/m2 |
| Viewing angle | 90° H / 60° V |
| Types of Reception | DVB-S / DVB-S2 / DVB-T / DVB-C |
| Speaker | 2x 3 W (Stereo) |
| Connections | RF input (DVB-T & DVB-C)RF input (DVB-S)PC input (D-Sub)Audio input coaxial (S/PDIF)PC Audio input 3,5 mmHeadphoe output 3,5 mmHDMI inputVideo / Audio (L/R) (with adapter)YUV (with adapter)USB 2.0 (Mediaplayer / Softwareupgrade)Scart |
| CI+ slot | yes (HD+ ready) |
| DVD player (integrated sideways) | DVD-R/-RW/+R/+RW, VCD, CD, CD-R/-RW |
| Playback formats video / photo / audio | MPEG 1-4, VOB, AV, XVID / JPEG / MP3, AC3, MP2, MPEG1, PCM, LPCM, OGG |
| Power supply | AC 110V ~ 240V, 50/60 Hz / DC 12 Volt |
| Power consumption working / standby | max. 28 W / < 0,5 W |
| VESA standard | 75 x 75 mm |
To ensure reliable and safe operation of this equipment, please read carefully all the instructions in this user guide, especially the safety information below.
Electrical safety
To prevent overload, don't share the same mains supply socket with too many other items of equipment.
- Do not place any connecting wires where they may be stepped or
- Do not place heavy items on the leads, which may damage them.
- Hold the Mains plug, not the wires, when removing from a socket.
- During a thunderstorm or while leaving the TV for long periods, disconnect the ae-
rial (if outdoor) and the power supply.
- Do not allow water or moisture to enter the TV. Do NOT use in wet or moist areas
such as Bathrooms, steamy kitchens or near swimming pools.
Pull the plug out immediately, and seek professional help if:
• the mains plug or cable is damaged
- Liquid is split onto the set, or if it is accidentally exposed to water or moisture
• Anything accidentally penetrates the ventilation slots
• The set does not work normally.
- Do NOT remove the safety covers. There are no user serviceable parts inside. You may invalidate the warranty. Qualified personal only are permitted to service this
apparatus.
• To avoid battery leakage, remove exhausted batteries from the remote control
handset, or when not using for along period.
- Do NOT break open or throw exhausted batteries on a fire.
Physical safety
- Do NOT block ventilation slots in the back cover. You may place the TV in a cabinet,
but ensure at least 5cm (2") clearance all around the unit.
- Do NOT tap or shake the TV screen, you may damage the internal circuitry. Take
good care of the remote control, do not drop it or allow it to come into contact with
liquids.
• To clean the TV use a soft dry cloth. Do NOT use solvents or petrol based fluids. For
stubborn stains, you may use a damp soft cloth with diluted detergent.
Insatll this TV by the pedestal stand (supplied).
For proper installation, please see the proceedings as follows:
a. Put the TV face down on a soft and flat surface (blanket, foam etc.) to prevent damage and scratching to the TV.
b. Put the base (x) on the neck (y) of the TV, and then fasten it by the screws supplied.
Notes:
When attaching the stand, make sure the screws are fastened tightly.
If the screws are not fastened tightly, it will make the TV unstable and may even tip over. Do not use other than the supplied screws.
natural_image
Technical line drawing of a vertical cylindrical device with directional arrows indicating rotation or movement (no text or symbols)Notes:
All parts must be positioned correctly and all screws must be fixed tightly. Otherwise, the TV may become unstable and could tip over to cause damage and injury. Do not force the TV to tilt horizontally more than the stand endures. Do not tilt the screen up or down to avoid damage on the stand and it may cause the TV to become unstable.
Front View
Side View
Connections

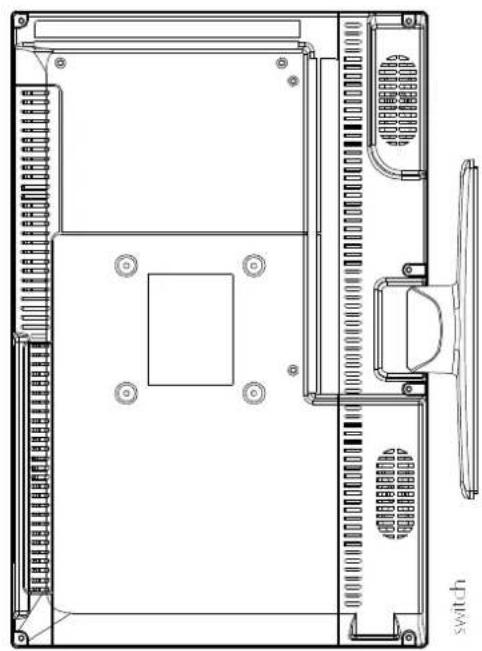
natural_image
Technical line drawing of a computer monitor rear panel with ventilation slots and a switch (no text or symbols)
Insert disc with label side towards back
natural_image
Diagram of a vertical cylindrical device with a red arrow pointing to its side (no text or symbols present)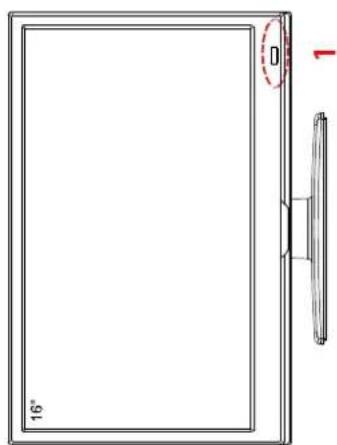
- (IR) Infrared Receiver: Receives IR signals from the remote control. (Power ON / Power OFF) LED indicator: Press POWER to turn on and off.
indicator on (green) = Power on mode
indicator on (red) = Standy mode
Top View
natural_image
Technical line drawing of a mechanical component with internal channels and a labeled section (no text or symbols)- The functions of the buttons are described as below:

EJECT PLAY INPUT MENU VOL- VOL+ CH- CH+ POWER
INPUT: Press to display the input source menu.
MENU: Press to display the OSD menu, press again to exit the menu.
CH+/-: Press to scan through channels.
VOL +/-: Press to adjust the volume.
PLAY: Play/Pause the programm.
EJECT: Eject the disc.
POWER: Turn on/off the TV set.
Remote control
| STANDBY | MUTE |
| 1 | 2 3 |
| 4 | 5 6 |
| 7 | 8 9 |
| - | 0 |
| EPG | FAV CH LIST TV/RADIO |
| TV MENU | VOL CH EXIT |
| SUBTITLE | DISPLAY |
| AUTO | TEXT HOLD SUBPAGE |
| CANCEL | REVEAL INDEX SIZE |
| AUDIO | D.DISP D.MENU D.SUU |
| MEDIA | |
| PROG | TITLE REPEAT A-B |
| POWER ⬆ : | Turn the TV on/standby. |
| MUTE ⬇ : | Press to mute the sound, press again or press VOL+ to unmute. |
| VOL +/-: | Adjust the volume. |
| CH +/-: | Scan through channels. |
| INPUT: | Press to display the input source menu. |
| SLEEP: | Standby timer. |
| CURSOR KEYS: | Allows you to navigate OSD menus and adjust the system settings to your preference. |
| OK: | Confirm the selection. |
| NR. BUTTONS: | Press 0-9 to select a TV channel directly when you are watching TV. |
| -/--: | Select 2-digit or 3-digit TV channel. |
| Return to the previous channel viewed. | |
| EPG: | To show the Electronic Program Guide during no-menu state only in DTV mode. |
| FAV: | Display the favorite program list. |
| CH.LIST: | Display the channel list. |
| TV/RADIO: | Switch to TV/RADIO. |
| TV MENU: | System setup menu. |
| EXIT: | Exit the OSD menu. |
| NICAM/A2: | TV Nicam/A2 select. |
| ASPECT: | Change the screen display mode. |
| SUBTITLE: | Turn on/off the subtitle display in DTV mode. |
| DISPLAY: | Press to display the current modes information. |
| AUTO: | Adjust to the optimal display settings in PC mode. |
Connecting RF Cable
Connecting a 75 Ohm aerial cable to the "RF IN" socket on the rear of the LED TV firmly.
other end of the power cord into a correctly wall outlet.
- Turn on the main power switch on the bottom of the LED TV, then press the POWER button on the side panel or the ⏻ button on the remote control to turn on the LED TV.
Notes:
Only use the AC/DC Adapter & Car Adapter provided.
Connect Satellite Dish
Connecting a 75 Ohm satellite cable to the "DVB-S/S2" socket on the rear of the LED TV firmly.
Notes:
To view television channel correctly, a signal must be received by the set.
Connecting to HDMI connector
HDMI (High Definition Multimedia Interface) is the first all digital consumer electronics A/V interface that supports uncompressed standard. One jack supports both video and audio information.
- Connect HDMI input connector on the LED TV to HDMI output connector on the DVD/Set-TV-Box by HDMI cable.
- Repeatedly press the SOURCE button on the remote control to select HDMI input source, then press the Enter button to perform your selection.
Notes:
No sound connection is needed for an HDMI connection.
Connecting to SCART connector
-
Connect the SCART connector on the external video device to the SCART connector on the LED TV by an SCART cabel.
-
Connect the coaxial cable from your amplifier to the coaxial output of the LED TV.
- You can enjoy the sound from the TV via by home theater system.
Connecting to a PC
-
Connect the VGA output termianl of your computer and the "VGA IN" (D-SUB 15PIN)" of the rear of your LED TV by a VGA cable
-
Connect the PC audio output terminal of your computer and the PC audio input terminal of the rear of your LED TV by an audio cable.
-
Repeatedly press the SOURCE button on the remote control to select PC input source, then press the Enter button to perform your selection.
The Ground Truth image displays a single, solid horizontal line, which is a stylistic or background element (like a rule line on paper). According to Rule 2, such lines must be ignored by the OCR result. The provided OCR content is "____", which consists of underscores. Underscores are not equivalent to a solid line and are not permitted under the “Stylistic/Background Lines (Ignore)” rule. Outputting underscores for a stylistic line is incorrect because it misinterprets the line as a placeholder fill-in-the-blank area. Since the OCR output incorrectly rendered a stylistic line as underscores (which should be ignored), this violates the rule. Therefore, the OCR result is inconsistent with the Ground Truth.
图图
[Non-Text]
[Non-Text]
[Non-Text]
[Non-Text]
[Non-Text]
Connecting to HDMI connector
Connecting to HDMI connector
HDMI (High Definition Multimedia)
interface tha information.
-
Connect HDMI by HDMI cable.
-
Repeatedly press the SOURCE button on the remote control to select HDMI input source, then press the Enter button to perform your selection.
The Ground Truth image displays a single, solid horizontal line, which is a stylistic or background element (like a rule line on paper). According to Rule 2, such lines must be ignored by the OCR result. The provided OCR content is "____", which consists of underscores. Underscores are not equivalent to a solid line and are not permitted under the “Stylistic/Background Lines (Ignore)” rule. Outputting underscores for a solid line constitutes an error, as it misrepresents the visual element and violates the instruction to ignore stylistic lines. Therefore, the OCR result is inconsistent with the Ground Truth.
图 1
Connecting to COAXIAL output
本公司及董事会全体成员保证信息披露内容的真实、准确和完整,没有虚假记载、误导性陈述或重大遗漏。
-
Connect the coaxial cable from your amplifier to the coaxial output of the LED TV.
-
Vincere, 1960, 2004, 7(1)
-
You can enjoy the sound from the TV via by home theater system.
(五) 2017年1月1日,公司召开2017年第二次临时股东大会,审议通过了《关于使用部分闲置募集资金进行现金管理的议案》,同意公司使用不超过人民币3.5亿元的闲置募集资金进行现金管理。
(1)
- Survey
(1) AD = BD = 1
|
|
(1)
回
1
Y HIFI
. . . . .
Coaxial cabel
(not supplied) | (○) || (○)
(not supplied) | →
(1)
- [0]
(2) 12 (3)
(1) 2017年,公司与上海浦东发展银行股份有限公司签订了《关于使用部分闲置募集资金进行现金管理的协议》。
广力云智慧零售收银系统
The Ground Truth image displays a single, solid horizontal line. According to Rule 2 (UNDERSCORE & LINE RULES), if the GT contains lines used for stylistic emphasis or as background elements (like a ruled line), the OCR result must ignore them. The line in the GT is clearly a stylistic or background line, not a placeholder for text. Therefore, the OCR should not have output any underscores. Outputting `____` constitutes an error under Rule 2, as it hallucinates placeholder symbols where none are semantically intended. No punctuation mismatch or formatting transformation applies here.
(1)基因通过控制 通过控制____,____的合成来控制代谢过程,进而控制生物体的性状。
(1)基因通过控制 通过控制____,____的合成来控制代谢过程,进而控制生物体的性状。
(1)基因通过控制 通过控制____,____的合成来控制代谢过程,进而控制生物体的性状。
The Ground Truth image displays a single, solid horizontal line. According to Rule 2 (UNDERSCORE & LINE RULES), this is a stylistic or background line, not a placeholder underscore. Therefore, the OCR result must ignore it and output nothing or only meaningful text. The provided OCR content is "____", which consists of four underscores. This is an incorrect interpretation of the line as a placeholder, violating the rule that stylistic lines must be ignored. The OCR has hallucinated placeholder underscores where none should exist in the GT. Hence, the OCR result is inconsistent with the Ground Truth.
[Non-Text]
[Non-Text]
[Non-Text]
Connecting to Composite (AV) Terminal
- Connect the video and audio signals by the composite (AV) adapter cable and RCA cable.
- Repeatedly press the SOURCE button on the remote control to select AV input source, then press the Enter button to perform your selection.
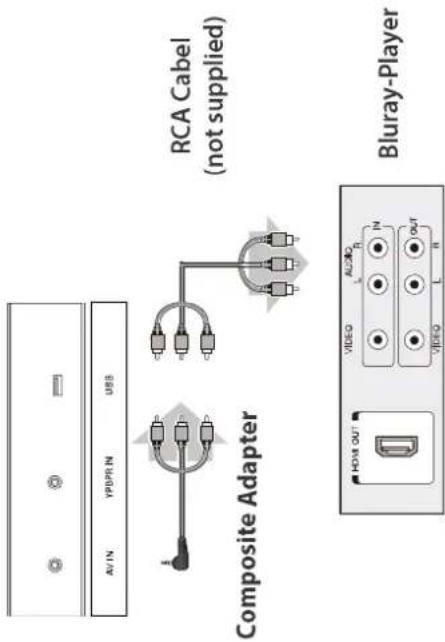
Connecting to Component (YPbPr) Terminal
- Connect the component signal by the component (YPbPr) adapter cable and component cable.
- Connect the audio signal by the composite (AV) adapter cable and audio cable.
- Repeatedly press the SOURCE button on the remote control to select YPbPr input source, then press the Enter button to perform your selection.
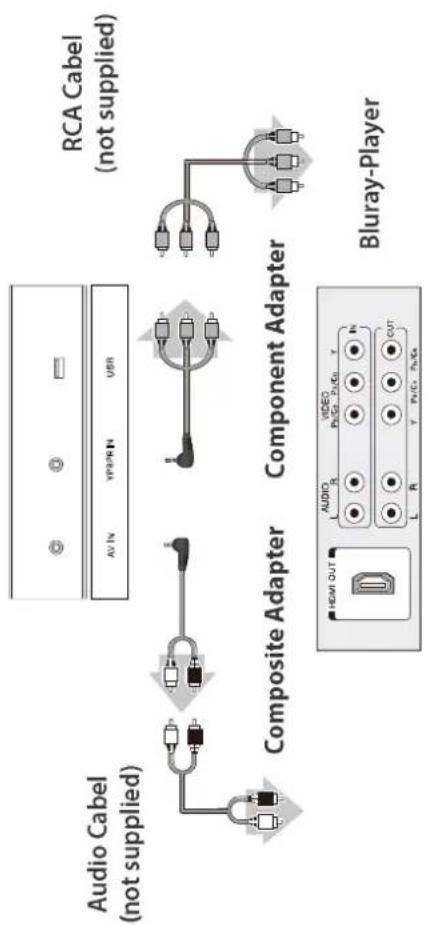
flowchart
graph TD
    A["Audio Cable (not supplied)"] --> B["Composite Adapter"]
    B --> C["Component Adapter"]
    C --> D["Bluray-Player"]
    style A fill:#f9f,stroke:#333
    style D fill:#bbf,stroke:#333
Connecting to a Headphone
-
You can connect a headphone to your LED TV if you wish to watch a TV program without disturbing the other people in the room.
-
Insert a headphone into the 3.5mm mini jack terminal on the LED TV. The sound is heard through the headphone.
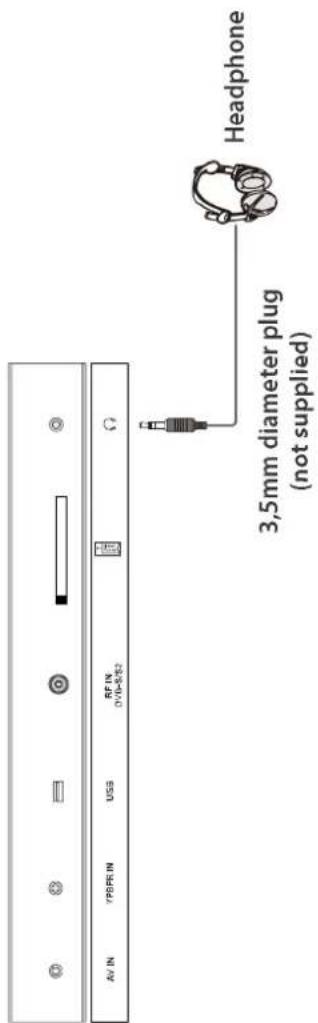
Connecting to an USB device
- Cable may be used when you connecting an USB device. (This cable is not supplied with LED TV.)

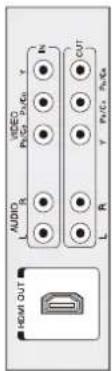
Connect to a Common Interface
This LED TV supports the latest Common Interface Standard: Common Interface Plus. The Common Interface Module menu provides access to software contained on Common Interface (CI) Modules.
- This function may not be available in some countries or regions. - Video and audio signals may not be output depending on broadcasts or services.
Although CI Module may enable you to view some services, this TV doesn't guarantee all service. (e.g. encrypted pay-TV channels)
Please use only the approved CI Modules by the broadcasters.
Consult your local dealer or broadcasters for more information or conditions of services.
Insert the Smard Card into the CA Module
Push the Smart Card into the CA Modules as far as it goes so that the side with the gold coloured contact clip is facing the side of CA Module marked with the provider's logo.
Note the direction of the arrow printed on the Smart Card.
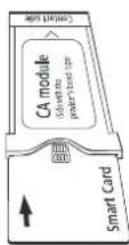
Notes:
Turn off Mains power On/Off switch when inserting or removing the CI module. If a view card and a card reader come as a set, first insert the card reader and then insert the view card into the card reader.
Insert the module in the correct direction.
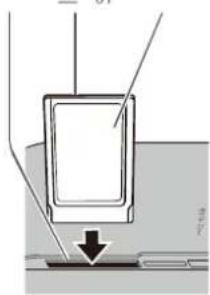
natural_image
Diagram of a door handle with arrows indicating direction (no text or symbols)Notes:
Please use a wall bracket appropriate for the size and weight of the LED TV. Two people are required for installation.
In these proceedings:
a. Firstly, attach the bracket to the wall. (Follow the instructions provided with your wall bracket.)
b. Then, remove the base from the LED TV.
c. Carefully lay the front of the unit face down on a flat, cushioned surface (blanket, foam, etc.), in order to avoid damage or scratches.
d. Fix the TV to the plate of the bracket, and tighten the screws on the mounting to the back of the TV with four threaded holes.
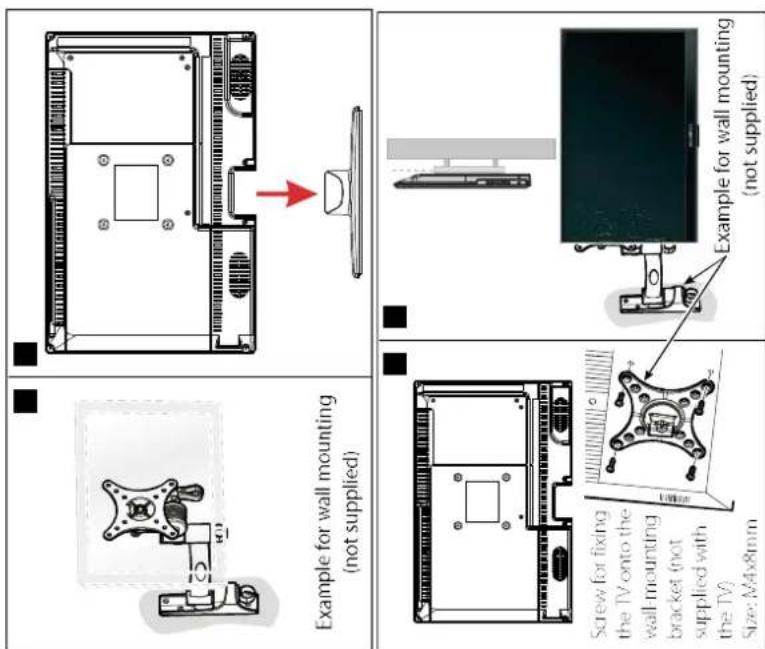
Notes:
Read and understand the instructions supplied with the wall mount bracket for installation on the wall as well as for fixing the TV in the correct way.
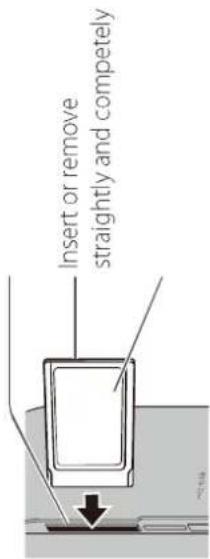
First Time Installation
Connect to power source and turn on the TV and below installation menu page will
display on the screen:
This is divided into 6 steps. Please select your personal settings. With the GREEN button to go to the next step, with the RED button to go back one
step.
Step 1
lome Mode:
- Home state
• Dynamic settings
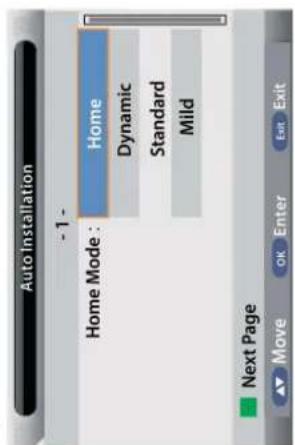
Step 2
Country:
choose the required country. (Germany)
[Non-Text]

Step 6
Satellite Setup:
select the preset list, or choose satellite
system to make your own settings. For
settings details, refer to "Basic Operation"
on page 27.
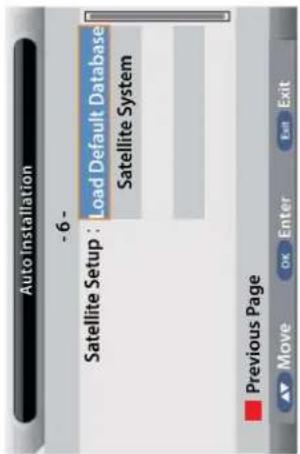
Step 3
Language:
choose the required language.(German)
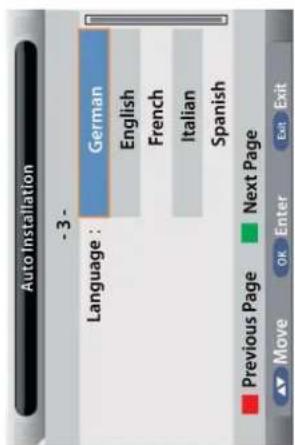
Step 4
Auto Power Off:
choose the required auto standby (off, 1 hour, 2 hour or 4 hour)
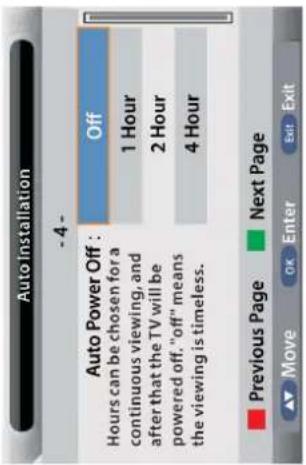
Step 5
TV Connection:
select the required operating mode (Air, Cable, Satellite)
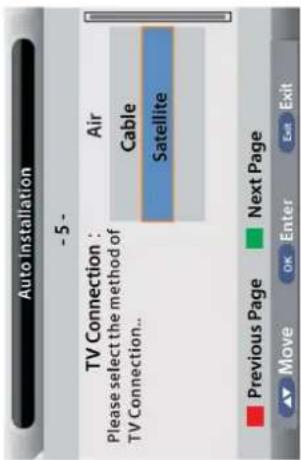
Power on/off
- Connect to the power supply with the adaptor.
To turn on the TV -> Press POWER button on the TV or remote control. To turn off the TV -> Press POWER button on the TV or remote control.
Input Source select
Press INPUT button on the TV set or remote control to display the input source menu, and use CH+/- button on the TV set or up/down button on remote control to select the input source, press OK button on the remote control to enter.
Note: Before you select the input source, make sure the connections are prepared.
Basic OSD Menu operation
Press MENU button to display the OSD menu as below:
Main menu: Picture | Sound | Channel | Feature | Setup
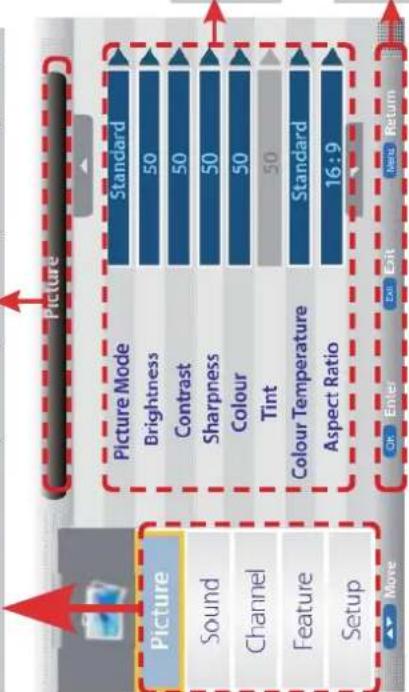
| Input |
| DTV |
| ATV |
| AV |
| SCART |
| YPBPR |
| HDMI |
| PC |
| Media |
| DVD |
| You should operate the OSD menu according to the hint. |
Use ▲/▼ button to select the main menu, and press ▶/OK button to enter the submenu. In the submenu, use ▲/▼ button to select the function item, press ▶/OK button to enter the setup menu, then press ◀/▶ button to adjust, or press ▲/▼ to select and press OK / ◀/▶ button to confirm.
* Press MENU / ◀ button to return to the upper menu. * Press EXIT button to exit the menu display.
Note1: Only when you input the suitable signal, the relevant items can be activated Note2: Please operating the OSD menu according to hint on the bottom of the banner.
1. Picture menu
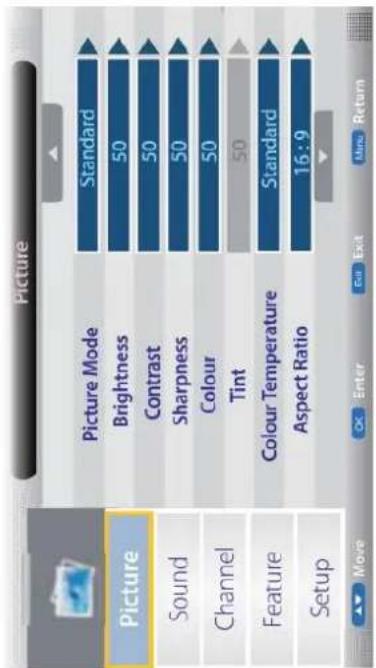
Picture Mode:
Mild and User.
Adjust image black level.
Adjust image contrast.
Adjust the sharpness(Gray and invalid in VGA/PC mode).
Adjust image colour from black and white.
Control the tint (NTSC mode only).
Select an optimum color temperature mode to suit your eyes
for viewing from Warm, Cool, Standard.
Change the aspect for the screen from 4:3,16:9, Zoom 1, Zoom 2
or Panorama etc...
Noise Reduction: If the broadcast signal received is weak, you can select the
Noise Reduction option to reduce the video noise level between Off, Low, Middle and High.
Low, Middle and High.
- Sound menu
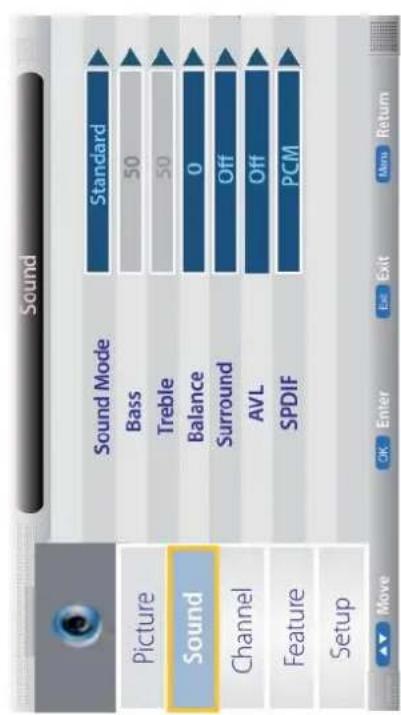
Sound Mode:
Channel Management: Enter the Channel management menu to edit the channels.
Speech and User.
Adjust the level of the lower-pitched sounds.
Adjust the level of the higherpitched sounds.
Balance: Adjust the audio output between left and right speakers.
Surround: Turn on/off the surround sound function.
Auto Volume Level (AVL): The volumes of all sources will be maintained when the
function's on.
SPDIF:
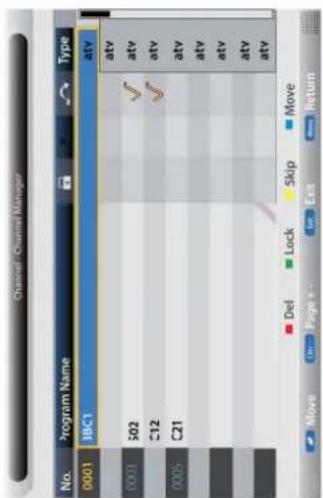
channel. And you have to enter the password to view the program.
Press YELLOW button to skip the channel or cancel the setting, and the program
will not be programmed by CH+/- button.
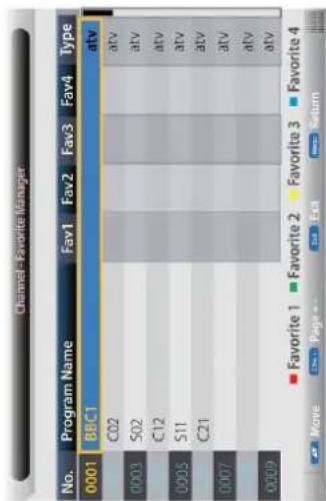
Favorite Management:
Add or remove favourite channels by
the colour buttons. Up to 4 favourite lists
are available, RED-Fav1, GREEN-Fav2,
YELLOW-Fav3, BLUE-Fav4.
ATV Manual Search: Enter the ATV Manual Search menu.
Select DTV type, you can choose Air(DVB-T), Cable(DVB-C), Satellite(DVB-S2), as you like.
TV Connection:
When the child lock is on, please enter the password (lock password in future menu) to start Auto and Manual search.
Auto Search: Press OK button to enter the Auto Search menu, select search mode, and press OK button to start Auto search.
Note:
- ALL: Auto search channels for DTV,
ATV and Radio.
DTV: Auto search channels for DTV
and radio.
ATV: Auto search channels for ATV.
- When the TV is auto-tuning, you
could press MENU button to stop auto
tuning and return to preview menu.
Color System: Press OK or RIGHT navigation button to enter submenu and press UP/
DOWN navigation buttons to select preferred color system.
Available options: Auto, PAL, SECAM.
Sound System: Press OK or RIGHT navigation button to enter submenu and press UP/
DOWN navigation buttons to select preferred sound system.
Available options: BG, DK, I, L, L'.
Satellite System
Press ▲/▼ button to select the "TV Convection", and set it on "Satellite".
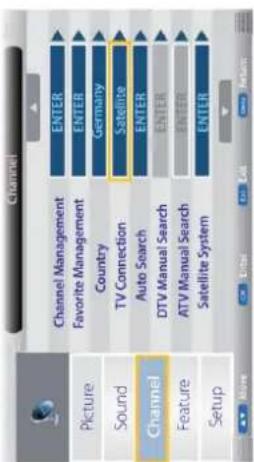
Select "Auto Search" as follow:
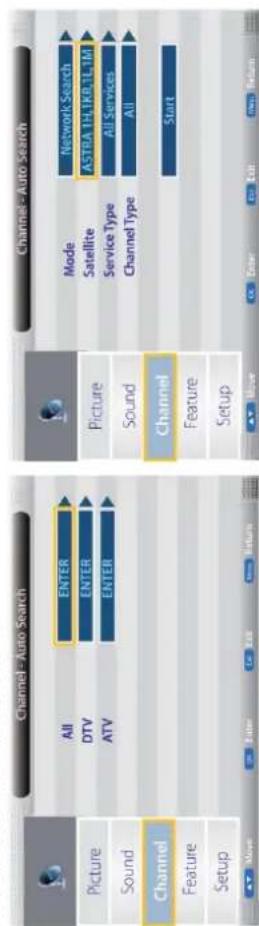
Operations in satellite Auto Search menu are shown in the following table
| Option | Value |
| Mode | Default, Network Search, Full Search |
| Satellite | 65 satellite for searching (3 user edit satellite) |
| Service Type | All Services,Free Service |
| Channel Type | All, TV Only |
When TV Connection is Cable:
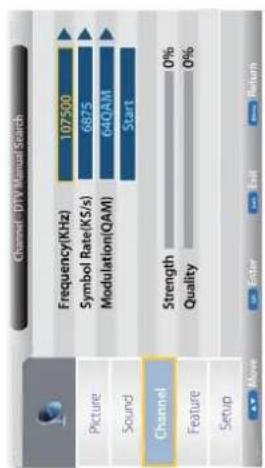
When TV Connection is Air:
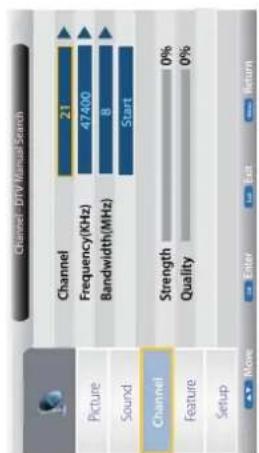
Press ▲/▼ button to select the "TV Convection", and set it on "Satellite".
| Kanal | |
| Bild | Kanal-Management ENTER |
| Favoriteverwaltung ENTER | |
| Land Deutschland | |
| Ton | TV Übertragung Satellit |
| Kanal | Autom. Suche ENTER |
| Funktionen | Man. Suche digita ENTER |
| Man. Suche analog ENTER | |
| Einst. | Satelliten System ENTER |
Press ▲ / ▼ button to select the "Satellite System", show as follow:
Operations in Satellite List Menu are shown in the following table:
| Key Stroke | Action |
| KEY_UP | use cursor to up |
| KEY_DOWN | use cursor to down |
| KEY_LEFT | switch operation to satellite system parameters setting list |
| KEY_RIGHT | switch operation to Transponder list |
| KEY_MENU | Back to Main Menu. |
| KEY_EXIT | Exit Main Menu. |
| KEY_GREEN | Enter satellite edit menu |
| Satellite System | |||
| 0002 ASTRA 1H,1KR,1... | 0001 11315 H 22000 | ||
| 0003 ASTRA 2A,2B,2D | 0002 11357 H 22000 | LNB Type 9750/10600 | |
| 0004 ASTRA 1E,1G,3A | 0003 11798 H 27500 | LNB Power On | |
| 0005 NILESAT 101.10 | 0004 11836 H 27500 | 22 KHz Auto | |
| 0006 EUTELSAT W3A | 0005 11876 H 27500 | Toneburst None | |
| 0007 EUTELSAT W1 | 0006 11874 H 27500 | DisEqC1.0 None | |
| 0008 BADR-2,3,4 EURO | 0007 11954 H 27500 | DisEqC1.1 None | |
| 0009 EUTELSAT SES... | 0008 11992 H 27500 | ||
Operations in Transponder List Menu are shown in the following table:
| Satellite System | |||
| Satellite | Transponder | ASTRA 1E,1G,3A | |
| 0002 ASTRA 1H,1KR,1... | 0001 11315 H 22000 | ||
| 0003 ASTRA 2A,2B,2D | 0002 11357 H 22000 | LNB Type | 9750/10900 |
| 0004 ASTRA 1E,1G,3A | 0003 11798 H 27500 | LNB Power | On |
| 0005 NILESAT 101,10 | 0004 11836 H 27500 | 22 KHz | Auto |
| 0006 EUTELSAT W3A | 0005 11876 H 27500 | Toneburst | None |
| 0007 EUTELSAT W1 | 0006 11874 H 27500 | DisEqC1.0 | None |
| 0008 BADR-2.3.4 EURO | 0007 11954 H 27500 | DisEqC1.1 | None |
| 0009 EUTELSAT SES... | 0008 11992 H 27500 | ||
| Key Stroke | Action |
| KEY_UP | use cursor to up |
| KEY_DOWN | use cursor to down |
| KEY_LEFT | switch operation toSatellite list |
| KEY_RIGHT | switch operation tosatellite system parameterssetting list |
| KEY_ENTER | Select/unselect cursor itemTransponder. |
| KEY_MENU | Back to Satellite list. |
| KEY_EXIT | Exit Main Menu. |
| KEY_RED | Enter Transponder Addmenu |
| KEY_GREEN | Enter Transponder Editmenu |
| KEY_YEL-LOW | Enter Transponder Deleteconfi m menu |
| KEY_BLUE | Enter Transponder scanmenu |
Operations in Setting Menu are shown in the following table:
| Key Stroke | Action |
| KEY_UP | use cursor to up |
| KEY_DOWN | use cursor to down |
| KEY_MENU | Back to Transponder list. |
| KEY_EXIT | Exit Main Menu. |
| Option | Value |
| LNB Type | 9750/10600, 9750/10750, 05150, 05750, 09750, 10600, 10750, 11300, 11475, User Single, User Dual |
| LNB Power | On / Off |
| 22KHz | Auto / Off / O |
| DisEqC Mode | Off, LNB1, LNB2, LNB3, LNB4, Burst A, Burst B |
| Motor | None, DisEqC1.2, DisEqC1.3 |
| Satellite System | |||||||
| Satellite | Transponder | ASTRA 1E,1G,3A | |||||
| 0002 | ASTRA 1H,1KR,1... | 0001 | 11315 | H | 22000 | ||
| 0003 | ASTRA 2A,2B,2D | 0002 | 11357 | H | 22008 | LNB Type | 9750/10600 |
| 0004 | ASTRA 1E,1G,3A | 0003 | 11798 | H | 27500 | LNB Power | On |
| 0005 | NILESAT 101.10 | 0004 | 11836 | H | 27500 | 22KHz | Auto |
| 0006 | EUTELSAT WJA | 0005 | 11876 | H | 27500 | Toneburst | None |
| 0007 | EUTELSAT WJ | 0006 | 11874 | H | 27500 | DisEqC1.0 | None |
| 0008 | BADR-2,3,4EURO | 0007 | 11954 | H | 27500 | DisEqC1.1 | None |
| 0009 | EUTELSAT SES... | 0008 | 11992 | H | 27500 | ||
| Strength | 0% | Add Edit | |||||
| Quality | 0% | Delete Scan | |||||
5V antenna power:
Turn on/off the 5V an enna power output.
- Feature menu
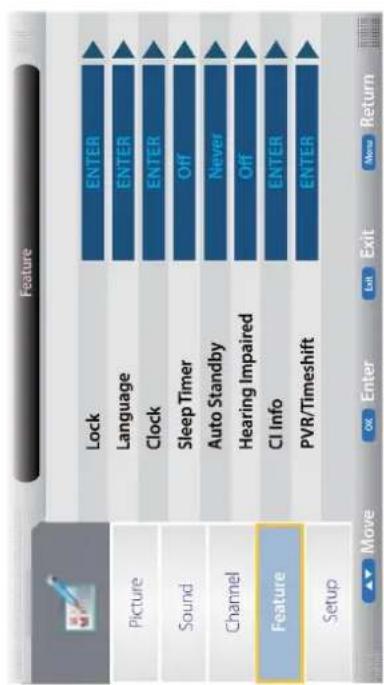
Lock Channel:
This menu allows you to lock certain features of the television so that they can not be used or viewed. For example if you don't want certain channels viewed by children or if the television is to be used in a hotel and you want certain channels be locked. When you enter the system lock menu you will be asked for a password. As default it is 0000.

Lock Enable - Turn on/off the lock functions.
Note: When it is be turned on, the functions of Parental Guidance and Change Pin code below will be locked, and the functions Lock(in Channel Management), Auto Search, DTV Manual Search, ATV manual Search in Channel menu will also be locked.
Parental Guidance - Select the Parental Guidance mode, or turn off the function.
Change Pin Code - Press OK button to enter, first enter the current code, then enter your new code and confirm your new code.
Hotel Mode - Enter the Hotel Setting menu.
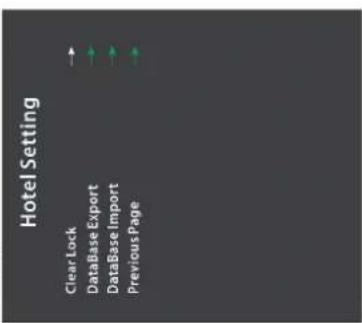
Hotel Lock: Turn on/off the Hotel Lock function.
Channel Lock: Disable the Channel menu in OSD.
Picture Lock: Disable the Picture menu in USD.
Sound Lock: Disable the Sound menu in OSD.
Feature Lock: Disable the Feature menu in OSD.
Setup Lock: Disable the Setup menu in OSD
Key Lock: Disable the buttons on the TV set
Key Lock. Enable the buttons on the TV set.
Figure 1.00
Enable the input series you doin
Source Lock. Disable the input source you desired.
Set Source: Select the default source when you tu
Select the default channel number when you turn on the TV.
Max Volume: Set the Max volume for the TV.
Default Volume: Set the default volume when the program is on.
Clear Lock: Clear all the locks above,
it means set all the locks to OFF and max volume to 100.
Database Export: Export all Hotel Settings to the USB device
Database Import: Import all Hotel Settings from the USB device
Previous Page: Select Previous Page items more the click button
Previous Page: Select Previous Page items, press the ok button
to return to the previous page.
Allows you to set the clock (as default the information is taken
automatically from the digital signal).
Lets you set the sleep timer so the television automatically switches
off a ter a certain amount of time
The TV will switch off itself automatically if no change in status
The TV will switch on itself as omatically if no change in status
within the time you select. You can choose 1H, 2H, 4H or off.
Pay per view services require a "smartcard" to be inserted into the
TV. If you subscribe to a pay-per-view service the provider will issue
IV. If you subscribe to a pay per view service the provider will issue
you with a 'CAM' and a "smartcard". The CAM can then be inserted
into the COMMON INTERFACE PORT (CI Card In).
Language:
PVR/ Timeshift:
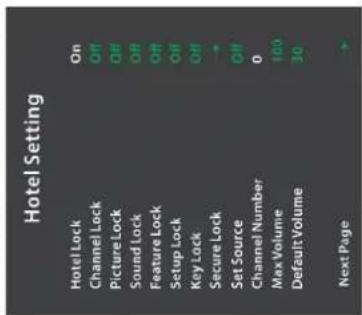
Hotel Lock:
Channel Lock
PictureLock:
Sound Lock:
Feature Lock:
Setuplock
Keylock
My Look.
Source Lock,
Set Source:
Channel Number:
Max Volume:
Default Volume
Clearlock:
CROF LOAR
ST. L. Box 1, Box 2
Database Export
Database Import:
Previous Page:
(1) 本说明仅供参考。
[Non-Text]
Language
Language.
Clock:
[Non-Text]
The Ground Truth image displays a single, solid horizontal line. According to Rule 2 (UNDERSCORE & LINE RULES), this is a stylistic or background line, not a placeholder underscore. Therefore, the OCR result must ignore it and output nothing or only meaningful text. The provided OCR content is "____", which consists of four underscores. This is an incorrect interpretation of the line as a placeholder, violating the rule that stylistic lines must be ignored. The OCR has hallucinated placeholder underscores where none should exist in the GT. Hence, the OCR result is inconsistent with the Ground Truth.
no function.
Sleep Timer:
Auto Power Off:
CI Info:
- Setup menu
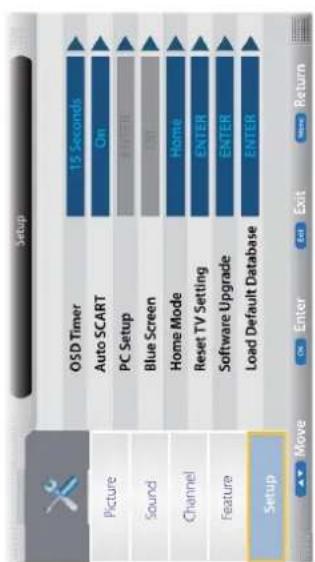
OSD Timer: Lets you adjust the amount of time the On Screen Menu stays on the screen before disappearing.
Change the PC Settings in PC mode.
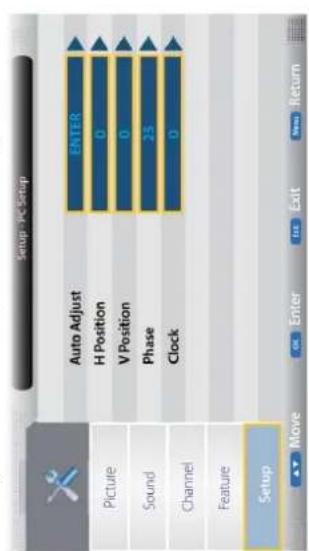
- Insert USB device, and select the Media mode form Photo, Music, Movie and eBook, then you will find the name of the d-vice display on the screen as shown below.

- Press ▲/▼ button to select the USB device and press OK button to enter the file list as shown below.
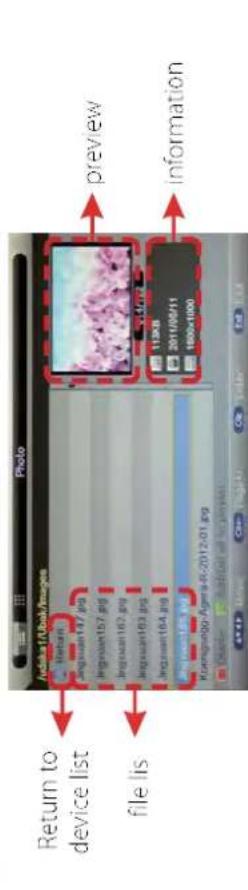
Press ▲/▼ buttons to move (press OK button to select the file or unfold the folder). Press RED button to delete the file; Press GREEN button to sign or cancel all the files to playlist. Press ◀/▶ OK button to sign or cancel the selected file to playlist. Press button to previous menu, Press EXIT button to select the file view type list (◀) or thumbnail (▶). Press Exit again to return to the root MENU. Then press ▶ button to program the files (be signed) you select or the files in the fold you select. Press ■ button to stop and exit the full screen program, please notes the hints on the bottom.
watch programs directly.
Adjust the transverse/vertical position of the screen.
Adjust the phase of the ADC sampling clock relative to the sync signal, until a stable image is obtained.
Adjust the pixel clock frequency, until the image size is maximized for the screen.
Load default Database: Import the default satellites and channel, so that the user can
Setup the parameter of the screen automatically.
Blue Screen: Changes the background when there is no input between clear and a blue background (Only available in some sources).
Home Mode: Press to select from the following home modes: Home, Dynamic.
Reset TV Setting: This clears all the TV settings for the television.
Software Upgrade: From time to time we may release new filmware to improve
the running of the television (available to download). This menu lets you upgrade that software onto the television. Further details of how to do this will be issued with the filmware. Contact the helpline or refer to the 'product support' section of the website.
Auto Adjust:
H/V-Position: Phase:
Clock:
Blue Screen:
Home Mode: Reset TV Setting:
Software Upgrade:
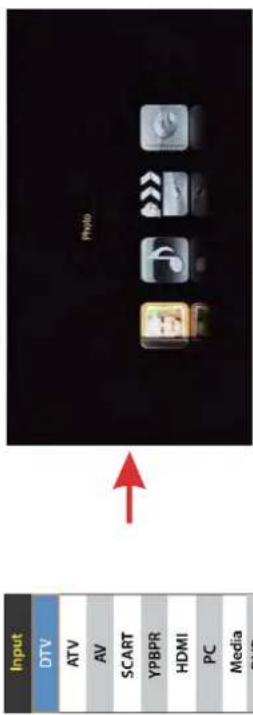
Press the INPUT button on the remote control to display the input source menu, select Media source by the ▲/▼ buttons, and press OK button to enter the Multimedia menu as shown below.
1. Photo

natural_image
Weather-themed interface icons including play, audio, and navigation buttons (no text or symbols on objects)Press ◀/▶ button to select the option on the table, and press OK button to change. Note: You could press OK button to display the option table when it disappears.
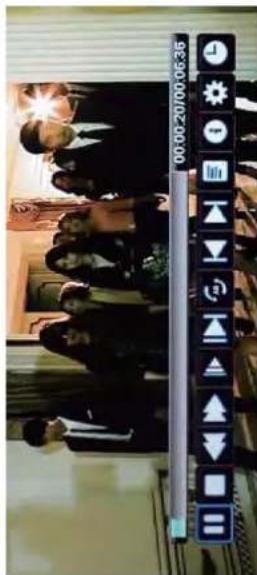
Press ◀/▶ button to select the option on the table, and press OK button to change.
Note: You could press OK button to display the option table when it disappears.
▶ Play/Pause the photo playing.
■ Stop and exit the full screen program.
▶▶ Play the previous or next file directly.
(2) Ratate the picture (0, 90, 180, 270).
Zoom in/out the picture, you could move the picture by Cursor left/right/up/
down button in Zoom mode.
i Display the information of the current fil
Display the photo setup menu, and select the Repeat mode, Background Music, Music Source, Slide Time, Effect.
Display the playing list.
Play/Pause the photo playing.
■ Stop and exit the full screen program.
Play fast backword or forward.
Play the movie in slow mode.
Play the movie in step mode.
Set the A-B repeat playing mode.
Play the previous or next file directly.
Display the playing list
Display the information of the current fil
Display the movie setup menu, and setup th
[NO TEXT]
(1)
Press ◀/▶ button to select
the option on the table, and
press OK button to change.
2. Music
![8.12l have 35: match(es) for robin hobb in listfile: MAJECKI_MAIN Type @majeckibiglist to obtain the whole list Imajecki Robin Hobb - [The Tawny Man 01] - Fool's Errand (v0.9) [rtf].rar ------------------------ 409.53 KB Imajecki Robin Hobb - [The Tawny Man 01] - Fool's Errand [covers & map].rar ------------------------ 255.8 KB](/content/2026/05/862023/images/7f46695aad157bf63abb6195221cd048524d1d45bd10d32c3d8bec6763e8af47.jpg)
▶ Play/Pause the photo playing.
■ Stop and exit the full screen program.
◀◀ ▶▶ Play fast backword or forward.
▶▶ Play the previous or next file directly.
Select the repeat mode for playing music.
Switch the window between "Information" and "Playlist".
Switch off the sc een displaying (BLUE button as quick button),
and it will be turned on by exepet power button).
RED button: Add or delete the bookmark.
GREEN button: Goto the appoint page.
YELLOW button: Display the bookmark list.
◀◀ ▶▶ Turn to previous/next page of the text.
BLUE button: Display the playlist.
BLUE button: Display the playlist.
◀◀ ▶▶ Turn to previous/next page of the RED button: Add or delete the bookmark. GREEN button: Goto the appoint page. YELLOW button: Display the bookmark list BLUE button: Display the playlist.
◀◀ ▶▶ Turn to previous/next page of the RED button: Add or delete the bookmark. GREEN button: Goto the appoint page. YELLOW button: Display the bookmark list BLUE button: Display the playlist.
◀◀ ▶▶ Turn to previous/next page of the RED button: Add or delete the bookmark. GREEN button: Goto the appoint page. YELLOW button: Display the bookmark list BLUE button: Display the playlist.
◀◀ ▶▶ Turn to previous/next page of the RED button: Add or delete the bookmark. GREEN button: Goto the appoint page. YELLOW button: Display the bookmark list BLUE button: Display the playlist.
◀◀ ▶▶ Turn to previous/next page of the RED button: Add or delete the bookmark. GREEN button: Goto the appoint page. YELLOW button: Display the bookmark list BLUE button: Display the playlist.
◀◀ ▶▶ Turn to previous/next page of the RED button: Add or delete the bookmark. GREEN button: Goto the appoint page. YELLOW button: Display the bookmark list BLUE button: Display the playlist.
◀◀ ▶▶ Turn to previous/next page of the RED button: Add or delete the bookmark. GREEN button: Goto the appoint page. YELLOW button: Display the bookmark list BLUE button: Display the playlist.
◀◀ ▶▶ Turn to previous/next page of the RED button: Add or delete the bookmark. GREEN button: Goto the appoint page. YELLOW button: Display the bookmark list BLUE button: Display the playlist.
◀◀ ▶▶ Turn to previous/next page of the RED button: Add or delete the bookmark. GREEN button: Goto the appoint page. YELLOW button: Display the bookmark list BLUE button: Display the playlist.
OSD Language
This is used to select the OSD language.
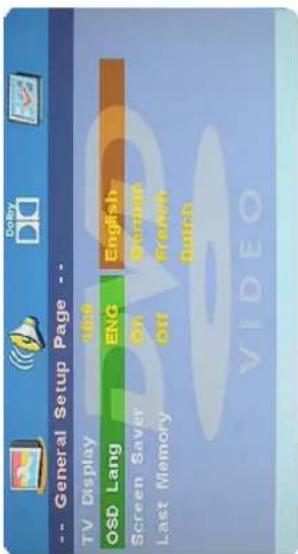
Screen Saver
Start the Screen Saver, the Screen saver image will appear when the player stops or the picture is frozen for a few minutes. This saver can keep the screen from being damaged.
ON: Start the screen saver OFF: Revome the screen saver
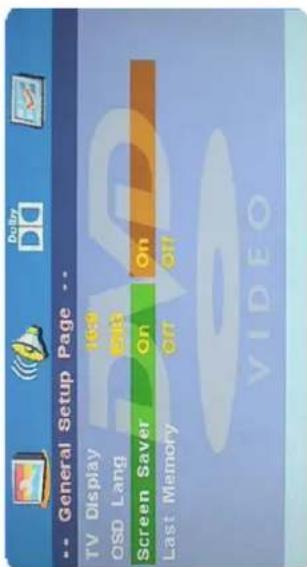
Last Memory
Can set the items on the last memory, "on" an off" option.
Select „on“, the shutdown will shutdown the machine before the settings the memory, re-boot the machine settings. Set near the same time.
Select „off“, every time the machine automatically switched back to the default settings.
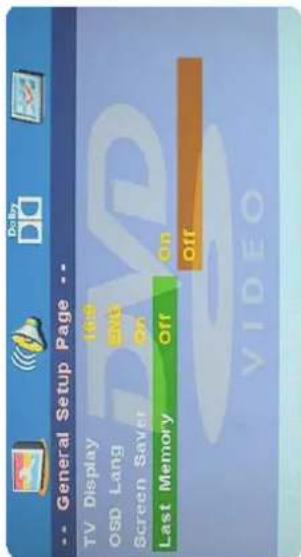
ON: Start the memory
OFF: Revome the memory
Press the Power button on the TV or the remote control, then press the INPUT button to select DVD mode. If there is no disc in the DVD player the screen will show "NO DISC". Insert Disc according to picture next to disc slot. Do not touch the playing surface. Hold the disc around the outside with your fingers and place the disc into the slot. The player will automatically draw the disc into the player. To "Eject" the disc, press the EJECT button on the TV or the "EJECT", button on the remote control.
DVD Setup Mode
- Setup Mode provides the menu for the configuration of General Setup Page, Audio Setup Page, Dolby Digital, Setup, Preference Page. - Item selection in the Setup Menu is done by using the Navigation Arrows, SETUP button and the OK button. - Press SETUP button first, enter into SETUP menu, then press the DIRECTION RIGHT button, you can enter into the next Sub-menu. - Press the SETUP button again to exit the Setup Menu.
General Setup Page
• 4:3 Pan Scan
This is selected when the DVD Player is connected to a normal TV. Wide-screen images are shown on the screen, but with some parts cut automatically. • 4:3 Letter Box This is selected when the DVD Player is connected to a normal TV. Wide-screen images are shown on the screen, with black belt on the top and bottom. • Wide
This is selected when the DVD Player is connected to a wide-screen TV.

Audio Setup
- Speaker Setup
In the "Audio Setup page" press ▼ button to select "Speaker Setup" item, press the OK button or ▶ button (play) into the "Speaker Setup page".
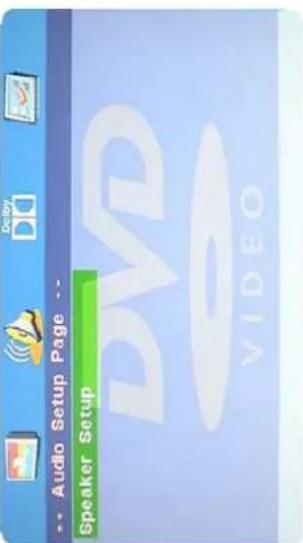
Downmix
• LT/RT
A disc recorded multi channel soundtrack, the output signal will be incorporated to left and right channel. Stereo A disc recorded multi channel soundtrack, the output signal will be incorporated to stereo.
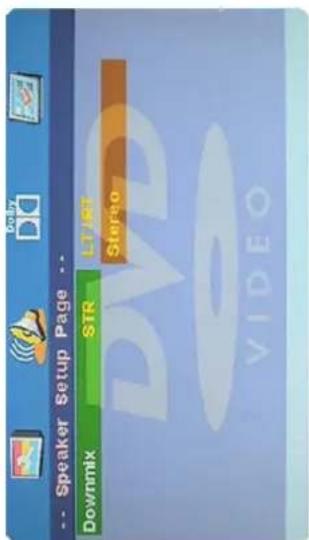
Dolby Digital Setup
• Dynamic
This option is used to set the compression ratio in order to control the sound contrast.
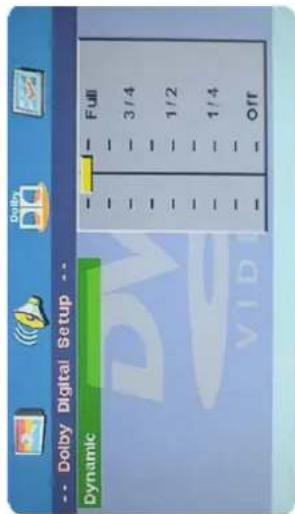
Preference Setup
You must press STOP twice to enter Preference page or NO DISC.
• PAL
This is selected when the DVD player is connected to an PAL TV System. • Multi
The DVD player will set the TV system according to the disc in the tray
- NTSC
This is selected when the DVD player is connected to an NTSC TV System.
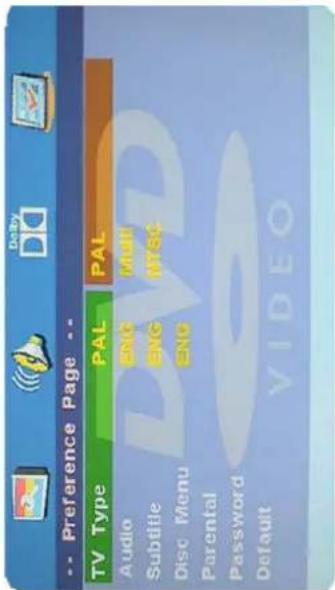
Audio
If a language listed below is recorded on a disc, you can play the sound in such language. If not, the language recorded will be used.
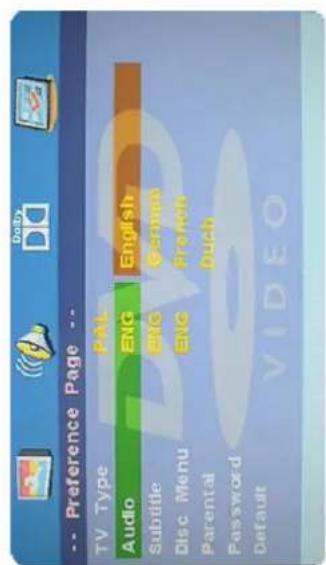
Subtitle
If a language listed below is recorded on a disc, you set the subtitle to be displayed in such language. If not, the language recorded will be used.
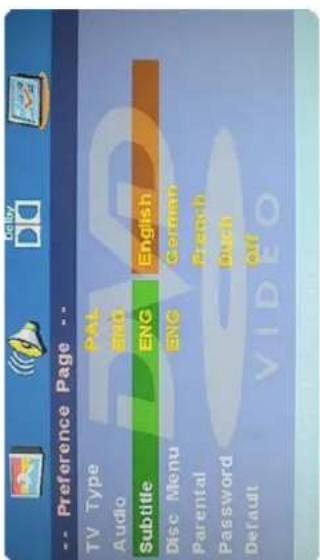
Disc Menu
If a language listed below is recorded on a disc, you can set the menu to be displayed in such language. If not, the language recorded will be used
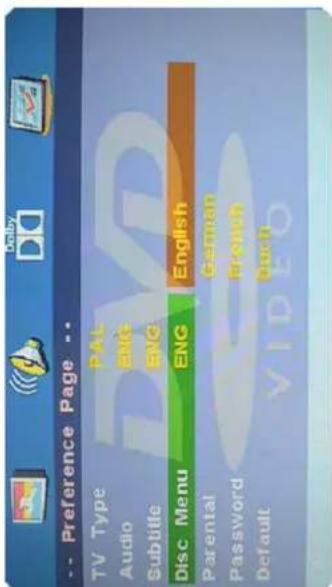
Parental
When playing disc with parental lock function, you may select an Age Control Grade according to grade of disc and your own preference. For example, if PG selected, DVD video disc rated higher than the PG grade cannot be played.
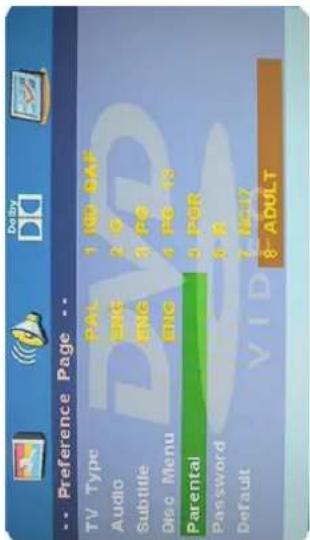
Password
User can change the password that is required when the user wants to change the Age Control Grade in the Parental Lock funktion.
Note: The default password is: 123456
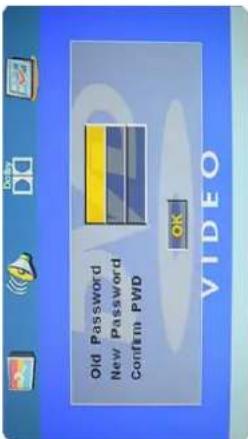
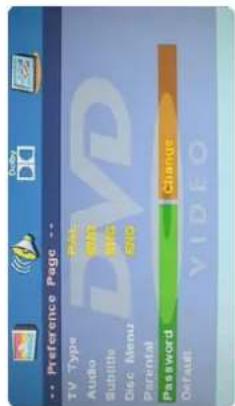
Default
User can load the original factory setting by choose RESET an press OK button.
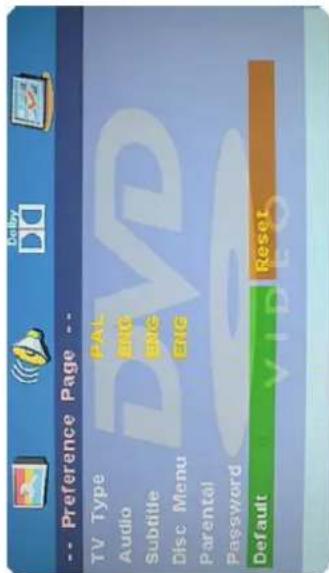
Supported File Formats for USB Mode
| *.dat, *.mpg, *.mpeg | MPEG1, MPEG2 | MPEG1/2 Layer 1/2/3, AAC/HEAAC, LPCM/ADPCM AC3/EAC3 | 1080P@30fps 50Mbit/sec | |
| MPEG2, H.264, VC1, AVS, MVC | MPEG1/2 Layer 1/2/3, AAC/HEAAC, LPCM/ADPCM AC3/EAC3 | H.264:1080Px2@25fps 1080P@50fps MVC: 1080P@24fps Other: 1080P@30fps 50Mbit/sec | ||
| *.vob | MPEG2 | MPEG1/2 Layer 1/2/3, AC3, LPCM | 1080P@30fps 50Mbit/sec | |
| *.mkv | MPEG1, MPEG2, MPEG4, H.264, XviD, VC1, WMV3, Motion JPEG | MPEG1/2 Layer 1/2/3, LPCM, AAC/HEAAC, AC3/EAC3 | H.264:1080Px2@25fps 1080P@50fps Other: 1080P@30fps 50Mbit/sec | |
| *.mp4,*.mov | MPEG1/2 Layer 3, AC3/EAC3, AAC/HEAAC, LPCM/ADPCM | H.264:1080Px2@25fps 1080P@50fps Other: 1080P@30fps 50Mbit/sec | ||
| *.avi | MPEG1/2/4, H.264, XviD, VC1, WMV3, Motion JPEG Sorenson H.263 | MPEG1/2 Layer 1/2/3, WMA, AAC/HEAAC, LPCM/ADPCM, AC3/EAC3 | H.264:1080Px2@25fps 1080P@50fps Other: 1080P@30fps 50Mbit/sec | |
| *.flv | H.264, Sorenson H.263 | MPEG1/2 Layer 3 AAC/HEAAC, LPCM/ADPCM | H.264:1080Px2@25fps 1080P@50fps Other: 1080P@30fps 50Mbit/sec | |
| *.3gp,*.3g2 | MPEG4, H.264 | 1920x1080@30P 20Mbit/sec | ||
| *.asf, *.wmv | MPEG2/4, WMV3, XviD, VC1, H.264, | MPEG1/2 Layer 1/2/3, LCPM, AAC/HEAAC, WMA, AC3/EAC3 | 1080P@30fps 50Mbit/sec | |
| *.mp3 | MPEG1 Layer 1/2/3 (mp3) | |||
| *.wav | LPCM | |||
| *.WMA/ASF | WMA, WMA Pro | |||
| *.m4a,*.aac | AAC, HEAAC | |||
| *.ac3 | AC3, EAC3 | |||
| *.jpg,*.jpeg | Baseline JPEG | 7680x4320 resolution | ||
| *.png | Progressive JPEG | 1280x1024 resolution | ||
| *.bmp | Interlace | |||
| *.txt | UTF-8 | 1Mb | ||
| *.srt | UNICODE ASCII | |||
PC Input Typical Display Modes
The following table is an illustration of some of the typical video display modes. Some, due to the display native resolution, are scaled automatically to enable correct image to be displayed.
Your TV may not support different resolutions. Supported resolution modes are listed below. If you switch your PC to an unsupported mode, a warning OSD will appear on the screen.
| 1 | 640x480 | 60Hz | 7 | 1024x768 | 60Hz |
| 2 | 640x480 | 72Hz | 8 | 1024x768 | 70Hz |
| 3 | 640x480 | 75Hz | 9 | 1024x768 | 75Hz |
| 4 | 800x600 | 60Hz | 10 | 1280x1024 | 60Hz |
| 5 | 800x600 | 72Hz | 11 | 1280x1024 | 75Hz |
| 6 | 800x600 | 75Hz | 12 | 1366x768 | 60Hz |
AV and HDMI Signal Compatibility (Input Signal Types)
Notes: In some cases a signal on the LED TV may not be displayed properly. The problem may be an inconsistency with standards from the source equipment (DVD, Set-top box, etc.). If you do experience such a problem please contact the manufacturer of the source equipment.
| SCART | PAL | O | HDMI | 480I | 60Hz | O | |
| NTSC 60 | O | 480P | 60Hz | O | |||
| RGB 50/60 | O | 576I | 50Hz | O | |||
| SECAM | O | 576P | 50Hz | O | |||
| AV | PAL 50/60 | O | 720P | 50Hz | O | ||
| NTSC 60 | O | 720P | 60Hz | O | |||
| SECAM | O | 1080I | 50Hz | O | |||
| YPbPr | 480I | 60Hz | O | 1080I | 60Hz | O | |
| 480P | 60Hz | O | 1080P | 24Hz | O | ||
| 576I | 50Hz | O | 1080P | 25Hz | O | ||
| 576P | 50Hz | O | 1080P | 30Hz | O | ||
| 720P | 50Hz | O | 1080P | 50Hz | O | ||
| 720P | 60Hz | O | 1080P | 60Hz | O | ||
| SCART | PAL | ○ | |
| NTSC 60 | ○ | ||
| RGB 50/60 | ○ | ||
| SECAM | ○ | ||
| AV | PAL 50/60 | ○ | |
| NTSC 60 | ○ | ||
| SECAM | ○ | ||
| YPbPr | 480I | 60Hz | ○ |
| 480P | 60Hz | ○ | |
| 576I | 50Hz | ○ | |
| 576P | 50Hz | ○ | |
| 720P | 50Hz | ○ | |
| 720P | 60Hz | ○ | |
| 1080I | 50Hz | ○ | |
| 1080I | 60Hz | ○ | |
If the display fails or performance dramatically deteriorates check the Display in accordance with the following instructions. Remember to check the peripherals to pinpoint the source of the failure. If the display still fails to perform as expected, connect your helpline for assistance.
No power
- Check all connections to the TV.
- Press either the power button or the Standby button on the Remote control.
No picture or sound
- Ensure that the TV is plugged in and the power is on.
- Ensure that the aerial is connected.
- Try a different program.
Poor picture quality
- Check the aerial connections.
- Check that the channel is tuned in properly.
- Adjust the picture settings:brightness,color,sharpness,contrast,hue.
- Make sure that the TV is not located close to electrical appliances that may emit radio frequency interference.
No colour
- Adjust the color setting.
- Check that the programme is broadcast in color. - Check that the channel is tuned properly.
TV does not respond to remote control
- Check that there are no obstructions between the remote control and the unit. - Check that the remote control is within range of the unit. - Check that the batteries in the remote control and not weak or exhausted.
This TV is for household use and registered as harmless on electromagnetic waves. Therefore, you can use it in every location as well as residential areas.
Note:
the source of the failure.
Declaration of Conformity
This complies with the following directives / standards is confirmed:
Electromagnetic Compatibility Directive 2004/108/EG EN 55013: 2001 + A1: 2003 + A2: 2006
EN 55020: 2007
EN 61000-3-2:2006 + A1:2009 + A2:2009
EN 61000-3-3:2008
Low Voltage Directive 2006/95/EG
EN 60065:2002+A1:2006+A11:2008


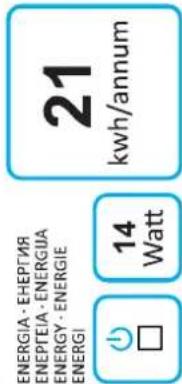

Weight and dimensions are not absolutely exact values.
notice.
Note: Weight and dimensions are not absolutely exact values. Technical details can be changed at any time (according to manufacturer) without prior notice.