Mythos XTR-50 - Højttaler DEFINITIVE TECHNOLOGY - Gratis brugsanvisning og manual
Find enhedens vejledning gratis Mythos XTR-50 DEFINITIVE TECHNOLOGY i PDF-format.

Brugerspørgsmål om Mythos XTR-50 DEFINITIVE TECHNOLOGY
0 spørgsmål om dette apparat. Besvar dem du kender, eller stil dit eget.
Stil et nyt spørgsmål om dette apparat
Download vejledningen til din Højttaler i PDF-format gratis! Find din vejledning Mythos XTR-50 - DEFINITIVE TECHNOLOGY og tag din elektroniske enhed tilbage i hånden. På denne side er alle dokumenter nødvendige for brugen af din enhed offentliggjort. Mythos XTR-50 af mærket DEFINITIVE TECHNOLOGY.
BRUGSANVISNING Mythos XTR-50 DEFINITIVE TECHNOLOGY
![Figure 9 Figure 10 3mm [1/8"]](/content/2026/05/861860/images/e01c93715ec71bf176ee7b48c26f688bec64c1cdaae7472d22e13b33598ffb68.jpg)
Attaching the Logo Badge
Mythos XTR-50 can be mounted either vertically as main or surround speakers or horizontally for use as a center channel speaker. The logo
badge is not pre-attached to the
grille and is packaged in a plastic
bag along with the other
accessories. It should be amixed in the current place on the mill
in the correct place on the grille once you have determined the
once you have determined the speaker's alignment. For horizontal
speaker's alignment. For horizontal (center channel) use, align the bad
with the location on the long side of the
grille; for vertical use, align the badge with the
location on the short side of the grille. [Figure 11] To affix
the logo badge, gently press the logo badge into the recess
on the grill. A magnet will hold the logo in place. Do not press
the badge too hard or you may crack the grille.
![Figure 11 al edge e of the edge with the grille. [Figure 11] To affix logo badge into the recess the logo in place. Do not press ack the grille.](/content/2026/05/861860/images/f167c018a3b7cbee3a102cb0ea30532ef81ba62c89ddcd26a93ff818544c8435.jpg)
Receiver/Speaker Set-up
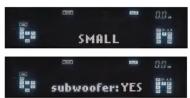
Access your receiver's "Speaker Set-up" or "Speaker Configuration" Menu.
1. In the Speaker Set-up/Configure function of your receiver, set all
channels that are connected to Mythos XTR-50s to "Small."
2. Select "Yes" when asked if you are using a subwoofer.
Service
Set the subwoofer crossover frequency on the receiver to 120 Hz if the speaker is mounted on a wall and 150 Hz if the speakers are sitting on a shelf.
Service and warranty work on your Definitive loudspeakers will normally
be performed by your Definitive Technology dealer or importer. If, however, you wish to return the speaker to us, please contact us first, describing the

FJAT12102009
For more information on Definitive Technology Loudspeakers and accessories, visit www.definitivetech.com, or email info@definitivetech.com.
Definitive Technology, Owings Mills, Maryland, USA. 800-228-7148
MYTHOS XTR-50 OWNER'S MANUAL
problem and requesting authorization as well as the location of the nearest factory service center. Please note that the address given in this booklet is the address of our offices only. Under no circumstances should loudspeakers be shipped to our offices or returned without contacting us first and obtaining return authorization.
Definitive Technology Offices
11433 Cronridge Drive, Owings Mills, Maryland 21117
Phone: (800) 228-7148 (US & Canada),
01 (410) 363-7148 (all other countries)
Technical Assistance
If you have any questions regarding your Mythos XTR-50 or its set-up, please contact your Definitive Technology dealer or importer. If your dealer or importer is unable to help you, please contact us directly at (800) 228-7148 (US & Canada), 01 (410) 363-7148 (all other countries) or e-mail info@definitivetech.com.
Limited Warranty: 5-Years for Drivers and Cabinets,
3-Years for Electronic Components
DEI Sales Co., dba Definitive Technology (herein “Definitive”) warrants to the original retail purchaser only that this Definitive loudspeaker product (the “Product”) will be free from defects in material and workmanship for a period of five (5) years covering the drivers and cabinets, and three (3) years for the electronic components from the date of the original purchase from a Definitive Authorized Dealer If the Product is defective in material or workmanship, Definitive or its Authorized Dealer will, at its option, repair or replace the warranted product at no additional charge, except as set forth below. All replaced parts and Product(s) become the property of Definitive. Product that is repaired or replaced under this warranty will be returned to you, within a reasonable time, freight collect. This warranty is non-transferable and is automatically void if the original purchaser sells or otherwise transfers the Product to any other party.
This Warranty does not include service or parts to repair damage caused by accident, misuse, abuse, negligence, inadequate packing or shipping procedures, commercial use; voltage in excess of the rated maximum of the unit, cosmetic appearance of culimetry not directly attributable to defects in material or workmanship. This warranty does not cover the elimination of externally generated static or noise, or the correction of antenna problems or weak reception. This warranty does not cover labor costs or damage to the Product caused by installation or removal of the Product. Definitive Technology makes no warranty with respect to its products purchased from dealers or outlets other than Definitive Technology Authorized Dealer.
THE WARRANTY IS AUTOMATICALLY VOID IF: 1) The product has been damaged, altered in any way; mishandled during transportation, or tampered with. 2) The product is damaged due to accident, fire, flood, unreasonable use, misuse, abuse, customer applied cleaner's, failure to observe manufacturers warnings, neglect or related events. 3) Repair or modification of the Product has not been made or authorized by Definitive Technology. 4) The product has been improperly installed or used.
Product must be returned (insured and prepaid), together with the original dated proof of purchase to the Authorized Dealer from whom the Product was purchased, or to the nearest Definitive factory service center. Product must be shipped in the original shipping container or its equivalent. Definitive is not responsible or liable for loss or damage to Product in transit.
THIS LIMITED WARRANTY IS THE ONLY EXPRESS WARRANTY THAT APPLICES TO YOUR PRODUCT. DEFINITIVE NEITHER ASSUMES NOR ORTERIZUES ANY PERSON OR ENTITY TO ASSUME FOR IT ANY OTHER OBLIGATION OR LIABILITY IN CONNECTION WITH THIS PROPERTY OF THE PROPERTY OF THIS PROPERTY. A PROCESSED BY THE ORDERED SETTLEMENT LIMITED TO EXPRESS, IMPLIED WARRANTY OF MERCHANTABILITY OR FITNESS FOR A PARTICULAR PURPOSE, ARE EXPRESSLY EXCLUDED AND DISCLAIMED TO ARE WITHOUT NOTICE. THIS PROPERTY IS SOLD AT 10:00 PM at 9:30 PM. THIS PROPERTY IS SOLD AT 10:00 PM at 9:30 PM. This PROPERTY IS SOLD AT 10:00 PM at 9:30 PM. THIS PROPERTY IS SOLD AT 10:00 PM at 9:30 PM. THIS PROPERTY IS SOLD AT 10:00 PM at 9:30 PM.
Some states do not allow the exclusion or limitation of consequential or incidental damages, or implied warranties, so the above limitations may not apply to you. This warranty gives you specific legal rights, and you may also have other rights which vary from state to state.
©2009 DEI Sales Co.
All rights reserved

This product complies with the essential requirements
of the EMC directive 89/336/EEC.
Definitive Technology® The Leader in High-Performance Loudspeakers®
Definitive Technology
MYTHOS XTR-50® OWNER'S MANUAL
Mythos XTR-50 Loudspeakers
Thank You
Thank you for choosing the Definitive Technology Mythos XTR-50 Loudspeaker System. Our engineers spent many years developing this product. In order to ensure that you experience the finest performance possible, we encourage you to take a moment to fully read this owner's manual and familiarize yourself with the proper installation and set-up procedures for your Mythos XTR-50 speakers.
natural_image
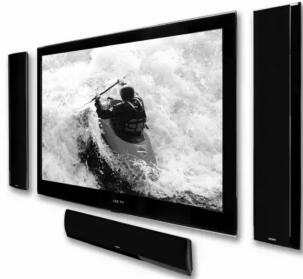
Modern flat-screen TV displaying a black-and-white photo of a person on a wave, no visible text or symbols.Definitive Technology® The Leader in High-Performance Loudspeakers®
Specifications
Mythos XTR-50
Driver complement: 2 each 3-1/2" (90mm) XTDD dome mid/bass drivers pressure-coupled to 4 each 3-1/2" (90mm) dome low-bass radiators, 1 each 1" (25mm) Pure Aluminum Dome Tweeter
Frequency response:(o verall on wall) 92Hz - 30kHz: (+/- 3dB on wall) 120Hz - 20kHz
Sensitivity: 92dB
Impedance: 8 Ohms nominal
Dimensions: (mounted on wall without bracket) 27" H x 6" W x 1-1/2" D (686mm x 152mm x 38mm)
Dimensions: (mounted on wall with bracket) 27" H x 6" W x 1-9/16" D (686mm x 152mm x 40mm)
Dimensions: (on table stand) 30" H (762mm)
Table-stand base dimensions: 8-11/16" W x 4-3/4" D (222mm x 136mm)
Product Weight: 5.1 lbs. (2.3kg)
Specifications subject to change without notice.
Notes:
Unpacking Your Mythos XTR-50 Speakers
Please Inspect For Shipping Damage
Each loudspeaker leaves our plant in perfect condition. Any visible or concealed damage most likely occurred in handling after it left our plant and should be reported at once to your Definitive dealer or the delivery company that delivered your loudspeaker. Please unpack your speaker carefully. Save all cartons and packing materials in case you move or need to ship your speaker. Record the serial number found on the back of the Mythos XTR-50 on this manual.
VERY IMPORTANT: Accessories
Various parts and accessories that you will need to use your Mythos XTR-50 are in the carton but are easy to overlook. Open both ends of the shipping carton. Carefully examine the contents of the shipping carton and packing material to find the plastic bags with accessories.
Definitive Technology
MYTHOS XTR-50 OWNER'S MANUAL
MYTHOS XTR-50 OWNER'S MANUAL
Connecting the Mythos XTR-50
The wire connection method used on the Mythos XTR-50 is different than most speakers so please read these instructions! (NOTE: if you are using the table stands, you should pass the wire through the wire channels before attaching the green speaker wire connector.)
- In the accessories plastic bag you will find a small green plastic connector as shown in Figure 1.
- Strip 1/2 inch (12 mm) of insulation from each conductor of the speaker wire to expose the bare metal and twist each of the individual conductors into single un-frayed strands.
- Use a small jewelers screwdriver to loosen the screws on the connector just enough to allow the wire ends to fit in the holes. [Figure 1]
- Slip the wire ends into the holes and tighten the screws until the wire is firmly attached to the connector. (NOTE: if you are using the table stands, you should pass the wire through the wire channels before attaching the wire connector.)
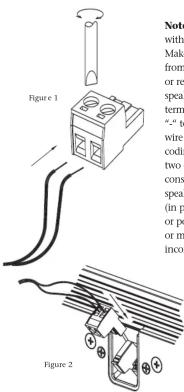
Note that one of the terminals is marked with “+” and the other is marked with “-”. Make certain that you connect the wire from the red (+) terminal of your amplifier or receiver to the “+” terminal on your speaker and the wire from the black (-) terminal of your amplifier or receiver to the “-” terminal on your speaker. Most speaker wire has some indicator (such as color-coding, ribbing or writing) on one of the two conductors to help you maintain consistency. It is essential to connect both speakers to the amplifier in the same way (in phase). If you experience a lack of bass or poor surround effect, it is likely that one or more of the channels is connected in incorrect polarity and needs to be rewired.
Pay closer attention to connect positive to positive and negative to negative on all channels.
-
Gently push the male connector with the wire into the female receptacle on the speaker. The connector is designed so that it can only go in one way with the correct orientation of positive and negative pins. [Figure 2]
-
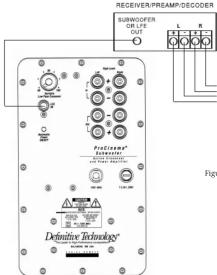
Connect a single RCA cable from the "SUB OUT" of your receiver to the LFE input of the subwoofer (not included). [Figure 3] This connecting method bypasses the subwoofer's internal "crossover" or low pass filter and relies on the crossover filter built into your receiver.
- See page 4 for instructions on Speaker Set Up in your surround receiver.
If you intend to place the Mythos XTR-50 on a TV or shelf in a horizontal orientation, see page 3.
Wall Mounting the Mythos XTR-50
• We recommend that wall-mounting of speakers be performed by professional installers or by those skilled in the use of power tools and the knowledge of building codes and structural issues.
- We recommend that you determine a suitable location for your speaker installation, and that you complete all wiring (especially "hidden" in-wall wiring) before mounting the brackets to your walls.
- Mythos wall-mount brackets are not suitable for ceiling mounting.
The Mythos XTR-50 loudspeaker comes with a wall-mounting bracket that can make mounting easier but in most cases the bracket is not necessary to wall-mount the speaker. The supplied bracket may be necessary when mounting the speaker to a full-motion or tilting TV wall-mount. You may choose to use the supplied wall-mount bracket if you want the speaker to protrude a bit more from the wall (total depth without the bracket is 1.5 inches [38mm] and 1.6 inches [40mm] with the bracket). The bracket is padded with foam that may be useful for damping rattles or vibrations between speaker and wall surface.
Follow these directions for wall mounting the speaker without using the bracket.
- The supplied cardboard mounting template is double-sided; one side is for horizontal orientation and the other is for vertical mounting. Be sure to face the correct side toward you. Hold the cardboard template in the intended location. Make sure the speaker clears the ceiling, adjacent walls, corners, beams, lighting fixtures and door/window frames. Leave at least 1" (25 mm) above or to the side of the speaker location to allow the speaker to slide onto the screws.
- Make sure the center of the template is centered with the TV screen's center points.
- When mounting the speaker horizontally, use a bubble level to make sure the template is level.
- When mounting the speaker vertically, use a plumb line to find perfect vertical. If the TV is off-level or off-plumb, the speaker will look better if it is off-level or plumb in exactly the same way as the TV.
- Use push pins to secure the template to the wall.
-
Make pencil marks in the holes labeled "Pilot Hole (for mounting without bracket)"; remove the template.
-
Pre-drill the pilot-hole locations for mounting screws (not included). Use screws rated to hold securely in the wall material and have screw heads (flat or panhead are acceptable) at least 0.33 inch (8.5mm) in diameter.
- It is best if at least one screw hits a wall stud. If there is no stud behind the pilot-hole location, install wall anchors (not included) to secure the bracket screws. [Figure 5] Follow the wall anchor manufacturer's directions. Each wall anchor should be rated to hold at least one half of the product net weight [see specifications on page 1].
- For masonry walls, use a masonry drill bit to pre-drill holes, and use masonry anchors and screws (not included).
- Drive in the screws until the head is approximately 0.12 inch (3mm) away from the wall. If the screws are driven too close to the wall, you will not be able to slip the speaker onto the screw heads. If the screws are not close enough to the wall, the speaker will be loose and may rattle when played.
- Push the speaker connector into the female receptacle on the back of the speaker (see page 2).
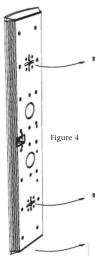
- Line up the speaker so that the screws enter the center part of the + shaped channels; slide the speaker down so that the screw heads hold the speaker in place. [Figure 4]
- Gently pull on the speaker to make sure the screws are firmly holding the speaker.
- If the speaker is not held tightly to the wall, drive the screws in a little deeper and try again.
Follow these directions for installing the speaker with the wall-mounting bracket.
- The supplied cardboard mounting template is double-sided; one side is for horizontal orientation and the other is for vertical mounting. Be sure to face the correct side toward you. Hold the cardboard template in the intended location. Make sure the speaker clears the ceiling, adjacent walls, corners, beams, lighting fixtures and door/window frames. Leave at least 1" (25 mm) above or to the side of the speaker location to allow the speaker to slide onto the screws.
- Make sure the center of the template is centered with the TV screen's center points.
- When mounting the speaker horizontally, use a bubble level to make sure the template is level.
- When mounting the speaker vertically, use a plumb line to find perfect vertical. If the TV is off-level or off-plumb, the speaker will look better if it is off-level or plumb in exactly the same way as the TV.
- Use push pins to secure the template to the wall.
- Make pencil marks in the holes labeled "Pilot Hole"; remove the template.
- Pre-drill the pilot-hole locations for mounting screws (not included). Use flat head screws rated to hold securely in the wall material and have screws heads between 0.25 inch (6.4mm) and 0.33 inch (8.4mm) in diameter.
- It is best if at least one screw hits a wall stud. If there is no stud behind the pilot-hole location, install wall anchors (not included) to secure the bracket screws. [Figure 5] Follow the wall anchor manufacturer's directions. Each wall anchor should be rated to hold at least one half of the product net weight [see specifications on page 1].
- For masonry walls, use a masonry drill bit to pre-drill holes, and use masonry anchors and screws (not included).
- Secure the bracket to the wall with screws driven into the pilot holes or wall anchors. Bracket should be tight to the wall, and screw heads should be flush with the bracket.
- Attach the supplied male connector to the speaker wire and plug the connector into the receptacle on the speaker (see page 2).
- Line up the speaker so that the mounting heads enter the center part of the + shaped channels; slide the speaker down so that the mounting heads hold the speaker in place. [Figure 6]
- Gently pull on the speaker to make sure the screws are firmly holding the speaker.
Mounting the Mythos XTR-50 to an articulating TV bracket
If you have a Plasma or LCD TV that is attached to the wall via a swing-out articulating bracket such as those offered by Chief and Sanus, consult the TV bracket manufacturer's user manual for specific speaker mounting instructions.
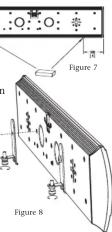
Shelf/Table Mounting
If you are going to use the Mythos XTR-50 in horizontal mode on a
shell or table, first attach the two supplied rubber pads to the bottom edge of the speaker. [Figure 7] Assemble the L-brackets to the threaded holes in the back of the speaker using the 1/4 20 x 12mm long screws provided. [Figure 8] Thread the foot screws into "L" brackets and adjust to tilt the speaker up or down to aim the speaker toward seated listener ear height.
If you are going to vertically mount the speaker on a shelf or table, do not attach the wall mount bracket to the speaker. Follow these steps:
-
Assemble the shelf stand using [Figure 9] as a guide.
-
Pass the speaker wire through the wire channel and attach the male speaker connector to the speaker wire as shown on Page 2.
- Assemble the provided screw and square-neck nut onto the lower hole in the back of stand leaving a 3mm gap between the nut flange and the stand. [Figure 10]
- Line up the center of the + shaped channel with the square-neck nut on the stand and push the speaker in and down on the nut.
- Thread the provided 1/4 20 screw through the top hole in the stand into the threaded hole in the speaker and tighten the screw.