
IT-002 - Mobiltelefon SITECOM - Gratis brugsanvisning og manual
Find enhedens vejledning gratis IT-002 SITECOM i PDF-format.

Brugerspørgsmål om IT-002 SITECOM
0 spørgsmål om dette apparat. Besvar dem du kender, eller stil dit eget.
Stil et nyt spørgsmål om dette apparat
Download vejledningen til din Mobiltelefon i PDF-format gratis! Find din vejledning IT-002 - SITECOM og tag din elektroniske enhed tilbage i hånden. På denne side er alle dokumenter nødvendige for brugen af din enhed offentliggjort. IT-002 af mærket SITECOM.
BRUGSANVISNING IT-002 SITECOM
SITECOM
Wireless Internet USB Phone IT-002
Full Manual
Index
Index 2
Introduction....3
Safety Instructions: 3
Battery Safety Instructions: 3
Disposal of the device 3
Cleaning....4
1. Getting Started....5
1.1 Charging battery with USB cord charger .... 5
1.2 Switch the wireless handset On / Off: 6
1.3 Handset operation....6
1.4 Paring up 6
1.5 Icon indications (PC side)....7
1.6 LED light indication for the wireless handset....8
1.7 LED light indication for the USB Dongle 8
2. Using the wireless Handset 9
2.1 Description of keypads 9
2.1.1 Skype Call Button: 10
2.1.2. Answer/Call Button: 10
2.1.3 Numeric Buttons: 11
2.1.4 Up/Down Button + Speaker Volume control: 11
2.1.5 Utility Button:.... 11
2.1.5.1 Device Setup 12
2.1.6 Call Ending Button + Power On / Off Button: 13
3. Making / receiving Skype calls:.... 14
3.1 Answering phone calls.... 14
3.2 Making Phone Calls — Calling stored contact 14
3.3 Making Phone Calls — Using Skype speed dial function.... 14
3.4 Making Phone Call — Using Skype out service 15
- Assigning PC Audio to PC Speakers 17
5. System Requirements ...... 18
6. Package.... 18
7. Technical Specifications .... 19
Introduction
T h is U S B ph one provides you the conv enienc e of make free call l s over t h e I nt ernet from PC to PC, as easy as using normal telephones. Simply plug the USB phone into the USB port of your PC, download Internet telephony software like Skype®, and you can start making calls. You can easily access the net and connect to your friends, family members or colleagues. The phone is fully compatible with Skype and can be used as audio device with Yahoo Messenger, MSN Messenger, MS NetMeeting, net2phone, babble etc for voice communication. The USB phones design is similar to a mobile phone with quick dial and volume control buttons.
Safety Instructions:
Please read this section carefully before starting using wireless USB handset for Skype.
Battery Safety Instructions:
- Do not burn, disassemble, strike or mutilate the battery. The battery contains toxic materials that could release, resulting in injury.
- There is a risk of explosion if you replace the battery with an incorrect battery type. Use only the battery that came with your phone.
- Remove batteries if storing the phone over 30 days.
- Do not short circuit the battery.
- Do not dispose of the battery in fire. This could result in explosion.
• Use specified chargers only. - Keep out of the reach of children.
The rechargeable battery must be disposed of properly, and may need to be recycled. Refer to your battery's label for battery type. Contact your local recycling center for proper disposal methods.
Disposal of the device
Some of the product materials can be reused if you bring them to a recycling point. Please contact your local authorities in case you need more information on the collection points in your area.
Cleaning
C I ean t h e h andset with h a s l i g h t l y damp c l ot h or with h an ant i-st at ic c l ot h . P I not u se ab rasiv e sol v ent for c I eaning pu rpose.
1. Getting Started
T h is sec t ion prov ides t h e S t ep-By -S t ep inst r u c t ions y ou wil l need for u sing Wirel ess S k y pe h andset .
1.1 Charging battery with USB cord charger
Before you use the wireless Sky pe handset for the first time, you must make sure that the battery is fully charged. For battery charging, do the following:
- Open the battery compartment.
- Insert the battery as indicated. (See below)
- Your PC or notebook must be powered on.
- Plug in the USB cord charger into the Wireless Skype phone and into a free USB port in your computer.
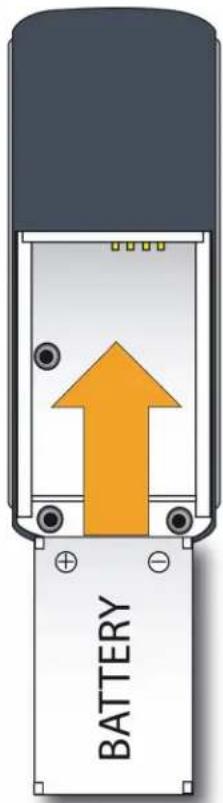
- Inserting the battery
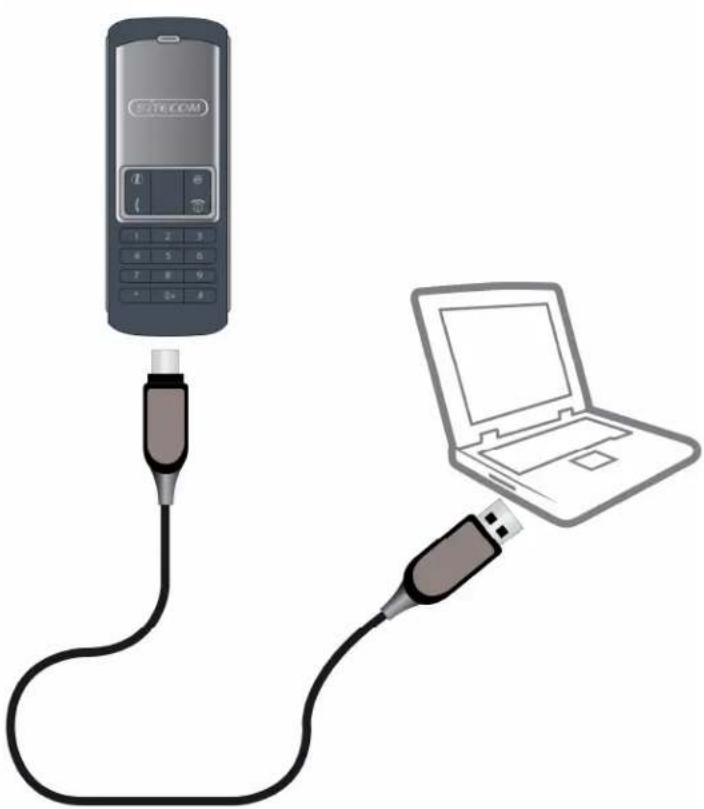
natural_image
Illustration of a mobile phone connected to a laptop via USB cable (no text or symbols)- Connecting the phone to your computer to charge the battery.
While charging, the LED light is indicated as below:
• The Red LED light on the phone will be turned on when the phone is charging.
- The Red LED light will extinguish when the battery is fully recharged.
1. 2 Switch the wireless handset On / Off:
For power saving purpose of the handset battery, it is recommended to switch off the handset when the PC is shut down. To switch the handset On/Off the handset:
- Press the call ending button on the handset for 3\~5 consecutive seconds.
- You will hear a ring tone for on/off status indication once the handset is powered on/ off.
1. 3 Handset operation
F or wirel ess h andset operat ion, see t h e fol l owing :
- Please install the driver for the wireless phone. Insert the installation CD, and click "Inst al I Driver".
- Plug in the USB dongle into a free USB port on your computer.
- Press and hold the 🔒 key to power on the phone.
- Once the 📄 appears in the system tray, the phone is ready to use.
1.4 Paring up
As factory default, the Wireless handset and the USB Dongle have already been paired up. Once the driver is properly installed, the wireless handset and the USB
Dongle should be ready to use. However, If you find the "X" is indicated in the tool bar, check the following:
• The wireless handset is powered ON.
- The Dongle is properly installed, and the USB cable firmly plugged in.
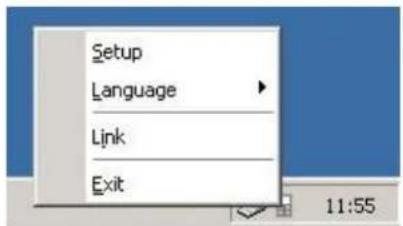
I f opt ions, ment ioned on t h e prev iou s pag e, are c h e c k e d b u t t h e u t i l it y st i l I show that t h e ph one is disc onnec t ed, p l ease c o n d u c t t h e manu al paring proc edu res:
- For manual paring, right click on the "☐" and you will find the below tool b ar. c
- Left click on the "Link" in the tool bar. c
- Press and hold the "i" button on the keypad of the wireless handset until the icon changes into . The handset is now ready for use.


1.5 Icon indications (PC side)
You will I find an ic on in t h e s y st em t ray . E ac h ic on indic at es a different st at u s of t h e wirel ess h andset :
| Icon | Phone status indication |
 | Failure to establish connection between handset and the Dongle.Please check if the handset is powered ON and the Dongle is properly inserted into t h e US B port . |
 | 2 or more dong l es are fou nd. P l ease remov e t h e ex c ess Dong |
 | Unab l e t o find Dong l e. c c |
 | No driv er is inst al l ed. c c |
| [27AX] | User has selected the "Utility" Section. (See section 2.1.5 for detail) |
 | P h one is in S T A N D BY Mode. |
 | P h one is in t h e S K Y P E c ont act l ist sec t ion. (S ee sec t ion 2.1 .1 for det ail s) |
 | R ec h arg ing b at t ery . |
 | Bat t ery l ow. P I ease rec h arg e t h e b at t ery . (S ee sec t ion 1 .1 for det ail ) |
1.6 LED light indication for the wireless handset
There are 2 LED lights on the wireless handset. The flashing of the WHITE and RED LED light indicate es:
| LED color | Flashing style | Status Indication |
| white | Rapid flashing | Establishing connection with Dongle. |
| white | Once per second | Connection established. Handset is ready to use. |
| wh it e, red | F I ashsimu l t aneou sl | S earch h ing for t h e dong l e. (paring in prog y |
| wh it e, red | F I ash es and h | Power On/Off in prog ress. |
| red | Rapid flashing | Out of reception range / Battery Low |
| red | L i g h t s u p | Bat t ery c h arg ing in prog ress. |
| - | No flashing | Handset is powered off. |
1.7 LED light indication for the USB Dongle
There is a BLUE LED light on the USB dongle. The flashing of the LED indicates:
| Flashing style | Status Indication |
| Rapidly | Connec t ion h as j u st b een est ab l ish ed. |
| Once per 1 .5 sec onds | Connec t ion est ab l ish ed and t h e h andset is ready |
| S h ort flash every sec onds | S earc h ing for h andset . (U nit paring u p in prog ress |
| No flashing | PC or Notebook is powered off. No connection established. |
t o u se.
2. Using the wireless Hands et
T h is sec t ion prov ides y ou wit h t h e b asic fu n c t ions of t h e wirel ess h andset .
2.1 Description of keypads
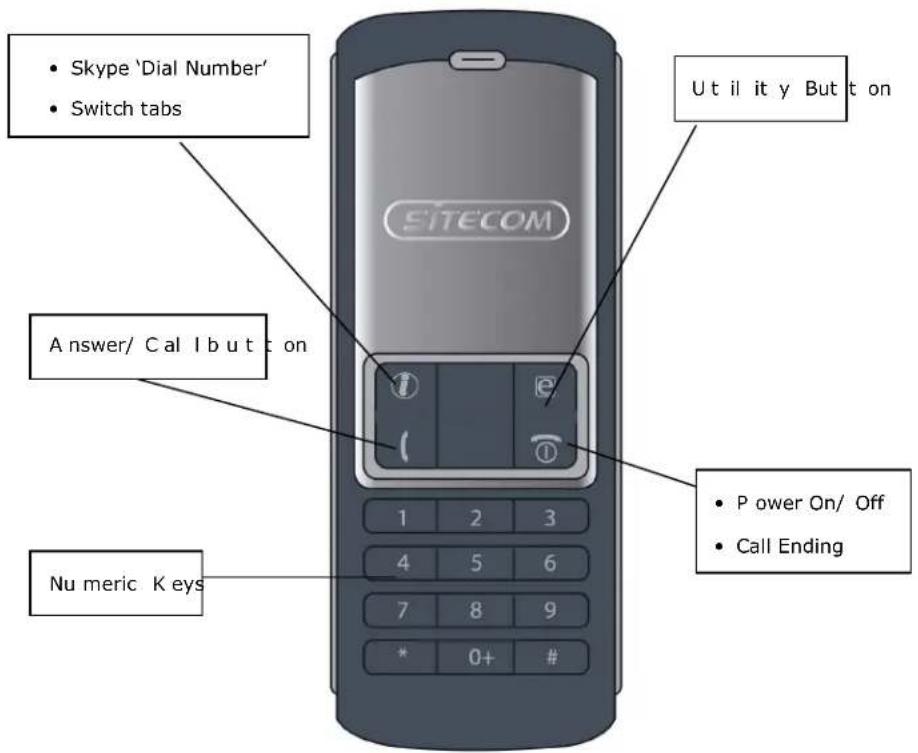
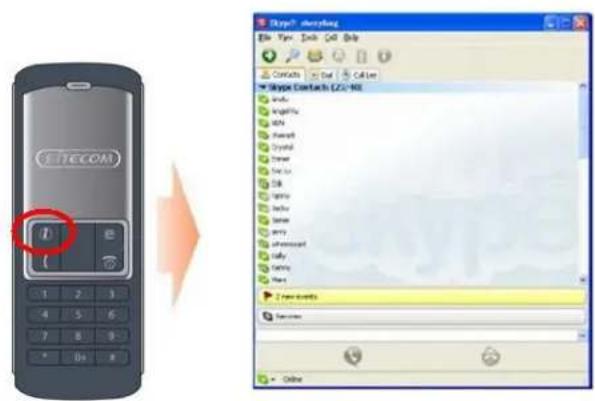
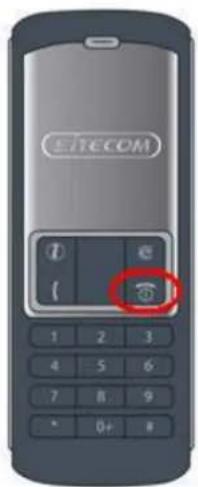
2.1.1 SkypeCall Button:
When the Sky pe ic on is h idden, press "c" once et o act iv at et he Sky pe prog ram. Press "c" again aft er t he Sky pe Pro gram h as opened to make a sele ct ion from t he Sky pe tab sc reen.
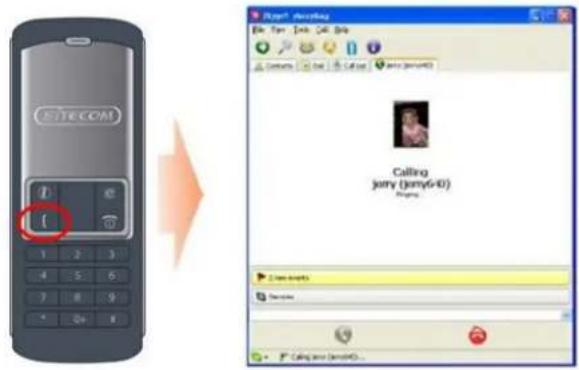
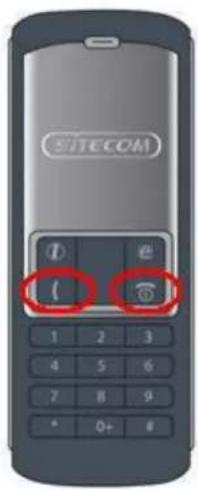
2.1.2. Answer / CallButton:
When a call I comes in, press this button to answer the call. When you have select a contact or completion dialing, press this button to call out.
2.1.3 Numeric Buttons:
You can use these key for dial ing. Use the numeric button to dial Skype out numbers. Also, you can use these buttons for speed dial. Speed dial codes can be setup for your Skype contacts. (see section 3.3 for detail)
2.1.4 Up/Down Button + Speaker Volume control:
Use these buttons to move upward or downward in your contact list, and to highlight a contact. You may also use these buttons to make your selection in other screens. Also, you may adjust the volume by using these buttons while you are on the phone.
2.1.5 Utility Button:
Use this button to activate the utility user interface. When pressing the "e" key, the utility window will I pop-u p:
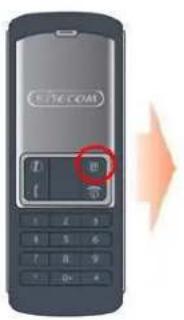
Remarks: You will see some icons on this page.
| ICON | Indication | |
 | Indicates the reception status. | |
| Indicat es t h e b att ery st at u s. | ||
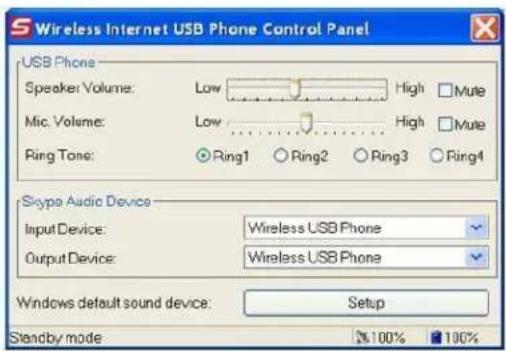
2.1.5.1 Device Setup U
You may change your phone set up in this section.
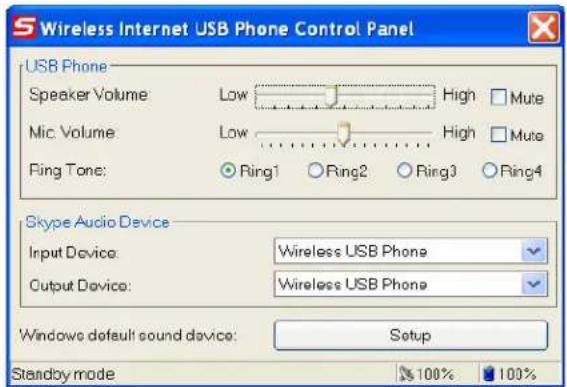
USB Phone Volume Adjustment
- Use the 'down' button on the handset to select the sound device you wish to modify.
• Use the 'up' button on the handset to increase the speaker and microphone
Ring Tone selection:
There are 4 ring tone types for you to choose from.
- Use the 'down' button on the handset to move to the Ring tone section.
- Press the Up button to select the desired ring tone, OR use the numeric key to select the desire ring tone. (eg. Press "1" for Ring 1)
Skype Audio Devices:
Please set both output and input device in the Skype Audio Device section to "Wireless USB Phone" to get the proper USB Phone function.
If you use the microphone and speakers attached to your PC for Skype, please change the "Windows default sound device" to your systems sound card.
2.1.6 Call Ending Button + Power On / Off Button:
At the end of conversation, press this button to hang up. This key can also be used to delete one or more digits when you dial a number with Skype Out.
This button can also switch the power ON/OFF for this handset. (See section 1.2 for details)
3. Making / receiving Skypecalls:
To make/ receive a Sky pecal I from the wireless handset, please read this section.
3.1 Answering phone calls
When a call is coming in, the Skype Phone begins to ring and the Skype indicator begins to flash. Press the Answer/Call button to answer the call and begin a conversation. When the conversation ends, press the Off/Cancel button to hang up.
3.2 Making Phone Calls — Calling stored contact
If you have stored contact information in the Skype contact list, you may use this list to call friends just like you would use the contact list in your cell phone.
- Press the Skype call button to activate Skype and your contact list.
- Press the Up/down button to select the contact you want to call.
- Press the call button to make a phone call.
3.3 Making Phone Calls — Using Skype speed dial function
This function is the most convenient and most useful dialing method offered by Skype. Just like pressing on a pre-set key on your cell phone to call a friend or relative, you may enjoy the same function in Skype with the wireless handset. By assigning a 1- or 2-digit speed dialing code in Skype you can call your contacts directly. Even longer numbers for SkypeOut such as local numbers, cell phone numbers, or international numbers can be simplified by assigning a 1- or 2-digit speed dialing code for easy calling.
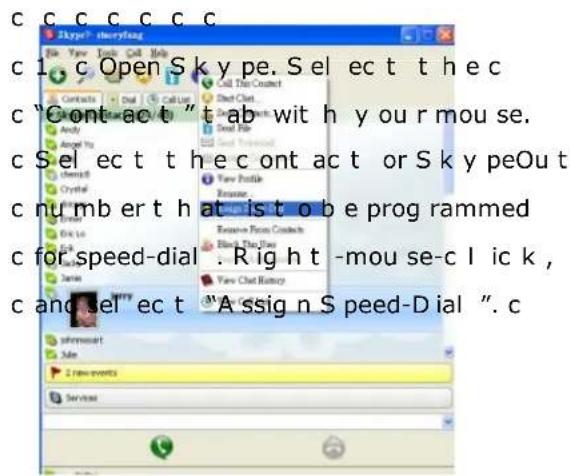
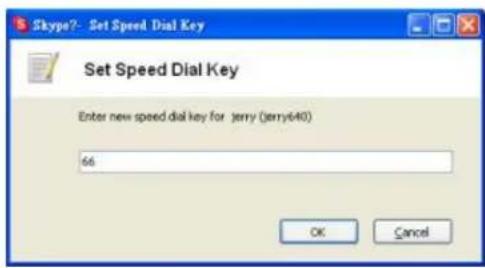
- When the setup dialog box pops u p, enter one or t wo dig it s as speed dial c ode. c
After the setup is completed, whenever a contact is highlighted in the future, the speed dialing code will appear. Remember this code; when calling this contact in the future, just dial the 1- or 2-digit code on the wireless handset and press "Call".
3.4 Making Phone Call — Using Skype out service
Skype is a free Internet phone service, and is very convenient when both parties are using the software for conversations on the Internet. You can still enjoy low cost phone services with SkypeOut to make local calls, mobile phone calls, long distance calls, and international long distance calls. To use Skype Out, please apply for an account and purchase credits online at the SkypeOut website first. With purchased credits for SkypeOut, you may use your wireless handset to call any phone number in the world.
To make a Sky peOut call I, you must enter the number in the following way (even local calls): c
" + " + " c o u n t r y c+o"dreü mber ". You can al so u se "0 0 " or "0 1 1 " before t h e c ou n t r y c ode.
Examples for dialing methods (using the country code "1" for calling to the USA):
- Press + 1 555 555 1234 (Remark: Press and hold the "0" for 2 sec. to change to "+"
or
- Press 0 0 1 555 555 1 234
or
- Press 0 1 1 1 555 555 1 234
WARNING:
The Skype software does not support calls to any emergency number nor emergency service (e.g. 112, 211, 911, 999 etc). To perform calls of this type please make sure to use a l and l ine t el eph one or a c el l u l ar/ mob il e ph one.
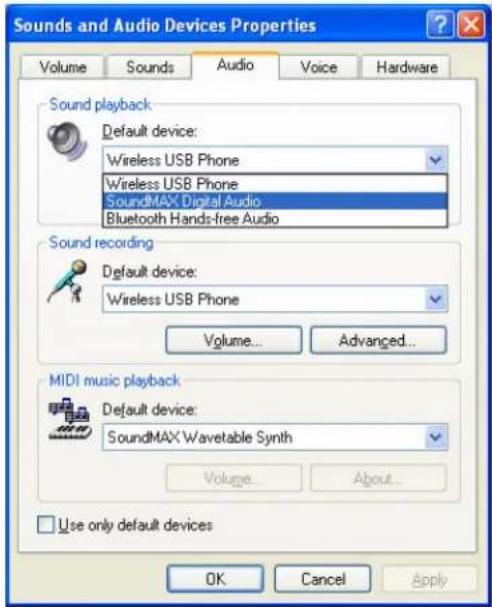
4. Assigning PC Audio to PC Speakers
T h e wirel ess S k y pe h andset h as a b u il t -in au dio c h ip, wh ic h is equ iv al ent t o an ext ernal sou nd c ard for y ou r c omput er. T h erefore, wh en t h e h andset is c onnec t ed t o a P C , t h e Windows operat ion sy st em wil l rec og nize it as t h e defau lt au dio ou t pu t dev ic e and repl ac e t h e orig inal au dio ou t pu t dev ic e. T h is fac il it at es pl u g -and- play t h e US B h andset , but it may int erfere wit h music or v ideo fil es. F il es t h at u sed t o b play ed t h rou g h y ou r speak ers or h eadset c connec t ed t o t h e orig inal sou nd c ard in y ou r P C , wil l b e p lay ed t h rou g h t h e wirel ess US B h andset once it is pl u g g ed in. T o al l ow music and sou nds t o b e p lay ed t h rou g h t h e orig inal speak ers, y ou mu st c h ang e t h e defau l t au dio dev ic e of y ou r P C .
-
Please click the utility key "e" to open the utility
-
Check the Windows default sound device, if the USB Phone is set as default audio device, then press the "Setup" button to start the windows "Sounds and Audio Devices Properties"
-
After the "Sounds and Audio Devices Properties" window is opened, select the "Audio" tab, and you will see the default device for sound play back is set to "USBAudio Dev ic".
-
Please change the audio device to your systems built-in sound card, to allow music to be played through your normal speakers.
5. System Requirements
S y st em R e q u i rement for t h e U S B wireless S k y pe h andset :
● Win 2000 / Win XP operation system
● 400MHz CPU or above
● 128MB RAM or above
● Minimum 15 MB Hard Disk Drive Space
- Internet connection (Any broadband connection or 56Kbps dial up modem)
6. Package
You will find the pack age contains:
- Wireless Skype handset
USB Dongle - Driver CD
● Rechargeable Battery - USB recharge cord
- Quick Install Guide
- Registration card
7. Technical Specifications
| 2.4GHz Wireless Skype Phone Specification | |
| Operation Frequency | 2.4GHZ unlicensed ISM Band(2.400~2.4835GHz) |
| R F Modu lat ioatMho | F S K |
| USB Spec | USB 2.0 Full Speed Operation Compliant |
| USB Audio | Compliant with USB Audio Specification V1.0 |
| Plug&Play with standard (build-in) U S B A u dio Dev Driv er. | |
| Battery Capacity | 500mAh Li-Ion Battery |
| Standby Time | >300 Hours |
| Talking Time | >5 Hours |
| Recharge Supply | 4.5V t o 7V, c an u se US B P ort as rec h arg in sou rc e |
| Recharge Current | 300mA (TYP.) |
| Recharge Time | <3Hours |
power