
BEO 9761 X - Ovn BLOMBERG - Gratis brugsanvisning og manual
Find enhedens vejledning gratis BEO 9761 X BLOMBERG i PDF-format.

Brugerspørgsmål om BEO 9761 X BLOMBERG
0 spørgsmål om dette apparat. Besvar dem du kender, eller stil dit eget.
Stil et nyt spørgsmål om dette apparat
Download vejledningen til din Ovn i PDF-format gratis! Find din vejledning BEO 9761 X - BLOMBERG og tag din elektroniske enhed tilbage i hånden. På denne side er alle dokumenter nødvendige for brugen af din enhed offentliggjort. BEO 9761 X af mærket BLOMBERG.
BRUGSANVISNING BEO 9761 X BLOMBERG
BUILT-IN OVEN FOUR ENCASTRABLE INTEGRIERTER OFEN
BEO 9761
Gebrauchsanleitung
Please read these instructions before installation or using your appliance!
Dear Customer,
By purchasing this product you have chosen an appliance of advanced technology and high quality.
The appliance was produced in modern facilities which meet all environmental standards.
The instructions will help you to operate the appliance quickly and safely.
- Upon delivery, please check that the appliance is not damaged. If you note any transport damage, please contact your point of sale immediately and do not connect and operate the appliance!
- Before you connect and start using the appliance, please read this manual and all enclosed documents. Please note in particular the safety instructions.
- Keep all documents so that you can refer to the information again later on. Please keep your receipt for any repairs which may be required under warranty.
- When you pass on the appliance to another person, please provide all documents with it.
Table of Contents
1 General information 4
Overview......4
Technical Data....5
Accessories supplied with the unit......5
2 Safety Instructions 7
Explanation of safety instructions ..... 7
Basic safety instructions....7
Safety for children 8
Safety when working with electricity.8
Intended use....9
Disposal....9
Packaging material....9
Old equipment....9
Future transportation......9
3 Installation 10
Before installation....10
Installation and connection....12
4 Preparation 14
Tips for saving energy 14
Initial operation....14
Setting the time....14
First cleaning of the appliance ..... 15
Initial heating 15
5 How to Operate the Oven 16
General information on baking, roasting and grilling 16
How to use the electric oven 16
Operating modes....18
How to operate the oven control unit20
How to use the program lock......22
Cooking times table....23
How to operate the grill 25
Cooking times table for grilling.....25
How to use the alarm clock....26
6 Maintenance and Care 27
General information 27
Cleaning the control panel....27
Cleaning the oven 27
Removal of oven door....28
Taking off the door inner glass ......28
Replacing the oven lamp 29
7 Troubleshooting 30
1 General information
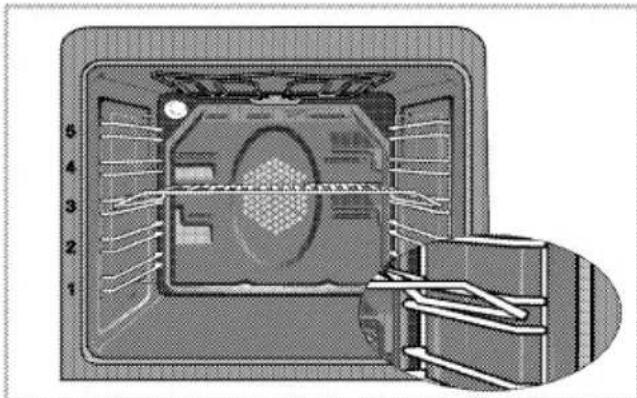
Overview

text_image
1 2 3 4 5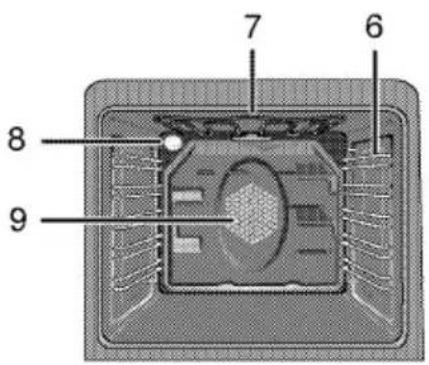
text_image
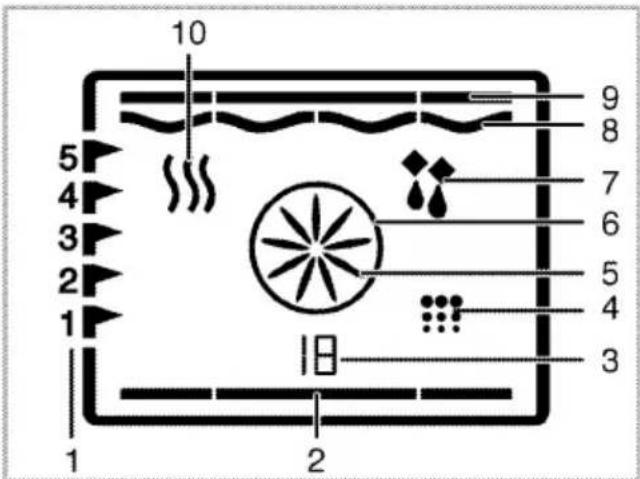
7 6 8 91 Control panel
2 Wire shelf
3 Tray
4 Handle
5 Door
6 Shelf positions
7 Top heating element
8 Lamp
9 Fan motor (behind steel plate)
text_image
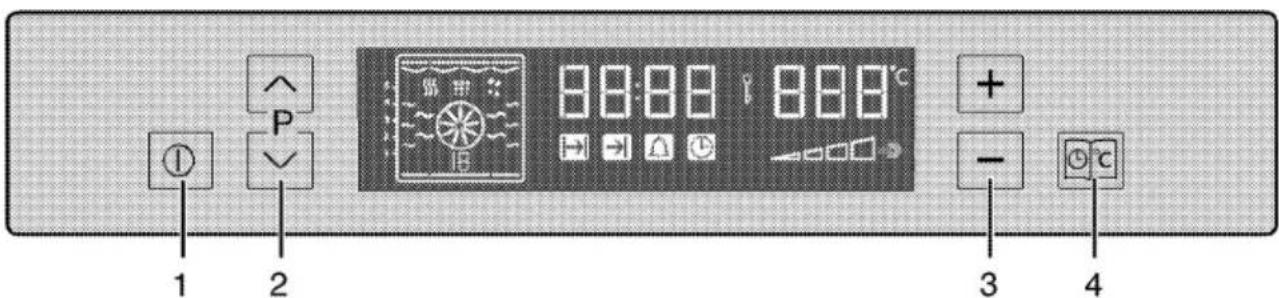
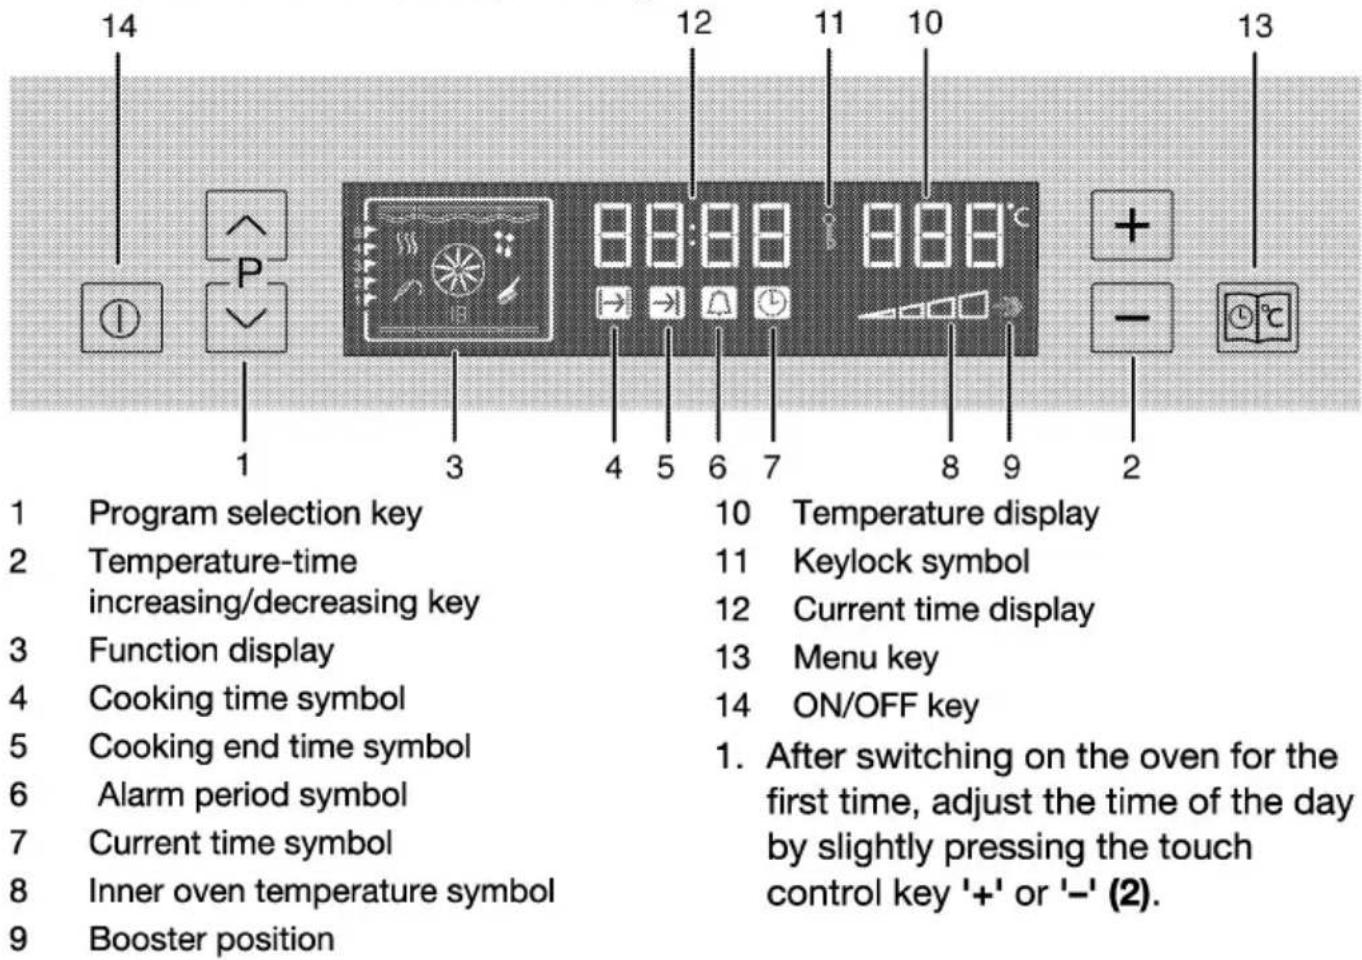
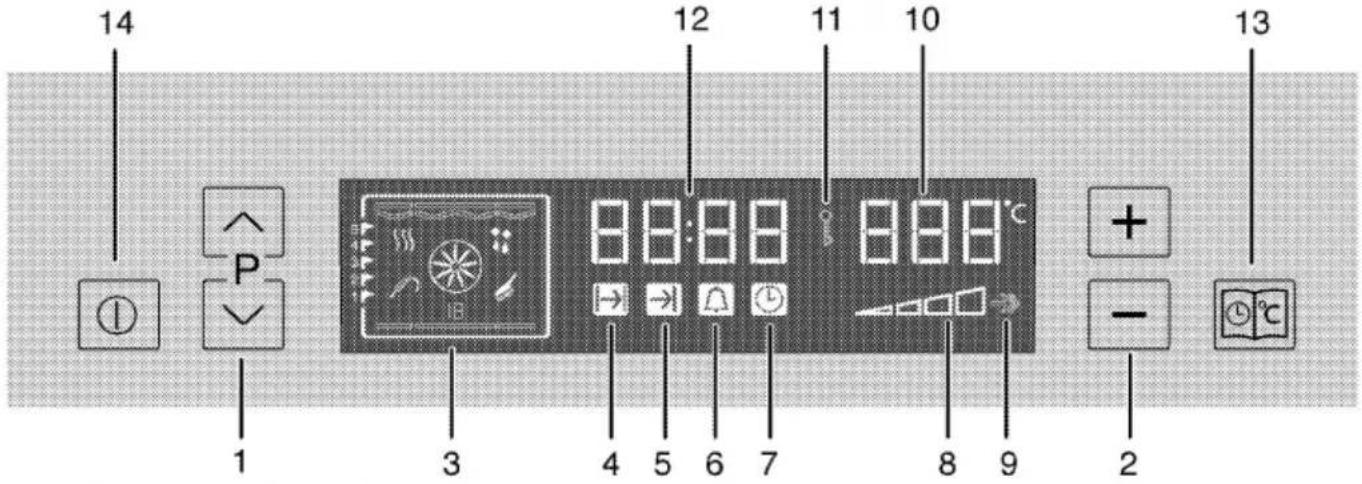
1 2 P 88:88 88:8°C + - 3 41 ON/OFF key
2 Program selection key
3 Temperature-time increase/decrease key
4 Menu key
Technical Data
| Voltage/frequency | 220-240 V ~ 50 Hz |
| Total electric consumption | 3.1 kW |
| Fuse protection | min. 16 A |
| Cable type / cross section | H05VV-FG3 x 1,5 mm ^2 |
| Cable length | max. 2 m |
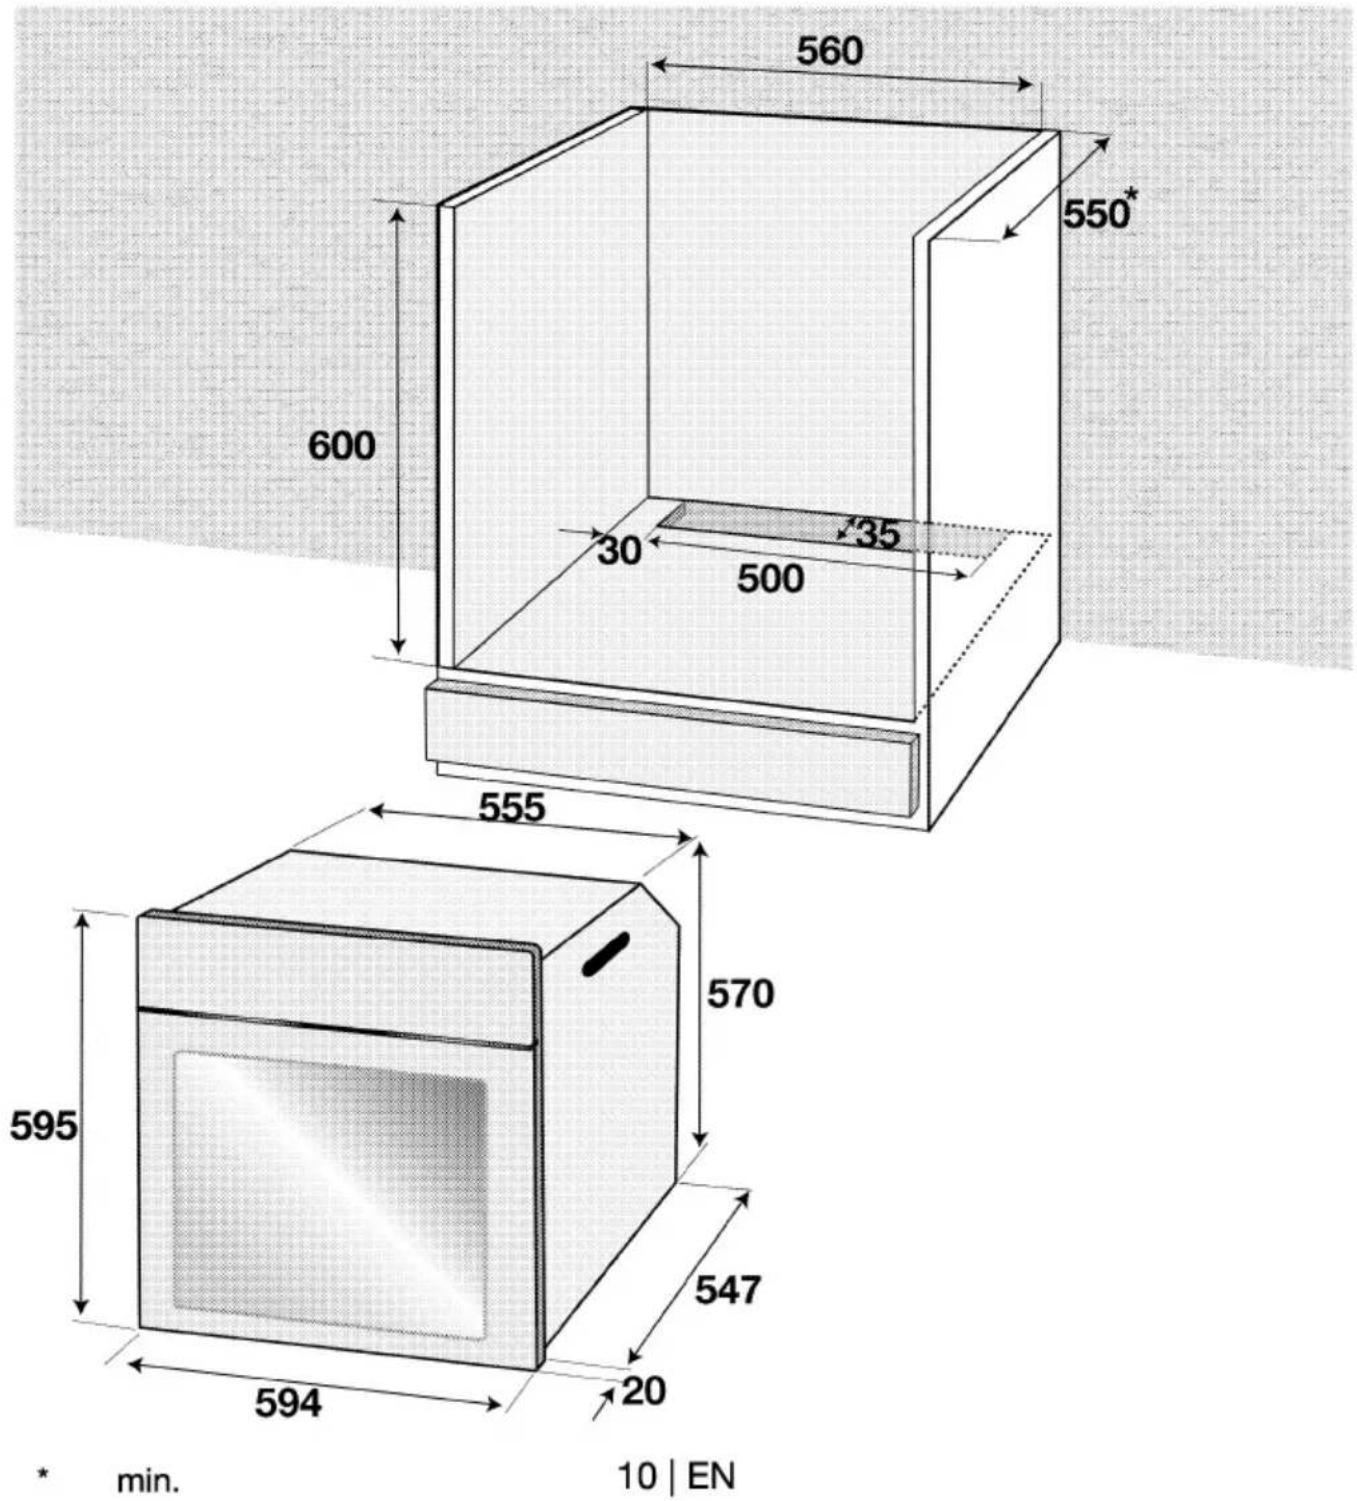
| Outer dimensions (height/width/depth) | 595 mm/594 mm/567 mm |
| Installation dimensions (height/width/depth) | **590 or 600 mm/560 mm/min. 550 mm |
| Main oven | Multifunction oven |
| Energy efficiency class# | A |
| Inside illumination | 15/25 W |
| Grill power consumption | 2.2 kW |
Basis: In electrical ovens, the data on energy labels are in conformity with EN 50304. Values were determined under standard load and convection/hot air (if available). Heating mode with an energy efficiency rating specified by EN 50304 is determined in accordance with below priority order depending on functions (modes) availability on the product. 1- Eco fan heating, 2-Slow cooking, 3-Fan heating (hot air), 4-Top and bottom heat with convection air, 5-Top and bottom heating.
** See Installation, page 10.
Accessories supplied with the unit

Important
Accessories supplied can vary depending on the product model. All the accessories described in the user manual may not exist on your product.
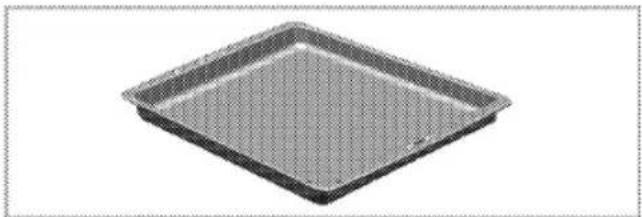
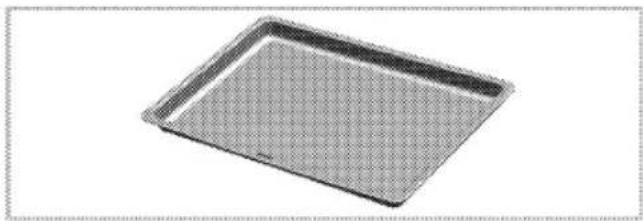
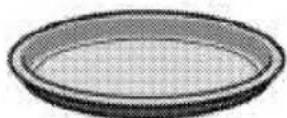
Baking tray
Can be used for pastries, frozen foods and big roasts.
natural_image
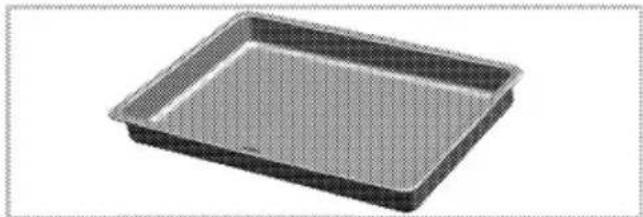
Exterior view of a square baking tray (no text or symbols)Deep roasting tray
Can be used for pastries, big roasts, foods with liquid content and during grilling as dripping pan.
natural_image
3D rendering of a rectangular baking tray with a mesh pattern (no text or symbols)Pastry tray
It is recommended for pastries such as cookies and biscuits.
natural_image
3D rendering of a rectangular baking tray with a grid pattern (no text or symbols)Small baking tray
Can be used for small portions. This baking tray is placed onto the wire shelf.

natural_image
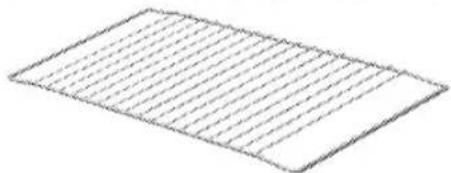
Rectangular metal tray with a grid pattern, no visible text or symbolsWire shelf
Can be used for roasting and as deposit for baking, roasting and casserole dishes.
natural_image
Simple line drawing of a rectangular sheet with horizontal lines, no text or symbols present
natural_image
Isometric line drawing of a rectangular plate with horizontal slats (no text or symbols)Proper positioning of the wire shelf and tray on sliding shelves
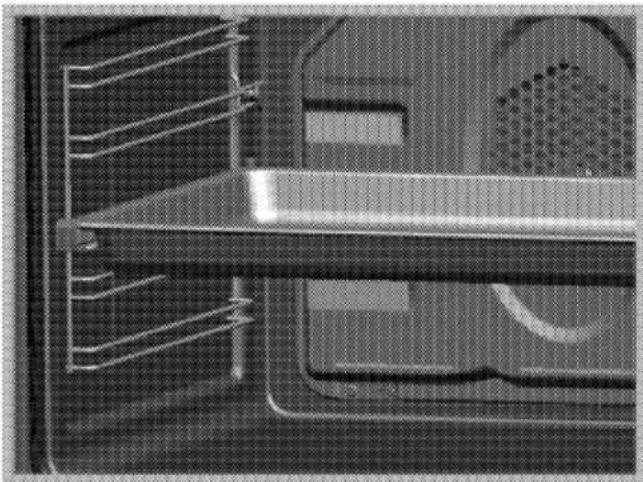
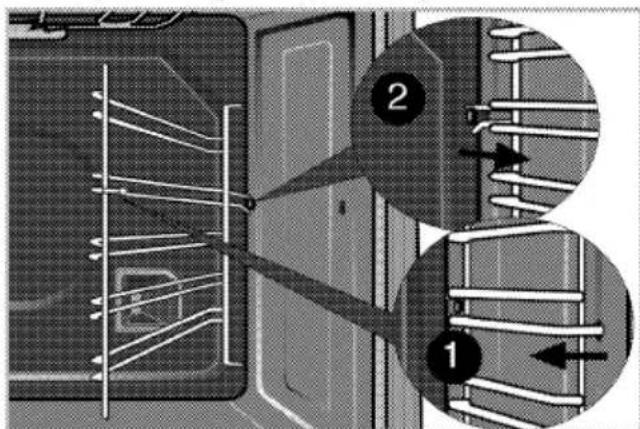
It is important to position the grill and/or dripping pan on the wire shelves correctly. Slide the grill or the dripping pan completely between the 2 rails and make sure it is stable before putting a dish on it (Please see the following figure).
natural_image
Close-up of a mechanical component with internal channels and mounting holes (no visible text or symbols)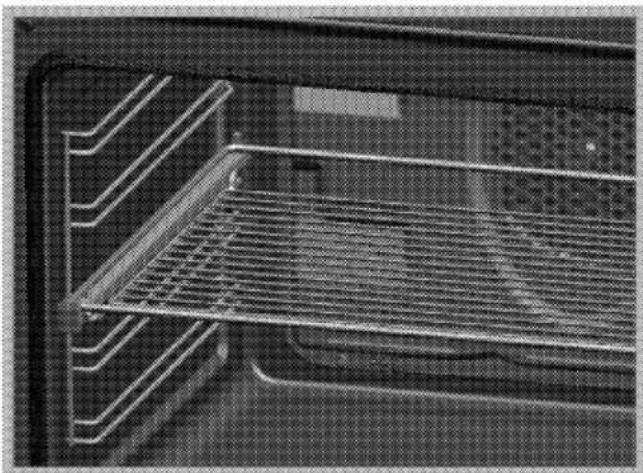
natural_image
Interior view of an oven with metal grating and ventilation slots (no text or symbols visible)Pizza tray
Can be used for pizza and pastries.
Explanation of safety instructions
The following types of safety instructions and information are used in this manual. They can be distinguished by the symbol and the initial signal word.

DANGER
High risk of personal injury.
Non-observance may or will cause serious injuries or death.

CAUTION
Risk of personal injury.
Non-observance may or will cause minor or medium injuries.

NOTICE
Risk of material damage.
Non-observance may or will cause damage on the appliance or other objects.

Important
Tip for the user.
Useful information on how to use the appliance. No injury risk information.
Basic safety instructions
- The manufacturer reserves its right to make changes in the technical specifications in order to improve the appliance quality without any prior notice. Figures included in
this manual are for schematic purpose only and may not match exactly with your appliance. Values stated on the markings of the appliance or in other printed documents supplied with the appliance are obtained under laboratory conditions as per relevant standards. These values may vary according to the usage of the appliance and ambient conditions.
- This appliance is not intended for use by persons (including children) with reduced physical, sensory or mental capabilities, or lack of experience and knowledge, unless they have been given supervision or instruction concerning use of appliance by a person responsible for their safety.
Children should be supervised to ensure that they do not play with the appliance.
- "An additional protective means to avoid contact with the oven door is available. This part should be fitted when young children are likely to be present."
- Never use when judgement or coordination is impaired by the use of alcohol and/or drugs.
- Do not operate the appliance if it is defective or shows any visible damage.
- Do not carry out any repairs or modifications on the appliance. However, you may remedy some malfunctions; see Troubleshooting, page 30.
- Be careful when using alcoholic drinks in your dishes. Alcohol evaporates in high temperatures and may cause fire since it will catch fire when it gets in contact with hot surfaces.
- Do not heat closed food containers and glass jars. Pressure that may build-up in the jar can cause it to burst.
- Ensure that no flammable materials are adjacent to the appliance as the sides become hot during use.
- Do not place baking trays, dishes or aluminium foil directly onto the bottom of the oven. The heat accumulation might damage the bottom of the oven.
Keep all ventilation slots clear of obstructions.
- Appliance may be hot when it is in use. Never touch the hot burners, inner sections of the oven, heating elements etc. Keep children away!
• Always use heat-resistant gloves when putting or removing the dishes into/from your oven. - Don't use the cooker with front door glass removed.
- Rear surface of the oven gets hot when it is in use. Gas / Electric connection should not touch the rear surface, otherwise the mains cable may get damaged. Do not trap the mains cable between the hot oven door and frame. Do not route the mains cable over the hot cooking section. Otherwise, cable insulation may melt and cause fire as a result of short circuit.
- Check all controls on the appliance are switched off after use.

Important
For the warranty to be valid, the appliance must be installed by a qualified person in accordance with current regulations.
Safety for children
- Accessible parts of the appliance will become hot whilst the appliance is in use and until the appliance has cooled, children should be kept away.
- Accessible parts may be hot when the grill is in use. Young children should be kept away.
- The packaging materials will be dangerous for children. Keep the packaging materials away from children. Please dispose of all parts of the packaging according to environmental standards.
- When the door is open, do not load any heavy object on it and do not allow children to sit on it. It may overturn or door hinges may get damaged.
Safety when working with electricity
- Any work on electric equipment and systems may only be carried out by authorized qualified persons.
- Even if the oven is off, the cooling fan continues working for a while after turning off the oven.
• In case of any damage, switch off the appliance and disconnect it
from the mains supply by removing the fuse or switching off the circuit breaker.
- Ensure that the fuse rating is correct.
Intended use
The appliance is designed for domestic use only. Commercial use is not admissible.
This appliance should not be used for warming the plates under the grill, hanging towels and dish cloths etc. on the handles, drying and the heating purposes.
The manufacturer shall not be liable for any damage caused by improper use or handling errors.
Disposal
Packaging material

DANGER
Risk of suffocation by the packaging materials!
Keep children away from the packaging materials.
The packaging material and transport locks are made from materials that are not harmful to the environment. Please dispose of all parts of the packaging according to environmental standards. This is beneficial to the environment.
Old equipment
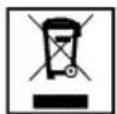
This appliance bears the selective sorting symbol for waste electrical and electronic equipment (WEEE). This
means that this appliance must be handled pursuant to European Directive 2002/96/EC in order to be recycled or dismantled to minimize its impact on the environment. For further information, please contact your local or regional authorities.
Electronic appliances not included in the selective sorting process are potentially dangerous for the environment and human health due to the presence of hazardous substances.
Future transportation

NOTICE
Do not place other items on the top of the appliance. The appliance must be transported upright.
Store the appliance's original box and transport the appliance in its original carton. Follow the guidance marks that are printed on the carton.

Important
Verify the general appearance of your equipment by identifying possible damage during the transportation.
To prevent the wire shelf and tray inside the oven from damaging the oven door, place a strip of cardboard onto the inside of the oven door that lines up with the position of the trays. Tape the oven door to the side walls.
If you do not have the original carton
Pack the appliance in bubble wrap or thick cardboard and tape it securely in order to prevent damage during transportation.
3 Installation
Before installation
The appliance is intended for installation in commercially available kitchen cabinets. A safety distance must be left between the appliance and the kitchen walls and furniture. See figure (values in mm).
- Surfaces, synthetic laminates and adhesives used must be heat resistant (100 °C minimum).
- Kitchen cabinets must be set level and fixed.
- If there is a drawer beneath the oven, a shelf must be installed between oven and drawer.
text_image
560 550* 600 30 135 500 555 570 595 547 20 594 * min. 10 | EN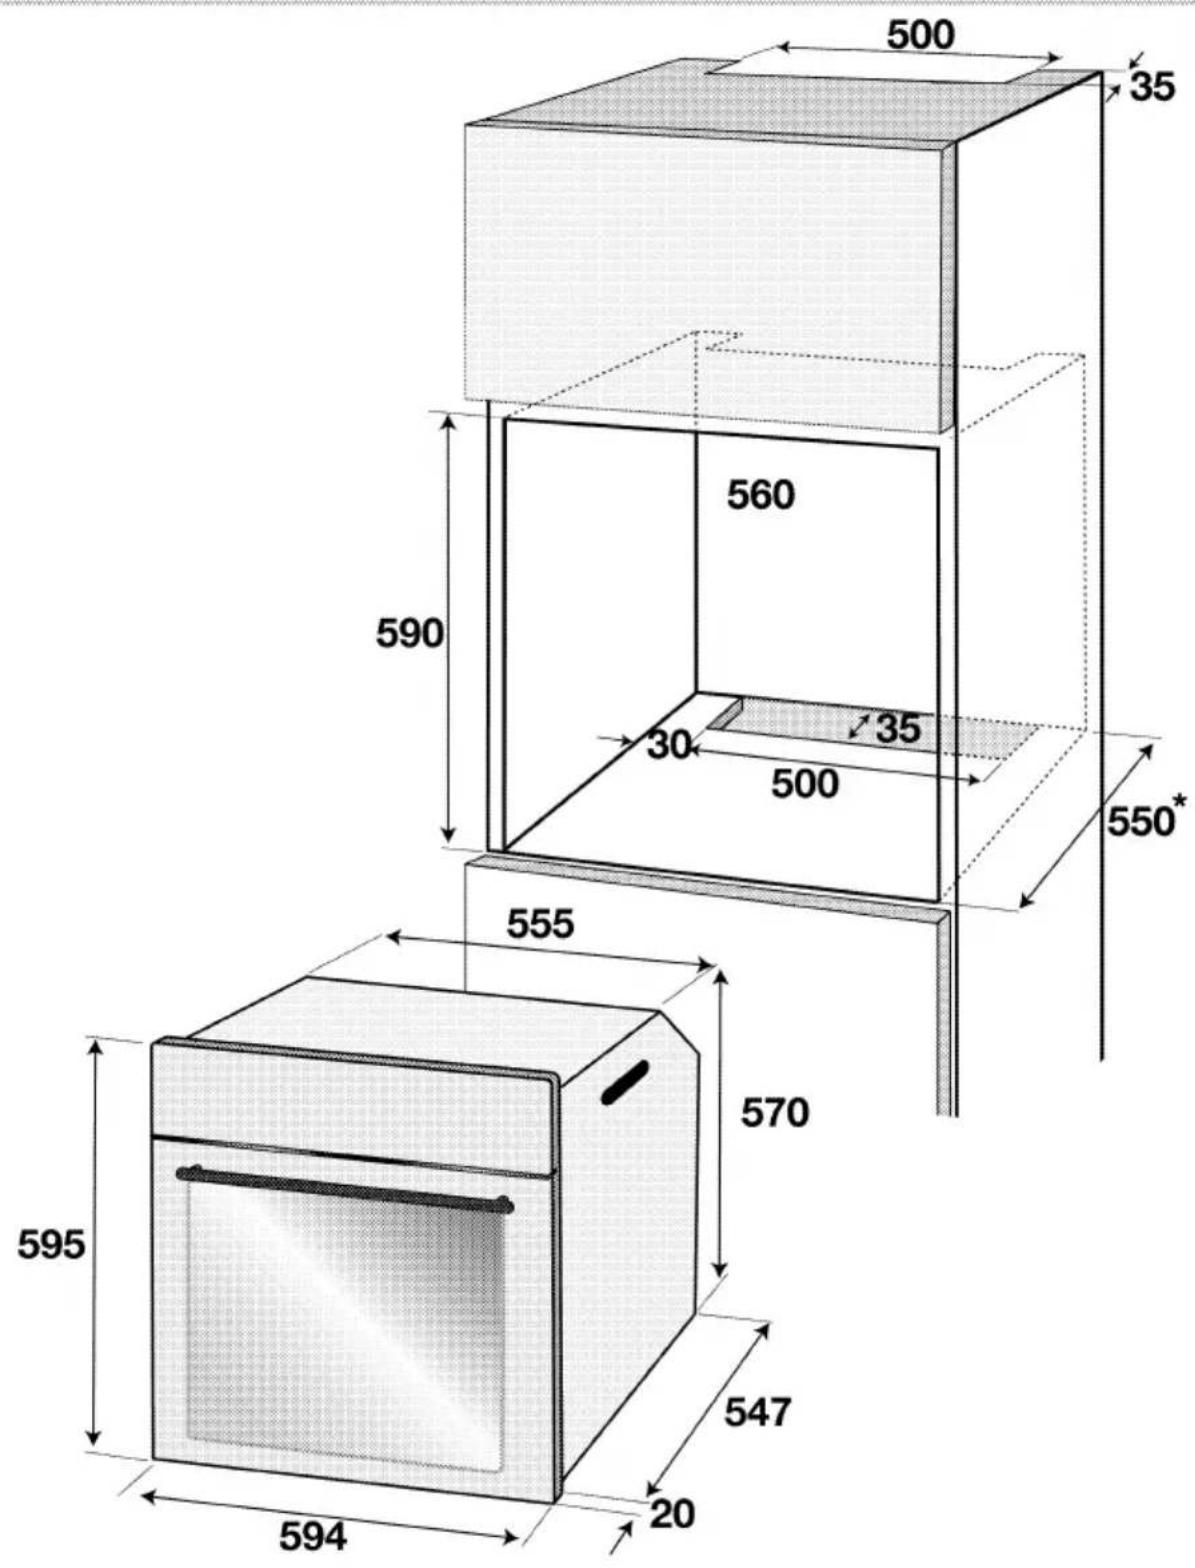
text_image
500 35 560 590 30 35 500 550* 555 570 595 547 20 594* min.
Installation and connection

NOTICE
Material damage!
The door and/or handle must not be used for lifting or moving the appliance.
- For installation the appliance must be connected in accordance with all local gas and/or electrical regulations.
- Carry the appliance with at least two persons.
- Use the slots or wire handles located at both sides to move the appliance.

NOTICE
If the appliance has wire handles, push the handles back into the side walls after moving the appliance.
Connection to the mains supply

Important
This appliance must be earthed!
Our company shall not hold responsible for any damage caused by using the appliance without an earthed socket.

DANGER
Risk of electric shock, short circuit or fire by unprofessional installation!
The appliance may be connected to the mains supply only by an authorized qualified person and the appliance is only guaranteed after correct installation.

DANGER
Risk of electric shock, short circuit or fire by damage of the mains lead!
The mains lead must not be clamped, bent or trapped or come into contact with hot parts of the appliance.
If the mains lead is damaged, it must be replaced by a qualified electrician.
- The mains supply must correspond to the data specified on the rating plate of the appliance. The rating plate can be seen when the front door is opened.
- The appliance mains cable must correspond to the specifications and the power consumption; see Technical Data, page 5.

DANGER
Risk of electric shock!
Before starting any work on the electrical installation, please disconnect the appliance from the mains supply.
- If no all-pole separation from the mains supply is possible, a separation unit must be connected with a contact distance of 3 mm min. (fuses, line safety switches, contactors) all poles which should be adjacent to (but not above) the cooker in accordance with IEE regulations. Failure to observe this instruction may result in operational problems and invalidation of the appliance warranty.
Additional protection by a residual current circuit breaker is recommended.
If a cable without a plug is provided together with your appliance;
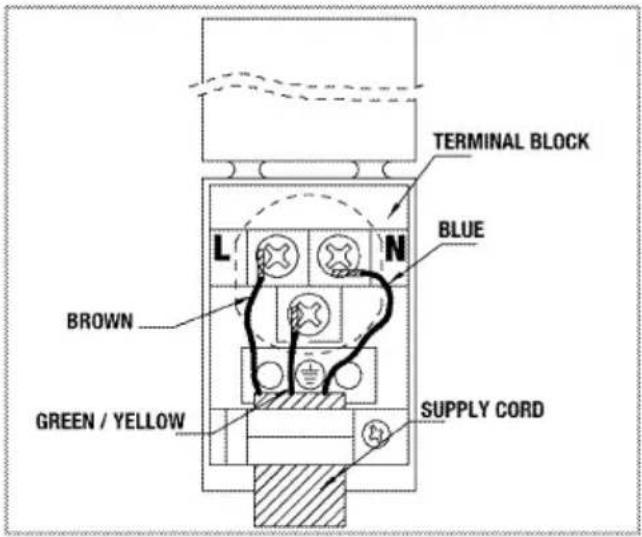
text_image
TERMINAL BLOCK BLUE L N BROWN GREEN / YELLOW SUPPLY CORD- for mono-phase connection, take care to connect as below:
• Brown cable = L (Phase)
• Blue cable = N (Neutral)
- Green/yellow cable must be connected to ground (E) 1= line .
Installation
- Slide the oven through the cabinet aperture, align and secure.
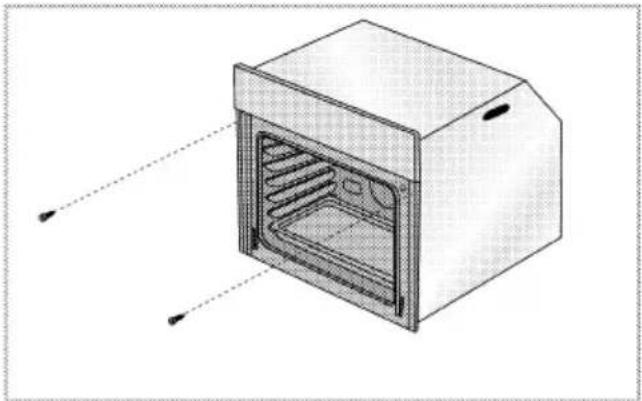
natural_image
Diagram of an oven with internal grating and ventilation slots, shown in 3D perspective (no text or labels)Fix your oven with the 2 screws and washers as indicated in the figure.
Final check
-
Connect the appliance to the mains supply and switch on the mains supply.
-
Check function.
For equipment with a cooling fan
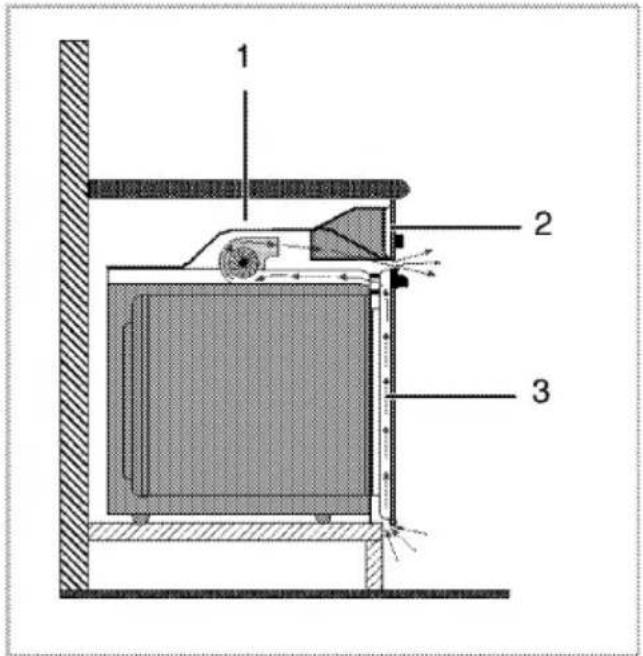
text_image
1 2 31 Fan
2 Control panel
3 Door
The Built-in cooling fan cools both the built-in cabinet and the front of the appliance.

NOTICE
Cooling fan continues to run for up to 20-30 minutes (approx.) even after the oven is turned off.
4 Preparation
Tips for saving energy
The following tips will help you to use your appliance in an ecological way and to save energy:
- Use dark coloured and enamel coated trays, since the heat transmission will be better.
- While cooking your meals, perform a preheating operation if it is advised in the user manual or cooking instructions.
- During cooking, do not open the oven door frequently.
- Try to cook more than one type of meal within the oven at the same time (You can cook two different meals at the same time by locating
cooking bowls on the same shelf). It will be suitable to cook more than one meal after each other. The oven will already be hot.
• Defrost frozen meals before cooking them.
- You can save energy by switching off your oven a few minutes before the end of the cooking time (The oven door should not be opened).
Initial operation
Before first usage of your appliance, don't forget to remove the sticker on the digital timer screen
Setting the time
text_image
14 12 11 10 13 P 1 3 4 5 6 7 8 9 2 Program selection key 10 Temperature display Temperature-time increasing/decreasing key 11 Keylock symbol Function display 12 Current time display Cooking time symbol 13 Menu key Cooking end time symbol 14 ON/OFF key 1. After switching on the oven for the first time, adjust the time of the day by slightly pressing the touch control key '+' or '-' (2). Alarm period symbol Alarm period symbol Current time symbol Inner oven temperature symbol Booster position
Important
If the current time is not set, time setting will start increasing up from 12:00. Clock icon '7' will remain lit to indicate that the current time has not been set. This icon will disappear once the time is set.
Adjust the existing time
- Activate the time of the day symbol '7' by pressing the key 13 twice for the time of the day.
- Adjust the time of the day by slightly pressing + or - key (2).

Important
Current time settings are cancelled in case of power failure. It needs to be readjusted. Time of the day can not be changed if the oven is operating in a function.
First cleaning of the appliance

NOTICE
The surface might get damaged by some detergents or cleaning materials. Do not use aggressive detergents, cleaning powder/cream or any sharp objects.
- Remove all packaging materials.
- Wipe the surfaces of the appliance with a damp cloth or sponge and dry with a cloth.
Initial heating

WARNING
Hot surfaces may cause burns!
Do not touch the hot surfaces of the appliance. Use oven gloves. Keep children away from the appliance.

Important
Smell and smoke may emit during first heating. Ensure that the room is well ventilated.
Any production residues or conservation layers must be burnt off before the first use. Heat up the appliance for about 30 minutes and then switch it off.
Electric oven
- Take all baking trays and racks from the oven.
- Close oven door.
- Select top and bottom heat with the function knob.
- Select the highest temperature with the thermostat knob; see How to use the electric oven, page 16.
- Heat approximately 30 minutes.
- Switch off oven; see How to use the electric oven, page 16
Grill oven
- Take all baking trays and wire shelf from the oven.
- Close oven door.
- Select highest power of the grill; see How to operate the grill, page 25.
- Heat approximately 30 minutes.
- Switch off grill; see How to operate the grill, page 25
5 How to Operate the Oven
General information on baking, roasting and grilling

DANGER
Risk of scalding by hot steam!
Take care when opening the oven door as steam may escape.
Tips for baking
- Use non-stick coated appropriate metal plates or aluminum containers or heat-resistant silicone moulds.
• Make best use of the space on the rack. - It is recommended to place the baking mould in the middle of the rack.
- Select the correct shelf position before turning the oven or grill on - don't move oven shelves when hot.
- Keep the oven door closed.
Tips for roasting
- Seasoning with lemon juice and black pepper will improve the cooking performance when cooking a whole chicken, turkey or a large piece of meat.
- Meat with bones takes about 15 to 30 minutes longer before it is cooked than a roast of the same size without bones.
- You should calculate about 4 to 5 minutes cooking time per centimeter height of the meat.
- Let meat rest in the oven for about 10 minutes after the cooking time. The juice is better distributed all
over the roast and does not run out when the meat is cut.
- Fish in a fire-resistant dish should be placed on the rack at the medium or lower level.
Tips for grilling
Grilling is ideal for cooking meat, fish and poultry and will achieve a nice brown sur-face without it drying out to much. Flat pieces, meat skewers and sausages are particularly suited for grilling as are vege-tables with a high water content such as tomatoes and onions.
- Distribute the pieces to be grilled on the wire shelf.
- If the grilling is on the wire shelf, locate a dripping pan under it in order to collect the fat.
- Add some water in dripping pan for easy cleaning.
How to use the electric oven
Turning the oven on
text_image
14 1 2 131 Program selection key
2 Temperature-time increase/decrease key
13 Menu key
14 ON/OFF key
1. Press key 14 for about 1 second to turn the oven on.
Select temperature and operating mode
After turning the oven on; nothing appears at the function display.
natural_image
Blank rectangular frame with black arrow symbols on the left side (no text or labels)
NOTICE
Oven will switch off automatically within 10 seconds if no oven setting is made on this screen.
Temperature, cooking time, cooking end time and booster can be set in this position.
- Slightly press ∧ or ∨ key (1) so that the desired function;
- You can adjust the desired temperature by slightly pressing '+' or '-' key (2).
» Your oven will readily start operating in the desired function and will increase the inner temperature to the set temperature.
» Active heaters and suggested tray position appear on the function display.
» If no temperature setting is made previously, then the suggested temperature for the selected function is indicated on the temperature display.
Function table contains the functions that can be used as well as minimum and maximum temperatures that can be selected in the oven.
text_image
10 5 4 3 2 1 1 2 9 8 7 6 5 4 31 Shelf position
2 Bottom heater
3 Function number
4 Cleaning position
5 Turbo fan
6 Turbo heater
7 Defrost position
8 Grill heater
9 Upper heater
10 Warm keeping
* Functions can vary depending on the product model!
Function table :
| Function | Suggested temperature (°C) | Temperature range (°C) |
| Static | 200 | 40-280 |
| Static + fan | 175 | 40-280 |
| Fan heating | 180 | 40-280 |
| 3 D | 205 | 40-280 |
| Pizza | 210 | 40-280 |
| Grill | 280 | 40-280 |
| Low grill | 280 | 40-280 |
| Eco fan heating | 180 | 160-220 |
| Bottom heater | 180 | 40-220 |
| Warm keeping | 60 | 40-100 |

Important
Maximum time that can be set for cooking period is limited with 6 hours at positions apart from keeping warm due to safety reasons. In case of power cut, program will be canceled. Reprogram is needed.

Important
While making any adjustment, related symbols on the clock will flash.

Important
Time of the day can not be adjusted when the oven is operating in any function or the clock is set to a semi-automatic or full automatic program.

NOTICE
Even if the oven is off, oven lamp lights up when the oven door is opened.
Switch off electric oven
Press key 14 for about 2 seconds to turn the oven off.
natural_image
Cross-sectional diagram of a refrigerator internal structure, showing internal components and ventilation duct (no text or labels)Shelf positions (model dependant)
It is important to position the wire grill on wire shelf correctly. The wire grill must be placed so that it will fit into
the opening of the wire shelf as illustrated in the figure.
Operating modes
The order of operating modes shown here might deviate from the arrangement on your appliance.
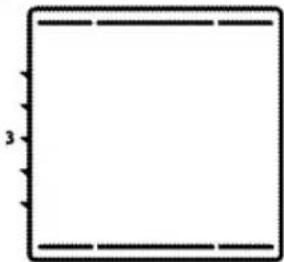
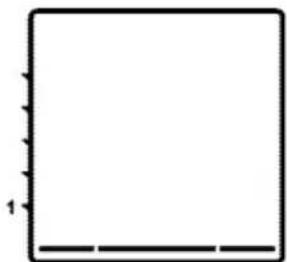
1. Top and bottom heat
natural_image
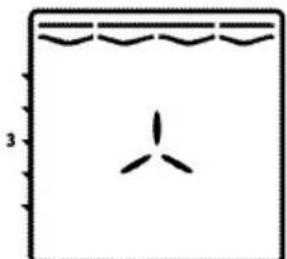
Simple geometric diagram of a square with dashed lines and a label '3' on the left side (no text or symbols within the shape)The foodstuffs are heated simultaneously from the upper and lower part. Suitable e.g. for cakes, cookies or cakes and casseroles in baking moulds. Cook with one tray only.
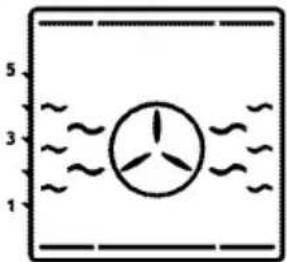
2. Top and bottom heat with convection air

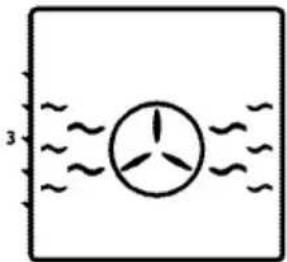
natural_image
Simple diagram with a three-blade fan inside a square frame, no text or symbols present.Warm air heated by the lower and upper heaters is evenly distributed throughout the oven very fast by means of the fan. Cook with one tray only.
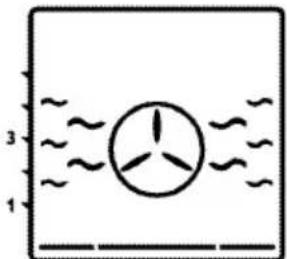
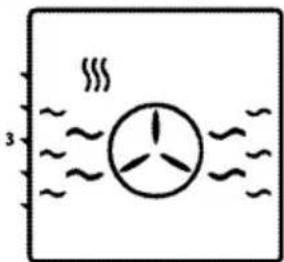
3. Hot air
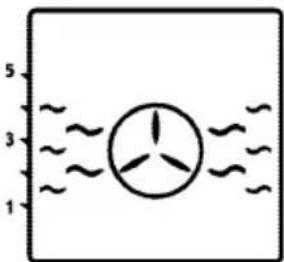
natural_image
Simple diagram of a wind turbine with three blades, surrounded by wavy lines (no text or symbols)Warm air heated by the rear heater is evenly distributed throughout
the oven very fast by means of the fan. It is suitable for cooking your meals in different shelf levels and preheating is not required in most cases. Suitable for cooking with multi trays.
- "3D" function
natural_image
Simple diagram of a wind turbine with water flow lines (no text or symbols)Top heat, bottom heat plus ring heat with fan (in the rear wall) are on. The appliance to be cooked is evenly and quickly cooked all around. Cook with one tray only.
- Pizza function
natural_image
Simple diagram of a fan with three blades, enclosed in a rectangular frame with wavy lines (no text or symbols)The bottom heat and the heating ring with fan (in the rear wall) are in operation. Suitable for baking pizza.
- Strong grill with convection air
natural_image
Simple line drawing of a boat hull with wavy roof lines and a single triangular hull (no text or symbols)Warm air heated by the large grill is distributed very fast in the oven by means of the fan. It is suitable for grilling large amount of meat.
- Put big or medium-sized portions in correct shelf
position under the grill heater for grilling.
- Set the temperature to maximum level.
-
Turn the food after half of the grilling time.
-
Surface grill

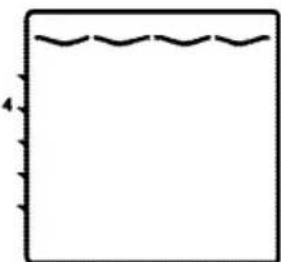
natural_image
Simple line drawing of a rectangular frame with wavy top and bottom edges, no text or symbols present.The large grill (under the oven roof) is in operation. Suitable for grilling larger quantities.
- Put big or medium-sized portions in correct shelf position under the grill heater for grilling.
- Set the temperature to maximum level.
-
Turn the food after half of the grilling time.
-
Grill-small
natural_image
Simple line drawing of a square with wavy top edge and small vertical tick marks (no text or symbols)The grill (under the oven roof) is in operation. Suitable for grilling.
- Put small or medium-sized portions in correct shelf position under the grill heater for grilling.
- Set the temperature to maximum level.
- Turn the food after half of the grilling time.
9. Eco fan heating
natural_image
Simple diagram showing a wind turbine inside a rectangular frame with wavy lines indicating water flow (no text or symbols)To save power, you can use this function instead of the cooking operations that you would perform by using turbo cooking at 160-220°C temperature range. But, the cooking time will increase a little bit.
Cooking times for this mode is given 'Eco fan heating' table.
10. Bottom heat
natural_image
Empty white square with black border and small vertical lines on top (no text or symbols)Only bottom heat is on. Is particularly suitable for dishes, such as pizza, which are required to be baked from bottom.
11. Warm keeping
natural_image
Simple diagram showing a fan with three blades inside water, no text or symbols presentCan be used for keeping food warm at low temperature and over a longer period of time.
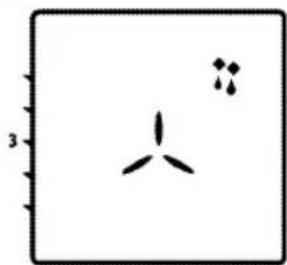
12. Operating with fan
natural_image
Simple diagram with a three-blade fan and two small dots, no text or symbols presentThe oven is not heated. Only the fan (in the rear wall) is in operation. Frozen granular food is thawed slowly at room temperature and cooked food is cooled down.

NOTICE
When the oven door is opened, the fan motor will not run to keep the hot air inside.
How to operate the oven control unit
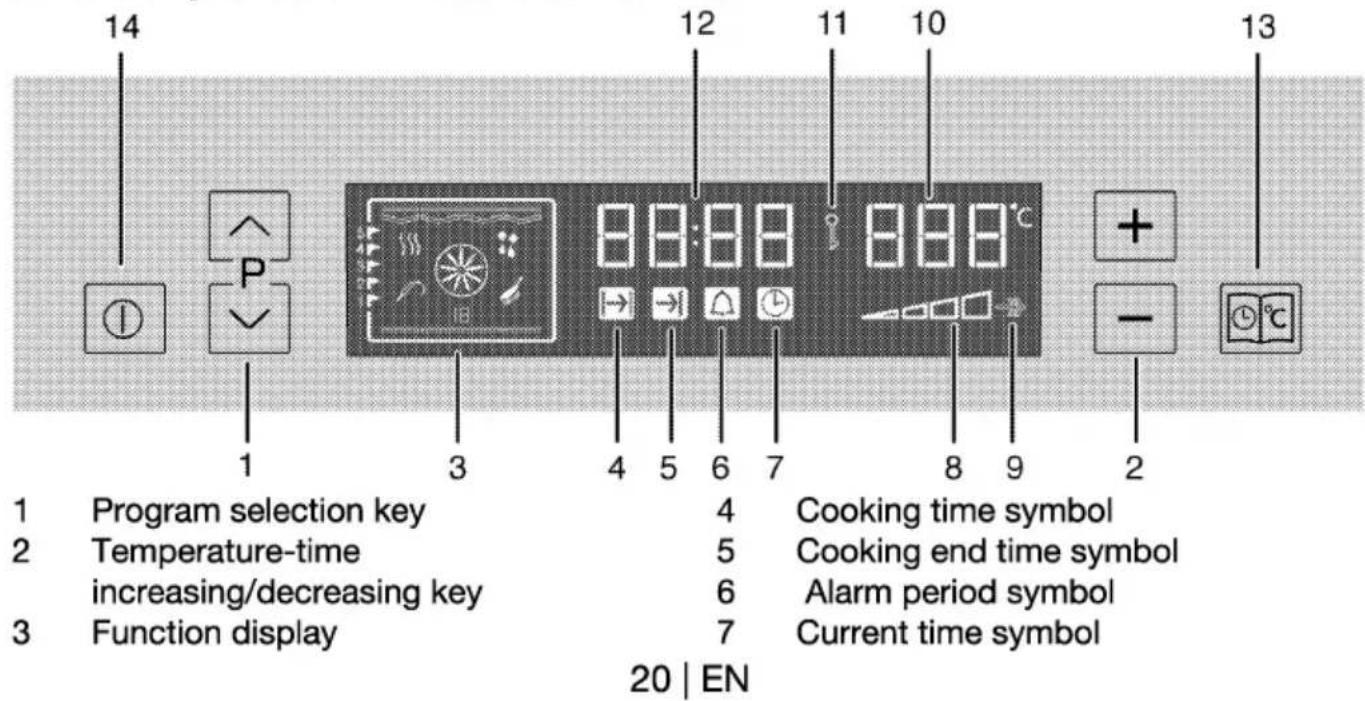
text_image
14 12 11 10 13 P 1 3 4 5 6 7 8 9 2 Program selection key 4 Cooking time symbol Temperature-time 5 Cooking end time symbol increasing/decreasing key 6 Alarm period symbol Function display 7 Current time symbol 20 | EN8 Inner oven temperature symbol
9 Booster position
10 Temperature display
11 Keylock symbol
12 Current time display
13 Menu key
14 ON/OFF key
Switch on semi-automatic operation In this operation mode, you may adjust the time period during which the oven will operate (cooking time). Oven starts to operate after the settings are made and runs at the set temperature throughout the cooking time. Oven turns off at the end of the cooking time.
- Turn on the oven by pressing and holding key '14'.
- Adjust the desired operation mode (function) by slightly pressing the key ∧ or ∨ (1).
- Activate the cooking time symbol '4' by pressing the key '13' with while the oven is operating.
- Adjust the cooking time by slightly pressing the key "+" or "-" (2).
» Cooking time symbol '4' remains lit after adjusting the cooking time. - Place your dish in the oven.
- Adjust the cooking temperature by slightly pressing the key "+" or "-" no. (2).
» The oven will be heated up to the preset temperature and will maintain this temperature until the end of the cooking time you selected.

NOTICE
All segments of the inner oven temperature symbol (8) will turn on when your oven reaches the set temperature.
-
After the cooking process is completed, "End" will be displayed and the alarm signal will sound.
-
To stop the alarm signal, press key no. '13' or '14'.
» Alarm will be silenced, oven will be turned off automatically and current time will be displayed on the screen.
Switch on automatic operation
In this operation mode you may adjust how long the oven will be operate (cooking time) and when it will be turned off (cooking end time).
- Turn on the oven by pressing and holding key '14'.
- Adjust the desired operation mode (function) by slightly pressing the key ∧ or ∨ no. (1)'.
- Activate the cooking time symbol '4' by slightly pressing the key '13' with while the oven is operating.
-
Adjust the cooking time by slightly pressing the key "+" or "-" no. (2).
» Cooking time symbol 4 remains lit after adjusting the cooking time. -
Activate the cooking end time symbol (5) by pressing the key 13 with short intervals.
-
Adjust the cooking end time by slightly pressing the key "+" or "-" no. '2'.
» Cooking end time symbol (5) remains lit after adjusting the cooking end time.
-
Place your dish in the oven.
-
Adjust the cooking temperature by slightly pressing the key "+" or "-" no. 2.
» Oven timer automatically calculates the startup time for cooking by using the end of cooking time you have set and the cooking period. Selected operation mode is activated when the startup time of cooking has come and the oven is heated up to the set
temperature. It maintains this temperature until the end of the cooking time. Oven lamp lights up during cooking.

NOTICE
All segments of the inner oven temperature symbol (8) will turn on when your oven reaches the set temperature.
-
After the cooking process is completed, "End" will be displayed and the alarm signal will sound.
-
To stop the alarm signal, press key '13' or '14'.
» Alarm will be silenced, oven will be turned off automatically and current time will be displayed on the screen. Oven lamp will also switch off.

NOTICE
If you want to cancel the semi-automatic or automatic programming after you have set them, you need to reset the cooking time.
Setting the Booster (Quick Preheating)
It can be used to reach to the desired inner oven temperature more quickly by operating the oven heaters in a combination different than the selected function.

Important
Booster function can only be set while the oven is operating. Booster function can not be selected in defrosting and cleaning modes. Booster setting is cancelled in case of power failure.
-
For booster function, press key 13 with short intervals until the booster symbol '9' becomes active.
» "OFF" will be displayed. -
Activate the booster by slightly pressing the key "+" no (2).
» After the booster is adjusted, "On" will be displayed and the booster symbol will remain lit.
» Booster symbol turns off after the desired inner oven temperature is attained and oven resumes its operation with the function selected before the booster.
3. To cancel the booster function, press key 13 to activate the booster symbol (9).
» "On" will be displayed.
4. Deactivate the booster by slightly pressing the key "-"no. (2).
» "OFF" will be displayed.
How to use the program lock Activate the program lock
You can prevent using of oven by activating the keylock feature.

Important
Keylock can be used either the oven is operating or not operating. Oven can still be turned off by keeping the key 14 pressed for 2 seconds even the key lock is activated while the oven is operating.
- For keylock; press key 13 with short intervals until the keylock symbol "11" becomes active.
» "OFF" will be displayed. - Activate the keylock by slightly pressing the key "+" no.'2'.
» After the keylock is adjusted, "On" will be displayed and the keylock symbol will remain lit.
Deactivate the program lock
- To deactivate the keylock, press key 13 with short intervals until the
keylock symbol "11" becomes active.
» "On" will be displayed.
2. Deactivate the keylock by slightly pressing the key "-" no. '2'.
» After the keylock is turned off, "OFF" is displayed and the keylock symbol '11' disappears.

Important
Oven buttons can not be used while the keylock function is active. Keylock function is not cancelled in a power failure.
Cooking times table

Important
The values indicated in the table below are data indicative. They may vary according to the type of food as well as your preferences of cooking.
Baking and roasting

Important
Level 1 is the bottom level in the oven.
| Food | Cooking level number | Rack position | Temperature (°C) | Cooking time (min.) (approx.) | |
| Cake in tray | One level | 3 | 175 | 25 ... 30 | |
| Cake in mould | One level | 2 | 180 | 40 ... 50 | |
| Cakes in paper | One level | 3 | 175 | 25 ... 30 | |
| 2 levels | 1 - 5 | 175 | 30 ... 40 | ||
| 3 levels | 1 - 3 - 5 | 180 | 45 ... 55 | ||
| Sponge cake | One level | 3 | 200 | 5 ... 10 | |
| 2 levels | 1 - 5 | 175 | 20 ... 30 | ||
| Cookies | One level | 3 | 175 | 25 ... 30 | |
| 2 levels | 1 - 5 | 170 ... 190 | 30 ... 40 | ||
| 3 levels | 1 - 3 - 5 | 175 | 35 ... 45 | ||
| Dough pastry | One level | 2 | 200 | 30 ... 40 | |
| 2 levels | 1 - 5 | 200 | 45 ... 55 | ||
| 3 levels | 1 - 3 - 5 | 200 | 55 ... 65 | ||
| Filled savory pastry | One level | 2 | 200 | 25 ... 35 | |
| 2 levels | 1 - 5 | 200 | 35 ... 45 | ||
| 3 levels | 1 - 3 - 5 | 190 | 45 ... 55 | ||
| Leaven | One level | 2 | 200 | 35 ... 45 | |
| 2 levels | 1 - 3 | 190 | 35 ... 45 | ||
| Lasagna | One level | 2 - 3 | 200 | 30 ... 40 | |
| Pizza | One level | 2 | 200 ... 220 | 15 ... 20 | |
| One level | 3 | 200 | 10 ... 15 | ||
| Beefsteak (whole)/ Roast | One level | 3 | 25 min. 250 after 180 ... 190 | 100 ... 120 | |
| Lamb haunch (casserole)Roast chicken | One level | 3 | 25 min. 250 after 190 | 70 ... 90 | |
| One level | 2 | 15 min. 250 after 180 ... 190 | 55 ... 65 | ||
| One level | 2 | 15 min. 250 after 180 ... 190 | 55 ... 65 | ||
| Turkey (5.5 kg) | One level |  | 1 | 25 min. 250 after 180 ... 190 | 150 ... 210 |
| One level |  | 1 | 25 min. 250 after 180 ... 190 | 150 ... 210 | |
| Fish | One level |  | 3 | 200 | 20 ... 30 |
| One level |  | 3 | 200 | 20 ... 30 | |
| While cooking with 2 trays at the same time, place the deep tray to the upper shelf and shallow tray to the lower shelf.It is suggested to perform preheating for all foods. | |||||
Eco fan heating

Important
Do not change the temperature during cooking in "Eco fan heating" mod.

Important
Do not open the door during cooking in "Eco fan heating" mod.
| Food | Cooking level number | Rack position | Temperature (°C) | Cooking time (min.) (approx.) | |
| Cakes in paper | One level |  | 3 | 200 | 35 ... 40 |
| Cookies | One level |  | 3 | 200 | 30 ... 35 |
| Dough pastry | One level |  | 3 | 200 | 40 ... 45 |
| Filled savory pastry | One level |  | 3 | 200 | 40 ... 45 |
(**) In a cooking that requires preheating, preheat at the beginning of cooking until the temperature symbol (8) of the oven rises up to the highest level.
Tips for baking cakes
- If pastry is too dry,
» Increase the temperature by 10°C and reduce the cooking time. - If pastry dropped,
» Use less liquid or lower the temperature by 10°C. - If pastry is too dark on top,
» Place it on a lower rack, lower temperature, and increase the cooking time. - If cooked well on the inside but sticky on the outside,
» Use less liquid, lower the temperature, and increase the cooking time.
Tips for baking pastry
- If the pastry is too dry,
» Increase the temperature some 10°C and decrease the cooking time.
» Dampen the layers of dough with a sauce composed of milk, oil, egg and yoghurt.
2. If the pastry takes too long to bake,
» Pay care that the thickness of the pastry you have prepared does not exceed the depth of the tray and remain level with it.
3. If the upper side of the pastry gets browned, but the lower part is not cooked,
» Make sure that the amount of sauce you have used for the pastry is not too much at the bottom of the pastry. Try to scatter the sauce equally between and on the dough layers for an even browning.
» Cook the pastry in accordance with the mode and temperature given in the cooking table. If the bottom part is still
not browned enough, place it on one-layer-lower shelf next time.
Tips for cooking vegetables
- If the vegetable dish runs out of juice and gets to dry,
» Since using a lid during cooking will keep the juice of the dish in the pan,
How to operate the grill

WARNING
Hot surfaces may cause burns! Close oven door during grilling.
Switch on grill
- Press key 14 for about 1 second to turn the oven on.
- Adjust the grill function by slightly pressing key ∧ or ∨ key (1).
- You can adjust the desired temperature by slightly pressing key + or - (2).
Cooking times table for grilling Grilling with electric grill
cook your vegetable dishes in a pan with a lid instead of a tray.
- If a vegetable dish does not get cooked,
» Boil the vegetables beforehand or prepare them like canned food and put in the oven.
Switch off grill
- Press key 14 for about 2 seconds to turn the oven off.
Shelf positions
For optimum grill coverage, position the wire shelf towards the front of the oven just out of contact with the glass door. Placing the wire shelf fully to the rear of the oven will reduce the grill coverage.
| Food | Insertion level | Grilling time (approx.) |
| Fish | 4...5 | 20...25 min.# |
| Sliced chicken | 4...5 | 25...35 min. |
| Lamb chops | 4...5 | 20...25 min. |
| Roast beef | 4...5 | 25...30 min.# |
| Veal chops | 4...5 | 25...30 min.# |
| Toast bread | 4 | 1...2 min. |
| #depending on thickness | ||
depending on thickness
How to use the alarm clock
In addition to using the timer for cooking, it can be also used as a reminder or an alarm clock.
As soon as the defined period of time has expired, the alarm clock will emit a signal. The alarm clock has no influence on the functions of the oven.
text_image
14 12 11 10 13 P 8:8:8 8:8°C + - 1 3 4 5 6 7 8 9 21 Program selection key
2 Temperature-time
increasing/decreasing key
3 Function display
4 Cooking time symbol
5 Cooking end time symbol
6 Alarm period symbol
7 Current time symbol
8 Inner oven temperature symbol
9 Booster position
10 Temperature display
11 Keylock symbol
12 Current time display
13 Menu key
14 ON/OFF key
Using the clock as an alarm
Alarm clock does not have any effect on the oven functions. It is used as a warning.
For example, you can use alarm clock to warn you for turning the dish in the oven round in a certain time.

Important
The maximum alarm time can be 23 hours and 59 minutes.

Important
Alarm clock can be used either the oven is operating or not operating.
Setting the alarm clock
- Press key '13' with short intervals until the alarm symbol '6' becomes active.
- Adjust it by slightly pressing the key "+" or "-" (2).
» Alarm symbol remains lit after adjusting the alarm time. - After the alarm time is finished, alarm symbol will start flashing and an alarm signal is heard.
- You can stop the alarm by pressing any button.
In order to cancel set alarm time;
- To reset the alarm time, press key '13' to activate the alarm symbol (6).
- Adjust it by slightly pressing the key "-" (2) until "00:00" is displayed.
General information

DANGER
Risk of electric shock!
Switch off the electricity before cleaning appliance to avoid an electric shock.

DANGER
Hot surfaces may cause burns!
Allow the appliance to cool down before you clean it.

NOTICE
The surface might get damaged by some detergents or cleaning materials.
Do not use aggressive detergents, cleaning powder/cream or any sharp objects.
Clean the appliance thoroughly after each use; in this way it will be possible to remove cooking residues more easily, thus avoiding these from burning the next time the appliance is used.
No special cleaning agents are required for cleaning the appliance. It is recommended to use warm water with washing liquid, a soft cloth or sponge and use a dry cloth for drying.
Do not use any abrasive cleaning materials!

Important
Do not use steam cleaners for cleaning.
Cleaning the control panel

NOTICE
Damage of the control panel! Do not remove the control knobs for control panel cleaning.
Clean control panel and control knobs.
Cleaning the oven
No oven cleaner or any other special cleaning agent is required for cleaning the oven. It is recommended to wipe the oven with a damp cloth while it is still warm.
To clean the side wall,
- Remove the front section of the side rack by pulling it in the opposite direction of the side wall.
- Remove the side rack completely by pulling it towards you.
text_image
Technical diagram showing two labeled components (1 and 2) of a mechanical or electrical assembly with internal wiring and structural elements.Catalytic walls
Side walls or just back wall of oven interior may be covered with catalytic enamel.
The catalytic walls of the oven must not be cleaned. The porous surface of the walls is self-cleaning by absorbing
and converting spitting fat (steam and carbon dioxide).
Clean oven ceiling
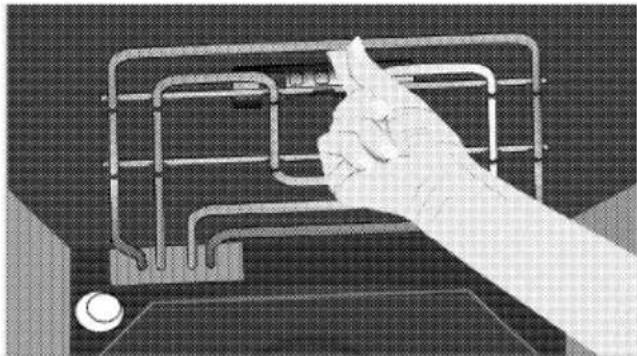
The grill element can be folded out for cleaning the oven ceiling.
- Loosing locking screws at the grill element with a screwdriver or a coin.
natural_image
Hand holding a tool interacting with a mechanical grid device (no visible text or symbols)» Grill heater folds downwards and remains attached to the ceiling of the oven.
- Clean oven ceiling with a damp cloth.
natural_image
Illustration of a hand pressing down on a device component (no text or symbols visible)- Fold the grill element up again and tighten the locking screws with a screwdriver or a coin.
Clean oven door
Don't use any harsh abrasive cleaners or sharp metal scrapers for cleaning the oven door. They could scratch the surface and destroy the glass.
Removal of oven door
-
Open the front door.
-
Open the clips at the hinge housing on the right and left hand sides of the front door by pressing them down as illustrated in the figure.
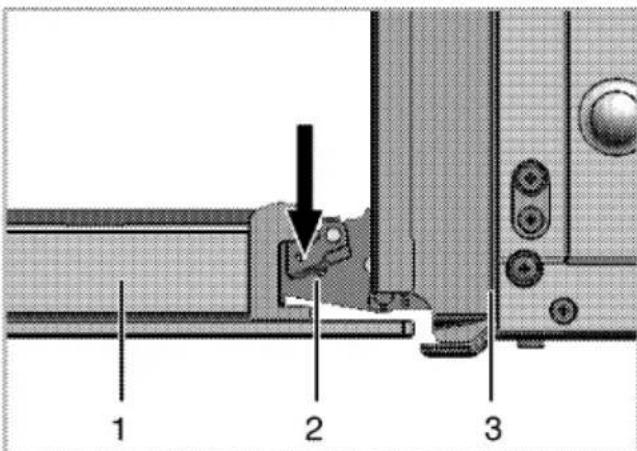
text_image
1 2 31 Front door
2 Hinge
3 Oven
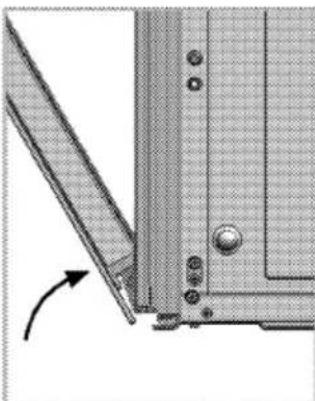
natural_image
Technical diagram of a mechanical component with a curved arrow indicating rotation (no text or symbols present)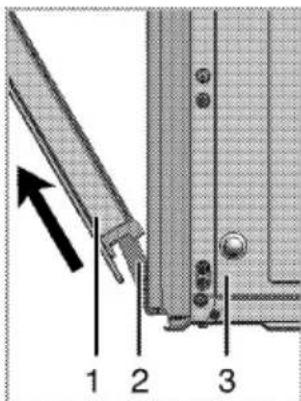
text_image
Technical diagram showing a mechanical assembly with labeled parts 1, 2, and 3, and an arrow indicating direction.-
Move the front door to half-way.
-
Remove the front door by pulling it upwards to release it from the right and left hinges.

NOTICE
Steps carried out during removing process should be performed in reverse order (steps 4, 3, 2 and 1) to reattach the door. Do not forget to close the clips at the hinge housing when reinstalling the door.
Taking off the door inner glass
The inner glass panel of the oven door can be removed for cleaning.
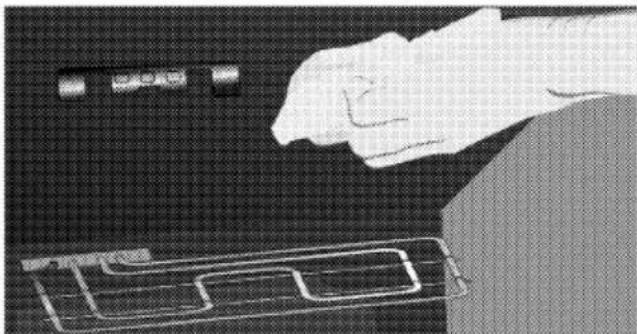
- Open oven door. Inner door glass of the oven is removable. In order to dismount the inner door, use the spade supplied together with the oven.
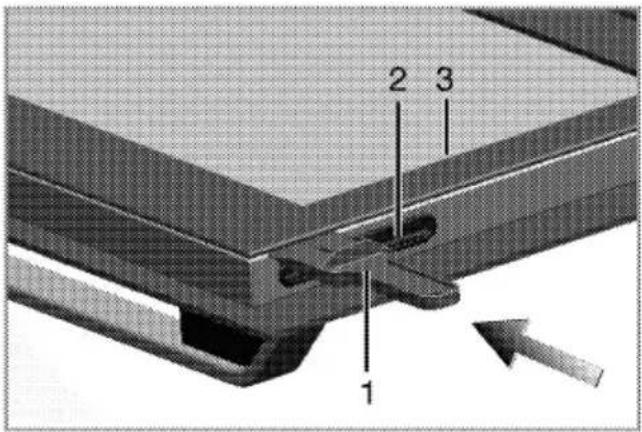
text_image
1 2 31 Spade
2 Plastic housing
3 Inner glass

text_image
Technical diagram showing a mechanical component with numbered parts and directional arrows indicating assembly or assembly.4 Pin
5 Pin housing
6 Metal Frame
- Put the spade to the to the area specified on the glass and push to the direction shown on the figure and remove the glass.
- In order to mount the glass, place the lower side of the glass to the plastic housings. Push the glass against the metal frame on the upper side to mount the pins to the housing.
Replacing the oven lamp

DANGER
Hot surfaces may cause burns!
Make sure that the appliance is switched off and cooled down in order to avoid the risk of an electrical shock.
The oven lamp is a special heat-resisting (T 300 °C) electric light bulb; see Technical Data, page 5. Oven lamps can be obtained from a good local electrical store.

NOTICE
Position of lamp might vary from diagram.
- Switch off the appliance at the mains.
- Unscrew glass cover by turning anti-clockwise.
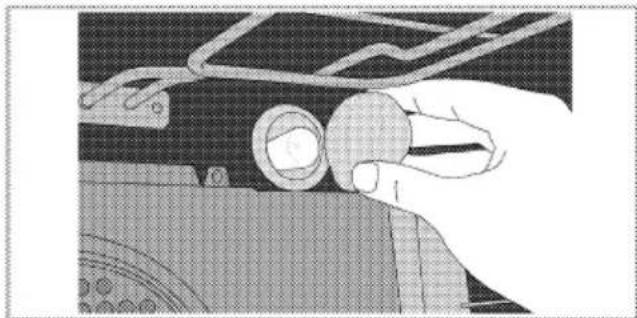
natural_image
Close-up of a hand adjusting a mechanical component with a circular knob (no visible text or symbols)- Unscrew oven lamp by turning anti-clockwise and replace it with new one.
- Refit the glass cover.

Troubleshooting

DANGER
Risk of electric shock, short circuit or fire by unprofessional repairs!
Repairs on the appliance must be carried out by an approved service centre.
- It is normal that steam escapes during operation.
- When the metal parts are heated, they may expand and cause noise.
Before you call the service, please check the following points.
Normal operating conditions
- Smoke and smell may emit for a couple of hours during the first operation.
Electrical equipment
| Malfunction/problem | Possible cause | Advice/remedy |
| The appliance does not work. | The mains fuse is defective or has tripped. | Check fuses in the fuse box. If necessary, replace or reset them. |
| Timer buttons do not work. | Keylock may be enabled. Please disable it(See; How to use the program lock, page 22). | |
| Oven light does not work | Oven lamp is defective. | Replace oven lamp. |
| No current. | Check fuses in the fuse box. If necessary, replace or reset them. | |
| Oven does not heat. | Function knob and/thermostat knob are not set. | Set function knob and thermostat knob. |
| If the appliance has a timer, the timer may not be set. | Set the time. | |
| No power. | Check mains supply and fuse box. |
If the problem has not been solved:
- Separate unit from the mains supply (deactivate or unscrew fuse).
- Call the after-sales service of your store reseller.

Important
Do not attempt to repair the appliance yourself. There are no customer service items inside the appliance.