Ei 410 - Fjernbetjening Ei Electronics - Gratis brugsanvisning og manual
Find enhedens vejledning gratis Ei 410 Ei Electronics i PDF-format.

Brugerspørgsmål om Ei 410 Ei Electronics
0 spørgsmål om dette apparat. Besvar dem du kender, eller stil dit eget.
Stil et nyt spørgsmål om dette apparat
Download vejledningen til din Fjernbetjening i PDF-format gratis! Find din vejledning Ei 410 - Ei Electronics og tag din elektroniske enhed tilbage i hånden. På denne side er alle dokumenter nødvendige for brugen af din enhed offentliggjort. Ei 410 af mærket Ei Electronics.
BRUGSANVISNING Ei 410 Ei Electronics
FIVE YEAR GUARANTEE (Limited)
Ei Electronics guarantees this product (excluding the battery) against any defects that are due to faulty material or workmanship for a five year period after the original date of purchase. This guarantee only applies to normal conditions of use and service, and does not include damage resulting from accident, neglect, misuse unauthorized dismantling or contamination howsoever caused. If this product has become defective it must be returned to one of the addresses below (see "Getting Your Remote Control Serviced") with proof of purchase. If the product has become defective during the five year guarantee period the unit will be repaired or replaced without charge. This guarantee excludes incidental and consequential damages.
Do not interfere with the product or attempt to tamper with it. This will invalidate the guarantee.
Ei Electronics
Shannon Industrial Estate,
Shannon, Co. Clare, Ireland.
Telephone: +353 (0)61 471277
www.eielectronics.com
Smoke/Heat Alarm
Remote Control
Model: Ei410T
The Ei410T Remote Control is an excellent accessory to help you manage and maintain your Alarms. It is designed for use with the SmartTest range of Alarms (models: Ei3100RF, Ei3103RF & Ei3105RF).
The Remote Control is used to test the alarms from a distance. There is therefore no need for chairs, ladders or poles to help you reach the alarms test button.
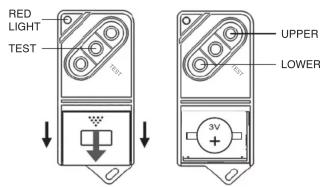
Figure 1(a) Figure 1(b)
INSTALLATION
- For ease of installation, the Remote Control is supplied with the battery connected and ready to use.
- Press the Test button on the Remote Control until the red light comes on. The red light indicates a radio frequency (RF) signal is being sent. (If this does not work, remove the battery (see Figure 1(a)), hold down the Test button for 10 seconds and then re-install the battery). The Alarms should respond within 20 seconds once they are within range (typically the range is over 10 metres indoors but this will depend on the type of walls etc.).
- As with all SmartTest products, it is essential that you House Code your Remote Control with your Alarms to prevent false alarms and other interference with nearby systems (see overleaf).
House Coding the Ei410T Remote Control
Some of the SmartTest products can transmit and receive over 150 metres (in free space) so it is important to ensure neighbouring systems do not interfere with your system and vice versa.
The following procedure will House Code your Remote Control with your SmartTest Alarms. After the House Coding procedure, the SmartTest Alarms and the Remote Control will only communicate with other units House Coded at the same time.
- Place all the SmartTest Alarms into House Code mode, within 10 minutes, by pressing their House Code buttons, as described in their instruction leaflets.
- Also, within the same 10 minutes, place the Ei410T Remote Control into House Code mode by pressing and holding the "Upper & Lower" buttons (see Figure 1(b)) simultaneously until the red light turns on. Release the buttons and the red light will now flash continuously (for 15 minutes) to show it is in House Code mode.
- The Remote Control will now send a House Coded radio message every 5 seconds with its House Code serial number. All Alarms within range, that are also in House Code mode themselves, will memorise the House Code serial number of the Remote Control.
Note: It may be necessary to move around the property with the Remote Control to ensure that all Alarms have received the signal.
- Check that the number of amber light flashes (for SmartTest Alarms) corresponds with the number of units in the system (i.e. Alarms plus Remote Control). For example, with 3 SmartTest Alarms and 1 Remote Control you should see 4 light flashes from each Alarm.
- Remove all the SmartTest Alarms from House Code mode as described in their instruction leaflets.
- Remove the Remote Control from House Code mode by pressing and holding the "Upper & Lower" buttons simultaneously until the red light comes on constantly (i.e. the same method as used to enter House Code mode). Release the buttons and the red light will no longer flash, indicating that the Remote Control has exited House Code mode.
(Alternatively, the Remote Control will exit the House Code mode by itself after 15 minutes without further user intervention. However, this could result in problems with nearby systems if their units are being House Coded at the same time).
- Finally, test each Alarm with the Remote Control and verify that the Remote Control activates it.
If some or all of the Alarms are not activated by the Remote Control repeat the House Code procedure again.
Clearing the House Codes
It may be necessary at some stage to clear the House Codes (e.g. if you wanted to use the Remote Control with different un-coded alarms).
To clear the House Codes:
Hold all three buttons down together, until the red light comes on and then release. This may take up to 10 seconds.
Note: clearing the House Codes will now reset the Remote Control to the original factory setting. It will now only communicate with uncoded Alarms.
Manual Testing with Remote Control Ei410T
Press the Test button on the Remote Control. The red light will come on to indicate it is transmitting an RF signal. Then:
• the units will alarm within 20 seconds.
We recommend that you manually test your alarms weekly using your Ei410T Remote Control.
Battery Replacement
The battery will normally last for 10 years. If it fails to communicate with the Alarms and/or the red light looks dim or does not light when a button is pressed, the battery is depleted and must be replaced.
Slide cover back (as shown in Figure 1) and remove the battery. Press the Test button for 10 seconds and then replace with a new Lithium 3 Volt Cell type DL2032 or CR2032. Ensure battery orientation is correct as shown in Figure 1(b).
Getting your Remote Control Serviced
If your Remote Control fails to work after you have read this leaflet contact Customer Assistance at the nearest address given at the end of this leaflet. If it needs to be returned for repair or replacement put it in a padded box with the battery disconnected. Send it to "Customer Assistance and Information" at the nearest address given on Remote Control or in this leaflet. State the nature of the fault, where the Remote Control was purchased and the date of purchase.
Note: It may be necessary, sometimes, to return a Smoke/Heat Alarm (see Smoke/Heat Alarm instruction leaflet) along with the Remote Control, if you cannot establish which may be faulty.
The crossed out wheelie bin symbol that is on your product indicates that this product should not be disposed of via the normal household waste stream. Proper disposal will prevent possible harm to the environment or to human health. When disposing of this product please separate it from other waste streams to ensure that it can be recycled in an environmentally sound manner. For more details on collection and proper disposal, please contact your local government office or the retailer where you purchased this product.
