
RR-55A-N - El-kedel Rinnai - Gratis brugsanvisning og manual
Find enhedens vejledning gratis RR-55A-N Rinnai i PDF-format.

Brugerspørgsmål om RR-55A-N Rinnai
0 spørgsmål om dette apparat. Besvar dem du kender, eller stil dit eget.
Stil et nyt spørgsmål om dette apparat
Download vejledningen til din El-kedel i PDF-format gratis! Find din vejledning RR-55A-N - Rinnai og tag din elektroniske enhed tilbage i hånden. På denne side er alle dokumenter nødvendige for brugen af din enhed offentliggjort. RR-55A-N af mærket Rinnai.
BRUGSANVISNING RR-55A-N Rinnai
Rinnai
RR-55A-N Natural gas/RR-55A-P Propane gas
Automatic Gas Rice Cooker with Safety Control Owner's Manual
Section I: Installation instructions
natural_image
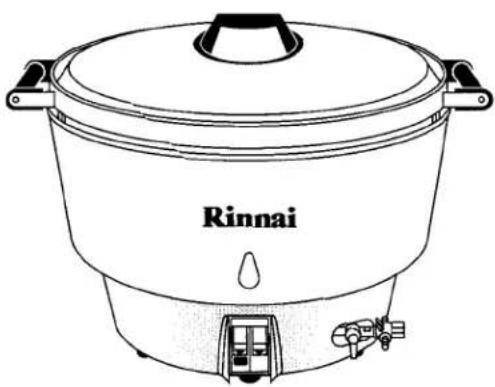
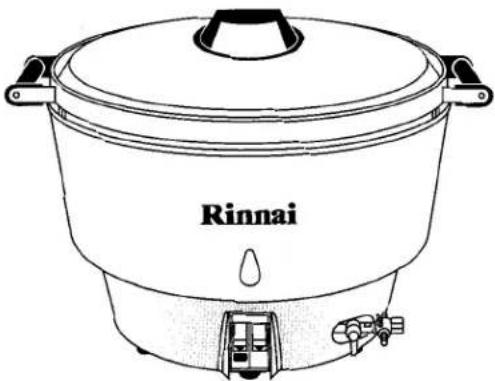
Line drawing of a Rinnai rice cooker with lid and side-mounted legs (no text or symbols on body)FOR YOUR SAFETY
Do not store or use gasoline or other flammable vapors and liquids in the vicinity of this or any other appliance.
WARNING
Improper installation, adjustment, alteration, service or maintenance can cause property damage, injury or death. Read the Installation, Operating and Maintenance Instructions thoroughly before installing or servicing this equipment.
TO THE PURCHASER
Contact your local gas supplier and ask instructions in the event the user smells gas. This information should be posted in a prominent location.
THE INSTALLER MUST LEAVE THIS MANUAL WITH THE UNIT AFTER INSTALLATION.
THE CONSUMER IS TO RETAIN THIS MANUAL FOR FUTURE REFERENCE.
Congratulations on your purchase of your Rinnai Automatic Gas Rice Cooker with Safety Control. Rinnai has long been the leading manufacturer of gas rice cookers. With proper installation and use, it should bring you years of reliable service.
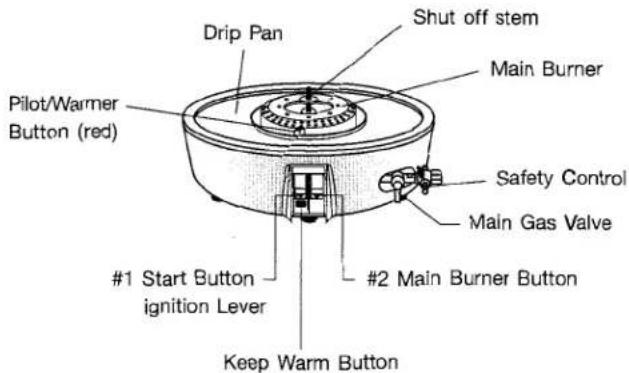
COMPONENT IDENTIFICATION


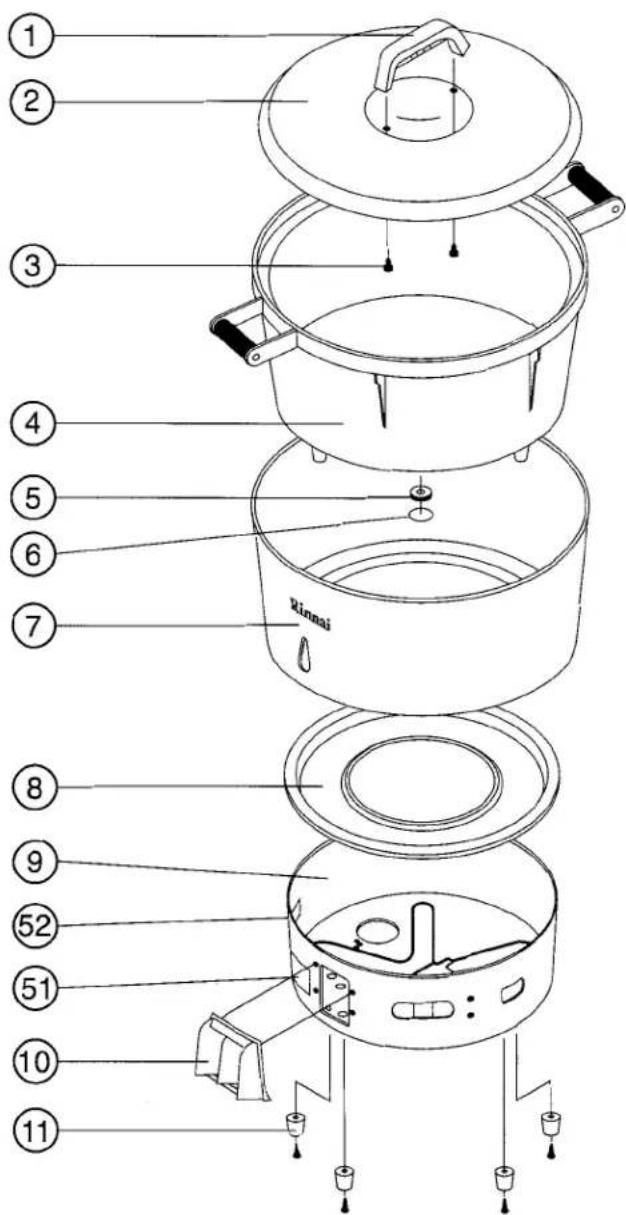
natural_image
Line drawing of a rice pot with two handles (no text or symbols on the pot itself)
BURNER ASSEMBLY
SPECIFICATIONS
Specifications:
| Type of gas | Natural | Propane |
| Btu | 35,000 | 34,000 |
| Gas Connection | 1/2"NPT | Remaining Specifications Same as RR-55A-N |
| Liquid Capacity | 24 qts. | |
| Unit Size | 17"h x 19"d x 23" | |
| Net Weight | 44 lbs. | |
| Carton Size | 21" x 21" x 17" | |
| Master Carton | 1 unit (4.4 cu.ft.) | |
| Shipping Weight | 50 lbs. | |
| Color | white jacket/gray base |
Capacity:
| Raw Rice | 17 lbs. (55-6 oz. cups) |
| Cooked Rice | 270 servings @ 3 oz. each |
INSTALLATION INSTRUCTIONS
INSTALLATION:
- The gas supply line must be of adequate size to insure maximum efficiency of the unit.
- The installation must conform with the National Fuel Gas Code, ANSI Z223.1, Natural Gas Installation Code, CAN/CGA-B149.1 or the Propane Installation Code, CAN/CGA-B149.2, as applicable, including:
a. The appliance and its individual shutoff valve must be disconnected from the gas supply piping system during any pressure testing of that system at test pressures in excess of 1/2 psi (3.45 kPa).
b. The appliance must be isolated from the gas supply piping system by closing its individual manual valve during any pressure testing of the gas supply piping system at test pressures equal or less than 1/2 psig (3.45 kPa).
- Local regulations governing gas appliance installations must be complied with.
- Equipment should be in an area with adequate ventilation
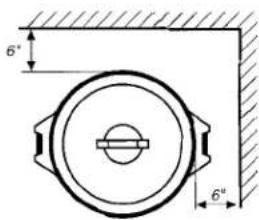
- Minimum spacing of 6" to combustible construction is required along back and side walls. Clearances for noncombustible construction are the same as combustible clearances.
For use only on noncombustible floors.
- Materials such as wood, compressed paper and plant fibers that will ignite and burn. Must Not Be Exposed Near this unit. Local safety codes should be complied with in respect to fire hazard avoidance.
- Use of a pressure regulator is mandatory.
- Keep the appliance area free and clear from combustible materials, gasoline and other flammable vapors and liquids.
- Locate this appliance in a well ventilated place. Do Not Block or Cover the opening between the shroud and pot. DO NOT OBSTRUCT FLOW OF COMBUSTION AND VENTILATION AIR.
- This equipment must be installed with adequate clearance for servicing and proper operation.
- This unit should be operated only with drip pan in place.
- If the unit is connected to a flexible gas line, the installation shall be made with a connector that complies with the Standard for Connectors for Movable Gas Appliances, ANSIZ21.69 or Connectors For Movable Gas Appliances, CAN/CGA-06.16, and a Quick Disconnect device that complies with the standard for Quick-Disconnect Devices for Use with Gas Fuel ANSIZ21.41, or Quick Disconnect Devices for use with Gas Fuel, CAN1-6.9, and adequate means must be provided to limit the movement of the appliance without depending on connector and the quick-disconnect device or its associated piping to limit the appliance movement.
- Before connecting gas check that gas valve on the appliance is turned "OFF" (gas valve knob in vertical position.)
- Check for leaks using soapy water or other suitable leak detector. DO NOT USE OPEN FLAME FOR TESTING. Rinse off the Soapy water after testing.
LIGHTING AND SHUT DOWN INSTRUCTIONS
Always follow these lighting and shutdown instructions when lighting your rice cooker. A five minute complete shutoff period is required before lighting or relighting pilot. Check for gas leaks before relighting unit. Use soapy water or other suitable leak detector. Rinse off the Soapy water after testing.
Notice to Installer: The following must be performed to insure proper safety valve operation.
- Remove Pot, Outer Jacket, and Drip Tray.
- Open the manual valve to the unit.
- Depress and hold the blue stem on the safety control located at the right of the burner base. This will allow gas to pass to the pilot control.
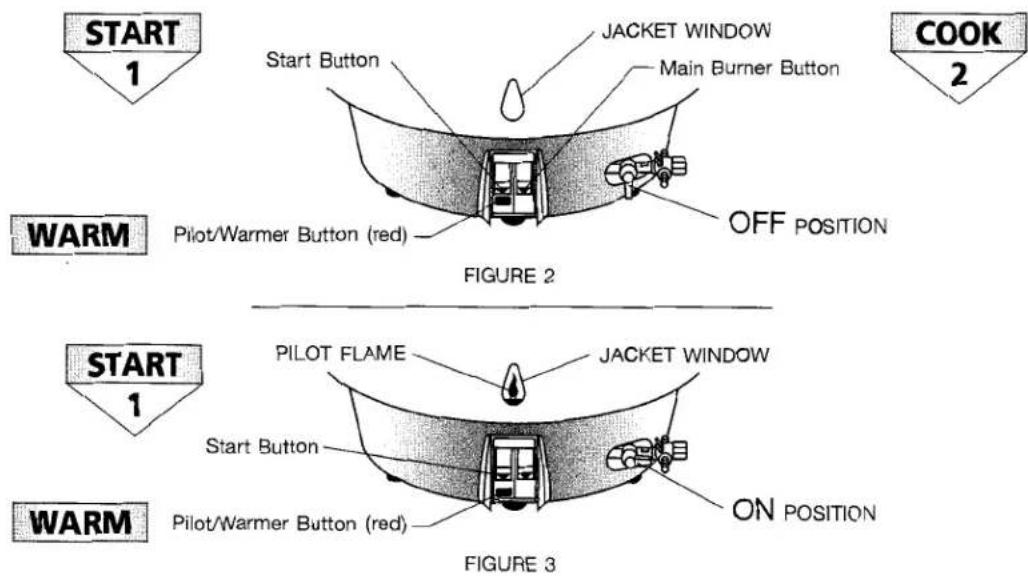
- With the safety control stem depressed, push the left button marked START down until you hear a click, then release it. This is the ignition lever and the pilot should light. The red button marked WARM controls the pilot and is hidden by the START button when off. Pushing the START button also depresses the WARM button, exposing it. It will stay down until pushed up to extinguish the pilot. If the pilot has not lit, repeat steps 2 & 3.
- Keep the safety valve stem depressed for a total of 30 seconds after the pilot has lit and then release the stem. The pilot should remain lit. If pilot fails to remain lit, see Trouble Shooting.
- Push the WARM button up to its off position. Listen for a faint metallic click within 45-180 seconds after turning off the pilot. The sound represents closing of the safety valve preventing gas from going to the pilot or main burner. Verify closure by trying to light the pilot by depressing the START button but without depressing the Safety Valve stem. The lack of gas to the pilot should be verified by no pilot ignition or faint sound of gas as it passes through the orifice of the Pilot Ignition Line.
SHUT DOWN: When removing the pot, make sure to push up the red button WARM until it clicks and is hidden by the START button. It is then in the "OFF" position. A five minute complete shutoff period is required before lighting or relighting pilot.
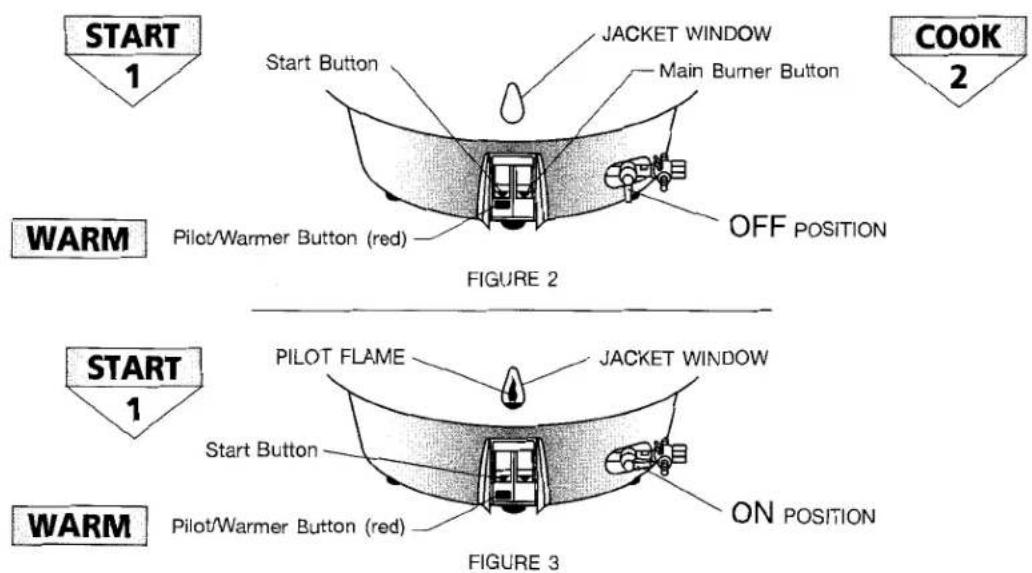
WARNING: *When igniting the pilot, position the Jacket window directly over START and COOK buttons. Do not be too close to the viewing hole when igniting.
Rinnai
RR-55A-N Natural gas/RR-55A-P Propane gas
Automatic Gas Rice Cooker with Safety Control Owner's Manual
Section 2: Operating and Maintenance Instructions
natural_image
Line drawing of a Rinnai rice cooker with lid and side ports (no text or symbols on body)FOR YOUR SAFETY
Do not store or use gasoline or other flammable vapors and liquids in the vicinity of this or any other appliance.
WARNING
Improper installation, adjustment, alteration, service or maintenance can cause property damage, injury or death. Read the Installation, Operating and Maintenance Instructions thoroughly before installing or servicing this equipment.
TO THE PURCHASER
Contact your local gas supplier and ask instructions in the event the user smells gas. This information should be posted in a prominent location.
THE INSTALLER MUST LEAVE THIS MANUAL WITH THE UNIT AFTER INSTALLATION.
THE CONSUMER IS TO RETAIN THIS MANUAL FOR FUTURE REFERENCE.
OPERATING INSTRUCTIONS
- Make sure the unit is properly assembled with drip tray, outer jacket, rice pot and cover in their proper positions. The rice should be in the pot prepared by the methods described on page 8. If the components are not properly seated, the unit cannot operate normally.
- Open the manual valve to the unit. Position the Jacket Window directly over START and COOK buttons.
- Depress and hold the blue stem on the safety control located at the right of the burner base. This will allow gas to pass to the START button.
- With the safety control stem depressed, push the left button marked START down until you hear a click, then release it. The pilot should light. The red button marked WARM controls the pilot and is hidden by the START button when off. Pushing the START button also depresses the WARM button, exposing it. It will stay down until pushed up to extinguish the pilot. If the pilot does not light, repeat steps 2 & 3.
- Keep the safety valve stem depressed for a total of 30 seconds after the pilot has lit and then release the stem. The pilot should remain lit. If pilot fails to remain lit, see Trouble Shooting.
- After the pilot has lit, Push Main Burner Control Button marked COOK to ignite the main burner and start cooking. The cook cycle will last approximately 22 minutes. When the cook button jumps up to the off position, allow the rice to remain undisturbed for an additional 10 minutes to cure. The curing time allows the rice to become fluffy and improves taste.
WARNING: When igniting the pilot, position the Jacket Window directly over START and COOK buttons. Do not be too close to the viewing hole when igniting.
SHUT DOWN: When removing the pot, make sure to push up the red button WARM until it clicks and is hidden by the START button. It is then in the "OFF" position. A five minute complete shutoff period is required before lighting or relighting pilot.
ASSEMBLY & COOKING
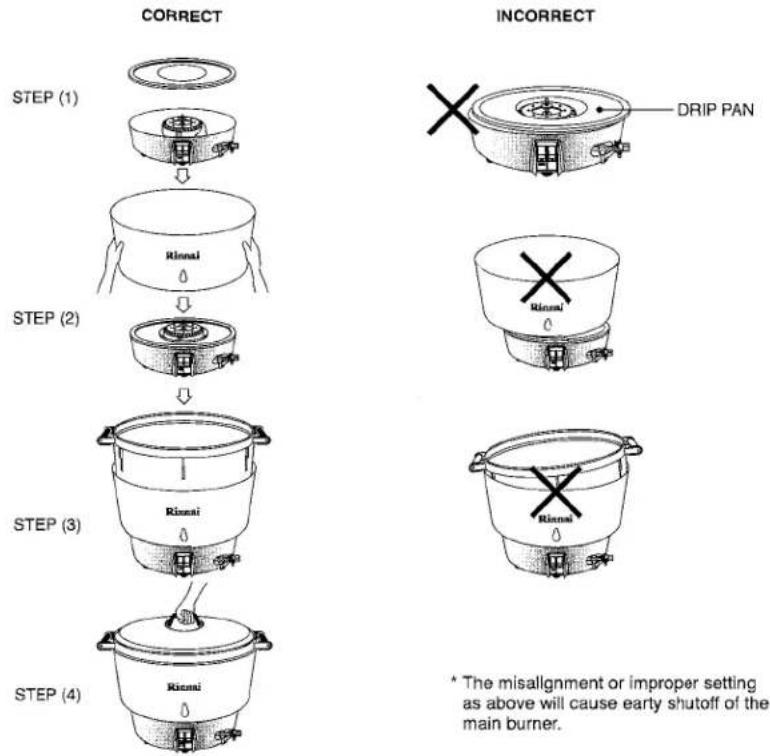
Step 1: Set Drip Pan on Base correctly. Do not use Drip Pan upside down.
Step 2: Align the Jacket Window directly over START and COOK buttons. Be sure that the Outer Jacket is sitting firmly in Drip Pan.
Step 3: Place the Rice Pot with rice and water into the Outer jacket. Make sure that the Rice Pot is level and sitting evenly in the jacket.
Step 4: Place the lid on the Rice Pot and ligth the burner. To light the burner, refer to operating instructions on page 6. Do not open lid while cooking. When the cooking is completed, the COOK button will pop up and the main burner will automatically shut off. Wait 10 minutes after main burner shuts off before removing lid to allow rice to "cure". The pilot keeps cooked rice hot (about 160^ / 71^ ) for four hours.
Step 5: Shut pilot off by pushing up the red keep warm button. See shut down instructions on page 6.
SEASONING THE RICE POT
A new Rice Pot should be carefully seasoned once before use. Wash rice in the rice pot using tap water. Remove the rice, leaving only the "milky" looking water in the pot. Light the pilot and initiate the cooking process. Using ordinary water for seasoning the pot may cause discoloration but will not effect either the unit or cooked rice.
VISUAL BURNER CHECK
When operating, burner flame should be light blue in color and should have no yellow tips or lifting from the burner. The air/gas mixture is adjusted by moving the air shutter arm under the unit below the main gas valve.
RICE PREPARATION
- Measure rice with measuring cup provided. This unit will cook a maximum of 15 pounds of dry rice. Uncooked rice volume triples after cooking.
- Determine the quantity of rice to be cooked. The maximum is 10 full measuring cups, the minimum is half that amount. Measure the rice into the pot and wash 4 or 5 times with fresh water. When wash water becomes almost clear, stop washing and drain.
- Cover the rice with 1" of water. A time-honored alternate method is to gently place your hand on the rice. Add enough water to reach the center of your knuckles where your fingers join your hand.
- Cover rice pot with stainless steel cover provided. Check to be sure that the pot is properly seated in the cooker base and the water level is of uniform depth covering the rice. For really tender, delicious rice, let rice soak in pot for about 10 minutes before igniting main burner.
RICE COOKING TIPS
- When cooking half-pot of rice, turn gas valve full on, and note flame on burner. Then turn gas valve slightly to OFF position until flame is reduced by half.
- Length of cooking time will vary according to type of gas used, gas pressure to burner, and quantity of rice being cooked.
- When main burner automatically shuts off, wait 10-15 minutes before removing lid to serve allowing rice to "cure". Rice in this unit will remain hot (about 160^ / 71^ ) for four hours.
CARE AND MAINTENANCE
- The rice pot of your RR-55 cooker is designed for use in this unit only. Never set the pot over any other stove as it will damage the thermostatic element and not operate automatically in the future.
- Keep the Piezo Electric Ignition clean and dry by wiping foreign matter off with dry cloth as necessary. Do not press down ignition knob when anyone is touching electrode as electric shock will result. If lighter fails to spark, check carefully that it is clean, dry and the black neoprene line from the ignition assembly is connected. Call your dealer or gas service for assistance if it continues to malfunction.
- Cooker base connected to gas supply may be cleaned with damp cloth and mild soap or detergent. Never immerse unit into water for cleaning. Be careful never to strain gas connection as this will damage manifold and could be very dangerous.
- Rice pot, cover, and enamel body may be removed for cleaning. These parts should be cleaned and carefully reassembled to prevent damage to unprotected cooking sensor. Do not force fit these parts as they assemble easily if properly positioned. Refer to sketch and picture when in doubt.
- After cooker is cleaned and assembled, leave all gas valves in "OFF" position, rice pot centered and resting evenly on enamel outer body of cooker.
TROUBLE SHOOTING
IF YOUR RICE COOKER SHUTS OFF TOO SOON, DO NOT PRESS THE COOK BUTTON A SECOND TIME. RICE WILL BURN! The sensor has activated and must cool to reset.
| DIFFICULTY | CAUSE | REMEDY |
| Main burner shuts off before rice is done, pilot remains lit | Insufficient water to cook rice | |
| Drip Pan, Rice Pot, and/or Outer Jacket are not correctly positioned | Cook with proper amounts of water | |
| Main burner does not shut off automatically | Shut Off Stem tip is worn | Raise tip per directions below |
| Sensing Element failed | Replace Sensing Element per instructions below |
If your rice cooker shuts off too soon, follow these steps to raise the shut off stem tip allowing the sensor better contact with the rice pot.
FIRST
- Remove rice pot.
- Locate shut off stem in center of burner.
SECOND
- Unscrew stem tip.
- Add lightweight washer (about 1/8" thick) under tip.
LAST
- Reinstsll tip.
- Insure spring returns tip to the top of its travel.
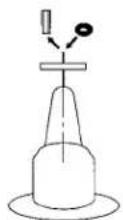
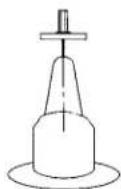
If the main burner does not shut off automatically, the sensing element may have failed and require replacement. Follow these steps to replace:
FIRST
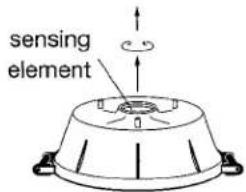
- Remove & invert rice pot.
- Remove sensing element spring, collar, and element.
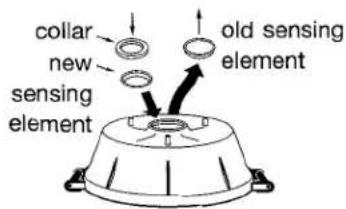
SECOND
- Replace sensing element. Important Note: Concave side of sensing element with letters must be exposed.
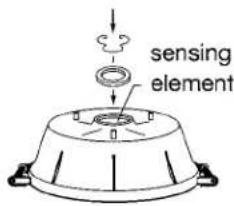
LAST
- Reinstall collar & spring.
| DIFFICULTY | CAUSE | REMEDY |
| Spillage on Pilot | Clean or replace pilot burner | |
| Pilot orifice clogged | Clean or replace pilot orifice | |
| Pilot and Main Burner Shut off while cooking | Insufficient gas pressure | Check gas pressure. Insure all gas valves are open. |
| Thermocouple is covered with spillage or is worn out | Replace Sensing Element per instructions below | |
| insufficient gas pressure | Check gas pressure. Insure all gas valves are open. Contact your gas supplier if problem per-sists | |
| Insufficient Pilot Burner flame | ||
| Main orifice blocked | Clean or replace main orifice | |
| Unit connected to incorrect type of gas | Check Rating Plate. Confirm unit is connected to correct type of gas | |
| Main Burner flame is yellow. Black soot collects on bottom of rice pot | Air Shutter Closed | Adjust/open Air Shutter |
| Spillage on main Burner or blockage inside Main Burner | Clean or replace main burner | |
| Flame lifts off main burner | Spillage on main burner | Clean or replace main burner |
| Excessive Air | Adjust/Close Air Shutter | |
| Boiling over | Too much water | Cook with proper amount of water. See instructions |
| Rice pot is put away for a long time without having been washed | Thoroughly wash pot and dry | |
| Pot interior turns gray | Pot is sterilized by boiling water but turns gray | Discoloration will not harm rice pot or rice |
SCHEMATIC DISASSEMBLY
MODEL RR-55A-N, RR-55A-P
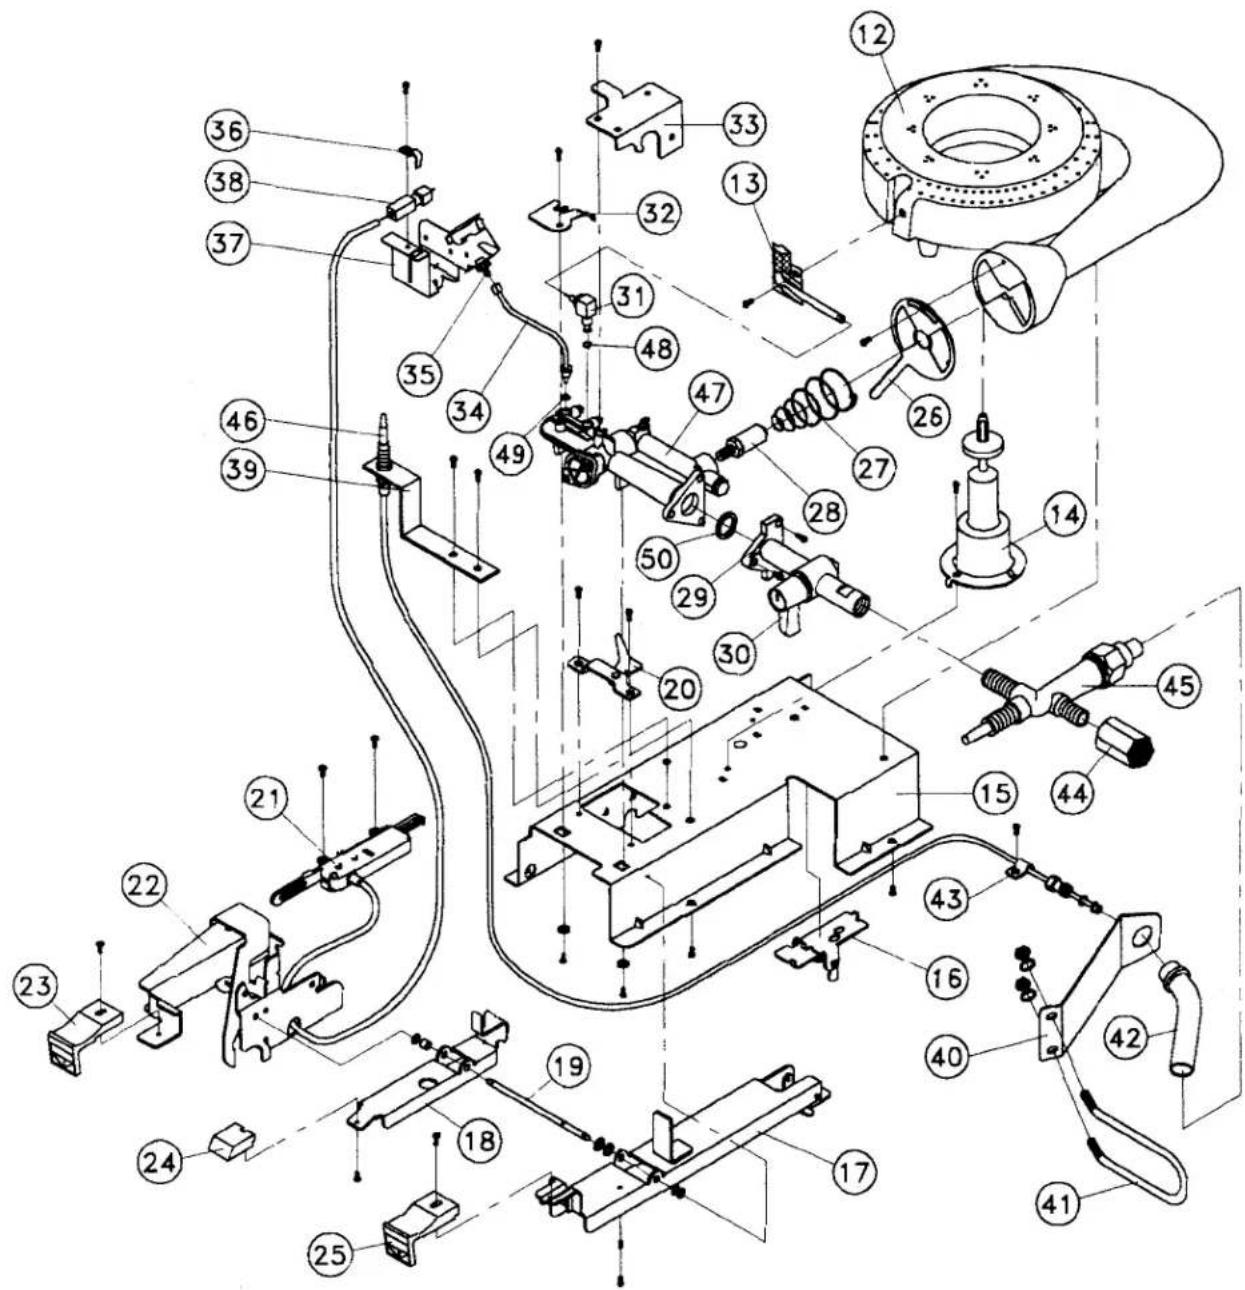
PARTS LIST
SPARE PARTS RICE COOKER
MODEL : RR-55A-N (FOR NATURAL GAS USE)
RR-55A-P (FOR PROPANE GAS USE)
| NO. | CODE OF PRODUCT | DESCRIPTION | Q'TY | REMARK |
| 1 | 4-TC-13-001-2 | HEAT PROOF HANDLE | 1 | |
| 2 | 9-TL-14-001-1XO1 | STAINLESS STEEL COVER | 1 | |
| 3 | 4-TC-13-001-3 | LID HANDLE SCREW | 2 | |
| 4 | 9-TL-14-002X06 | CAST ALUMINUM RICE POT | 1 | |
| 5 | 4-G-44990-2X01 | SENSING ELEMENT | 1 | |
| 6 | 4-4491A | RETAINING SPRING | 1 | |
| 7 | 9-TL-000015 | OUTER JACKET | 1 | |
| 8 | 4-TC-13-009 | DRIP PAN | 1 | |
| 9 | 9-TC-13-010X02-B | LOWER CASING | 1 | |
| 10 | 4-TC-13-043-1-2-1 | FRONT CONTROL PANEL | 1 | |
| 11 | 4-TPC-302X02 | NON-MAR FEET | 4 | |
| 12 | 4-RF-8 | CAST IRON BURNER | 1 | |
| 13 | 4-TC-13-035-036 | PILOT W/RETAINER PLATE | 1 | |
| 14 | 4-TC-13-025-029 | SHUT-OFF STEM | 1 | |
| 15 | 9-TC-13-038X02 | BASE PLATE | 1 | |
| 16 | 4-TC-13-055-058 | RACHET LEVER ASS'Y | 1 | |
| 17 | 4-TC-13-047-051 | COOKING - LEVER ASS'Y | 1 | |
| 18 | 9-TC-13-045 | KEEP WARM LEVER ASS'Y | 1 | |
| 19 | 4-TC-13-048 | LEVER SHAFT | 1 | |
| 20 | 4-TC-13-039-042 | INTER LOCK ASS'Y | 1 | |
| 21 | 4-TC-17-018 | PIEZO MECHANISM ASS'Y | 1 | |
| 22 | 4-TC-13-059-062 | IGNITION LEVER | 1 | |
| 23 | 4-TP-13-076-2-1 | #1 START BUTTON | 1 | |
| 24 | 4-TC-13-078 | RED PILOT/WARMER BUTTON | 1 | |
| 25 | 4-TC-13-077-2-1 | #2 MAIN BURNER BUTTON | 1 | |
| 26 | 9-TC-12-020 | AIR DAMPER | 1 | |
| 27 | 4-TC-13-021 | AIR DAMPER PUSH SPRING | 1 | |
| 28 | 9-TC-13-018 N | MAIN BURNER ORIFICE-NATURAL GAS | 1 | NATURAL GAS, ∅ 2.20 |
| 28 | 9-TC-13-018 P | MAIN BURNER ORIFICE-PROPANE GAS | 1 | PROPANE GAS∅ 1.50 |
PARTS LIST
SPARE PARTS RICE COOKER
MODEL : RR-55A-N (FOR NATURAL GAS USE)
RR-55A-P (FOR PROPANE GAS USE)
| NO. | CODE OF PRODUCT | DESCRIPTION | Q'TY | REMARK |
| 29 | 9-41378A | GAS VALVE | 1 | |
| 30 | 4-TC-13-013-1-2 | GAS VALVE KNOB | 1 | |
| 31 | 4-TC-13-030-034 N | PILOT ORIFICE-NATURAL GAS | 1 | NATURAL GAS, ∅ 0.25 |
| 31 | 4-TC-13-030-034 P | PILOT ORIFICE-PROPANE GAS | 1 | PROPANE GAS, ∅ 0.18 |
| 32 | 4-TC-13-037 | RETAINER PLATE | 1 | |
| 33 | 9-TC-13-017 | PILOT ORIFICE RETAINING PLATE | 1 | |
| 34 | 4-TA-00052 | PILOT IGNITION LINE | 1 | |
| 35 | 4-TPC-344 N | IGNITION ORIFICE NATURAL GAS | 1 | NATURAL GAS, ∅ 0.60 |
| 35 | 4-TPC-344 P | IGNITION ORIFICE PROPANE GAS | 1 | NATURAL GAS, ∅ 0.45 |
| 36 | 9-TPC-088 | CERAMIC ELECTRODE CLAMP | 1 | |
| 37 | 4-TC-13-072-075 | IGNITION HOLDER | 1 | |
| 38 | 4-CP-50682X02 | CERAMIC ELECTRODE | 1 | |
| 39 | 9-TL-1532-4 | THERMOCOUPLE RETAINING PLATE | 1 | |
| 40 | 9-TL-1534-1 | VENTURI PLATE | 1 | |
| 41 | 9-TL-1532-1 | U CLAMP | 1 | |
| 42 | 9-TL-1532-5 | TURBO VENTURI | 1 | |
| 43 | 4-TL-1532-2 | THERMOCOUPLE CLAMP | 3 | |
| 44 | 9-TL-1532-3 | GAS LINE CONNECTOR | 1 | |
| 45 | 4-400057 | SAFETY DEVICE SET | 1 | |
| 46 | 4-200044S | THERMOCOUPLE SET | 1 | |
| 47 | 9-10227N | MAINIFOLD ASSEMBLY, NATURAL GAS | 1 | |
| 47 | 9-10227P | MAINIFOLD ASSEMBLY, PROPANE GAS | 1 | |
| 48 | 4-RN-001-S | O-RING | 1 | |
| 49 | 4-ORP3 | P3 O-RING | 1 | |
| 50 | 4-ORP14 | P14 O-RING | 1 | |
| 51 | 5-198NP | LIGHTING INSTRUCTIONS | 1 | |
| 52 | RR-55A-N | LABEL FOR NATURAL GAS | 1 | |
| 53 | RR-55A-P | LABEL FOR PROPANE GAS | 1 |
5 MAJOR STEPS
-
Call the Service Center
-
Provide Proof of Purchase and Serial Number
-
Obtain a RGA number
-
Pack well and send back.
-
Repair and return back to the customer
Distributor should NEVER exchange the product to the Customer without first consult with Thunder Group's Customer Service Department. We will not honor any return or exchange without a RGA number.

THUNDER GROUP, INC.
WWW.TARHONG.COM
SUBJECT: RETURN AUTHORIZATION POLICY AND PROCEDURE
in the event that customers have a problem, either warranty or non-warranty related, customers should take the following steps to ensure the problem is handled professionally.
When a problem arises, customers have to call in one of the following Thunder Group service centers:
| - Los Angeles, CA | Tel: 1-800-844-1828 | Fax: 323-869-9881 |
| - Houston, TX | Tel: 1-866-690-0111 | Fax: 713-690-0123 |
| - Ridgewood, NY | Tel: 1-718-366-1988 | Fax: 718-366-2663 |
How to determine if the problem is a warranty-related problem:
- It has to be under the manufacturer original warranty.
a. 1 year from the date of original purchase by the end user for all ELECTRIC Rice Cooker/Warmer products; or
b. 90 days from the date of original purchase by the end user for all GAS Rice Cooker/Grill. - Customers / End Users have to present proof of purchase from it's supplier or vendor in order to valid the warranty period. Fax copy is acceptable.
- Customers / End users have to provide a valid serial number for the product.
- No sign of misuse or abuse of the products
If the problem is determined to be a warranty-related problem:
- Customer Service Specialist will issue a RGA number to the customer.
- Customers have 30 days to return the product(s), freight pre-paid, to our service center.
- On-site technician will determine the cause of the problem and perform any necessary repair (repair time is usually 7 days, however, Thunder Group, Inc. reserve the right to extend the length of the repair if the problem needs more special attention).
- Thunder Group, Inc. is responsible for all labors and parts.
- Products will be shipped back to the customer, freight pre-paid.
- Warranty for the repair work is 30 days or the remaining of the original warranty period; whichever is favorable to the customer.
If the problem is determined to be a non-warranty-related problem:
- Customers can request parts-sheet to be faxed to them and order parts in order to perform the repair themselves; or
- Customers can send back the product for a non-warranty repair with authorization to repair the unit.
- Repair fee is USD 65.00 per hour plus the cost of parts.
- Product will be shipped back to the customer at freight collect.
*Thunder Group will not honor any payment deduction for warranty-related issue without authorization or damages caused by shipping.
RECOMMENDATION:
- Customer should deep the original Sales receipt and the Serial number during the warranty period.
- Customer should fill out and send back the warranty card that came with the product upon purchase.
- Customer should always maintain and clean the products from dusts and cooking residues.
- Customer should always unplug the unit when not using.
- Always read the user manual / warranty policy before operating the unit.
CHICAGO, IL
TEL: 800-555-1299 FAX: 773-478-2050
HOUSTON, TX
TEL: 866-690-0111 FAX: 713-690-0123
LOS ANGELES, CA
TEL: 800-844-1828 FAX: 323-869-9881
MIAMI, FL
TEL: 888-449-6211 FAX: 888-449-6411
Rinnai America CORPORATION
1662 LUKKEN INDUSTRIAL DRIVE WEST LA GRANGE, GEORGIA 30240
Phone (706) 884-6070
Fax (706) 884-6099
Toll Free (800) 621-9419