
ACT-5001 - Videokamera DENVER - Gratis brugsanvisning og manual
Find enhedens vejledning gratis ACT-5001 DENVER i PDF-format.

Brugerspørgsmål om ACT-5001 DENVER
0 spørgsmål om dette apparat. Besvar dem du kender, eller stil dit eget.
Stil et nyt spørgsmål om dette apparat
Download vejledningen til din Videokamera i PDF-format gratis! Find din vejledning ACT-5001 - DENVER og tag din elektroniske enhed tilbage i hånden. På denne side er alle dokumenter nødvendige for brugen af din enhed offentliggjort. ACT-5001 af mærket DENVER.
BRUGSANVISNING ACT-5001 DENVER
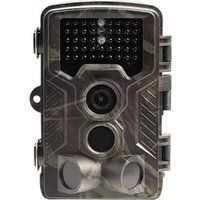
Appearance
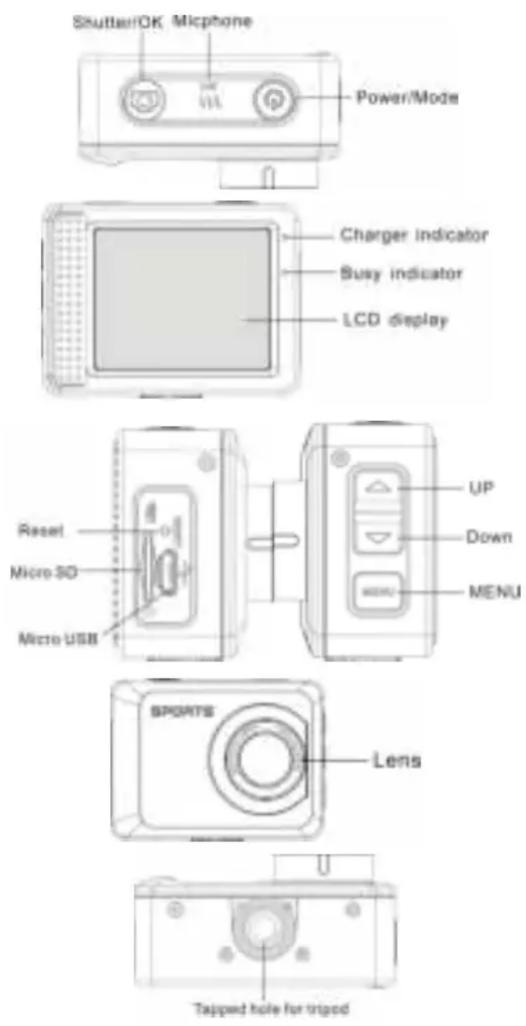
| Key/Indicator | Function |
| Power key | Power On/Off; switch over among video recording, capturing and playback |
| Shutter key | Video recording/capturing; play/stop playing video file (Playback mode); menu confirmation |
| MENU key | Open and exit from menu; Stop play video files ( playback mode) |
| Up key | Digital zoom-in: select menu (after opening the menu); file page-up; pause playing video ( playback mode); Retreat quickly video ( playback mode) |
| Down key | Digital zoom-out: select menu (after opening the menu); file page-down : Fast forward video ( playback mode) |
| Charger indicator | Indicator lights in red during charging, and the indicator turns off after charging full. ( Power off charging ) |
| Busy indicator | When the camera is busy (for example: during film recording, capturing, automatic screen-off), the busy indicator will light. |
Start to use
1. Charge the built-in lithium battery
The camera is equipped with built-in 3.7V lithium battery. Please ensure power available for the camera and timely charge it in case of low battery.

natural_image
Diagram showing a device connected to two monitors (no text or symbols visible)Connect the camera to computer for charging under shutdown status. The charging indicator will be on when charging, and will be off when the battery is fully charged. Generally, the battery can be fully charged after 2-4 hours.
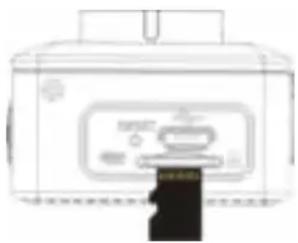
2. How to use the memory card
2.1 Properly insert the TF card into the card holder as per the instructions indicated near the card holder.
2.2 To remove the TF card, press the end of memory card gently, the card will be ejected.
natural_image
Line drawing of a portable device with a lid and front panel (no text or symbols)Note: The camera is not equipped with built-in memory. Please insert memory card before using. Before using the camera, it is a must to format the memory card on the camera.
3. Startup and shutdown:
3.1 Startup: press the POWER key for 3 second, the camera will show startup screen and enters into POWER ON state;
3.2 Shutdown: press the POWER key when the camera is under idle mode to shut down;
3.3 Auto shutdown: the camera will be shut down automatically when the camera is under idle mode for a certain time to save power. The default time for auto shutdown is 3 min.
3.4 Shutdown under low power: when the battery is under low power, the LCD will
indicate “☑”. Please charge the battery timely. When the icon turns red and flashes, the camera will be shut down automatically.
4. Function modes switching
The camera has 3 modes: photo mode, recording mode, and playback mode. Use the power key to switch the modes after starting up.
Recording mode: for recording videos;
Photo mode: for taking photos;
Playback mode: for playing back the current video.
5. Indicators
6.1 BUSY indicator: When the camera is working (e.g. recording, photographing, auto screen off etc.), the indicator will light;
6.2 Charging indicator: In shutdown state, the lightened indicator means the user is charging the camera.
6. Photo/recording mode
(With maximum 29 minutes video recording per sequence)
It enters automatically into recording mode.
Press Shutter to start recording, and press Shutter again to stop recording.
Press Shutter to directly take photo.
In rerecording/photo mode, press Up/Down for digital zoom in/out.
6.1 Screen display in photo mode
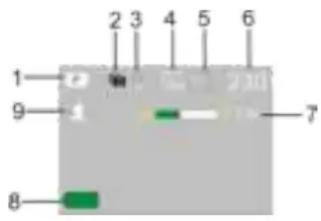
- Photo mode
- Three photos continuous shooting mode
- Self-timer mode
- Photo resolution
- Photo quality
- Available shooting count
- Icon of digital zoom
- Battery state
- Face detect
6.2 Screen display in recording mode
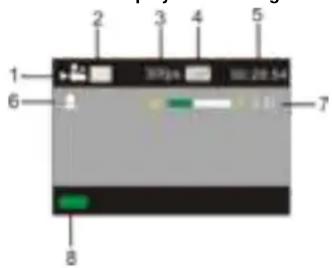
- Video mode
- Video quality
- Video framerate
- Video resolution
- Available time to record
- Face detect
- Icon of digital zoom
- Battery state
Note:
- When using the HD size or FHD video, you must use the TF high-speed card at class 4 or above.
- Automatic screen-off will be performed during recording for saving power. User may short press Power key or shutter key to enable the screen for displaying.
7. Menu Setting Mode
7.1 Menu display
In photo, recording and playback mode, press Menu key to open the menu, and then press Up/Down key to select menu, press the Shutter key to enter submenu. When selecting menu, the selected menu will be displayed with blue background.
In the video mode setting "Seamless" menu in this mode, Optional Settings 1/3/5 minutes video segmentation, automatic stop when it is time to this video, and immediately start the next video automatically. When the card is out of memory, a video is automatically deleted the first, and will continue to start to the next video.

Photo menu mode

Recording menu mode
8. Playback mode
Press Power key to enter playback mode to browse photo/video, play the video recorded by this camera.
Press Up/Down key to access to previous or next photo/video.
Play movie: Press the shutter button to start/pause play video, press the up/down key to Retreat quickly /fast forward playback, press the MENU button to stop play video

Video file playback

Video pause mode
ALL RIGHTS RESERVED, COPYRIGHT DENVER
ELECTRONICS A/S
DENVER®
www.denver-electronics.com

Electric and electronic equipment and included batteries contains materials, components and substances that can be hazardous to your health and the environment, if the waste material (discarded electric and electronic equipment and batteries) is not handled correctly.
Electric and electronic equipment and batteries is marked with the crossed out trash can symbol, seen above. This symbol signifies that electric and electronic equipment and batteries should not be disposed of with other household waste, but should be disposed of separately.
As the end user it is important that you submit your used batteries to the appropriate and designated facility. In this manner you make sure that the batteries are recycled in accordance with legislature and will not harm the environment.
All cities have established collection points, where electric and electronic equipment and batteries can either be submitted free of charge at recycling stations and other collection sites, or be collected from the households. Additional information is available at the technical department of your city.
Please fill the blank with the model number of this player for future reference.
Importer:
DENVER ELECTRONICS A/S
Stavneagervej 22, DK-8250 EGAA, DENMARK
www.facebook.com/denverelectronics


- Appearance
- Start to use
- Charge the built-in lithium battery
- How to use the memory card
- Startup and shutdown:
- Shutdown under low power: when the battery is under low power, the LCD will
- Function modes switching
- Indicators
- Photo/recording mode
- Screen display in photo mode
- Note:
- Menu Setting Mode
- Menu display
- Playback mode
- ALL RIGHTS RESERVED, COPYRIGHT DENVER
- ELECTRONICS A/S
- DENVER®
- www.denver-electronics.com
Mærke : DENVER
Model : ACT-5001
Kategori : Videokamera