
DC-511 - Kamera LENCO - Gratis brugsanvisning og manual
Find enhedens vejledning gratis DC-511 LENCO i PDF-format.


Brugerspørgsmål om DC-511 LENCO
0 spørgsmål om dette apparat. Besvar dem du kender, eller stil dit eget.
Stil et nyt spørgsmål om dette apparat
Download vejledningen til din Kamera i PDF-format gratis! Find din vejledning DC-511 - LENCO og tag din elektroniske enhed tilbage i hånden. På denne side er alle dokumenter nødvendige for brugen af din enhed offentliggjort. DC-511 af mærket LENCO.
BRUGSANVISNING DC-511 LENCO
Lenco
DC-511 Manual
For information and support, www.lenco.eu
1. Get to know your camera
5.0 Mega pixels resolution sensor
Digital still camera
Digital video camcorder
Built-in flash Light 8x digital zoom
2.4" TFT color display
Micro SD card support
2xAAA alkaline batteries
Smile detection
Anti-shaking still
2. Functional parts
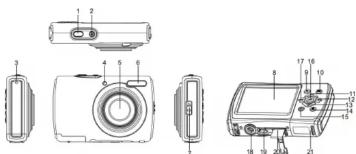
| 1 | Shutter Press this button to take photographs / start filming. |
| 2 | Power on/off buttonPress this button to turn on, press again to turn off. |
| 3 | Strap hook Hook for attaching the wrist strap to the camera. |
| 4 | Busy indicator When the indicator is blinking, the camera is busy. |
| 5 | LensNote: Keep the lens clean. Dirt and fingerprints will affect the quality of the picture. |
| 6 | Flash lightUse the built-in flash to give the subject extra lighting if it is in dark surrounding the best flash distance is recommended within 1.5m. |
| 7 | Macro switchMacro mode: Select this mode to take close-up photograph (distance 11cm - 18cm).Normal mode: Select this mode to take photographs from 0.5m - infinity. |
| 8 | LCD screen |
| 9 | Mode Press it to select PHOTO/VIDEO mode. |
| 10 | Menu Press it to enter camera setting mode. |
| 11 | Up Up & Digital zoom in. |
| 12 | Right/Flash light For RIGHT selection in menu modeFor flash light function selection in photo mode. |
| 13 | Down Down & Digital zoom out. |
| 14 | Delete Press it to delete the photos/videos in playback mode. |
| 15 | Playback Press it to enter playback mode. |
| 16 | Enter To start/slop recording a video clip in playback mode, or to confirm changes in menu mode. |
| 17 | Left / EV±For LEFT selection in menu modeFor exposure value set up in photo/video mode. |
| 18 | Tripod connector To fix the camera on tripod (not included). |
| 19 | USB interfaceVia this connection, you can connect to a computer. |
| 20 | Micro SD card slot SD storage location. |
| 21 | Battery doorDoor for battery. |
3. Explanation of the status icons
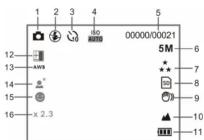
| Item | Function | Description |
| 1 | Mode selected | Photographs mode.Videos capture mode.Photo playback mode.Video playback mode. |
| 2 | Flash indicator | Force flash:The flash is on in any environment.Auto flash:The camera determines if the flash should be used or not.No flash: The flash is turned off. |
| 3 | Self-timer | 10s Timer |
| 4 | ISO | Light Sensitivity select. |
| 5 | Photo/Video counter | Photo mode:No. of pictures had been taken.Video mode:Recording time in second.Playback mode:No. of pictures or video file. |
| 6 | Selected resolution | 12M = 4032x3024;8M = 3264x 24485M = 2560x1920;3M = 2048x1536;1.3M = 1280x960;VGA = 640x480 |
| 7 | Picture quality | Super fine.Fine.Normal. |
| 8 | Micro SD card indication | The Micro SD card is inserted and will be used as storage for PHOTO and VIDEO |
| 9 | Brightness alert | Alert user to hold the camera steadily. |
| 10 | Normal/Macro mode indicator | Mode (0.5m ~ infinity).Macro mode (11cm ~ 18cm). |
| 11 | Battery indicator | The batteries are full.The batteries are empty. |
| 12 | Exposure value | Show EV ± value. |
| 13 | White Balance | White balance selection. |
| 14 | Scene mode | Landscape/Backlight/Night scene/Portrait/Sports |
| 15 | Smile detection | On/off |
| 16 | Zoom indicator | Showing zoom ratio. |
- Details for camera setting
| SIEC | Size | capture Mode | Single / 10s Timer | Single or 10s timer selection |
| Resolution | 12M pixel resolution | 4032 x 3024 | ||
| 8.0M pixel resolution 326k x 2448 | ||||
| 5.0M pixel resolution 2569 x 1920 | ||||
| 3.0M pixel resolution 2048 x 1536 | ||||
| 1.3M pixel resolution 1280 x 960 | ||||
| VGA resolution | 640 x 480 | |||
| Quality | Super Fine/Fine/Normal | Picture quality setting | ||
| Sharpness | Strong/Normal/Soft | Sharpness setting | ||
| Audio | Automatic white balance | |||
| White balance | Daylight | White balance selected for daylight surrounding | ||
| Cloudy | White balance selected for cloud surrounding | |||
| Tungsten | White balance selected for tungsten lighting | |||
| Fluorescent | White balance selected for fluorescent surrounding | |||
| Video | Scene | Auto/Landscape/Backlight/Night scene/Portrait/Sports | Scene setting | |
| ISO | Auto/50/100/200 | Sensitivity select | ||
| Smile detection | On / Off | Smile detection setting | ||
| Anti-shaking | On / Off | Anti-shaking setting | ||
| Resolution | VGA 640 x 480 QVGA 320 x 240 | Video resolution set up | ||
| Size | Date/Time | Y/Y/MM/DD | Date or time setting | |
| Auto power off | Off / Minute / 3 Minutes | Auto power off selection | ||
| Beep sound | Off/On | Beep sound setting | ||
| Language | English/T-Chinese/S-Chinese/French/Deutsch/Italian/Spanish/Portuguese/Japanese | Select display language | ||
| Date stamp | Date & Time /Date /Off | Date stamp | ||
| Frequency | 50Hz / 60Hz | Select power frequency in your location | ||
| Format | Internal Memory/SD card | Format the memory location select all data will be lost). | ||
| Default setting | Cancel / OK | Default setting | ||
| Version | See the firmware version |
Note: The camera will remain the last setting when it is turned off.
5. Using the camera
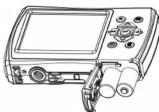
5.1 Installing the batteries
- Open the battery door
- Open the battery door.
- Insert 2xAAA alkaline b
- Close the battery door.
5.2 Inserting a memory card (not included)
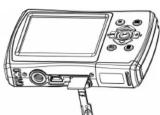
Follow the instructions given below to insert the optional micro SD memory card into the camera.
- Turn off the camera first.
-
Open the cord bar.
-
Open the card bar.
-
Insert the mica SE
-
Insert the micro SD card into the camera.
Note: There is only one right direction to insert the micro SD memory card into the slot. Do not
force the card into the slot, or else it may damage both the camera and the micro SD memory card.
memory card.
Note: The micro SD memory card must be formatted before taking photographs. See the
5.3 Formatting the memory or micro SD card
-
Press the menu button ( i) PHOTO or VIDEO mode
-
Select the setup mode by press the right button.
-
Select the format icon by press the ( ) button and press the ENTER button ( ) to
confirm
- Select Internal memory / SD card then press the ENTER button.
5.4 Setting the resolution
The camera can be set to different resolutions.
The camera can be set to different resolutions. 1. Press / . . . . . . . . . . . . . . . . . . . . . . . . . . . . . . . . . . . . . . . . . . . . . . . . . . . . . . . . . . . . .
- Press ( ) button in PISO mode, select the resolutions from by( ) keys and press the ENTER button ( ) to confirm.
Resolutions: VGA (640 x 480), 1.3M (1280 x 960), 3M (2048 x 1536),
5M (2560 x 1920), 8M (3264x 2448), 12M (4032 x 3024)
- Six different resolutions will be displayed. Select the desired resolution by using the up or
down buttons and press the ENTER button to confirm the selection
5.5 Taking photographs
-
Turn on the camera
-
Depending on the distance to the object being photographed, use macro switch to adjust
the distance. Select the flower symbol ( ) if you wish to take a close-up photograph
(11cm - 18cm).
If you wish to take video or photograph of surroundings or people (0.5m – infinity), set the
macro switch to normal mode (▲)
- If you are not sure if there is enough lighting, turn the automatic flash(A) on by pressing
the flash button. (If the battery power is too low, the flash won't be activated).
- Use the LCD screen to aim the object you wish to take photograph.
Use the face detection to aim the people you wish to take photograp
-
Press SHUTTER button and wait until the LCD display turn on again
-
If "SMILE" detection is ON, shutter will be activate automatically once a smile face is
detected
Caution: 1) Taking picture for fast-moving object is not recommended
2) Image may be distorted when taking picture in a moving vehicle.
5.6 Zoom in and out
70.
The camera can zoom in up to 8 times. Zoom in or out by pressing the up or down button, a number will appear on the display. 9 x is the
room in for out by processing the up of down button, a number will appear off the display; also to the maximum zoom ratio.
5.7 Self-timer setting
You can use the self-timer function when you wish to take a photograph for yourself or when you
wish to take a photograph for an object which the camera must be as still as possible.
-
Set the camera to photo mode
-
Press the MENU button ( The menu will appear
-
Press the down button to select Capture Mode and confirm by pressing the ENTER button.
-
Press the down button to set the delay time: 10S Timer
-
Press the ENTER button to confirm. The self-timer function is now ready for use
-
Aim at the object you wish to take photo.
-
Press the SHUTTER button to take a photograph
-
The photo will be taken after the timer reaches the delay time of 10s and the camera will be seen during the delay time.
5.8 Recording video clips
-
Press the MODE button to select the video clip mode(□)
-
For setting the resolution, Press MENU button and select Resolution, then press the
-
For setting the resolution, press MENU button and select ENTER button to confirm. Two resolution will be displayed
ENTER button to confirm: Two solid VGA (640 × 480) - OVGAL (320 × 340)
VGA (040 x 480) QVGA(320 x 240) 3. Press the SHUTTER button to start res
- Press the SHOTTER button to start recording video, press the SHOTTER button again to stop recording. The video clip will now be saved as an AVI file in the camera memory.
5.9 Playback photographs
-
Press the button to get into playback mode
-
Press the button to get into playback mode.
-
Press the left or right buttons to see photographs
-
In full screen display, press the up button to zoom in the photo
-
In full screen display, press the up button to 200
-
To view images in thumbnail, press down button
-
To view images in thumbnail, press down button.
-
To shift the image in room in mode, press the ENTER button then use the
-
To shift the image in 2001 up/down left/right buttons
up/down/first/right buttons.
- Press the MENU button, select SLIDE SHOW, and then press the ENTER button to confirm. The picture saved in your covers, however, is also available to
confirm. The pictures saved in your camera or your micro SD card will be displayed in
sequence automatically.
5.10 Playback video clips
-
When video clips are displayed, press the ENTER button to start playing the video and
-
When video clips are displayed, probe the ENTER button to press the ENTER button again to pause the playback.
press the ENTER button again to pause the playback. 2 press right button to fast forward or press left button to rewind
- press right button to last forward of press left button to rewind.
-
Press the down button to stop
-
Press the down button to stop.
-
Press the button again to exit
-
Press the button again to exit
5.11 Delete photographs and video clips
You can choose to delete a single photograph / video clip, or delete all the photographs / video
clips in the memory
Follow the instructions given below to delete photograph.
-
Press the (▶) button to enter the playback mode
-
Press left or right button to select photograph/video clip to be delete
-
Press the delete button (回) and select Delete This Image(All
-
Press the delete button (☐) and select Delete This
-
Press the ENTER button, then select OK to confirm
-
Press the ENTER button, then select OK to confirm.
-
Press the 📄 button to suit
-
Press the 📋 button to exit. NOTE: Select "All" and Press the ENTER button to confirm all the pictures and videos will be
NOTE: Select A
6. Connecting to a PC
The unit can be connected to the computer as mass storage device and transfer photo/video files
for storage
7. Specifications
| Sensor | 5.0 Mega pixel CMOS sensor |
| Image resolution | 12.0 Mega pixels: (4032x3024)8.0 Mega pixels: (3264x 2448)5.0 Mega pixels: (2560x1920)3.0 Mega pixels: (2048x1536)1.3 Mega pixels: (1280x960)VGA: (640x480) |
| Lens | F/2.8 f = 8.5mm |
| Focus range | 0.5m. – Infinity |
| Macro mode | 11cm – 18cm |
| Digital zoom 8x | Auto / force / off) |
| Flash strobe Built-In ( Auto / 11cm / 18cm) | 2.4" TFT color display |
| LCD display | |
| White balance Auto / Daylight / Cloudy / Fluorescent / Tungsten | |
| Video mode | 20fps@VGA30fpsQVGA with micro SD card |
| External memory card | SD card supports up to 8GB |
| File format | Picture, JPEG, Video: AVI |
| Soft timer | 10 seconds |
| PC interface USB 2.0 | |
| Power source | 2xAAA alkaline batteries |
8. System requirement
| Operating system | Windows XP / Vista or aboveMac 9.x or X.x |
| CPU | Pentium III or above |
| RAM | At least 64MB |
| Interface | USB port |
| CD | 4x speed CD ROM or above |
9. Troubleshooting
| Problem | Cause | Solution |
| Cannot turn on the camera | Low battery power. Battery placed at wrong polarities. | Replace or install the battery correctly. |
| Photos can not be saved when taking pictures. | The memory card or built-in memory hasn't been formatted properly. | Format the memory in setup mode of the camera. Please refer to section 5.3. |
| Cannot find removable disk after connecting the camera to the computer. | Connection failure. | Make sure all cable connections are secured and restart the computer if necessary. |
| Flash does not work. | Battery power is too low. | Replace with new 2xAAA alkaline batteries. |
| The batteries used up very fast. | Incorrect or old, used up, battery | Replace with new 2xAAA alkaline batteries. |
| The photos are blurry | 1. The camera is not held steadily2. The lens of camera is dirty. | 1. Hold the camera steadily until it beeps when taking video photo.2. Clean the lens with soft dry cloth. |
List of accessories:
Camera 1x User manual 1x
1
[NO TEXT]
区
A
-
-
For information and support, www.lenco.eu
- Lenco
- DC-511 Manual
- Get to know your camera
- Functional parts
- Explanation of the status icons
- Using the camera
- Installing the batteries
- Inserting a memory card (not included)
- Formatting the memory or micro SD card
- Setting the resolution
- Taking photographs
- Zoom in and out
- Self-timer setting
- Recording video clips
- Playback photographs
- Playback video clips
- Delete photographs and video clips
- Connecting to a PC
- Specifications
- System requirement
- Troubleshooting
- List of accessories:
Mærke : LENCO
Model : DC-511
Kategori : Kamera