
40PFT6529 - Fjernsyn PHILIPS - Gratis brugsanvisning og manual
Find enhedens vejledning gratis 40PFT6529 PHILIPS i PDF-format.


Brugerspørgsmål om 40PFT6529 PHILIPS
0 spørgsmål om dette apparat. Besvar dem du kender, eller stil dit eget.
Stil et nyt spørgsmål om dette apparat
Download vejledningen til din Fjernsyn i PDF-format gratis! Find din vejledning 40PFT6529 - PHILIPS og tag din elektroniske enhed tilbage i hånden. På denne side er alle dokumenter nødvendige for brugen af din enhed offentliggjort. 40PFT6529 af mærket PHILIPS.
BRUGSANVISNING 40PFT6529 PHILIPS
PHILIPS
Television
6500 Series
User Manual
32PHT6529
40PFT6529
Content
1. Home Screen 3
1.1 Introduction 3
1.2 Dashboard and Settings 3
1.3 Google TV and Basic TV 3
1.4 Open the home screen 3
2. Setting Up 4
2.1 Read the Safety Instructions 4
2.2 TV Stand and Wall Mounting 4
2.3 Power Cable 4
3. Remote Control 5
3.1 Key Overview 5
3.2 Pair Your Remote Control to TV 6
3.2 Voice Search 6
3.4 IR sensor 6
3.5 Batteries and Cleaning 7
4. Switching On and Off 7
5. Connect Devices 8
5.1 About Connections 8
5.2 Home Theatre System - HTS 9
5.3 Video device 9
5.4 AVIN 9
5.5 Audio Device 9
5.6 USB flash drive 10
5.7 Connecting TV 10
6. Bluetooth ^® 10
6.1 What You Need 10
6.2 Pairing a Device 11
7. Connect your Google TV 11
7.1 Network and Internet 11
7.2 Google Account 12
8. Settings menu 13
9. Sources 13
9.1 Switch to a Device 13
10. Menu(TV) 13
10.1 Menu operation description 13
11. Time and Language 13
11.1 Date and Time 13
11.2 Language 13
12. Power and Energy 13
13. Videos, Photos, Music 14
13.1 From a USB Connection 14
14. Netflix 14
15. Amazon Prime Video 14
16. Channels 14
16.1 Channel Scanning 14
16.2 Time Shift Option 15
16.3 REC Option 15
17 Specifications 15
17.1 Environmental Protection 15
17.2 Power 15
17.3 Operating System 16
17.4 TV Type 16
17.5 TV Input Resolution 16
17.6 Connectivity 16
17.7 Sound 16
17.8 Multimedia 16
18. Help and Support 16
18.1 Register your TV 16
18.2 Troubleshooting 16
18.3 Online Help 18
18.4 Support and Repair 18
19. Safety and Care 18
19.1 Safety 18
19.2 Screen Care 19
20. Terms of Use 20
21. Environment(Shop mode) 20
22. Copyrights 21
22.1 Google TV 21
22.2 HDMI 21
22.3 HEVC Advance 21
22.4 Dolby 21
22.5 Other Trademarks 21
23. Disclaimer 21
1. Home Screen
1.1 Introduction
To enjoy the benefits of your Google TV, connect the TV to the Internet. Press ⚠ HOME on your remote control to get your Home screen. Like on your Android smartphone or tablet, the Home screen is the centre of your TV. From the Home screen you can decide what to watch by browsing entertainment options from apps and live TV.
The Home screen is organized in rows to let you discover great contents from your favourite apps. Apps may populate their recommendation (if available) according to their own choice as an individual rows in the home screen.
Highlights on your home screen
You can explore movies and shows from your services and popular apps using multiple indexes including Home, Apps, Collections and Search. Sign in to your Google account and let the streaming service provide you with personalized recommendations based on your past viewing content and interests. You can also trigger Google's search system using voice or text input in the Search Index tab.
Favourite Apps
The home screen's application index includes all installed applications that come with the TV, as well as applications you have installed from the Google Play™ store. You can also install and add more apps as Favorites from the Apps index tab.
Tour guide
Decide what you want to watch next with easy-to-use navigation. Browse your personalized recommendations, pick up where you left off, or use the new index tag system to quickly find specific apps.
Explore personalized recommendations
Browse your favorite shows and movies on all your favorite media services. Sign in to your Google Account to get started.
Get recommendations through Google
Your services will be saved to your Google account, allowing you to get better recommendations across Google's services.
See also www.support.google.com/googletv
1.2 Dashboard and Settings
Dashboard
The Dashboard is a side panel in your TV that provides access to settings, device controls, notifications, and more.
You can access the dashboard in Two ways:
1 - Browse the ✉ information home page on the home page.
2 - Press the ⚙ button on the remote control.
The dashboard contains the following features.
- Settings: Access all settings menus to adjust TV settings.
- Clock and screen saver: Display the system clock. Press this function to start the screen saver immediately.
- Inputs: Launch the input source list to switch to any connected device.
• Picture: Quick links to adjust image settings.
• NO NOTIFICATIONS: Provides you with TV system related - Clear all: Press Clear all to delete all notifications.
1.3 Google TV and Basic TV
Functional differences
You can set your Google TV to basic TV mode or Google TV mode.
Basic mode only includes live TV and external devices (such as HDMI) functionality.
Google TV mode requires signing in with your Google account and an Internet connection. Full mode gives you all the features of Basic mode, plus more Google personalization. Examples: movies and shows from your favorite streaming apps, personalized recommendations, and the Google Assistant that lets you search and control your TV using your voice.
Differences in home page screen
The homepage list of signal sources and the information homepage can be used to operate TV functions. The application column in the second column contains all.
1.4 Open the home screen
To open the home screen and one of its items:
1 - Press ⏠ HOME.
2 - Select an item and press OK to turn it on or start.
3 - Keep pressing ← Back or press ⚠ HOME to return to the home screen.
2. Setting Up
2.1 Read the Safety Instructions
Read the safety instructions first before you use the TV.
2.2 TV Stand and Wall Mounting
TV Stand
You can find the instructions for mounting the TV stand in the Quick Start Guide that came with the TV. In case you lost this guide, you can download it from www.philips.com/TVsupport. Use the model number of the TV to look for the Quick Start Guide to download.
Wall Mounting
Your TV is also prepared for a VESA-compliant wall mount bracket (sold separately).
Wall mount dimensions may vary with different case types; see the Quick Start Guide included in the product packaging to see which sizes will fit your TV.
Please use the following dimensions when purchasing a wall mount.

32"/40" 200x200mm
Upper:M4(L:9.5mm\~10.5mm)
Lower: ST4 (L: 9.5mm \~ 10.5mm)

M:Machine screw

ST: Flat tail self-tapping screw
Caution
Wall mounting the TV requires special skills and should only be performed by qualified personnel. The TV wall mounting should meet safety standards according to the TVs weight. Also read the safety precautions before positioning the TV.
TP Vision Europe B.V. bears no responsibility for improper mounting or any mounting that results in accident or injury.
2.3 Power Cable
- Make sure the power cable is securely inserted in the connector.
- Make sure that the power plug, in the wall socket, is accessible at all times.
- When you unplug the power cable, always pull the plug, never pull the cable.

Although this TV has a very low standby power consumption, unplug the power cable to save energy if you do not use the TV for a long period of time.
3. Remote Control
3.1 Key Overview
Top

1 - Power ⏻ (Standby / On)
To switch the TV on or back to Standby.
2 -VOICE microphone
3 -AMBILIGHT
Due to differences in machine model functions, this button is reserved only and is not applicable to this model.
4 - prime video
To launch the Amazon Prime Video App.
5 -NETFLIX
- To launch the Netflix App with the TV switched on or from standby.
- If you have a Netflix membership subscription, you can enjoy Netflix on this TV. Your TV must be connected to the Internet.
- To open Netflix, press the NETFLIX key to open the Netflix App. You can open Netflix immediately from a TV in standby.
6 - → (SOURCES)
To open the Sources menu.
7 - YouTube
To launch the YouTube App.
8 - :: Apps
Due to differences in machine model functions, this button is reserved only and is not applicable to this model.
9 - i (INFO)
Press to open the programme information screen.
10 - (TV GUIDE)
Enable the EPG function.
Middle

1 - OK key
To confirm a selection or setting. To open the TV menu with typical TV functions(Channel, TV options).
2 - ←(Back)
Return to the previous menu.
Return to the previous application/internet page.
3 - MENU
- To open the TV menu with typical TV functions (Channel, TV options).
- Open the 'Settings' menu under the smart home page
4 - Colour keys
Follow the on-screen instructions to select more options or operations.
5 - Navigation keys
To navigate up, down, left or right. (▲/▼/◄/►)
6 - (Google Assistant™)
To launch the Google Assistant™.
7 - ⓗ (Home)
To open the Home menu. Long press to launch the Dashboard on side of screen.
8 - Playback
- Play ▶, to playback.
• Pause II, to pause playback
- Stop ■, to stop playback
- Fast rewind ◀, to rewind
- Fast forward ▶, to go fast forward
Bottom
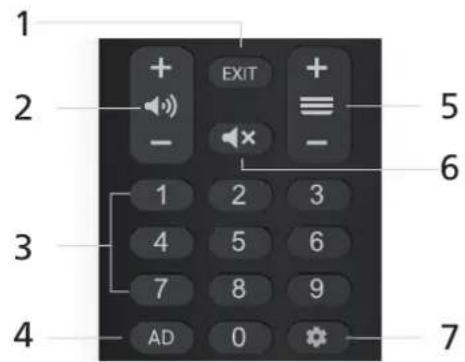
1 - EXIT
To return to previous menu.
2 +◀) - Volume
Press + or - to adjust the volume level.
3 - Number keys
To select a channel directly.
4 -AD
• Audio output setting.
MTS.
5 -≡+/-
Change program channel.
6 - × Mute
Press to mute the sound or to restore it.
7 - Dashboard
To launch Dashboard on side of screen to access Settings, picture, notifications and more.
3.2 Pair Your Remote Control to TV
This remote control uses both Bluetooth* and IR (infrared) to send its commands to the TV.
- You can use this remote control via IR (infrared) for most operations.
• To use advanced operation like voice search and remote control keyboard, you need to pair (link) the TV with the remote control.
When you start the initial TV installation, the TV invites you to press ⚠ Home + ← Back key to pair the remote control. It is suggested to complete the pairing during the first TV installation.
Note:
1 - Once the remote control has entered pairing mode successfully, the blue LED indicator ring around the microphone on the front side of the remote control starts blinking.
2 - The remote control must be kept close to the TV (within 1m distance) during pairing in order to ensure success.
3 - If the TV does not launch the voice control field when press, pairing was unsuccessful.
4 - It is advisable to wait until the set has fully started up and launched all background processes before pairing mode is entered as the toast message containing further instructions may appear too late, thereby negatively impacting the pairing procedure.
Pairing again
If the pairing with the remote control was lost, you can pair the TV with the remote control again.
You can press ⚠ Home + ← Back key (approximate for 3 seconds) for pairing.
You can also go to ⚙ Settings > Remotes & Accessories > Pair accessory, and then follow the on-screen instructions.
A message will be displayed when the pairing is successful.
3.3 Voice Search
You can search for videos, music or anything else on the Internet by simply using your voice. You can speak into the microphone on the remote control.
You need to pair the remote control to the TV before use voice search.
To use Voice:
1 - Press 🖼️ on remote control, the blue light on the remote control lights up and the search field opens, the microphone is active.
2 - Speak out what you are looking for with clear pronunciation. You can speak for 10 seconds before the microphone switches off. It might take some time for the results to appear.
3 - In the list of search results, you can select the item you want.
3.4 IR sensor
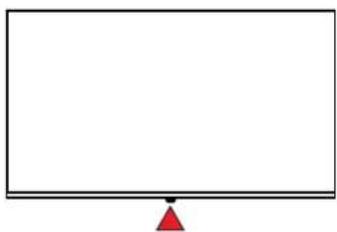
The TV can receive commands from a remote control that uses IR (infrared) to send commands. If you use such a remote control, always make sure you point the remote control at the infrared sensor on the front of the TV.
natural_image
Simple diagram of a blank rectangular frame with a red triangle at the bottom (no text or symbols)Warning
Do not put any objects in front of IR sensor of the TV, it may block the IR signal.
3.5 Batteries and Cleaning
Replace batteries
Refer to the Quick Start Guide in your product package for detailed information about the remote control batteries.
If the TV does not react on a key press on the remote control, the batteries might be empty.
To replace the batteries, open the battery compartment on the back of the remote control.
1 - Slide the battery door in the direction shown by the arrow.
2 - Replace the old batteries with new batteries. Make sure the
+ and the - ends of the batteries line up correctly.
3 - Reposition the battery door and slide it back until it clicks.
- Remove the batteries if you are not using the remote control for a long time.
- Safely dispose of your old batteries according to the end of use directions.
Cleaning
Your remote control is treated with a scratch-resistant coating. To clean the remote control, use a soft damp cloth. Never use substances such as alcohol, chemicals or household cleaners on the remote control.
4. Switching On and Off
Make sure the TV is connected to the mains AC power. The indicator light at the bottom of the TV lights up.
Switch on
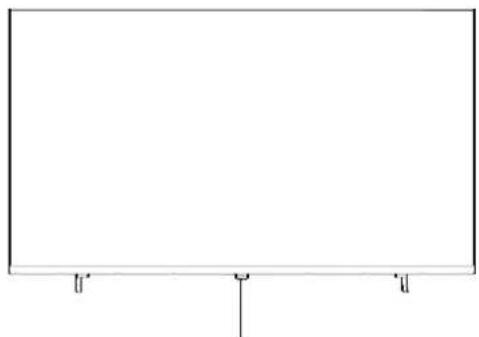
Press ⏻ Power on the remote control to switch the TV on. You can also press ⏻ key on the bottom of the TV to switch the TV on in case you can't find the remote control or its batteries are empty.
natural_image
Simple rectangular frame with three vertical tick marks at the bottom (no text or symbols)Power LED indicator and remote receiving window.
Standby: Turn the TV on or switch the TV back to standby.

natural_image
Pure diagram of a symmetrical structure with vertical supports and horizontal bars, no text or symbols present.Appearance varies by model, please refer to the actual product. Please use the remote control for more operations.
A TV in standby mode remains connected to mains power, but consumes less power.
To turn off the TV completely, unplug the power plug. When unplugging the power plug, be sure to pull up from the plug and never pull on the cable. Please ensure that the power plug, power cord and power socket of the product are easily accessible at all times.
5. Connect Devices
5.1 About Connections
This manual is shared by multiple models, the interface is slightly different, please refer to the actual
Connectivity Guide
Always connect a device to the TV with the highest quality connection available. Also, use good quality cables to ensure a good transfer of picture and sound.
When you connect a device, the TV recognizes its type and gives each device a correct type name. You can change the type name if you wish. If a correct type name for a device is set, the TV automatically switches to the ideal TV settings when you switch to this device in the Sources menu.
Network port
Data input from the Internet.
LAN transmission rate:
Supports networks with speeds less than or equal to 100/10Mbps.
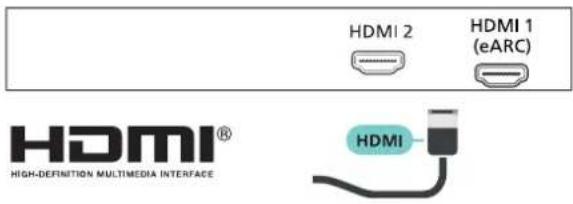
HDMI ports
HDMI Quality
An HDMI connection has the best picture and sound quality. One HDMI cable combines video and audio signals. Use an HDMI cable for High Definition (HD) TV signals.
To transmit the best signal quality, please use ultra-high speed certified HDMI cables, and the HDMI cable length should not exceed 5 meters.


HDMIeARC
Only HDMI 1 supports HDMI eARC (Audio Return Channel).
If the device, typically a Home Theatre System (HTS), soundbar or AV receiver, also has the HDMI eARC connection, connect it to HDMI 1 on this TV. With the HDMI eARC connection, you do not need to connect the extra audio cable that sends the sound of the TV picture to the HTS. The HDMI eARC connection combines both signals.
You can use any HDMI connection on this TV to connect the HTS but eARC is only available for 1 device/connection at a time.

HDMI CEC
Connect an HDMICEC-compatible device to the TV and operate it using the remote control.

The "HDMI CEC (Consumer Electronics Control)" function must be turned on on the TV and connected device.
Remark:
• HDMI CEC may not work with other brands of devices.
• The HDMI CEC function uses different names on different brands of devices. For example: Anynetv Aquos Link, Bravia Theater Sync, Kuro Link, Simplink and Viera Linko. Not all brands are fully compatible with EasyLink. The HDMI CEC brand names mentioned in the above examples are the property of their respective owners.
5.2 Home Theatre System - HTS
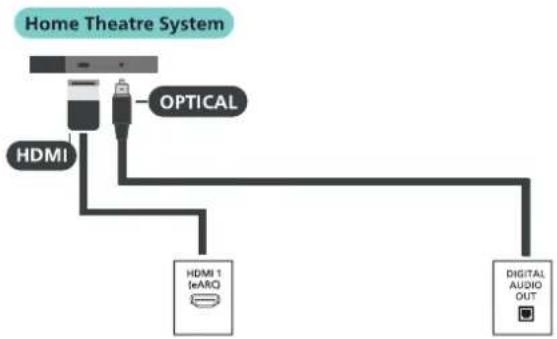
Connect using HDMI eARC
Connect your home theater (HTS) to your TV using an HDMI cable. You can use the built-in CD player connected to a Philips Soundbar or HTS.
HDMI eARC
If your home theater has an HDMI eARC connector, you can connect using the HDMI eARC connector on your TV. With HDMI eARC, you don't need to connect additional audio cables. The HDMI eARC connector combines the signals from both sides.
HDMI 1 on the TV can provide audio return channel (eARC) signals, so the TV can only send eARC signals to this HDMI connector.

Audio and video synchronization (synchronization)
If the sound doesn't match the video on the screen, you can use a disc player to set a delay on most home theaters to synchronize the sound with the video.
Connect using HDMI
Use an HDMI cable to connect your home theater (HTS) to your TV. You can use the built-in CD player to connect to a Soundbar or HTSo if the home theater system does not have an HDMI eARC connector, please attach an optical audio cable to transmit the sound from the TV screen to the home theater.
flowchart
graph TD
    A["Home Theatre System"] --> B["HDMI"]
    A --> C["OPTICAL"]
    B --> D["HDMI 1 (eARO)"]
    C --> E["DIGITAL AUDIO OUT"]
5.3. Video device
HDMI
An HDMI connection has the best picture and sound quality. For best signal quality transfer, use a High speed HDMI cable and do not use an HDMI cable longer than 5 m, and also connect devices supporting HDR on any one of HDMI connections.
5.4 AV IN
It is used for audio and video transmission between the set-top box and the TV. The connection method is to use a dedicated AV cable.

Y Yellow (video signal cable)
W White (audio left channel signal connection cable)
® Red (audio right channel signal connection cable)
5.5 Audio Device
Digital Audio Out - Optical
Audio Out - Optical is a high quality sound connection.
This optical connection can carry 5.1 audio channels. If your device, typically a Home Theatre System (HTS), has no HDMI ARC connection, you can use this connection with the Audio In-Optical connection on the HTS. The Audio Out - Optical connection sends the sound from the TV to the HTS.

Headphones
You can connect a set of headphones to the connector on the back of the TV. This connection device is a mini-jack 3.5 mm jack. You can additionally adjust the headphone volume.

5.6 USB flash drive
You can connect the USB
View photos or play music and videos on your tablet.
While the TV is on, plug the USB flash drive into one of the USB connected devices on the TV.
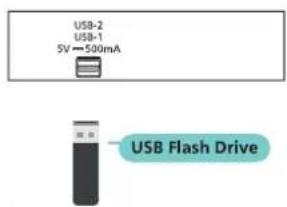
To view USB
files on the flash drive, please click 🔗 Home and select the (MediaPlayer) application icon to launch the application.
To stop viewing USB
To view the contents of the pen drive, press ← /EXIT or select another activity.
Please exit the (MediaPlayer) application before disconnecting the flash drive.
To safely remove a USB flash drive:
1-Press the ←/EXIT key and a yes/no pop-up will appear to exit the media player.
2-Select Yes and press OK.
3- Wait for the exit process to complete and then remove the pen drive.
5.7 Connecting TV
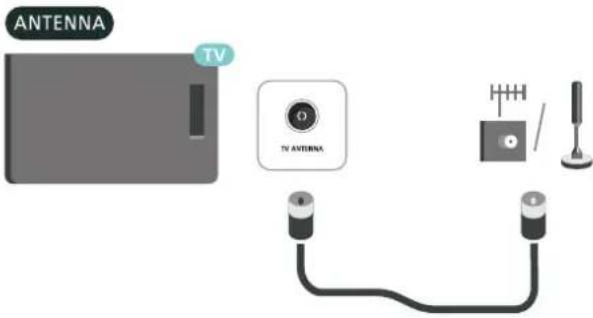
TV ANTENNA
RF (Radio Frequency or modulated signal design used as the carrier for television broadcasts.) input that connects to your Cable or VHF/UHF antenna.
Warning
When connecting outdoor antenna to signal port of the TV set, please turn off the main power switch of the TV set first. Do not approach the outdoor antenna to high voltage mains power line to avoid electric shock. The wired network antenna connected to this TV set must be isolated from the protective grounding, or else it will cause fire or other hazards.
6. Bluetooth®
6.1 What You Need
You can connect a wireless device with Bluetooth® to this TV – a wireless speaker or headphones.
To enable the TV audio on a wireless speaker, you must pair the wireless speaker with the TV. The TV can only play the sound on one speaker at a time.
Attention
Before you purchase a wireless Bluetooth* speaker system, please find out more about the newest models and look for a device with a low latency rating. Ask your dealer for advice.
Disclaimer:
Due to the transmission limitations of Bluetooth® wireless technology, a slight sound delay might occur when you hear audio from your Bluetooth® headphone or Bluetooth® speakers.
When this occur, you might see the character moving his or her mouth but there is a slight delay in spoken dialog accompany it – commonly known as lip Sync error.
6.2 Pairing a Device
Pairing accessories
The Bluetooth ^® device should be located within 5 meters of the TV. Read the device's user manual for information on pairing and wireless range of the device. Please make sure the Bluetooth ^® setting on the TV is turned on.
Once you pair a Bluetooth ^® device, you can select it to play your TV's sound. Once pairing is complete, there is no need to re-pair the device unless you remove it.
To pair a Bluetooth ^® device with the TV:
1- Turn on the power of the Bluetooth ^* device and place the device within the signal range of the TV.
2-Select Settings > Remotes & Accessories > Pair accessory.
3- Press OK, Follow the on-screen instructions.
This will pair the device with the TV and the TV will save the connection. If the maximum number of paired devices has been reached, you may need to unpair the paired devices first.
4- If necessary, press ← repeatedly to return to the previous level.
Remark:
Only one Bluetooth ^® audio output can be paired at a time. If you want to pair with another Bluetooth ^® speaker or headset, please unpair the currently installed one first.
7. Connect your Google TV
7.1 Network and Internet
Home Network
To enjoy the full capabilities of your Philips Android TV, your TV must be connected to the Internet.
Connect the TV to a home network with a high-speed Internet connection. You can connect your TV wirelessly or wired to your network router.
Connect to Network
Wireless Connection
What You Need
To connect the TV to the Internet wirelessly, you need a Wi-Fi router with a connection to the Internet. Use a high-speed (broadband) connection to the Internet.

Turn Wi-Fi On or Off
1- Settings > Network & Internet > Wi-Fi.
2-Press OK to turn on/off WiFi.
Make the Connection
Settings > Network & Internet > Wi-Fi.
1 - In the list of found networks, select on your wireless network. If your network is not in the list because the network name is hidden (you switched off the SSID broadcast of the router), select Add new network to enter the network name yourself.
2 - Follow the on-screen instruction.
3 - A message will be shown when the connection is successful.
Problems
Wireless network not found or distorted
- Microwave ovens, DECT phones or other Wi-Fi 802.11b/g/n devices in your proximity might disturb the wireless network.
• Make sure that the firewalls in your network allow access to the TV's wireless connection. - If the wireless network does not work properly in your home, try the wired network installation.
Internet does not work
- If the connection to the router is OK, check the router connection to the Internet.
The PC and Internet connection are slow
- Look in your wireless router's user manual for information on indoor range, transfer rate and other factors of signal quality.
- Use a high-speed (broadband) Internet connection for your router.
DHCP
- If the connection fails, you can check the DHCP (Dynamic Host Configuration Protocol) setting of the router. DHCP should be switched on.
Wired Connection
What You Need
To connect the TV to the Internet, you need a network router with a connection to the Internet. Use a high-speed (broadband) connection to the Internet.

flowchart
graph TD
    A["TV"] --> B["NETWORK"]
    B --> C["Router"]
    C --> D["NETWORK"]
    C --> E["INTERNET"]
Establish a connection
1 - Connect the router to the TV using a network cable (Ethernet cable**).
2- Please make sure the router is powered on.
3 - The TV will continuously search for network connections.
4 - A message will be displayed when the connection is successful.
If you cannot connect, please check the DHCP settings of the router. DHCPMust be turned on.
**To comply with EMC regulations, please use shielded FTP Cat.5E Ethernet cable.
7.2 Google Account
Sign In Google Account
To enjoy the full capabilities of your Philips Android TV, you can sign in to Google with your Google Account.
By signing in you'll be able to play your favourite games across phone, tablet and TV. You'll also get customized video and music recommendations on your TV home screen as well as access to YouTube and other apps.
Sign in to your Google account in basic mode If you didn't choose to sign in with your Google Account when you first set up your TV, your TV is currently running in basic mode. You can switch your TV to Google TV mode at any time by signing in with your Google Account. Sign in to the TV using your existing Google account. A Google account consists of a set of email addresses and a set of passwords. If you don't have a Google Account yet, create one on your computer or tablet (accounts.google.com).
Press the ⚠ Home button, select Set up Google TV, and press OK, then follow the prompts to log in.
Google account settings
You can set or view several specific settings or information about your Google Account.
You can manage your service, set content preferences, autoplay previews, hidden purchases and rentals, and make payments and purchases. Customize your Google Assistant to app-only mode, or remove this Google Account.
To turn on these settings...
1 - Log in to your Google account.
2 - Select ⚙ Settings > Accounts & Sign-in and press OK.
3 - Explore other Google account settings.
4 - If necessary, press ← repeatedly to return to the previous level.
8. Settings menu
You can set up many TV-related functions in this project, please refer to the website electronic manual for specific functions.
Press ⚙ and select ⚙ Settings, then press OK. Or on home screen, press MENU.
- Set up Google TV
- Channels & Inputs
- Display & Sound
• Network & Internet
• Accounts & Sign-in - Privacy
- Apps
- System
- Remotes & Accessories
• Help & Feedback
9. Sources
9.1 Switch to a Device
In the Input Source list, you can switch to any connected device. You can switch to the tuner to watch TV, or play files from a connected USB flash drive. You can switch to a connected device to watch the program, such as a digital receiver or Blu-ray Disc player.
To switch to a connected device:
1 - Press → SOURCES to open the sources menu.
2 - Select one of the item in the source list and press OK. The TV will show the programme or content of the device.
10. Menu(TV)
10.1 Menu operation description
Press MENU to show the main menu on the screen:
1 - Press ∧(up)/∨ (down) key to select a menu from Channels, TV Options.
2 - Press < (left)/> (right)key to select an item in the menu.
3 - Press OK key to enter the submenu.
4 - Press ∧(up)/∨ (down) key to adjust the value or setting.
5 - Press ← key to return to previous menu or exit the menu.
6 - During menu operation, the icons of invalid options are gray.
11. Time and Language
11.1 Date and Time
Settings > System > Date & Time.
11.2 Language
Change the language of TV menus and messages.
Settings > System > Language.
Select the language used to display TV menus and messages.
12. Power and Energy
Set the Power on behavior
Settings > System > Power & Energy > Power on behavior. Set the TV to stay on Google TV home screen or on Last used input when power on the TV.
13. Videos, Photos, Music
13.1 From a USB Connection
You can view your photos or play your music and videos from a connected USB flash drive.
With the TV switched on, plug in a USB flash drive to one of the USB connections.
1 - Press ⚠ Home, select Media Player from the Apps list and press OK.
2 - Use Navigation keys to select the file type.
3 - Follow the on-screen instructions to play the files.
Notice:
1 - Some non-standard USB devices may not be recognized, please replace them with standard USB devices;
2 - The streaming media system has certain restrictions on the format of each playback file. If the system limit is exceeded, the playback will fail;
3-Please do not plug or unplug USB devices during system playback, as this may cause system or device problems. Before replacing the USB device, please disconnect the power of the machine first;
4-This system supports USB 1.1 and USB 2.0 interface transmission protocols such as U disk and mobile hard disk;
5-The maximum output current of the USB interface of this machine is 500mA. When the limit is exceeded, the machine will self-protect. If the user connects an external device with a relatively large current, it is recommended to use an external power supply;
6-The local system is very complex, equivalent to a computer system, so when reading or playing files, due to factors such as USB device compatibility and stability, the screen may stop or the function may not work. Please try Shut down the machine and reinitialize the system.
During playback, press the INFO key to display the menu options, select the corresponding menu, and press the OK key to confirm the operation. Users can press the EXIT key to exit playback, or press the ▶/II/■/◄◄/► keys to perform shortcut operations
14. Netflix
If you have a Netflix membership subscription, you can enjoy Netflix on this TV. Your TV must be connected to the Internet. In your region, Netflix might only come available with future software updates.
To open Netflix, press NETFLIX on the remote control to open the Netflix App. You can open Netflix immediately from a TV in standby.
www.netflix.com
15. Amazon Prime Video
When you become an Amazon Prime member, you can access thousands of popular movies and shows, including exclusive Prime Originals.
Press the prime video key on your remote control or the app icon to open the Amazon Prime Video app. Your TV must be connected to the Internet to use the application. For more information about Amazon Prime Video, please visit www.primevideo.com.
16. Channels
16.1 Channel Scanning
Scan channels if it is the first time to use the product. Before scanning, please make sure that the antenna has been connected properly.
ATV Scanning
After selecting ATV source, press ⚙ key, and select ⚗ Settings > Channels & Inputs > Channels > Channel Scan, then press OK key to enter.
- Select Analogue Auto Scan, and press OK key, then the machine starts auto scanning.
- Select Analogue Manual Scan, and press OK key. Set Program, Audio System, Color System, Frequency, and select Start scan, then press OK key. Select Scan Up or Scan Down, and press OK key, the machine starts scanning.
DTV Scanning
After selecting Cable/Antenna source, press ⚙ key, and select ⚙ Settings > Channels & Inputs > Channels > Channel Scan > Tuner Mode > Antenna/Cable, then press ← key.
If the tuner mode is Antenna.
- Select Antenna Auto Scan, and press OK key, then the machine starts auto scanning.
- Select Antenna Manual Scan, and press OK key. Set Channel Number, Frequency(MHz), BandWidth(M), and select Start Scan, then press OK key, the machine starts scanning.
If the tuner mode is Cable.
- Select Cable Auto Scan, and press OK key. Set Scan Type, Frequency(MHz), Network ID, and select Start, then press OK key, the machine starts auto scanning.
- Select Cable Manual Scan, and press OK key. Set Channel Number, Frequency(MHz), and select Start Scan, then press OK key, the machine starts scanning.
16.2 Time Shift Option
In DTV mode, press OK key, and select Channels > Start TimeShift, then press OK key to turn on the time shift function. Press ← key to stop and exit time-shift.
When user pauses program for a short time, time-shift function can suspend and cache the playing program to U disk. When user resumes playing, the program can continue to be played.
16.3 REC Option
In DTV mode, press OK key, select Channels > Start Recording. Press OK key to select recording time, then press OK key to start recording. In the process of recording, select Channels > REC (■), then press OK key to save and exit recording.
Press OK key, then select Channels > Recorded Programs. Select the file that you want to play, and press OK key. Select Play recording, then press OK key to play it.
While playing, you can press ← key to exit playing.
Note: Only the memorizer with FAT32 file system supports the recording function. Memorizer with other file systems need to be formatted; Before formatting memorizer, please back up useful data because the content of memorizer can not recover after formatting.
17. Specifications
17.1 Environmental Protection
Product card
32"
• Power consumption in power-on mode (W): 55W
- Standby power consumption (W) ^* : ≤ 0.5 W
• Display resolution (pixels): 1366 x 768p
40"
• Power consumption in power-on mode (W): 60W
- Standby power consumption (W) ^* : ≤ 0.5 W
• Display resolution (pixels): 1920 x 1080p
*When the TV is turned off using the remote control and no functions are activated. Power consumption in full standby mode is ≤0.5 W.
It takes several minutes for the TV to enter full standby mode.
Note: If you turn on Wake On Network function, the maximum power consumption of the machine in standby mode does not exceed 1W.
Product end of use
Disposal of used products and batteries
Please take the initiative to learn about the different recycling and disposal systems for electronic and electrical products in your local area.
Please follow local regulations and do not throw away old products with general household waste. Proper disposal of old products helps avoid potential adverse effects on the environment and human health.
Please take the initiative to learn about your local regulations regarding battery recycling, as proper disposal can help avoid adverse effects on the environment and human health.
17.2 Power
Product specifications are subject to change without notice. For more specification details of this product, see www.philips.com/TVsupport.
Power
• Mains power: AC 100-240V
• Ambient temperature: 5°C to 35°C
17.3 Operating System
Android OS
17.4 TV Type
Diagonal screen size
- 80 cm / 32 inch
• 100 cm / 40 inch
TV resolution
• 1366×768 / 32 inch
• 1920×1080 / 40 inch
17.5 TV Input Resolution
Supported Video only resolution
Resolution — Refresh rate
• 1080i - 50Hz,60Hz
Supported Computer/Video resolution
Resolution — Refresh rate
- 720p - 50Hz,60Hz
• 1920 x 1080p,60Hz
17.6 Connectivity
TV Side
- USB 1/USB 2
• TV ANTENNA
• Headphones: Stereo mini-jack 3.5 male screw jack
• HDMI 1 input: eARC
- HDMI 2
• AV IN
• Digital audio output: optical fiber
• LAN: RJ45 (NETWORK)
17.7 Sound
Output power (RMS): 32"/40": 6W+6W
• Dolby Audio
17.8 Multimedia
Connections
- USB 2.0
- Ethernet LAN RJ-45
• Wi-Fi 802.11ac, dual band - Bluetooth® 5.0
Supported USB file systems
- FAT32
Playback formats:
• Video Codecs: MPEG1, MPEG2, MPEG4, H.264, HEVC/H.265, VP8, VP9, AV1
• Audio Codecs: MPEG1/2 Layer1, MPEG1/2 Layer2, MPEG1/2 Layer3, AC3, HEAAC
• Image Codecs: JPEG, PNG, BMP, GIF, Webp
- Subtitles Formats Support: SRT, SMI, SSA, SUB, ASS, TXT
18. Help and Support
18.1. Register your TV
Go to www.philips.com/TVsupport to register your TV and enjoy many benefits, including full support (including file downloads), Get early access to new product news, exclusive offers and discounts, the chance to win prizes, and even the opportunity to participate in special surveys about new product releases.
18.2 Troubleshooting
Switch On and Remote Control
The TV does not switch on
- Disconnect the power cable from the power outlet. Wait for one minute then reconnect it.
• Make sure that the power cable is securely connected.
Creaking sound at startup or switch off
When you are switching the TV on, off or to standby, you hear a creaking sound from the TV chassis. The creaking sound is due to the normal expansion and contraction of the TV as it cools and warms up. This does not affect performance.
TV does not respond to the remote control
The TV requires some time to start up. During this time, the TV does not respond to the remote control or TV controls. This is normal behaviour.
If the TV continues to be unresponsive to the remote control, you can check if the remote control is working by means of a mobile phone camera. Put the phone in camera mode and point the remote control to the camera lens. If you press any key on the remote control and you notice the infra-red LED flicker
through the camera, the remote control is working. The TV needs to be checked.
If you do not notice the flickering, the remote control might be broken or its batteries are low.
This method of checking the remote control is not possible with remote controls which are wirelessly paired with the TV.
The standby light keeps flashing
Please unplug the power cord from the electrical outlet. Wait 5 minutes before reconnecting the power cord. If flickering still occurs, please contact Philips TV Customer Care Center.
Picture
No picture/distorted picture
- Please make sure you select the correct device as the TV input source.
- Please confirm that the external device or input source is connected correctly.
There is sound but no picture
- Change to another video source, then switch back to the current source, then restore the picture style in the "Picture" settings.
The picture quality transmitted by the device is poor
- Make sure the device is connected correctly. If applicable, make sure the device's output video is set to the highest resolution.
Image does not fit the screen size
- Please change to another aspect ratio.
- Change the aspect ratio to original.
The screen position is incorrect
- The picture signal sent by some devices may not match the screen size. Please check the signal output of the connected device.
- Change the aspect ratio to automatic.
Computer screen is unstable
Please make sure your computer uses a supported resolution and update/refresh rate.
Sound
No sound or poor sound quality
If no audio signal is detected, the TV automatically switches the audio output off — this does not indicate malfunction.
• Make sure that the sound settings are correctly set.
• Make sure that all cables are properly connected.
• Make sure that the volume is not muted or set to zero.
• Make sure that the TV audio output is connected to the audio input on the Home Theatre System.
Sound should be heard from the HTS speakers.
- Some devices may require you to manually enable HDMI audio output. If HDMI audio is already enabled, but you still do not hear audio, try changing the digital audio format of the device to PCM (Pulse Code Modulation). Refer to the documentation accompanying your device for instructions.
HDMI and USB
HDMI
- Please note that HDCP (High-bandwidth Digital Content Protection) support will take more time for the TV to display content from HDMI devices.
- If the TV cannot recognize the HDMI device and no picture is displayed, switch the input source to another device and then switch back.
- If the picture and sound of a device connected to HDMI is distorted, please connect the device to another HDMI port on the TV and restart the source device.
- If intermittent sound interruption occurs, please confirm that the output setting of the HDMI device is correct.
- If you are using an HDMI to DVI adapter or HDMI to DVI cable, please make sure there is an additional audio cable connected to the AUDIO IN (mini-jack jack only), if available.
Volume icon not showing
- If you use the TV remote control to adjust the device volume after connecting an HDMI-CEC audio device, this is normal.
Photos, videos and music from USB device not showing
- Make sure the USB storage device is configured to be compatible with the "Large Storage Class" as described in the storage device's documentation.
- Please confirm that the USB storage device is compatible with the TV.
- Please confirm that the TV supports the relevant audio and video file formats.
USB file playback is not smooth
- The file transfer performance of the USB storage device may limit the data transfer rate to the TV, resulting in erratic playback.
Network
Wi-Fi network not found or distorted
- Microwave ovens, DECT phones or other Wi-Fi 802.11b/g/n devices in your proximity might disturb the wireless network.
• Make sure that the firewalls in your network allow access to the TV's wireless connection.
- If the wireless network does not work properly in your home, try the wired network installation.
Internet does not work
- If the connection to the router is OK, check the router connection to the Internet.
• Refer to your wireless router's user manual for information on indoor range, transmission speed, and other factors that affect reception quality.
The PC and Internet connection are slow
DHCP
- If the connection fails, you can check the DHCP (Dynamic Host Configuration Protocol) setting of the router. DHCP should be switched on.
Bluetooth®
Unable to pair
Confirm that the device is in pairing mode. Please refer to the device's user manual.
- Wireless speakers should be as close as possible to the TV. Trying to pair multiple devices to the TV at the same time may not be successful.
Bluetooth®
Disconnected
- Wireless speakers should always be located within 5 meters of the TV.
Bluetooth®
Audio and video synchronization
- Before purchasing a wireless Bluetooth* speaker, please confirm the quality of its audio and video synchronization (commonly known as "mouth synchronization"). Not all Bluetooth* devices work correctly. Please consult your dealer for advice.
18.3 Online Help
Go to www.philips.com/TVsupport to solve any Philips TV related problem, you can consult our online support. You can select your language and enter your product model number. On the support site you can find your country's telephone number to contact us as well as answers to frequently asked questions (FAQs). In some countries, you can chat with one of our collaborators and ask your question directly or send a question by email.
18.4 Support and Repair
For support and repair, call the Consumer Care hotline in your country. Our service engineers will take care of a repair, if necessary.
Find the telephone number in the printed documentation that came with the TV.
Or consult our website www.philips.com/TVsupport and select your country if needed.
TV model number and serial number
You might be asked to provide the TV product model number and serial number. Find these numbers on the packaging label or on the type label on the back or bottom of the TV.
Warning
Do not attempt to repair the TV yourself. This may cause severe injury, irreparable damage to your TV or void your warranty.
19. Safety and Care
19.1 Safety
Important
Read and understand all safety instructions before you use the TV. If damage is caused by failure to follow instructions, the warranty does not apply.
Risk of Electric Shock or Fire
- Never expose the TV to rain or water. Never place liquid containers, such as vases, near the TV.
If liquids are spilt on or into the TV, disconnect the TV from the power outlet immediately.
Contact Philips TV Consumer Care to have the TV checked before use.
- Never expose the TV, remote control or batteries to excessive heat. Never place them near burning candles, naked flames or other heat sources, including direct sunlight.
- Never insert objects into the ventilation slots or other openings on the TV.
- Never place heavy objects on the power cord.
- Avoid force coming onto power plugs. Loose power plugs can cause arcing or fire. Ensure that no strain is exerted on the power cord when you swivel the TV screen.
- To disconnect the TV from the mains power, the power plug of the TV must be disconnected. When disconnecting the power, always pull the power plug, never the cord. Ensure that you have full access to the power plug, power cord and outlet socket at all times.
Risk of Injury or Damage to the TV
- Two people are required to lift and carry a TV that weighs more than 25 kg or 55 lbs.
- If you mount the TV on a stand, only use the supplied stand. Secure the stand to the TV tightly.
Place the TV on a flat, level surface that can support the weight of the TV and the stand.
- When wall mounted, ensure that the wall mount can safely bear the weight of the TV set. TP Vision bears no responsibility for improper wall mounting that results in accident, injury or damage.
- Parts of this product are made of glass. Handle with care to avoid injury or damage.
Risk of damage to the TV!
Before you connect the TV to the power outlet, ensure that the power voltage matches the value printed on the back of the TV. Never connect the TV to the power outlet if the voltage is different.
Stability Hazards
This product is designed and intended for consumers and personal use in a domestic home environment, unless agreed otherwise with the manufacturer in writing. Failure to follow this recommendation or the instructions provided in the product user manual and the product supportive documentation can cause damage to the product and will void the warranty for such cases.
A television set may fall, causing serious personal injury or death. Many injuries, particularly to children, can be avoided by taking simple precautions such as:
- ALWAYS ensure the television set is not overhanging the edge of the supporting furniture.
- ALWAYS use cabinets or stands or mounting methods recommended by the manufacturer of the television set.
- ALWAYS use furniture that can safely support the television set.
- ALWAYS educate children about the dangers of climbing on furniture to reach the television set or its controls.
- ALWAYS route cords and cables connected to your television so they cannot be tripped over, pulled or grabbed.
- NEVER place a television set in an unstable location.
- NEVER place the television set on tall furniture (for example, cupboards or bookcases) without anchoring both the furniture and the television set to a suitable support.
- NEVER place the television set on cloth or other materials that may be located between the television set and supporting furniture.
- NEVER place items that might tempt children to climb, such as toys and remote controls, on the top of the television or furniture on which the television is placed.
If the existing television set is going to be retained and relocated, the same considerations as above should be applied.
Risk of Batteries
- Do not ingest the battery. Chemical burn hazard.
- The remote control may contain a coin/button cell battery. If the coin/button cell battery is swallowed, it can cause severe internal burns in just 2 hours and can lead to death.
- Keep new and used batteries away from children.
- If the battery compartment does not close securely, stop using the product and keep it away from children.
- If you think batteries might have been swallowed or placed inside any part of the body, seek immediatemedical attention.
- Risk of fire or explosion if the battery is replaced by an incorrect type.
- Replacement of a battery with an incorrect type that can defeat a safeguard (for example, in the case of some lithium battery types).
-
Disposal of a battery into fire or a hot oven, or mechanically crushing or cutting of a battery, that can result in an explosion.
-
Leaving a battery in an extremely high temperature surrounding environment that can result in an explosion or the leakage of flammable liquid or gas.
- A battery subjected to extremely low air pressure that may result in an explosion or the leakage of flammable liquid or gas.
Risk of Overheating
Never install the TV in a confined space. Always leave a space of at least 10 cm or 4 inches around the TV for ventilation. Ensure curtains or other objects never cover the ventilation slots on the TV.
Risk of Hearing Damage
Avoid using earphones or headphones at high volumes or for prolonged periods of time.
Low Temperatures
If the TV is transported in temperatures below 5°C or 41°F, unpack the TV and wait until the TV temperature reaches room temperature before connecting the TV to the power outlet.
Humidity
In rare occasions, depending on temperature and humidity, minor condensation can occur on the inside of the TV glass front (on some models). To prevent this, do not expose the TV to direct sunlight, heat or extreme humidity. If condensation occurs, it will disappear spontaneously while the TV is playing for a few hours.
The condensation moisture will not harm the TV or cause malfunction.
19.2 Screen Care
- Never touch, push, rub or strike the screen with any object.
- Unplug the TV before cleaning.
- Clean the TV and frame with a soft damp cloth and wipe gently. Avoid touching the Ambilight® LEDs on the backside of the TV. Never use substances such as alcohol, chemicals or household cleaners on the TV.
• To avoid deformations and colour fading, wipe off water drops as quickly as possible. - Avoid stationary images as much as possible. Stationary images are images that remain onscreen for extended periods of time. Stationary images include onscreen menus, black bars, time displays, etc. If you must use stationary images, reduce screen contrast and brightness to avoid screen damage.
20. Terms of Use
2024 © TP Vision Europe B.V. All rights reserved. This product was brought to the market by TP Vision
Europe B.V. or one of its affiliates, hereinafter referred to as TP Vision, which is the manufacturer of the product. TP Vision is the warrantor in relation to the TV with which this booklet was packaged. Philips and the Philips Shield Emblem are registered trademarks of Koninklijke Philips N.V.
Specifications are subject to change without notice. Trademarks are the property of Koninklijke Philips N.V or their respective owners. TP Vision reserves the right to change products at any time without being obliged to adjust earlier supplies accordingly.
The written material packaged with the TV and the manual stored in the memory of the TV or downloaded from the Philips website www.philips.com/TVsupport are believed to be adequate for the intended use of the system.
The material in this manual is believed adequate for the intended use of the system. If the product, or its individual modules or procedures, are used for purposes other than those specified herein, confirmation of their validity and suitability must be obtained. TP Vision warrants that the material itself does not infringe any United States patents. No further warranty is expressed or implied. TP Vision cannot be held responsible neither for any errors in the content of this document nor for any problems as a result of the content in this document.
Errors reported to Philips will be adapted and published on the Philips support website as soon as possible.
Terms of warranty - Risk of injury, damage to TV or void of warranty!
Never attempt to repair the TV yourself. Use the TV and accessories only as intended by the manufacturer. The caution sign printed on the back of the TV indicates risk of electric shock. Never remove the TV cover. Always contact Philips TV Customer Care for service or repairs. Find the telephone number in the printed documentation that came with the TV. Or consult our website www.philips.com/TVsupport and select your country if needed. Any operation expressly prohibited in this manual, or any adjustments and assembly procedures not recommended or authorised in this manual, shall void the warranty.
Pixel characteristics
This TV product has a high number of colour pixels. Although it has effective pixels of 99.999% or more, black dots or bright points of light (red, green or blue) may appear constantly on the screen. This is a structural property of the display (within common industry standards) and is not a malfunction.
Therefore, please note this is not subjected to repair, exchange or refund within and/or out of the warranty period.
Backlight characteristics
All Philips TV have gone through stringent tests and checks before shipping to you. You can be rest assured that we place the quality of our TVs the utmost importance so that you do not suffer any viewing displeasure while watching your TV. However, please note that backlight bleeding ("Mura effect") and /or unevenness of background light that can only be observed in dark images or in a very dark and dim room are considered to be within TV specifications. Such occurrences do not represent a deterioration nor shall be regarded as a defect of the TV. Hence, we regret that claims of this nature for warranty, free of charge service, replacement or refund cannot be accepted within and/or out of the warranty period.
TP Vision is committed to developing, producing and marketing products that cause no adverse health effects. TP Vision confirms that, as long as its products are handled properly for their intended use, they are safe to use according to scientific evidence available today. TP Vision plays an active role in the development of international safety standards, enabling TP Vision to anticipate further developments in standardisation for early integration in its products.
21. Environment (Shop mode)
Settings > System > Television > Environment > Home/Shop
22. Copyrights
22.1 Google TV
Google TV is the name of this device's software experience and a trademark of Google LLC.
Google, YouTube and other marks are trademarks of Google LLC.

Google TV
22.2 HDMI
The terms HDMI, HDMI High-Definition Multimedia Interface, HDMI Trade dress and the HDMI Logos are trademarks or registered trademarks of HDMI Licensing Administrator, Inc.

HIGH-DEFINITION MULTIMEDIA INTERFACE
22.3 HEVC Advance
Covered by one or more claims of the HEVC patents listed at patentlist.accessadvance.com.
Future proof with advanced HEVC decoding

Advance™
Covered by patents at patentlist.accessadvance.com
22.4 Dolby
Dolby
AUDIO
Manufactured under license from Dolby Laboratories. Dolby,
Dolby Audio, and the double-D symbol are registered trademarks of Dolby Laboratories Licensing Corporation.
22.5 Other Trademarks
All other registered and unregistered trademarks are the property of their respective owners.
23. Disclaimer
Services and/or software offered by third parties may be changed, suspended, or terminated without prior notice. TP Vision does not bear any responsibility in these sorts of situations.

All registered and unregistered trademarks are property of their respective owners.
Specifications are subject to change without notice.
Philips and the Philips Shield Emblem are registered trademarks of Koninklijke Philips N.V. and are used under license.
This product has been manufactured and is sold under the responsibility of TP Vision Europe B.V., and TP Vision Europe B.V. is the warrantor in relation to this product.
2024© TP Vision Europe B.V. All rights reserved.
www.philips.com/welcome


- PHILIPS
- User Manual
- Content
- Home Screen 3
- Setting Up 4
- Remote Control 5
- Switching On and Off 7
- Connect Devices 8
- Bluetooth ® 10
- Connect your Google TV 11
- Settings menu 13
- Sources 13
- Menu(TV) 13
- Time and Language 13
- Power and Energy 13
- Videos, Photos, Music 14
- Netflix 14
- Amazon Prime Video 14
- Channels 14
- Specifications 15
- Help and Support 16
- Safety and Care 18
- Terms of Use 20
- Environment(Shop mode) 20
- Copyrights 21
- Disclaimer 21
- Home Screen
- Introduction
- Highlights on your home screen
- Favourite Apps
- Tour guide
- Explore personalized recommendations
- Get recommendations through Google
- Dashboard and Settings
- Dashboard
- Google TV and Basic TV
- Functional differences
- Open the home screen
- Setting Up
- Read the Safety Instructions
- TV Stand and Wall Mounting
- TV Stand
- Wall Mounting
- Caution
- Power Cable
- Remote Control
- Key Overview
- Pair Your Remote Control to TV
- Voice Search
- IR sensor
- Batteries and Cleaning
- Cleaning
- Switching On and Off
- Connect Devices
- About Connections
- Connectivity Guide
- Network port
- HDMI ports
- Home Theatre System - HTS
- Connect using HDMI eARC
- Connect using HDMI
- Video device
- HDMI
- AV IN
- Audio Device
- Digital Audio Out - Optical
- Headphones
- USB flash drive
- Connecting TV
- Bluetooth®
- What You Need
- Pairing a Device
- Pairing accessories
- Connect your Google TV
- Network and Internet
- Home Network
- Connect to Network
- Problems
- Google Account
- Sign In Google Account
- Google account settings
- Settings menu
- Sources
- Switch to a Device
- Menu(TV)
- Menu operation description
- Time and Language
- Date and Time
- Language
- Power and Energy
- Videos, Photos, Music
- From a USB Connection
- Notice:
- Netflix
- Amazon Prime Video
- Channels
- Channel Scanning
- ATV Scanning
- DTV Scanning
- Time Shift Option
- REC Option
- Specifications
- Environmental Protection
- Product card
- Product end of use
- Power
- Operating System
- TV Type
- TV Input Resolution
- Connectivity
- Sound
- Multimedia
- Help and Support
- Register your TV
- Troubleshooting
- Picture
- Sound
- HDMI and USB
- Network
- DHCP
- Bluetooth®
- Unable to pair
- Disconnected
- Audio and video synchronization
- Online Help
- Support and Repair
- Warning
- Safety and Care
- Safety
- Important
- Risk of Electric Shock or Fire
- Risk of Injury or Damage to the TV
- Stability Hazards
- Risk of Batteries
- Risk of Overheating
- Risk of Hearing Damage
- Low Temperatures
- Humidity
- Screen Care
- Terms of Use
- Environment (Shop mode)
- Copyrights
- Google TV
- Google TV
- HDMI
- HEVC Advance
- Advance™
- Dolby
- Dolby
- Other Trademarks
- Disclaimer
Mærke : PHILIPS
Model : 40PFT6529
Kategori : Fjernsyn