SM4T - Højttaler Bogen - Gratis brugsanvisning og manual
Find enhedens vejledning gratis SM4T Bogen i PDF-format.

Brugerspørgsmål om SM4T Bogen
0 spørgsmål om dette apparat. Besvar dem du kender, eller stil dit eget.
Stil et nyt spørgsmål om dette apparat
Download vejledningen til din Højttaler i PDF-format gratis! Find din vejledning SM4T - Bogen og tag din elektroniske enhed tilbage i hånden. På denne side er alle dokumenter nødvendige for brugen af din enhed offentliggjort. SM4T af mærket Bogen.
BRUGSANVISNING SM4T Bogen
Easy Install® Speaker Models SM1EZ and SM4T
Speaker Layout
CEILING VIEW

text_image
A = Ceiling height Start B = 2 x Ceiling height Row 1 A B Row 2 B Row 3 speakers repeat odd row / even row pattern as needed to fill roomThe layout of the speakers should be planned before installation begins. Layout starts in one corner of the room. The first speaker should be positioned from each wall a distance approximately equal to the ceiling height of the room.
The next speaker in row 1 should be spaced a distance approximately equal to twice the height of the ceiling. Each additional speaker in the row should use this same spacing.
Row 2 starts at twice the ceiling height distance from row 1 and twice the ceiling height from the wall. The other speakers in this row are also spaced at twice the ceiling height.
Row 3 is again spaced at twice the ceiling height from the previous row. The first speaker starting this row is positioned at one ceiling height distance from the wall (similar to row 1).
Continue this pattern of alternating rows until the room is covered.
Because of the wide sound dispersion characteristic of the SM1EZ and SM4T, exact placement is not critical. The spacing of the speakers can be adjusted so that the speakers are evenly spaced in a row.
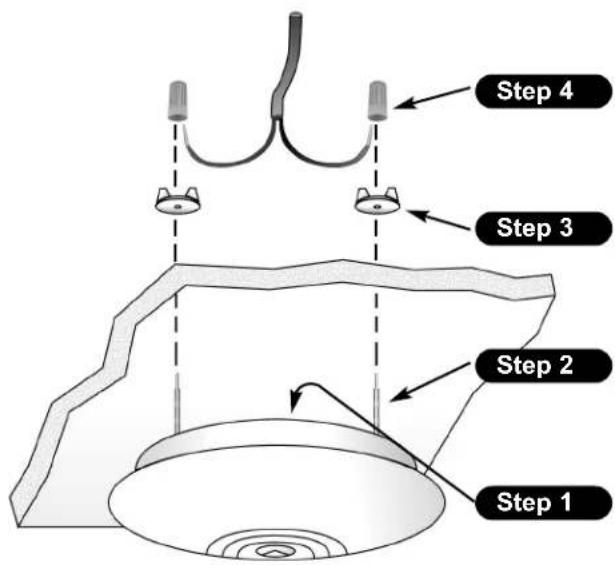
Speaker Installation
text_image
Step 4 Step 3 Step 2 Step 1BOGEN®
COMMUNICATIONS, INC.
50 Spring Street, Ramsey, NJ 07446, U.S.A.
Tel. 201-934-8500, Fax: 201-934-9832
www.bogen.com
STEP 1 - Select amplifier system voltage, 25V or 70V, using the jumper on the circuit board end, opposite the transformer.
STEP 2 - Position the speaker on the ceiling tile and slowly push the speaker, forcing the studs through the ceiling tile.
NOTE: When using the SM4T model, set the rotary switch to the correct wattage tap for the application before mounting the speaker. Check the back of the SM4T box for the tap settings chart.
STEP 3 - Clean any loose debris or conductive foil from around the studs. Spin the wide-based wing nuts (supplied) down the stud. Tighten the wing nuts until they are very snug (finger tighten only - no tools required). Check that the speaker is drawn tight to the ceiling tile. Fiberglass sleeves (supplied) should be placed over the studs at this point to insulate the exposed portion of the stud as a safety precaution.
STEP 4 - The electrical connections are made to the studs with the wire nuts (supplied). The studs are color-coded to allow proper phasing.
Suggested amplifier connections are:
COPPER stud - 70V/25V HOT
NICKEL stud - 70V/25V COMMON
Nylon wire ties (supplied) can be used to secure the speaker wires to the studs if desired. (Nylon wire ties should wrap around the fiberglass sleeve.)
The speaker will also work perfectly well with these connections reversed. However, it is important to be consistent in the wiring of the speakers in the system. If adjacent speakers have reversed wiring connections, they will tend to cancel each other's bass response, diminishing the sound quality.
Warranty
Bogen's Easy Install® Speakers are warranted to be free from defects in material or workmanship for three (3) years from the date of sale to the original purchaser. Any part of the product covered by this warranty that, with normal installation and use, becomes defective will be repaired or replaced by Bogen, at our option, provided the product is shipped insured and prepaid to: Bogen Factory Service Department, 50 Spring Street, Ramsey, NJ 07446, USA. The product will be returned to you freight prepaid. This warranty does not extend to any of our products that have been subjected to abuse, misuse, improper storage, neglect, accident, improper installation or have been modified or repaired or altered in any manner whatsoever, or where the serial number or date code has been removed or defaced.
THE FOREGOING LIMITED WARRANTY IS BOGEN'S SOLE AND EXCLUSIVE WARRANTY AND THE PURCHASER'S SOLE AND EXCLUSIVE REMEDY. BOGEN MAKES NO OTHER WARRANTIES OF ANY KIND, EITHER EXPRESS OR IMPLIED, AND ALL IMPLIED WARRANTIES OF MERCHANTABILITY OR FITNESS FOR A PARTICULAR PURPOSE ARE HEREBY DISCLAIMED AND EXCLUDED TO THE MAXIMUM EXTENT ALLOWABLE BY LAW. Bogen's liability arising out of the manufacture, sale or supplying of products or their use or disposition, whether based upon warranty, contract, tort or otherwise, shall be limited to the price of the product. In no event shall Bogen be liable for special, incidental or consequential damages (including, but not limited to, loss of profits, loss of data or loss of use damages) arising out of the manufacture, sale or supplying of products, even if Bogen has been advised of the possibility of such damages or losses. Some States do not allow the exclusion or limitation of incidental or consequential damages, so the above limitation or exclusion may not apply to you. This warranty gives you specific legal rights, and you may also have other rights which vary from State to State.
Products that are out of warranty will also be repaired by the Bogen Factory Service Department -- same address as above or call 201-934-8500. The parts and labor involved in these repairs are warranted for 90 days when repaired by the Bogen Factory Service Department. All shipping charges in addition to parts and labor charges will be at the owner's expense. All returns require a Return Authorization number.
08/10/2004
