All-In-One Advanced Bottle and Pouch Warmer - Flaskevarmer Tommee Tippee - Gratis brugsanvisning og manual
Find enhedens vejledning gratis All-In-One Advanced Bottle and Pouch Warmer Tommee Tippee i PDF-format.

Brugerspørgsmål om All-In-One Advanced Bottle and Pouch Warmer Tommee Tippee
0 spørgsmål om dette apparat. Besvar dem du kender, eller stil dit eget.
Stil et nyt spørgsmål om dette apparat
Download vejledningen til din Flaskevarmer i PDF-format gratis! Find din vejledning All-In-One Advanced Bottle and Pouch Warmer - Tommee Tippee og tag din elektroniske enhed tilbage i hånden. På denne side er alle dokumenter nødvendige for brugen af din enhed offentliggjort. All-In-One Advanced Bottle and Pouch Warmer af mærket Tommee Tippee.
BRUGSANVISNING All-In-One Advanced Bottle and Pouch Warmer Tommee Tippee

Mayborn (UK) Limited, Balliol Business Park, Newcastle upon Tyne, NE12 8EW, UK
Copyright © Mayborn (UK) Limited 2018. Made in China.
Model number: 1151. Voltage: 220-240V\~50-60Hz 550-650 W.

Any questions? Visit our website tommeetippee.com


heat after use. Allow to cool before cleaning. When in use the steriliser contains hot water and steam, Keep hands and arms away from steam vents as it can cause burns and scalds. Use in a well ventilated area. Do not operate any appliance with a damaged cord or plug or after the appliance malfunctions a damaged cord or plug or after the appliance malfunctions a well ventilated area. Do not operate any appliance with a damaged cord or plug or after the appliance malfunctions a well ventilated area. Do not operate any appliance with a damaged cord or plug or after the appliance malfunctions a well ventilated area. Do not operate any appliance with a damaged cord or plug or after the appliance malfunctions a well ventilated area. Do not operate any appliance with a damaged cord or plug or after the appliance malfunctions a well ventilated area. Do not operate any appliance with a damaged cord of surface. Do not move appliance when in use. Do not let the cord hang over the edge of the kitchen work surface or touch hot surfaces. The product has been avoided a hazard. Always use on a flat, dry heat resistant kitchen work top surface. Do not move appliance when in use. Do not let the cord hang over the edge of the kitchen work surface or touch hot surfaces. The product has been avoided a hazard. Always use on a flat, dry heat resistant kitchen work top surface. Do not move appliance when in use. Do not let the cord hang over the edge of the kitchen work surface or touch hot surfaces. The product has been avoided a hazard. Always use on a flat, dry heat resistant kitchen work top surface and does not use any accessories other than those supplied with this appliance. The cord must exit the cable tidy using the exit recess. If the cord is correctly placed in the tidy product will sit level. Do not start using the product if it is not sitting level. Regularly check the cord and plug for signs of damage, if visible remove from use immediately. This appliance is intended to be used in households and similar applications such as: staff kitchen areas in shops, offices and other working environments; farm houses by clients in hotels, motels and other residential types

electric steam steriliser
INSTRUCTIONS FOR USE
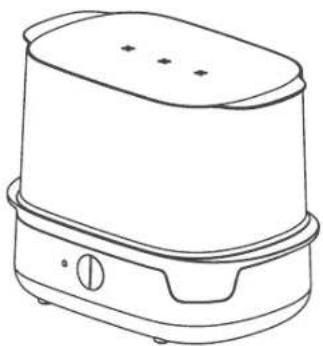
natural_image
Line drawing of a portable electric heater with control buttons (no text or symbols)
Please read and keep these instructions 0423221/423222
IMPORTANT WARNINGS! These instructions can also be found at www:tommeetippee.com Keep this instruction sheet for future reference as it includes important information. This application is intended for household use only. Do not time ensure that the voltage is comparable with your electricity supply by checking the label on the base of the unit. Ensure water has been added to the unit before switching the unit on. Do not immerse in water. To protect against fire, electric shock and injury to persons do not immerse cord, plugs or other parts of the unit in water or other liquid. Misuse of the product may result in the risk of fire, electric shock and/or personal injury. Do not put base with plug into the dishwasher. This apppliance shall not be used by children. Keep the application and its cord out of reach of children. This application is not intended for use by persons (including children) with reduced physical, sensory or mental capabilities, or lack of experience and knowledge, unless they have been given supervision or instruction concerning the use of the application by a person danger associated with operating electrical appliances. Never allow children to use this application. User maintenance other than cleaning and descaling is not required for this product. Cleaning and user maintenance shall not be made by children. The surfaces will get hot during use. 335
SET UP
CLEAN YOUR STERILISER BEFORE FIRST USE - Refer to parts guide and diagram
- Do not connect to power at this stage.
- Remove all items from inside the steriliser base.
- Pour exactly 80ml of water into the steriliser base
- Assemble the lower tray (A) with logo front facing and upper tray (B) and place in the steriliser base.
- Add the lid.
- Connect the lead and plug into the mains supply. Switch on at mains supply.
- Press the play switch and it will light up amber to show the sterilising has begun.
- The light will switch off when sterilising has finished.
- Allow to cool for 5 minutes before turning off at the mains, removing the plug and steriliser lid.
- Remove upper tray and lower tray, pour away any remaining water and wipe dry. Your steriliser is now ready to use.
This steriliser is designed for use with Tommee Tippee bottles and feeding accessories (except bottle brush). The steriliser will hold a maximum of 6 Tommee Tippee bottles or a combination of fewer bottles plus soothers and breast pump parts.
PARTS GUIDE
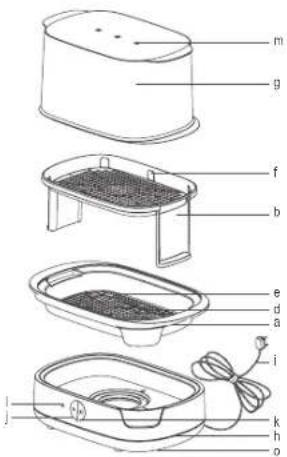
a. Removable lower tray
b. Removable upper tray
c. Drying rack (parts a+b) with sterile surface
d. Locator for tommee tippee bottle neck
e. Locator for tommee tippee anti-colic valve (for
use if sterilising advanced anti-colic bottle)
1. Locator for bottle hood
g. Ltd
h. Steriliser base
1. Lead with plug
j. Power button (play)
k. Stop button
1. Sterilising indicator light
m. Steam vents
n. 80ml measurement on Tommee Tippee bottle
o. Cable tidy
CLEANING
Unplug and allow to cool before cleaning. After each use pour away remaining water from the steriliser base by tipping the steriliser sideways over a sink and wipe clean with a damp cloth only. Do not clean with abrasive cleaners or allow to come into contact with solvents or harsh chemicals, damage could result.
DE-SCALING
The frequency of de-scaling should be as follows:
Hard water: 14 days
Medium: 21
Soft: 28
You can find out your water quality via your water provider. FAQs and a picture of limescale can be found on our website. After each use pour away remaining water from the unit base by tipping the unit sideways over a sink and wipe with a damp cloth only. Unplug the unit and allow to cool before cleaning. A build up of limescale can negatively affect the performance of the unit. We recommend carrying out the descaling process as per above frequency guidelines to ensure the unit continues to work efficiently. Living in a hard water area can produce limescale quicker than other areas therefore descaling is required sooner. Use a descaler that is suitable for use with stainless steel and use as per the manufacturer's guidelines. Alternatively you can use white vinegar or a descaling sachet to descale your unit, please use as per manufacturer's guidelines. Where no method is slated, 1 sachet to 200ml of hot water ratio can be applied. See our website for detailed descaling method. Once you have descaled then follow instructions under set up to perform a final cleaning cycle. DO NOT use metal objects or scourers to clean your unit. DO NOT use bleach or sterilising fluid to clean the unit. DO NOT use abrasive or anti-bacterial materials. DO NOT scrub the heat plate.
TROUBLESHOOTING
Steriliser will not work
Check the mains lead is plugged into the unit and the mains socket is switched on. Check the fuse is in the plug (in a UK plug only). Check the socket by plugging in another appliance. Check the appliance by plugging into another socket.
Excessive steam
Check that items are correctly loaded in steriliser. Use exactly 80ml
Bottles come out with a chalky mark
Steriliser needs descaling. Refer to Cleaning Instructions.
Cycle takes too long to complete
Too much water in steriliser. Use exactly 80ml.
INFORMATION ON THE DISPOSAL FOR WASTE ELECTRICAL & ELECTRONIC EQUIPMENT (WEEE)
This symbol on the products and accompanying documents means that used electrical and electronic products should not be mixed with general household waste. For proper disposal for treatment, recovery and recycling, please take these products to designated collection points where they will be accepted on a free of charge basis. In some countries you may be able to return your products to your local retailer upon the purchase of a new product. Disposing of this product correctly will help you save valuable resources and prevent any possible effects on human health and the environment, which could otherwise arise from inappropriate waste handling. Please contact your local authority for further details of your nearest collection point for WEEE.
Penalties may be applicable for the incorrect disposal of this product in accordance with national legislation. The product is fitted with a BS 1363 mains plug containing a fuse. If it ever becomes necessary to replace the fuse, only use fuses that are marked BS 1362, and rated at 5A. In the unlikely event that this plug is not suitable for the sockets in your home, it should be removed and a suitable plug fitted as follows: The wires of the mains lead are coloured in accordance with the following code: GREEN AND YELLOW – EARTH
BLUE - NEUTRAL
BROWN-LIVE
As these colours may not correspond with the coloured markings sometimes used to identify the terminals in the plug, connect as follows.
The wire coloured GREEN AND YELLOW must be connected to the terminal marked E or by the earth symbol or coloured GREEN or GREEN AND YELLOW. The wire coloured BLUE must be connected to the terminal marked N or coloured BLACK. The wire coloured BROWN must be connected to the terminal marked L or coloured RED.
If you are in any doubt about how to wire a plug or replace a fuse safely, consult a qualified electrician.
USAGE
Before sterilisation, wash all bottles and feeding accessories in warm soapy water or in a dishwasher (top rack only) to remove any milk residues. Separate all components for washing and reassemble teat and screw ring for sterilising.
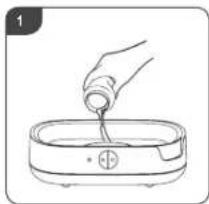
natural_image
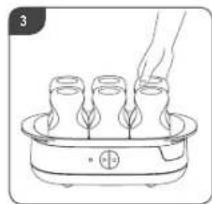
Line drawing of a hand pouring liquid into a small bowl (no text or symbols)- Place on a flat, heat resistant work surface. Pour exactly 80ml of water into the steriliser base. Your Tommee Tippee bottles have a handy 80ml measure.
natural_image
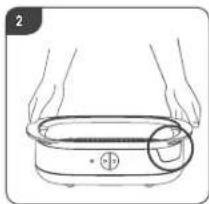
Line drawing of hands holding a cylindrical object with a button, no text or symbols present- Assemble lower tray into the steriliser base with logo facing forwards on the right hand side.
natural_image
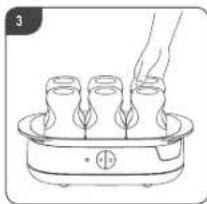
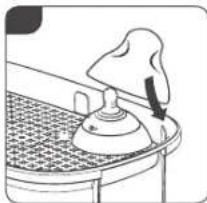
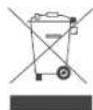
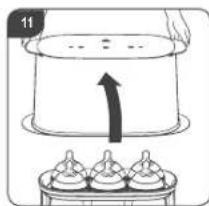
Line drawing of a hand placing a leafy plant into a pot on a steamer (no text or symbols)- Place the bottles neck downwards into the locators of the removable tray. This includes locators for advanced anti-colic valves.
natural_image
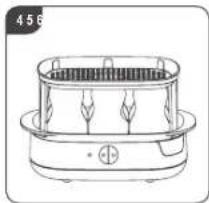
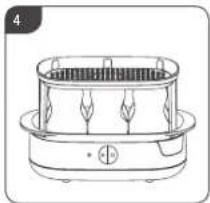
Line drawing of a portable heater with three blades and a side-mounted base (no text or symbols)- Place the upper tray onto the lower tray.
natural_image
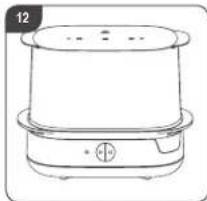
Line drawing of a portable electric stove with three cooling fans (no text or symbols)- Place the assembled teat and screw ring onto the upper tray. It is important not to have the hoods fitted onto the teat and screw ring.
natural_image
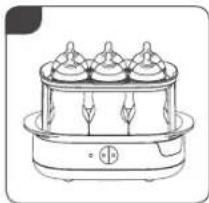
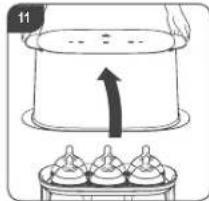
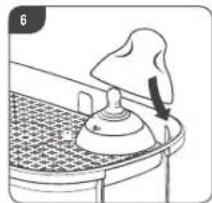
Line drawing of a kitchen sink with a tool, showing a bowl and tray (no text or symbols)- Slot the hoods into the hood locators of the removable upper tray so that they hang over the teat and screw ring but are not fully assembled.
natural_image
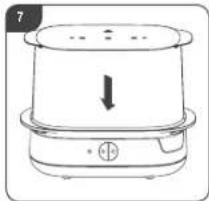
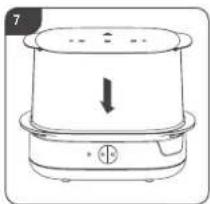
Line drawing of a steamer with a downward arrow indicating compression or cooling process (no text or symbols)- Place the lid onto the steriliser base and plug the lead into the mains power.
natural_image
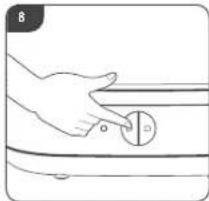
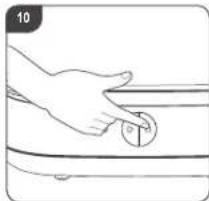
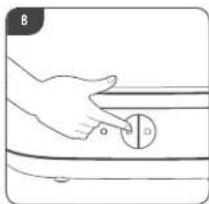
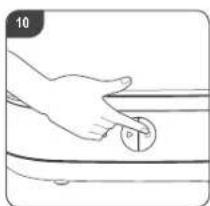
Hand holding a circular button with a small square, no text or symbols visible- Press the play button to start the machine. An amber light will come on. This shows that the steriliser is in its warm up phase and will automatically begin the sterilising phase when the appropriate temperature is reached.
natural_image
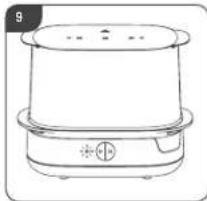
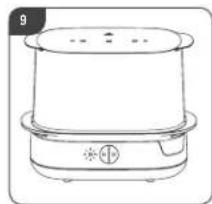
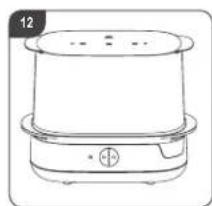
Line drawing of a portable electric heater with lid and control panel (no text or symbols)- The light will automatically switch off when the sterilising phase has finished.
natural_image
Illustration of a hand holding a circular object with an arrow, next to a curved surface (no text or symbols)- The stop button is there in case you need to manually stop your steriliser mid cycle. If you do this you will have to restart the sterilising process from the beginning as the contents will not be sterilised.
- After the cycle has finished allow to cool for at least 5 minutes before opening the steriliser. We recommend that you hold the lid by the two side handles, lift vertically until you have cleared the upper tray then tilt the lid to an angle away from you to allow the water to drain.
natural_image
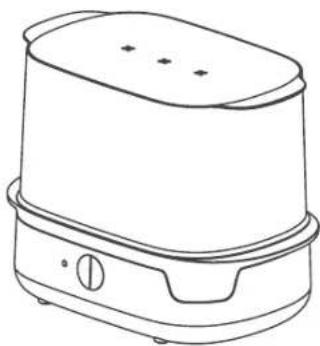
Line drawing of a portable appliance with lid and base (no text or symbols)- The contents will remain sterile for 24 hours if the steriliser is unopened.
natural_image
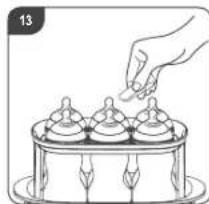
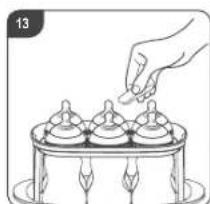
Illustration of a hand placing small objects onto a cake with decorative flutes (no text or symbols)- Wash your hands thoroughly before handling sterilised items. Take care as the items may be hot. Remove the sterilised items. The teal longs can be used to remove the small items.
natural_image
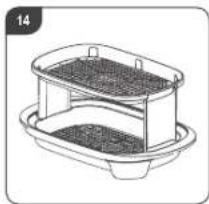
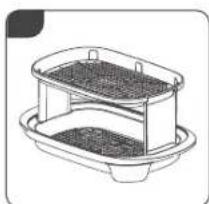
Line drawing of a two-tiered container or basin with mesh patterns (no text or symbols)- The trays can be used separately as a drying rack or sterile surface.
natural_image
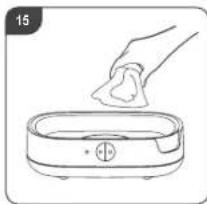
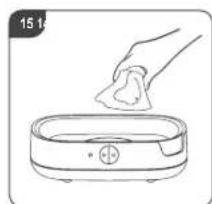
Line drawing of a hand cleaning a small appliance with a cloth (no text or symbols)- To help in the reduction of limescale, ensure that the unit is drained and wiped after use once fully cooled.
WARNINGS
MORE THAN 80ML OF WATER IN THE STERILISER BASE WILL PROLONG THE CYCLE TIME. LESS THAN 80ML MAY NOT STERILISE ITEMS PROPERLY. DURING STERILISATION HOT STEAM PASSES THROUGH THE VENTS AT THE TOP OF THE UNIT. POSITION THIS UNIT AWAY FROM WALLS AND MAKE SURE IT IS NOT UNDERNEATH ANY OVERHANGING SHELVES OR CABINETS. DO NOT OPEN THE STERILISER UNTIL THE LIGHT HAS SWITCHED OFF, OR YOU HAVE PRESSED THE STOP BUTTON AND WAITED 5 MINUTES TO ALLOW FOR COOLING.

Maybom (UK) Limited,
Balliol Business Park.
Newcastle upon Tyne,
NE12 8EW, UK
Copyright © Mayborn (UK) Limited 2018.
Made in China.
Model number: 1151. Voltage: 220-240V\~50-60Hz 550-650 W.

Any questions?
Visit our website
tommeetippee.com


The source image contains no legible text or symbols. According to Rule 4 (Edge Noise Strategy), since the ground truth is not clearly visible, the OCR should output nothing.
Therefore, the corrected OCR text is:
```text [No text detected]
^1 ^2 ^3 ^4
1
الله بُمْنَّة
- ترطع مزهان نامن بولسی ۶۰۰۱۵۰۴۲۹۸۳۰۱۶۲۱۶۲۱۶۲۱۶۲۱۶۲۱۶۲۱۶۲۱۶۲۱۶۲۱۶۲۱۶۲۱۶۲۱۶۲۱۶۲۱۶۲۱۶۲۱۶۲۱۷
K. K and K. K and K. K and K. K and K. K and K. K and K. K and M .
-
-
-
-
-
-
-
-
-
-
-
-
-
-
-
-
-
-
-
-
-
-
-
-
-
-
-
-
-
-
-
-
-
-
-
-
-
-
-
-
-
-
-
-
-
-
-
-
-
-
-
-
-
-
-
-
-
-
-
-
-
-
-
-
-
-
-
-
-
-
-
- 801.
-
-
-
-
-
-
-
-
-
-
-
-
-
-
-
-
-
-
-
-
-
-
-
-
-
-
-
-
-
-
-
-
-
-
-
-
-
-
-
-
-
-
-
-
-
-
-
-
-
-
-
-
-
-
-
-
-
-
-
-
-
-
-
-
-
-
-
-
-
-

^2 Φ, Φ, Φ, Φ, Φ, Φ, Φ, Φ, Φ, Φ, Φ, Φ, Φ, Φ, Φ, Φ, Φ, Φ, Φ, Φ, Φ, Φ, Φ, Φ, Φ, Φ, Φ, Φ, Φ, Φ, Φ, Φ, Φ, Φ,
^1
1
الله بعربية
^1 ^2 ^3 ^4
(###)
-
-
-
-
-
-
-
-
-
-
-
-
-
-
-
-
-
-
-
-
-
-
-
-
-
-
-
-
-
-
-
-
-
-
-
-
-
-
-
-
-
-
-
-
-
-
-
-
-
-
-
-
-
-
-
-
-
-
-
-
-
-
-
-
-
-
-
-
-
-
-
-
-
-
-
-
-
-
- 80.
-
-
-
-
-
-
-
-
-
-
-
-
-
-
-
-
-
-
-
-
-
-
-
-
-
-
-
-
-
-
-
-
-
-
-
-
-
-
-
-
-
-
-
-
-
-
-
-
-
-
-
-
-
-
-
-
-
-
-
-
-
-
-
-
-
-
-
-
-
-
-
-
-
-
-
-
-
a^2 | m^2 | ^2 | h^2 | g^2 | d^2 | a^2 | c^2 | ^2 | e^2 | f^2 | g^2 | h^2 | i^2 | j^2 | k^2 | l^2 | m^2 | n^2 | o^2 | p^2 | q^2 | r^2 | s^2 | s^2 | s^2 | s^2 | s^2 | s^2 | s^2 | s^2 | s^2 | s
( \text{الله بعربية مُهْمَرْدَةٍ ٥٣٤٠٢٠١٠٠٠٠٠٠٠٠٠٠٠٠٠٠٠٠٠٠٠٠٠٠٠٠٠٠٠٠٠٠٠٠٠٠٠٠٠٠٠٠٠٠٠٠٠٠٠٠٠٠١
###
^1 ι. 10. 11. 12. 13. 14. 15. 16. 17. 18. 19. 20. 21. 22. 23. 24. 25. 26. 27. 28. 29. 30. 31. 32. 33. 34. 35. 36. 37. 38. 39. 40. 41. 42. 43. 44. 45. 46. 47. 48. 49. 50. 51. 52. 53. 54. 55. 56. 57. 58. 59. 60. 61. 62. 63. 64. 65. 66. 67. 68. 69. 70. 71. 72. 73. 74. 75. 76. 77. 78. 79. 80. 81. 82. 83. 84. 85. 86. 87. 88. 89. 90. 91. 92. 93. 94. 95. 96. 97. 98. 99.
15270161857, 8 453516157016157016
^1
###
1237 1238 1239 1240 1241 1242 1243 1244 1245 1246 1247 1248 1249 1250
الله بابع مُمْرَّهِ وَلَّدَّهُ مُمْرَّهِ وَلَّدَّهُ مُمْرَّهِ وَلَّدَّهُ مُمْرَّهِ وَلَّدَّهُ مُمْرَّهِ وَلَّدَّهُ مُمْرَّهِ وَلَّدَّهُ مُمْمَرْتُ وَلَّدَّهُ مُمْمَرْتُ وَلَّدَّهُ مُمْمَرْتُ وَلَّدَّهُ مُمْمَرْتُ وَلَّدَّهُ مُمْمَرْتُ وَلَّدَّهُ مُمْمَرْتٍ وَلَّدَّهُ مُمْمَرْتٍ وَلَّدَّهُ مُمْمَرْتٍ وَلَّدَّهُ مُمْمَرْتٍ وَلَّدَّهُ مُمْمَرْتٍ وَلَّدَّهُ مُمْمٍ
སྒྱི་འཁོང་དགྱི་སྟན་རྒྱི་བཅིག་འཁོང་ཆུང་སྟན་རྒྱི་བཅིག་འཁོང་ཆུང་སྟན་རྒྱི་བཅིག་འཁོང་ཆུང་སྟན་རྒྱི་བཅིག་འཁོང་ཆུང།
1
www.tommeetippee.com
^1 ^2 ^3
tommee tippee
جهاز الت-Timeم بالبخار الكهربائي
تعليمات الاستخدام
natural_image
Line drawing of a portable electric heater with control buttons (no text or symbols)
يرجى قراءة هذه التعليمات والاحتفاظ بها
0423221/423222
175? 176? 177? 178? 179?
-
-
-
-
-
-
-
-
-
-
-
-
-
-
-
-
-
-
-
-
-
-
-
-
-
-
-
-
-
-
-
-
-
-
-
-
-
-
-
-
-
-
-
-
-
-
-
-
-
-
-
-
-
-
-
-
-
-
-
-
-
-
-
-
-
-
-
-
-
-
-
-
-
-
-
-
-
-
- 80.
-
-
-
-
-
-
-
-
-
-
-
-
-
-
-
-
-
-
-
-
-
-
-
-
-
-
-
-
-
-
-
-
-
-
-
-
-
-
-
-
-
-
-
-
-
-
-
-
-
-
-
-
-
-
-
-
-
-
-
-
-
-
-
-
-
-
-
-
-
-
-
-
-
-
-
-
-
1567
^1 ^2 ^3 ^4
-
-
-
-
-
-
-
-
-
-
-
-
-
-
-
-
-
-
-
-
-
-
-
-
-
-
-
-
-
-
-
-
-
-
-
-
-
-
-
-
-
-
-
-
-
-
-
-
-
-
-
-
-
-
-
-
-
-
-
-
-
-
-
-
-
-
-
-
-
- 71.
-
-
-
-
-
-
-
-
-
-
-
-
-
-
-
-
-
-
-
-
-
-
-
-
-
-
-
-
-
-
-
-
-
-
-
-
-
-
-
-
-
-
-
-
-
-
-
-
-
-
-
-
-
-
-
-
-
-
-
-
-
-
-
-
-
-
-
-
1
الله بُمْرَّهِ مُسْتَّةٍ وَلَّدَّةٍ
الله بُمْرَّهِمٍ مُحْتَدَّهِمٍ مُحْتَدَّهِمٍ مُحْتَدَّهِمٍ مُحْتَدَّهِمٍ مُحْتَدَّهِمٍ مُحْتَدَّهِمٍ مُحْتَدَّهِمٍ مُحْتَدَ’
( \text{الله بعربية مزهان نم عَلَّدِهُ مَرْبَةٍ وَمَنْتَهُ مَرْبَةٍ مَرْبَةٍ مَرْبَةٍ مَرْبَةٍ مَرْبَةٍ مَرْبَةٍ مَرْبَةٍ مَرْبَةٍ مَرْبَةٍ مَرْبَةٍ مَرْبَةٍ مَرْبَةٍ
^1 ^2 ^3 ^4
དང་ནིང་དང་སྐད་པའིག་རྒྱལ་བཅིན
18742 17753. 61795. 9660 7740 7740 7740 7740
16
-
-
-
-
-
-
-
-
-
-
-
- 6.
-
-
-
-
-
-
-
-
-
-
1
( \text{الله بعربية مُمْنَدِيَةٍ مُهُرْتَّبُهُ عَلَّىٍ وَمَّلَّةٍ مُهُرْتَّبُهُ عَلَّىٍ وَمَّلَّةٍ مُهُرْتَّبُهُ عَلَّىٍ وَمَّلَّةٍ مُهُرْتَّبُهُ عَلَّىٍ وَمَّلَّةٍ
^1 ^2 ^3 ^4 ^5 ^6 ^7 ^8 ^9 ^10 ^11 ^12 ^13 ^14 ^15 ^16 ^17 ^18 ^19 ^20 ^21 ^22 ^23 ^24 ^25 ^26 ^27 ^28 ^29 ^30 ^31 ^32 ^33 ^34 ^35 ^36 ^37 ^38 ^39 ^40
15.10.15.16.17.18.19.20.21.22.23.24.25.26.27.28.29.30.31.32.33.34.35.36.37.38.39.40.41.42.43.44.45.46.47.48.49.50.51.52.53.54.55.56.57.58.59.60.61.62.63.64.65.66.67.68.69.70.71.72.73.74.75.76.77.78.79.80.81.82.83.84.85.86.87.88.89.90.91.92.93.94.95.96.97.98.99.100
^1 ^2 ^3 ^4 ^5 ^6 ^7 ^8
نظفي جهاز الت-Timeم الخاس بك قبل أول استخدام - يرجى الإعلاع على دليل الأجزاء والرسم التخطيطى
لا توصلى الجباز بالكيرbeans في هذه المرحلة 1
2 أخرحي جميع العناصر من داخل فاعدة جهز التعميم
4: كير الرف (أ)俯ظ محانّ : لشعارARRYطالأماس، وأعل الرف (اب) وضجيه في قاعدة حياز التقدم
5 ضعى الغطاء
وصلى الملك ب_ADDR النباز الكهربئي، وMSGلي مصر النبار الرنبر
1 7
اضغطي على ذر التشفيل وسوف بتحول لونه إلى الветقالي لإطهار أن التعليم قدADA
هُبناطفي الضوء عندما كنتهي دورة التُعقيم
9 اتركيه لبigerد لمدة 5 دقتق قبل اي climates النشغيل من مصر النيار الرئيس، واسحيى المفيس وغطاء جهاز التعقييم
10
أخرجي/pdf العني والرف السطى واسكي المياء loئيفية تم امسحها! جهاز التعيم الخاصة بك حاوز الأن للاستخدام
ضّ مم جهاز الت Phillies هذا للاستخدام مع رضّّ اعات كومي كيبى وملحقات التكنية (باستثماء فرشاة الرضّّ إólica). وبستوع جهاز
لتعفيم 6 رضّدً، عات نرجمي تيبي كحد الفضى أو مجموعة من الرضاعات ذات السعة الفنية بالاضافة إلى أجزاء
الهات و镨خة الذي
دليل الأجزاء
أ. رف سطي قابل للاز الـة
ب. رف علوي قابل لناز الـة
ج. رف تجيفف (الأخزاء + ب) مزرد يسطح التعبيم
د. محمد نضود عنق رضّة عات كومي تيبي
م. محمدNUMBER المضاد المقصى من نومي تيبي
(الاستخدام في حالة tighterر رضّة عات المضادية للقصى
(العَمْتَكُدِمَة)
و- معدد عطاء الرضاعة
ز - اغطاء
ح- قاعدة جهاز التعميم
ط- التوصيل بالثيار الرئيس
(شعيل) ي- زر التشغيل
ك-زر التوف
ل- ضوء مؤشر التقيم
م- فتحات البخار
ن- مفیاس 80 مل على رض، اعامة توصی تبی
و-يكرة الملك
الفصلي العقىس الكهرباني وتركي الجهاز تيRED قيل التنظيف. اسكلى المياد المستغية من التذّ خانFixed كل Consumption عن طريق خان على الحوض ونتظيف بقطعة قماث مبalledة قطر. Undا نتظيفات بالynnظات الكاشطة أو السماح بالتناسى مع العنيфик أو قبّل المد
المراد الكيمياتية المركزة، فقد ي Authentic عنها تلف الجهاز
إزالة الترسيبات
بَنْبُغِي تکرَار عملية أَزَائَة الترسيك وَلَقْاً لَا إِمَا بَلِي
لماء العسر - 14 yo
الماء المتوسط - 21-jω
الماعير:28 يُنْ
يمكّك معرفة نوعية المياء الخاصة يك
عن طريق مزود المربه. Sesكن الاطلاع على الأستلة الشتعة وصورة من الترمينات
على موفقا على شبكة الإنت Balt. تشكى المياء Selbstفية من قاعدةIrحدة بعد كل استخدام عن طريق قلب جهاز التعبيم على
الحوض ومسحه يقطعة فضال مبلاة ققط لفصل الوحدة من التيار الكيرباني و اتركيلها تفرد قبل التنظيف،WMIKل أن ياتر
نر اكم الترسيت سليّ
ا على أداء الوحدة لذا علنا نوصي بنتفيد عملية ازالة الترسيت وطُ
اتوجيبات التكرار المكتورة أعلاه
لضمان استمرار عمل الوحدة بكفادة. يمكن أن يودي الع rely في منطقة ذات ماء عشر إلى كراكم الترسيات لسرع من المحاطق
الأخرى، ذلك يجب إزالة الترسيك في أفرب وفت. واستخدمي أداة منلسبة لازالة الترسيك مصنوعة من العولان المقالو م樽ام لتصداً
واستخدامها وفقً : لتوğiهات الشركة الصينعة. وبدلا من ذلك، يمكن لاتخدام الخل الأبيض لو كيس إزالة الترسيبات لازالة
الترسيكت من على الوحدة، ويرحي ابعاع توحيات Starbucks المصنعة و عنما لاد نكر أي طريقة، يمعتك تطبيق كيس إزالة
فرسبيك واحد على 200 مل من لسبة الماء السaxon، وراجعي موفعنا على الانترعت لمعرف طربقة ازالة الترسبات بالتقصيل
وفرر ازاله الترسيبكت، ابعي соответствات الواردة في قم الحضبط لتقيد دورة التضيف التهلاية. لا إستخدمى ادرات معدئيه أر
إسغجات التنظيف الوحدة. ولا تستخى مواك الت Dy騒ض أو سال التعيم时不ظيف الوحدة. لا *" المواد الكلاطة أو المضكة
للكتيريا. لا نفركي لزحة الطاقة الحRARية
الإستعمال الأخطاء و اصداحها
لن يعمل جهاز التعقيم
تحفى من أن الوحدة متصلة بالثبار الكهربائي الرئيس ومفس thiyar الكهربقي قيد الت-Shغيل. وتحفى من أن قاطع التباز متصل
بلكهرباء (في المغيس الثالثى الخاصة بالملكة المتحدة فقط). وتحقى من أن الم Expected قديكون متصل بجهاز أخرى. وتحقى من
أنihanز مُصل بقبر اخر
البخار الزائد
تحقى من تعبئة العاصر في جهار الت Phillies بشكل Session، اس-employedي 80 مل بالضبط
تأني الرضّ ععت بعلامة طباشيرية
الإستعمال الحرفية لاز Vietnamese الترسيحات. يزجى ال kilograms لل Estimates التنظيف
تُنْتَرِقِ الْدُورَةِ وَكُّاٍ طُوِيلًاَجَدٍ إِلَكْمَالِها
الKEYIR من الماء في حيال التعقيم استخدمي 80 مل باضبظ
المعلومات المتتGFة ب Patientمن من تفانيات المعدات الكهربانية والإلكترونية
يُهَا الرمر الموجود على المنتجات والثائق المرفقة أن المتتجات الكربائية والإلكرونية المستخدمة يجب عدم خاطها مع的なقيات الم赞زية العامة وغرض التخصص السليم وال Thompson مع的なقيات واستعاتها و footage تعر Herba، برجى أخد هذه المنتجات
إلى نقط نсобيع معينة حيث يثم قيولها مجالً . . . وفي ب Objects البذان، قد تمكلي من إجادة ملتجلك إلى يالع التجزنة المحلي لديك
عَدْ مُرَاء٥ مِلَّجْ جَدِيد
وسيساعك التخلس من هذا المنج بطرية صحيحة على نوفير الموارد القيمة ومنع أي الار محctlة على صحة الإنسان والبيلة،
وَلَّي يُمْكَ لَى نُشَأَ عَن مِعَلَجَة الْتَفَابِات بِطَرِيَةً غَير مِلَائَمَةً لَدَا يَرْجِي الْاتُصَالِ بِالُسْلَّةِ الْمُحِبَةً للْحُصُولِ عَلَى مَرِيْزِ مِن
التفاصيل عن أقرب نقطة لتجميع نفابات المعدات الكهربادية والإلكترونية
ط Winning العFeedات على التخلص غير السليم من هذا الم ---------- وقَلْلتشريعتات الوطنية
وبحتوي على قاطع تبaryl. exponentially من الصروري استندال القراطع: BS 1363
ققطوبفرة 5 أمير. في الحالات غير الظ حتملة واشني لا يكون فيها هذا BS 1362
أ ل UE منزك، يجب إز الله وتوصل مفس منسب كما يلي
لون اسلك الشير الكيرباني الرئيسية وفق اللمز التالي
الخصر والامع - ارطى
الازرق - محيد
الباني - كهرباء
ل typرّ : « الأَنْ هَدَهُ الْأَوَانِ قَدٍ لَا تُواقْمَ مِعَ الْعَلَامِاتُ الْمُولِيَةُ الْتَيْيَّ دُ مُشْمِدْ أَحْبِدُ : لَتَحَدَيدُ الْأَطْرَفُ المُوْجِرَدَةُ فِيِ الْمُضِسِ، لَثَا يَرْجِي
الترصل على الن shr الثاني
أو يارمز الأرصى أو يال Tennis E يجب أن يكون الملك التلون بالführen الأخصر والأصفر منผลงาน بالطرف الذي يحل علامة
أو بالون الأسود. N الأخضر أو بالون الأخضر والأقص، وجب wires PKه المذون بالون الأزرق يلطرف الذي يعمل علامة
أو باللون الأحمر L و inhib توصيل الملك المлонن باللون البني بالطرف الذي يعمل علامة
أي شك بشان كيلية توصبيل المغس أو امتبadal القاطع بطريفة امنة، برجي استثارة فني كهرباني مؤهل إذا كان لديك
ل Estimates، ملcheckات التغنية دلماسد الذافقة، الصين، أو في، عسيلة联合国، (الرفي العلوي، ققط)
لازالة أي يفنية للحلب. لصلىي حمع المكونات لغمل وإعادة تجmeg LinkedInة وحلقة المسمار تعليمها
natural_image
Line drawing of a hand placing a leafy plant into a pot (no text or symbols)3 ضعى restrictive إعت للاقل في
مcludes الرف القبل لازالة. وتشمل
المحندات هذه على الصامات
المضادة لل despص المتقدمة

natural_image
Line drawing of hands holding a cylindrical object with a circular detail (no text or symbols)رکیل الرف السفي وضعيه على 2
قاعدة جهاز التعتيم محادئاً لشعار
الشربط موحة للامام على الجاب
الابين
natural_image
Line drawing of a hand pouring liquid into a small appliance (no text or symbols)1 ضعي الجهاز على سطح مسطح
وMexico للحرارة: إسكي 80 mill
العربية بال yards في قاعدة جهاز التعميم.
تُمُنْع رَهِذَّ، إِعَات تُومي نَبِي الخَاسَة بِك
يمقين سهل الاستخدام 80 من
natural_image
Line drawing of a mechanical device with a handle and base plate (no text or symbols)أدخلي الأغطبة في محدودات غطاء
الرف العوي القابل لإزالة بحث تُحلق
حلمة الرضّة : اعامة وحلقة المسمار ولكن لا
تُجمع بشکل کامل

natural_image
Line drawing of a portable steamer with three cooling fans and a base (no text or symbols)ضعي حلمة الرضاعة المجموعة رحلقة
المسمر فوق/pdf العوي. ومن
الأهمة بمکال عدم تركيب اعلبة على
حلمة الرضّ إعاة و Drinkingة المسمار
natural_image
Line drawing of a portable toaster with cooling fans and a heat sink (no text or symbols)5 ضعي لزف العلوي فرق/pdf المعلى 4
natural_image
Line drawing of a portable steamer with lid and control panel (no text or symbols)9 مبندPFي العسو تلقالىت Timestampا كنكى
مرحلة الت Talيم
natural_image
Hand holding a circular button on a surface, no text or symbols visible8 خضطى على زر التخ竞价 لبده كشغير
الجهاز وسبضيella الضوء البرتقالى.
ويدل على أن جهاز التعقيم في مرحلة
الشخين وسيدا مرحلة التعقيم
للكاني : احتما يصل إلى درجة الحرازة
العربية
natural_image
Line drawing of a portable heater with a downward arrow indicating cooling (no text or symbols)7 ضعي للغطاء برق قاعدة جياز
التحيم ورصلي الملك بال_ADDR
الرئيس للكهرباء
natural_image
Line drawing of a portable steamer with lid and control panel (no text or symbols)إذا ترك جهاز التعميم مقالً، د. فستظ
محتويات م Coconutة لندة نصل إلى
24
- بعد انتهاه武器، اتركها ت parties تمدة
5 دستوق على الأقل قبل فتح جイヤز
ال tangيم. ولوصيكبامساك الغطاء
بالمقابض الموجودة على الجائبين،
فعه عموني احتى تخيفالرف
العُلوي ثم اسمكى القضاء يزاوية
منده بعیه oncِجَتَى نَمْكَنَى من
نعریح دمپاه.
natural_image
Illustration of a hand holding a circular object with labeled parts (a, b, c) on a surface, no text or symbols present.10
إي recipients دورة التحيم يدويها في
متقفها. عند عمل ذلك، سيتعير
عليفعادة تشفيل عملية التoxicيم من
البدأ lần المحوبات إن تكون مُعفمة
natural_image
Line drawing of a hand cleaning a small appliance with a cloth (no text or symbols)للمساعة في الحد من تراكم الترسيات، ذلكي من تقويف الوحدة وسعها بعد استخدامها حال تبريدها يَالكَامْل
natural_image
Line drawing of a two-tiered container or basin with mesh patterns (no text or symbols)ليمكن استخدام الأرief بشكل منفصل
كحلل تجief أر سطح مع Demand
natural_image
Illustration of a hand placing a small object into a cake with three round domes (no text or symbols)13 إغملي يديك جين ١ قمل التعمل مع
العناصر المّ حُمَةِ وتوخى الحفر إذا
أن العصر市场需求 ماخنة، وأzielى
العناصر العقمة،WMيمكن استخدام
ملنقط الحلمة إزالة العلاصر الصغيرة
تحذیرات
وضع أكثر من 80 مل من المياد في قاعدة جهاز التoseconds سيعمل على اطثة مدة الدورة. ووضع كمية أجل من 80 مل إن يعقم
المواد بشكل صحيع. يbreر البخار الساضل لنئاء عملية الت-Timeم من خلال الفتحة الموجدة في الجزء规程ي من الوحدةGW,
ضعي هذا الوحدة بعديً ١ عن الحدران و BREAK من عدم وجردها تحت أي رفوف أو خزانت مكذلية. ولا نقصى حهار التعليم حتى
تعملى الإضاء، أو اسغطي على زر الإبitaف وانطري سدة 5 نقلق حتى تyperد