
SB-DXMQ-8X2 - Ekstern harddisk Sabrent - Gratis brugsanvisning og manual
Find enhedens vejledning gratis SB-DXMQ-8X2 Sabrent i PDF-format.


Brugerspørgsmål om SB-DXMQ-8X2 Sabrent
0 spørgsmål om dette apparat. Besvar dem du kender, eller stil dit eget.
Stil et nyt spørgsmål om dette apparat
Download vejledningen til din Ekstern harddisk i PDF-format gratis! Find din vejledning SB-DXMQ-8X2 - Sabrent og tag din elektroniske enhed tilbage i hånden. På denne side er alle dokumenter nødvendige for brugen af din enhed offentliggjort. SB-DXMQ-8X2 af mærket Sabrent.
BRUGSANVISNING SB-DXMQ-8X2 Sabrent
ROCKET XTRM-Q 16TB EXTERNAL ALUMINUM SSD

natural_image
3D rendering of a black rectangular electronic device labeled 'SABREN' with visible ports and a circular logo on top (no text beyond branding)INTRODUCTION
Your Sabrent SB-DXMQ-8X2 is a Thunderbolt™ 3 dual-disk external drive. This means that it contains two separate 8 TB disks inside, totaling 16 TB of external storage space. You have the option of using them as two independent disks, or you can combine them via software to form one single disk (on either macOS or Windows operating systems).
WARNING: It is NOT recommended to combine disks if you plan to use this device with different computers. This is because every time you connect the unit to a different computer, the operating system will force you to "IMPORT FOREIGN DISKS" from inside the Disk Management application.
FEATURES
• Automatically detects Thunderbolt™ 3 connection
• Solid aluminum construction for durability and maximum heat dissipation
- Integrated temperature and health monitoring system
- Plug & Play
SYSTEM REQUIREMENTS
- Windows / Mac
PACKAGE CONTENTS

natural_image
Line drawing of a white electronic device with a circular logo on top, labeled '1' in corner (no text or symbols on body)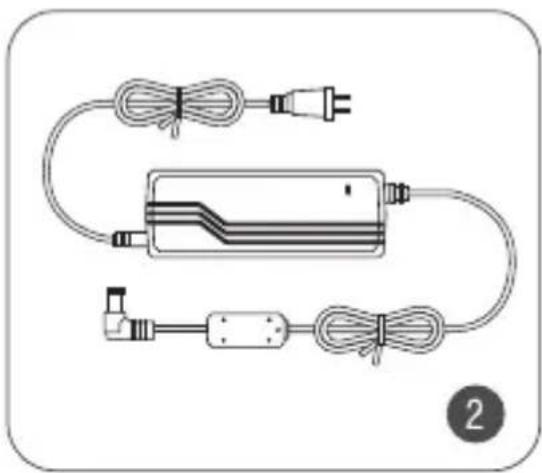
natural_image
Diagram of a medical or electrical device with coiled wires and connectors, no visible text or symbols
natural_image
Diagram of two U-shaped connectors with lightning bolts and a numbered circle (no text or symbols on the connectors)
natural_image
Simple line drawing of a document with two horizontal lines, no text or symbols present- Sabrent Thunderbolt™ 3 NVMe Dual-Disk Drive.
- 110\~240V AC to 20V DC power adaptor.
- Thunderbolt™ 3 cable.
- This quick user guide.
CONNECTING FOR THE FIRST TIME VIA THUNDERBOLT™ 3
- Connect your Sabrent external device to your computer.
- Connect the AC-DC power adaptor to the back your Sabrent device.
- Push the power button on the back of the unit to turn it on.
- Make sure to confirm your computer's port has the Thunderbolt 3 logo, otherwise it will likely be a standard USB 3 Type-C port and this device will not work.
- When using any Thunderbolt 3 device for the first time, your operating system might need you to approve the connection. If this is the case, select "Always Connect" and click "OK". You can alternatively select "Ask Every Time" if you need to do so for security reasons.
Approve Thunderbolt™ Devices
The following Thunderbolt™ device chain has been plugged into Port 2 and one or more devices require your permission to connect to this system.
Select the devices you wish to connect:
Sabrent External NVMe SSD
Always Connect
Note: Selecting "Do Not Connect" will prevent that device and all devices further down the chain from being used on the system. Install the driver included with the device before approving the device.
OK
HOW TO ACHIEVE MAXIMUM WRITING SPEEDS
- On your keyboard, press the Windows key + X. Once the menu appears, open the "Device Manager"

- Highlight and right-click on your recently installed Rocket XTRM-Q. From the context menu, select "Properties".

- Select "Better Performance", then check both boxes under "Write-caching policy" and click "OK" to finish.

COMBINING DISKS IN RAID MODE (WINDOWS)
WARNING: This operation WILL ERASE ALL THE DATA you may have in the disks you are combining.
AVAILABLE TYPES OF VOLUME
A striped volume (RAID 0) is a volume whose data is interleaved across two or more physical disks. The data on this type of volume is allocated alternately and evenly to each of the physical disks. This maximizes performance. It cannot be mirrored or extended and is not fault-tolerant.
A mirrored volume (RAID 1) is fault-tolerant because it maintains a copy of the same data on both disks. The downside is that the storage space is halved.
A spanned volume (JBOD / SEQUENTIAL) writes data until the first disk is full and then it starts writing data to the second disk. It cannot be mirrored and is not fault-tolerant.
- Open Disk Management with administrator permissions.
In the search box on the taskbar, type Disk Management. Alternatively, you can press the Windows key + the X key on your keyboard. Once the menu appears, open "Disk Management" as an administrator. If it is a touchscreen computer, select and hold (or right-click if you are using a mouse) on Disk Management, then select Run as administrator > Yes. If you can't open it as an administrator, type Computer Management instead, and then go to Storage > Disk Management.
| Apps and Features |
| Mobility Center |
| Power Options |
| Event Viewer |
| System |
| Device Manager |
| Network Connections |
| Disk Management |
- Right-click on the first disk of your new Sabrent drive and select "Delete Volume".

- Click "Yes" to delete the volume.
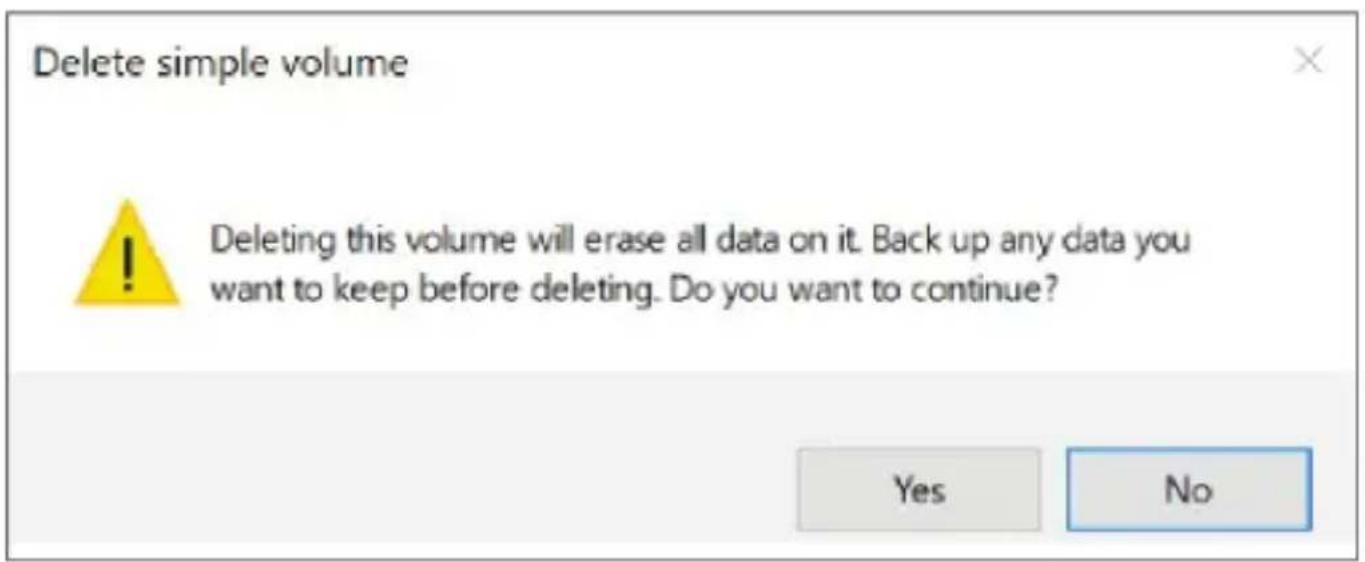
- Repeat the process with the second disk until both disks appear as "Unallocated" as seen in the picture.
| Disk 1 Basic 7452.02 GB Online | 7452.02 GB Unallocated |
| Disk 2 Basic 7452.02 GB Online | 7452.02 GB Unallocated |
- Right-click on "Disk 1" and select the preferred type of RAID. To combine two disks, you have three volume options: Spanned, Striped, or Mirrored.

- Highlight "Disk 2" on the left panel and click "Add>" to add it to the right panel.

- Once both disks have been added to the right-hand panel, click "Next>".

- Choose the desired drive letter and click "Next>".
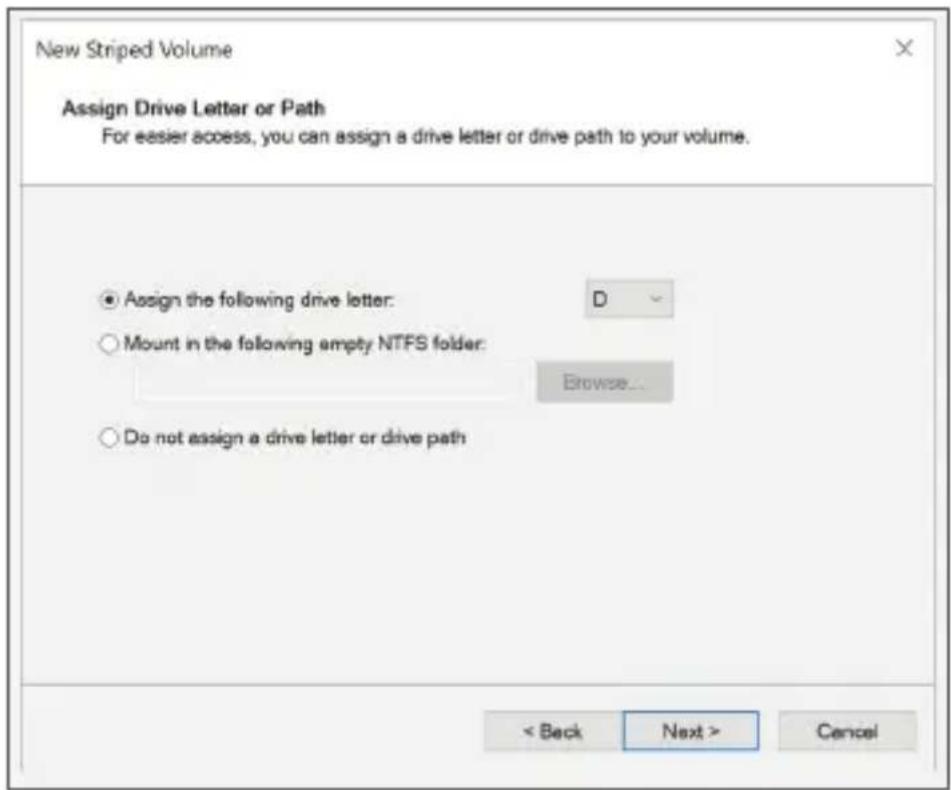
- Assign the preferred "Volume Label" and make sure the "Perform a quick format" option is checked, then click "Next>".

- Click "Finish" and you are done.
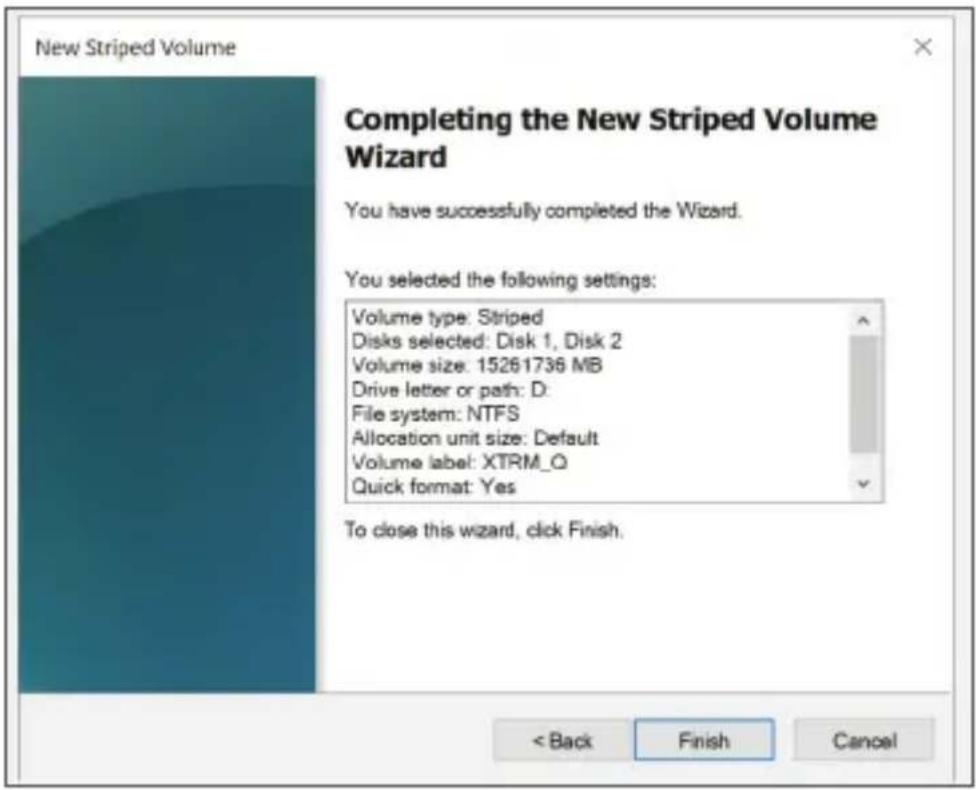
- After the computer finishes formatting the newly created volume, you will notice both disks have the same drive letter. In this example, the drive letter "D:"
| Disk 1 Dynamic 7452.02 GB Online | XTRM_Q (D:) 7452.02 GB NTFS Healthy |
| Disk 2 Dynamic 7452.02 GB Online | XTRM_Q (D:) 7452.02 GB NTFS Healthy |
COMBINING DISKS IN RAID MODE (MACOS)
WARNING: This operation WILL ERASE ALL THE DATA you may have in the disks you are combining.
- Open the macOS Disk Utility as seen in the picture.

- Open the "File" menu option and then choose "RAID Assistant".
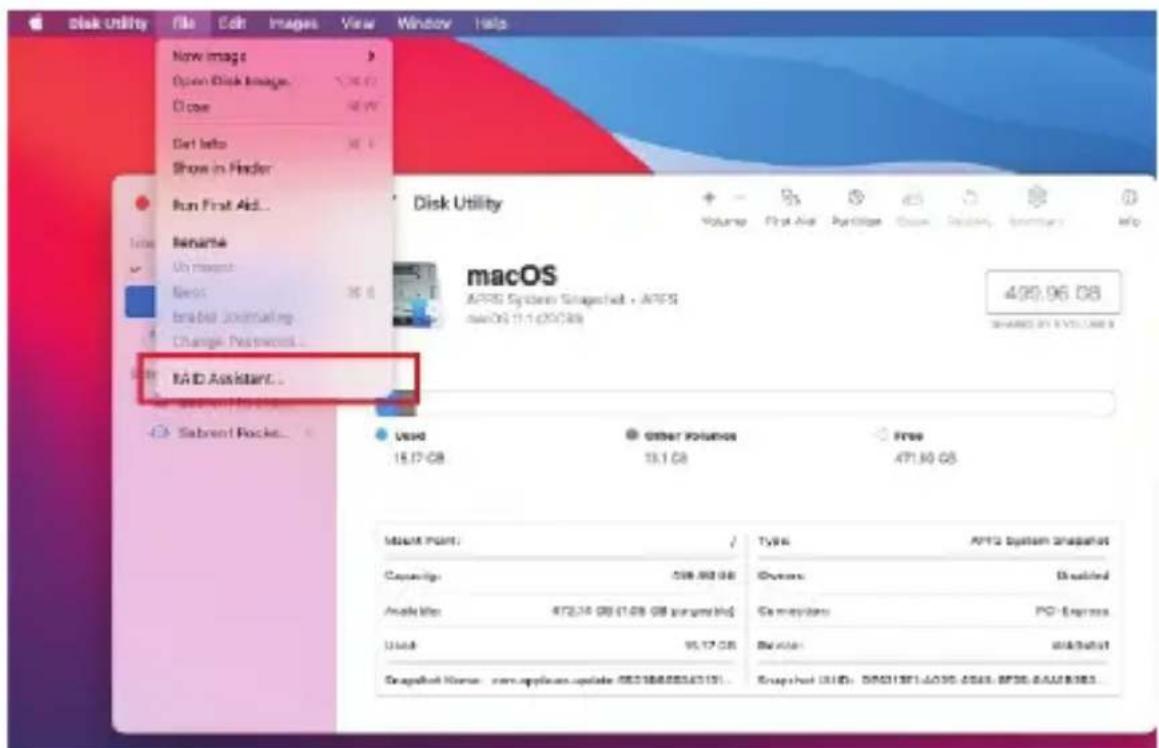
- Select the RAID mode you would like to use and click "Next".

- Select both Sabrent disks as you can see in the picture and click "Next" to finish.

TROUBLESHOOTING YOUR THUNDERBOLT™ 3 DEVICE
To troubleshoot the scenario where a Thunderbolt™ 3 device is not recognized properly, we suggest checking following items:
- Make sure that both the computer and the device are turned on and that the Thunderbolt™ 3 device is connected to the computer via the Thunderbolt™ interface.
- Disconnect and re-connect the Thunderbolt™ cable and/or restart the computer.
- Use the Thunderbolt™ 3 cable that was included. If you own a second cable, test both to rule out any problems with the cable.
- Confirm that your computer supports Thunderbolt™. If it has a USB-C port but only supports USB, the Thunderbolt™ device won't work.
- For Windows PCs, update the BIOS of your computer.
- For Windows PCs, update the Thunderbolt™ firmware (NVM) on your computer.
- For Windows PCs, update the Thunderbolt™ software (driver) on your computer.
- For Windows PCs, when you connect a new device for the first time, you might have to approve the device. Select "Always Connect".
- For Windows PCs, if the device is recognized at first but disconnecting and re-connecting fails, install the device driver for Windows.
- For Windows PCs, if the device is no longer recognized after upgrading your operating system (e.g. from Windows 7 to Windows 10), uninstall the Thunderbolt™ software and re-install the latest version, even if it's the same version.
FILE FORMAT
This Sabrent drive is pre-formatted using the exFAT file system, which is supported by current versions of Windows, Mac, and Linux OS.
Please note: Data formatted in a particular file format may not be compatible with certain operating systems and/or specific computer configurations. This does not mean your drive is not working.
SABRENT

Please contact our Technical Support Team for additional troubleshooting
Thunderbolt and the Thunderbolt logo are trademarks of Intel Corporation or its subsidiaries in the U.S. and/or other countries. All other brands and logos belong to their corresponding owners.


- ROCKET XTRM-Q 16TB EXTERNAL ALUMINUM SSD
- INTRODUCTION
- FEATURES
- SYSTEM REQUIREMENTS
- CONNECTING FOR THE FIRST TIME VIA THUNDERBOLT™ 3
- HOW TO ACHIEVE MAXIMUM WRITING SPEEDS
- COMBINING DISKS IN RAID MODE (WINDOWS)
- AVAILABLE TYPES OF VOLUME
- COMBINING DISKS IN RAID MODE (MACOS)
- TROUBLESHOOTING YOUR THUNDERBOLT™ 3 DEVICE
- FILE FORMAT
- SABRENT
- Please contact our Technical Support Team for additional troubleshooting
Mærke : Sabrent
Model : SB-DXMQ-8X2
Kategori : Ekstern harddisk