
32VDH683B - Fjernsyn VOX - Gratis brugsanvisning og manual
Find enhedens vejledning gratis 32VDH683B VOX i PDF-format.


Brugerspørgsmål om 32VDH683B VOX
0 spørgsmål om dette apparat. Besvar dem du kender, eller stil dit eget.
Stil et nyt spørgsmål om dette apparat
Download vejledningen til din Fjernsyn i PDF-format gratis! Find din vejledning 32VDH683B - VOX og tag din elektroniske enhed tilbage i hånden. På denne side er alle dokumenter nødvendige for brugen af din enhed offentliggjort. 32VDH683B af mærket VOX.
BRUGSANVISNING 32VDH683B VOX


GBR
LED 32VDH683B
LED 43VDF683B

natural_image
Black-and-white aerial view of a mountainous landscape with dense forested slopes and misty peaks (no text or symbols visible)Quick Start Guide
Please read this manual carefully before TV operation. Retain it for future reference.
Dolby
Manufactured under license from Dolby Laboratories. Dolby, Dolby Audio, Pro Logic, and the double-D symbol are trademarks of Dolby Laboratories Licensing Corporation
Attach the Table Stands
How to assemble the stand
If you need to remove or assemble the stand please read the following instructions. - Before attaching/detaching the stand, make sure to turn off the TV.
- Before performing work, spread cushioning over the base area to lay the LED TV on. This will prevent it from being damaged.

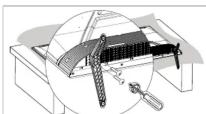
Step 2
Wallmounting Installation (optional)

| Inches | Specifications VESA (A*B) | Standard screw (C*D) | Quantity |
| 32-43" | 100 x 100 mm | 4M6*L10 |
Note: "D" is the effective length of the screw in the mounting hole.
Before installing the wall-mounted bracket, please screw the 4 wall-mounted
adapter studs into the 4 wall-mounted nuts of the metal back.
The figures and illustrations in this manual are provided for reference only and
may differ from their actual appearance
Note:
- The bracket fixed on the wall is an optional part.
- When assembling the TV, there should be no other articles around it and please keep it distant from other articles
- When assembling the TV, please ask the professional worker to fix it in order to avoid danger.
- The fixing picture is only for reference.
- Please follow the user's manual about bracket assemble to fix the TV.
- Attach the mounting bracket with the VESA compatible wall mounting kit.

PREFACE
- Read this Quick Start Guide before starting Set-up.
- Then, carefully follow the Instructions, heeding all Warnings.
- Do Not remove the TV back cover or block the TV ventilation openings.
- Do Not use the TV near water or a heat Source
- Do not pinch or cut the Power Cord
Note:
The product and illustrations in this Quick Start Guide is only for explanation purposes and may vary depending on model.
WARNING
Never place a television set in an unstable location. A television set may fall, causing serious personal injury or
death. Many injuries, particularly to children, can be avoided by taking simple precautions such as:
- Using cabinets or stands recommended by the manufacturer of the television set.
- Only using furniture that can safety support the television set.
- Ensuring the television set is not overhanging the edge of the supporting furniture.
- Not placing the television set on tall furniture (for example, cupboards or bookcases) without anchoring both
the furniture and the television set to a suitable support.
- Not placing the television set on cloth or other materials that may be located between the television set and
supporting furniture.
- Educating children about the dangers of climbing on furniture to reach the television set or its controls
If your existing television set is being retained and relocated, the same considerations as above should be applied.
[EMPTY]
What You Will Need for Set-up (Not Included)
- Head Screwdriver
- Internet Connection (Needed for Smart TV Streaming)
• Wireless Router (Needed for Smart TV Streaming)
• Computer, Tablet or Smart Phone (Needed for Smart TV Set-Up)
[Non-Text]
Front panel
The buttons on the lower panel control your TV's basic features, including the on-screen menu.
To use the more advanced features, you must use the remote control.

Remote control sensor / Power indicator
First Time use
When the TV is turned on for the first time after being shipped from the factory, initialization of the TV may take approximately several minutes, just following TV's guide to finish initialization.
Connecting to the Internet
To get access to the Internet, using a wired connection or connecting to an available wireless network.
It is recommended to use a modem or router that supports Dynaic Host Configuration Protocol(UHCP). Modems and routers that support DHCP automatically provide the IP address, netmask, gateway, DNS Server 1 and DNS Server 2, so you do not have to enter them manually. Most home networks already have DHCP. Configure network settings to connect TV to an available network.
Using External Devices
You can connect various external devices to the TV. The types and shapes of connectors available vary depending on your TV model. For the external device's connection, refer to "Connecting to the External Devices".
Setup via Mobile Phone
When you turn on the TV for the first time, the TV will support setup via your smart device by scanning the QR code
If you scan the QR code to allow setup via the mobile app, setup of the TV will be more efficient.
Before performing setup with the mobile app, please make sure your mobile device has Bluetooth activated.
Note: The setup above is for referencing purpose and may differ depending on models/countries/regions.
Unpack the TV and Accessories from the Carton Box
- Please see the unpacking instructions on the top of the carton box (and below).
- As noted, be careful not to grab or put pressure on the TV screen.
- Check the carton box carefully for all included Accessories.

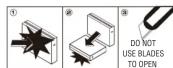

UNPACK
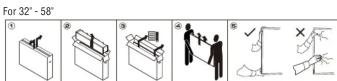

UNPACK WITH CARE

Package Contents

TV x 1pc Quick Start Guide x 1pc

The image contains no text or characters.

AAA Batteries for Remote x 2 pcs Screws for Table Standstands x 2 pcs

Remote Control × 1pc

Connecting to the External Devices


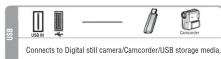


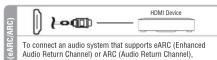

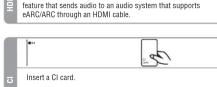


- Specifications
| Model | KDL32VC683JANTS | KDG43VC683JANTS | |
| Display size | 32" Diagonal (max.) | 43" Diagonal (max.) | |
| LED panel resolution | 1366x768 | 1920x1080 | |
| Speaker output power | ≥5Wx2 | ||
| Power supply | 110-240V~, 50/60Hz | ||
| Power consumption | 50W | 75W | |
| Standby consumption | ≤0.5W | ||
| Antenna input | 75 ohms | ||
| Controller power | DC 3V(Two AAA size batteries) | ||
| Dimensions(LxWxH) | TV with stand | 718x205x479mm | 955x215x611mm |
| TV without stand | 718x61x418mm | 955x74x558mm | |
| Weight(Net weight) | TV with stand | 2.9kg | 5.3kg |
| TV without stand | 2.85kg | 5.25kg | |
| Work temperature | 0°C-40 C | ||
- Prepare The Remote Control
| Installing Batteries | |
| 1 | Open the battery compartment cover on the back side. |
| 2 | Insert two 1.5V AAA size batteries in correct polarity. Don't mix old or used batteries with new ones. |
| 3 | Closed the cover. |
Note:
1) Batteries should last approximately one year under normal use (actual use will vary).
2) If the TV will remain inactive for an extended period of time, remove the batteries from the remote control
to avoid possible damage due to leakage.
3) Do not mix old and new batteries or different types of batteries.
4) Do not throw batteries into fire or water
5) The batteries (battery pack or batteries installed) should not be exposed to excessive heat such as sunshine, fire or the like.
^ Point the remote towards the remote control sensor of the TV and use it within 8 meters. ^ Put the used batteries into the recycling bin since they can negatively affect the environment.
Remote Buttons
-
POWER: Turn the TV on and off
-
INPUT: Press this button to select the signal source.
-
Number Buttons(0-0): Directly select channel with digital buttons
-
Guide: Select electronic program guide, in DTV mode, it will display all the
information of program in a week when pressing this button.
- CH LIST: Displays program list
It's used in APPS.6. Color Buttons:
Display the main menu or exit the current menu.7. MENU:
- Digital Media Player Control Buttons: Play/Pause, please refer to relevant instructions
in the section of multimedia player
-
Arrow Buttons (up/down/left/right): Press the up, down, left or right button to scroll the menu and change menu item's value.
-
OK: Confirm selection.
→ Returns to the previous screen.11
Exit the menu.12. EXIT:
-
HOME( 🔒 ): Press this button to display home page.
-
VOL(+/-): Press these buttons to adjust the volume.
-
CH(^^/▼): Press these buttons to change channel upward or downward.
-
MUTE: Press to cut off the sound of the TV set, press again to resume
-
SUBTITLE: In USB mode, press this button to switch subtitles when movie is playing
-
TEXT: Press to select the teletext mode. Note: Remote control may differ from the
above figures depending on the product model and region.
-
INFO: Press to display current channel information
-
☑: You can press and hold the Edit button to re-customize
-
Streaming service buttons: If network connects press these keys to view video
2.1 Streaming service button streaming service directly.

10. SET-UP THE TV (Using the Remote Control)
View the embedded E-Manual that contains information about your TV's key features.
Launch the E-Manual
Press button on your remote control and select Settings > Support > E-Manual.
Enter the Home screen of the E-Manual.
Press INPUT button on your remote control and select TV, then press button on your remote control and
select E-Manua
Enter Enjoy Live TV chapter to learn more about how to set up Live TV features.
Press INPUT button on your remote control and select Connection Guide
Enter Connecting to External Devices chapter to learn more about how to connect external devices to your
TV and how to set up.
Note: • The black background icon indicates the button on the remote control.
- The grey background icon indicates the icons on the TV screen for selecting
Home Screen
All TV functions can be accessed from the Home screen.
-
Navigation bar
-
Apps
Note: Indicators or icons may vary depending on models/
countries/rigions.
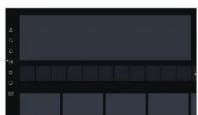
Display the Home Screen
Press button on your remote control to enter the home screen. To exit the Home screen, press INPUT button on
your remote control or use the navigation buttons to move the focus to the → input icon on the top of the screen.
press button to enter and select your desired input source.
Use the Navigation Bar
The navigation bar refers to indicators and icons on the top of the Home screen.
Search: Search the content you want.
Input: Select the input source depending on the device you have connected to your TV.
Settings: Manage TV configuration.
Notifications: Allow pop-up notifications to appear for useful information and events that occur with your TV,
including: Advertising, New Arrivals, Warnings and Legal Statements, System Messages and Alexa Notification.
You can enable/disable each of these notifications at Settings in the notification centre. You can view the list of event messages generated by the TV.
8 VIDAA Account
A VIDAA account provides all the best features of your Smart TV and ensures that all services are kept up to date.
For more information about VIDAA account, please refer to Benefits of Smart TV > Using a VIDAA Account in E-manual.
Guide
Quick access to Guide. For more information, please refer to Enjoy Live TV > Programme Guide(EPG) in E-manual.
Live TV
Quick access to Live TV. For more information, please refer to First-Time Use > Prepare Live TV in E-manual.
Use the Shortcuts
You can add inputs, channels and websites to the Home screen, to have quick access to them for your convenience.
Add and remove inputs
-
Press INPUT button.
-
Move the focus to an input you want to add to the Home screen and press > Add to home > OK
The input icon will appear in Shortcuts on the Home screen.
Note:
Some options from the input source page cannot be added to the Home screen.
To remove the input from Shortcuts, move the focus to the shortcut, then press and hold the OK button on your
remote control
Add and remove channels
-
In Live TV, press OK button to access the channel list.
-
Press 📄 button and press OK button to pick channel that you would like to add on the Home screen.
-
Select Add to home. The channel icon will appear in Shortcuts on the Home Screen
Note:
To remove, the channel from Shortcuts move the focus to the shortcut, then press and hold the OK button on
your remote control
Add and remove webpages
-
In Browser, visit a website you would like to add on the Home screen.
-
Use the D-pad to move the focus to the ≡ Menu icon in the top of the Browser navigation bar and select Add to
hon
- Select Add and this webpage will appear in the Shortcuts on the Home screen.
Note:
To remove webpages from Shortcuts, move the focus onto the shortcut page, then press and hold the OK button
on your remote control.
11. Trouble Shooting
Having trouble?
Don't worry, it's usually an easy fix.
| After Auto Tuning only some channels are available | Check your area is covered by Digital Video Broadcasts.Try re-tuning or manually tuning missing channels.Check that you are using the correct antenna type. |
| Channel cannot be selected | Check if the channel has been blocked in the main menu settings. |
| USB not playing | Please check connecting USB cable and power supply is connected.Hard drive has not been formatted. Please make sure USB disk is compatible and the multimedia data formats are supported. |
| Picture is distorted, macroblock, small block, dots, pixelization, etc | Compression of video contents may cause distortion especially on fast moving pictures such as sports and action movies. |
| Noise from speaker | Check cable connections, make sure a video cable is not connected to an audio input.Low signal level may cause sound distortion. |
| TV turns off automatically | Check if the Off Timer is set to On in the Setup menu.Sleep Timer may have been enabled.If there is no signal for about 10 minutes from an input, the TV will turn off. |
| TV turns on automatically | Check if the On Timer is set to On in the Setup menu. |
| Picture is not shown in full screen | Black bars on each side will be shown on HD channels when displaying SD (4:3) contents.Black bars on Top & Bottom will be shown on movies that have aspect ratios different from your TV.Adjust picture size option on your external device or TV to full screen. |


- Attach the Table Stands
- Wallmounting Installation (optional)
- PREFACE
- WARNING
- What You Will Need for Set-up (Not Included)
- Front panel
- First Time use
- Unpack the TV and Accessories from the Carton Box
- Package Contents
- Connecting to the External Devices
- Remote Buttons
- SET-UP THE TV (Using the Remote Control)
- Launch the E-Manual
- Home Screen
- Display the Home Screen
- Use the Navigation Bar
- VIDAA Account
- Guide
- Live TV
- Use the Shortcuts
- Add and remove inputs
- Add and remove channels
- Add and remove webpages
- Trouble Shooting
- Having trouble?
Mærke : VOX
Model : 32VDH683B
Kategori : Fjernsyn