
Jamaica 990 - Bilradio BLAUPUNKT - Gratis brugsanvisning og manual
Find enhedens vejledning gratis Jamaica 990 BLAUPUNKT i PDF-format.


Brugerspørgsmål om Jamaica 990 BLAUPUNKT
0 spørgsmål om dette apparat. Besvar dem du kender, eller stil dit eget.
Stil et nyt spørgsmål om dette apparat
Download vejledningen til din Bilradio i PDF-format gratis! Find din vejledning Jamaica 990 - BLAUPUNKT og tag din elektroniske enhed tilbage i hånden. På denne side er alle dokumenter nødvendige for brugen af din enhed offentliggjort. Jamaica 990 af mærket BLAUPUNKT.
BRUGSANVISNING Jamaica 990 BLAUPUNKT

BLAUPUNKT
CAR MULTIMEDIA
JAMAICA 990
Enjoy it.
Operating instructions
NOTE: Please do not watch videos or use other Apps while the vehicle is in motion. Doing so, is a safety violation. To watch videos or use Apps, please ensure that the vehicle is in parked mode with handbrake activated. Please check compatibility Of the device with your mobile phone before purchase. New phone software versions in the future may or may not be compatible with the device. In-Warranty replacement will not be applicable for non compatibility Of the mobile phone with the device.
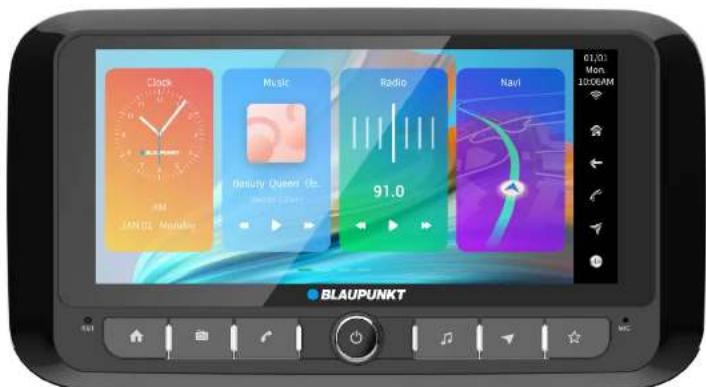
The head unit features a brilliant capacitive display with a high-end tuner

-
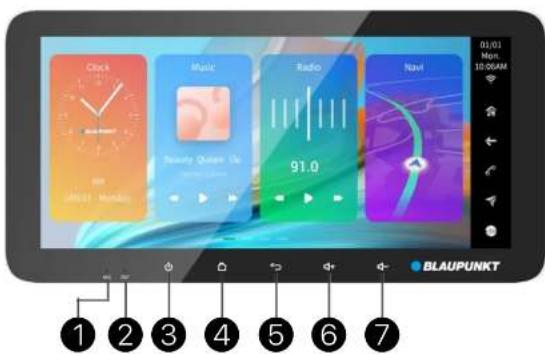
Internal microphone
-
Reset button. System reset
-
Power/Mute button Short Press: Turn on device, Mute Audio; Long Press: Device Power OFF;
-
Home button. Go to home menu
-
Back button. Back to previous menu
-
Volume increase Short Press: Increase volume in single step; Long Press: Volume Up;
-
Volume decrease Short Press: Decrease volume in single step; Long Press: Volume decrease;
-
Radio button: Go to Radio menu
-
Phone button: Go to bluetooth menu
-
Vloume knob: Short Press: Turn on device, Mute Audio; Long Press: Device Power OFF; Clockwise Rotation: Increase Volume; Counterclockwise Rotation: Decrease Volume;
-
Music button: Go to Music playback menu
-
Navi button: Go to GPS map
-
Screen OFF button: Device continues to work in the background

More ways change Volume:
- Drag left and right on volume control bar;
- Touch bottom right side to display system menu, Drag up and down Media bar;
- Short or Long press SWC Volume+ / Volume- button;
Keep pressing touch screen more than 5 seconds with 5 fingers will start to calibrate and reset side buttons.
Home Menu:
- Enter Screen Saver
- Enter Music playback menu
- Enter Radio menu
- Enter GPS map menu
- Media playback shortcut. Access last Source menu
- Navigation shortcut: It will not work if there's no MAP application installed
- Enter Bluetooth menu
- Back to previous menu
- Back to Home menu
- Enter System Control menu for quick access to system Settings including Brightness, Volume, Bluetooth, Wi-Wi NO/OFF, Mute, Screen Off, System Reboot, Turn On screen saver, Night Mode ON/OFF, take Screenshot
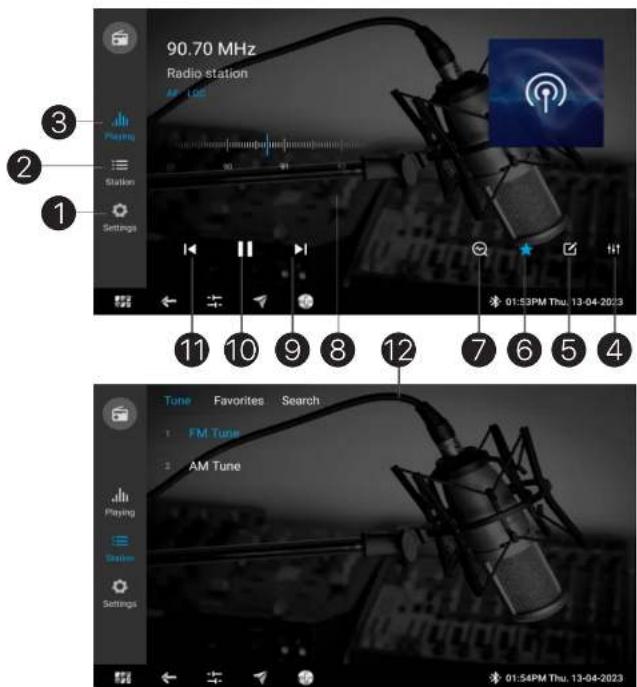
- Enter radio settings menu
- Enter radio source menu
- Enter radio playing menu
- Enter equalizer menu
- Input frequency by manual
- Save or delete the current frequency to favorites list
- Auto store. Click this icon will start scan and save value stations into seek list
- Frequency bar, drag left or right can change redio frequency
This bar will not have when playing favorites or searched stations list - Next key and [11] Previous key
On tune playing menu, this key for search and stop to play next value station;
On Favorites and Search playing menu, this key for next station; - Play/Mute radio
- Tune menu, select FM or AM system will go into playing menu

- Enter favorites list. Select station to enter playing menu. On this playing menu Next/Previous button and SWC button only for Next/Previous station, can not support frequency scan;
- Delete station from favorites list
- Enter Search menu
- Select band
- RDS PTY filter settings
- Start to search and save value stations to search list Click station to go into playing menu; On this playing menu Next/Previous button and SWC button only for Next/Previous station, can not support frequency scan;
- Add/delete station from favorites list
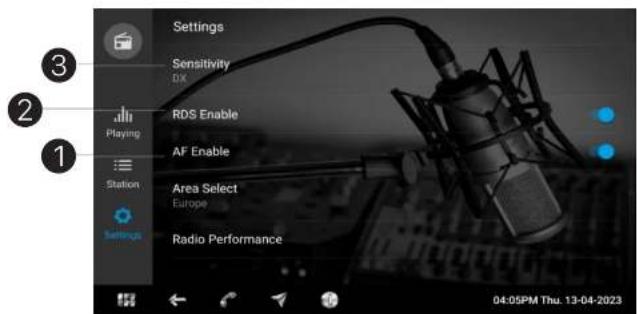
- RDS AF On/Off. AF on, radio will change to other better signal frequency automatically for better receive This function just works on the radio broadcasting support AF function, others will not change frequency;
- RDS On/Off
- Radio sensitivity setting

- Enter Playlists menu
- Enter music file Library menu
- Enter Playing menu
- Enter Equalizer settings menu
- Setting Repeat current playlist, Repeat One, Shuffle playback. Click [12] for same setting
- Show playing list
- Add current track to Favorite list or delete it
- Drag this bar change Elapsed time
- NextTrack
- Play/Pause
- Previous Track
- Delete all music file from current playlist
- Delete Music File from Playlist
- Play Music File

- Scan all Music Files and update to Library
- Music Files classified according to the Artists
- Music Files classified according to the Albums
- All Music Files
- Music Files classified according Folders Path
- Click [...]:
Play next: Add all files to current PlayList and start to play next file;
Play later: Add all files to current PlayList & commence to play at end of current list;
Add to PlayList: Add all files to specified list;
Delete: Delete all files from Storage;
The music files cannot restored once deleted - Shuffle: Play files in no particular order
- Play all files beginning from the first one
- Start to play this file
- Play this file next
- Play this file at end of PlayList
- Add this file to specified list
- Delete this file from storage

- Back to video file list
- To delete video file or check file information: touch the video file for 2 seconds and it will pop out from the File Management menu to either delete or check file information. A file once deleted cannot be restored.
- Drag left or right on this bar or progress bar to move within the file
- Setting display ratio: 1:1, 16:9, 4:3, Full screen, Auto
- Play mode: Play once, Repeat current file, Repeat all
- Next
- Play/Pause
- Previous
- Scan and update all video files
- Change File-Sort, Manage Files, set up File list display mode and enter PlayBack settings
- Play this file
- Video File folder path
- Video Library

-
Setting for Video Playback: Resume Play-Yes: Start PlayBack from last stopped point Resume Play-No: Start PlayBacK from beginning Check at Start-Up: Show selection menu
-
Play in background: ON: Video continues to play in the background; OFF: Video stops playing once application has been moved to the background
-
360 display: ON: 360 AVM recorded video files can be played OFF: 360 AVM recorded video files will not be played
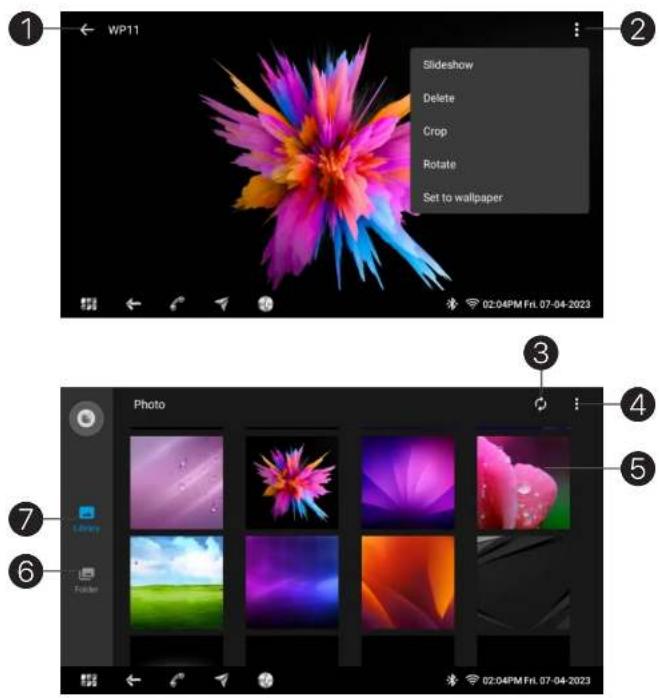
- Photo file list
- Slideshow: Each photo is displayed for 3 seconds as a Slideshow
Delete: Delete Photo file from storage
Crop: Edit photo
Rotate: Rotate display Photo
Set as Wallpaper: Set current photo as system
Wallpaper
A file can not be restored once deleted - Scan and update Photo files
- Files Management
- Display this photo
- Photo files Folder path
- Photo files Library
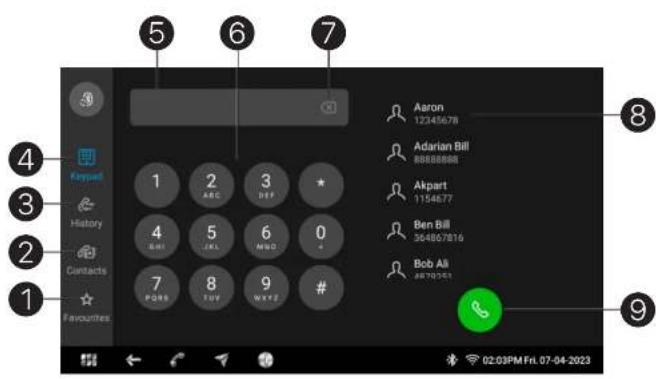

- Favorite contacts
- Phone Book
- Call History
- Keyboard
- Input Number
- Numeric Keypad
- Delete Input
- Contacts. Touch a contact on screen to dial out
- Dial out/Confirm input number
- Call history. Click [▽] to display Call History or Display Missed Call list
- Update Call History from mobile phone
- Click Contacts List for dialled numbers
- Click [☆] Add Contact to Favorites list


- Search Contact-letters or numbers
- Download Phone Book
- Touch right side letters to display priority contacts or matched contacts
- Touch contact to dial out or add to Favorites

- Cancel dialing / Reject incoming call
- Mute microphone during a conversation
- Display numeric keypad for additional input
- Transfer phone call between car infotainment and mobile phone
- Click favorites to Dial out or delete it from favorites list
A. This radio has 96 different ringtones integrated into it, user can select favorite one for incoming calls;
B. Phone call volume and Ringtong volume can be increased separate in the system -- Go to[Settings] --[Volume]--[Phone volume] and [Ring volume];
C. This device by default works with an external microphone. It can be changed to internal microphone. To switch to internal microphone go to [Settings] --[Volume]--[Microphone];
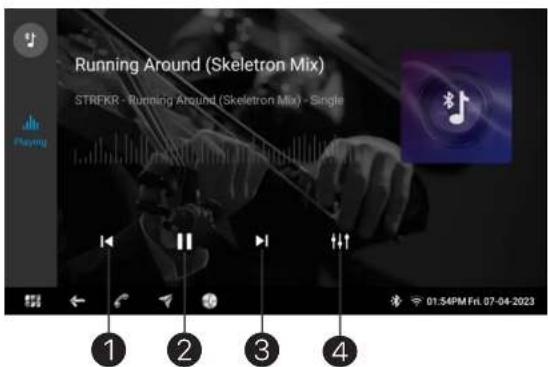
Select [BT Music] on home menu to active BT streaming
- Previous
- Play/Pause
- Next
- Enter Equalizer setting
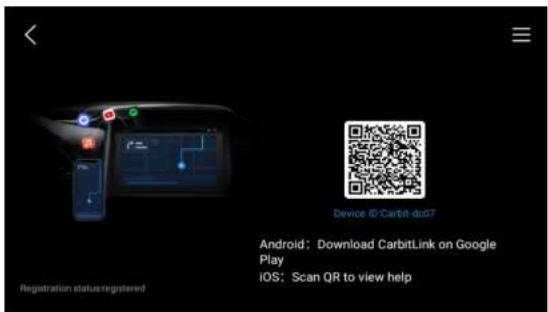

- Scan QR code for download and install EasyConnect application in the mobile phone
- Share Hotspot from mobile phone to the device
- Click PhoneLINK on the home menu to connect mobile phone to the device
- Connect mobile phone with USB cable and open the app
- Enjoy PhonLINK
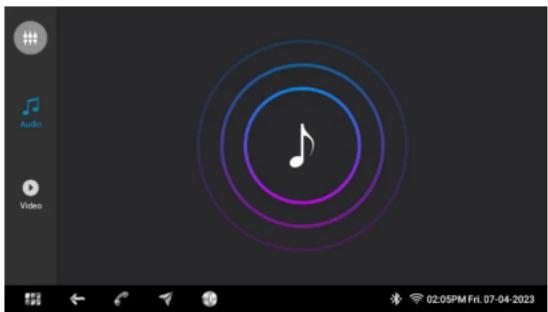
- Touch [AV-IN] on the HOME menu to start AUX-IN playback
- For Audio connect a Stereo 3.5mm cable to the Input port, For Video input, connect via the RCA ports provided in the rear of the radio
- Audio and video quality depends on the source, It's recommended to input high quality video and audio for best results
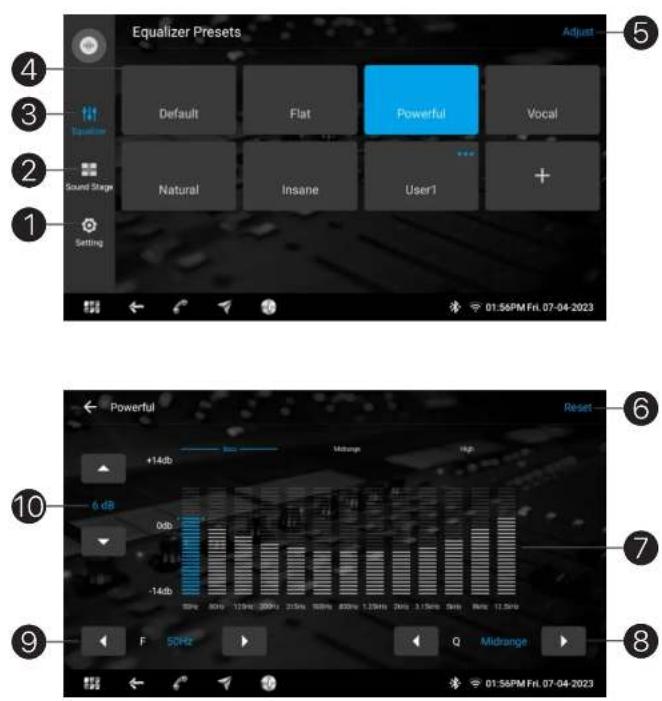
- Enter Additional Settings menu
- Enter Sound Stage menu
- Enter Equalizer setting menu
- Equalizer pre-sets
- Enter individual frequencies setting menu
- Reset all items of this menu to default settings
- Individual Frequency Setting status
- Q value setting - Can be set up to Narrow/Mid/Wide
- Select the individual frequency to increase or decrease levels
- Change each individual frequency gain levels:
Press [7] to select a frequency - Press [9] horizontal arrow to toggle between frequencies - Press [10] horizontal arrows to increase or decrease the level of the selected frequency;
Press [4] and [+] to add the EQ settings for quick access. Each user setting can be saved as pre-set

Factory pre-set EQ curves can be changed by adjusting individual EQ frequencies to suit user listening Press [6] to return pre-set EQ curves to factory default settings; Sound stage can be set up for Driver, Passenger or ALL; In the stage menu user can select a seat position as default.
User can then adjust time alignment and individual channel levels to suit the in-cabin listening environment; Press [4] to Reset to factory defaults settings
This device supports 4.2 channels output, it supports 2 Channel mode or 3-way Channel mode;
3-way Channel mode sound stage is adjustable similar to 2 Channel mode;
[7], [8], [9] 2 Channel settings menu


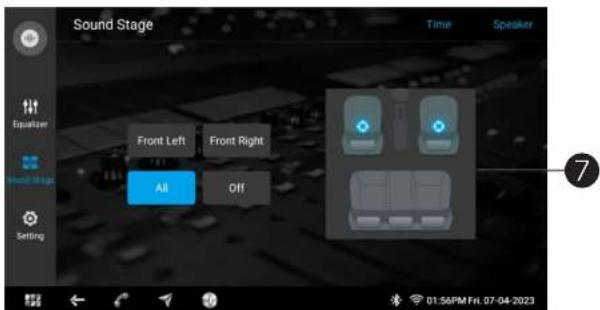


- To Set up RCA outputs for 2 Channel or 3-way
- Enter Crossover menu for HPF/LPF settings
- Import and export EQ settings config file
- Loudness On, all channel outputs are enhanced
- Reset Crossover settings to Factory default
- Crossover ON/OFF
- Crossover settings status display
- KValue setting
- Frequency setting
- 2 Channel mode - Adjust Front HPF, Rear HPF, Subwoofer LPF items select 3-way mode Crossover settings are High HPF, Mid HPF, Mid LPF, Bass LPF. Bass LPF and subwoofer LPF Phase can be adjusted


- Enter category menu
- Enter Storage Browse menu
- Enter Storage File path menu
- Files Categorized - classify Files as Images, Videos, Audio, APKs and Update file FUPs. Recently visited files under recent File manager application works for File Cut/Copy and Paste, Rename, Create folder and similar

- Enter Wall paper list
- Enter Theme list
- Preview Integrated Themes
- Integrated wallpaper preview
Select favorite Theme or Wallpaper - Touch Apply on pop-up menu, the Theme and Wallpaper will change to the selected option
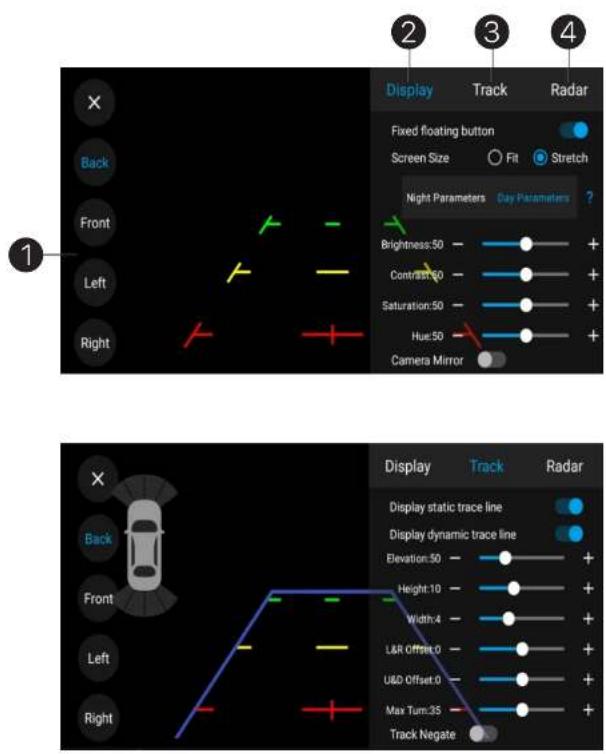
CVBS Camera and 4 Channel AHD Camera Reverse Input Settings:
Touch Camera option to access the Reverse Camera input menu, then press the top right corner to display the pop-up Settings menu;
- Select one camera input to change settings CVBS and 360AVM mode does not have this option;
- Camera Input video display settings
- Reverse track settings
- Original Proximity Radar display

360 AVM Camera Settings:
360AVM function is optional, the device may not including
Go to [Settings]--[Reverse mode]--[Reverse video input]
--Select 360AVM pro to active 360AVM function
Set up the camera Format to match Cameras for camera video display
-
See around view video
-
Touch for take a picture
The device must have storage device on USB port with correct Record Device setting
-
Car model shop
-
Settings
-
Carmodel setting
-
Calibration and Bird View settings. These settings only for installation
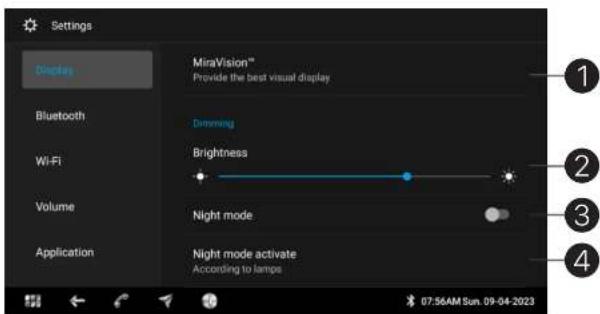

Touch [Settings] on HOME page or Touch right bottom bar, then Select the [settings] icon on pop-up menu to access displayed options
Settings menu:
Incorrect setting may cause the system to malfunction. Please Select [Factory reset] to revert to default Factory settings or consult with the Service Department Display Settings:
- Enter MiraVision display setting menu
- Adjust overall screen Brightness setting
- Night mode On-Screen and Backlight to change Brightness
- Headlight/Parking lights ON: The overall screen and keys illumination level will decrease to 50%, provided the Illumination lead is connected to the factory harness.
Sync with Internal System Clock: Once the Night mode is turned ON, the screen brightness will drop in Sync with the time of day - Parking ON - Playback of moving images or videos is blocked until the parking brake is activated. It's required to connect the Parking Brake wire to the Handbrake switch
- Screen Saver ON - Clock display after [7] pre-set Interval duration.

To go back to Main screen, touch any key or the screen to exit Screen Saver mode
-
Interval Duration - to start Screen Saver
-
Wallpaper settings
MiraVision display settings:
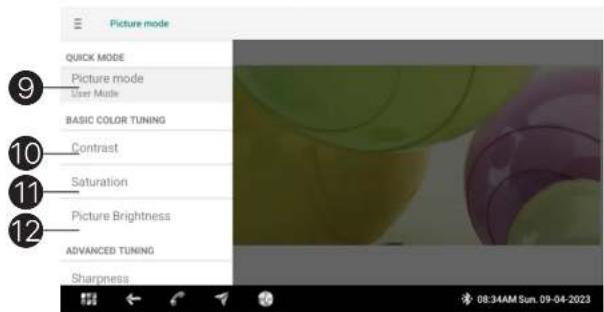
- Default is Standard Mode.
Select Active User Mode for below additional Settings
-
Drag bottom dot sideways to change Contrast
-
Drag bottom dot to change Saturation
-
Drag bottom dot to change Picture Brightness
-
Drag bottom dot to change Sharpness
-
Drag bottom dot to change Color Temperature
-
Switch On Dynamic Contrast for HDR
-
Switch On Bluelight Defender and drag bottom dot to change the Bluelight effect.
Any changes to these Settings can be seen immediately
- Restore default settings


Bluetooth Settings:
- Change Device Name
- Manage device - System can connect with multiple Bluetooth devices, and each device function can be set up
- This device works with A2DP audio streaming
- This device works with HFP-handsfree phone calls
Bluetooth Pair and connect:
Search for available Bluetooth devices
Select an available device and Press pair to show a pop-up menu.
Touch [Pair] on both devices
System will search and Connect with the last device automatically upon boot up

Wi-Fi Setting:
Select one of the available networks, input Password in the pop-up menu to connect to the available Wi-Fi network.
Ensure the Wi-Fi/Bluetooth antenna has been connected to device
Source Volume Settings:
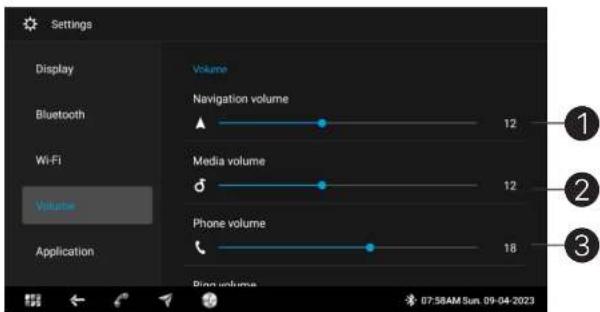
Individual Source volume levels can be set up for overall sound output balance while switching sources
- Navigation volume setting
- Media playback volume setting
- Phone call volume setting


- Incoming phone call ring volume setting
- Voice assist volume: Application for devices equipped with Voice Assist
- System Volume Level at Start: Can be set to a range from 4-12 as Start - Immaterial of what the last volume level was, it will default to a level selected between 4-12
- Navigation alert mix level: To reduce or increase the individual Source Level when there's a prompt from the Navigation source
- Touch Beep tone
- Microphone external / internal setting
- Incoming phone call ringtone setting
- Adjust Volume level when reverse gear is selected


Application Settings:
- Auto Restart modes: Disable Auto-start: System will stay on Homepage upon Start
- Last opened Media app: System will open last Media app and commence playback
Specific app: System will open specific app on [2] automatically It is an extension of [1] - Specify default app from similar multiple apps: This option will not work if the device has only one app

Reverse mode Setting:
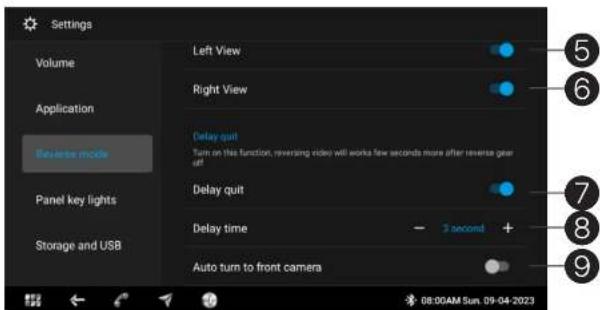
Incorrect setting may cause video to not be displayed on the screen. Please check camera specifications and select correctly from options given. Incorrect selection may cause issues with the video signal display on the device
- Reverse camera CVBS input: Reverse camera fromat must be CVBS format
- 360AVM: Reverse cameras format setting must match installed cameras, Device supports 720P and 1080P camera video input
- 4 channel AHD camera: [2], [3] settings must match installed cameras
- Cameras format setting 360AVM and 4 channel AHD camera format settings, This setting is for compatible right side CVBS camera 4, 5, 6. Front, Left and Right side cameras can be Off
- Delay Reverse Display setting: Duration of reverse camera view display after reverse gear is disengaged
- Delay quit time setting
- Auto Front Camera display once Reverse gear is disengaged


Display Key Illumination Setting:
- Key Illumination mode setting Always ON: System ON, Display backlight ON Vehicle Illumination mode: Display backlight ON only when headlight is ON
Ensure headlight detect wire had been connected to vehicle headlight power wire
- Enter key light color setting menu
- Dynamically change colors On, panel light changing multi color automatically
- Select color tile or on color circle, then click [Apply]
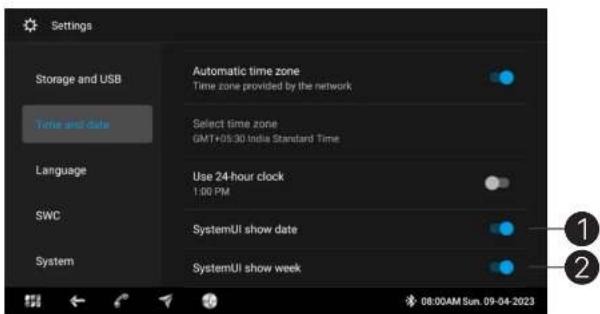

Time and Date Setting:
- Display Date OFF - the bottom bar will not display Date information
- Display Week OFF - the bottom bar will not display Week information
SWC Setting:
- Enable SWC function
- Enter SWC button pair menu
- Enter SWC button function diagnosis

![Current ad[AD0][2854] Ad mistake-Auto(89) Ad level-Auto(Low) Clear paired keys Previous Paired Short press Ad: [AD0][2282,1630,34] CLEAR Next Paired Short press Ad: [AD0][2673,1628,171] CLEAR Volume + Paired Short press Ad: [AD0][2854,1970,306] CLEAR Volume - Unpaired Mute Unpaired Devee Unpaired 08:02AM Sun. 09-04-2023](/content/2026/05/1014838/images/a3a25b70d5ee86572cc8b7f37cd997f65dcd0440c5527103c321eeab6bcd001d.jpg)
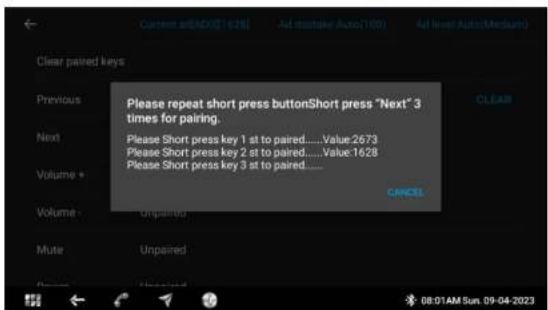
- Select a function key, then select short press or long press and then press same function button on the steering wheel control. Press 3 times to ensure pairing success
- Click Clear to earse paired button: Ensure AD Key1/Key2 wires are connected to the vehicles wiring harness correctly. Should the SWC button not work as expected, follow the pop-up menu and check the connections

System Settings:
- Reboot system: OS and applications will reboot
- Factory reset, will erase all user data and return to Factory Default settings
Ensure user data is backed up before Factory Reset. User data cannot be recovered after a Factory Reset; - System update only works on value update file
Installation:
- Power interface
- Multifunction Interface
- GPS antenna
- FM/AM antenna
- 5G Wi-Fi antenna
No all models come with functions listed above.
Depending on the features included the User Interface may vary.

Multifunction Interface
| 1 | 3 | 5 | 7 | 9 | 11 | 13 | 15 | 17 | 19 | 1 | 3 | 5 | 7 | 9 | 11 | |
| AMP | AUX_Input_R | AUX_Input_L | SIM_DATA | SIM_DET | SIM_CLK | S M_RST | SIM_VDD | Front CAM/Right CAM | MIC | Left_Tum_Dot | AHD GND | AHD GND | AHD GND | AHD GND | Camera Power SV | |
| GND | Audio_Out_FL | Audio_Out_FR | GND | SIM_GND | GND | NC | SUB_L | AUX_Input_Y | M C+ | Right_Tum_Dot | Front AHD | Right AHD | Back AHD | Left AHD | Camera Power SV | |
| 2 | 4 | 6 | 8 | 10 | 12 | 14 | 16 | 18 | 20 | 2 | 4 | 6 | 8 | 10 | 12 | |
| 1 | 3 | 5 | 7 | 1 | 3 | 1 | 3 | 5 | 1 | 3 | 5 | 7 | 9 | |||
| GND | Audio_Out_FL | SPDIF Power | CAN-RX | USB_SV | USB_GND | USB_SV | USB_GND | NC | UART_TX | UART_RX | IR Out | Reverse CAM Power +12V | PARKING | |||
| SUB_R | Audio_Out_RR | SPDIF Out | CAN-TX | USBO_OTC_DP | USBO_OTC_DM | USB1_DP | USB1_DM | NC | 2.4G W/B/T_Ant | RCA_GND | Reverse Camera | CAMERA_GND | SO W/B/T_Ant | |||
| 2 | 4 | 6 | 8 | 2 | 4 | 2 | 4 | 6 | 2 | 4 | 6 | 8 | 10 |
| POWER | |||||||
| 1 | 3 | 5 | 7 | 9 | 11 | 13 | 15 |
| 2 | 4 | 6 | 8 | 10 | 12 | 14 | 16 |
| 1 | 3 | 5 | 7 | 9 | 11 | 13 | 16 |
| GND | ACC | Reverse | SWC Key-1 | FR- | FR+ | FL- | FL+ |
| B+ | ILL | SWC Key-2 | Ant. Power | RL- | RL+ | RR+ | RR- |
| 2 | 4 | 6 | 8 | 10 | 12 | 14 | 16 |
Power Interface



Mærke : BLAUPUNKT
Model : Jamaica 990
Kategori : Bilradio