IWD-1020C - Vanddispenser Imarflex - Gratis brugsanvisning og manual
Find enhedens vejledning gratis IWD-1020C Imarflex i PDF-format.

Brugerspørgsmål om IWD-1020C Imarflex
0 spørgsmål om dette apparat. Besvar dem du kender, eller stil dit eget.
Stil et nyt spørgsmål om dette apparat
Download vejledningen til din Vanddispenser i PDF-format gratis! Find din vejledning IWD-1020C - Imarflex og tag din elektroniske enhed tilbage i hånden. På denne side er alle dokumenter nødvendige for brugen af din enhed offentliggjort. IWD-1020C af mærket Imarflex.
BRUGSANVISNING IWD-1020C Imarflex

imarflex®
HOT and COLD WATER DISPENSER
DUAL-DISPENSE


SPACE SAVER DESIGN

slimBODY
• BUILT-IN CUP HOLDER (9oz)
• BUILT-IN CABINET
• HYGIENIC DISPENSING SYSTEM
• ENERGY EFFICIENT
- CHILD-LOCK FEATURE
- REMOVABLE DRIP TRAY
• INSULATED HOT & COLD RESERVOIR
• CAPACITY: HOT-5 LITERS ( ≥90^ C)
COLD-2 LITERS ( ≥10^ C)
• POWER: HOT 420W / COLD 150W

SPECIFICATION:
MODEL NO. : IWD-1020C
POWER CONSUMPTION : Hot - 450W
Cold - 120W
RATED VOLTAGE : 230Va.c. 60Hz
IMPORTANT SAFEGUARDS:
When using electrical appliances, basic safety precautions should always be followed, including the following:
- Read all instructions thoroughly.
- Before using the Water Dispenser, check if the voltage indicated corresponds with the convenience outlet (230Va.c.).
-
Do not use two-way socket with another appliance.
-
Do not use any appliance with a damaged cord or plug. If the cord is damaged, it must be replaced with the same type and size of a qualified person or bring the unit to the manufacturer or to the nearest lmarflex Authorized Service Center to avoid hazard.
-
To avoid a hazard due to instability of the appliance, it must be fixed in accordance with the instructions.
-
Do not place the Water Dispenser near gas stove, electric burner or heated oven.
-
Children should be supervised to ensure that they do not play with the appliance.
-
This appliance is not intended for use by persons (including children) with reduced physical, sensory or mental capabilities, or lack of experience and knowledge, unless they have been given supervision or instruction concerning use of the appliances by a person responsible for their safety.
-
Keep the water dispenser in a dry and cool place and avoid direct sunlight. Rearward of the machine should be at least 20cm far from the wall. Never put the machine on the paper or foam, which may cause unstable condition, such as store water or cause creepage. Never put anything flammable beside this machine.
-
To avoid damage, do not plug the power cord or turn on the heating switch until 3 minutes after you put the filled water gallon.
-
This water dispenser must be used with third-prong grounding plug and creepage protection switch. If two flat plugs will use, the grounding wire must be properly grounded before use.
-
In case the unit will not use for a long time, turn off the switch and pull the plug out from the socket then drain the remaining water through drain hole.
-
Never use organic liquid to clean the machine. Splashing of water to the body is strictly prohibited.
-
You should use the ON/OFF switch to turn on or off the unit. It is prohibited to turn on or off the unit through plugging or unplugging the power cord. Never extend the length of the power supply cord to avoid fire.
-
Never turn the machine upside down or lean it more than 45^ .
-
Do not adjust the thermostat of the unit by yourself.
-
Power cord or other parts of the unit must be replaced by authorized service center personnel.
-
The cooling time of the unit might take longer when the environment temperature is higher than the normal.
-
Save this instruction for future reference.
DESCRIPTION OF PARTS:
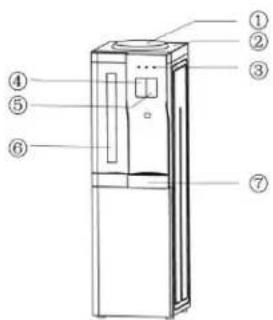
(FRONT)
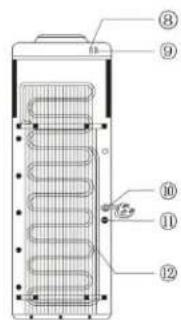
(REAR)
| FRONT | REAR | ||
| NUMBER | PART NAME | NUMBER | PART NAME |
| 1 | Gallon Supporter | 7 | Cabinet |
| 2 | Top Cover | 8 | Cooling Switch |
| 3 | Indicator Light | 9 | Heating Switch |
| 4 | Hot Water Tap | 10 | Power Cord |
| 5 | Normal Water Tap | 11 | Drain Hole |
| 6 | Cold Water Tap | 12 | Condenser |
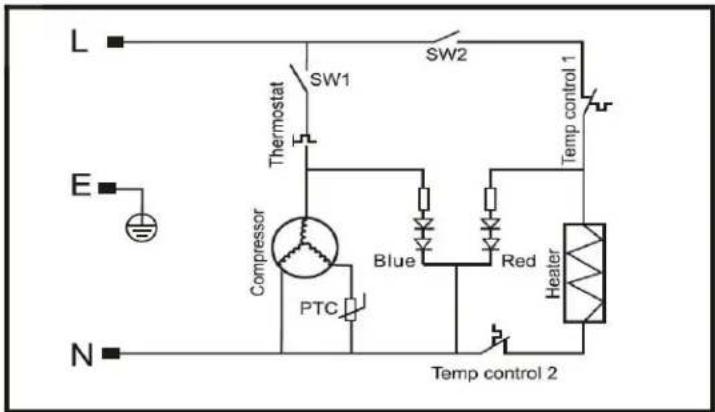
CIRCUIT
HOW TO USE:
- Tear the label from the water gallon.
- Turn the water gallon upside down then vertically insert the water gallon into the gallon supporter on top of the machine.
- Insert the plug to the socket; turn on the power switch located at the back portion of the unit. The indicator lights up accordingly once the machine works.
- Vertically pull out the water gallon by two hands when the gallon is empty and replace it with another gallon of water.
- The latest single tap can be fitted for consumer's taste; you can freely control the water temperature by pressing the two taps at the same time.
- Use the paper cup container.
- Standard Paper Cup: 9 ounces. Tuck the paper cup into the inside hole upward
- To take off the paper cup, slightly turn the paper cup downward
CLEANING AND MAINTENANCE:
• Prepare bleach disinfecting solution
Mix 1 teaspoon (5ml) of household bleach with 1 liter of water. Do not make this any stronger. If you make extra solution, this should be used up within 30 days. Safety note: Use vinegar instead if you are sensitive to bleach
- Draining Instruction: Open the taps and take off the cap and rubber stopper from the water outlet on the rear side of the unit
-
Clean your water dispenser
-
Unplug the unit.
- Remove the empty water gallon.
- Remove no-spill top and/or baffle if equipped.
- Wearing gloves and safety goggles, scrub interior of reservoir and nozzle(s) with sponge soaked in bleach solution. Let the solution stand for more than 2 minutes but less than 5 minutes to avoid plastic corrosion.
- Fill the reservoir with clean tap or bottled water to rinse four (4) times and drain into a bucket. Dispose into sink.
- Clean the drip pan, no-spill top and baffle with bleach solution as well. Rinse and replace.
- Replace and use new gallon to fill dispenser. If there is any remaining smell, continue rinse process
TROUBLE SHOOTING:
| PROBLEM | POSSIBLE CAUSE | REMEDY |
| No hot or cold water | Over Consumption of hot or cold water in short timeNo power supply | The hot and cold water will be available after a whileConnect the plug and turn on heating or cooling switch |
| No running water from the taps | Empty gallonInlet of gallon supporter blocked by gallon seal | Replace it with a new water gallonClean wasted paper and gallon seal and re-install the water gallon |
| Leakage from gallon supporter | Broken water gallon | Replace it with a new water gallon |
| Noise Operation | No placid installation | Place the unit on placid & solid surface |