40HS410AN - Fjernsyn Aconatic - Gratis brugsanvisning og manual
Find enhedens vejledning gratis 40HS410AN Aconatic i PDF-format.

Brugerspørgsmål om 40HS410AN Aconatic
0 spørgsmål om dette apparat. Besvar dem du kender, eller stil dit eget.
Stil et nyt spørgsmål om dette apparat
Download vejledningen til din Fjernsyn i PDF-format gratis! Find din vejledning 40HS410AN - Aconatic og tag din elektroniske enhed tilbage i hånden. På denne side er alle dokumenter nødvendige for brugen af din enhed offentliggjort. 40HS410AN af mærket Aconatic.
BRUGSANVISNING 40HS410AN Aconatic
Aconatic
คู่มือการใช้งาน
LED TV
รุ่น
32HS410AN
40HS410AN
คำแน NaNำ
กรุณาศึกษาคู่มืออย่างละเอียด ก่อนทำการติดตั้งและใช้งานโทรทัศน์
เก็บคู่มือนี้ไว้ใช้อ้างอิง
สารบัญ
ข้อควรระวังเรื่องความปลอดภัย 1
การติดตั้งโทรทัศน์และการเชื่อมต่อ 3
อุปกรณ์ภายในกล่อง 3
การติดลั่งโทรทัศน์ 3
การเชื่อมต่อสัญาณต่างๆ 3
ปุ่มโทรทัตน์ 5
วิโนทอนโทร 5
การใช้งานเบื้องต้น 7
เปิดเครื่อง / semi- partition methodology 7
การเลือกแหล่งสัญญาณ 7
การใช้งานหน้าเมนู 7
คําแนะนําสําหรับฟังกัชน Smart TV 7
การค้นหาของรายการ 7
การกันหาสัญญาณนาล้อก (ATV) 7
การบุนทึกช่องรายการ 8
Time Shift 8
APP 8
การตั้งค่าเครือข่าย 8
Wake On Lan / Wake On Wlan 9
9
การแก้ไขปัญหาบีองต้น 10
คําแนะนําในการติดตั้งชาโทรทัศน์ 10
การใช้แขวนสำหนับโทรทัศน์ 11
คำเตือนและด้านความปลอดภัย
ของบุคณ์เที่ล้อใช้ LED TV อัตริยะประสิทธิภาพสูงและมัตถิฟังเข่นที่ผลิตโดยบริษัทของการ ซ่ําล้อ certainนี้จะ第一时间ให้คุณภาพผลิตเห็นได้อย่างขึ้น การออดแบบผลิตภัณฑ์ที่ได้คําเนื่องปัจจัยที่ผลต่อความปลอดภัยและอย่างไรก็ตาม การใช้งงานที่ไม่เหมาะสมจากจําเรดเก็บไฟฟ้าเชื่อเพาะห์ไฟหนึ่มได้ เก็ความปลอดภัย ซื้อ ผู้การใช้งานของผลิตภัณฑ์ที่และตรวจสอบให้เทิงว่าผลิตภัณฑ์ที่สามารถแอนได้เต็มประสิทธิภาพ Forcedoàn คู่มีและ Outlookอย่างระดับระว่างต่อไรก้างาน และปฏิบัติตาม คําแนะน้ําด้านความปลอดภัยต่อไปนี้่นี้ Iran徒เกิน คู่มีผู้ใช้ที่ใช้วในภายหลัง
| Warning | อาจทําให้เสือชีวิตได้ | |
| บ่งออกถึงพฤติกรรมสั่งห้น | ||
| Attention | อาจซ์ผลให้เกิดการบาดเจ็บหรืออุญเสิตร์พย์สิน | |

ระบุการดําเนินการที่ต้องทำ
ภายใต้เงื่อนไขตังต่อไปนี้
- ไฟฟ้าขัดข้องหรือแรงดันไฟฟ้าไม่เสถียร
- เสียงหรือกลิ่นผิดปกติจากอุปกรณ์
- สายไฟ ac เสี่ยหาย
- ที่วีเสียเนื่องจากการตกหล่น กระทอก หรือกระทอก
- ของเหลวหรือสิงแปลกปลอมเข้าไปในเครื่องรับโทรทัศน์

ปิดที่วีทันที่ อดสายไฟออกจากเต้ารับไฟฟ้า และติดต่อเจ้าหน้าที่ช่อมบํารุงที่ได้รับอนุญาต
- หากกําชไวไฟอื่น ๆ รั่ว อย่าถอดสายไฟของชุดที่วีหรือเครื่องใช้ ไฟฟ้าอื่น ๆ ให้ปิดวาล์วนกัสทันทีและเปิดประตูและหน้าต่างแทน

คำเดือน
ใช้ไฟเพียง 220 VAC / 100 - 240 VAC เท่านั้น
- สายเคเบิลทั้งหมดสามารถเชื่อมต่อหรือดึงออกให้หลังจาก ปิดแหล่งจ่ายไฟแล้วเท่านั้น
- ห้ามซ่อมเครื่องที่วีในตําแหน่งที่ไม่มั่นคง มิฉะนั้น อาจทําให้ เครื่องตก เลียหาย หรือแม้แต่ไฟฟใหม่ได้
- อย่างเครื่องรับโทรทัศน์ไว้ในสภาพแวดล้อม: 1. แสงแตกโดยตรง ความชื่น ร้อนจัด หรือผ่าน
- ด้วยสารไวไฟหรือวัตถุระเบิด
- ด้วยถ้าชไวไฟหรือมีฤทธิ์กัดกร่อน
- ในห้องนําห้องครัว ฯลฯ
- ห้ามใช้เต้ารับที่ชํารุดหรือไม่เหมาะสม และตรวจสอบให้แน่ใจ ว่าปลัดและเต้ารับนั้นแขื่อมต่ออย่างถูกต้อง
- เก็บปลักไฟและเต้ารับให้ปราศจากฝุ่นและชิ้นส่วนโลหะ
- อย่างสายไฟลี่ยหาย: 1. ห้ามใช้สายไฟที่ข่าวุค 2. ห้ามวางของหนักกับสายไฟ 3. เก็บสายไฟให้ทํางจากแหล่งความร้อน 4. ห้าม modificสายไฟขะเฉียบปลัด

คำเตือน
- อย่างข้อมต่อเครื่องใช้ไฟฟ้ามากเกินไปกับรางปลัดไฟอันเตียว มิจะนั้น อาจถ่อให้เกิดไฟไหมมั่นี่องจากการใช้พลังงานสูง
- อย่าให้步伐ไฟ (เช่น เที่ยนไข) เข้าใกล้เครื่องรับโทรศัตน์ มิจะนั้น อาจก่อให้เกิดไฟฟ้าชื่อ контроляไฟใหม่ได้
- อย่างภาวะจะที่บรรจุน้ำไว้บนเครื่องที่วี เพื่อหลีกเฉียงไฟฟ้าร็อตหรือไฟไหมัที่เกิดจากหยุดน้ำที่กระเดินใส่
- ห้ามเจาะวัตถุมีคนโลหะ หรือของเหลวเข้าไปในข้าวต่อ ลัญญาณหรือช่องระบายอากาศ เพื่อหลักเฉี่ยงไฟฟ้า ลัดวงจรและผลิตภัณฑ์
- ช่องบททรัศน์ ออกแบบมาเพื่อระบาดความร้อน เพื่อให้เก็บใจว่าส่วนประกอบภายในทั้งหมดดุลหภูมิไม่สูง และสามารถทํางานได้ตามปกติเป็นสถานาน กรุง apartmentsย่าปิดรูขตะวาง
ห้ามอัมผัสปลักด้วยมือที่เปียกมิจะนั้นเจงทําให้เกิดไฟฟ้าชื่อตได้
อย่าเปิดที่วีในสภาพอากาศที่มีฬาญฝนฟ้าคะนอง ให้อตุปลักไฟ และขัวต่อเสาอากาศแทนเพื่อหลีกลี่ยงฟ้า Sp่า
ห้ามocoดประกอบชุดที่วัด้วยตัวเอง มิจะนั้น อาจถ่อให้เกิดไฟฟ้ารักตน์ไฟฟ้าใหม่ได้คิดต่อบุคลากรที่มีคุณสมบัติเหมาะสม อําหรับการบํารุงรักษา

คําเดือน
- อย่าปล่อยให้ตึกปีนขึ้นไปบนที่วี
- เก็บอุปกรณ์เสริมขนาดเล็กให้ห่างจากมือเต็กเพื่อหลีกเสี่ยงการกลืน
- หากไม่ได้ใช้เครื่องที่วีเป็นเวลานาน โปรดปิดอุปกรณ์และ
อดสายไฟออก
ก่อนทําความสะอาดเครื่องให้ออดสายไฟออกแล้วขัด้ Dallasมุ่น หันใช้สารเคมีและหลিকถ้องสิ่งแปร办公楼อมข้าไปในอุปกรณ์ การทําความสะอาดที่ไม่ถูกต้อง(เช่น น้ํา Yearทําความสะอาด น้ํา เจ้า)อาจทําใช้รูปลักษณะของผลิตภัณฑ์เสียหาย ผลิตภัณฑ์ข้อมูลเป้าไหลข้าไปในเครื่องและด่วนประกอบที่เสียหาย ทําให้เครื่องไม่สามารถแสงได้

คำเตือน
- หากต้องการปรับた่าแทน่งหรือมุมของที่วี โปรดอดสายไฟ ทั้งหมดออกและเคลื่อนช้าๆ เพื่อหลีกเฉี่ยงไม่ให้หลุด
- ห้ามถุด้วยวัตถุแข็ง เ批次 งอหรือปีบหน้าจอ
- ห้ามใช้เครื่องทันที่หลัง Locกย้ายเครื่องไปยังสถานที่ที่มีอุณหภูมิส่งจากอุณหภูมิต่ําซึ่งจะทำให้เกิดเฝาภายในเครื่อง
- หากหน้าจอดตกและของเหลวกระเด่นบนผิวหนัง โปรดล้าง ด้วยน้ำสะอาดทันที่เป็นเวลา 15 นาที แล้วไปที่พบแพทย์ของคุณ
- ในการถือเครื่องที่วีด้วยมือ โปรดจับที่มุนและจับที่ต้านล่าง ห้ามจับตรงหน้าจอ
- การแสดงภาพเดียวกันเป็นเวลานวนหรือภาพที่ใช้งานด้วยค่าคงที่ไดอนจะปล่อยให้ "ภาพคงอยู่" บนหน้าจอชื่งจะไม่หายไปหลังจากเปิดเครื่องเป็นเวลานวน การรับประกันไม่ครอบคลุมถึงปรากฏการแต่ที่ไม่หึ่งประสงค์นี้
- ดูทีวีเพื่อสุขภาพ:
- ดูในที่แสงเหมาะสม แสงไม่ตี่หรือดูเป็นเวลานนาอาจทํารัย ดวงตาของคุณ
- ปรับระดับเฉียงให้เหมาะสมเพื่อไม่ให้กระทบต่อการ
ได้ยินของคุณ
● อดสายไฟของอุปกรณ์เพื่อตัดกระแสせいฟ - หากใช้ปลักไฟหรืออุปกรณ์ต่อฟ่วงเป็นอุปกรณ์ตัดการเชื่อมต่อ ควรให้การใช้งานที่จ่าย
- ปลักไฟจะต้องเชื่อมต่ออย่างน่าเชื่อมือ ปลักไฟหวมมอาจ ทําไฟเกิดประกายไฟและไฟไหมได้
- ข้อกําหนดทางเทคนิคทั้งหมดในคู่มือผู้ใช้และบนบรรจุภัณฑ์สามารถเปลี่ยนแปลงได้โดยไม่ต้องแจ้งให้ทราบอ่างหน้า Incidentการเขี่ยงเบนเล็กน้อยระหว่างคู่มือการใช้งานและการใช้งานจริงให้มีตามนั้นเป็นหลัก
HDMI™
HIGH-DEFINITION MULTIMENA INTERFACE
The terms HDMI, HDMI High-Definition Multimedia Interface, HDMI Trade Dress and the HDMI Logos are trademarks or registered trademarks of HDMI Licensing Administrator, Inc.
Dolby Audio
Manufactured under license from Dolby Laboratories. Dolby, Dolby Audio, and the double-D symbol are trademarks of Dolby Laboratories
การติดตั้งโทรทัศน์และการเชื่อมต่อ
อุปกรณ์ภายในกล่อง
- โทรทัศน์
- คู่มือการใช้งาน
- การควบคุมระยะไกล
4.สายไฟ (หรือต่อกับเครื่องที่วี)
5.สายปลง AV (ตัวเลือก)
การติดตั้งโทรทัศน์
ข้อแนะนําการติดตั้ง
- ควรติดตั้งโทรทัศน์ใกล้กับแหล่งจ่ายไฟ เพื่อให้ง่ายต่อการเสียบและยอดปล็อก
- ควรติดตั้งโทรหัศน์ใกล้กับแหล่งจ่ายไฟ เพื่อให้ง่ายต่อการเสียบและดอดปล็ค
- เพื่อหลีกเลื่องความเสียหายควรวางโทรทัศน์ไว้บนโต๊ะหรือฐานที่แข็งแรง
- การให้พนักงานหรือผู้เชี่ยวชาติดตั้งโทรทัศน์บนผนัง
- ห้าまวางโทรทัศน์ไว้บนวัตถุที่ไวต่อการสิ่นสะเทือน
- ห้าวางโทรศัศน์ในสถานที่ที่แมลงอาเซ้าไปในตัวเครื่องได้
- ห้ามติดตั้งโทรทัศน์ใกล้กับเครื่องปรับอากาศมิจะนั้นแผงหน้าจอ อาจมีความขึ้นและทำให้ส่งอเพื่อนได้
- ไม่ควรติดตั้งโทรทัศน์ใกล้สนามแม่เหล็กเพราะอาจทำให้อลื่นดูกรบกวน
text_image
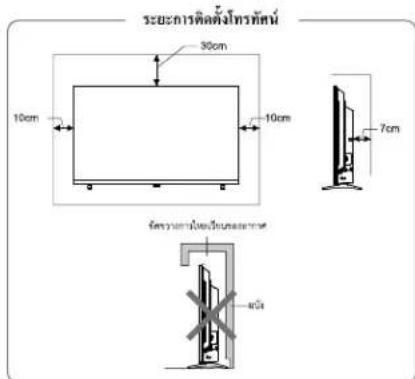
ระยะการติดตั้งที่กรัศน์ 30cm 10cm 10cm 7cm 900mm 900mm
text_image
การติดตั้งบุนผนัง 30cm 10cm 10cm 10cm 20cm 20cm 20cmการระบายอากาศ
- ควรเว้นพื้นที่รอบๆ โทรทัศน์เพื่อระบายอากาศแสดงในรูป
- ห้ามปิดช่องระบายอากาศหรือไสวัตถุดา เข้าไปในโทรทัศน์
- ห้ามวางอุปกรณ์ใกล้กับโทรศัศน์ เช่น ดู้หนังสือ ตู้เสื้อผ้า นอกจากโทรศัศน์ได้รับการระบายอากาศอย่างเหมาะสม
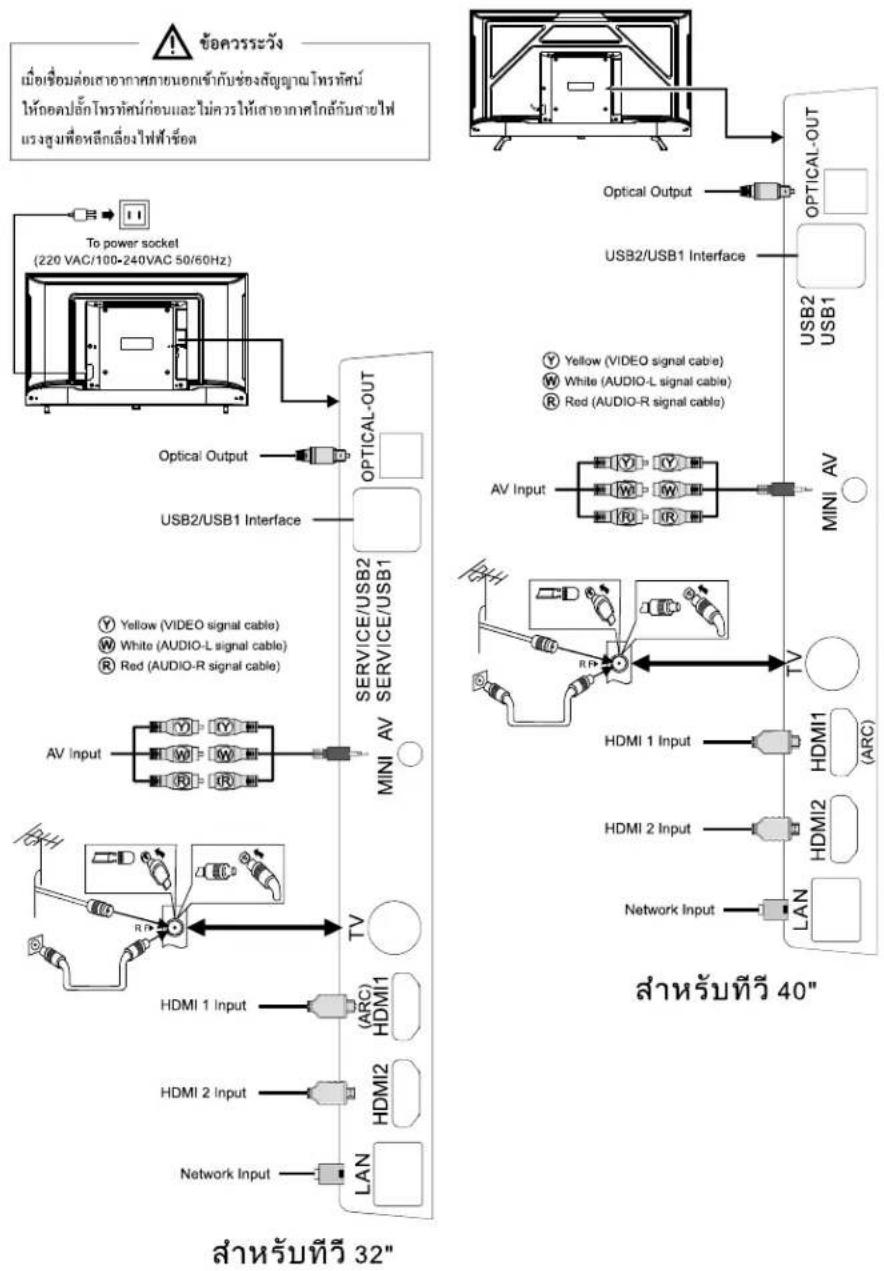
การเชื่อมต่อสัญญาณต่างๆ
ข้อสังเกต:
- ช่องเชื่อมต่อ USB รองรับอุปกรณ์ต่อพ่วง รวมถึงอุปกรณ์เก็บข้อมูล USB เมาร์ USB แป้นพิมพ์ ฯลฯ
2.เมื่อคุณต้องการเชื่อมล่อยุปกรณ์ที่รองรับ ARC ให้เลือก HDMI-1
3. ช่องต่อสัญญาณ HDMI สามารถรับฟังค์ชั่นการเชื่อมต่อ DVI ด้วยสาย
ต่อสัญญาณ HDMI/ DVI จากภายนอก
4. ยุปกรณ์ต่อพ่วงและสายเก็บลที่อธิบายไว้ในคู่มือควรซื้อแยกต่างหาก
flowchart
graph TD
    A["Network Input"] --> B["HDMI 1"]
    A --> C["HDMI 2"]
    A --> D["ARC"]
    A --> E["HDMI1"]
    A --> F["HDMI2"]
    A --> G["TV"]
    G --> H["AV Input"]
    H --> I["MINI AV"]
    I --> J["SERVICE/USB2 SERVICE/USB1"]
    J --> K["OPTICAL-OUT"]
    K --> L["To power socket (220 VAC/100-240VAC 50/60Hz)"]
    L --> M["Optical Output"]
    M --> N["USB2/USB1 Interface"]
    N --> O["Service/USB2 SERVICE/USB1"]
    O --> P["MINI AV"]
    P --> Q["Network Input"]
    Q --> R["HDMI 1 Input"]
    Q --> S["HDMI 2 Input"]
    Q --> T["ARC"]
    Q --> U["HDMI1"]
    Q --> V["HDMI2"]
    Q --> W["LAN"]
    W --> X["HDMI 2 Input"]
    W --> Y["ARC"]
    W --> Z["HDMI 1 Input"]
    W --> AA["HDMI 2 Input"]
    W --> AB["MINI AV"]
    AB --> AC["Service/USB2 SERVICE/USB1"]
    AC --> AD["OPTICAL-OUT"]
    AD --> AE["Optical Output"]
    AE --> AF["USB2/USB1 Interface"]
    AF --> AG["Service/USB2 SERVICE/USB1"]
    AG --> AH["OPTICAL-OUT"]
    AH --> AI["Optical Output"]
    AI --> AJ["USB2/USB1 Interface"]
    AJ --> AK["Service/USB2 SERVICE/USB1"]
    AK --> AL["OPTICAL-OUT"]
    AL --> AM["Optical Output"]
    AM --> AN["USB2/USB1 Interface"]
    AN --> AO["Service/USB2 SERVICE/USB1"]
    AO --> AP["OPTICAL-OUT"]
    AP --> AQ["Optical Output"]
    AQ --> AR["USB2/USB1 Interface"]
    AR --> AS["Service/USB2 SERVICE/USB1"]
    AS --> AT["OPTICAL-OUT"]
    AT --> AU["Optical Output"]
    AU --> AV["USB2/USB1 Interface"]
    AV --> AW["Service/USB2 SERVICE/USB1"]
    AW --> AX["OPTICAL-OUT"]
    AX --> AY["Optical Output"]
    AY --> AZ["USB2/USB1 Interface"]
    AZ --> BA["Service/USB2 SERVICE/USB1"]
    BA --> BB["OPTICAL-OUT"]
    BB --> BC["Optical Output"]
    BC --> BD["USB2/USB1 Interface"]
    BD --> BE["Service/USB2 SERVICE/USB1"]
    BE --> BF["OPTICAL-OUT"]
    BF --> BG["Optical Output"]
    BG --> BH["USB2/USB1 Interface"]
    BH --> BI["Service/USB2 SERVICE/USB1"]
    BI --> BJ["OPTICAL-OUT"]
    BJ --> BK["Optical Output"]
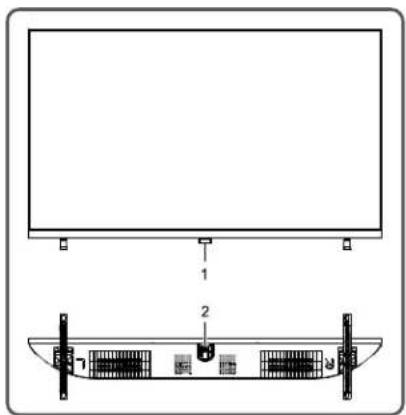
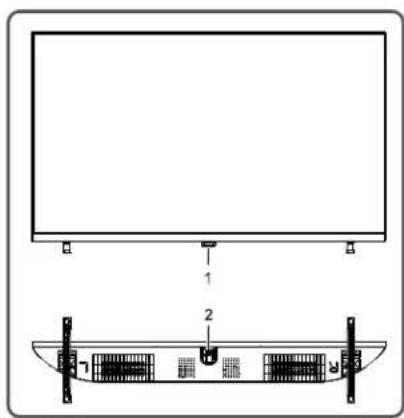
ปุ่มโทรทัศน์
text_image
Technical diagram showing a monitor setup with labeled components and a schematic of a device panel with internal components.-
ไฟ LED แสดงสถานะและการรับสัญญาเจ้ากรีในทอนไทร Class
-
u
การเปิดเครื่องหรือสแหนด์ภายใต้วยปุ่ม:
① เมื่อเลิ่งขบปลักไฟเข้ากับเต้ารับไฟฟ้า คุณสามารถกลุ่น Ⓑ เพื่อเปิด ที่วิได้
② ในสถานะเปิดเครื่อง ให้อตุปุ่ม ⚙ เพื่อแสดงเมบุฟังก์ชั้น
แล้วกตุ้ม Tunisiaเพื่อเลือกไอกอน Tunisiaจากนั้นกตุ้ม Tunisiaต่างไว้เพื่อปิดที่วี ลังจากปิดที่วีแล้ว
① ในเมนูที่ไม่ใช่ OSD ให้ Hoodปุ่ม 📊 เพื่อแสดงเมนูฟังก์ซัน
② ในเมนฟังก์ชัน กตบุ่ม ⏻ เพื่อเลือกรายการฉัดไป และกตบุ่ม ⏻ เพื่อยินยัน
หมายเหตุ
① ลักษณะที่ปรากฏแตกต่างกันไปขึ้นอยู่กับรุ่นและผลิตภัณฑ์
② ไปรดใช้ในทคอนโทรลเพื่อการใช้งานเพิ่มเติม
รีโมทคอนโทรล
วิธีการติดตั้งแบตเตอรี่ในรีโมทคอนโทรล
กอต่ําปิดช่องใส่แบตเตอรี่และใส่แบตเตอรี่ AAA (1.5V) 2 ก้อน ตรวจสอบขั้วของแบตเตอรี่เป็นไปตามเครื่องหมายขึ้น – “ และ ” –” ในช่องใส่แบตเตอรี่ของรีไม่ตอนโทรล
ข้อควรระวังในการใช้งานรีโมทคอนโทรด
- ควรอื่นรีไม่เทคนิคไทรัลไปที่เซ็นเซอร์บนหน้า certifiedไทรัตน์ ในระหว่างการใช้งาน ไม่ดาวมีวิตถุ่งที่วางไว้ระหว่างรีไม่เทคนิคไทรัลกับเซ็นเซอร์ เพราะอาชัดของการทํางนระบบ
- ไม่ควรให้มีการตกลหรือกระทกลบ่อยๆ นอกจากนี้ไปรคอย่าให้มีไIVEทุกอนโทรลไ drainแสงแต่โดยตรงเนื่องจาก อาจส่งผลให้มีไIVEทุกอนโทรลเสียรูป
- วิโมทคอนไทรอลาจใช้งานไม่ได้เมื่อตัวเซ็นเซอร์ได้รับสงสตตโดยตรง ศวรรถปลี่ยนมุนไทรัศน์หรือใช้งานริโมทคอนไทรอลาลกลักษะดังเซ็นเซอร์
- แบตเตอร์เหลือน้อยละมีแต่ต่อควบคุม ซึ่งในการฝืนี่แนะน่าให้เปลี่ยน แบตเตอรี่ใหม่ หากไม่ได้ใช้งานรีในเทคนิทรถเป็นเวลานาน ความออกแบตเตอร์ออก
- อย่าใช้แบตเตอรี่ต่างประเภทไม่ควรใช้แบตเตอรี่เก่าและใหม่ด้วยกัน ความปลี่ยนแบตเตอรี่เป็นชู่
- อย่างแบบเตอร์ listeningในกองไฟ กรุษากําขัดแบตเตอร์ตามกรูระเบียบ พิ่งที่ยวข้องเกี่ยวคับการควบคุมสิ่งแวดล้อม
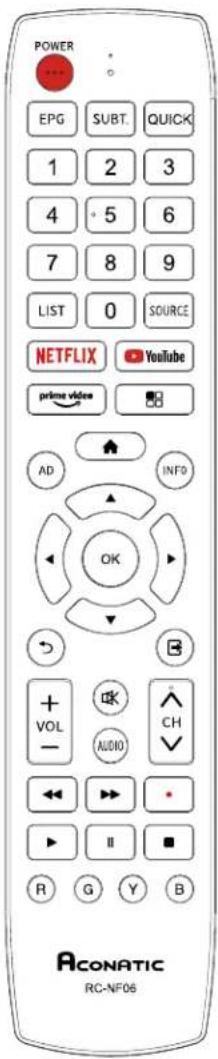
ปุ่มรีโมทคอนโทรล
text_image
POWER EPG SUBT. QUICK 1 2 3 4 5 6 7 8 9 LIST 0 SOURCE NETFLIX YouTube prime video AD INFO OK VOL AUDIO CH R G Y B ACONATIC RC-NF06| ปุ่ม | ฟังก์ชันการใช้งาน |
| Power (⋯) | เปิด / ปิด เกรื่อง |
| Mute (ค) | เปิด / ปิด เลียง |
| Number keys | ปุ่มหมายเลขพรเวื้อเลือกช่อง |
| LIST | ปุ่มแสดงช่องรายการ |
| AD | ปุ่มเลือกภาษาเสียง |
| prime video | ปุ่มเปิดเอาปลติเซ็น Prime Video |
| YouTube | ปุ่ม YouTube |
| SOURCE | ปุ่ม เลือกช่องสัญญาณ |
| NETFLIX | ปุ่ม Netflix |
| Home (▲) | ปุ่ม แสดงหน้าโอมของไพรทัศน์ |
| Menu (BB) | ปุ่ม เปิด/ปิด แนนการตั้งค่า |
| ◀,▶,▲,▼ | ปุ่ม เลียก บน ถ่าง ซ้าย ชาว |
| OK | ปุ่ม เลียก ตกลง |
| Return ( ⊃ ) | ปุ่ม ตกลับไปยังรายการก่อนหน้านี้ |
| Exit (B) | ปุ่ม ยกเลิก รายการ |
| Red key | ปุ่มฟังก์ขึ้นพิเศษ |
| Green key | |
| Yellow key | |
| Blue key | |
| INFO | ปุ่ม แสดงรายการ |
| VOL+/- | ปุ่ม เพื่อ/verse ระดับเสียง |
| CH+/- (^CH∨) | ปุ่มเปลี่อนช่องรายการ |
| EPG | ปุ่มแสดงผงผังช่องรายการ |
| AUDIO | ปุ่มตั้งคําเสียง |
| SUBT. | ปุ่มแสดงภาษาคําบรรยาย |
| QUICK | ปุ่ม Quick menu |
| ◀◀ | ปุ่มเล่นไฟล์ก่อนหน้านี้ |
| ▶▶ | ปุ่มเล่นไฟล์ ดีดไป |
| Record (•) | ปุ่มบันทึกช่องรายการ |
| ▶ (play) | ปุ่มเล่นในโหมดมัลติมิติย |
| ■ | ปุ่มหอุดเล่น |
| II | ปุ่มหอุดเล่นชี้ว chamberะ |
หมายเหตุ: ลักษณะของรีเมทคอนโทรลอาจจะแตกทางจากรูปนี้ โปรดอ้างอิงจากอุปกรณ์จริง
การใช้งานเบื้องต้น
ข้อสังเกตุ:
- การใช้งานปุ่มควบคุมโทรทัศน์ สามารถอูได้ที่ค่าอธิบายโทรทัศน์
- ปุ่ม [▶] หมายถึงบุ้นทิศทาง และบุ่ม ▶หมายถึงบุ้น ฟังก์ชั่นเล่น
- คําแนะนําการใช้งานเมญในคู่มือนี้ อธิบายตามโหมดโทรทัศน์และ การทํางานในโหมดอื่นๆ
- ก่อนเปิดเครื่องกรุณาตรวจสอบแหล่งจ่ายไฟ
- ชอฟต์แวร์ของประเทศไทย และต่างกันการทํางานของชอฟต์แวร์ เดพะควรขึ้นอยู่กับสถานการณ์ที่เกิดขึ้น
- เนื่องจากผลิตภัณฑ์มีการอําปตเตอย่าง Congoเนื่อง ซอฟต์แวรร์ชึงได้รับการอําปกรณเมื่อใดก็ได้ หาการทํางานของซอฟต์แวรร์แตกต่างจากการทํางานจริง โปรดคุผลิตภัณฑ์จริง
เปิดเครื่อง / 全面推进บายด์
เสียบสายไฟเข้ากับตํารับไฟฟ้า จากนั้งทดสอบ [⏻] เพื่อเปิดทวี เมื่อคุณใช้วรีเป็นครั้งแรก ที่วีจะเข้าสู่การตั้งค่าการเริ่มต้น และตั้งค่า ตามความต้องการของคุณ
ในตอนเปิดเครื่องให้ Trinidadม [ Ⓧ ] เพื่อเปลี่ยนเบ็นใหม่ตสแทนค์บาย
★ เล็ดลับพิเศษ: อุปกรณีขึ้นการประหยัดพลังงานเทคโนโลยี หากไม่มีสัญญาแล้วในการเปิดเครื่องสถานะจะเจ้าสู่สถานะสูตน์บ้าย โดยอัตโนมัตโนห้านที่; เครื่องจะเจ้าสู่สถานะสูตน์บ้ายอัตโนมัติตาม เวลาทําหนด
การเลือกแหล่งสัญญาณ
คุณสามารถเรื่องต่ออุปกรณ์ต่าง ๆ กับโทรทัศน์หามีสายลัญญาณภาพ HDMI, AV และยืนๆ คุณสามารถเรื่องต่อกับช่องลัญญาณที่สอดคล้องกันของโทรทัศน์ หลังจากเรื่องต่อแล้วให้ปิดอุปกรณ์และกลุ่ม [SOURCE] จากนั้นหมู่ของแหล่งลัญญาณจะปราบกูบนหน้าจอ หกุ่ม [▲]/[▼] เดื่อเลือกลัญญาณเข้าและกลุ่ม [OK] เดื่อยืนยัน
การใช้งานหน้าเมนู
กดปุ่ม [■] เพื่อแสดงเมนุหลักบนหน้าจอ:
- กดปุ่ม[▲]/[▼]เพื่อเลือกเมนุการตั้งค่าวีดีโอ, เลียง, ที่วี,
การตั้งค่า,ระดับความเหมาะสม,ขึ้นๆ
2.จากนั้นกดปุ่ม [OK]/[▶] เพื่อเข้าสู่เมนุที่เลือก - circuit [▲]/[▼] เพื่อเลือกรายการในเมนู
- กดปุ่ม [OK] เพื่อเข้าสู่เมนูย่อย
- กตปุ่ม[◀]/[▶] หรือ [▲]/[▼] เพื่อปรับค่าหรือตั้งค่า
- circuitุ้ม [ ⊃ ]เพื่อกลับไปยังก่อนหน้าเมนูเมื่อโทรทัศน์
แสดงเมนูย่อย
7.ระหว่างการใช้งาน เมนูที่ไม่ได้เลือกระจะเปลี่ยนเป็นสีเทา
หมายเหตุ: รหัสผ่านเริ่มต้นสำหรับสื่อ委屈บทือ 0000
คําแนะนําสำหรับฟังถ์ชั่น Smart TV กดปุ่ม [♠] เพื่อแสดงหน้าโฮม
- กดปุ่ม [◀]/[▶] เพื่อเลือกแอปพลิเคชั้น
- circuitุ่ม [OK] เพื่อเลือกแอปพลิเคชั่น
- ตดปุ่ม [B] เพื่อออกจากโหมดสมาร์ท
หมายเหตุ: ก่อนที่จะใช้งานอินเทอร์เน็ต โปรดเชื่อมต่ออินเนอร์เน็ต เข้ากับโทรศัศน์โดยไปที่ “การตั้งค่าเครือข่าย”
การตั้งคําภาษา
กลปุ่ม [■] เลือก การตั้งค่าระบบ > ภาษา และกดปุ่ม [OK] เพื่อเข้าสู่ รายการ กลปุ่ม [▲]/[▼] เพื่อเลือกภาษาที่ต้องการแล้วกดปุ่ม [OK]
การค้นหาช่องรายการ
สแกนช่องก่อนดูที่วีครั้งแรก จากนั้น ตรวจสอบ ให้แน่ใจว่าต่อยเสาอากาศอย่างถูกต้องแล้ว และเลือกแหล่งสัญญาณ เป็น ATV หรือ DTV
การค้นหาสัญญาณาล็อก (ATV)
หลังจากเลือกเหล่งสัญญาณ ATV แล้ว ให้ตบุ่ม[SB] และเลือก TV จากนั้นกตปุ่ม [OK] เพื่อเข้าสู่
- เลือก Channel Scan และกดปุ่ม [OK] จากนั้นเครื่องจะเริ่ม สแกนอัดโนมติ
- เลือกการสแกนด้วยตนเองแบบอะนาล็อก และตั้งค่าความมี่เริ่มต้น (Mhz) เลือก Scan Up หรือ Scan Down และกดปุ่ม [OK] เพื่อกันหา ช่องด้วยตามเอง
การค้นหาสัญญาณ (DTV)
หลังจากเลือกแหล่งสัญญาณ DTV แล้วให้กดปุ่ม[■]และเลือก TV>
Tuner Mode > DVBT/DVBC ตามที่คุณต้องการ
หลังจากเลือก DVBT
- เลือก TV > Channel Scan และกดปุ่ม [OK] จากนั้นเครื่องจะเริ่ม สแกนอัตโนมติ2. เลือก TV > Manual Scan > RF Channel และ กดปุ่ม [▶] เพื่อเข้าซู่ เลือกช่อง จากนั้นกดปุ่ม [OK] เพื่อดันหาช่อง ตัวตนเอง
หลังจากเลือก DVBC
- เลือก TV > Channel Scan และกดปุ่ม [OK] เพื่อบ้อน หลังจากตั้งค่าโหมดステกแลแล้ว เลือกสนเกน จากนั้งกดปุ่ม [OK] เพื่อบันหาช่อง
- เลือก TV > Manual Scan และตั้งค่าหวนนิย์ (KHz), การมองดูแล, Symbol Rate (Ksym/s) เลือกสนเกน จากนั้งกดปุ่ม [OK] เพื่อบันหาด้วยตนเองช่อง.
การบันทึกช่องรายการ
ในโหมด DTV lacks Record [•] จากนั้น committeesจะเริ่มบันทึก lacks [■] เพื่อหุคดและออกจากการบันทึก
กดปุ่ม [■] และเลือก การดิ้งค่า > ตั้งค่าบันทึก > รายการบันทึกจากนั้งกดปุ่มเพื่อแสดงปุ่มบันทึกไฟล์และขณะเล่น ให้กด [◀] / [▶] / ▶/[Ⅱ]/[■]. เพื่อค่าเบียนตามส่วน
หมายเหตุ: ฟังกั่นการบันที่กรองรับระบบไฟล์ FAT32 เท่านั้นระบบ ไฟล์อื่นจําเป็นต้องทําการฟอร์เมด ก่อนฟอร์แมตแนะนําให้สํารองข้อมูล ที่เป็นประโยชน์เกตัวท่านเอง
การตั้งค่า Time shift
เมื่อผู้ใช้ออกจากโปรแกรมชั่วขณะหนึ่ง ฟังก์ขึ้น Time Shift สามารถ หอุตราธการได้ชั่วตราว และบันที่กรายการไปยังที่เก็บข้อมูลเมื่อผู้ใช้กลับ มาหล่นรายการต่อ
ในโหมด DTV ให้คตุ้ม [■] และเลือกล็งค่า > ตั้งการบันที่ค์ > โหมด Time Shiftจากนั้นเกตปุ่ม [OK] เที่ย่อกซูรรการ,เลือก เปิด และเกตปุ่ม [II] ด้วยเลือก Time shift จะแสดงบนหนังจดและโปรแกรม จะอุ่นในสถานะเหตุข้าวิตว่า ให้คตุ้ม ▶ เพื่อเล่นไปแกรมต่อเกตปุ่ม [■] เพื่อเหตุผลและออกจากรายการจะเล่น ให้คต[◀][▶]▶ /[II]/[■] ตามที่คุณต้องการ
APP
กตุ้ม[♠] จากนับกลุ่ม[◀]/[▶] เที่เอล็อก“Andเพลิ่งซึ่งและ กต[OK] เที่เข้าใช้งานสําหรับ Youtube, Prime Video และ Netflix สามารถกลุ่ม[YouTube]. [prime video] และ [NETFLIX] ในโหมดตามบ้าน คุณสมาราธเปิดเครื่อง และใช้งาน Netflix โดยการกลุ่ม[NETFLIX] บริ่มไห MCCON โทรา
การตั้งค่าเครือข่าย
กต์ปีม [■■] จากนั้นมเลือก ตั้งทํา > เศรีอข่าย > การกําหนดค่า > อินเทอร์เพช จากนั้นมเลือกไร้สาย หรือ ยิเชอร์เน็ต
■ Wireless
- หลังจากเลือก Wireless แล้ว ให้กลุ่ม[OK] จากนั้นเลือก การตั้งต่ํา Wireless> แทนและกลุ่ม[OK] จากนั้นรายการเรื่องของคุณจะดันหาสัญญาณเครื่อข่ายใช้สายโดยอัดในมบัติ เครื่อข่ายที่ต้นหาโดยไม่มีไอดอน 📄 แสดงว่าเครื่องเชื่อมต่อถับเครื่อข่ายโดยไม่มีรหัสผ่าน เครื่อข่ายที่มีไอดอน 📄 แสดงว่ามีการเข้ารัสและคุณต้องเป็นรหัสผ่านที่ลูกต้องเพื่อเชื่อมต่อกับเครื่อข่าย
- เลือกเครือข่ายที่คุณต้องการเชื่อมต่อในรายการเครือข่าย และกดปุ่ม
- พิมท์รหัชผ่านการเชื่อมต่อเครือข่ายในกล่องและออกจากแป้น พิมพ์ จากนั้นเลือกเชื่อมต่อ และกดปุ่น[OK] เพื่อ,ซี่อมต่อเครือข่าย
- หาตวีอําดุลกซื้น ให้ล้าน ตั้งค่า Wireless > ตัวตนเอง และกตุ่ม [OK] เพื่อเจ้าสู่ ตั้งเชื่อเครือข่าย (SSID) และกตุ่ม [▶] เพื่อ เพื่อเจ้าสู่เลือกใหม่ความปลอดภัย จากนั้นบ้านรัสค่านที่ถูกต้องเพื่อเรียน.
- trafficกุณเลือกตั้งที่ Wireless > อัดโนมัติ จากนั้นบ้อน PIN หรือ PBC เพื่อเชื่อมต่อกับเครือข่ายอัดโนมัติ
■ Ethernet
- หลังจากเลือก อีเรอร์เน็ต แล้ว ให้กดปุ่ม [OK]จากนั้นเลือก IP Setting > Address Type > AUTO และเครื่องของคุณจะเชื่อมต่อ กับเครื่อข่ายโดยอัตโนมัติ
- เลือก Address Type > Manual และกตุ้ม [▲]/[▼]เพื่อเลือก IP Address Subnet Mask, Default Gateway, Primary DNS และ Secondary DNS เพื่อตั้งค่า จากนั้งกตุ้ม [⊃]ของคุมเตร์ขงจะ เช็ขมต่อกับเครือข่ายตัดโนนดิ
Wake On Lan / WakeOnWlan
อนุญาต์ให้ควบคุมค่านระบบเพื่อบัติศนีวิตโดยการส่งรูปแบบทางเทคนิค ที่ถุดกําตาหนัง (ใช้ได้เมื่อเชื้อมต่อเรือนข่าย) กลุ่ม [■] จากนั้นเลือก ตั้งค่า > เครือข่าย > การเก็บหนดค่า > Wake On Lan /Wake on Wan และกลุ่ม [OK] เพื่อเข้าสุระการ กลุ่ม [▲]/[▼] เพื่อตั้งค่าเป็น - เปิด “หรือ - ปิด” แล้วกลุ่ม [OK] เพื่ออื่นยัน
มัลติมเตีย
กลุ่ปุ่ม[♠]จากนั้งกลุ่ปุ่ม [▲]/[▼]/[◀]/[▶]เพื่อเลือก Media และกลุ่ปุ่ม[OK]เพื่อเช้าสู่ราชการ จากนั้งเลือกประเภทไฟล์จาก ภาพถ่าย เพลงวิธีไก
■ การเล่นไฟล์ในอุปกรณ์ติสก์ภายในเครื่อง Before
ก่อนเล่นไฟส์ติสก์
เสียบอุปกรณ์เก็บข้อมูล USB เท้ากับช่องเสียบ USB เลือกอุปกรณ์ดิสก์ ภายในเครื่องในไดเร็กทอร์ไไฟล์และกดปุ่ม [OK] เพื่อเข้าซู่เลือกไฟฟดเตอร์ เข้าหมายและกดปุ่ม [OK] เพื่อเข้าซู่ไฟฟดเตอร์ จากน้ําNKC [▲]/[▼]/
[◀]/[▶]เพื่อเลือกไฟล์เป้าหมายและกด▶เพื่อล่น กดปุ่น [⊃]เต็อกลับไปชังหน้าก่อนหน้า
คําแนะนํา:
- ไม่ควรใช้ USB ที่ไม่ได้มาตรฐาน
- ระบบมัลคิมิติย อาซมีข้อเจ้ากัดในรูปแบบไฟล์
- ไม่ควร Orthodoxอุปกรณ์ USB จะจะกําลังเส้นมิจะนั้นระบบหรืออุปกรณ์อาจมีปัญหา Algeriaที่จะเปลี่ยนอุปกรณ์ USB โปรดปิดแหล่งจ่ายไฟของเครื่อง
- ระบบรองรับมาตรฐาน USB 1.1 และอุปกรณ์ USB 2.0
- concentrate ไฟของช่อง USB คือ 500mA
- ขวะกําลังย่านหรือเล่นไฟล์ หากหน้าจอเกิดต้างหรือบางฟึ่งที่ชั่นเข้า
ใช้งานไม่ได้ให้ปิดเครื่องแล้วเบิดเครื่องใหม่อีกครั้ง
กตปุ่ม [OK] เพื่อแสดงข้อมูลหรือช่อนข้อมูล
หากต้องการเส้น กลวุ่ม [◀]/[▶]/▶/[■]/[■]
บนวีไมเทคนิทรรสเพื่อใช้งาน
การแก้ไขปัญหาเมืองต้น
■ มีจุดขาวเกิดขึ้นในหน้าจอโทรทัศน์และมีเสียจรบความ
- ตรวจสอบการต่อสายอากาศหรือสายเคบิลธีกทรั้ง
- ลําดับส่งประเทศไทย (VHF/UHF)
- ปรับทิศทางและตําแหน่งของเส Outcome
- ลองไร้ตัวเพิ่มสัญญาณ
■ไม่มีการแสดงภาพหรือเสียงบนหน้าจอหรือไฟแสดงสถานะไม่ติด
ตรวจสอบว่าสายไฟเชื่อมต่ออยู่หรือไม่
- มีเอบเส้นขึ้นในหน้าจอโทรทัศน์
อย่าใช้อุปกรณ์ไฟฟ้าข้างโทรพัศน์และปรับพิศทางเสาวอากาศ เทอลตสัญญาณรวมกวน
■ภาพช้อนเกิดขึ้นบนหน้างอที่วี
- ใช้สาหภาพที่รับสนุญญาณได้ดิ
- ปรับทิศทางของเส่าอากาศ
■ภาพไม่มีสี
เข้าการดั้งค่า "Video" เพื่อเพิ่มความอื่มตัวของสี
■ โทรทัศน์ไม่มีเสียง
- ปรับระดับเสียงให้อยู่ในระดับที่เหมาะสม
- ตตุ้ม [OK] แนวโมทคอนโทระเพื่อกลิ่กใหม่ตําตสื่อน
■ไม่มีสัญญาณภาพหรือไฟแสดงสถานะทะพิม
- ตรวจสอบสายเชื่อมต่อสัญญาณจากนั้นลองเชื่อมต่อใหม่
- เครื่องอาจอยู่ในใหมดสแดนบายค์บายหรือรีบตอยู่
■ ระยะรีโมทคอนโทรอัตนเกินไป
- ตรวจสอบสาเซ็อมต่อสัญญาเจานนั้นลองเซื่อมต่อใหม่
- เปลี่ยนแบตเตอร์
■ การเล่นวิศี Iceออนไลน์ข้ามาก
- โปรดอับเกรดแบบค์วิตท์เครือข่ายของกรณ์ให้สูงขึ้น
- โปรดลงเปลี่ยนเครือข่ายที่ติกว่า
■เครื่องทำงานข้า ระบบชัดข้องไม่สามารถใช้งานได้
ตัดการเชื่อมต่อเหล่งข่ายไฟก่อนและเชื่อมต่อหลังจากนั้นประมาณ
1-2 นาที ไหปิดไทรทัศน์อิกรรัง
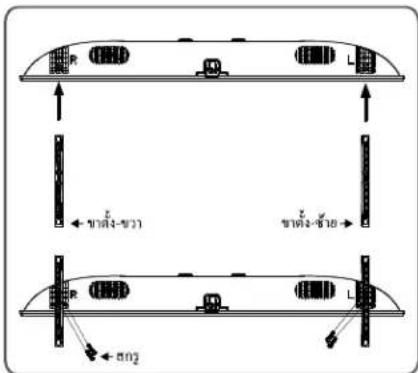
ค่าแนะนําในการติดตั้งชาโทรทัศน์
อันตับแรกให้วงวดเรื่องในแนวราบ แล้วตรวจสอบขตั้งต้านซ้าย-ขวา ตําแหน่งการวางให้กูกต้อง จากนั้นติดตั้ง ชาที่ด้านล่างของเครื่องตามทิศทาง ของลูกตรในรูปจากนั้นชั่นสกรุ
text_image
L L L L L ← 75° ← 60° ← 25°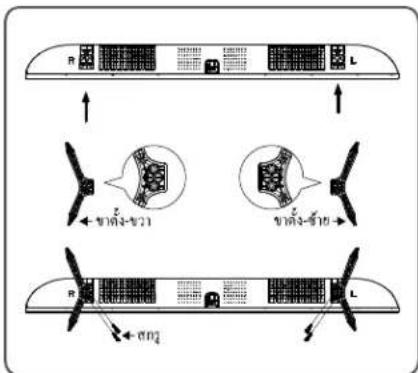
flowchart
graph TD
    A["R"] --> B["L"]
    B --> C["飞机部件1"]
    B --> D["飞机部件2"]
    C --> E["飞机部件3"]
    D --> F["飞机部件4"]
    E --> G["飞机部件5"]
    F --> H["飞机部件6"]
    G --> I["飞机部件7"]
    H --> J["飞机部件8"]
    I --> K["飞机部件9"]
    J --> L["飞机部件10"]
หมายเหตุ: ลักษณะของชาตั้งโทรทัศน์ภาอแตกต่างจารุบ โปรดอ้างขิงจากกุปกรณ์จริง
การใช้ชาแขวนสำหรับโทรศัศน์

ข้อควรระวัง
- เมื่อติดตั้งโทรทัศน์บนแน้ง โปรดเลือกตัวชีดติดผนังโทรทัศน์ที่เหมาะสม
ตรวจสอบให้แน่ใจว่าความสามารถในการรับน้ำหนักของผนังสำหรับ
การติดตั้งนั้นไม่น้อยกว่า 4 เท่าของน้ำหนักของชุดโทรทัศน์และตัวอีดติด ผนังเพื่อหลีกเลี่ยงการตกกระแทก - โปรดย้างอิงค่าแนะนําที่มาพร้อมกับโทรศัศน์และการติดตั้งขบหนดัง ตรวจสอบให้นแน่ใจว่าไม่มีสายเตบลหรือท่อร้อยสายในหนัง
- การให้ช่างเทคนิคทําการติดตั้ง บริษัทจะไม่รับผิดชอบต่ออุบดีเหตุในระว่าง
ที่เกิดขึ้นหรือความเสียหายที่เกิดจากการดิตตั้งโทรักษ์ที่ไม่เหมาะสม
หมายเหตุ:
- หาพบสกรูสำหรับอีตผนังทางด้านหลังไพรทัศน์ก่อนที่จะติดตั้งจะต้องยอดสกรูออกก่อน
- ควรเลือกซื้อสกรุที่ถูกต้องและเหมาะสมกับการใช้งาน
- หากมีสกรุ่นที่มาพร้อมกับขาแขวน ควรตรวจสอบว่าสามารถติดตั้งกับ ชุดโทรทัศน์ได้หรือไม่
32"/40":
ST4×10mm flat tail self-tapping screws 2pcs (option)
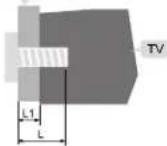
text_image
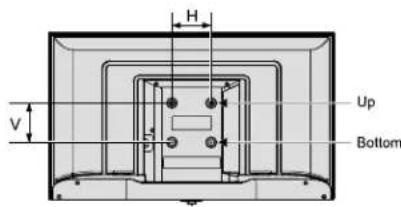
H V Up Bottomชุดขานวน
الله
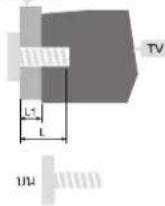
L1:ความหนาตัวยื้อผนิ้ง
L1:ความหนาตัวขีดผนัง
| ระยะทางและปฏิบัติ Panamaที่(แวดลัง แล้วตามปีว) | สรุทที่ได้ใช้ในทางที่ดื่อนวนนําการและสรุทปีว |
| 32": 100×100 | Up: 2 × M4 (L=8+L1),สรุทที่ยงBottom: 2 × ST4 (L='8+L1'),สรุทเกี่ยวล้อยแบบทางเบน |
| 40": 200×200 | Up: 2 × M4 (L=8+L1),สรุทที่ยงBottom: 2 × ST4 (L='8+L1'),สรุทเกี่ยวล้อยแบบทางเบน |
Contents
Safety Warning and Notice 1
Mounting and Connecting.... 3
Packing list 3
Mounting the TV set 3
Connecting peripheral equipment 3
Panel Control Keys 5
Remote Control 5
Basic Operations 7
Turning on/Standby 7
Signal source selection 7
Menu operation description 7
Smart TV 7
OSD Language setting 7
Channel scanning 7
REC option 8
Time shift option 8
APP 8
Network settings 8
Wake On Lan / Wake On Wlan 9
Multimedia player 9
Troubleshooting....10
Base Installation Instructions....10
Use of a TV wall mounting....11
Safety Warning and Notice
Thanks for choosing the high-performance and multifunctional intelligent LED TV produced by our company. This precious thing will bring you better audiovisual enjoyment. The design of this product has given consideration to factors affecting personal safety, and the product itself has gone through strict tests prior to delivery. However, improper operation may result in electric shock and fire disaster. To ensure safety, prolong the service life of this product, and make sure the best performance of this product can be given full play to, please read the manual and marking label carefully before using it and comply with the following safety instructions. Please keep the user manual for later use.
| Warning | May result in casualties | |
| Indicate the behaviors that must be prohibited | ||
| Attention | May result in personal injury or property losses | |

Indicate the operations that must be
performed
Under Following Conditions
● Power failure or unstable voltage
● Abnormal sound or smell from the device.
● AC power cord is damaged.
● TV set is damaged due to falling off, knock or impact.
● Any liquid or foreign matters enter into the TV set.
Turn off the TV set immediately, unplug the power cord from the power outlet, and contact authorized maintenance personnel.

- If coal gas or other flammable gases leak, do not unplug the power cord of the TV set or other electric appliances; instead, close the valve of the gas immediately and open the doors and windows.

Warning

● Only use 220 VAC/100-240VAC 50/60Hz power supply.
● All cables can be connected or pull out only after power supply is turned off.
- Do not fix the TV set on instable position, or else it may cause falling off, damage, or even fire.
- Do not put the TV set in the environment: 1. With direct sunshine, moisture, overheating, undercooling or heavy dust;
-
With flammable or explosive substance;
-
With flammable or corrosive gas;
-
In bathroom, kitchen, etc.
- Do not use damaged or improper power socket, and ensure that the plug and socket are connected properly.
- Keep the power plug and socket free of dust and metal pieces.
● Do not damage the power cord:
-
It is prohibited to refit the power cord;
-
Do not put heavy object on the power cord;
-
Keep the power cord away from heat source;
-
Do not drag the power cord when unplugging.

Warning

- Do not connect too many appliances to one power strip, or else it may cause fire due to high power consumption.
- Do not let open flame (e.g. lit candle) approach the TV set, or else it may cause electric shock or fire.
- Do not put the container filled with water on the TV set, to avoid electric shock or fire caused by water drop of splashing.
- Do not penetrate any sharp object, metal or liquid into the signal connector or air vents, to avoid short circuit and product damage as well as electric shock.
● The slots on the case is designed to release heat so as to assure that all inside components will not reach an extra high temperature and can work normally for a long time. Please do not cover the holes while place it.

Do not touch the plug with wet hands, or else it may cause electric shock.

Do not turn on the TV set in thunderstorm weather; instead, unplug the power plug and antenna connector to avoid lightning strike.

Do not disassemble the TV set by yourself, or else it may cause electric shock or fire. Contact qualified personnel for maintenance.

Attention
● Do not let children climb onto the TV set.
- Keep the small accessories away from children's reach to avoid swallowing.
- If the TV set won't be used for a long time, please turn off the device and unplug the power cord.
Before cleaning the TV set, unplug the power cord and wipe with soft cloth; do not use chemical reagents and avoid foreign substances entering into the device. The incorrect cleaning (such as cleaning fluid, water, etc) may lead to damage of product's appearance, erasing products printing information, even flow into the machine and damage components, cause machine can not display.

Attention
● To adjust the position or angle of the TV set, please disconnect all wires and move slowly to avoid falling off.
- Do not rub with hard object, knock at, bend or squeeze the screen.
- Do not use machine immediately after transferring machine to the places with high temperature from low temperature, which will cause fogging inside machine and failures.
- If the screen is broken and the liquid splashes on skin, please wash with clean water immediately for 15 minutes, and go to see your doctor.
● To carry the TV set with hands, please grasp the corners and hold the bottom; do not apply force on the panel.
- Displaying the same image for a long time or active image with fixed words, icons will leave "image persistence" on screen which will not disappear after powering off for a long time. This undesirable phenomenon is not covered by warranty.
● Healthy TV watching:
1. Watch in appropriate light; poor light or long time watching may hurt your eyes.
2. Adjust the volume appropriate to avoid hurting your hearing.
● Unplug the power cord of the device to cut off the power supply.
- If a power plug or appliance coupler is used as disconnecting device, it should ensure easy operation.
● Power plug shall be connected reliably. Loose power plugs may cause sparkle and fire.
- All the technical specifications in the user's manual and on the packaging are subject to changes without prior notice. If there is slight deviation between the user's manual and actual operation, the latter shall prevail.
HDMI™
HIGH-DEFINITION MULTIMEDIA INTERFACE
The terms HDMI, HDMI High-Definition Multimedia Interface, HDMI Trade Dress and the HDMI Logos are trademarks or registered trademarks of HDMI Licensing Administrator, Inc.
Dolby Audio
Manufactured under license from Dolby Laboratories. Dolby, Dolby Audio, and the double-D symbol are trademarks of Dolby Laboratories
Mounting and Connecting
Packing list
- The TV set.
- User Manual.
- Remote control.
- Power cord (or attached to TV set).
- AV transfer cable (Optional).
Mounting the TV set
Tips on Installation
● The TV set should be mounted near the AC power socket for easy plugging and unplugging.
- For your safety, please select appropriate wall mount bracket or base.
● To avoid hurt, it is required to place the TV set on stable plane, or fix on firm wall.
- Ask qualified personnel to mount the TV set on the wall. Improper mounting may result in instable TV set.
- Do not place the TV set at any place susceptible to mechanical vibration.
- Do not place the TV set at any place that insects may enter.
- Do not mount the TV set against air conditioner, or else the internal panel of the display may condense moisture and cause failure.
- Do not place the TV set at any place with strong magnetic field, or else it may be interfered with and damaged by electromagnetic wave.
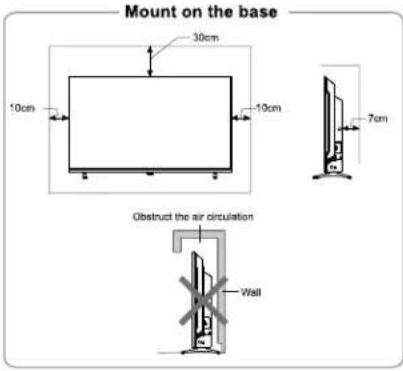
text_image
Mount on the base 30cm 10cm 10cm 7cm Obstruct the air circulation Wall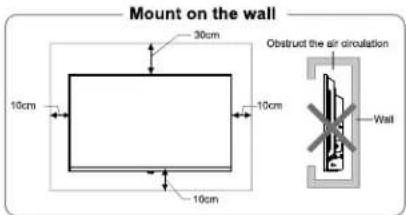
text_image
Mount on the wall 30cm 10cm 10cm 10cm Obstruct the air circulation WallVentilation
- Please keep this space at least around the TV, as shown in the figure.
- Do not cover the air vents or insert any object into the enclosure.
- Do not put the device in limited space, e.g. bookcase or embedded closet, unless the TV set is properly ventilated.
Connecting peripheral equipment
Remark:
- USB interfaces support peripheral equipment, including USB mass storage device, USB mouse, keyboard, etc.
- When you need to connect the device which support the ARC function, please select the HDMI-1 interface.
- HDMI connector can realize DVI connector function with external HDMI/DVI commutator.
- The peripheral equipment and cables described in this manual should be purchased separately.
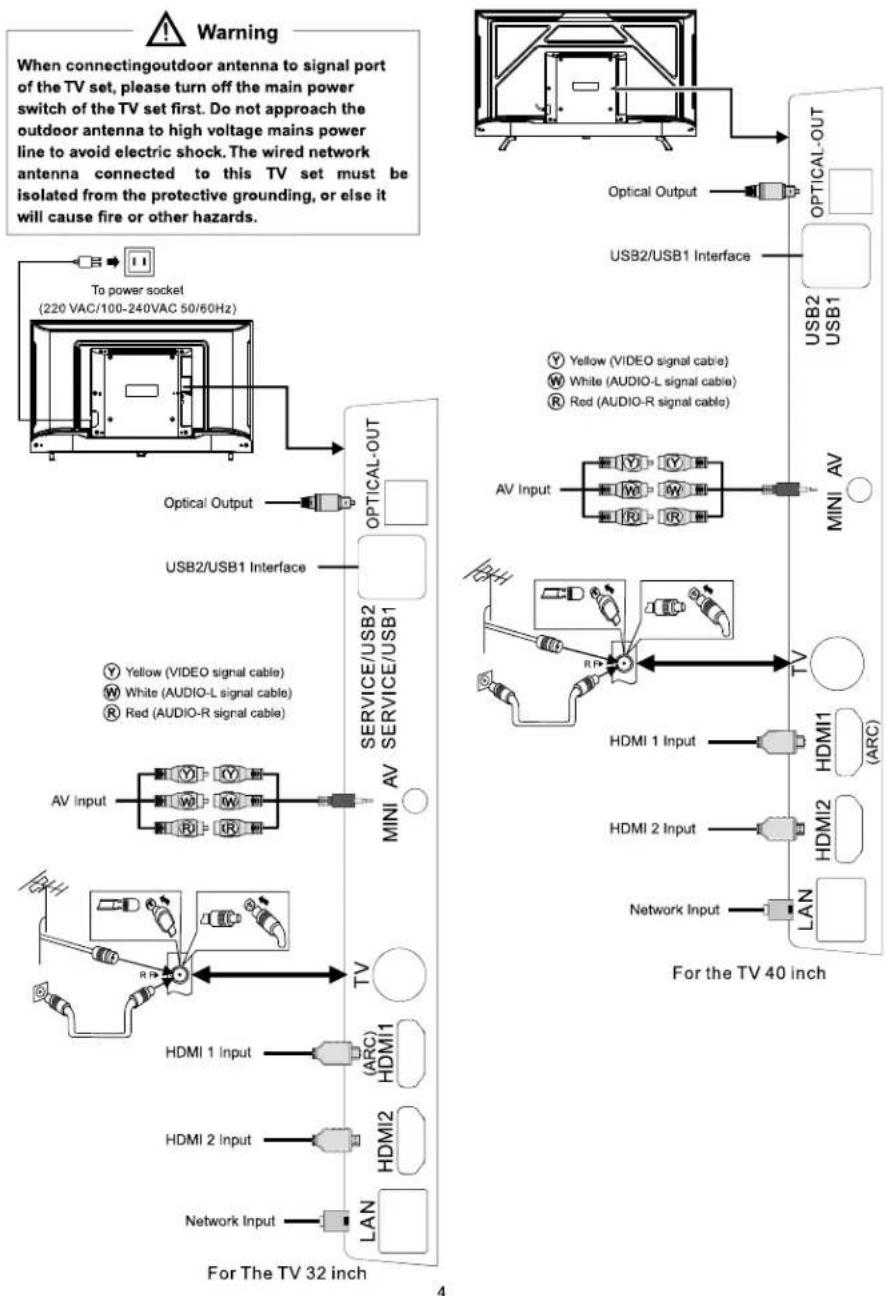
text_image
Warning When connectingoutdoor antenna to signal port of the TV set, please turn off the main power switch of the TV set first. Do not approach the outdoor antenna to high voltage mains power line to avoid electric shock. The wired network antenna connected to this TV set must be isolated from the protective grounding, or else it will cause fire or other hazards. To power socket (220 VAC/100-240VAC 50/60Hz) Optical Output OPTICAL-OUT USB2/USB1 Interface USB2 USB1 Y Yellow (VIDEO signal cable) W White (AUDIO-L signal cable) R Red (AUDIO-R signal cable) AV Input MINI AV AV SERVICIE/USB2 SERVICE/USB1 AV MINI For the TV 40 inch HDMI 1 Input HDMI2 Network Input LAN For The TV 32 inch HDMI 1 Input HDMI2 Network InputPanel Control Keys
text_image
Technical diagram showing a monitor mounted on top with labeled parts and a separate view of a device with internal components.-
Power LED indicator and remote receiving window.
-
⏻ key:
Entering power on or standby with the ⏻ key:
①. When insert the power code plug into the electrical socket, you can press ⏻ key to turn on the TV.
②. In the power-on state, press ⏻ key to display the function menu, and press ⏻ key to select the ⏻ icon, then keep pressing ⏻ key to turn off the TV.
After the TV is turned on:
①. In the non-OSD menu, press ⏻ key to display the function menu.
②. In the function menu, press ⏻ key to select the next item, and keep pressing ⏻ key to confirm.
Remark:
①. The appearance varies depending on the model, and the actual product shall prevail.
⑦. Please use the remote control for more operation.
Remote Control
Method for Installation of Remote Control ttery
Remove the battery compartment cover and insert two AAA (No. 7, 1.5V) batteries; make sure the polarity of the batteries is in compliance with the polarity mark "+" and "-" in the battery compartment of the remote control.
Precautions for using the remote control
● The remote control should be pointed at the remote control sensor during operation. An object placed between the remote control and the remote control sensor may impede normal operation.
● The remote control should be prevented from strenuous vibration. Besides, please do not set or place the remote control under direct sunshine, as heating power may result in deformation of the remote control.
● Remote control failure may occur when the remote control sensor of the main unit is under direct sunshine or strong lighting; in this case, please change the angle of lighting or this TV set, or operate the remote control near the remote control sensor.
- Low battery will influence the remote control distance, in which case, the battery should be replaced with a new one. If the remote control is going to be idle for a long time or the battery runs out, please take the battery out to prevent the remote control from being corroded by battery leakage which may result in damage and failure of the remote control.
- Please do not use batteries of different types. It is not allowed to use old and new batteries together; the batteries should be replaced in pair.
- Please do not throw the batteries into fire or charge or decompose the batteries; do not charge, short-circuit, disassemble/assemble, heat or burn used batteries. Please dispose the waste batteries pursuant to relevant regulations on environmental protection.
Keys of the Remote Control
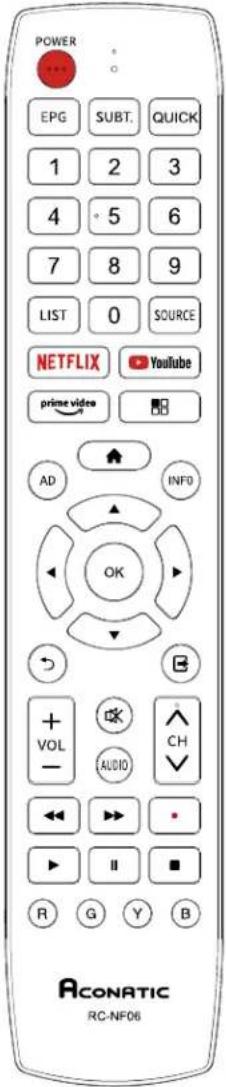
text_image
POWER EPG SUBT. QUICK 1 2 3 4 5 6 7 8 9 LIST 0 SOURCE NETFLIX YouTube prime video AD INFO OK VOL AUDIO CH R G Y B ACONATIC RC-NF06| Keys | Function |
| Power (⋯) | Switch between working and standby status. |
| Mute (OK) | Turn on/off the sound. |
| Number keys | Select the channel or input numbers. |
| LIST | Show channel list. |
| AD | Turn on/off the associated audio. |
| prime video | Open prime video application. |
| YouTube | Open YouTube application. |
| SOURCE | Show signal source menu. |
| NETFLIX | Open Netflix application. |
| Home (▲) | Show home page. |
| Menu (■) | Show OSD menu. |
| ◀,▶,▲,▼ | Select items or adjust values. |
| OK | Confirm the operation. |
| Return (⊃) | Return to previous menu page. |
| Exit (☒) | Exit OSD menu or application. |
| Red key | Special function keys. |
| Green key | |
| Yellow key | |
| Blue key | |
| INFO | Show information bar. |
| VOL+/- | Turn up/down the volume. |
| CH+/-(^CH∨) | Change program channel. |
| EPG | Electronic program guide. |
| AUDIO | Select audio language. |
| SUBT. | Select subtitle language. |
| QUICK | Quick menu. |
| ◀◀ | Fast backward. |
| ▶▶ | Fast forward. |
| Record (•) | Start to record current program. |
| ▶(play) | Play function in multimedia. |
| ■ | STOP. |
| II | Time shift key(PAUSE). |
Note: The appearance of the remote control may be different from this diagram; please refer to the real object as standard.
Basic Operations
Remark:
- The keys operation refers to remote control operation, for panel control keys operation please refer to "Panel Control Keys" operation explanation.
- The [▶] key means direction key and the ▶ key means play function key
- Menu Operation Instruction in this manual is explained according to TV mode. The operations in other modes are similar to the one in TV mode, and users can take it as reference.
- Before power-on platform, please make sure that the power supply is stable.
- The software of different countries is different. The specific software operation should be subject to the actual situation.
- Because the product is constantly updated, the software is upgraded at any time, if the software operation is different from the actual operation, please refer to the actual product.
Turning on/Standby
Plug power cord into the electrical socket, then press [⏻] key to turn on the TV.
When you first use the TV, it goes into the initialization settings, and set it according to your needs.
In power on state, press [☐] key to switch to standby mode.
★ Special Tips: This device adopts energy saving technology. If there is no signal input in power on state, it will enter standby state automatically in five minutes; The device will enter standby state automatically at specified sleep time.
Signal source selection
You can connect various devices to the TV set and view high quality images. If the video device has HDMI, AV and other video output ports, you can select one of them and connect to corresponding input ports of the TV set. After connected, turn on the device and press [SOURCE] key, then menu of signal source will be displayed on the screen. Press [▲]/[▼] key to select the input signal, and press [OK] key to confirm.
Menu operation description
Press [☐] key to show the main menu on the screen:
- Press [▲]/[▼] key to select a menu from Video, Audio, TV, Setup, Parental, About.
- Press [OK]/[▶] key to enter the submenu.
- Press [▲]/[▼] key to select an item in the menu.
- Press [OK] key to confirm.
- Press [◀]/[▶] key or [▲]/[▼] key to adjust the value or setting.
- Press [⊃] key to return to previous menu when the TV displays the submenu.
- During menu operation, the icons of invalid options will change into grey.
Note: The default password for the lock system is 0000.
Smart TV
Press [▲] key to show the home page.
-
Press [◀]/[▶] key to select an application;
-
Press [OK] key to run the application;
-
Press [☐] key to exit the smart mode.
Note: Before accessing the Internet, please connect your TV set to the Internet. Refer to "Network Settings" for details.
OSD Language setting
Press [■] key, select Setup > OSD Language and press [OK] key to enter. Press [▲]/[▼] key to select the desired language, and then press [OK] key.
Channel scanning
Scan the channels before watching the TV for the first time. Before scanning, please make sure that the antenna has been connected properly, and select the signal source as ATV or DTV.
ATV Scanning
After selecting ATV source, press [☐] key, and Select TV, then press [OK] key to enter.
-
Select Channel Scan, and press [OK] key, then the machine starts auto scanning.
-
Select Analog Manual Scan, and set Start Frequency (MHz). Select Scan Up or Scan Down, and press [OK] key to manually search for channels.
DTV Scanning
After selecting DTV source, press [■■] key, and select TV > Tuner Mode > DVBT/DVBC according to your needs.
After select DVBT.
-
Select TV > Channel Scan, and press [OK] key, then the machine starts auto scanning.
-
Select TV > Manual Scan > RF Channel, and press [▶] key to enter. Select channel, then press [OK] key to manually search for channels.
After select DVBC.
- Select TV > Channel Scan, and press [OK] key to enter. After setting Scan Mode, select Scan, then press [OK] key to search for channels.
- Select TV > Manual Scan, and set Frequency (KHz), Modulation, Symbol Rate (Ksym/s). Select Scan, then press [OK] key to manually search for channels.
REC option
In DTV mode, Press Record [•] key, then the system begins recording. Press [■] key to stop and quit recording.
Press [■] key, and select Setup > Record Setting > Record List, then press [OK] key to display the record files and play them.
While playing, press [◀]/[▶]/▶/[■]/[Ⅱ] key to handle.
Note: The recording function can only support memorizer with FAT32 file system. Memorizer with other file systems need to be formatted; Before formatting memorizer, back-up useful data because the content of memorizer can not recover after formatting.
Time shift option
When user leaves program for a short time, time-shift function can suspend and cache the playing program to U disk. When user resumes playing, the program can continue to be played.
In DTV mode, press [■] key, and select Setup > Record Setting > Time Shifting Mode, then press [OK] key to enter. Select on, and press [II] key. Time Shift option menu shows on the screen and the program is in suspended state. Press ▶ key to resume play program. Press [■] key to stop and quit time-shift.
While playing, press [◀◀]/[▶▶]/▶ /[■]/[Ⅱ] key to handle.
APP
Press [▲] key, then press [◀]/[▶] key to select an application and press [OK] key to enter. As to Youtube, prime video, netrange and Netflix, you can press the [YouTube]. [prime video] and [NETFLIX] keys to use them. In the standby mode, you can turn on the TV and use Netflix by pressing [NETFLIX] key on the remote control.
Network settings
Press [■] key, then select Setup > Network > Configuration > Interface, select Wireless or Ethernet.
Wireless
- After selecting Wireless, press [OK] key, then select Wireless Setting > Scan, and press [OK] key, then the wireless network signals are searched by your machine list automatically. The network searched without icon indicates that the machine connects to the network without a password. The network with icon indicates that it is encrypted and you must enter the correct password to connect to the network;
- Select the network you want to connect to in the network list, and press [OK] key;
- Type network connecting password in the box and exit keyboard, then select Connect and press [OK] key to connect to network.
- If the network is hidden, select Wireless Setting > Manual, and press [OK] key to enter. Set the network name (SSID), and press [▶] key to enter. Select security mode, then enter the correct password to connect.
- If you select Wireless Setting > Auto, then enter the PIN or PBC to automatically connect to the network.
■ Ethernet
- After selecting Ethernet, press [OK] key, then select IP Setting > Address Type > AUTO, and your machine will connect to the Network automatically;
- Select Address Type > Manual, and press [▲]/[▼] key to select IP Address, Subnet Mask, Default Gateway, Primary DNS and Secondary DNS to set them. Then press [⊃] key, your machine will connect to the Network automatically.
Wake On Lan / WakeOnWlan
It allows remote systems to wake up the sleeping TV by sending a frame of a specific format which the client anticipates. (It is available when network is connected.)
Press [■] key, then select Setup > Network > Configuration > Wake On Lan / Wake On Wlan, and press [OK] key to enter. Press [▲]/[▼] key to set it as "On" or "Off", and press [OK] key to confirm.
Multimedia player
Press [▲] key, then press [▲]/[▼]/[◀]/[▶] key to select Media and press [OK] key to enter. Select the file type from Photo (☐), Music (☐), Video (☐).
■ Playing Files in local disk device: Before playing files in the local disk, insert the USB mass storage device into the USB interface.
Select local disk device in the file directory and press [OK] key to enter. Select the target folder and press [OK] key to enter the folder. Then press [▲]/[▼]/[◀]/[▶] to select the target file and press ▶ to play it. Press [⊃] key to return to previous page.
Attention:
-
Nonstandard USB devices can't be recognized probably; in this case, please replace a standard USB device;
-
The stream media system has certain restriction on the format of files; the playing will be abnormal if it is out of the system restriction;
-
Do not remove the USB device while playing, or else the system or device may have problem; Before replace the USB device, please turn off the machine's power supply;
-
The system supports standard USB1.1 and USB2.0 devices, such as USB mass storage devices and removable hard disks;
-
The maximum output current of the USB port of this device is 500mA, and the self-protection will be enabled if it is beyond this limit; please use external power supply if an external device of higher current will be connected;
-
The system is complicated; when it is reading or playing files, the screen may be still or certain functions may be invalid due to the compatibility and stability of the USB device; in this case, please turn off the device and re-initialize the system.
While playing, press [OK] key to display or hide the toolbar. Press [◀]/[▶]/▶/[■]/[■] key on the remote control to operate.
Troubleshooting
■ Snowflake spots occur in the TV images and there is noise in accompanying sound.
- Check if the antenna plug is loose or the cable is in good condition.
- Check the antenna type (VHF/UHF).
- Adjust the direction and position of the antenna.
- Try to use signal enhancer.
■ There is neither display nor sound on the screen. The indication light is not on. Check if the power line is connected.
■ Dotted line or strip disturbance occurs in TV images.
Do not use electric hair dryer aside the TV set and adjust the antenna direction to reduce disturbance.
■ Double images occur on the TV screen.
- Use high oriented antenna.
- Adjust the direction of the antenna.
■ The images are colorless.
Enter "Video" setting to increase color saturation.
■ The TV has no accompanying sound.
- Adjust the volume to a proper degree.
- Press [OK] key on the remote control to cancel mute mode.
■ No signal input images show on the machine screen. The indicator light is blinking.
-
Check if the signal connecting cable is loose or falls off. Reconnect it.
-
The machine may be in standby mode, please reboot.
■ The remote control distance is short or out of control.
- Remove the object to avoid blocking the remote control receiving window.
- Replace the battery.
■ Online video play is very slow.
- Please upgrade your network bandwidth to a higher one.
- Please try to replace with other addresses to obtain better resources.
■ Machine is slow, system crash, can't operate the machine.
Disconnect the power supply first, and connect the power supply after about 1-2 minutes, then turn on the TV again.
Base Installation Instructions
Put the machine flat first, distinguish left and right base and base installation front and back direction, then install the bases in the bottom of the machine back cover as arrow direction in figure. Align screw holes, then fasten screws (notice that base module has to be adjusted at figure status, otherwise it cannot be installed in.)
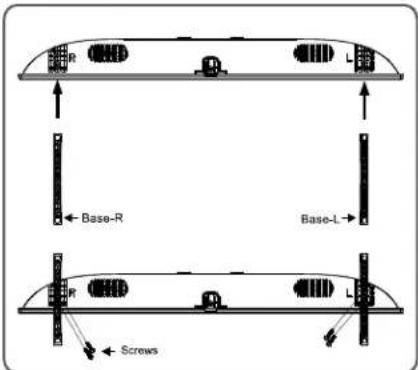
text_image
R L ← Base-R Base-L R L ← Screws
text_image
R L Base-R Base-L F L ScrewsRemark: The actual base and machine appearance may be different from pictures; please refer to the actual device.
Use of a TV wall mounting
Warning
- Please purchase a suitable TV wall mount when mounting your TV on the wall.
- Ensure that the bearing capacity of the wall for mount installation is no less than 4 times the weight of the TV set and the wall mount so as to avoid falling.
- Please refer to the instructions provided with the TV set and wall mount for installation.
- Make sure there is no cable or conduit in the wall section where a wall mount will be installed.
- Please entrust a professional technician to complete installation. The company shall not be liable for accidents, personal injury or damage caused by improper installation of TV set.

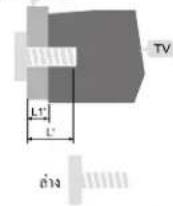
text_image
H V Up BottomWall mount
Up
Wall mount
Bottom
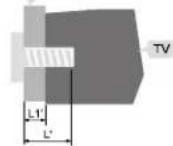
L1: Thickness of wall mount
L1': Thickness of wall mount
| Distance between holes on the wall(H×V)(mm) | Required screws (recommended bolt length)(mm) |
| 32": 100×100 | Up: 2×M4 (L=8+L1), Machine screws Bottom: 2×ST4 (L'=8+L1'), Flat tail self-tapping screws |
| 40": 200×200 | Up: 2×M4 (L=8+L1), Machine screws Bottom: 2×ST4 (L'=8+L1'), Flat tail self-tapping screws |
Note:
- If any screws are found in the screw hole for wall mount behind the TV set before installing the wall mount, the screws shall be removed and put in place for later use.
- Please buy the wall screws according to the actual situation.
- If there are flat tail self-tapping screws in the accessories, please decide whether it is suitable for use according to the actual situation of the wall mount.
32"/40";
ST4×10mm flat tail self-tapping screws 2pcs (option)
Aconatic
บริษัท ไชป์ เอเรียนท์ ไทย จํากัด (มหาชน) HIFI ORIENT THAI PUBLIC COMPANY LIMITED
83/161 -162 ของนางศ์ราน47(ขันตต2) ทิม. 0-2954-5281, 0-2580-6955 แขวงซุ่งสหงน้อง เดตหลักที่ Core Line. 02-591-9444, 02-589-5115 กรุงเทพมหานกร 10210
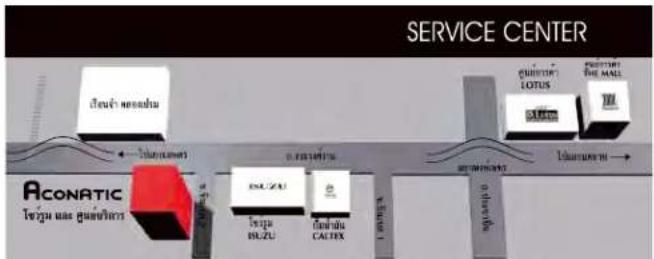
flowchart
graph LR
    A["Service Center"] --> B["ACONATIC"]
    B --> C["Address block: Tewu's neoadju"]
    B --> D["Address block: Tewu's suu guanlalara"]
    B --> E["Address block: SUZU"]
    B --> F["Address block: CATEX"]
    B --> G["Address block: LOTUS"]
    B --> H["Address block: LOTUS"]
    B --> I["Address block: LOTUS"]
    B --> J["Address block: LOTUS"]
    B --> K["Address block: LOTUS"]
    B --> L["Address block: LOTUS"]
    B --> M["Address block: LOTUS"]
    B --> N["Address block: LOTUS"]
    B --> O["Address block: LOTUS"]
    B --> P["Address block: LOTUS"]
    B --> Q["Address block: LOTUS"]
    B --> R["Address block: LOTUS"]
    B --> S["Address block: LOTUS"]
    B --> T["Address block: LOTUS"]
    B --> U["Address block: LOTUS"]
    B --> V["Address block: LOTUS"]
    B --> W["Address block: LOTUS"]
    B --> X["Address block: LOTUS"]
    B --> Y["Address block: LOTUS"]
    B --> Z["Address block: LOTUS"]
หมายเหตุ : บริษัทอลสวนเสี่หอ์ในการเปลี่ยนแปลงรายการของสมนาคุณและรายละเอียดสินค้าโดยมีต้องแจ้งให้ทราบล่วงหน้า