
CBK-MH01 - Ukategoriseret SONY - Gratis brugsanvisning og manual
Find enhedens vejledning gratis CBK-MH01 SONY i PDF-format.


Brugerspørgsmål om CBK-MH01 SONY
0 spørgsmål om dette apparat. Besvar dem du kender, eller stil dit eget.
Stil et nyt spørgsmål om dette apparat
Download vejledningen til din Ukategoriseret i PDF-format gratis! Find din vejledning CBK-MH01 - SONY og tag din elektroniske enhed tilbage i hånden. På denne side er alle dokumenter nødvendige for brugen af din enhed offentliggjort. CBK-MH01 af mærket SONY.
BRUGSANVISNING CBK-MH01 SONY
SONY.
4-419-194-01(1)
Monitor Hood
取扱説明書
Operating Instructions
お買い上げいただきありがとうございます。
注意 電気製品は、安全のための注意事項を守らないと、
はかをしにり火込の相当に損害を与えることがあります。
この股証説明書には、患者が活くための書を注意言葉明と先後の取り扱いの条件としてあります。この股証説明書をよくお読みのうえ、製出を今にお使いください。若話かになった上とは、いつでも見られるところにあず保管してください。
CBK-MH01
© 2011 Sony Corporation Printed in Japan

この説明書は、再生館を使用しています。
Printed on recycled paper.
[Unreadable]
「ソニー業務用商品相談窓口のご案内」にある窓口へ
ソニー株式会社 〒1080075 東京都港区酒南171
http://www.sony.net/
日本語
安全のために
ソニー農品は安全に充分保護して設計されています。しかし、電気農品は、すべてがつないかを説明され、農業やその他の事故によりけが死したり廃りの物品に汚染を写えたりすることがあります。当途を除くために次のことを必ず守りください。
- 安全のための二重事項がある。
故障したり装潢したら使わずに、ソニーのリービス窓口に相談する。
警告表示の意味
この家族説明書をこび製生では、次のような表示をしています。表示の内容をよく理解してから本文をお読みください。
注意
この表示の注意事項を守らないと、毎局やその他の事故によりがやしたり返近の物品に被害を与えることをございます。
行為を指示する記号

注意
下記の注意を守らないと、けがをしたり周辺の物品に損害を与えることがあります。
機器や部品の取り付けは正しく行う

ネジを愛めずに便らと、LCDモニターへの創意などで落下して、オペの位置となるおそれがあります。
指示
保証書とアフターサービス
保证書
- この公室には保証書が測定されていますので、古詩の上づの際の受け取りください。
- 所定の市場の記入および記載内容をお達成のうえ。大切に保存してください。
アフターサービス
調子が無いときはますチェックを
の説明書をどう一定ご属になってお来べくにさい。
それでも具合が悪いときは
お行いづけ、または添付の「ソニー会利用製品のご相談書目の企業内」にある近くのソニーのノーゼスをにご相談ください。
保证期間中の修理は
保証書の記載内容に基づいて修繕させていただきます。詳しくは保証書をご覧ください。
保証期間経過後の修理は
処理によって軸軽が維持できる場合。ご要引により各利整置させていただきます。保証調査中の処理など、アノターサービスについてで不明な別は、改買い上げます。またはソニーのサービス業団にお問い合わせください。
A
日本語
CEK-VH01は、ソニーソリッドステートメエリーガムエーター(NVA)SK/FL3以降、カムエーターと味噌COモニターに攻って付え、ルベガ通化COモニターの細胞を見ることができるモニターフードです。最大75までの角値はCOモニターの角値を含いたり、ルベガ通化を見上げて白血にCOマニター間囲を見ることもできます。
使用上のご注意
カムコーターのLCD、B LGITを液晶ディスプレイバックライトはイッチとLCD-BRIGHT(液晶ディスプレイできる場合)オタンはモニターフドを取り付けた後は便えません。取り付け前に月間するか、カムコータのメニューを使ってLCDモニターの心心を判断してください。
◆ 調解の_かたは、P4W+3K+2Lの取扱説明書をご覧ください。
カムコーダーを得当する際点でニーラーフードを示すしてください。健康や教育では定つまみが届み、カムコ ダーやモニターフードの通信についてもおれがあります。
モニターフードを組み立てる
モータ フ - H2K M-HOは、出荷に以下の部分に分かれています。
■ ルーベストリー (アイドー7を発行)
1. 2023年7月1日
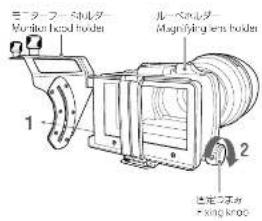
1 モニターフードホルダーの穴にルーベホルダーの軸を差し込む。
2 固定つまみを右へ [OCK方向へ] 回して締める。
モニターフードを取り付ける
カムニーダー PMW F3K/F3L の LCD ニターを開き、エニターノードをカムニーダーへ取り付します。
◆ ICDエニターの関係方法。PHAW F3K/F3Iの取扱説明書の ICDエニターを検討する。
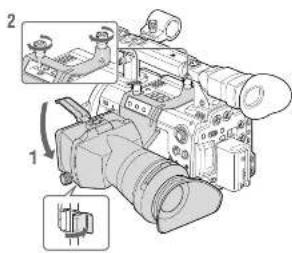
1 ルーベホルダーをLCDモニターにはめ込み、バンドを留める。
2 カムコーダーのアクセサリー取り付けネジ穴(か所)へモニターフードホルダーをネジ止めする。
[Non-Text]
B
English
The CBK-MH01 Monitor Hood is designed to be attached to the LCD monitor of the PMW-F3K/F3L Solid-State Memory Camcorder (hereinafter "the camcorder") to enable viewing the screen of the LCD monitor through the magnifying lens of the CBK-MH01.
The CBK-MH101 allows you to adjust the angle of the LCD monitor within 75 degrees or to view the LCD monitor screen directly by flipping up the eyepiece.
Precautions
The LCD BLIGHT (LCD backlight) switch and LCD BRIGHT (LCD brightness) button cannot be operated after the monitor hood has been mounted on the camcorner. Operate the switch/button before mounting or use the camcorner's menu to adjust the brightness of the LCD monitor.
For me adjustment, refer to the camcorner's Operating Instructions.
- Detach the monitor hood before transporting the camcorder. Otherwise the fixing knob may be loosened by shock or vibrations and cause damage to the camcorder and/or the monitor hood.
Assembling the Monitor Hood
The CBK MH01 Monitor Hood comes from the factory with the following two
• Monitor hood holder
- Magnifying lens holder (with the eyepiece mounted) First assemble the monitor hood.
1 Insert the axis on the magnifying lens holder into the hole on the monitor hood holder.
2 Tighten the fixing knob by rotating it clockwise (toward the LOCK direction).
Attaching the Monitor Hood to the Camcorder
Open the LCD monitor on the PMW F3K/F3L camcoror and attach the monitor hood to the camcoror.
For how to open the LCD monitor, refer to "Adjusting the LCD Monitor" in the operator's Operating instructions.
1 Fit the magnifying lens holder onto the LCD monitor and fasten the buckle of the belt.
2 Tighten the two screws on the monitor hood holder in the accessory mounting screw holes on the camcorder.
日本雨
アイビースの角度調整をする

最大75°の電圧で「モニターとメイピースの内座を測量することができる。
1 ルーベホルダーの固定つまみを左へ回してゆるめる。
2 アイビースの角度を調整する(最大5°)。
3 固定つまみを右へ【OCK方向へ】回して締める。
已注意
- アイビ ス部分を持ってカムコ ダ を持ち上げにりしないでください。
LEDモニターのセンスに通盘の人が知わり、送れるされがあります。
固定すまちを繰めた状態で無心に力を加えないでください。カムコーダーや
十二ターノードが改訂する場合があります。
アイビースを開く

アイバースを開けると「CDモニターの画面を直接見ることができます。
1 ルーベホルダー底面のクリップを押してはすす。
2 アイビースを上に開く。
アイビースは、120歳いた位置でロックします。
通はロック位置で使用してください。
ロック位置からさらに開くこともできますが、再度120”の位置でバックした場合は、いったもの同じ位置までもしてから間を直してください。
アイピースを取りはす

モニターフードバルダーとルーベホルダーをカムコーダーに取り付けにする。ノイビースにけを取りはやすことができます。
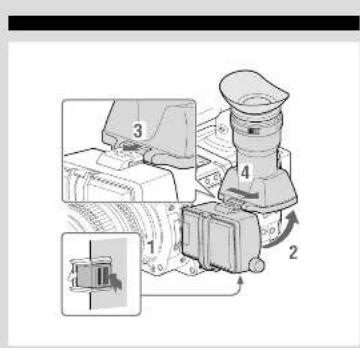
1 ルーベホルダー底面のクリップを押してはす。
2 アイビースのルーベ面がルーベホルダーの上面と平行になるように上に開く。
3 ルーベホルダー上面のボタンをアイビースと反対の方向にスライドさせ、ロックをはずす。
4 アイビースを水平にスライドさせて取りはす。
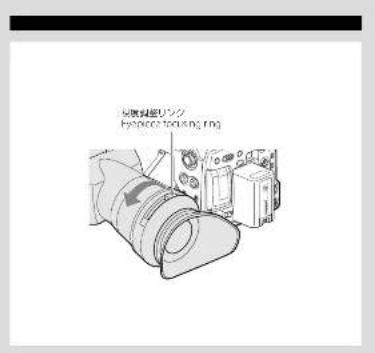
アイピースの視度を調整する

アイピストの程度調移リングを作して、面換ではしっかり昇るように調移することができます。
主な仕様
質量
约140g
生様および外国は、改良のため予告なく変更することがあります。为了承ください。
お使いになる前に、必ず動作を行ってください。故除その他にどう企業上の機会損失等は保証期間および保証期間経過後にいかわらず、残額はいたしかねますのでご了ぶください。
English
Adjusting the Angle of the Eyepiece

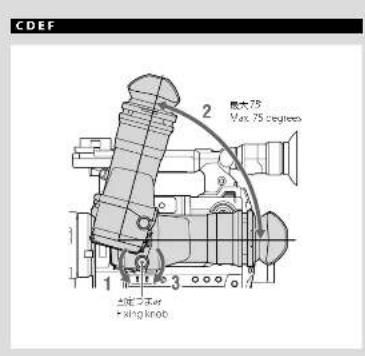
The angle of the LCD monitor and eyepiece can be adjusted within 75 degrees.
1 Loosen the fixing knob on the magnifying lens holder by rotating it counterclockwise.
2 Adjust the angle of the eyepiece (as much as 75 degrees).
3 Tighten the fixing knob by rotating it clockwise (toward the LOCK direction).
Notes
• Do not lift up the cancorder holding the eyepiece.
Doing so may damage the camcorder, as excessive force may be applied to the hinge of the LCT monitor.
- Do not apply excessive force to the camcorder and/or monitor hood when the fixing knob is tightened. It may lead to damage to the camcorder and/or the monitor hood.
Opening the Eyepiece

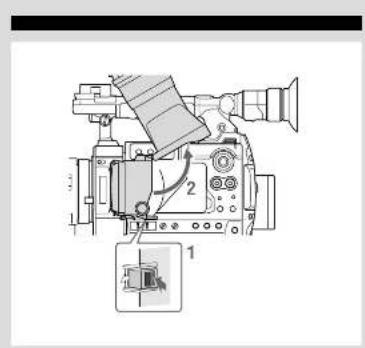
You can directly view the LCD monitor screen by opening the eyepiece.
1 Push to release the clip on the bottom of the magnifying lens holder.
2 Flip up the eyepiece.
It locks at the 120-degree position.
Normally use the eyepiece in the locked position.
Although you can open it farther from the locked position, once return it to the closed position to lock at the 120 degree position again.
Detaching the Eyepiece

You can detach the eyepiece only with the monitor hood holder and magnifying lens holder attached to the camborder.
1 Push to release the clip on the bottom of the magnifying lens holder.
2 Flip up the eyepiece until the magnifying lens surface becomes parallel to the top panel of the magnifying lens holder.
3 Slide the knob on the top of the magnifying lens holder to the opposite side of the eyepiece to unlock.
4 Detach the eyepiece by horizontally sliding it.
- SONY.
- Monitor Hood
- CBK-MH01
- 日本語
- 安全のために
- 警告表示の意味
- 注意
- 保証書とアフターサービス
- 保证書
- アフターサービス
- A
- 使用上のご注意
- モニターフードを組み立てる
- モニターフードを取り付ける
- B
- English
- Precautions
- Assembling the Monitor Hood
- Attaching the Monitor Hood to the Camcorder
- 日本雨
- アイビースの角度調整をする
- 已注意
- アイビースを開く
- アイピースを取りはす
- アイピースの視度を調整する
- 主な仕様
- Adjusting the Angle of the Eyepiece
- Notes
- Opening the Eyepiece
- Detaching the Eyepiece
Mærke : SONY
Model : CBK-MH01
Kategori : Ukategoriseret