AG-120 - Symaskine JUKI - Gratis brugsanvisning og manual
Find enhedens vejledning gratis AG-120 JUKI i PDF-format.

Brugerspørgsmål om AG-120 JUKI
0 spørgsmål om dette apparat. Besvar dem du kender, eller stil dit eget.
Stil et nyt spørgsmål om dette apparat
Download vejledningen til din Symaskine i PDF-format gratis! Find din vejledning AG-120 - JUKI og tag din elektroniske enhed tilbage i hånden. På denne side er alle dokumenter nødvendige for brugen af din enhed offentliggjort. AG-120 af mærket JUKI.
BRUGSANVISNING AG-120 JUKI
中文 ENGLISH
AG-120
使用说明书
INSTRUCTION MANUAL
前言:
欢迎使用本公司产品,制衣行业的正确投资选择!本说明书为本公司新研发的“内裤上松紧带机”产品参考手册,请认真阅读此手册以更好的运用本公司产品!在操作设备请仔细阅读本说明,并且请注意以下要求:
1: 用户操作前必须可靠接地,保证人身安全!
2: 非专业人士请勿拆卸控制箱;
3: 控制箱与电机远离强磁高辐射环境;
4: 不要在过热环境中作业(作业时环境温度: -20^ 50^ );
5: 不要在过于潮湿环境中作业(作业时环境湿度:20%\~90%);
6: (1)本设备出厂时默认为 220V 的电源电压【220V 接入供电时额定电压为 200V\~240V 之间】
Preface:
Welcome to use the our products, it is theright investment choices in garment industry!
The user manual is for our newly developed “Elastic belt machine for underwear” products reference manual, Please read this manual carefully, hope it can give you useful help!
Before reading the manual, please note the following requirements:
1: The user must be reliably grounded before operation to ensure personal safety!
2: Non-professionals do not disassemble the control box;
3: The control box and the motor are far away from the strong magnetic and high radiation environment;
4: Do not work in an overheated environment (ambient temperature during operation: -20°C\~50°C);
5: Do not work in an excessively humid environment (humidity during operation: 20%\~90%);
6: (1) The default power supply voltage of this device is 220V when it leaves the factory [The rated voltage is between 200V and 240V when 220V is connected to the power supply]
安全叮嘱:
1: 电机接通时请不要把脚放在脚踏板上
2: 本产品请专业人士安装调试
3: 严禁在通电时打开控制箱与电机端盖
4:换针,穿线或更换底线时请关闭电源
5:安装,拆卸维修时请关闭电源
6:翻抬缝纫机时请关闭电源
7: 使用本产品请远离高频电磁波和电波发射器等,以免所产生的电磁波干扰伺服驱动器而发生错误动作。
保修策略:
1: 本产品自购买起免费保修 1 年,终身维护。保修期内除人为损坏外出现的任何质量问题可联系售后。
2: 未经本公司同意自行拆卸,改装造成损坏将不给予保修。
3: 但凡出现无法解决的问题可以联系本公司。
Safety requirement:
1: Do not put your feet on the pedals when the motor is switched on.
2: Let professionals to install and debug this product.
3: Do not open the control box and the motor cover when energized
4: Please turn off the power when changing the needle, threading or replacing the bottom line
5: During installation and removal service, please turn off the power
6: Please turn off the power when turn lift sewing machine
7: Use this product, please stay away from high-frequency electromagnetic wave and wave transmitter, so as to avoid the electromagnetic wave interference servo driver and wrong action.
Warranty policy:
1: Since from the purchase of this product, the free 1-year warranty, lifetime maintenance. During the warranty period, any quality problems the product will be free repaired, except artificial damage.
2: Without our consent disassemble or modify, the damaged will not give in warranty.
3: Whenever find the problem can not be solved, you can contact with our company.
目录
绷缝机介绍
安全注意事项
1、安装
2、机器部件的零件说明
3、机器位置调整说明
4、显示屏常用操作介绍
5、操作参数说明表
6、如何使用机器
7、故障代码解析
8、装箱单
content
Hemming sewing machine introduction
Safety precautions
1、Install
2、Description of machine parts
3、Adjust the machine position
4、Introduction of display screen common operation
5、Operating Parameter Description
6、How to using machine
7、Error code analysis
8、Packing list
安全措施
感谢您购买本设备,在开始操作任何程序之前,请仔细阅读本手册,
然后正确、安全地使用设备。
将本手册放在方便的地方,以便在需要时快速查阅。
Thank you for purchasing this device. Before starting any procedures, please read this manual carefully and then use the device correctly and safely.
Keep this manual handy for quick reference when needed.
绷缝机介绍
1、介绍
- 本手册描述了安全使用本装置的说明。
- 在开始任何程序之前,仔细学习本手册并充分了解如何操作、检查、调整和节省人力维护装置。
- 在使用工业缝纫机时,您总是在靠近运动部件(例如,针)的位置执行操作。因此您必须记住,您可以很容易的触碰到它们。为了防止事故发生,您必须正确使用我们提供的安全产品。
●所有使用自动装置的人员必须认真学习本手册和缝纫机使用说明书,并在任何程序开始前采取必要的安全措施。
Hemming sewing machine introduction
1. Introduction
●This manual describes the instructions for using this unit safely.
●Study this manual very carefully and understand fully how to operate, check, adjust and maintain the labor saving unit before beginning any of the procedures.
- You always perform operations close to moving parts such as needles when using industrial sewing machines. Therefore you have to keep in mind you could easily touch them. To prevent accidents, it is essential that you use the safe products supplied by Pegasus correctly.
- All the people who will use automatic unit must study this manual and the instruction manual for sewing machines very carefully and then take necessary safety measures before beginning any of the procedures.
为了安全起见,一定要认真并仔细的学习。
2、危险,警告和注意事项的指示
为防止事故,我们的产品和本手册中使用了显示危险程度的事故、指示(符号和/或标志)。
请仔细研究内容并遵循说明。
指示标签很容易就能找到。
当它们被染色或被移除时,请贴上新的标签。
如果需要新标签,请联系我们的销售办事处。
请使用那些能够吸引使用者注意的符号、标志和/或信号词。
Be sure to study very carefully for safety
- Indications of dangers, warnings and cautions
To prevent, accidents, indications (symbols and/or signs) which show the degree of danger are used on our products and in this manual.
Study the contents very carefully and follow the instructions.
Indication labels should be found easily.
Attach new labels when they are stained or removed.
Contact our sales office when new labels are needed.
Symbols, signs and/or signal words which attract users' attention. Symbols and messages
符号和信息
 危険DANGER 危険DANGER | 表示对生命或肢体的直接危害 | Indicates an immediate hazard to life or limb. |
 警告WARNING 警告WARNING | 表示对生命或肢体的潜在危险 | Indicates a potential hazard to life or limb. |
 注意CAUTION 注意CAUTION | 表示可能导致伤害或损坏的错误 | Indicates a possible mistakes that could result in injury or damage. |
 | 操作机器和/或自动装置时,务必参照说明书。 | Be sure to follow the instructions when you operate the machine and/or labor saving device. | |
 | 千万不要这样做。 | Never do this. | |
 | 接地标识 | Grounding identification | |
 | 当心烫伤 | Warning scald | |
 | 重心 | center of gravity | |
 | 当心触电 | Warning: Electric Shock Hazard | |
 | 高压危险 | High voltage hazard | |
 | 当心伤手 | Warning injure hand |
 | 注意电压 | Pay attention to voltage |
安全注意事项
①应用与日的
本设备被设计用于,根据您的需要来提高质量和生产量。
因此,切勿将该设备用于可能会破坏上述目的的应用。
②情况
使用本设备时的某些情况可能会影响其寿命、功能、性能和安全性。
为安全起见,在以下情况下,请勿使用本设备。
1、不要在有噪音的物体附近使用设备,如高频焊机等。
2、请勿在含有化学物质的空气中使用或保存该装置,也不要将该设备直接暴露在化学品下。
3、请勿在高温或阳光直射下将设备放在室外。
4、请勿在可能影响设备的高湿度或环境温度下使用该设备。
-
当电压波动范围大于额定电压的±10%时,不得使用本装置。
-
不要在不能正确获得控制电机规定电源电压的地方使用该装置。
7、不要在无法正确获得设备规定的气压供应的地方使用。
8、不要将设备暴露在水中。
Safety precautions
①Applications, purpose
The automatic unit is designed to increase quality and productivity according to your needs.
Therefore never use the device for the applications, which may defeat the above purpose.
②Circumstances
Some circumstances when you are using the automatic unit may affect its life, function, performance, and safety.
For safety, do not use the automatic unit under the circumstances below.
-
Do not use the device near objects, which make noise such as a high-frequency welder, etc.
-
Do not use or store the device in the air, which has vapor from chemicals, or do not expose the device to chemicals.
-
Do not leave the device outside, in high temperatures or the direct sun.
-
Do not use the device in high humidity or ambient temperatures, which may affect them.
-
Do not use the device on the condition that the voltage fluctuation range is more than ± 10% of the rated voltage.
-
Do not use the device at the place where the supply voltage specified for the control motor cannot be properly obtained.
-
Do not use the device at the place where the air supply specified for the device cannot be properly obtained.
8.Do not expose the device to the water.
③安全措施
(1)对自动装置进行维护时的安全预防措施。
- 在进行检查、修理、清洁自动装置、关闭电源、从电源插座上断开电源插头并按下机器旋钮以确保机器停止运行。
如果必须在通电的情况下对机器和/或自动装置进行维护,请务必小心,因为机器和/或设备可能会意外启动。
为防止误操作引起的事故,应建立自己的安全操作程序并遵照执行。
- 只有训练有素的人员才能进行日常维护和/或修理机器和/或设备。
- 请勿自行修改机器和设备。
※请咨询当地的销售业务或代表进行修改。
③Safety measures
(1) Safety precautions when you perform maintenance on the automatic unit.
- W hen performing maintenance such as when checking, repairing, cleaning the automatic unit, turn off the power, disconnect the power plug from the outlet and press the machine treadle in order to make sure the machine does not run.
If you have to perform maintenance on the machine and/or automatic unit with the power on, always be careful because the machine and/or device could start operating unexpectedly.
To prevent accidents caused by incorrect operation, you should establish your own procedures for safe operation and follow them.
- Only well-trained people should perform routine daily maintenance and/or repair the machine and/or device.
- Do not modify the machine and device yourself.
※ Consult your local Pegasus' sales office or representative for modification.

(2) 操作设备之前
在操作设备之前,检查主轴箱、机器装置和设备,确保它们没有任何损坏和/或缺陷。
如果有,请立即修理或更换任何有缺陷的零件。
(3) 培训
为防止事故发生,操作人员和服务/维护人员应具备适当的安全操作知识和能。

(2) Before operating the device
Before operating the device, check the machine head, machine unit and device to
If so, repair or replace any defective parts immediately.
(3) Training
To prevent accidents, operators and service/maintenance personnel should have proper knowledge and skill for safe operation.

请勿自行修改设备。
重机不承担因改装而引起的一切责任。

Do not modify the equipment by yourself.
JUKI does not assume all the responsibility caused by the refit.
一、安装
1、Install
总功率:1.4-1.5KW/h
Total power: 1.4-1.5KW/h
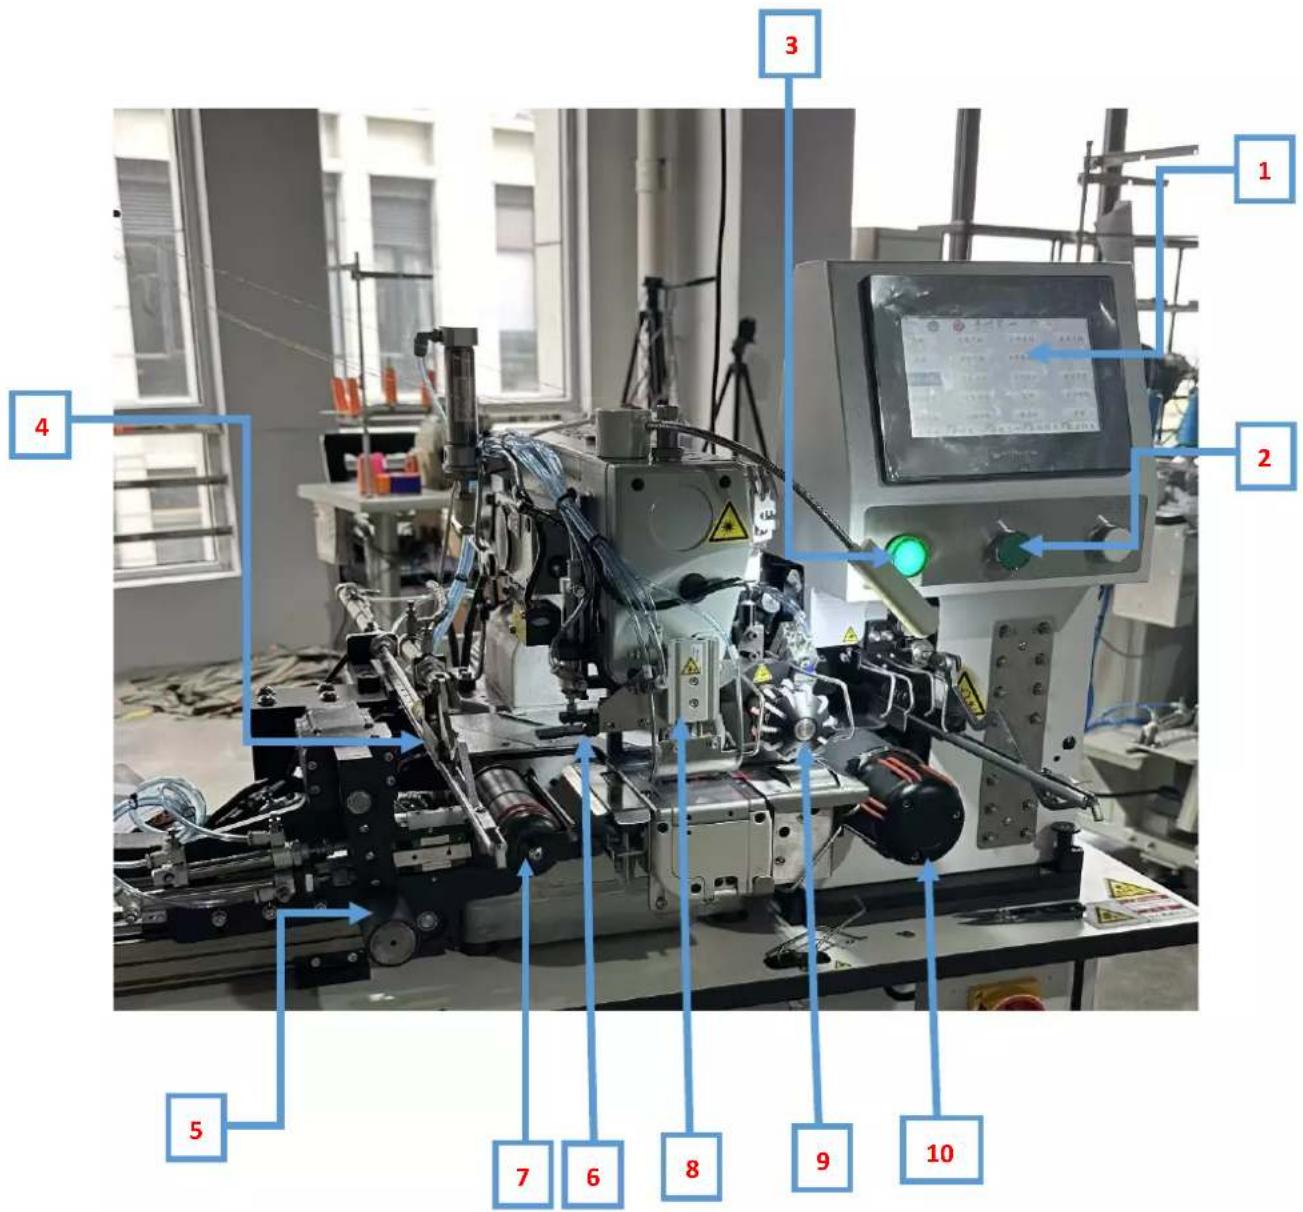
| 1 | 操作面板operation panel | 9 | 左纠偏装置,左送布装置Left deviation correction device, left cloth feeding device |
| 2 | 启动按start up button | 10 | 右纠偏装置,右送布装置Right deviation correction device, right cloth feeding device |
| 3 | 电源指示power indicator | ||
| 4 | 橡筋自动上料装置Automatic rubber bar feeding device | ||
| 5 | 后辅动轮Rear auxiliary drive wheel | ||
| 6 | 骨位检测装置one position detection device | ||
| 7 | 撑开装置Openning device | ||
| 8 | 吹线升降缸ire blowing lifting cylinder |
二、机器部位的零件说明
2、Description of machine parts
| 序号NO | 零件位置调整Part position adjustment | 功能说明Function description | |
| 1 | 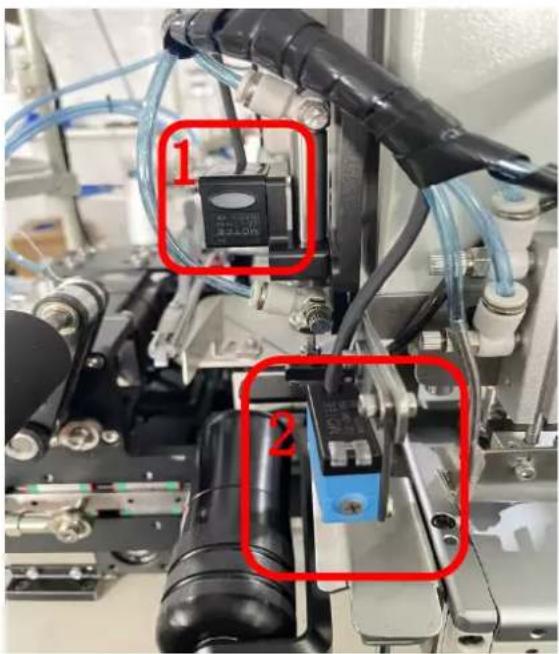 | 1.骨缝感应器Suture sensor2.布料感应器Cloth sensor | |
| 2 | 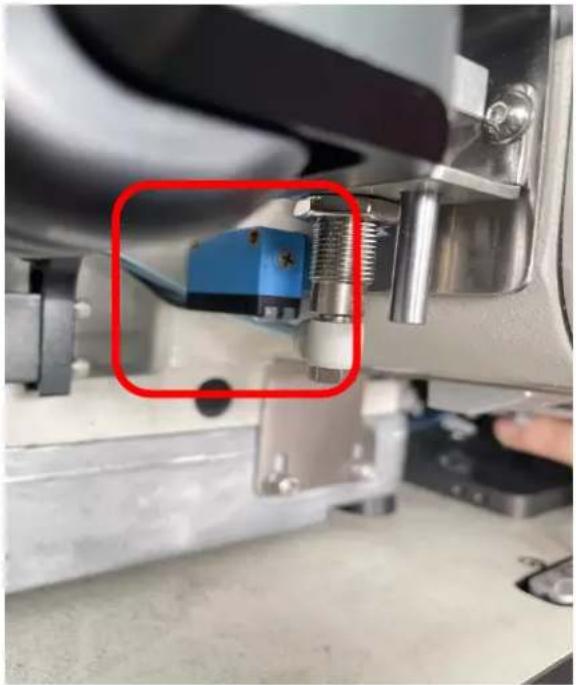 | 橡筋感应器Rubber band sensor | |
| 3 | 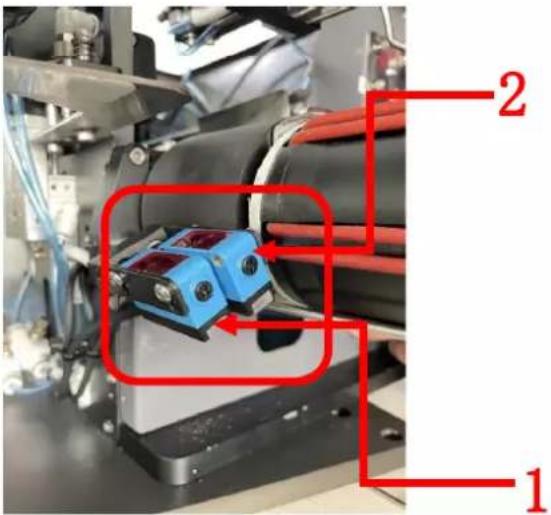 | 1.左对边感应器一,前裆部V型时,需要启用此感应器。The left opposite side sensor 1 needs to be enabled when the front crotch is V-shaped2.左对边感应器二,正常布料时s使用此感应器。Left opposite side sensor 2. This sensor is s used for normal cloth distribution | |
| 4 | 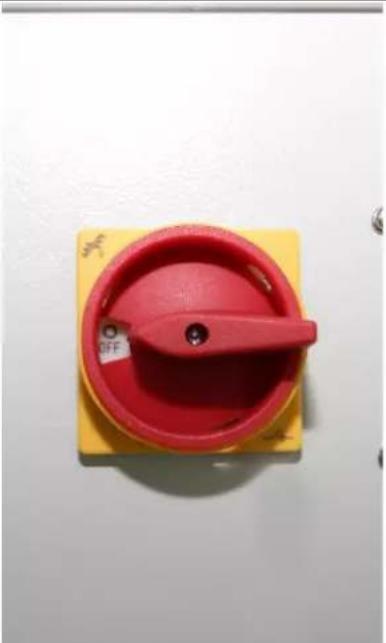 | 电源启动开关Power start switch | |
| 5 | 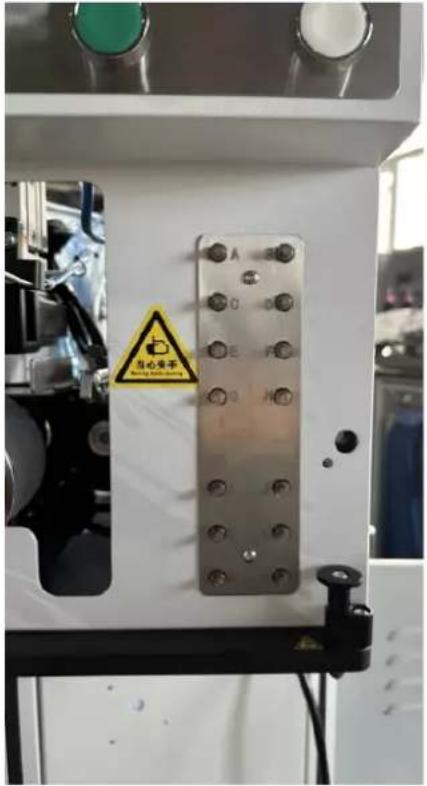 | 吹气大小控制面板,根据吹气尾端的号码管,对照此面板。The blowing size control panel is compared with this panel according to the number tube at the end of blowing. | |
| 6 | 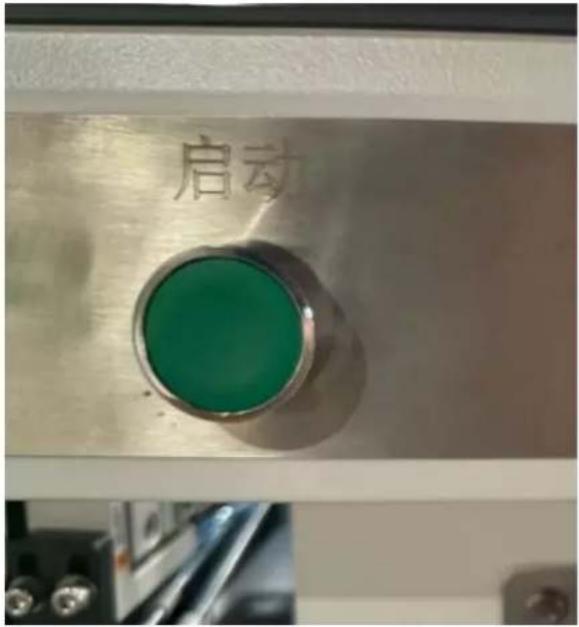 | 启动开关,开始起缝的时候的动作开关Start the switch to start the action switch when sewing | |
| 7 | 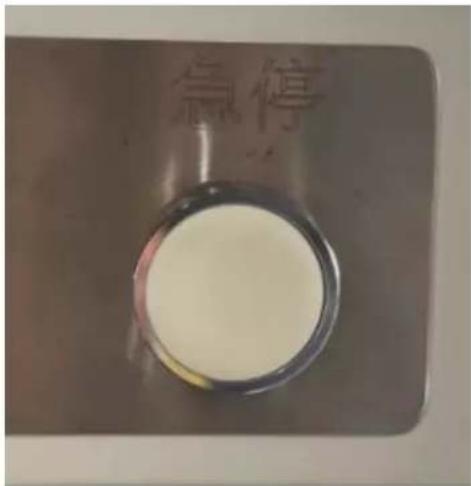 | 急停开关,遇到紧急需要停止的时候的开关Emergency stop switch, in case of emergency need to stop the switch | |
| 8 |  | 操作面板显示屏Operation panel display screen | |
三、机器部件及位置调整
3、Machine Component Position Adjustment
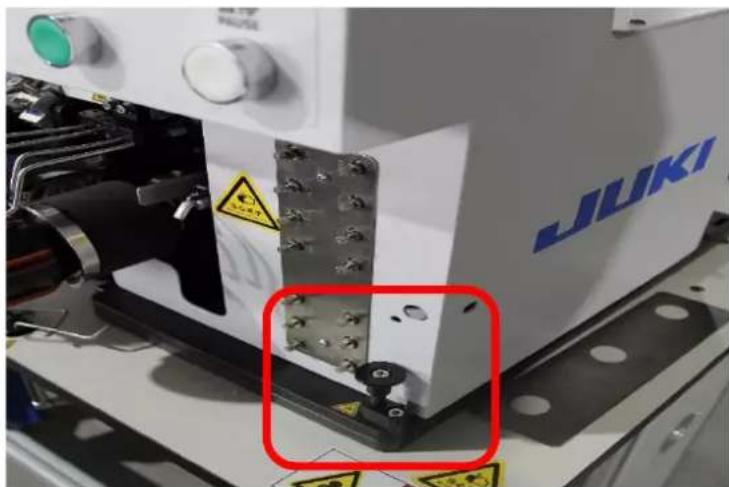
natural_image
Close-up of a JUKI industrial machine with warning labels and a highlighted section showing a metallic component (no readable text or symbols beyond branding)- 当需要打开控制机构和缝纫机头部分时,请旋转上图黑色旋钮至松开状态,然后向机器逆时针方向拉动控制机构就可以打开了,工作时请务必锁紧此按钮。
When it is necessary to open the control mechanism and the sewing machine head section, please rotate the black knob in the above diagram to the unlocked position, and then pull the control mechanism towards the machine in a counterclockwise direction to open it. Please make sure to lock this button during operation.
- 下图显示的是机器的打开状态。
The image below shows the open state of the machine.

natural_image
Industrial machine with mechanical components and warning signs (no readable text or symbols)3.其他机械部分,默认为出厂设置调试完成状态,可根据实际工作需求,进行适当的微调。如有无法解决的问题请联系售后及服务人员。
Other mechanical parts are, by default, set to the factory-adjusted completed state. They can be subject to appropriate fine-tuning according to actual operational requirements. If you encounter any issues that cannot be resolved, please contact after-sales and service personnel.
四、显示屏常用操作介绍
4、Introduction of display screen common operation

首先选择语言,有中文,英文(根据版本的不同,语言类型也会随之更改。)
First choose the language, Chinese, English (Depending on the version, the language type changes.)
进入参数设置
Enter Parameter Settings
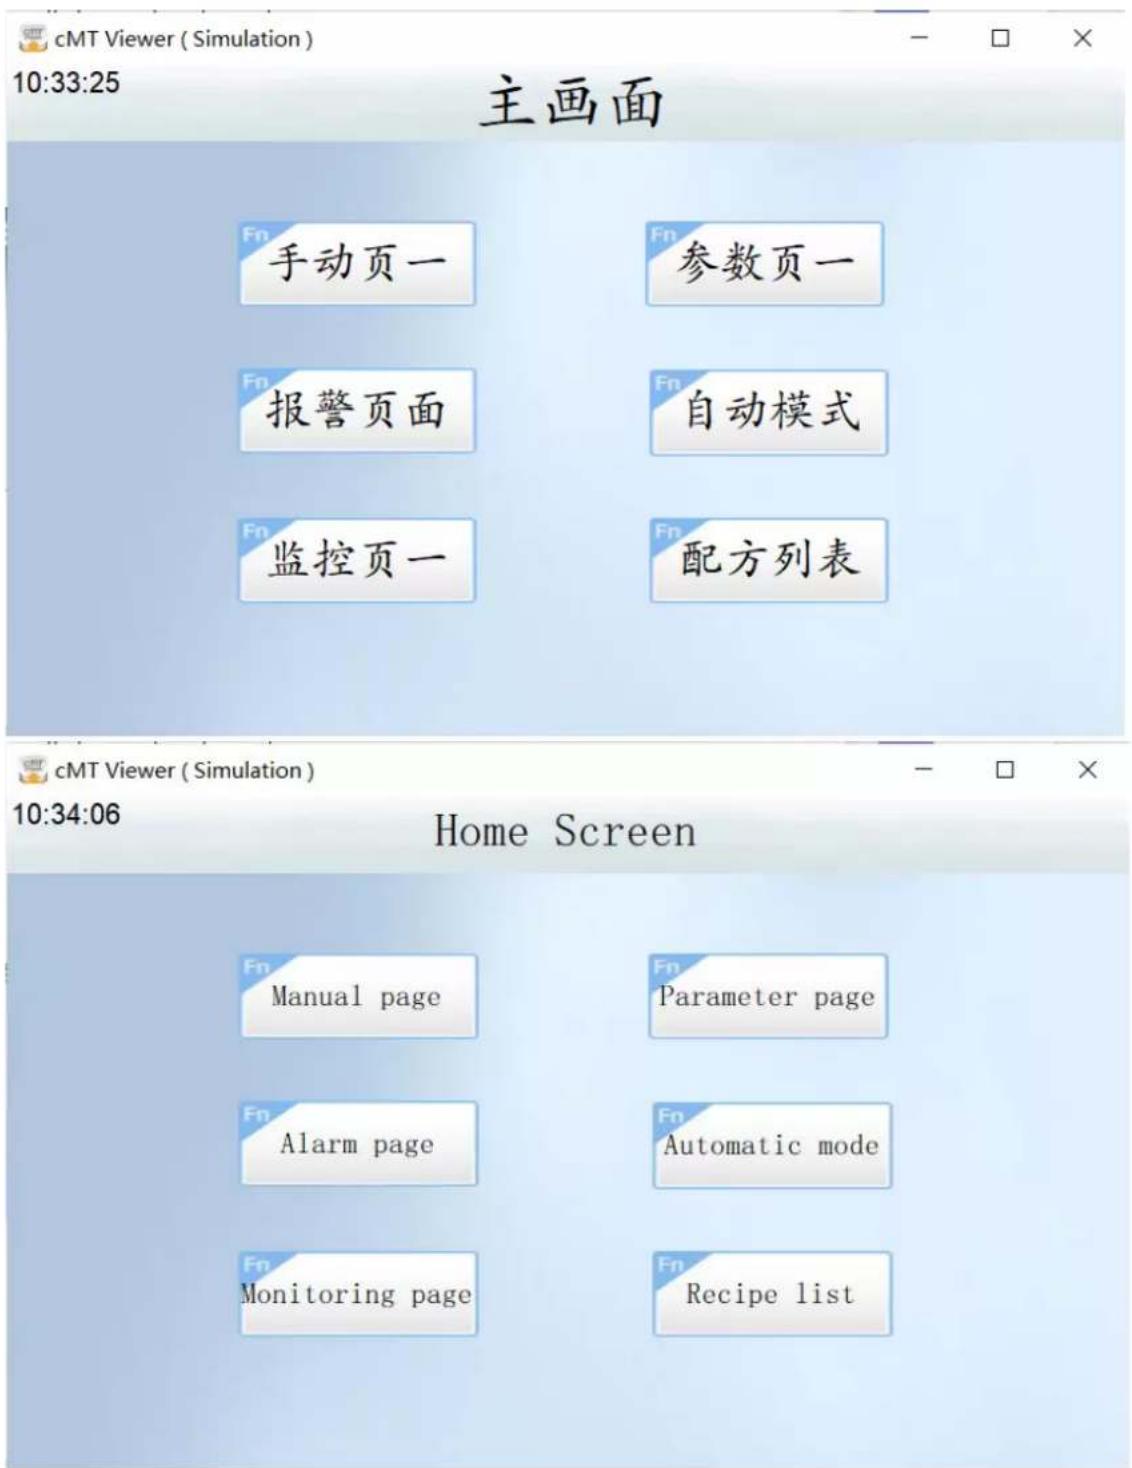
然后自由调整
And then adjust it freely.
参数的详细说明请参照操作说明参数表。
Please refer to the operating instructions parameter
table for a detailed description of the parameters
| cMT Viewer (Simulation)10:35:29 参数页一 下一页 | ||||||
| 当前配方 | TY | 保存 | 2 | 新增 | ||
| 缝制开始 | 0 | 2.20 | 实时针数 | 0 开始 | ||
| 慢针开始 | 0 | 2.20 | 总针数 | 0 | ||
| 慢针结束 | 0 | 2.20 | 停吹气二 | 0 结束 | ||
| 右纠偏停止 | 0 | 2.20 | 橡筋针码比例 | 0.00 | ||
| 定规缸复位 | 0 | 2.20 | 左送布轮校正 | 1.00 | ||
| 左纠偏停止 | 0 | 2.20 | 左纠停后速度 | 0 | ||
| 主页面 | 手动页一 | 参数页一 | 自动模式 | 配方列表 | ||
| cMT Viewer (Simulation)10:37:58 Parameter page Next page | ||||||
| Current recipe | TY | Upload | 2 | Newly added | ||
| Sewing start | 0 | 2.20 | Real time stitches | 0 start | ||
| Slow needle start | 0 | 2.20 | Total needles | 0 | ||
| Slow needle end | 0 | 2.20 | Stop blowing | 0 stop | ||
| Right deviation correction stop | 0 | 2.20 | Rubber needle size ratio | 0.00 | ||
| Gauge cylinder reset | 0 | 2.20 | Melt wheel correction | 1.00 | ||
| Left deviation correction stop | 0 | 2.20 | Correct speed after left stop | 0 | ||
| Main page | Manual page | Parameter page | Automatic mode | Recipe list | ||
| 当前配方 | TY | 保存 | 新增 | ||||
| 左纠偏向内速度 | 25 | r/s | 慢针关 | 报警开 | |||
| 左纠偏向外速度 | 25 | r/s | 上料开 | 断线一 | |||
| 右纠偏向内速度 | 25 | r/s | 自启关 | 断线二 | |||
| 右纠偏向外速度 | 25 | r/s | 断线三 | ||||
| 断线四 | |||||||
| 断线五 | |||||||
| 主页面 | 手动页一 | 参数页一 | 自动模式 | 配方列表 | |||
| Current recipe | TY | Upload | Newly added | ||||
| Inward correction speed left | 25 | r/s | Slow needle off | Alarm on | |||
| Outward correction speed left | 25 | r/s | Feeding on | Broken line 1 | |||
| Inward correction speed right | 25 | r/s | Self start off | Broken line 2 | |||
| Outward correction speed right | 25 | r/s | Broken wire 3 | ||||
| Broken wire 4 | |||||||
| Broken wire 5 | |||||||
| Main page | Manual page | Parameter page | Automatic mode | Recipe list | |||
五、操作参数说明表
5、Operating Parameter Description Table
| 当前配方 | chushi | 保存 | 新增 | |||||
| 缝制开始 | 0 | 2.20 | 实时针数 | 0 | 开始 | |||
| 慢针开始 | 0 | 2.20 | 总针数 | 0 | ||||
| 慢针结束 | 0 | 2.20 | 停吹气二 | 0 | 结束 | |||
| 右纠偏停止 | 0 | 2.20 | 橡筋针码比例 | 0.00 | ||||
| 定规缸复位 | 0 | 2.20 | 左送布轮校正 | 1.00 | ||||
| 左纠偏停止 | 0 | 2.20 | 左纠停后速度 | 0 | ||||
| 主页面 | 手动页一 | 参数页一 | 自动模式 | 配方列表 | ||||
当前配方 chushi 1. 显示当前配方的名称,可自定义。
name of the current recipe, which can be customized.
送料针码比例:根据缝纫机的针距大小,进行微调。送料针码比例越大,装置的送料速度越快。
Feeding needle size ratio: fine tune according to the needle pitch of the sewing machine. The larger the proportion of feeding needle code, the faster the feeding speed of the device.)
缝制开始 0 2.20
2.:缝制开始节点到慢针开始节点阶段的起始针
数和送料针码比例,本阶段送料针码比例越大,则装置的送料速度越快。
The number of starting stitches and the proportion of feeding needle code from the beginning of sewing to the beginning of slow needle. The larger the proportion of feeding needle code in this stage, the faster the feeding speed of the device.
慢针开始 0 2.20
3.:前者是,慢针开始节点的针数大小,数值越
大,慢针开始动作越迟,数值越小,慢针开始动作越早。
The number of stitches at the beginning of the slow needle. The larger the value, the later the slow needle starts to act, and the smaller the value, the earlier the slow needle starts to act.
后者是,慢针开始节点到慢针结束节点,之间的的送料针码比例,参数值越大,本阶段装置的送料速度越快,参数值越小,反之。
The latter is the proportion of feeding needle code from the beginning of the slow needle to the end of the slow needle. The larger the parameter value, the faster the feeding speed of the device at this stage, and the smaller the parameter value, otherwise.
| 慢针结束 | 0 | 2.20 |
4.:前者是,慢针结束节点的针数大小,数值越
大,慢针结束越迟,数值越小,慢针结束越早。
The former is the number of stitches that the slow needle ends. The larger the value, the later the slow needle ends, the smaller the value, and the earlier the slow needle ends.
后者是,慢针结束节点到右纠偏停止节点,之间的的送料针码比例,参数值越大,本阶段装置的送料速度越快,参数值越小,反之。
The latter is the proportion of feeding needle code from the slow needle end node to the right deviation correction stop node. The larger the parameter value, the faster the feeding speed of the device at this stage, and the smaller the parameter value, otherwise.
| 右纠偏停止 | 0 | 2.20 |
5. 前者是,右纠偏停止节点的针数大小,数值
越大,右纠偏停止越迟,数值越小,右纠偏停止越早。
The former is the number of stitches of the right deviation correction stop node. The larger the value, the later the right deviation correction stop, and the smaller the value, the earlier the right deviation correction stop.
后者是,右纠偏停止节点到定规缸复位节点,之间的送料针码比例,参数值越大,本阶段装置的送料速度越快,参数值越小,反之。
The latter is the ratio of feeding needle code between the right deviation correction stop node and the reset node of the gauge cylinder. The larger the parameter value, the faster the feeding speed of the device at this stage, and the smaller the parameter value. On the contrary.
| 定规缸复位 | 0 | 2.20 |
6.:前者是,定规缸复位节点的针数大小,数值
越大,定规缸复位越迟,数值越小,定规缸复位越早。
The former is the number of needles in the reset node of the gauge cylinder. The larger the value, the later the gauge cylinder resets, and the smaller the value, the earlier the gauge cylinder resets.
后者是,定规缸复位节点到左纠偏停止节点,之间的送料针码比例,参数值越大,本阶段装置的送料速度越快,参数值越小,反之。
The latter is that the larger the parameter value, the faster the feeding speed of the device at this stage, the smaller the parameter value, and vice versa.
| 左纠偏停止 | 0 | 2.20 |
7.:前者是,左纠偏停止节点的针数大小,数值
越大,左纠偏停止越迟,数值越小,左纠偏停止越早。
The former is the number of stitches of the left deviation correction stop node. The larger the value, the later the left deviation correction stop, and the smaller the value, the earlier the left deviation correction stop.
后者是,左纠偏停止节点到结束,之间的送料针码比例,参数值越大,本阶段装置的送料速度越快,参数值越小,反之。
The latter is the proportion of feeding needle code between the left deviation correction stop node and the end. The larger the parameter value, the faster the feeding speed of the device at this stage, and the smaller the parameter value. On the contrary.
| 当前配方 | chushi | 保存 | 新增 | |||||
| 缝制开始 | 0 | 2.20 | 实时针数 | 0 | 开始 | |||
| 慢针开始 | 0 | 2.20 | 总针数 | 0 | ||||
| 慢针结束 | 0 | 2.20 | 停吹气二 | 0 | 结束 | |||
| 右纠偏停止 | 0 | 2.20 | 橡筋针码比例 | 0.00 | ||||
| 定规缸复位 | 0 | 2.20 | 左送布轮校正 | 1.00 | ||||
| 左纠偏停止 | 0 | 2.20 | 左纠停后速度 | 0 | ||||
| 主页面 | 手动页一 | 参数页一 | 自动模式 | 配方列表 | ||||
实时针数 0
8.: 显示学习模式下的实时针数,不需要手动调整。
Display the number of real-time stitches in learning mode without manual adjustment.
总针数 0
9.:学习模式下,缝制开始到结束,将最终的实时显示针数,
输入总针数。
In the learning mode, from the beginning to the end of sewing, the final number of stitches will be displayed in real time and the total number of stitches will be input.
停吹气二 0
10.: 由缝制开始, 累计针数等于此参数值时, 吹气二停止, 参
数值越大,吹气二停止越迟,参数值越小,反之。
Starting from sewing, when the cumulative number of stitches is equal to this parameter value, the second blowing stops. The larger the parameter value, the later the second blowing stops, and the smaller the parameter value. Vice versa.
橡筋针码比例 0.00
11.:根据缝纫机的针距大小,得出此参数值,实际调试中再进
行微调,参数值越大,橡筋装置转动速度越快,数值越小,反之。
This parameter value is obtained according to the needle pitch of the sewing machine, and then fine-tuning is carried out in the actual debugging. The larger the parameter value is, the faster the rubber band device rotates, and the smaller the value is, otherwise.
左送布轮校正 1.00
12.: 此参数作用于左送布装置速度,参数值越大,左送布装
置的速度相对变快,参数越小,反之。
This parameter affects the speed of the left cloth feeding device. The larger the parameter value, the faster the speed of the left cloth feeding device, and the smaller the parameter, and vice versa.
左纠停后速度 0
13.:左纠偏装置停止节点到达后,左纠偏装置不在随感应器的
状态变化,而是按照此参数值的速度,向外纠偏。参数值越大,向外纠偏速度越快,参数值越小,反之。
After the stop node of the left deviation correction device arrives, the left deviation correction device does not change with the state of the sensor, but corrects the deviation outward according to the speed of this parameter value. The larger the parameter value, the faster the outward correction speed, and the smaller the parameter value, and vice versa.
| 当前配方 | chushi | 保存 | 新增 | ||||||
| 左 | 撑开位一 | 右 | 0 | mm | 右送布轮校正 | 1.00 | |||
| 撑开位二 | 0 | mm | 后辅动轮校正 | 1.00 | |||||
| 实时位置 | 0 | mm | 手动速度 | 1 | r/s | ||||
| 撑开速度 | 200 | mm/s | 寻骨速度 | 30 | r/s | ||||
| 撑开延时 | 0.0 | S | 骨位感应延时 | 0.3 | S | ||||
| 缝制延时 | 0.0 | S | 骨位补偿 | 0 | mm | ||||
| 主页面 | 手动页一 | 参数页一 | 自动模式 | 配方列表 | |||||
撑开位一 0 mm
14.: 布料第一段撑开位置,根据布料大小决定,数
值越大,撑开位置越大,数值越小,反之。
The opening position of the first section of the cloth is determined according to the size of the cloth. The larger the value is, the larger the opening position is, the smaller the value is, and vice versa.
左 撑开位二 右 0 mm
15.:布料第二段撑开位置,右纠偏停止节点到达
后,布料会撑开到此参数设定的位置。
The second section of cloth will be stretched out. After the right deviation correction stop node arrives, the cloth will be stretched out to the position set by this parameter.
实时位置 0 mm
16.: 实时显示撑开轴的当前位置。不需要手动设
定。
Display the current position of the support shaft in real time. Manual setting is not required.
撑开速度 200 mm/s
17.:撑开轴的运动速度,数值越大,运动速度越
快,数值越小,反之。
The larger the value of the movement speed of the support shaft, the faster the movement speed, and the smaller the value, and vice versa.
撑开延时 0.0 s
18.:自动模式下,感应到橡筋,经过此参数设定的
时间后,撑开轴运动到位置一。
In automatic mode, the rubber band is sensed. After the time set by this parameter, the support shaft moves to position i.
缝制延时 0.0 S
19.:自动模式下,自启开关打开情况下,感应到布
料,此时间后开始缝制。
In automatic mode, when the self start switch is on, the cloth is sensed and sewing starts after this time.
右送布轮校正 1.00
20.:此参数作用于右送布装置速度,参数值越大,右送
布装置的速度相对变快,参数越小,反之。
This parameter affects the speed of the right cloth feeding device. The larger the parameter value, the faster the speed of the right cloth feeding device, and the smaller the parameter, and vice versa.
后辅动轮校正 1.00
21.: 此参数作用于后辅动轮装置速度,参数越大,后辅
动轮的速度相对变快,参数越小,反之。
This parameter affects the speed of the rear auxiliary drive wheel device. The larger the parameter, the faster the speed of the rear auxiliary drive wheel, and the smaller the parameter, and vice versa.
手动速度 1
22.: 手动模式下, 各装置的运转速度, 参数值越大, 运
转速度越快,参数值越小,反之。
In the manual mode, the larger the parameter value, the faster the operation speed and the smaller the parameter value of each device, and vice versa.
寻骨速度 30 r/s
23.: 寻骨装置的运动速度, 参数越大, 寻骨速度越
快,参数越小,反之。
For the motion speed of the bone searching device, the greater the parameter, the faster the bone searching speed and the smaller the parameter, and vice versa.
骨位感应延时 0.3 s
24.: 寻骨时, 骨位感应器经过此参数设定的时间
后,开始起作用。参数值越大,感应器开始起作用越迟。参数值越小,反之。
When searching for bone, the femoral position sensor starts to work after the time set by this parameter. The higher the parameter value, the later the sensor starts to work. The smaller the parameter value, and vice versa.
骨位补偿 0 mm
25.:寻骨结束,骨缝停止的位置不理想时,可通过
设定此参数值的大小,来调整骨缝的位置。以针脚为参考,参数大于零时,骨缝远离针
脚,参数小于零时,反之。
When the stop position of bone suture is not ideal after bone searching, the position of bone suture can be adjusted by setting the value of this parameter. Take the pin as the reference.
When the parameter is greater than zero, the bone suture is far away from the pin. When the parameter is less than zero, vice versa.
09:25:47
上一页
参数页三

下一页
| 当前配方 | CHIISHI | 保存 | 新增 | |||||||
| 左纠偏向内速度 | 20 | r/s | 收边速度 | 0 | r/s | |||||
| 左纠偏向外速度 | 20 | r/s | 后辅动轮作用针数 | 0 | ||||||
| 右纠偏向内速度 | 20 | r/s | 切刀上停位 | 0 | ||||||
| 右纠偏向外速度 | 20 | r/s | 切刀高速 | 0 | P | |||||
| 后撑布延时 | 0.0 | S | 切刀低速 | 0 | P | |||||
| 收边距离 | 0 | mm | 闭合延时 | 0.00 | S | |||||
| 主页面 | 手动页一 | 参数页一 | 自动模式 | 配方列表 | ||||||
左纠偏向内速度
25
26.: 左纠偏装置把布料向里纠的速度, 参数值越
大,向里纠的速度越快,参数越小,反之。
The left deviation correction device corrects the cloth inward. The greater the parameter value, the faster the inward correction speed and the smaller the parameter, and vice versa.
左纠偏向外速度
25
27.: 左纠偏装置把布料向外纠的速度,参数值越
大,向外纠的速度越快,参数越小,反之。
The left deviation correction device corrects the cloth outward. The greater the parameter value, the faster the outward correction speed and the smaller the parameter, and vice versa.
右纠偏向内速度
25
28.:右纠偏装置把布料向里纠的速度,参数值越
大,向里纠的速度越快,参数越小,反之。
The right deviation correction device corrects the cloth inward. The greater the parameter value, the faster the inward correction speed and the smaller the parameter, and vice versa.
右纠偏向外速度
25
29.: 右纠偏装置把布料向外纠的速度,
参数值越大,向外纠的速度越快,参数越小,反之。
The speed at which the right deviation correction device corrects the cloth outward,
The larger the parameter value, the faster the outward correction speed, and the smaller the parameter, and vice versa.
六、如何使用机器
6、How to use this machine
1、连接气源与电路,切换电源开关。
2、检查触摸屏上信号灯与各个传感器信号灯是否正常,若能够正常接收信号输入并显示为正常;可通过查看电路板上的 PLC 来判断传感器是否有信号输入。
3、选择所需要的的语言进入主画面;进入参数设置,一般默认已有调试好的参数,但是需要与实际加工的布料配合来修改数据。
4、进入手动模式,确认各个功能正常动作。
5、确保无误后,进入自动模式。
6、套上需要缝制的松紧带,松紧带传感器检测到后,一定时间后会自动撑开。
7、按照要求放置好面料后,按下启动按钮,或等待自启时间后开始工作。
8、缝制结束后,将布料取出。橡筋自动上料装置会自动将橡筋放入相应位置。
9、若出现停转、设备报警的现象,请断电重启;若故障始终存在,请联系厂家售后进行机器维护。
1、Connect the air source to the circuit and press the power switch.
2、Check whether the signal lights on the touch screen and the signal lights of each sensor are normal. If the signal input can be received normally and displayed as normal; you can check whether the sensor has a signal input by checking the PLC on the circuit board.
3、Select the desired language to enter the main screen; enter the parameter setting, generally there are already debugged parameters by default, but the data needs to be modified in conjunction with the actual processed fabric.
4、Enter manual mode and confirm the normal operation of each function.
5. After ensuring correctness, enter the automatic mode.
6. Put on the elastic belt to be sewn. After the cloth sensor detects it, it will automatically open after a certain time.
7. After placing the underwear as required, press the start button or wait for the self start time to start working.
8. After sewing, the material clip moves to push the cloth out.
9. If there is a stall or equipment alarm, please power off and restart; if the fault persists, please contact the manufacturer for after-sales maintenance of the machine.
缝纫机头的调整和使用请参考
飞马公司:W3662HP-33 型号产品使用说明书
Sewing Machine Head Adjustment and Usage, please refer to the
PBASUS Company: W3662HP-33 Model Product Manual.
七、故障代码解析
7、Error code analysis
| 故障描述Fault description | 故障产生原因Causes of failure | 故障的解决方法Fault solution |
| 断线一Broken line fault one | 断线break line | 检查过线是否正常,重新穿线Check the line and re-thread it |
| 断线二Broken line fault two | 断线break line | 检查过线是否正常,重新穿线Check the line and re-thread it |
| 断线三Broken line fault three | 断线break line | 检查过线是否正常,重新穿线Check the line and re-thread it |
| 断线四Broken line fault four | 断线break line | 检查过线是否正常,重新穿线Check the line and re-thread it |
| 断线五Broken line fault five | 断线break line | 检查过线是否正常,重新穿线Check the line and re-thread it |
| X0信号异常X0 signal error | 1.信号线松动Loose signal wire2.信号采集板故障Fault of signal acquisition board | 先检查线路,确认无误后更换信号采集板Check the circuit first and replace the signal acquisition board after confirmation |
| X2信号异常X2 signal error | 1.信号线松动Loose signal wire2.信号采集板故障Fault of signal acquisition board | 先检查线路,确认无误后更换信号采集板Check the circuit first and replace the signal acquisition board after confirmation |
八、装箱单
8、Packing list
| 名称Name | 数量Quantity |
| 缝纫机主设备Main equipment of sewing machine 1 | |
| 缝纫机辅件盒Accessory box for sewing machine 1 | |
| U 盘USB Flash Disk | 1 |
JUKI
[AG-120 内裤上腰机说明书]
[AG-120 Underpants loading machine Instruction Manual]
感谢您的观看,欢迎与我们取得联系!
Thank you for watching, welcome to contact us!
联系电话:+81-42-357-2379 邮箱:https://www.juki.com
TEL:+81-42-357-2379 Email: https://www.juki.com
公司地址:206-8551 东京都多摩市鹤牧 2-11-1
2-11-1, TSURUMAKI, TAMA-SHI, TOKYO 206-8551, JAPAN