TurboDry EX - Tørretumbler IFB - Gratis brugsanvisning og manual
Find enhedens vejledning gratis TurboDry EX IFB i PDF-format.

Brugerspørgsmål om TurboDry EX IFB
0 spørgsmål om dette apparat. Besvar dem du kender, eller stil dit eget.
Stil et nyt spørgsmål om dette apparat
Download vejledningen til din Tørretumbler i PDF-format gratis! Find din vejledning TurboDry EX - IFB og tag din elektroniske enhed tilbage i hånden. På denne side er alle dokumenter nødvendige for brugen af din enhed offentliggjort. TurboDry EX af mærket IFB.
BRUGSANVISNING TurboDry EX IFB

Shop 24x7 @ www.ifbappliances.com | Email customerservice@ifbglobal.com | Call 080 458 45678/080 695 45678 www.facebook.com/IFBappliances twitter.com/IFBAppliances www.instagram.com/ifbappliances/ www.youtube.com/channel/UCJTIHxPTfez4mrbVBIQLb9Q
wimwic koli Fennery 3025

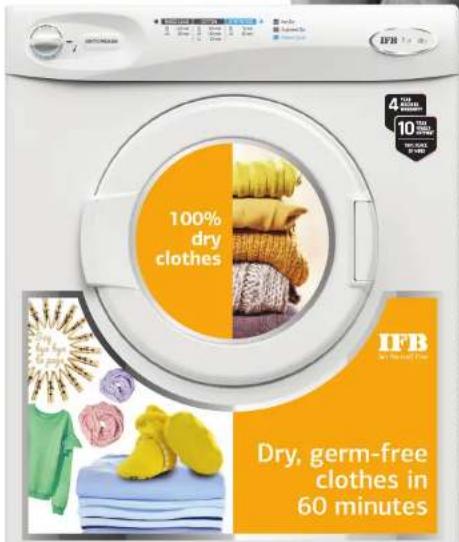
Turbodry 100% Clothes Dryer
User Manual
natural_image
Close-up of a woven or corrugated metal grate with a central square hole (no text or symbols visible)
Read instructions before switching on the clothes dryer. Observe safety guidelines at all times.
IFB
Set Yourself Free
Welcome to the IFB family.
Here's to your freedom!

natural_image
Cartoon illustration of a smiling washing machine with arms and legs, waving (no text or symbols)01
The A to Z of your clothes dryer

Safety guidelines for installation
- Keep the packaging material. It may come in handy when shifting residence.
- Remove the transit tape and clip from the door. Do not operate the clothes dryer till they have been removed.
- Keep the transit tape and clip. They will be useful when shifting the machine.
- All clothes dryer installation work must be carried out only by authorised IFB Care Service Personnel.
- Do not operate the appliance where inflammable substances such as oil, benzene or highly inflammable gas are present. Such materials may cause fire or explosions.
- Install the clothes dryer in a room with temperature between 5°C and 35°C. The air inlet and outlet at the rear of the machine must be kept free of obstruction. Use an exhaust kit to ensure efficiency by minimising moisture being blown into the room.
• Always put the machine on the floor after removing the carpet. - Protect the machine from direct sunlight and rainfall.
- Do not locate the clothes dryer behind a lockable door, sliding door or one with a hinge on the opposite side to the clothes dryer.
- Do not place the machine on a slanting, uneven or unstable surface.
- A concrete floor is the most suitable installation surface for a clothes dryer, being far less prone to vibration during the tumble cycle than wooden floorboards. Alternately, you can mount the machine on the wall or stack it atop your IFB Front Load washing machine (7.5 Kg and above) use the IFB Dryer stacking kit to avoid any hazard.
• To relocate and reinstall the clothes dryer, please contact IFB Care.
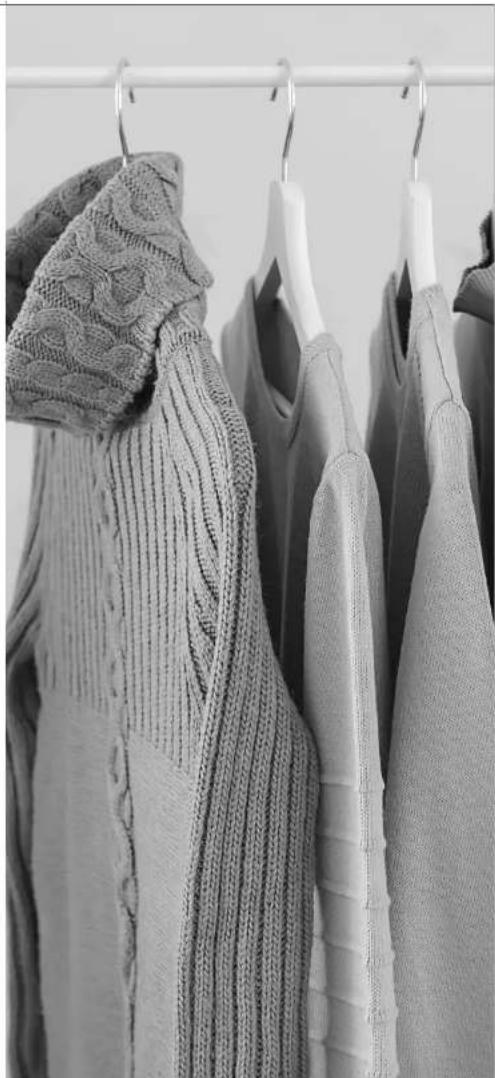
natural_image
Black-and-white photo of multiple clothes hanging on a white hanger, no visible text or symbols
Read all instructions and explanations for installation carefully before use. Follow the instructions carefully. Keep the operating instructions handy for later use.
Safety instructions
Any damage, which may be caused by cockroaches or other vermin, will not be covered by the appliance guarantee.
- Do not install and use a damaged machine. Before connecting the machine, ensure that the connection data on the data plate (fusing, voltage and frequency) match the main electricity supply. If in any doubt, consult IFB Care.
- Do not dry articles that have been cleaned, washed, soaked in or dabbed with combustible or explosive substances (such as oil, paint, gasoline, degreasers, dry cleaning solvents, kerosene etc). This may result in fire or explosions.
- This appliance can be used by children aged 8 years and above and persons with reduced physical, sensory or mental capabilities or lack of experience and knowledge if they have been given supervision or instructions concerning the use of the appliance in a safe way and understand the hazards involved.
• Children should not play with the appliance. - Cleaning and user maintenance should not be performed by children without supervision.

Caution
- The electrical safety of this appliance can only be guaranteed when continuity is complete between the machine and an effective earthing system, which complies with local and national regulations. It is most important that a qualified electrician regularly tests this basic safety requirement. The manufacturer cannot be held responsible for the consequences of an inadequate earthing system.
- For safety reasons, do not operate this appliance on an extension cable. Extension leads do not guarantee the required safety of the appliance. There is danger of overheating.
- The machine is built in accordance with current safety requirements.
- Unauthorised repairs could result in unforeseen dangers for the user, for which the manufacturer cannot accept responsibility. Only authorised IFB Care Service Personnel should undertake repairs.
- The machine is completely isolated from the electricity supply only when it is switched OFF at the wall socket and the plug is taken out, or it is switched OFF from the main source, or the main fuse is taken out or MCB switched OFF.
- Only genuine IFB original spare parts should replace faulty components. Only when these parts are fitted can the safety standards of the machine be guaranteed.
- If the power cord is faulty, it must be replaced only by an IFB approved service technician to protect the user from danger.
- The clothes dryer should never be stacked on a washing machine without using the proper stacking kit (contact authorised IFB Care service personnel for more details). Doing so is extremely dangerous, as the dryer may vibrate off the washing machine during use.
About eWaste
eWaste or Electronic Waste or Waste Electrical and Electronic Equipment (WEEE) are the terms used to describe old, end-of-life or discarded appliances using electricity.
Dos
• Always dispose of products that have reached end-of-life by calling an authorised local eWaste recycler.
• Always drop off used electronic products, batteries or accessories at your nearest authorised eWaste recycler when they reach end-of-life.
- Whenever possible, or as instructed, sort packaging materials according to responsible waste disposal and recycling options.
Don'ts
- Do not dismantle electronic products on your own.
- Do not throw electronic products in bins with a 'Do Not Dispose' sign.
- Do not give eWaste to informal and unorganised sectors such as local scrap dealers and rag pickers.
- Do not dispose of your product in garbage bins along with municipal waste that ultimately reaches landfills.

- Do not pull the cord to disconnect the plug. Hold the plug itself. Do not insert or remove the plug with damp hands.
- Do not spill water over the machine. In case of spillage, wipe dry. Avoid the machine coming in contact with floor cleaning chemicals.
- Do not wash or spray water over the switch or control panel.
- Do not touch the clothes dryer with wet hands.
- Ensure that the machine is connected to a 3 pin socket with good earthing and 16 Amp MCB or other automatic short circuit protection devices.
• Always make sure that the drum is stationary before removing clothes. Reaching into a moving drum is extremely dangerous. - This clothes dryer is for domestic drying of garments only. It is not designed for commercial use
- Garments soiled with substances such as cooking oil, acetone, alcohol, petrol, kerosene, stain removers, turpentine, wax and wax removers should be washed in hot water with extra detergent before being dried in the clothes dryer.
- Items made of foam rubber (latex foam), shower caps, waterproof textiles, rubber backed articles and clothes or pillows fitted with foam rubber pads should not be dried in the clothes dryer.
- If the clothes dryer is stopped before the end of its drying cycle, remove items and allow the heat to dissipate before using it again.
- The final part of the drying cycle (Cooldown) airs the clothes without any heat to ensure that they are cooled down to a temperature that ensures they will not be damaged.
Risks of Improper Handling of eWaste
eWaste usually includes components which, if disposed of improperly, hold environmental consequences such as air, water and soil pollution and also pose risks to human health.
By ensuring this product is disposed of correctly, you will
help prevent potential negative consequences for the environment and human health. Components and materials used in
the manufacture of this clothes dryer are fully compliant with provisions of hazardous substances outlined in eWaste Management Rules, 2016.
For Detailed Information and Disposal Request
Contact IFB Care at 08045845678/08069545678 and provide your details to our representative to request your product to be picked up for disposal

- Only garments washed in water should be dried in this clothes dryer. Do not dry items cleaned with flammable liquids (eg dry cleaning fluid).
- Always check the garment's care label to make sure it can be tumble dried in a clothes dryer.
• To prevent overheating, always ensure the airflow is unobstructed at the inlet and outlet. - Failure to follow these safety instructions may result in damage to the clothes dryer and may not be covered by the warranty.
- Clean the lint filter after every drying cycle. This reduces drying time, saves energy and avoids overheating. Not cleaning the lint filter can become a fire hazard or cause damage to your clothes.
- The clothes dryer must be periodically cleaned by a service technician, especially if the mounting changes from upright to inverted or vice versa.
- A torn or damaged lint filter must be immediately replaced with a new one.
- Do not operate the clothes dryer without a lint filter.
- Do not overload the clothes dryer. Doing so can increase lint build up due to reduced airflow.
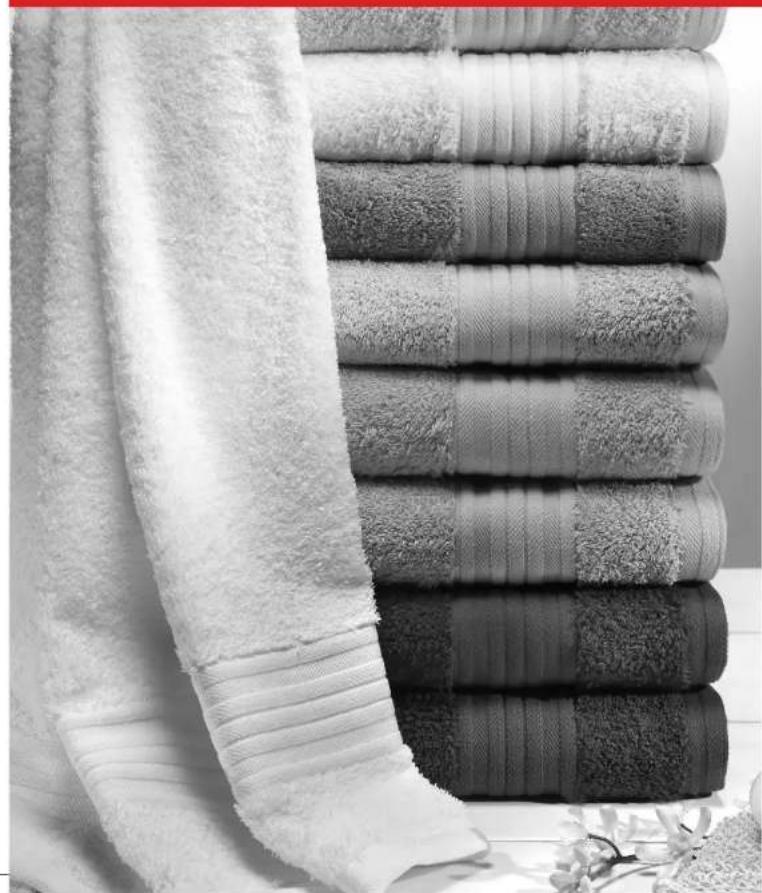
natural_image
Stack of folded towels in a kitchen setting, no visible text or symbolsContents
• Safety guidelines
• Safety instructions
Chapter 1: Getting started with your machine
• Installing your machine & safety guidelines
• Before you start
Chapter 2: Working your machine
• 4 easy steps to dry your laundry
- Features
Chapter 3: Get more from your machine
- Tips for best results
• Drying guide
• Maintenance and cleaning
Chapter 4: Useful information
- Troubleshooting
• Technical specifications
• Service record - Warranty
PAGE
04
06
12
16
17
19
20
21
23
24
27
29
33
Warning Electrical safety of this appliance can only be guaranteed when continuity is complete between it and effective earthing system which complies with local and national safety regulations. It is important that this basic requirement is present and regularly tested. When there is any doubt, the onsite wiring system should be inspected by a qualified electrician. IFB cannot be held liable for the consequences of an inadequate earthing system (eg electric shock etc).

Precautions This appliance conforms to safety requirements. Inappropriate use can lead to injury or damage to property. Please read this manual carefully. It contains information on safety, installation, use and maintenance
Getting started with your machine
Note A protection film is provided for safety of the cabinet during transit. It can be removed at the time of installation.
natural_image
Simple line drawing of a rectangular block with circular openings and a curved side, no text or symbols present.12
Installing your machine & safety guidelines
1 Options for installation
Unpack and place the new clothes dryer in proximity to an electrical connection. If placing it on the floor, ensure that the floor is properly levelled. Alternately, it can be placed on a worktop or mounted on a wall.
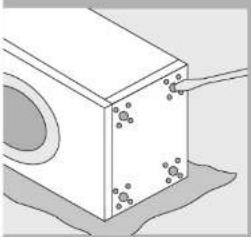
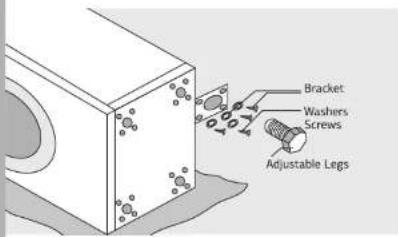
2 Installing on the floor
Use the levelling kit to install the clothes dryer on the floor.
- Place a piece of cardboard, towel etc on the floor and tip the clothes dryer onto its side.
- Remove the 4 plastic plugs using a screwdriver.
- Screw the brackets to the bottom of the clothes dryer.
- Screw the levelling feet onto the bracket and level the machine by adjusting them.
• Make sure that the machine rests on all four feet on a level surface.
Note if the levelling feet are removed, the plastic plugs at the bottom must be replaced.
3 Mounting on a wall
Use the wall mounting kit to install, which is available as an optional extra, to mount the clothes dryer on a wall.
- The wall or vertical surface onto which the brackets will be fixed should be strong enough to support the weight of the clothes dryer when fully loaded (approx 45 Kg).
- Ensure at least 15 mm of space above the clothes dryer to enable it to be lifted onto the brackets.
- If mounting the clothes dryer above a top load washing machine, ensure sufficient space below it so that the lid of the washing machine can be opened.
- If the clothes dryer is enclosed inside a cupboard, adequate inlet and exhaust ventilation must be ensured. The moist exhaust air must be vented out of this space. A venting kit is available for this purpose as an optional extra.
If the venting kit is required, ensure adequate space for it.
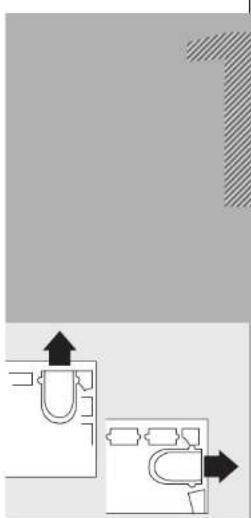
*Note The exhaust air deflector at the back of the clothes dryer can be positioned to direct exhaust upwards or sideways. Unscrew and reposition as required.
Mounting of the clothes dryer on the wall can be arranged through a third party at a prevailing cost at the time of the installation.
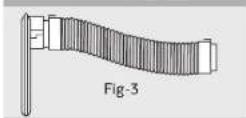
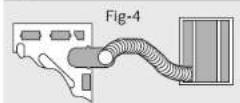
4 Mounting the venting kit
Follow the steps below to assemble the venting kit.
- The venting kit includes an adapter, a hose and two connectors.
- Assemble the connectors on both ends of the hose by rotating them.
- Insert one end of the hose assembly into the adapter slot.
- Unscrew the exhaust air deflector from the back of the clothes dryer and replace it with the adapter. The venting kit may be mounted in a sideways or upwards position using the same screws.
natural_image
Diagram showing two mechanical components with directional arrows, no text or symbols present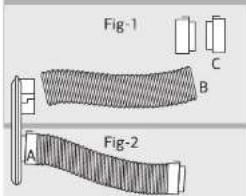
13
natural_image
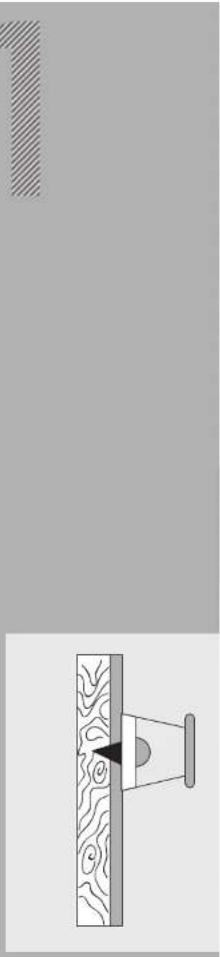
Diagram showing a wooden plank inserted into a wall with a small circular component inserted, alongside a hatched rectangular area (no text or symbols)5 Mounting on a brick wall
Follow the steps below to mount the clothes dryer on a brick wall.
- The mounting brackets included with the clothes dryer may be fixed to any suitable vertical surface.
- Use the template to mark the drilling holes for the brackets.
- Bolt the brackets directly to the wall using self-locking masonry fasteners.
Note When fixing the brackets to the wall, the mounting plate should face the other bracket.
natural_image
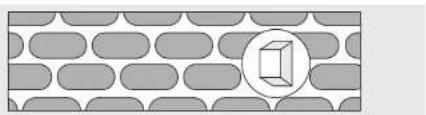
Diagram showing a 3D cube inside an oval on a textured background (no text or symbols)6 Mounting on a timber framed wall
Follow the steps below to mount the clothes dryer on a timber framed wall.
- The mounting brackets must be positioned so that the fasteners attach to the wall studs behind the plaster or wall sheeting.
- If it is not possible to screw the brackets directly into the wall (because they are at an inconvenient height or spacing), a timber batten (90 mm x 30 mm) should be fastened to the wall using 4 coach screws (6 mm x 70 mm). The wall brackets can then be attached to the batten using 4 coach screws (6 mm x 30 mm).
- To maintain the same distance between the wall and the clothes dryer, another timber batten of the same size may need to be fastened to the wall in line with the plastic spacer.
Note Before mounting the clothes dryer on the wall, please ensure that the plastic spacer is located as shown.
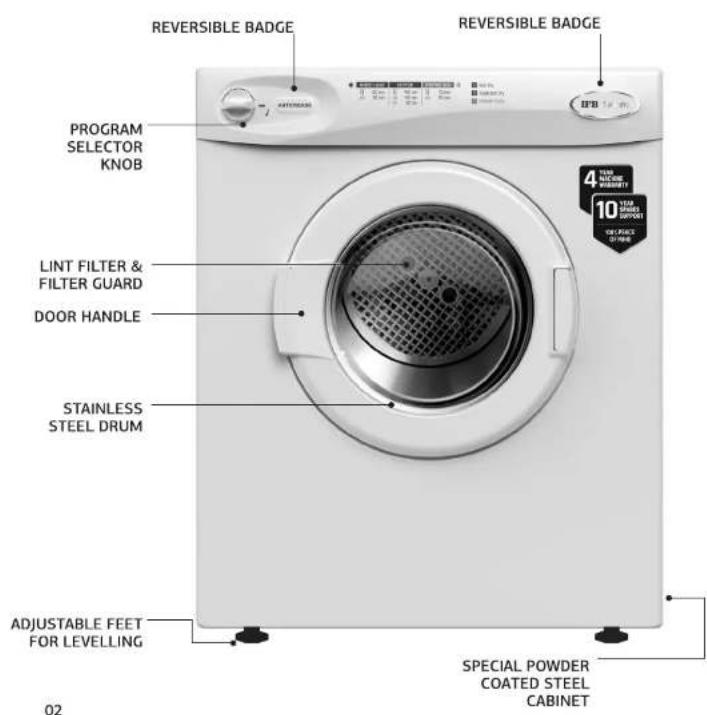
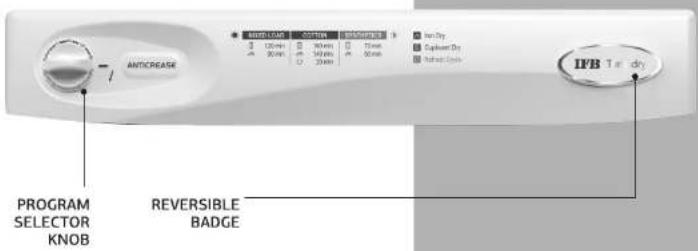
7 Reversible badges
The IFB logo and Anticrease badges may be reversed when mounting the clothes dryer upside down on the wall.
- Use a thin, bladed knife to unclip the badges from the panel.
• Vertically reverse the badges. - Clip the badges back onto the panel.

natural_image
Top-down view of a washing machine with a circular vent and control panel (no visible text or symbols)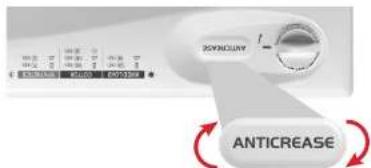

Before you start
Check your machine
- Ensure that the clothes dryer has been installed and connected properly.
- Wipe the inside of the drum with a soft, damp cloth to remove any dust that may have accumulated during transport or storage.
- It is mandatory to have a 16 Amp, 3 pin 220–240 V AC, 50 Hz electrical point with a 16 Amp MCB or automatic short circuit protection device.
- No double adapters or extension cords should be used.
- Make sure the lint filter and guard are properly fitted.
- Read all instructions before operating the clothes dryer.

natural_image
Black-and-white photo of a woman holding a baby while lying on a sofa, no text or symbols visible
Working your machine
4 easy steps to dry your laundry
1 Sort the laundry
- Do not overload the clothes dryer. This poses the risk of creasing, increases drying time and reduces efficiency. Also, never load dripping wet clothes in the clothes dryer as it may lead to electric shock or damage to components.
- To add or remove items from the clothes dryer or check the dryness of the load during the drying cycle, turn the Selector Knob to Refresh (for a cool down) at least 1 min before attempting to open the door. This is to prevent scorching or possible self-combustion..
Load the laundry
- Check and remove any small articles or any laundry items left inside the drum or on the rubber gasket.
- Place garments loosely inside the drum.
- Loosely load the clothes in the drum one by one until it is about half full. Clothes fluff up as they dry so don't cram them in tightly when wet. They must tumble freely in the dryer.
Note Separate fabrics that will attract lint from those that will give off lint.
Select Drying program
• Power ON the machine from the main power Switch.
- Two temperature settings for dryer are available as mentioned below.
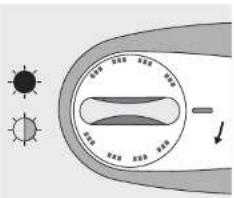
- Select the drying time by turning the timer dial clockwise.
- Times shown on the timer dial are approximate and may vary due to voltage fluctuation.
- Drying time depends on fabric type, size, weight and wetness. Spin dry your laundry in a washing machine to reduce drying time.
- Drying time is also affected by room temperature and humidity. Clothes will take longer to dry on a cool or humid day.
Note The timer dial will only operate when turned in a clockwise direction. Turning it in an anti-clockwise direction may damage the clothes dryer.
PROGRAM
Cotton Regular/Mixed Load
Synthetics/Delicates

TYPE OF LAUNDRY
Heavier items such as towels and flannel blankets.
Delicate fabrics prone to shrinkage such as lingerie, synthetics etc.
Starting and stopping
• After you have set the time, close the door to start the clothes dryer.
- To stop the clothes dryer during a drying cycle, simply open the door and the drum will stop rotating.
• If you wish to continue the drying cycle, close the door.
Note You can lengthen or reduce the drying time during a drying cycle using the timer dial.
Features
Anticrease
The clothes dryer has been programmed to rotate in one direction for 3 minutes and then in the other direction for 3 minutes. This reduces tangling and ensures even drying in a shorter time.
Safety Reset
A temperature activated safety cut-off device protects the clothes dryer from overheating. A safety reset switch located near the door latch activates the safety device.

Tips for best results
- Woollens should not be tumble dried but pulled to their original shape and dried flat.
• Clothes or towels soiled with sand or grit should be washed to remove the particles before being placed in the clothes dryer. - Some woven and loop knit fabrics tend to shrink by varying amounts depending on their size. Do not use the Regular setting for these garments and always stretch them out immediately after drying.
- Do not overload the clothes dryer. To reduce wrinkles, remove permanent press articles as soon as the clothes dryer stops.
Fabric guide
Fibre or leather
Follow manufacturer's instructions
Baby clothes and nightgowns
If garments are made of acrylic, dry only using the Delicate setting. Check manufacturer's instructions.
Fibreglass
Do not dry fibreglass items in the clothes dryer. Garments may pick up glass particles during subsequent drying cycles, which may cause skin irritation.
Rubber and plastic
Items made of rubber or plastic such as aprons, bibs, tablecloths, chair covers, curtains etc should not be dried in the clothes dryer.
Drying Guide
| Time* (min) | ||||
| Fabric | Weight of Dry Laundry (Kg) | Program Selection | Iron Dry | Cupboard Ready |
| Cotton/Linen | 2.5 | Normal | 30-50 | 40-70 |
| Cotton/Linen | 3.5 | Normal | 50-80 | 60-90 |
| Cotton/Linen | 4.5 | Normal | 70 | 80-110 |
| Cotton/Linen | 5.0 | Normal | 80-100 | 90-120 |
| Cotton/Linen | 5.5 | Normal | 120-140 | 140-160 |
| Synthetic | 2.5 | Easy | - | 30-60 |
| Synthetic | 3.5 | Easy | - | 60-80 |
| Synthetic | 4.5 | Easy | - | 80-100 |
| Synthetic | 5.0 | Easy | - | 100-120 |
| Synthetic | 5.5 | Easy | 80-100 | 120-140 |
| Mixed | 3.5 | Easy | 60-80 | 70-100 |
| Mixed | 5.5 | Easy | 110-130 | 130-160 |
| Refresh Cycle | 5.5 | Refresh | - | 20 |
* For laundry spin-dried at 700RPM
Note The values mentioned above are under standard test conditions. They may vary depending on the type of fabric, mix of garments, moisture content, ambient humidity and temperature, power interruptions during cycle etc.
Cloth weights
| Cotton sheets | (D)(S) | 1 Kg500 g | Pyjamas/ShirtsCottonOther | 400 g280 g200 g | Bedspreads/BlanketsAcrylic | 3 Kg1.5 Kg |
| Other than cotton | (D)(S) | 650 g400 g | BlousesCottonOther | 650 g100 g | SweatersCotton vestsLightweight | 400 g100 g150 g |
| Pillowcases(Cotton/Other) | 110 g85 g | SareesCottonSynthetic | 140 g350 g | Cotton vestsUnderslips | 100 g100 g | |
| Bath towelsHand towels | 600 g260 g | SocksLong (2 pairs)Short (2 pairs) | 150 g85 g | SkirtsTrousersJeans | 200 g250 g400 g | |
| Tablecloths(Small)(Large) | 230 g600 g | Handkerchiefs (6)Napkins (12)Panties | 85 g1.1 Kg80 g | |||
| Table napkins | (4) | 150 g | Lungi/Dhoti | 200 g |
D = Double; S = Single
The chart indicates average weights of clothes. The recommended weight of your drying load should not be exceeded to ensure that your machine dries your clothes effectively. Suggested weights are approximate and may vary.
Maintenance and cleaning
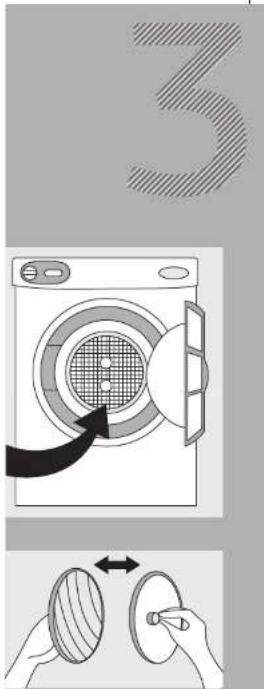
Cleaning the air filter
Inside your clothes dryer, at the rear, is a high efficiency micromesh lint filter. This must be cleaned after every use.
How to remove the lint filter
• Pull out the filter from the clothes dryer.
- Unsnap the micromesh filter from the plastic guard as shown.
- Peel off or shake loose the lint from the filter.
How to refit the lint filter
- Make sure the 'fingers' at the centre of the lint filter point towards the filter guard.
- Snap the lint filter into the guard. Make sure to push it all the way in.
- Refit the guard, with the filter attached, in the clothes dryer drum. It should snap into place when fitted correctly
natural_image
Interior view of a modern kitchen appliance with a washing machine, storage boxes, and a cabinet (no visible text or symbols)
Useful information
Troubleshooting
Make sure you have installed the clothes dryer in accordance with the installation instructions.
If the clothes dryer does not start, check the following probable causes before you contact your service provider.
| PROBABLE CAUSE | SOLUTION |
| The power cord is not plugged in firmly. | Plug in the power cord firmly. |
| The power outlet is not switched ON. | Switch On the power outlet. |
| The safety cut-off has been activated. | Reset the safety cut-off using the safety reset switch. If the safety cut-off activates repeatedly, switch OFF the clothes dryer and contact IFB Care. |
| Lint build up. | Remove and clean the lint filter. |
| Exhaust is blocked. | Make sure the outlet is not obstructed. |
| The house fuse has blown. | Replace the house fuse. |
| The door is not properly closed. | Close the door properly. |
| The drum securing tape has not been removed. | Remove the drum securing tape. |
| The timer dial is not turned to the correct setting. | Turn the timer dial to the correct setting. |
| The power cord is damaged. | Contact IFB Care. A damaged power cord must be replaced only by an IFB Service Technician. |
| The clothes have not dried properly. | Clothes were not dried for long enough.Turn the timer dial to set a longer drying time.Drying time may also need to be extended if the ambient temperature is 5°C or below.Make sure the lint filter is not blocked.Make sure the safety cut-off device has not been activated. If so, reset the safety cut-off using the safety reset switch. If the safety cut-off activates repeatedly, switch OFF the clothes dryer and contact IFB Care. |
24
Before contacting IFB Care, make sure you have the make, model and serial number of your clothes dryer at hand. The IFB Service Centre will require this information.
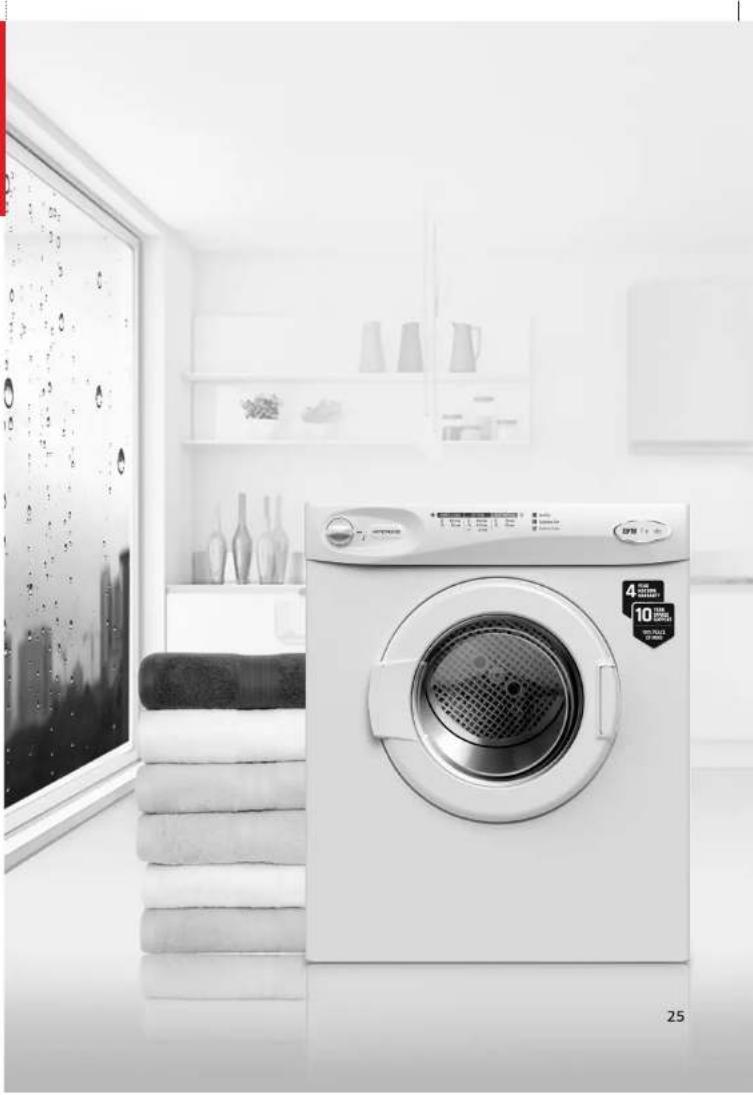
natural_image
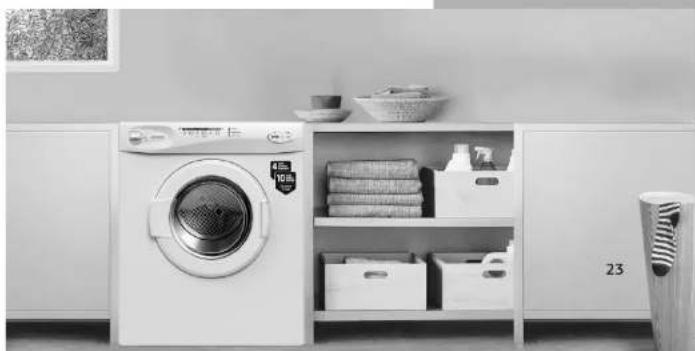
Interior of a modern kitchen with a white washing machine, folded towels, and a window showing a wall-mounted dish (no visible text or symbols)Accessories for your clothes dryer
Venting kit
The clothes dryer removes a considerable amount of moisture from the wet clothes. A venting kit has been designed to direct the moist air from its exhaust outdoors.
Wall mounting kit
Use the wall mounting kit to mount your clothes dryer on the wall. (Refer installing your machine & safety guidelines on Page 13)
Levelling kit
Your clothes dryer can be installed on the floor using the levelling kit. (Refer Installing your machine & safety guidelines on Page 12). Alternately, your clothes dryer can be mounted on a worktop using vacuum cups.
Dryer Stacking Kit
Save space in your laundry room by stacking the dryer on top of your Front Load Washer. To do this, you will need the Dryer stacking kit. (Refer to the Dryer Stacking kit leaflet for more details)
Note Stacking kit installation is not recommended on a washing machine with trolley.
For more details on accessories, kindly contact IFB Care.
Technical specifications
| Model | Turbody |
| Power Supply | 220-240 V Single Phase 50 Hz |
| Dimensions | 530 x 600 x 720 mm (H x W x D) |
| Net Weight | 26 Kg |
| Capacity | 5.5 Kg of dry cotton(4.5 Kg economic load) |
| Drying Programs | 2 (Regular, Delicate) |
| Maximum Cycle Time | 180 minutes (including Cooldown) |
| Selector Knob | Program Selector |
| Timer Type | Electromechanical |
| Safety Cut-off Switch | Manual |
| Safety Door Switch | Single pole microswitch |
| Heater Rating | 1.8 kW |
| Drum Speed | 55RPM |
| Power Consumption | 1.0 kWh-4.8 kWh |
| Exhaust Flow Rate | 30 Ltr/sec |
| Auto Cooldown | 13 minutes |
Note The times mentioned above are approximate values. Actual values may vary due to voltage fluctuations. The design and specifications are subject to change without prior notice due to continuous improvement and product development.
| Service record | ||
| Complaint | Comments, attended by | Date |

Installation report
Model ____ Serial no ____
Customer's name ____
Phone (residence) (office)
Address
Installation check points
Machine delivered on
Machine installed on
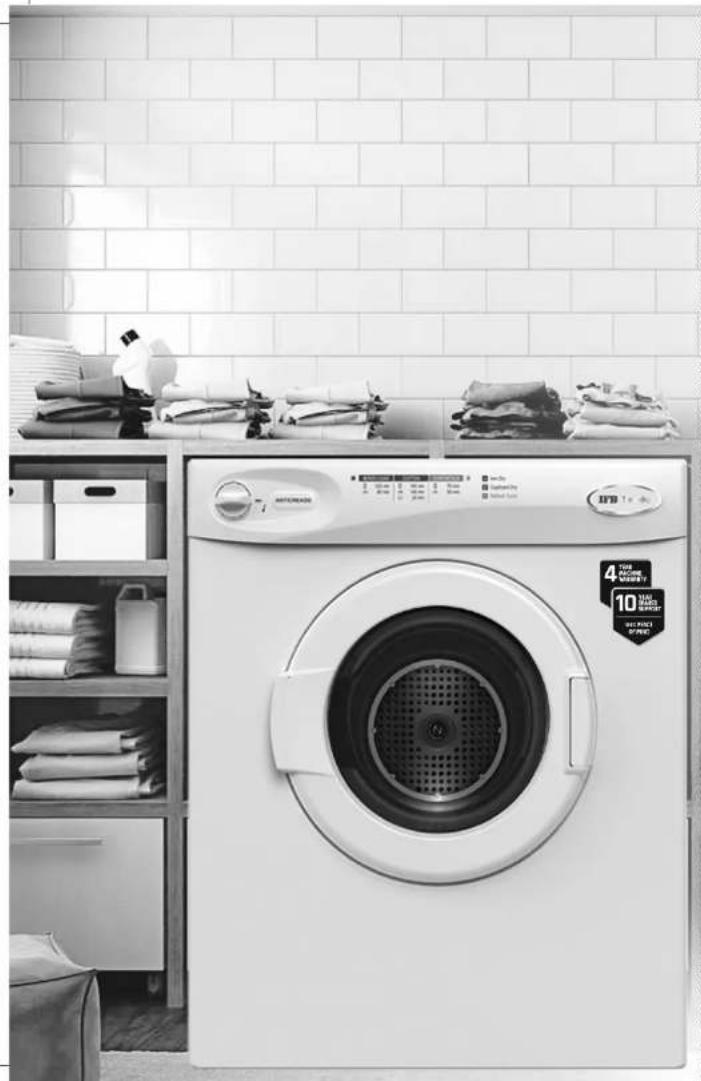
natural_image
Black-and-white photo of a washing machine in a kitchen with tiled walls and laundry boxes (no visible text or symbols)Warranty—Customer copy
Model
Serial no
Dealer's name
Date of purchase
Customer's name
Address
Phone
Motor serial no.
natural_image
Red 3D geometric shape with rounded corners, no text or symbols presentWARRANTY
IFB Industries Ltd (the Company) warrants to the original domestic purchases of this washing machine (Appliance) that it is free from defects in workmanship and material. During 4 Years (48 months) from the date of purchase of the new washing machine all the parts of the washing machine which prove to be defective in workmanship and/or materials shall be replaced or repaired free of charge on intimation to the Company/Company's authorised service centre nearest to the place where the appliance is installed. During 10 years (120 months) from the date of purchase of the new washing machine, the motor which proves to be defective in workmanship and/or materials shall be replaced or repaired free of charge on intimation to the Company/Company's authorised service centre nearest to the place where the appliance is installed.
The warranty is subject to limitations of warranty.
LIMITATIONS OF WARRANTY
1) This Warranty is not valid in case of the following events:
a) If the Warranty Card is not fully and properly filled in and signed at the time of purchase or installation by the Company's authorised dealer/service engineer.
b) If the completed Warranty Card is not presented to the authorised personnel at the time of service/repair.
c) If the appliance is not used in accordance with manufacturer's instructions given in the 'User Manual'
d) If the washing machine has been installed, serviced, repaired, opened or tampered with by unauthorised personnel
e) If defects arise/caused by accidents, alteration, misuse, neglect, abuse, substitution of original components with spurious/non genuine components, attack by household pests/rodents, fire, flood earthquake, lighting and/or any other acts of God/natural calamities.
f) If defect arise with unauthorised optional accessories such as trolley, rat mesh, machine cover, online filter, inlet/exhaust extension hose, tap adapter, extended power supply cable, adjustment feet cover etc.
g) If damages occur by improper electrical circuits outside the washing machine or by any electrical supply thereof
h) If the machine serial number on the appliance is defaced, missing or altered.
i) If sea water or any sub-standard detergent has been used in the appliance.
j) If the appliance is taken out of India.
2) This Warranty does not cover any type of painting or plating, including rusting etc or defects thereof.
3) The Company is not liable for any incidental or consequential damages.
4) Parts replaced or repaired under this Warranty are warranted throughout the remaining of the original Warranty period
5) The Company is not liable for any delay in servicing due to reasons beyond the control of the Company or any of its authorised service centres.
6) This Warranty is not applicable if the washing machine is used for commercial purpose or at places such as institutions, hostels, hospitals, community halls or in other similar applications.
7) For any service under this Warranty beyond city/town/municipal limits from the Company/authorised service centre, a fixed charge of ₹250 will be collected from the customer in addition to the actual to and fro charges by the shortest route. Alternatively, the customer can bring the appliance to the nearest service centre for carrying out the necessary repairs, at their own cost.
8) To avail the 10 years motor warranty, customers should get the machine serviced only by an IFB authorised service partner.
9) Any issue other than the motor arising outside the warranty period of 4 years, will be repaired on a chargeable basis.
10) Repair/service charges for any issue with the motor outside the 10 years motor warranty period, will be payable by the customer.
11) IFB's decision in this regard shall be final and binding on the customer.