SEN-IR-TEMP - Termometer Joy-It - Gratis brugsanvisning og manual
Find enhedens vejledning gratis SEN-IR-TEMP Joy-It i PDF-format.

Brugerspørgsmål om SEN-IR-TEMP Joy-It
0 spørgsmål om dette apparat. Besvar dem du kender, eller stil dit eget.
Stil et nyt spørgsmål om dette apparat
Download vejledningen til din Termometer i PDF-format gratis! Find din vejledning SEN-IR-TEMP - Joy-It og tag din elektroniske enhed tilbage i hånden. På denne side er alle dokumenter nødvendige for brugen af din enhed offentliggjort. SEN-IR-TEMP af mærket Joy-It.
BRUGSANVISNING SEN-IR-TEMP Joy-It

natural_image
Close-up of a blue electronic component with metallic pins and a central metallic knob (no visible text or symbols)INFRARED THERMOMETER
Infrared sensor module for non-contact temperature measurements
1. GENERAL INFORMATION
Dear customer, thank you for choosing our product. In the In the following, we will show you what you need to bear in mind during commissioning and use.
Should you encounter any unexpected problems during use, please feel free to contact us.
2. BASICS
This infrared sensor module uses the MLX90614 sensor and enables non-contact temperature measurements. The control is particularly simple via the I2C interface and is thus possible with a wide variety of microcontrollers and single board computers.
3. APPLICATION EXAMPLE ARDUINO
First, connect the module to your Arduino as follows:
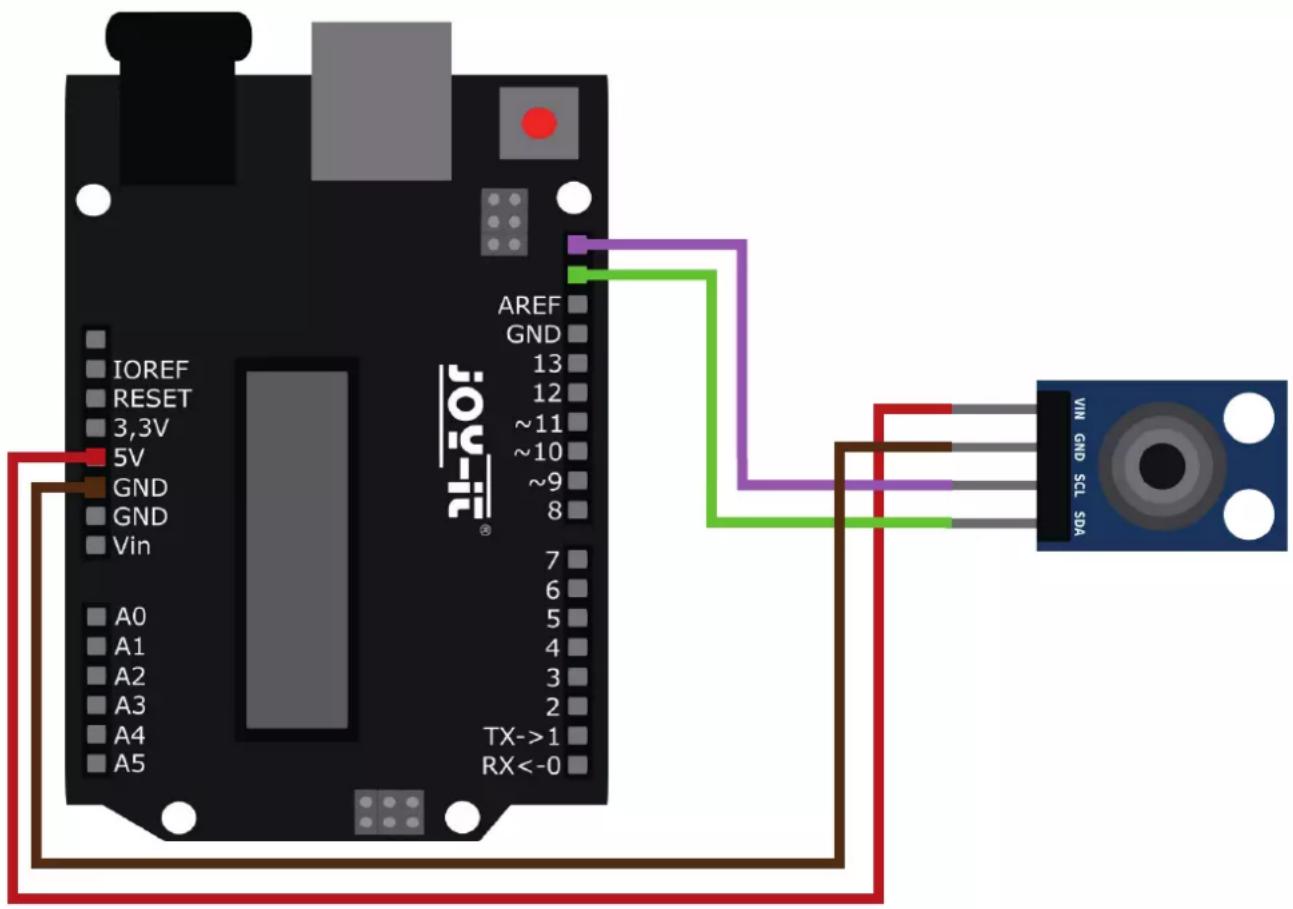
ARDUINO INFRARED THERMOMETER
| 5 V | VIN |
| GND | GND |
| SCL (D19) SCL | |
| SDA (D18) | SDA |
For usage, we recommend to use the MLX90614 Library from Adafruit. To install this, first open the library manager in your Arduino IDE under Sketch → Include Library → Manage Libraries.
Here, type MLX90614 in the search box and install the library titled Adafruit MLX90614 Library.
A suitable example program is already included in the library. Open this under File → Examples → Adafruit MLX90614 Library → mlxtest. Transfer the code sample to your Arduino and open the serial monitor to display the measurement outputs.
4. APPLICATION EXAMPLE RASPBERRY PI
First connect the module to your Raspberry Pi as follows:
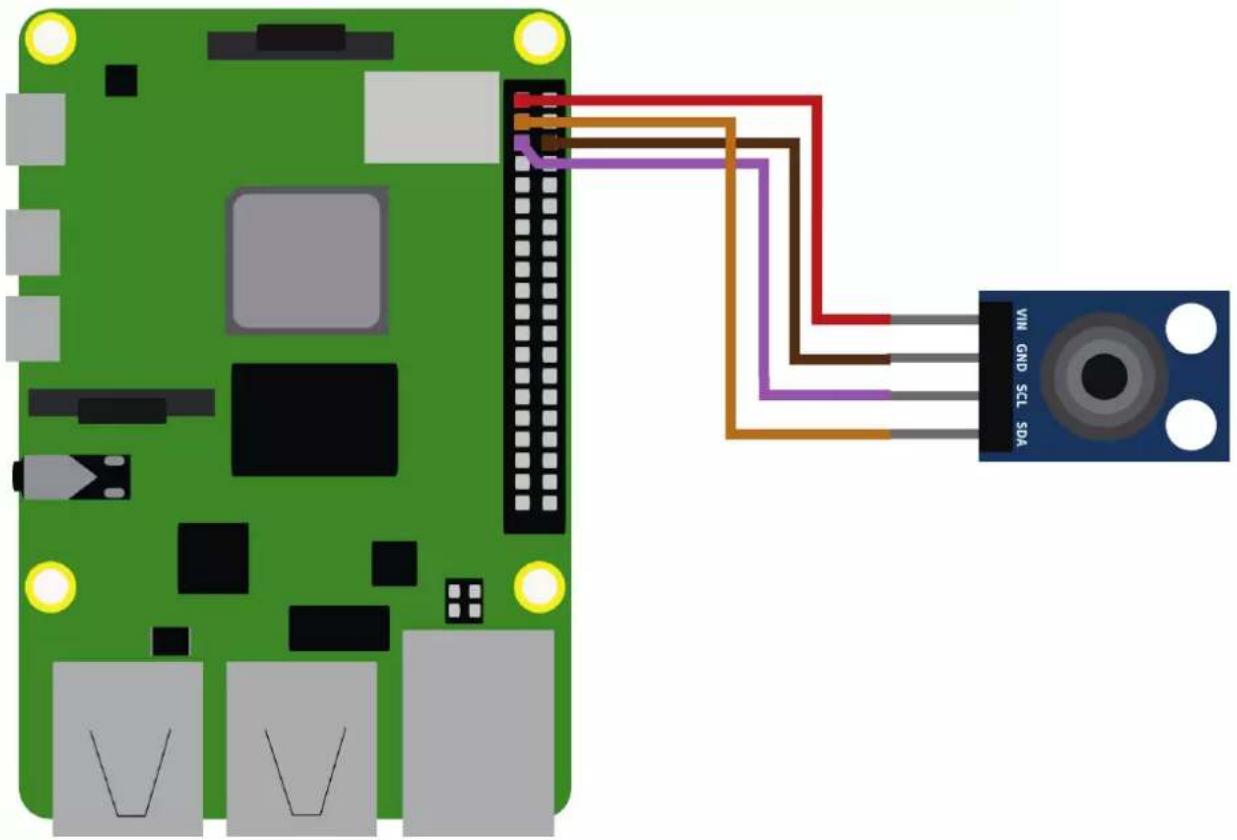
natural_image
Green Raspberry Pi connected to a blue Sensor SGA sensor via cable routing (no text or symbols on components)RASPBERRY PI INFRARED THERMOMETER
| 3,3 V | VIN |
| GND | GND |
| SCL (GPIO2) SCL | |
| SDA (GPIO3) | SDA |
Before we can use the sensor we first need to enable the I2C interface on the Raspberry Pi. To do this, open a new terminal window and enter the following command to open the Raspberry Pi configuration menu:
sudo raspi-config
Navigate here to the menu 3 Interfacing Options and activate here I5 I2C.
Now we can create our sample program. To make it as easy to use as possible, we are going to use a class from Raspberry Pi Tutorials for this. Create a new Python file by entering the following command:
sudo nano mlx90614.py
Insert the following content here:
import time
import SMBus

class MLX90614( ):
    MLX90614_TA = 0x06
    MLX90614_TOBJ1 = 0x07

    def __init__(self, address = 0x5a, bus = 1):
    self.address = address
    self.bus = SMBus(SMBus(bus)

    def readValue(self, registerAddress):
    error = None
    for i in range(3):
    try:
    return self.bus.read_word_data(self.address, registerAddress)
    except IOError as e:
    error = e
    sleep(0.1)
    raise error

    def valueToCelcius(self, value):
    return -273.15 + (value * 0.02)

    def readObjectTemperature(self):
    value = self.readValue(self.MLX90614_TOBJ1)
    return self.valueToCelcius(value)
def readAmbientTemperature(self):
    value = self.readValue(self.MLX90614_TA)
    return self.valueToCelcius(value)

sensor = MLX90614()
while True:
    print("Object temperature: ", sensor.readObjectTemperature())
    print("Ambient temperature: ", sensor.readAmbientTemperature())
    print("----")
    time.sleep(0.5)
Save the file with the key combination CTRL + O, confirm with Enter and exit the editor with the combination CTRL+X.
Alternatively, you can download the sample program directly to your Raspberry Pi with the following command:
wget https://www.joy-it.net/files/files/Produkte/SEN-IR-TEMP/SEN-IR-TEMP-RPi.zip
unzip SEN-IR-TEMP-RPi.zip
Now install the required dependencies with the following command:
sudo apt-get install python3-smbus i2c-tools -y
Now you can run the sample program:
sudo python3 mlx90614.py
5. INFORMATION & TAKE-BACK OBLIGATIONS
Our information and take-back obligations under the Electrical and Electronic Equipment Act (ElektroG)

Symbol on electrical and electronic equipment
This crossed-out trash can means that electrical and electronic equipment does not belong in the household trash. You must hand in the old equipment at a collection point. Before handing in, you must separate used batteries and accumulators that are not enclosed in the old device from the old device.
Return options:
As an end user, when you purchase a new appliance, you can return your old appliance (which performs essentially the same function as the new one purchased from us) for disposal free of charge. Small appliances with no external dimensions larger than 25 cm can be returned in normal household quantities, regardless of the purchase of a new appliance.
Possibility return to our company location during opening hours:
SIMAC Electronics GmbH, Pascalstr. 8, D-47506 Neukirchen-Vluyn
Possibility return in your area:
We will send you a parcel stamp with which you can return the device to us free of charge. To do this, please contact us by e-mail at Service@joy-it.net or by phone.
Packaging information:
Please pack your old device securely for transport. If you do not have suitable packaging material or do not wish to use your own, please contact us and we will send you suitable packaging.
6. SUPPORT
We are also there for you after the purchase. If you have any questions or problems arise, we are also available by e-mail, telephone and ticket support system.
E-Mail: service@joy-it.net
Ticket-System: http://support.joy-it.net
Phone: +49 (0)2845 9360 - 50 (9:30 - 17:15 o'clock)
For more information, visit our website:
www.joy-it.net