
F-YCL27N - Affugter PANASONIC - Gratis brugsanvisning og manual
Find enhedens vejledning gratis F-YCL27N PANASONIC i PDF-format.


Brugerspørgsmål om F-YCL27N PANASONIC
0 spørgsmål om dette apparat. Besvar dem du kender, eller stil dit eget.
Stil et nyt spørgsmål om dette apparat
Download vejledningen til din Affugter i PDF-format gratis! Find din vejledning F-YCL27N - PANASONIC og tag din elektroniske enhed tilbage i hånden. På denne side er alle dokumenter nødvendige for brugen af din enhed offentliggjort. F-YCL27N af mærket PANASONIC.
BRUGSANVISNING F-YCL27N PANASONIC
natural_image
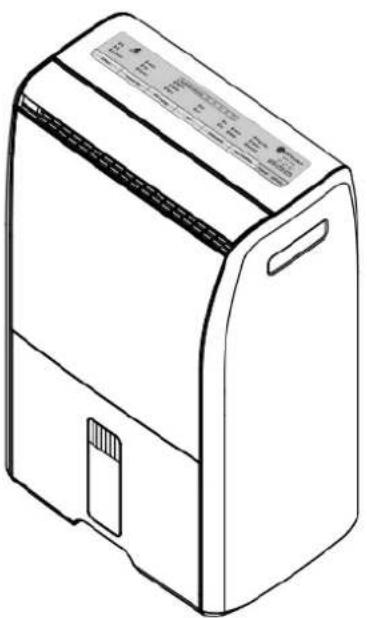
Line drawing of a portable air conditioner unit (no text or symbols)Panasonic®
Operating Instructions
Dehumidifier
Model No. F-YCL27N
This product is for indoor use only
Contents
< Page >
| Safety Precautions ...... 2~4Part Names ...... 5~6 | Preparing for use |
| Dry Clothes mode ...... 7Dehumidifying mode ...... 8Fan mode ...... 9Air Swing / Louver Direction ...... 10• Air Direction Setting Examples ...... 11Using the Timer/ Removing a Full Tank ...... 12Continuous Drainage ...... 13Maintenance ...... 14~15• Drying Clothes ...... 16• Effectiveness of the filter ...... 16 | Operation |
| Fault ! ? ...... 17~18Memo ...... 19Specifications ...... 20 | Troubleshooting |
Correct use will help you save electricity
Warranty card included Separately
Thank you for purchasing this Panasonic product.
- Please read these operating instructions carefully, in order to use the product correctly and in a safe manner.
- Also, be sure to read the "Safety precautions" section (pages2\~4), before use.
- Keep the warranty documentation in a safe place along with the operating instructions for future reference.
Safety precautions
Always pay attention to these precautions
To prevent users and others bodily harm or property losses, we are explaining the precautions that must be observed.
■ Ignoring the symbols denoting incorrect operation, can result in harm or level of damage, described in the following two categories.

WARNING: This symbol indicates the "Possibility of death or serious injury".

CAUTION: This symbol indicates the "Possibility of injury or damage to property".
■ Meanings of symbols that always observed are as shown below.

This symbol indicates an action that "requires caution".


This symbol indicates a "never do this" action.


This symbol indicates an "always do this" action.

WARNING
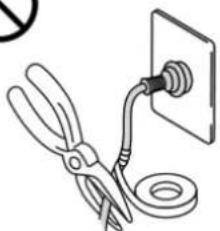
■ Do not do anything that may damage the power cord or power plug.

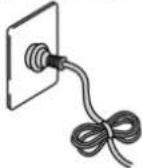
Please do not cut, modify, bend strongly, pull, place heavy objects on top of or tie the power plug with nylon straps or wires; continual use of damaged power plugs may result in electric shock, short circuit or fire.
- If the included power cord is damaged, it must be replaced by the manufacturer, the manufacturers authorized service agent or registered electrician in order to avoid a safety hazard.
■ Do not disconnect the power plug with wet hands.

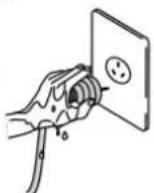
Electric shocks may occur.
■ Avoid the power cord if it is damaged or modified

natural_image
Illustration of a pair of scissors holding a wall-mounted electrical socket connected to a wall outlet (no text or symbols)Damage from heavy objects placed on the power cord, heating the power cord or pulling on the power cord may cause fire or electric shock.
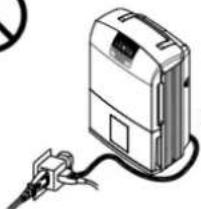
■ Do not use overloaded the rated current of the power outlet and wiring equipment.

natural_image
Illustration of a portable electronic device with a plug and cable (no text or symbols)Use too many branch lines will exceed the rated current, it may cause a fire by overheating.
■ Do not use a damaged power cord

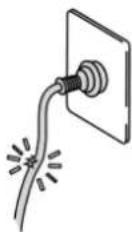
Using a damaged power cord may result in short circuit or fire. Please consult with the manufacturer or an authorized service agent.
■ Do not start or stop the unit by inserting or pulling out the power plug.

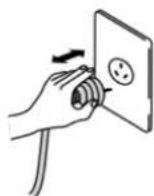
It may cause fire or electric shock by overheating.
■ Insert the power plug completely

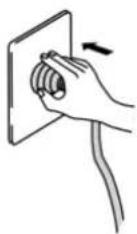
If the power plug is not inserted securely, fire due to overheating may occur.
- Do not use damaged power plugs or loose wall sockets.
■ Do not use the voltage other than as specified for unit.

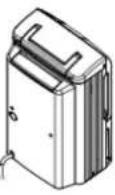
It may cause fire or electric shock by overheating.

WARNING
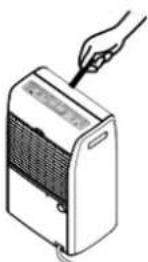
■ Do not insert fingers or other objects into the air inlet or outlet.

natural_image
Illustration of a hand inserting a plug into a device with a label (no text or symbols on the device itself)The rotating fan inside the unit could cause injury.
■ Do not unplug roughly.

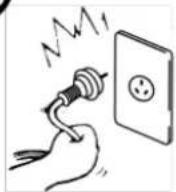
Unplugging roughly may damage the power cord and may cause electric shock, short circuit or fire.
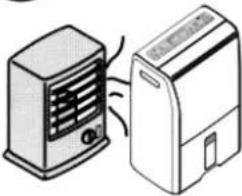
■ Do not place the unit near a heater.

natural_image
Illustration of a portable air conditioner unit connected to a smaller electronic device (no text or symbols visible)Plastic parts may melt and cause fire.
■ Periodically clean the dust and dirt on the power plug.

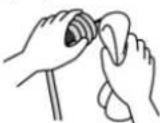
Dust may accumulate on the power plug in humid conditions and may cause the insulation to fail and cause a fire.
- Disconnect the power plug and wipe it with dry cloth. If not using the unit, disconnect the power plug.
■ Never try to repair the unit by yourself.

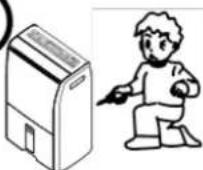
Fire or electric shock may occur.
- Consult the manufacturer or the manufacturers authorized service agent.
■ Do not stretch the power cord.

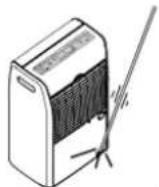
Trapping the power cord as in the above illustration, may cause a short circuit or broken wires (which may cause a fire or an electric shock.)
■ Switch off the unit and pull out the power plug if smoke or an abnormal smell is detected.

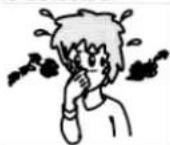
It may cause fire or electric shock by overheating.
- Consult the manufacturer or the manufacturers authorized service agent.
■ Do not pull on the power cord when carrying or storing the unit.

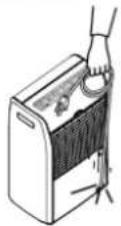
Pulling on the power cord as in the above illustration may damage the wires inside the cord and fire or electric shock may result.

CAUTION
■ Please monitor indoor temperature during prolonged operation.

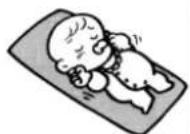
During operation, heat from the unit can cause indoor temperature to rise, upsetting homeostasis, potentially making people feel unwell.
■ Do not use in places where water may splash onto the unit.

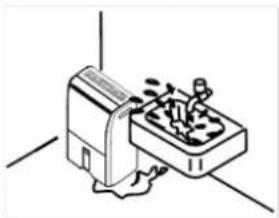
natural_image
Simple line drawing of a mechanical component with no visible text or symbolsFire or electric shock may occur.
Place the unit on a level and sturdy floor.

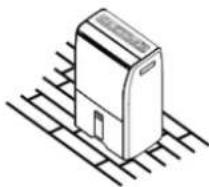
natural_image
Isometric line drawing of a rectangular electronic device with a label on its top, placed on a grid surface (no text or symbols present)If the unit tilts water will overflow, and wet the furniture potentially causing fire or electric shock.
■ Do not use the unit near flammable gas.

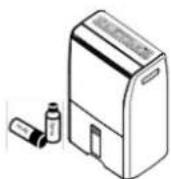
If flammable gases permeate the surrounding space, it may cause fire.
■ Do not use in confined spaces such as closets.

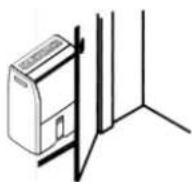
If there is insufficient ventilation, overheating and fire may occur.
■ Do not use in places exposed to direct sunlight, wind or rain.

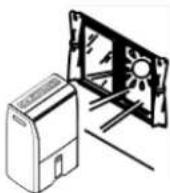
Resulting heat may cause fire or electric shock.
Safety Precautions
This unit is not intended for use by persons (including children) with reduced physical, sensory or mental capabilities, or lack of experiences and knowledge, unless they have been given supervision or instruction concerning use of the unit by a person responsible for the safety. Children should be supervised to ensure that they do not play with the unit.
CAUTION
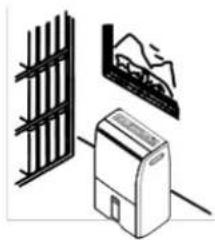
■ Do not use in place where there are artworks or academic documents.
■ Do not place flower vases or other water container on top of the unit.
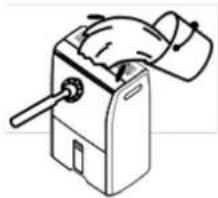
- Do not wash the unit directly with water.

natural_image
Illustration of a doorbell, front panel, and air conditioner unit (no text or symbols)Deterioration of stored articles may occur.

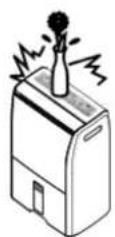
Water may spill into the unit and fire or electric shock may occur.

natural_image
Line drawing of a hand operating a device with a handle and lever (no text or symbols)Water leakage may cause electric shock.
■ Do not place any heat or flame producing instrument in air outlet of the unit.
■ Do not cover the air inlet or air outlet with cloths or towels.
■ Do not sit or climb on the unit.
■ Do not hold the unit by the louver when moving or lifting it.

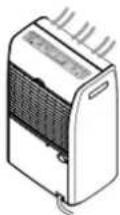
Incomplete combustion may cause carbon monoxide poisoning.

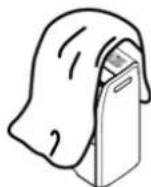
Air circulation will decrease and overheating or fire may occur.

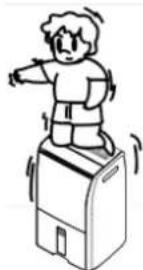
You may fall over, and injury may occur.

The unit may fall down and injury may occur.
■ Before moving the unit, turn off the power and empty the tank.
■ Before cleaning the unit, the unit must be powered off and unplugged from the electrical outlet.
If the unit will remain unused for a long period, disconnect the power plug, for safety.
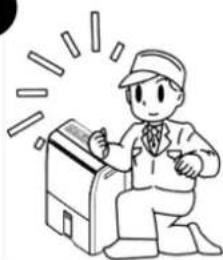
■ After prolonged use, perform periodic inspection.


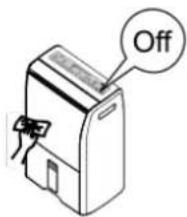

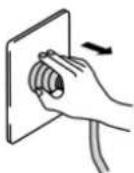

natural_image
Cartoon illustration of a person in a suit kneeling beside a box with motion lines indicating speed (no text or symbols)Failure to empty the tank may result in water leakage resulting in fire, electric shock or water damage to furniture.
The high-speed rotation of the fan inside may cause injury.
Accumulation of dust and foreign objects may occur and may lead to overheating and fire may occur.
Particularly the air filter and drains should be checked routinely to avoid overheating and leakage, resulting in house fires and items wetted.
Part Names
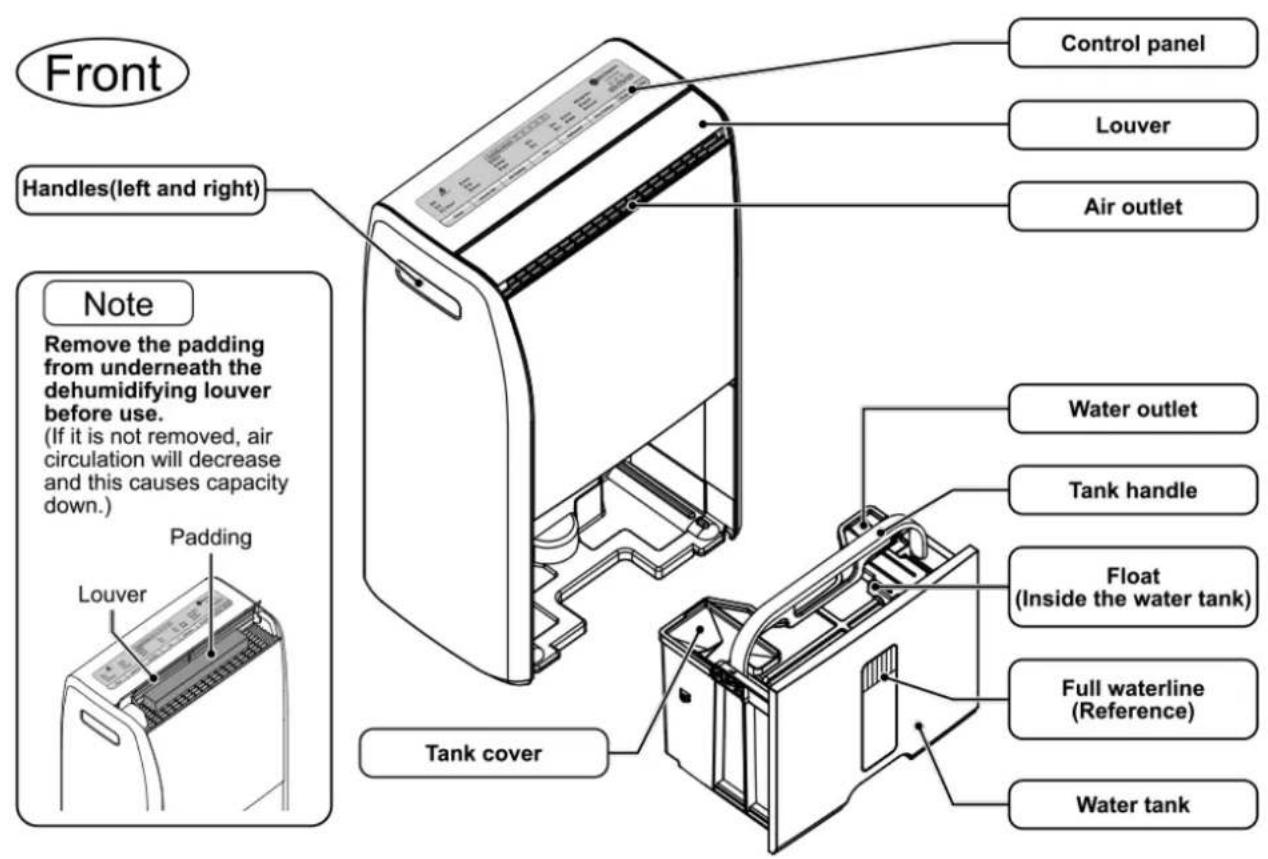
Back
Note
Caster(On the bottom of unit/4 pieces)
- Casters only move laterally
CAUTION
● Use care when moving the unit over carpet, or when the tank is filled with water.
(The unit may fall over causing spills, which may result in electrical shock, fire or damage to furniture.)

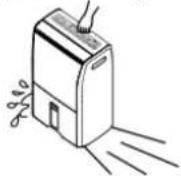
Where to use
- At least 20 cm distance from the wall. (Walls and furniture near the unit, may be stained by electrostatic.
- At least 1 Meter distance from any TV, radio (To prevent screen interference, noise)
natural_image
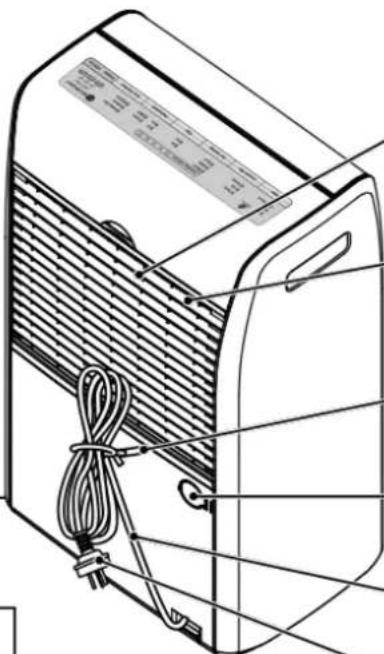
Technical line drawing of a portable air conditioner unit with coiled cable and connectors (no text or symbols)Air inlet
Air filter
( P.15) Do not block air inlet, so as to avoid poor ventilation.
Power cord hook
Drain pipe interface
( P.13)
Power cord
Power plug
※Remove cover from plug before use.
Part Names
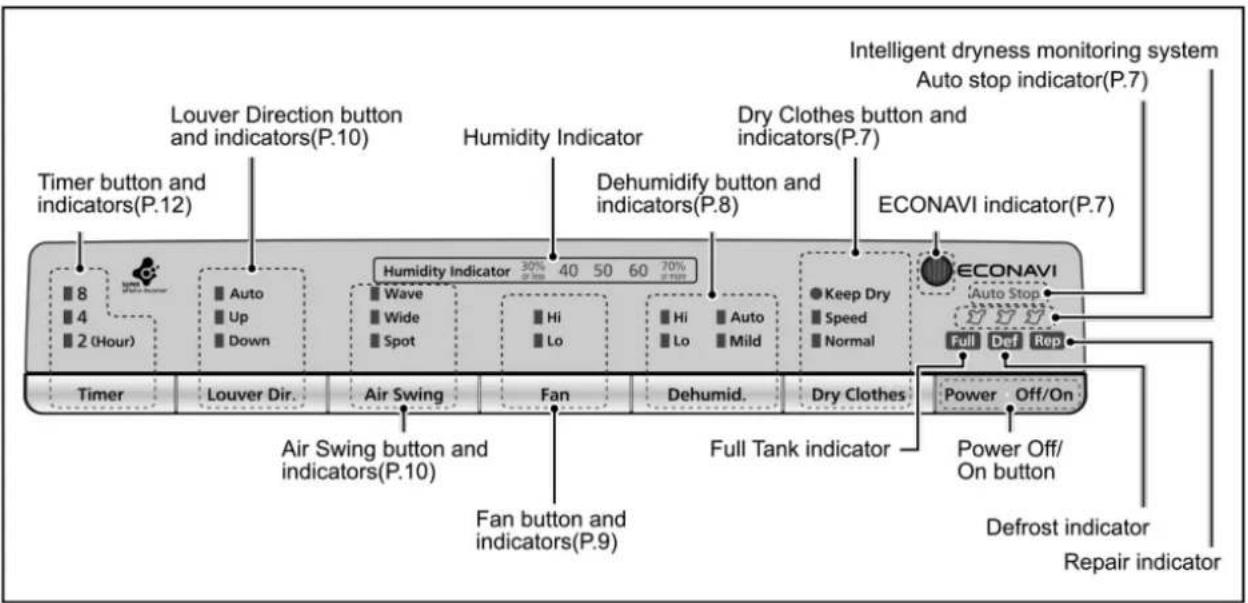
Control panel
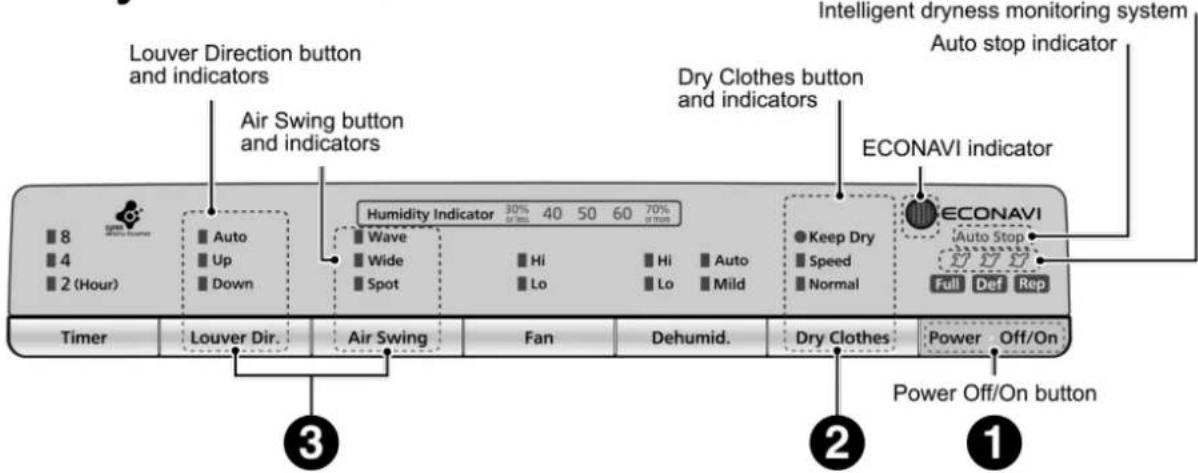
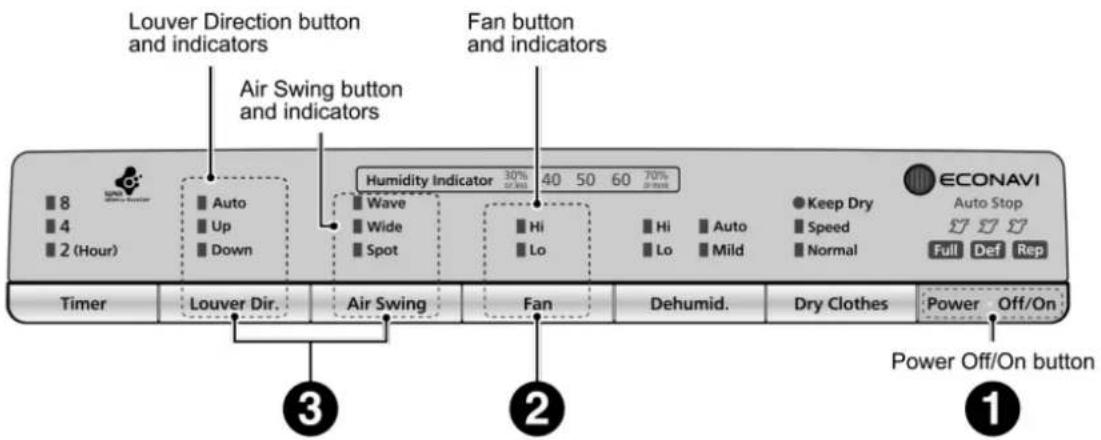
● The display indicators only illuminate when the corresponding item is selected.
Note
* When humidity is 30 % or less, the humidity indicator will display a red light.
* When humidity is 70 % or more, the humidity indicator will display a red light.
* When humidity is 40 %\~60 %, the humidity indicator will display a green light.
* Please check the following when the "Repair" indicator is flashing.
● When unit is tipped over
① Disconnect the power plug.
② Set the unit back upright.(wipe away any spilled water.)
③ Let the unit stand for half a day without using it. (to let the inside of the unit out completely in case any water has spilled inside)
④ insert the power plug again and restart the unit.
- Does the unit tilt?
→ Disconnect the power plug and ensure that the unit is sitting level. Reconnect the power cord and start dehumidification.
* When Full Tank Indicator is flashing, the unit will cease operation until the water tank is emptied.
* When Defrost indicator is flashing, the unit is defrosting. In Defrost condition, the unit will only respond to the "Power Off / On" button. All other button operations are invalid until the Defrost operation has completed.
Dry Clothes mode
1 Insert the power plug Turn on the unit

■ To stop operation
■ When using timer (P.12)
■ When Full Tank indicator is flashing (P.12)
● Operation will stop automatically → Please empty the tank.
Note
- If no button pushes are detected in a 24 hour period, the unit will automatically cease operation.
● The compressor will stop operating if the indoor temperature exceeds the range of 5-35°C. (But the fan motor will continue to operate)
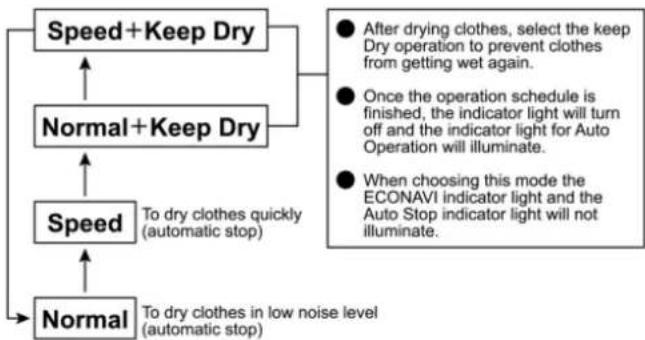
flowchart
graph TD
    A["Speed+Keep Dry"] --> B["Normal+Keep Dry"]
    B --> C["Speed"]
    C --> D["Normal"]
    D --> E["To dry clothes quickly (automatic stop)"]
    E --> F["After drying clothes, select the keep Dry operation to prevent clothes from getting wet again."]
    E --> G["Once the operation schedule is finished, the indicator light will turn off and the indicator light for Auto Operation will illuminate."]
    E --> H["When choosing this mode the ECONAVI indicator light and the Auto Stop indicator light will not illuminate."]
    C --> I["To dry clothes in low noise level (automatic stop)"]
ECONAVI
● The ECONAVI function will only operate when in [Normal] or [Speed] mode.
● The dryness sensor detects the temperature and humidity of the surroundings and uses this to judge the level of dryness required. Once this level of dryness is achieved, the unit will automatically stop operation.
● See page 16 for further information on the ECONAVI function.
Intelligent dryness monitoring system ( )
● Will only work when [Dry Clothes] function is selected.
● Dryness notification
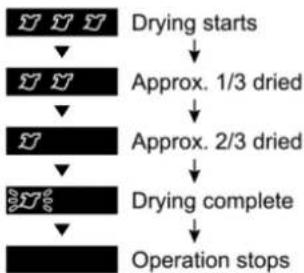
flowchart
graph TD
    A["Drying starts"] --> B["Approx. 1/3 dried"]
    B --> C["Approx. 2/3 dried"]
    C --> D["Drying complete"]
    D --> E["Operation stops"]
● Degree of dryness may vary depending on factors such as the type and amount of clothing, hanging method, and environmental conditions
Dehumidifying mode
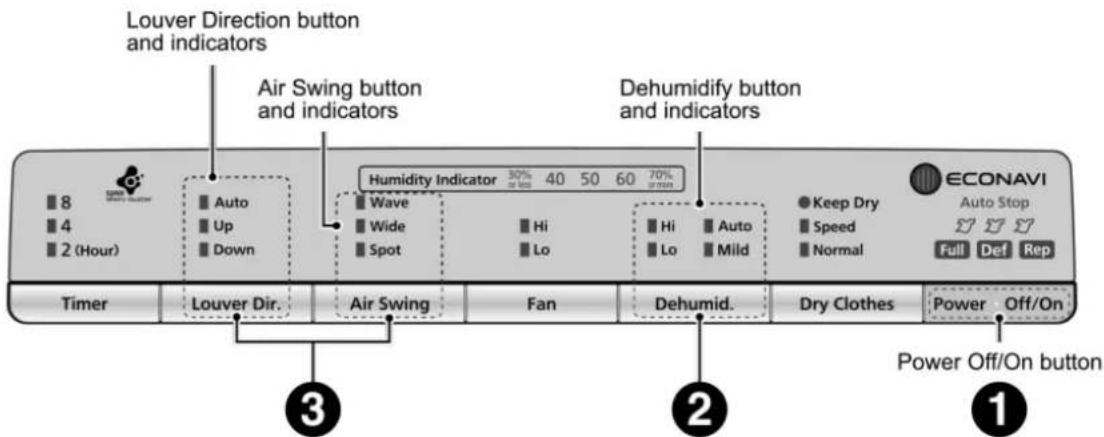
1 Insert the power plug Turn on the unit

■ To stop operation
■ When using timer (P.12)
■ When Full Tank indicator is flashing (P.12)
● Operation will stop automatically → Please empty the tank.
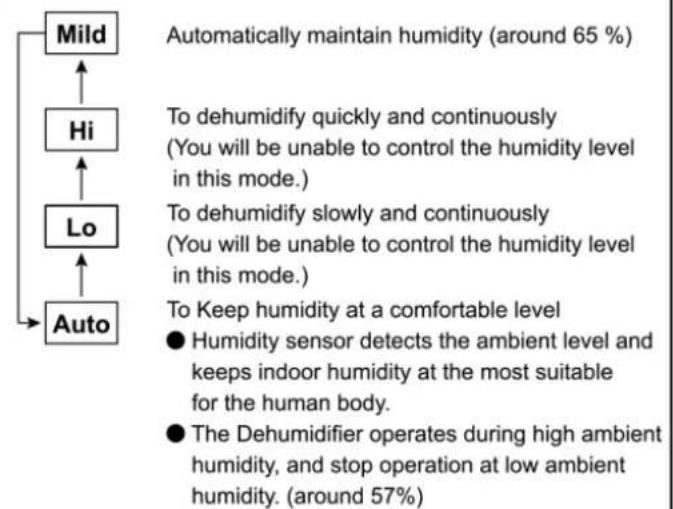
flowchart
graph TD
    A["Mild"] --> B["Hi"]
    B --> C["Lo"]
    C --> D["Auto"]
    D --> E["To Dehumidify quickly and continuously (You will be unable to control the humidity level in this mode.)"]
    E --> F["To Dehumidify slowly and continuously (You will be unable to control the humidity level in this mode.)"]
    F --> G["To Keep humidity at a comfortable level"]
    G --> H["● Humidity sensor detects the ambient level and keeps indoor humidity at the most suitable for the human body."]
    G --> I["● The Dehumidifier operates during high ambient humidity, and stop operation at low ambient humidity. (around 57%)"]
    A --> J["Automatically maintain humidity (around 65%)"]
Note
- If no button pushes are detected in a 24 hour period, the unit will automatically cease operation.
● The compressor will stop operating if the indoor temperature exceeds the range of 5-35°C.
(But the fan motor will continue to operate)
Fan mode
1 Insert the power plug Turn on the unit
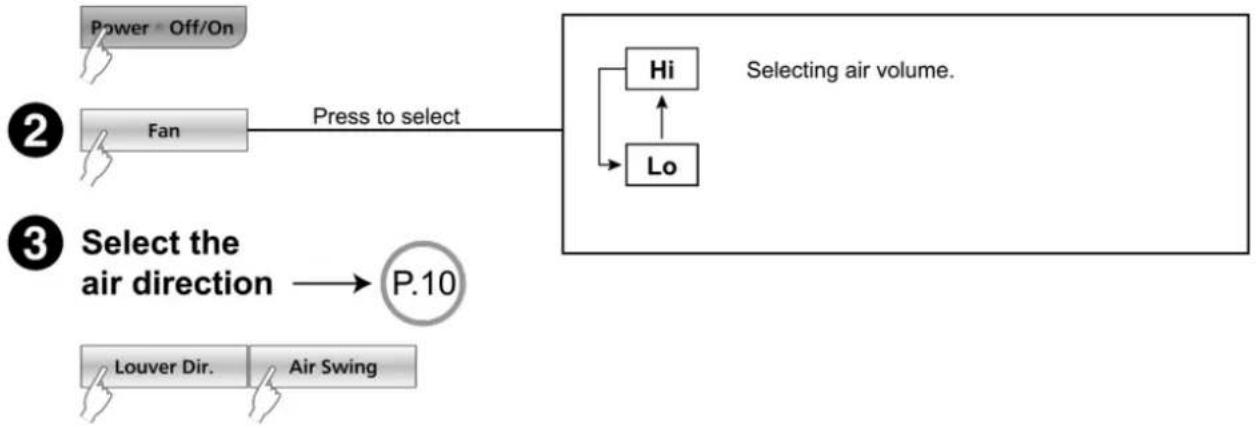
flowchart
graph TD
    A["Power Off/On"] --> B["Fan"]
    B --> C["Press to select"]
    C --> D["Hi"]
    D --> E["Selecting air volume."]
    F["Louver Dir."] --> G["Air Swing"]
    H["Lo"] --> D
    I["2"] --> B
    J["3"] --> K["Select the air direction"]
    K --> L["P.10"]
Note
● This product can only be operated within an indoor temperature range of 5\~35 °C.
● Using the unit in an environment where the ambient temperature is outside this range may cause the unit to operate abnormally.
● The dehumidifier is used for daily life, such as the removal of unpleasant humidity and help to dry laundry, but if ambient humidity is under 50 %, unit can not help maintain a comfortable humidity environment.
● The unit will stop operation when power failure occurs, and return to standby mode after power recovery. To ensure compressor life, do not operate within 3 minutes after the unit shutdown.
If louver has been removed
■Installing the louver
1 Insert the left side hole into the projection at the left side in the main unit.
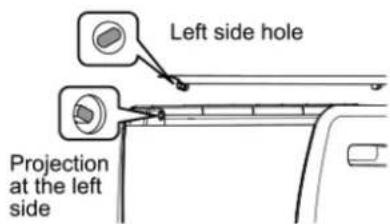
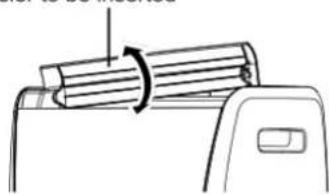
Turn louver up and down to make it easier to be inserted
natural_image
Diagram of a mechanical device with a rotating shaft and adjustment knob (no text or symbols)2 Set the louver so that it is horizontal, then bend it out slightly at the middle.
3 Insert the right side into the unit.
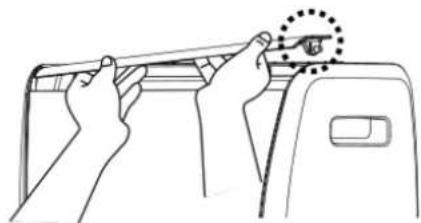
natural_image
Line drawing of hands installing or adjusting a door panel with a circular mark on the top (no text or symbols)Air Swing / Louver Direction
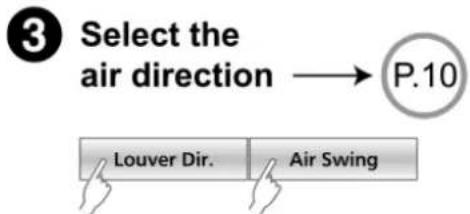
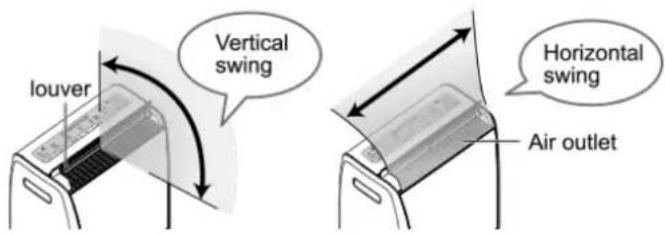
After selecting the operation mode (P.7\~P.9), set the air direction.
Operation
| Vertical swing | The swing can be set to match the height of the place where you would like the air to reach.■ To make the louver swingWhile operation is in progressLouver Dir.(Press to select)DownUpAuto(Swinging stops) | ■ To stop swinging and choose the air direction.Select「Auto」,the louver keeps swinging.When the louver is at the desired position, press (Louver Dir.) again.Louver Dir.The Louver Direction indicator will turn off and swinging will stop.NoteDo not manually move the louver while the swinging operation is in process.(The swing range will change.) |
| Horizontal swing | The swing can be set to match the width of the place where you would like the air to reach.While operation is in progressAir Swing(Press to select)SpotWideWave(Normal)Concentrated on a small areaLeft / right side wide horizontal areaConcentrated on the middle, but with left / right side wide area | ● If you do not select a horizontal swing setting, the dry air outlet will expel air along its entire width. |
Vertical swing
Horizontal swing
Air Direction Setting Examples
Tips for drying effectively
① Place the dehumidifier at a place that all clothes can be reached evenly.
② Leave space between each item of clothing so that air can circulate freely.
③ Leave a distance of 40 cm or more between the dehumidifier and the clothes, depending on the amount of clothes.
| Drying clothes | To Dry Downward | Louver Dir. Down Air Swing Wide *1 | 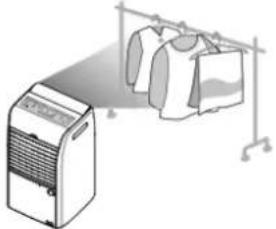 | |
| To Dry Upward | Louver Dir. Up Air Swing Wide *1 | 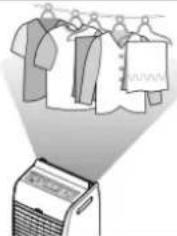 | ||
| To Dry Upward and Downward | Louver Dir. Auto Air Swing Wide *1 | 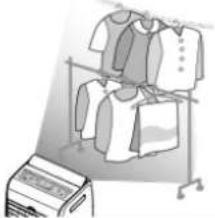 | ||
| To Dry Small Amounts | Louver Dir. Auto *2 Air Swing Spot | 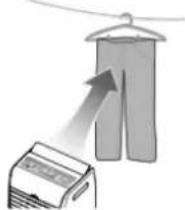 | ||
| Dehumidifying | Closets and Shoe Racks, etc. | Louver Dir. Auto *2 Air Swing Wide | 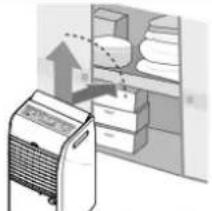 | ● Leather items such as shoes can not be dried with a dehumidifier.(They will become warped or damaged.) |
| Ceilings and Walls, etc. | Louver Dir. Up Air Swing Wide | 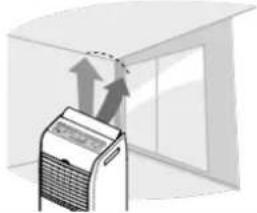 |
*1: If there are items which are difficult to be dried, placed in between other items, use the "Wave" setting to make drying more effective.
*2: Choose either "Up" or "Down" depending on how high the clothes are hanging and how high the closet is.
Using the Timer / Removing a Full Tank
Using the Timer
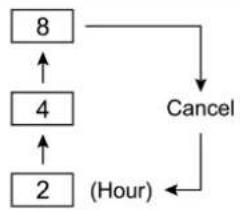
flowchart
graph TD
    A["8"] --> B["4"]
    B --> C["2"]
    C --> D["(Hour)"]
    D --> E["Cancel"]
    E --> A
● After setting the timer, it will show the remaining time. For example, you set the timer switch off the unit after 8 hours, the indicator will show 4 hours when there are 4 hours left, and so on.
- When the timer has been set, it will continue to count down even if the tank fills with water and dehumidifier stops operation.
- When using timer in laundry mode, the ECONAVI indicator, Auto Stop Indicator will not illuminate and the Intelligent dryness monitoring system cannot be activated.
How to remove a full tank
- When the tank water level reaches the full waterline (around 5 litres), operation will stop automatically. (The Full Tank indicator is flashing)
- Please follow the steps
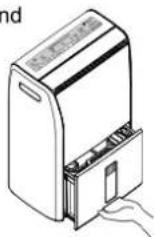
1
Remove the tank slowly with one hand
● Do not touch the inner part of the unit.
(May cause breakdown)
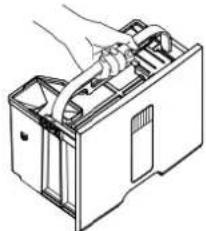
2
Carry tank carefully by the tank handle.
natural_image
Line drawing of a mechanical device with hands operating it (no text or symbols)3
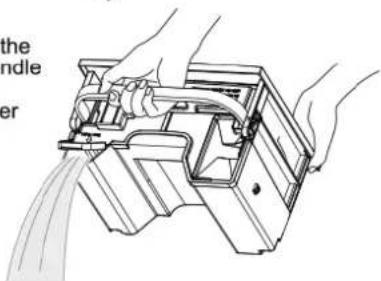
Push the tank cover and open the water outlet.
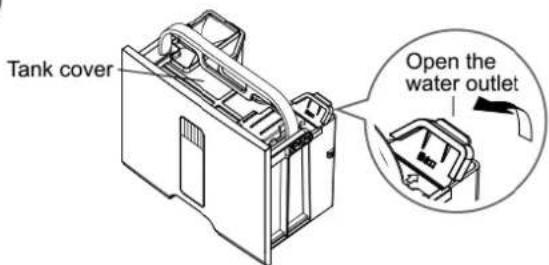
4
While holding the tank by the handle and the base, empty the water in the tank.
natural_image
Technical line drawing of a mechanical component being processed with a tool (no text or symbols present)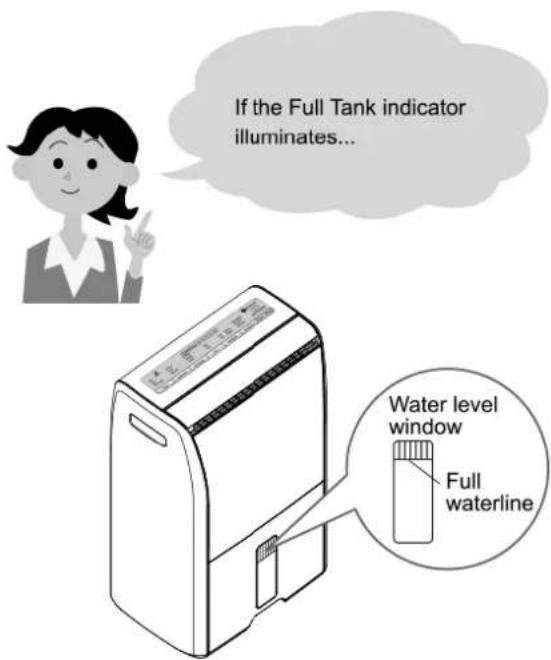
■ Installing the tank
Close the water outlet, and then fully re-insert the tank.
- Close the tank cover and water outlet securely. (Or the water tank will not fit in the unit correctly and may result in water leakage.)
- Please reinsert the water tank completely. If the water tank is not correctly reinserted, the unit will not operate when the "Power Off / On" button is pressed. Remove the water tank and carefully reinsert again.
Continuous Drainage
If there is adequate drainage nearby, the unit can be connected directly to the drain pipe and use the continuous drainage function.

CAUTION
■ Drainage hose must be securely installed

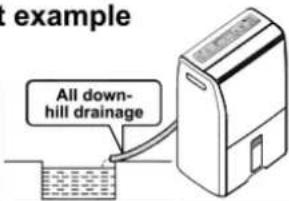
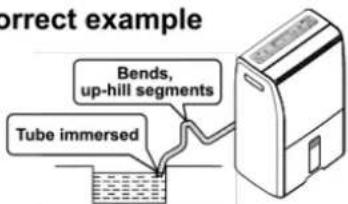
Please avoid bending or kinking the drain hose, make the drainage go as far as it will go. Poor drainage may result in leakage, this in turn may cause damage to furniture.
■ The ambient temperature of drain pipe must not fall below 0°C

Water in drain pipe may freeze and block drainage, resulting in leakage and damage to furniture.
Install the hose
Correct example
Incorrect example
Items to be purchased
● Hose
Length: 30cm longer than the distance between dehumidifier and the drain.
Internal diameter: 15mm
Note
When the temperature of water in the drain pipe is much cooler than the ambient temperature, the surface of drainage pipe may develop condensation. Please take insulation measures if necessary.
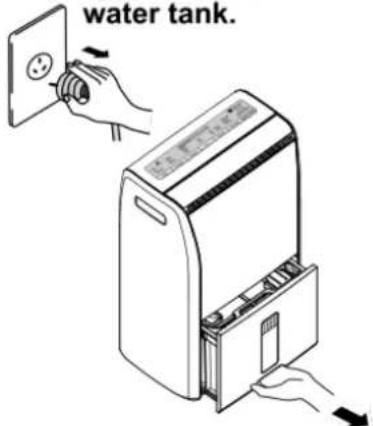
1 Disconnect the power plug and remove the water tank.
② Open the drain pipe interface
(Perform in 90 degree to the right, do not remove it)
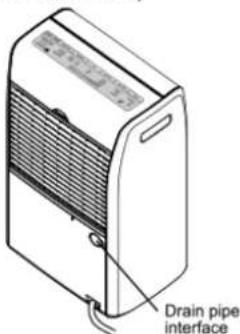
● Clean the drain pipe interface.
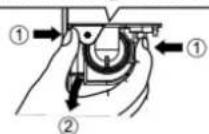
3 Remove the sealing device
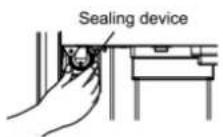
Follow the arrow ① direction clamped, then follow the arrow ② direction remove
4 Connect the hose to the drain pipe
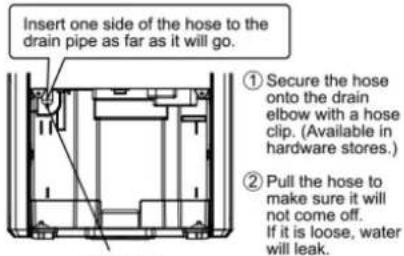
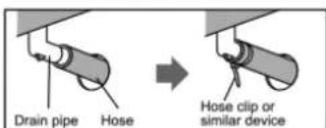
5 Insert the Water Tank
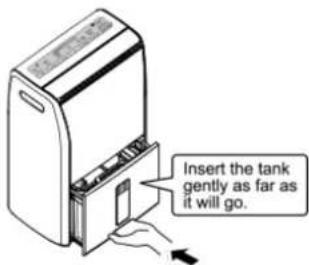
- Improper installation may cause the unit to operate incorrectly.
Note: ● When restoring to the normal drainage mode, improper installation may result in water overflow.
Please contact the manufacturer or authorized service agent.
- If no buttons are pressed for 24 hours, operation will stop automatically to prevent unintended continuous operation.
Maintenance

natural_image
Illustration of a smiling woman in business attire pointing upward (no text or symbols)Be sure to unplug the unit from the wall and empty the tank before maintenance.
CAUTION
■ Do not clean the product with solvents such as benzine or thinner, and do not apply insect sprays.
(This product may become cracked and injury may occur. This may cause damage to the product resulting in injury, furniture damage, short circuit, electrical fire or electrical shock.)
■ Always be sure to disconnect the power plug and empty the tank. (See Removing a Full Tank. P.12)
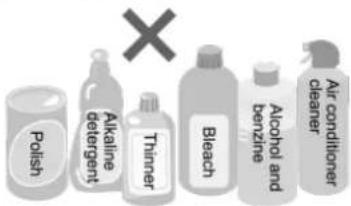
● Cleaning agents such as those shown at left should not be used.
● If using a chemically treated cloth, please read the manufacturers instructions that came with the cloth.
Water Tank (Suggest once a month)
● Rinse the tank and the tank cover about 2\~3 times in water.
● Rinse off any slime in water without removing the float.
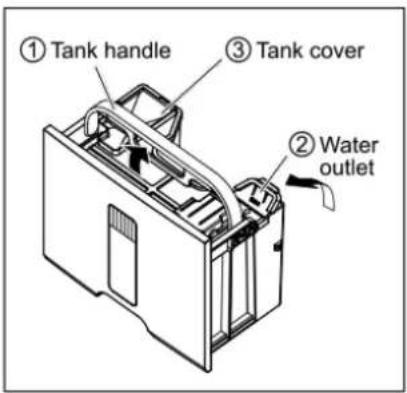
■ Removing the tank cover
① Lift up the tank handle.
② Open the water outlet.
③ Pull up the tank cover.
● Do not strongly pull on the water outlet.
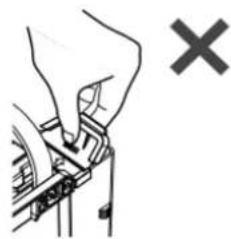
natural_image
Illustration of a hand fastening a mechanical component with a cross symbol (no text or labels)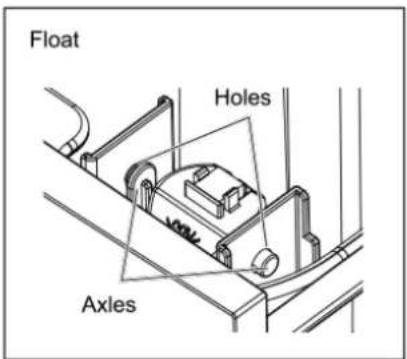
Float
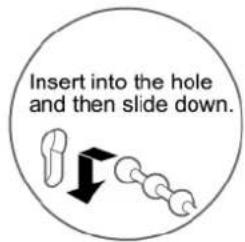
● Rinse the area around the two axles with water to remove any dirt, this will prevent the float from malfunctioning.
- Never remove the float. (If the float is not attached properly, the unit will not operate correctly and water may leak.) If the float comes off, insert the two axles into the holes as shown in the illustration at left.
● For stubborn stains, clean with water mixed with diluted kitchen detergent.
- Depending on conditions in the room, the tank may become blackened. (This is caused by impurities in the air dissolving into the water collected by the dehumidifier.)
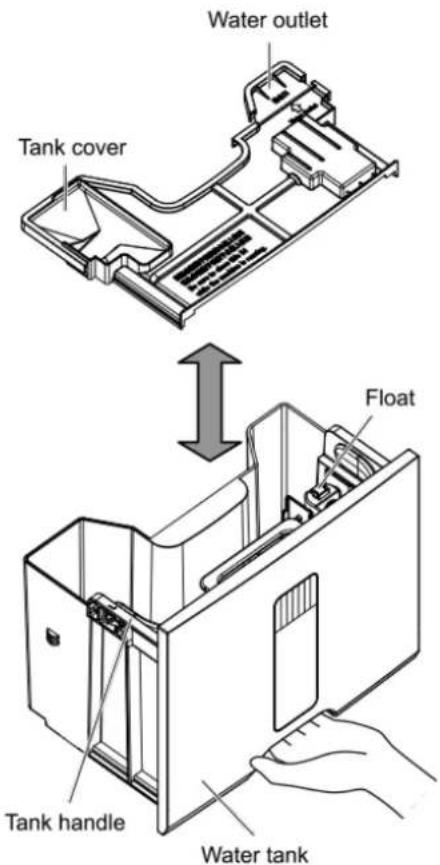
■ Dampen a cloth, wring it out firmly, and then use it to wipe the outside of the unit.
● Do not lay down the unit. (Water leakage will occur.)
● For stubborn stains, use water mixed with diluted kitchen detergent.
- Do not operate the unit with a wet air filter inserted.
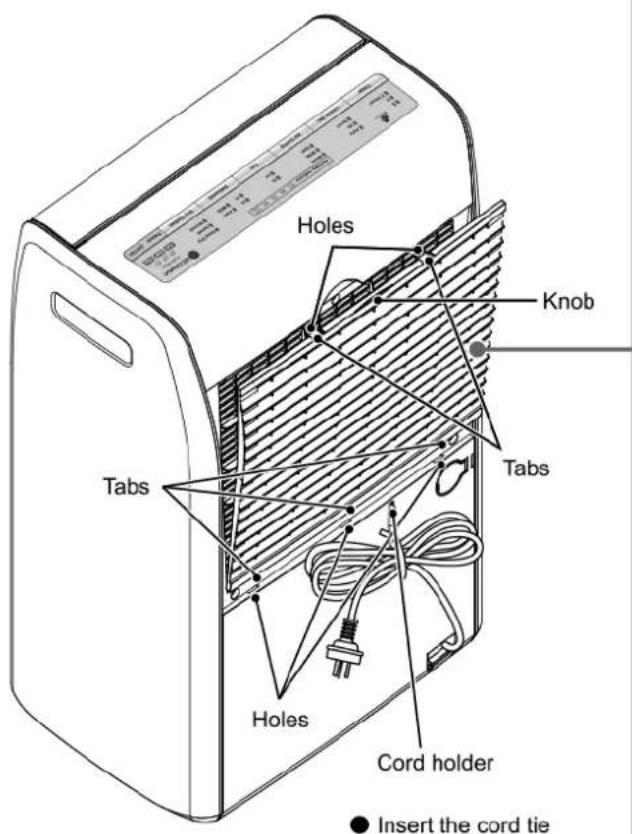
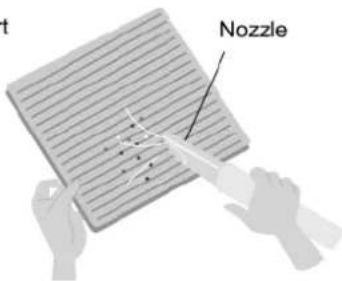
Air filter (Suggest once every two weeks)
Remove dust and dirt using a vacuum cleaner etc.
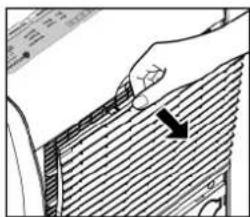
Removal
natural_image
Illustration of a hand holding a pen or ruler over a striped surface, with an arrow pointing to the pen tip (no text or symbols present)● Pull the knob toward you.
Installation
natural_image
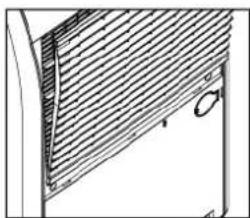
Technical line drawing of a corner panel with diagonal hatching and angle markers (no text or symbols)① Insert the tabs (there are 3) on the bottom into the holes in the unit.
natural_image
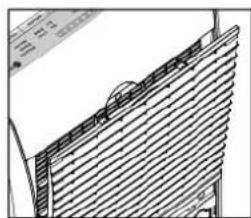
Architectural line drawing of a window with slats and a door, no text or symbols present② Push the top of the filter to inset the tabs (there are 2) into the holes in the unit.
● If the filter becomes damaged, it should be replaced.
● Regular maintenance
(If the unit becomes blocked with dust and dirt, dehumidifying performance will be affected and the unit will use excess power)
If not using the unit for long periods of time
natural_image
Line drawing of hands operating a mechanical device with a water droplet falling (no text or symbols)①Please select mode "Fan" and set timer to shut down for around four hours.
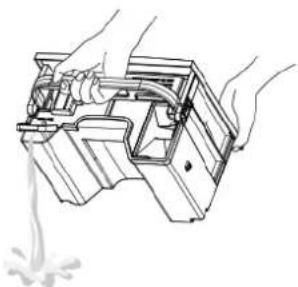
② Disconnect the power plug, let the unit stand for one day, and then employ the water tank. (P.12)
③ Clean the unit, tank and filter.
④ Cover the unit with a plastic bag.
⑤ Store the unit upright in a dry and well-ventilated place which is flat and stable. (Laying it down may result in a breakdown, or cause any water remaining inside the unit to leak out.)
Drying clothes
About ECONAVI
Econavi mode operates when operating mode is set to「Normal」or「Speed」modes.
The dryness sensor detects the temperature and humidity, and uses this as a reference to judge the level of dryness in order to stop operation automatically.
● Operation running time for reference.
| Model No. | F-YCL27N | |
| Clothes Amount | Drying operation running time | |
| Normal | Speed | |
| About 2 kg ~ 4 kg | 4.3 ~ 6.4 hr | 3.5 ~ 5.3 hr |
| About 4 kg ~ 6 kg | 6.4 ~ 8.3 hr | 5.3 ~ 7.5 hr |
Test conditions: Temperature: 20 °C
Humidity: 80%
Room space: 20 m²
(Manufacturer's results)
- Running time and consumption of electric power for the actual state of dryness may vary depending on factors such as the type and amount of clothing, the hanging method, and environmental conditions.
● The dehumidifier will stop after a maximum operation time of 10 hours.
Effectiveness of the filter
The Super alleru-buster and anti-bacterial agents contained in the filter help inhibit allergens, bacteria and mold.
Super alleru-buster
Inhibits allergens (such as pollen and house dust mites) accumulated by the filter.
Testing facility: Osaka Municipal Technical Research Institute
Testing method: Application of the enzyme immunoassay method to confirm the reduction of refined mite allergens.
Testing results: Inhibition of activity confirmed
Anti-bacteria
Inhibits bacteria*3 and mold*4 accumulated by the filter.
*3 Testing facility: Japan Food Research Laboratories
Testing method: Confirmation by means of an agar cultivation method using a standard agar culture.
Testing results: Activity inhibited by 99% or more
*4 Testing facility: Japan Food Research Laboratories
Testing method: Based on anti-mold testing (halo method)
Testing results: Anti-mold effectiveness of halo method confirmed.
● The filter has a unique fragrance of catechin. This is normal and is not harmful to the human body.
● The original filter has a light brown color. Some light brown dots may appear on the filter after use. This is normal and does not affect the filter performance.
Fault!?
First, check the following.
If problems cannot be solved, be sure to disconnect the power plug, and then consult authorized service agent to repair the unit.
| Problems | What to check? |
| 1 Buttons do not operate. | ● Is the Full Tank indicator is flashing (P.12), or is Repair indicator flashing?(P.6), Does the Defrost indicator is flashing? (P.6) |
| 2 The Full Tank indicator is flashing even though the tank is not full. | ● Are the tank and float correctly installed inside the unit? (P.12,P.14)Was the tank banged against the unit during insertion? (P.12)→ Please reinsert the water tank completely. If the water tank is not correctly reinserted, the unit will not operate when the “Power Off / On” button is pressed. Remove the water tank and carefully reinsert again. |
| 3 Water is leaking | ● Has the unit been tilted or tipped over?● Was the unit moved while there was still water in the tank? (P.4)● Has the float come off? (P.14) |
| 4 The tank does not fill up with water.(The unit is not dehumidifying very well.) | ● Is the filter clogged (P.15), or is something blocking the air inlet or air outlet?(P.4)● Are the room temperature and humidity low? (The unit dehumidifies less as the room temperature and humidity become lower.)● Is the unit set to operate in “Auto” or “Mild” mode? (P.8)If the temperature is outside the range of 5 °C ~ 35 °C , dehumidifier operation will stop and become blower operation. (P.9) |
| 5 No water remains inside the unit. | ● Is the Fan mode set?→ Fan mode will not retain water. |
| 6 It takes a long time to dry clothes. | ● Is wet, cold air entering the room?→ Keep doors and windows closed as much as possible while drying clothes. |
| 7 Clothes do not dry completely. | ● Did prior clothes drying cycle complete?● Is wet, cold air entering the room?→ Avoid open doors and windows as much as possible while drying clothes.● Is there a heater in use near the unit?(If the surrounding temperature is too high, the sensor will be unable to accurately judge the drying time.)● Is the air blowing onto the all clothes?● Are the clothes hung too closely together or in layers? |
| 8 The humidity does not go down. | ● Is wet, cold air entering the room?→ Avoid opening doors and windows while drying clothes. |
| 9 Condensation forms all the time, even during dehumidifying. | ● It may not be possible for dehumidifying to be fully effective if you place the dehumidifier in some places such as near windows, or behind furniture where air circulation is poor. |
Fault!?
First, check the following.
If problems cannot be solved, be sure to disconnect the power plug, and then consult authorized service agent to repair the unit.
| Problems | What to check? |
| 10The Repair indicator is flashing | Does the unit lay down?→ 1. Disconnect the power plug and set the unit back upright. (Wipe away any spilled water.)Let the unit stand for half a day or more without using it (to dry the unit completely in case any water has spilled inside)Insert the power plug again and restart the unit.Does the unit tilt?→ Disconnect the power plug and then reconnect it.Have any magnets or metallic objects been placed on top of the unit?→ Disconnect the power plug, remove the magnets or metallic objects from on top of the unit. Reinsert the power cord and begin dehumidification. |
| 11Operation stops at the time of continuous drainage. | If no buttons are pressed for 24 hours, operation will stop automatically to prevent unintended continuous operation. |
| 12It generate “click” sound when changing the wind speed. | Do not worry about that, it’s a normal phenomenon for generating “click” sound when changing the Fan mode |
If the following happens, please disconnect the power plug, and contact the manufacturer or authorized service agent.
| Problems | What to check? |
| 13 The Repair indicator, other indicators flash. | ●Wet machine malfunction, please contact your manufacturer or authorized service agent. |

WARNING
If the supplied power cord is damaged, it must be replaced by the manufacturer, authorized service agent or registered electrician.
| Kind Reminder | If the dehumidifier is used for an extended period of time! | ||
 | Did these symptoms occur? | ● Unable to operate or stops suddenly during operation when power is connected.● Power is only sometimes connected when the power cord is moved.● Abnormal sounds or vibrations occur when the fan is rotating.● The unit itself overheats abnormally, and smells like something is burning.● Other abnormalities or malfunctions. | When these symptoms occur, in order to prevent accidents from happening, please turn off the power, disconnect the power plug and contact your purchasing manufacturer or authorized service agent by our company for repairs. |
Memo
Specifications
| Model No. | F-YCL27N | ||
| Power supply | 230-240 V ~ 50 Hz | ||
| Power plug shape | ◎ | ||
| Operating condition | Temperature | 30 °C | |
| Relative humidity | 80 % | ||
| Water removal (L/Day) | Hi | 27 | |
| Power consumption (W) | Hi | 355 | |
| Water tank capacity (L) | 5 | ||
| Weight (kg) | 16.5 | ||
| Dimensions (WxHxD) (mm) | 370X605X250 | ||
* The unit consumes approximately 2.0 W of power when operation is off. (While power plug is inserted)
Customer's record
For model name and production number of this product, please refer to the back side of machine. Please record them in the space provided and keep for future reference.
| MODEL NO. F-YCL27N | SERIAL NO. |
| DATE OF PURCHASE | MANUFACTURER NAME |
| MANUFACTURER ADDRESS | |
| MANUFACTURER TELEPHONE NUMBER | |
Panasonic Corporation
Web Site : http://www.panasonic.com
©Panasonic Ecology Systems Co., Ltd. 2015 All Rights Reserved.
- Panasonic®
- Operating Instructions
- Dehumidifier
- Model No. F-YCL27N
- Contents
- Safety precautions
- WARNING
- CAUTION
- Back
- Note
- Caster(On the bottom of unit/4 pieces)
- Where to use
- Air inlet
- Air filter
- Power cord hook
- Drain pipe interface
- Power cord
- Power plug
- Part Names
- Control panel
- Insert the power plug Turn on the unit
- ■ To stop operation
- ■ When using timer (P.12)
- ■ When Full Tank indicator is flashing (P.12)
- ECONAVI
- Intelligent dryness monitoring system ( )
- Dehumidifying mode
- Fan mode
- If louver has been removed
- ■Installing the louver
- Air Swing / Louver Direction
- Operation
- Air Direction Setting Examples
- Tips for drying effectively
- Using the Timer / Removing a Full Tank
- Using the Timer
- How to remove a full tank
- ■ Installing the tank
- Continuous Drainage
- ■ Drainage hose must be securely installed
- ■ The ambient temperature of drain pipe must not fall below 0°C
- Items to be purchased
- ● Hose
- Disconnect the power plug and remove the water tank.
- ② Open the drain pipe interface
- Remove the sealing device
- Connect the hose to the drain pipe
- Insert the Water Tank
- Maintenance
- ■ Do not clean the product with solvents such as benzine or thinner, and do not apply insect sprays.
- Water Tank (Suggest once a month)
- If not using the unit for long periods of time
- Drying clothes
- About ECONAVI
- Effectiveness of the filter
- Super alleru-buster
- Anti-bacteria
- Fault!?
- Memo
- Specifications
- Customer's record
- Panasonic Corporation
Mærke : PANASONIC
Model : F-YCL27N
Kategori : Affugter