
ECH/AT-2000 3AE EEC - Varmeapparat ELECTROLUX - Gratis brugsanvisning og manual
Find enhedens vejledning gratis ECH/AT-2000 3AE EEC ELECTROLUX i PDF-format.


Brugerspørgsmål om ECH/AT-2000 3AE EEC ELECTROLUX
0 spørgsmål om dette apparat. Besvar dem du kender, eller stil dit eget.
Stil et nyt spørgsmål om dette apparat
Download vejledningen til din Varmeapparat i PDF-format gratis! Find din vejledning ECH/AT-2000 3AE EEC - ELECTROLUX og tag din elektroniske enhed tilbage i hånden. På denne side er alle dokumenter nødvendige for brugen af din enhed offentliggjort. ECH/AT-2000 3AE EEC af mærket ELECTROLUX.
BRUGSANVISNING ECH/AT-2000 3AE EEC ELECTROLUX
GB · Electric convection heater
- User's manual
AL · Ngorhësi elektrik i Ilojit të konvektorit
- Manuali i përdorimit
PL · Elektryczny grzejnik konwekcyjny
- Instrukcja obsługi
RO·Încălzitor electric de convectie
- Instrucțiuni de exploatare
Fill your life with comfort

Get quick access to instructions, additional product information and support at our website home-comfort.com
2 www.home-comfort.com
- ENGLISH....4
- SHQIP 14
- POLSKI 24
- ROMÂNĂ 38
4 www.home-comfort.com
CONTENT
- INTRODUCTION....5
- SAFETY REGULATIONS 5
- PURPOSE OF THE DEVICE 5
- GENERAL VIEW OF THE DEVICE....5
- CONTROL UNIT DEVICE 5
- INDICATORS DESIGNATION ON LED DISPLAY 6
- TURNING ON THE DEVICE....6
- PROGRAM FUNCTION 6
- OVERHEATING PROTECTION FUNCTION 8
- SWITCHING OFF THE APPLIANCE 8
- DEVICE CONTROL 7
- INSTALLATION OF THE DEVICE 9
- SPECIFICATIONS 10
- CARE 11
- TROUBLESHOOTING 11
- COMPLETING UNITS 11
- STORING THE APPLIANCE 11
- RECYCLING 11
- WARRANTY 11
- DATE OF PRODUCTION 11
WE THINK ABOUT YOU
Thank you for purchasing an Electrolux appliance. You have chosen a product, backed by decades of professional experience and innovations. Unique and stylish, it was created with care for you. Therefore, whenever you use it, you can be sure that the results will always be excellent. Welcome to Electrolux!
On our website you can:

Find product recommendations, user manuals, maintenance information: http://www.home-comfort.com/support/

Buy a product in your city: http://www.home-comfort.com/search/find-a-store/

While selling this device, dealer must fill "Product details" section located on the inside of the back cover of this manual.

Designation
Caution/Important safety information Common information and recommendations
Warranty service is performed according to the terms specified in the "Warranty" section.
Note:
In the text of this manual, the electric convector may have such technical names as appliance, device, vehicle etc.
This product is only suitable for well insulated spaces or occasional use.
Introduction
Please read and strictly follow the requirements contained in this manual. Please keep the manual and documents confirming the date of purchase of the device in a safe place for easy retrieval and use.
The device is intended for air heating in household premises.
Safety regulations

Caution!
Non-following the manual can cause serious injury or serious equipment damage.
When using the device, observe the general safety rules when using electrical devices. Failure to follow safety instructions and instructions can result in electric shock, fire and/or serious injury. Before using the device, carefully read the following safety rules:
- When the heater is turned on for the first time, a characteristic smoke smell may occur due to the burning of oil in the heating elements. It is recommended to turn on the heater for 10-20 minutes in a well-ventilated area before installation.
- Any electrical appliance should be supervised, especially if there are children nearby. Make sure that children do not touch the device with their hands.
- Do not use the convector with damaged and/or damaged or frayed power cable.
- The mains cable must be positioned so that it is not stepped on, that it is not abraded, torn, kinked or otherwise damaged.
- Do not allow foreign objects or liquids to enter the inside of the device.
- Always place the appliance in such a way in such a way as to prevent the possibility of ignition of flammable materials (for example, curtains). Make sure nothing is blocking the inlet and outlet ducts. To avoid fire, do not put clothing or other items on the device.
• Make sure that the bodies of the device and its heating element have cooled down, before the device is dismantled and packed for long-term storage. - Do not use the device in open spaces outdoors.
• Make sure that the mains voltage corresponds to that indicated on the label of the device.
- Do not try to repair the device yourself. Please contact your dealer.
- Unplug the device from the mains when not in use and before cleaning.
General view of the device
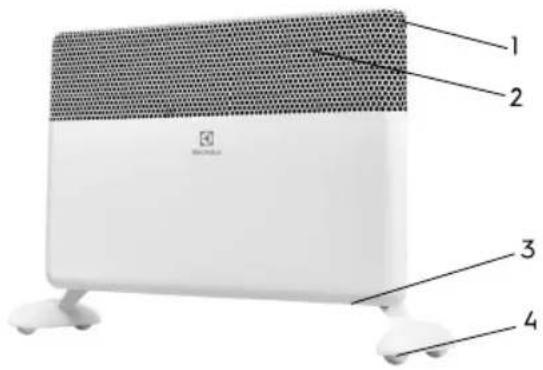
Figure. 1
- Control unit
- Ventilation vents
- Ventilation inlets
- Chassis for floor installation (supplied separately)
Control unit device

Figure. 2 Control unit
- Control panel.
- Control box retainer.

Fig. 2 Control panel
- LED display.
- Button to increase the value of target temperature.
- Button for switching on/off the device + switching between Comfort, Eco, Anti-frost modes.
- Button for turning on/off the open window function.
- Button for reducing the target temperature.
Indicators designation on LED display

-
Indication of the current power of the heating element:
-
full - two bars are lit;
- half - one bar is on.
-
- display of the target temperature and Display target temperature and errors.
- Wi-Fi connection status.
- Indication of the Open Window function.
- Indication of the convector work:
- lit red - the convector is on;
- not lit - the convector is off.
- Indication of the current heating mode:
- Comfort - orange;
- Eco - green;
-
Anti-frost - blue.
-
Indication of the status of the micathermic heating element operation.
Turning on the device
Press the on/off button ⏻ to put the unit into run mode. Press the button ⏻ to turn on the device. The factory set temperature is +24 °C.
Heating power setting
To turn on half power heating element, press the and buttons △ and ▶ simultaneously for 2 seconds. One bar will light up - half power of heating. To turn on full power, press the and buttons △ and ▶ simultaneously for 2 seconds. Two bars will light up - full heating power.
Operating modes and functions
There are 3 temperature operating modes available for adjustment:
Comfort - range from 10 °C to 35 °C. Eco - deviation range from Comfort from 3 °C to 7 °C. Anti-Frost - a range from 3 °C to 7 °C.
Control the target heating temperature
- To increase the target temperature value, use the button [☐]
- To decrease the target temperature value use the button
Switching step is 1 degree.
"Open window" function
When this function is active, when the temperature drops within 10 minutes (and then up to 30 minutes) by 5 or more degrees - the Anti-Frost mode is switched on the heater. If in the time interval 10 - 30 minutes the temperature continues to drop, the device turns off. Further, the heater waits for the stabilization of the decrease in the room temperature, if it rises by 2 degrees, then the last set mode is turned on.
To activate/deactivate the control panel lock of the control panel, press the ☐.
"Parental control" function
To activate/deactivate the control panel lock of the control panel, press the buttons □ and ▽ for 12 seconds at the same time.
"Auto Restart Resume" function
In the event of a short-term power outage, and its further inclusion, the convector automatically switches to the operating mode, while maintaining the last operating mode of the device and the set temperature (if a timer was set, the set shutdown time is saved). If the device was in standby mode when the power was turned off, it will remain in the same mode when the power supply is restored.
"Overheating protection" function
The device is equipped with an automatic switch that is activated when the upper temperature limit is reached. The heater switches off automatically in case of overheating. After eliminating the source of overheating, the heater will turn on automatically.
Switching off the appliance
To turn off the device, press the button in any operating mode.
Device control
Preparation for work
- Carefully remove the heater from the cardboard box.
- Remove the colored stickers from the front panel before use.
- At the first start-up, some odor may appear, which will disappear after the convector starts to work.
- Fix the device in a stable position according to the assembly and installation instructions.
- After installing the convector, plug it into a power outlet.
- It is not recommended to use the same electrical outlet for simultaneous plugging in heater and other high power electrical appliance.
Wi-Fi Pairing Mode
To put the Wi-Fi module in Pairing mode, you must press the and buttons 📄 and Ⓧ simultaneously for 2 seconds. The Wi-Fi icon will start blinking once per second. If the connection is successful, the Wi-Fi icon will start to light up steadily.
Wi-Fi statuses:
- The icon is not lit - the device is not connected;
- Icon blinking - pairing mode;
- The icon lights up - the device is connected.
Installation of the device
Recommended installation
The device must be fixed in accordance with the regulations.
The switch and other mechanisms must stay away from splashing water. It is strictly forbidden to cover or plug the air inlets or outlets (grilles), due to the risk of accident or damage to the device. Do not place behind curtains, doors, wall or air vents. Observe the minimum installation distances on floors, surfaces, furniture, etc.

Figure. 5
1. Wall mounted installation option (bracket and mounting template included)
Use the brackets to mount the heater on the wall according to the pictures below. The distance from the device to the floor and surrounding objects must be at least 10 cm (Figure 5):
To install the bracket on a wall, follow these steps:
8 www.home-comfort.com
- Attach the mounting template to the wall in the place where you plan to place the vector.
• Mark and drill holes. - Place the bracket on the wall and secure it with the fasteners.
Fix the device to the bracket as follows (Figure 6):
- Place the lower part of the convector onto the bracket using the special holes located in the lower part of the convector.
- Slide the upper part of the convector onto the bracket, fixing it with the latches on the bracket.
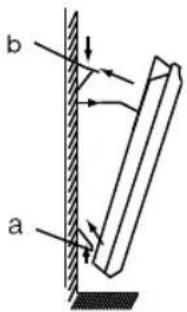
Figure. 6

natural_image
Technical line drawing of a mechanical component inside a circular frame (no text or symbols)Figure. 7
2. Floor installation
Using the chassis, having previously studied the mounting scheme (Figure 7), install the device on the floor:
- Carefully turn the convector upside down.
- Take one of the chassis and attach to the landing area on the right or left side of the convector so that it fits snugly against the convector body.
- Secure the chassis using the supplied mount.
Repeat the same procedure for attaching the second chassis.
Troubleshooting
| Malfunction symptom | Cause of malfunction | Troubleshooting steps |
| No heating | 1) There is no power supply.2) The convector is in standby mode.3) The actual room temperature is higher than the thermostat setting. | 1) Establish a reliable connection.2) Set the convector to operating mode.3) Adjust the temperature mode of the convector. |
| Smell of burnt dust when first turned on | Not a malfunction | The smell disappears after a few minutes of convector operation |
If after trying all the troubleshooting steps, the problem is not resolved, contact an authorized service center in your area or your sales representative.
Specifications
| Model | ECH/AT-15003AE EEC | ECH/AT-17003AE EEC | ECH/AT-20003AE EEC |
| Power, W | 1350-1500 | 1500-1700 | 1800-2000 |
| Rated current, A | 6.14-6.25 | 6.82-7.08 | 8.18-8.33 |
| Rated voltage, -V/Hz | -220-240/50-60 | -220-240/50-60 | -220-240/50-60 |
| Ingress protection class | IP24 | IP24 | IP24 |
| Electrical protection class | I | I | I |
| Heating area, m^2 | 13-15 | 15-17 | 18-20 |
| Appliance size (W×H×D), mm | 560×420×120 | 640×420×120 | 800×420×120 |
| Packing size (W×H×D), mm | 655×445×153 | 735×445×153 | 895×445×153 |
| Net weight, kg | 4.028 | 4.514 | 5.51 |
| Gross weight, kg | 5.074 | 5.626 | 6.798 |
* Indicated is a guideline value and may differ depending on actual conditions of use

The convector is supplied with a sticker on the front panel. Remove it before using the device.
Care
The convector does not require any special maintenance. Before servicing (leaving) the convector must be disconnected from the power supply.
The body of the device should be periodically wiped with a soft, lint-free cloth or damp sponge. Never use abrasive, foaming detergents or solvents. It is quite easy to clean the space behind a wall-mounted heater.
Press down the two latches on the back of the heater and pull the heater forward. After it is removed, you can wash the wall on which it was installed.
After finishing cleaning, put the heater back in its normal operating position.
Recommended indoor temperature and humidity:
a) for the convector operation: from -25^ to +30^ , humidity from 40% to 90% ; b) for the storage of the convector: from -20^ to +80^ , humidity from 40% to 90% .
Troubleshooting
Error Display:
E1 - Temperature sensor failure;
E2 - Short circuit on the temperature sensor channel;
E3 - Temperature sensor overheated. Current temperature exceeded +48°C;
E4 - The ambient temperature has fallen below the permissible operating temperature of the unit (below -26 °C).
Completing units
-
Electric heater
-
Wall mounting bracket
-
Mounting template
-
A set of fasteners
-
Operation manual
-
Chassis set with wheels
Storing the appliance
Make sure the heater is cool before storing it. It is recommended to clean the heater and store (preferably in the original packaging) in a cool dry place in case you plan not to use device for a long time.
Recycling

The time-expired appliance can't be disposed with household waste (2012/19/EU).
Warranty
Warranty service is performed according to the terms specified in the "Warranty" section.
Warranty:
- Warranty period for the item is two years from the purchase date. If any defects occur due to defects in materials and/or workmanship during this two-year warranty period, the item should be repaired or replaced.
- Free maintenance or replacement is possible only in case if convincing evidence is provided, for example a stub, which confirms that the day when the service is requested, is within the warranty period.
- The warranty does not cover products and/or parts of the product that are subjects to deterioration, may be considered as expendable supplies or which are made of glass.
- The warranty is void if the defect is caused by damage ensuing by misuse, poor maintenance (for example, a failure occurred due to ingress of foreign objects or liquids) or if changes or repairs were performed by persons not authorized by the Manufacturer.
- For the correct use of the product, the user must strictly follow all included in the manual instructions, and also must avoid any action or manipulation described as unwanted or indicated so in this manual.
• These warranty restrictions do not affect your statutory rights.
Support:
The support during and after the warranty period is available in all countries where the product is officially distributed. Please contact your dealer for help.
Date of manufacture
The date of manufacture is indicated on a sticker on the body of the appliance, and also encrypted in Code-128. The date of manufacture is determined as follows:
SN

month and year of production
Do not remove and keep safe the serial number on the device's body. If the serial number sticker is lost or damaged, it will not be possible to restore the production date if necessary.
Importer:
Manufacturer: CladSwiss AG, Bahnhofstrasse 27, 6300 Zug, Switzerland. E-mail: info@cladswiss.com
Made in PRC.
Electrolux is a registered trademark used under license from AB Electrolux (publ.).
The manufacturer reserves the right to modify the design and characteristics of the device.
This manual may contain technical and typing errors. Changes to technical characteristics and assortment are subject to change without notice.
Product design and technical data may vary from the one pictured on the packaging. Please refer to a sales consultant for more detailed information.
| Information requirement for the electric local space heaters | |||||
| Model identifier(s): ECH/AT-1500 3AE EEC | |||||
| Item | Symbol | Value | Unit | Item | Unit |
| Heat output | Type of heat input, for electric storage local space heaters only (select one) | ||||
| Nominal heat output | P_nom | 1,3831 | kW | manual heat charge control, with integrated thermostat | NO |
| Minimum heat output (indicative) | P_min | 0,6837 | kW | manual heat charge control with room and/or outdoor temperature feedback | NO |
| Maximum continuous heat output | P_max,c | 1,3831 | kW | electronic heat charge control with room and/or outdoor temperature feedback | NO |
| Auxiliary electricity consumption | fan assisted heat output | NO | |||
| At nominal heat output | eI_max | 0 | kW | Type of heat output/room temperature control (select one) | |
| At minimum heat output | eI_min | 0 | kW | single stage heat output and no room temperature control | NO |
| In standby mode | eI_ss | 0,00039 | kW | two or more manual stages, no room temperature control | NO |
| with mechanic thermostat room temperature control | NO | ||||
| with electronic room temperature control | NO | ||||
| electronic room temperature control plus day timer | NO | ||||
| electronic room temperature control plus week timer | YES | ||||
| Other control options (multiple selections possible) | |||||
| room temperature control, with presence detection | NO | ||||
| room temperature control, with open window detection | YES | ||||
| with distance control option | NO | ||||
| with adaptive start control | NO | ||||
| with working time limitation | NO | ||||
| with black bulb sensor | NO | ||||
| Contact details | Manufacturer: CladSwiss AG, Bahnhofstrasse 27, 6300 Zug, Switzerland. E-mail: info@cladswiss.com | ||||
| Model identifier(s): ECH/AT-2000 3AE EEC | |||||
| Item | Symbol | Value | Unit | Item | Unit |
| Heat output | Type of heat input, for electric storage local space heaters only (select one) | ||||
| Nominal heat output | P_nom | 1,8546 | kW | manual heat charge control, with integrated thermostat | NO |
| Minimum heat output (indicative) | P_min | 0,9313 | kW | manual heat charge control with room and/or outdoor temperature feedback | NO |
| Maximum continuous heat output | P_max,c | 1,8546 | kW | electronic heat charge control with room and/or outdoor temperature feedback | NO |
| Auxiliary electricity consumption | fan assisted heat output | NO | |||
| At nominal heat output | el_max | 0 | kW | Type of heat output/room temperature control (select one) | |
| At minimum heat output | el_min | 0 | kW | single stage heat output and no room temperature control | NO |
| In standby mode | el_ss | 0,00039 | kW | two or more manual stages, no room temperature control | NO |
| with mechanic thermostat room temperature control | NO | ||||
| with electronic room temperature control | NO | ||||
| electronic room temperature control plus day timer | NO | ||||
| electronic room temperature control plus week timer | YES | ||||
| Other control options (multiple selections possible) | |||||
| room temperature control, with presence detection | NO | ||||
| room temperature control, with open window detection | YES | ||||
| with distance control option | NO | ||||
| with adaptive start control | NO | ||||
| with working time limitation | NO | ||||
| with black bulb sensor | NO | ||||
| Contact details | Manufacturer: CladSwiss AG, Bahnhofstrasse 27, 6300 Zug, Switzerland. E-mail: info@cladswiss.com | ||||
PERMBAJTJE
- HYRJE 15
- RREGULLATE SIGURISE....15
- QËLLIMI I PAJISJES....15
- PAMJA E PËRGJITHSHME E PAJISJES 15
- BLLOKU I KONTROLLIT 15
- KUPTIMIN E IKONAVE NË EKRAN 16
- NDIZNI PAJISJEN 16
- REGJIMETTË PUNËS DHE FUNKSIONET 16
- FIKJE E PAJISJES....16
- PËRDORIMI I PAJISJES....16
- INSTALIMI DHE MONTIMI 18
- MIREMBAJTJA 18
- ZGJIDHJA E DEFEKTEVE 18
- SPECIFIKIMET 19
- ZGJIDHJA E PROBLEMEVE 19
- PËRMBAJTJA E PAKETIMIT 19
- RUAJTJE E PAJISJES 19
- RICIKLIMI 20
- DETYRIMET E GARANCISÉ 20
- DATA E PRODHIMIT 20
NE MENDOJMË PËR JU
Ju falënderojmë për blerjen e një pajisje Electrolux. Ju keni zgjedhur një produkt të mbështetur nga dekada përvojë profesionale dhe inovacioni. Unike dhe me stil, ajo ishte dizajnuar duke menduar për ju. Prandaj, sa herë që e përdorni, mund të jeni i sigurt që rezultatet gjithmonë do të jenë të shkëlqerya. Mirë se vini në Electrolux!
Në faqen tonë të internetit ju gjeni:

Gjeni rekomandimet për perdorimin të produktit, manualet e, informacionin e mirëmbajtjes: http://www.home-comfort.com/support/

Bleni një produkt në qytetin tuaj: http://www.home-comfort.com/search/find-a-store/

Pas shitjes së paisjes, shitësi duhet te plotesoje pjesen "Product details", e cila ndodhet ne faqen e fundit të këtij manualit.
Simbolet e përdorur

Kujdes/të dhënat e rëndësishme për rregullat e sigurisë

Informacioni i përgjithshëm dhe rekomandime
Shërbimi i garancisë kryhet në përputhje me kushtet e specifikuara në seksionin "Detyrimet e garancisë".
Shënim:
Në tekstin e këtij manuali, një konvektor elektrik mund të ketë emra teknikë, siç janë, pajisja, aparati, etj.
Kjo pajisje është e përshtatshme vetëm për ambiente brendshëm të izoluara ose për përdorim periodik.
Hyrje
Ju lutemi lexoni dhe ndiqni me përpikëri kërkesat e përmbajtura në këtë manual. Ruani manualin dhe dokumentet që konfirmojnë datën e blerjes së pajisjes në një vend të sigurt, më qellim qe te merrni dhe të përdorni këtë manual më lehtësi në të ardhmen.
Pajisja është konstruktuar për ngrohjen e ajrit në ambientet shtëpiake.
Rregullat e sigurisë

Vëmendje!
Kërkesat të cilat, nëse nuk ndiqen, mund të rezultojnë në trauma të renda ose dëmtim serioz të pajisjeve.
Gjatë përdorimit e pajisjes, respektoni rregullat e përgjithshme të sigurisë të përdorimit të pajisjeve elektrike. Mosrespektimi i rregullave dhe udhëzimeve të sigurisë mund të rezultojë në goditje elektrike, zjarr dhe/ose dëmtim serioz. Para se të përdorni pajisjen, lexoni me kujdes masat të sigurisë e mëposhtme:
- Kur ngrohës është ndezur për herë të parë, mund të shfaqet një erë karakteristike tymi për shkak të djegies së vajit në elementet i ngrohësit. Rekomandohet të ndizni ngrohësin për 10-20 minuta në një zone të ventiluar mirë para instalimit.
- Çdo pajisje elektrike duhet të mbikëqyret, veçanërisht nëse përdoret ne prani të fëmijëve. Sigurohuni që fëmijët të mos prekin pajisjen me duart e tyre.
- Mos përdorni një konvektor të dëmtuar dhe/ose me një kabillo energjie të dëmtuar ose të prishur.
- Kabillo i korrentit duhet të jetë e pozicionuar në atë mënyrë që të mos shkelet më këmbë, që të mos fshihet, griset, lakohet ose dëmtohet ndryshe.
- Mos lejoni që objektet e huaja ose lëngjet të hyjnë brenda pajisjes.
Gjithmonë vendosni pajisjen në mënyrë që parandaloni ndezjen e materialeve të ndezshme(p.sh. perde).Sigurohuni që asgjë nuk bblokon kanalet. hyrëse dhe dalëse Për të shmangur zjarrin, mos vendosni veshje ose sende të tjera në pajisje. - Sigurohuni që trupi i pajisjes dhe elementi i tij i ngrohjes të jenë ftohur para se pajisja
të çmontohet dhe të vendoset paketimin për ruajtje afatgjatë.
- Mos e përdorni pajisjen në hapësira jashtë.
- Sigurohuni që furnizimi më energjinë elektrike të përputhet me të dhënat në etiketën e pajisjes.
- Mos u përpiqni ta rregulloni pajisjen vetë. Ju lutemi kontaktoni shitësin.
- Shkëputeni pajisjen nga rrjeti kur nuk përdorni, dhe para se ta lani.
Pamja e përgjithshme e pajisjes
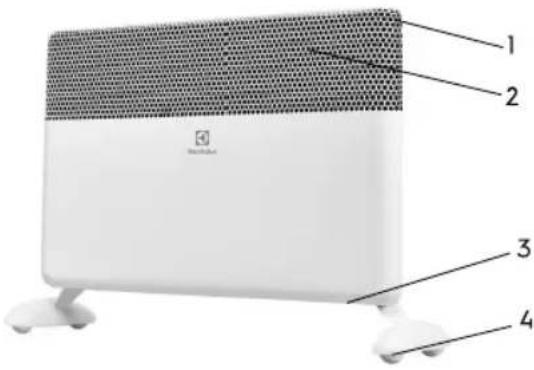
Figure 1
- Biloku i kontrollit
- Vendi i hyrjes se ajrit
- Vendi i daljes se ajrit
- Këmbët për të vendosur në dysheme (vijnë veçmas
Blloku i kontrollit
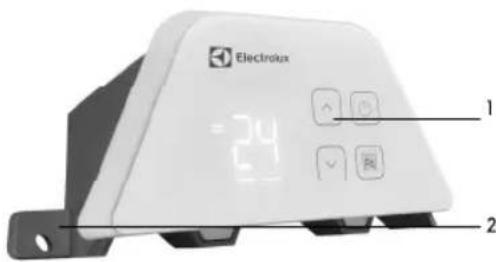
Figure 2 Biloku i kontrollit
- Paneli i kontrollit.
- Bblokimi i njësisë së kontrollit.
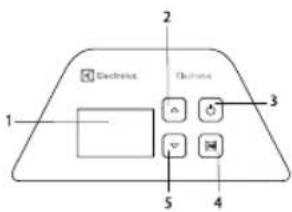
Ori. 2 Paneli i kontrollit
- Ekran LED.
- Butoni i rritjes së vlerës së synuar temperatura.
- Butoni i ndezjes/fikjes së pajisjes + kalimi ndërmjet modaliteteve Comfort, Eco, Anti-Frost.
- Butoni për të aktivizuar/çaktivizuar funksionin e dritares së hapur.
- Butoni i uljes së vlerës së synuar temperatura.
Përcaktimi i treguesve në ekranin LED.

- Tregimi i fuqisë aktuale të elementit të ngrohjes:
- plot - dy shufra janë ndezur; - gjysmë - një shirit.
-
Shfaq temperaturën e synuar dhe gabimet.
-
Statusi i lidhjes Wi-Fi.
-
Tregimi i funksionit «Dritarja e hapur».
-
Treguesi i funksionimit të konvektorit:
- ndizet e kuqe - konvektori është i ndezur;
-
fikur - konvektori është i fikur.
-
Tregimi i mënyrës aktuale të ngrohjes:
-
Comfort - portokalli;
- Eco - jeshile;
-
Anti-frost - blu.
-
Shfaqja e gjendjes së funksionimit të elementit ngrohës mikatherim*.
Ndizni pajisjen
Shtypni butonin e ndezjes/fikjes së ngrohësit për ta vënë pajisjen në punë. Klikoni butonin për të ndezur pajisjen. Temperatura e vendosur në fabrikë është +24 °C.
Vendosja e fuqisë së ngrohjes
Për të ndezur gjysmën e energjisë element ngrohës, mbani të shtypur njëkohësisht butonat △ dhe □ për 2 sekonda. Një shirit do të ndizet - gjysma e fuqisë së ngrohjes. Për të ndezur fuqinë e plotë, mbani të shtypur njëkohësisht butonat △ dhe □ për 2 sekonda. Dy shufra do të ndizen - fuqia e plotë e ngrohjes.
Regjimet të punës dhe funksionet
3 regjime të temperaturës janë të disponueshme për rregullim:
Comofort - shkon nga 10 °C deri në 35 °C. Eco - devijimi nga Comforti nga 3 °C në 7 °C. Anti-Frost - shkon nga 3 °C deri në 7 °C.
Kontrolli i synuar i temperaturës së ngrohjes
- Përdorni butonin për të rritur vlerën e temperaturës së synuar [.]
- Përdorni butonin për të ulur vlerën e temperaturës së synuar □.
Ndërrimi i hapit 1 shkallë.
Funksioni "Dritare e hapur"
Kur ky funksion aktivizohet, kur temperatura bie brenda 10 minutave (dhe më pas deri në 30 minuta) me 5 ose më shumë gradë, aktivizohet regjimi Anti-Frost. Nëse, brenda një interval kohor prej 10 - 30 minutash, vazhdon të bjerë temperatura , pajisja fiket. Më tej, ngrohësi pret stabilizimin e uljes së temperaturës së dhomës, nëse rritet me 2 gradë, atëherë ndizet regjimi i fundit e vendosur.
Për të aktivizuar/çaktivizuar funksionin hapni dritaren, shtypni një herë butonin.
Funksioni "Kontrolli prindëror"
Për të aktivizuar/çaktivizuar kyçjen e panelit të kontrollit, mbani të shtypur njëkohësisht butonat □ dhe ▼ për 12 sekonda.
Funksioni i "Auto Restart Resume"
Më ndërprerje e afatshkurtër të energjisë, dhe ndezjes përsëri, konvektori automatikisht kalon në, regjimin të fundit, duke mbajtur mënyrën e fundit të funksionimit të pajisjes dhe temperaturën e caktuar (nëse është caktuar një kohëmatës, koha e fikjes mbetet e njëjta). Nëse pajisja ka qenë në më regjim Pritje kur është fikur energjia,, ajo do të mbetet në të njëjtin regjime kur energjia të rivendoset.
Funksioni i "Mbrojtjes nga mbinxehja"
Pajisja është e pajisur me ndërprerës automatik që aktivizohet kur arrihet kufiri i fundit temperaturës. Ngrohësi fiket automatikisht në rast së mbinxehjes. Pas eliminimit të burimit të mbinxehjes, ngrohësi do të ndizet automatikisht.
Fikje e pajisjes
Për të fikur pajisjen, shtypni butonin ⏻ në çdo regjim funksionimi.
Përdorimi i pajisjes
Fillimi
- Me kujdes hiqeni ngrohësin nga kutia e kartonit.
- Hiqni ngjitësit e ngjyrosur nga paneli i kon- trollit.
- Kur e ndizni për herë të parë, mund të shfaqet një erë, e cila do të zhduket pasi konvektori të fillojë të funksionojë.
- Fiksoni pajisjen në një pozicion të qën-drueshëm sipas udhëzimeve të montimit dhe instalimit.
- Pas instalimit të konvektorit, futeni atë në një prizë elektrike.
Nuk rekomandohet të përdorni të njëjtën prizë elektrike për të lidhur në të njëjtën kohë ngro-hës dhe një pajisje tjetër elektrike me fuqi të lartë.
Modaliteti i çiftimit WiFi
Për të vendosur modulin Wi-Fi në modalitet çiftimi, për këtë ju duhet të mbani njëkohësish butonat ☑ dhe ☑ për 2 sekonda. Ikona Wi-Fi do të pulsojë një herë në sekondë. Në rast të lidhjes së suksesshme, ikona Wi-Fi do të fillojë të digjet në mënyrë statike.
Statuset Wi-Fi:
- Ikona nuk ndizet - pajisja nuk është e lidhur;
- Ikona pulsuese - modaliteti i çiftimit;
- Ikona është e ndezur - pajisja është e lidhur.
Instalimi dhe montimi
Montimi i rekomanduar
Konvektori duhet të jetë i montuar në përputhje me rregullat.
Çelësi i fikjes dhe mekanizmat e tjerë duhet të jenë jashtë zonës ku mund të lagën më pikat të ujit. Éshtë rreptësishtë e ndaluar të mbuloni ose mbusheni rrjete te marrjes/daljes së ajrit, për shkak të rrezikut nga defektet ose dëmtimi i pajisjes. Mos vendosni pas perdeve, dyerve, në afërsi të vrimave në mure ose kanaleve të ventilimit. Ndiqni udhëzimet për distancën minimale të instalimit në dysheme, mure, afër mobileve, etj.
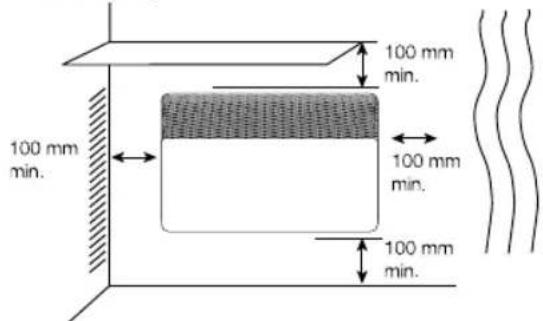
Figure 5
1. Opsioni i montimit në mur (kllapa dhe modeli i montimit të përfshirë)
Përdorni kllapat për të montuar ngrohësin në mur sipas fotove më poshtë. Distanca nga pajisja në dysheme dhe objektet përreth duhet të jetë më paktë 10 cm (Figure 5).
Për të instaluar kllapën në mur, duhet të bëni si më poshtë:
- Ngjitni modelin e montimit në mur në vendin ku planifikoni të vendosni konvektorin.
• Shënoni pikat dhe bëni vrimat.
- Vendosni kllapën në një mur dhe për të rregulluar atë më anë të elementeve fiksues.
Siguroni qe pajisje të jetë e vendosur ne kllapat si më poshtë (figura 6):
- Vendosni pjesës e poshtme në kllapa duke përdorur vrimat speciale të vendosura në fund të konvektorit.
- Vendosni pjesën e sipërme të konvektorit në kllapa, fiksoni atë me kapës te ndodhura ne kllapa.

Figure 6

natural_image
Technical line drawing of a mechanical assembly inside a circular frame (no text or symbols)Figure 7
2. Instalimi në dysheme
Duke përdorur shasinë, pasi keni studiar figurën e fiksimit (Figure 7), instaloni pajisjen në dysheme:
- Ktheni me kujdes konvektorin përmbys.
- Merrni një nga shasitë dhe bashkëngjitni vendin e uljes në djathtë ose të në të majtë të konvektorit në mënyrë që të përshtatet mirë në kapakun e konvektorit. Vrima e vidhos duhet të përputhet.
- Siguroni shasinë duke përdorur një shtojcë të veçantë, e cila ndodhet në paketim.
- Përsëriteni të njëjtën gjë për të fiksuar shasinë e dytë.
Zgjidhja e defekteve
| Simptomë | Shkaku i fajit | Korrigjues veprimi |
| Nuk ngrohet | 1) Pa fuqi.2) Konvektori është në gjendje standby.3) Temperatura aktuale e dhomës më e lartë se temperatura e vendosur ne termostat. | 1) Krijoni lidhje e sigurt me linjë.2) Kaloni konvektorin në regjimin e funksionimit.3) Rregulloni të dhënat e temperaturës së konvektorit. |
| Erë e pluhurit të djegur kur ndizet së pari | Nuk është defekte | Erë zhduket pas disa minutave të funksionimit të konvektorit |
Nëse, pas të gjitha përpjekjeve për të zgjidhur problemin, problemi nuk zgjidhet, kontaktoni një qendër të autorizuar tuaj ose përfaqësuesin tuaj të shitjeve.
Specifikimet
| Model | ECH/AT-15003AE EEC | ECH/AT-17003AE EEC | ECH/AT-20003AE EEC |
| Wattage, W | 1350-1500 | 1500-1700 | 1800-2000 |
| Rryma elektrike, A | 6,14-6,25 | 6,82-7,08 | 8,18-8,33 |
| Tension, -V/Hz | -220-240/50-60 | -220-240/50-60 | -220-240/50-60 |
| Shkallë e rezistencës ndaj ujit/ pluhurit | IP24 | IP24 | IP24 |
| Klasa elektrike | 1 | 1 | 1 |
| Zona e ngrohjes, m^2 | 13-15 | 15-17 | 18-20 |
| Përmasat e pajisjes (W×H×D), mm | 560×420×120 | 640×420×120 | 800×420×120 |
| Përmasat e paketimit (W×H×D), mm | 655×445×153 | 735×445×153 | 895×445×153 |
| Pesha neto, kg | 4,028 | 4,514 | 5,51 |
| Pesha bruto, kg | 5,074 | 5,626 | 6,798 |
* ndryshojne ne varësi të kushteve aktuale të funksionimit.

Konvektori furnizohet me një letër ngjitës në panelin e përparmë. Hiqeni atë përpara se të përdorni pajisjen.
Mirëmbajtja
Konvektori nuk kërkon ndonjë mirëmbajtje të veçantë. Para se të shërbeni (lani) konvektori duhet të shkëputet nga furnizimi me energji elektrike.
Trupi i pajisjes duhet të fshihet periodikisht me një leckë të butë, pa garzë ose me sfungjer të lagur. Asnjëherë mos përdorni pastrues gërryes, shkumës ose tretës. Pastrimi i hapësirës pas një ngrohësi të montuar në mur është relativisht i lehtë. Shtypni dy butonat në pjesën e prapme të ngrohësit dhe tërhiqni ngrohësin përpara. Pasi të hiqet, mund të lani murin në të cilin ishte instaluar.
Pas përfundimit të pastrimit, vendoseni ngrohësin përsëri në pozicionin e tij normal të funksionimit.
Temperatura dhe lagështia e rekomanduar në dhomë:
a) për funksionimin e konvektorit: nga -25°C deri + 30°C, lagështia nga 40% në 90%; b) për ruajtjen e konvektorit: nga -20°C në + 80°C, lagështia nga 40% në 90%.
Zgjidhja e problemeve
Shfaqja e gabimit:
E1 - Sensori i hapur i temperaturës;
E2 - Qark i shkurtër në kanalin e sensorit të temperaturës;
E3 - Mbinxehja e sensorit të temperaturës.
Temperatura aktuale ka kaluar +48 °C;
E4 - Temperatura e ambientit ka rënë nën temperaturën e lejuar të funksionimit të pajisjes (nën -26 °C).
Përmbajtja e Paketimit
- Ngrohës elektrik
- Kllapat për instalim ne mur
- Modeli i montimit
- Set i elementeve fiksues
- Manuali i përdorimit
- Set shasi me rrota
Ruajtje e pajisjes
Ngrohësi duhet të ftohet para së çohet në ruajtje.
Rekomandohet të pastroni ngrohësin dhe ta ruani (mundësisht paketimin i tij origjinal) në një vend të freskët dhe të thatë nëse planifikoni të mos përdorni pajisjen për një kohë të gjatë.
Riciklimi

Kjo pajisje nuk mund të hidhet me mbeturina shtëpiake (2012/19/EU).
Detyrimet e garancisë
Shërbimi i garancisë kryhet në përputhje me kushtet e specifikuara në seksionin "Detyrimet e garancisë".
Garancia:
- Periudha e garancisë për produktin éshtë dy vjet nga data e blerjes. Nëse gjatë këtë periudhë garancie dy vjeçare çdo defekt që rrjedh nga mangësi në materiale dhe/ose mjeshtëri pune produkti do të riparohet ose zëvendësohet.
- Riparimi ose zëvendësimi falas është i mundur vetëm nëse sigurohet prova bindëse, për shembull me duke përdorur një dëftesë që konfirmon atë dita në të cilën kërkohet shërbimi është brenda garancisë afat.
Garancia nuk përfshin produktet dhe/ose pjesë të produktit që janë vesh dhe lot që mund të konsiderohen si harxhues në natyrë ose të cilat janë bërë prej qelqi. - Garancia éshtë e pavlefshme nëse defekti të shkaktuara nga dëmtimi i shkaktuar nga jo i duhur përdorimi i duhur, mirëmbajtja e dobët të jetuarit (për shembull, refuzimi ishte për shkak hyrja brenda produktit nga të huajt objekte ose lëngje) ose nëse riparimet ose riparimet janë kryer nga persona jo i autorizuar nga Prodhues.i
- Për përdorimin e saktë të produktit, përdoruesi duhet të përmbahet në mënyrë rigoroze të gjitha udhëzimet e përfshira NË manualin e përdoruesit dhe duhet të përmbahet nga çdo veprim ose manipulim që përshkruhet si - personale ose për të cilat ka udhëzime në manualin e përdoruesit.
- Këto kufizime të garancisë nuk ndikojnë në të drejtat tuaja ligjore.
Mbështetje:
Mbështetja gjatë dhe pas periudhës së garancisë mund të merret në të gjitha vendet ku produkti shpërndahet zyrtarisht. Ju lutemi kontaktoni shitësin tuaj për ndihmë.
Data e prodhimit
Data e prodhimit është shënuar ne një letër ngjitës në kapak, dhe gjithashtu është e koduar në Code-128.
Data e prodhimit përcaktohet si më poshtë:

muaji dhe viti i prodhimit.
Mos e fshini dhe ruani numrin serial të pajisjes. Humbja ose dëmtimi i letrës ngjitse më numrin serail, në raste së nevojes, nuk do të lejojë të përcaktohet data e prodhimit.
Importues:
Prodhues: CladSwiss AG,
Bahnhofstrasse 27, 6300 Zug, Zvicër.
E-mail: info@cladswiss.com
E prodhuar në Kinë.
Electrolux është një markë tregtare e regjistruar e përdorur nën licencën e AB Electrolux (botuar).
Prodhuesi rezervon të drejtën për të bëre ndryshime në dizajn dhe karakteristikat e pajisjes.
Në tekst dhe numra, udhëzimet mund gabime teknike dhe gabime tipografike.
Ndryshimet në specifikime dhe asortimenti mund të prodhohet pa njoftim paraprak.
Mund të gjenden disa gabimet në shkrim, në tekste dhe numra.
Dizajni dhe të dhënat teknike të pajisjes mund të ndryshojnë nga ato të treguara në paketim. Ju lutemi kontaktoni konsulentin tuaj të shitjes për më shumë informacion.
| Informacionit për këtë ngrohës elektrik të hapësirës lokal | |||||
| Identifikues (et) e modelit: ECH/AT-1500 3AE EEC | |||||
| Të dhënat | Symbol | Vlera | Njësia e | Lloji | Njësia |
| Prodhimi i nxehtësisë | Lloji i prodhuesit të nxehtësisë, për ngrohësit elek-trike lokale më mundësi ruajtjes (zgjidhni një) | ||||
| prodhimi i nxehtësisë nominal | P_nom | 1,3831 | kW | kontrolli manual i ngarkesës së nxehtësisë, me termostat të integruar | NUK |
| Prodhimi mini-mal i nxehtësisë (indikator) | P_min | 0,6837 | kW | kontrolli manual i ngarkesës së nxehtësisë me reagime për temperaturën e dhomës dhe / ose të hapësirës së jashtëm | NUK |
| Maksimumi i vazhdueshëm të prodhimit të nxehtësisë | P_max,c | 1,3831 | kW | kontrolli elektronik i ngarkesës së nx- ehtësisë me reagime për temperaturën e dhomës dhe / ose të hapësirës së jashtëm | NUK |
| Konsumi shtesë i energjisë elektrike | Nxirrje e nxehtësisë nëpërmjet ventilatorii | ||||
| Të prodhimi i nxehtësisë nominal | el_max | 0 | kW | Lloji i prodhimit të nxehtësisë / kontrollit të temper- aturës së dhomës (zgjidhni një) | |
| Të prod- himi minimal i nxehtësisë (indikator) | el_min | 0 | kW | prodhim i nxehtësisë me një fazë të vetme dhe pa kontroll të temperaturës së dhomës | NUK |
| Në regjimin të pritjes | el_ss | 0,00039 | kW | dy ose më shumë faza manuale, pa kontroll të temperaturës së dhomës | NUK |
| me termostat mekanikë dhe më kontroll të temperaturës së dhomës | NUK | ||||
| me termostat elektronik dhe më kontroll të temperaturës së dhomës | NUK | ||||
| me termostat elektronik dhe më kontroll të temperaturës së dhomës dhe kohëmatësi ditor | NUK | ||||
| me termostat elektronik dhe më kontroll të temperaturës së dhomës dhe kohëmatësi javor | PO | ||||
| Mundësi të tjera të kontrollit (zgjedhje të shumë- fishta të mundshme) | |||||
| kontroll i temperaturës në dhomë, me zbuli-min e pranise së dikujt | NUK | ||||
| kontroll të temperaturës në dhomë, me identifikimi l dritares së hapur | PO | ||||
| më kontrollin të distancës | NUK | ||||
| me kontrollin adaptues të fillimit të punës | NUK | ||||
| me kufizim të kohës së punës | NUK | ||||
| me sensori e llambës zezë | NUK | ||||
| Detajet e kon-taktit | Prodhues: CladSwiss AG, Bahnhofstrasse 27, 6300 Zug, Zvicër. E-mail: info@cladswiss.com | ||||
| Identifikues (et) e modelit: ECH/AT-2000 3AE EEC | |||||
| Të dhënat | Symbol | Vlera | Njësia e | Lloji | Njësia |
| Prodhimi i nxehtësisë | Lloji i prodhuesit të nxehtësisë, për ngrohësit elek-trike lokale më mundësi ruajtjes (zgjidhni një) | ||||
| prodhimi i nxehtësisë nominal | P_nom | 1,8546 | kW | kontrolli manual i ngarkesës së nxehtësisë, me termostat të integruar | NUK |
| Prodhimi mini-mal i nxehtësisë (indikator) | P_min | 0,9313 | kW | kontrolli manual i ngarkesës së nxehtësisë me reagime për temperaturën e dhomës dhe / ose të hapësirës së jashtëm | NUK |
| Maksimumi i vazhdueshëm të prodhimit të nxehtësisë | P_max,c | 1,8546 | kW | kontrolli elektronik i ngarkesës së nx- ehtësisë me reagime për temperaturën e dhomës dhe / ose të hapësirës së jashtëm | NUK |
| Konsumi shtesë i energjisë elektrike | Nxirrje e nxehtësisë nëpërmjet ventilatorii | ||||
| Të prodhimi i nxehtësisë nominal | el_max | 0 | kW | Lloji i prodhimit të nxehtësisë / kontrollit të temper- aturës së dhomës (zgjidhni një) | |
| Të prod- himi minimal i nxehtësisë (indikator) | el_min | 0 | kW | prodhim i nxehtësisë me një fazë të vetme dhe pa kontroll të temperaturës së dhomës | NUK |
| Në regjimin të pritjes | el_sb | 0,00039 | kW | dy ose më shumë faza manuale, pa kontroll të temperaturës së dhomës | NUK |
| me termostat mekanikë dhe më kontroll të temperaturës së dhomës | NUK | ||||
| me termostat elektronik dhe më kontroll të temperaturës së dhomës | NUK | ||||
| me termostat elektronik dhe më kontroll të temperaturës së dhomës dhe kohëmatësi ditor | NUK | ||||
| me termostat elektronik dhe më kontroll të temperaturës së dhomës dhe kohëmatësi javor | PO | ||||
| Mundësi të tjera të kontrollit (zgjedhje të shumë- fishta të mundshme) | |||||
| kontroll i temperaturës në dhomë, me zbuli-min e pranise së dikujt | NUK | ||||
| kontroll të temperaturës në dhomë, me identifikimi l dritares së hapur | PO | ||||
| më kontrollin të distancës | NUK | ||||
| me kontrollin adaptues të fillimit të punës | NUK | ||||
| me kufizim të kohës së punës | NUK | ||||
| me sensori e llambës zezë | NUK | ||||
| Detajet e kon-taktit | Prodhues: CladSwiss AG, Bahnhofstrasse 27, 6300 Zug, Zvicër. E-mail: info@cladswiss.com | ||||
ZAWARTOŚĆ
- WSTEP 25
- ZASADY BEZPIECZEŃSTWA 25
- PRZEZNACZENIE URZĄDZENIA 25
- OGÓLNY WIDOK URZĄDZENIA 25
- URZADZENIE JEDNOSTKI STERUJACEJ 26
- ZNACZENIE IKON NA WYŚWIETLACZU 26
- WŁACZANIE URZĄDZENIA 26
- TRYBY PRACY I FUNKCJE 26
- TRYBY MOCY GRZEWCZEJ 26
- FUNKCJA PROGRAMME 27
- WYŁACZANIE URZADZENIA 27
- STEROWANIE URZADZENIEM 27
- MONTAŻ URZADZENIA 27
- OBSTUGA 29
- ROZWIAZYWANIE PROBLEMÓW 29
- DANE TECHNICZNE 29
- KOMPLETOWANIE 30
- UTYLIZACJA 30
- GWARANCJA 30
- DATA PRODUKCJI 30
MYŚLIMY O WAS
Dziękujemy że kupili urządzenia Electrolux. Wybrali Państwo produkt poparty dziesięcioleciami doświadczenia zawodowego i innowacji.
Wyjątkowy i stylowy, stworzony z troską o państwie. Dlatego za każdym razem, gdy go będziece używać, możecie być pewni, że efekty zawsze będą doskonałe.
Witamy w Electrolux!
Na naszej stronie internetowej możesz:

Znaleźć rekomendacje produktów, instrukcje obsługi, informacje o konserwacji: http://www.home-comfort.com/support/

Kupić produkt w swoim mieście: http://www.home-comfort.com/search/find-a-store/

Sprzedając to urządzenie, sprzedawca powinie wypełnić rozdział „Szczegóły produktu”, co się znajduje na wewnętrznej stronie tylnej okładki niniejszej instrukcji.

Używane symbole

Uwaga/Ważne informacje dotyczące bezpieczeństwa

Generalne informacje i zalecenia
Serwis gwarancyjny jest wykonywany na warunkach określonych w punkcie "Gwarancja".
Uwaga:
W tekście tej instrukcji konwektor elektryczny może mieć takie nazwy techniczne jak urządzenie, device, aparat itp.
To urządzenie nadaje się tylko do dobrze izolowanych pomieszczeń lub do sporadycznego użytku.
Wstęp
Prosimy o przeczytanie oraz ścisłe przestrzeganie wymagań zawartych w tej instrukcji. Prosimy o przechowywanie instrukcji oraz dokumentów, potwierdzających datę zakupu urządzenia w bezpiecznym miejscu w celu łatwego wyszukania i używania.
Urządzenie przeznaczone jest do ogrzewania powietrza w pomieszczeniach mieszkalnych.
Zasady bezpieczeństwa

Uwaga!
Nieprzestrzeganie instrukcji może spowodować poważne poranienia lub poważne uszkodzenie sprzętu.
Podczas korzystania z urządzenia należy przestrzegać ogólnych zasad bezpieczeństwa. Nieprzestrzeganie zasad bezpieczeństwa i instrukcji może spowodować porażenie prądem elektrycznym, pożar i /lub obrażenia ciała. Przed przystąpieniem do eksploatacji urządzenia należy uważnie przeczytać poniższe zasady bezpieczeństwa:
- Przy pierwszym włączeniu grzejnika może pojawić się charakterystyczny zapach dymu z powodu spalania oleju w elementach grzejnych. Zaleca się włączenie grzałki przez 10-20 minut w dobrze wentylowanym pomieszczeniu przed instalacją.
- Każde urządzenie elektryczne musi być monitorowane, zwłaszcza jeśli w pobliżu znajdują się dzieci. Uważaj, aby dzieci nie dotykały urządzenia rękami.
- Nie należy używać konwektora z uszkodzonym i/lub uszkodzonym lub zużyłym kablem sieciowym.
- Kabel sieciowy musi być umieszczony w taki sposób, aby nikt nie nadepnąt na niego, aby nie ścierał się, nie rozdarł, nie tworzył pętli ani nie ulegał innym uszkodzeniom.
- Nie pozwól, aby do urządzenia dostaty się ciała obce lub płyny.
- Urządzenie należy zawsze ustawiać w taki sposób, aby materiały łatwopalne (np. zastony) nie uległy zapaleniu. Upewnij się, że nic nie blokuje kanałów wlotowych i wylotowych. Aby uniknąć pożaru,
nie należy kłaść odzieży ani innych przedmiotów na urządzeniu.
- Upewnij się, że korpus urządzenia i jego element grzejny ostygły, zanim urządzenie zostanie zdemontowane i zapakowane do długotrwałego przechowywania.
- Nie używaj urządzenia na otwartej przestrzeni na zewnątrz.
- Upewnij się, że napięcie sieciowe odpowiada napięciu podanemu na etykiecie urządzenia.
- Nie próbuj samodzielnie naprawiać urządzenia. Skontaktuj się ze sprzedawcą.
- Odłącz urządzenie od sieci, gdy nie jest używane i przed czyszczeniem.
Ogólny widok urządzenia

Rys. 1
- Jednostka sterująca
- Otwory wentylacyjne
- Wloty wentylacyjne
- Podwozie do montażu podłogowego (dostarczanego osobno)
Urzqdzenie jednostki sterującej

Rys. 2 Jednostka sterująca
1 Panel sterowania.
2 Element mocujący modułu sterowania.
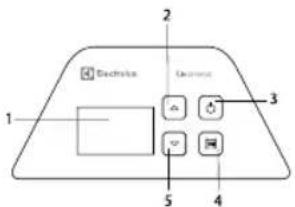
Rys. 2 Panel sterowania
- Wyświetlacz LED.
- Przycisk zwiększania celu temperatura.
- Przycisk włączania/wyłączania + przełączanie między trybami Comfort, Eco, Anti-frost.
- Przycisk służący do włączania/wyłączania funkcji otwartego okna.
- Przycisk zmniejszania celu Przycisk do obniżania temperatury docelowej.
Oznaczenie wskaźnika na wyświetlaczu LED

-
Wskazanie aktualnej mocy grzewczej elementu grzejnego:
-
pełna - świecą się dwie kreski;
-
połowa - świeci się jeden pasek.
-
Wyświetlanie temperatury docelowej i Wyświetlanie temperatury docelowej i błędów.
- Stan połączenia z siecią Wi-Fi.
- Wskazanie funkcji Otwórz okno.
- Wskazanie pracy konwektora:
- świeci na czerwono - konwektor jest włączony;
- nie świeci - konwektor jest wyłączony.
- Wskazanie aktualnego trybu ogrzewania:
- Comfort - kolor pomarańczowy;
- Eco - zielony;
- Anti-frost - niebieski.
- Wyświetlanie stanu pracy mikrotermicznego elementu grzejnego.
Włączanie urządzenia
Naciśnij przycisk ⏻ włączania/wyłączania grzałki aby przełączyć urządzenie w tryb pracy. Naciśnij przycisk ⏻ aby włączyć urządzenie. Temperatura ustawiona w fabryce to + 24 °C.
Ustawianie mocy grzewczej
Aby przełączyć element grzejny na połowę mocy elementu grzejnego, naciśnij jednocześnie przyciski i i przytrzymajje przez 2 sekundy. Świeci się jeden pasek - połowa mocy grzewczej. Aby włączyć pełną moc, naciśnij jednocześnie przyciski i i przez 2 sekundy. Świecq się dwa paski - pełna moc grzewcza.
Tryby pracy i funkcje
Dostępne sq 3 ustawienia temperatury pracy: Comfort-zakres od 10 °C do 35 °C. Eco - zakres odchylenia Comfort od 3 °C do 7 °C. Anti-Frost-zakres od 3 °C do 7 °C.
Regulacja docelowej temperatury ogrzewania
- Aby zwiększyć wartość temperatury docelowej, należy użyć przycisku
- Aby zmniejszyć wartość temperatury docelowej, należy użyć przycisku Krok przełączania wynosi 1 stopień.
Funkcja "Otwarte okno"
Gdy ta funkcja jest aktywna, przy spadku temperatury przez 10 minut (i dalej do 30 minut) o 5 lub więcej stopni na grzejniku włącza się tryb Anti - frost. Jeśli w przedziale czasowym od 10 do 30 minut trwa obniżenie temperatury-urządzenie wyłącza się. Następnie grzejnik oczekuje stabilizacji spadku temperatury w pomieszczeniu, jeśli wzrośnie o 2 stopnie, włącza się ostatni ustawiony tryb. Aby włączyć lub wyłączyć funkcję funkcję otwartego okna, naciśnij przycisk raz.
Funkcja "Kontroli rodzicielskiej"
Blokuje wszystkie przyciski na panelu sterowania. Podczas pracy urządzenia Naciśnij i przytrzymaj jednocześnie przyciski strzałek w lewo i w prawo przez kilka sekund. Na wyświetlaczu zaświeci się wskaźnik blokady. Funkcja «Kontrola rodzicielska» jest aktywna. Aby wyłączyć funkcję, powtórz tę samą operację, co w przypadku włączenia. Aby włączyć lub wyłączyć blokadę panelu sterowania jednostki sterującej, naciśnij przycisk i jednocześnie przez 12 sekund.
Funkcja "Auto Restart Resume"
W przypadku krótkotrwałej przerwy w dostawie prądu i dalszego jej włączenia konwektor automatycznie przechodzi w tryb pracy, z zachowaniem ostatniego trybu pracy urządzenia i ustawionej temperatury (w przypadku, gdy został ustawiony timer, ustawiony czas wyłączenia jest zapisywany). Jeśli urządzenie znajdowało się w trybie gotowości w momencie wyłączenia zasilania, po wznowieniu zasilania urządzenie pozostanie w tym samym trybie.
Funkcja "Ochrony przed przegrzaniem"
Urządzenie jest wyposażone w wyłącznik automatyczny, który aktywuje się po osiągnięciu górnego limitu temperatury. Grzejnik wyłącza się automatycznie w przypadku przegrzania. Po wyeliminowaniu źródła przegrzania, grzejnik włączy się automatycznie.
Wyłączanie urządzenia
Aby wyłączyć urządzenie, naciśnij przycisk w dowolnym trybie pracy.
Sterowanie urządzeniem
Przygotowanie do pracy
- Ostrożnie wyjmij grzejnik z kartonu.
- Przed użyciem należy usunąć kolorowe naklejki z płyty czołowej.
- Przy pierwszym włączeniu może pojawić się jakiś zapach, który zniknie po rozpoczęciu pracy konwektora.
- Zamocować urządzenie w stabilnej pozycji, zgodnie z instrukcją montażu.
- Po zainstalowaniu konwektora podłącz go do gniazda zasilania.
- Nie zaleca się używania tego samego gnia- azdka elektrycznego w celu jednoczesne- go włączenia do niego grzejnika i innego urządzenia elektrycznego o dużej mocy.
Tryb parowania Wi-Fi
Aby włożyć moduł Wi-Fi do gniazda W trybie parowania naciskaj jednocześnie przyciski i przez 2 sekundy. Ikona Wi-Fi zacznie migać raz na sekundę. Jeśli potączenie zostanie nawiązane pomyślnie, Ikona Wi-Fi zacznie świecić światłem ciągłym.
Stany sieci Wi-Fi:
- Ikona nie świeci się - urządzenie nie jest podłączone;
- Ikona miga - tryb parowania;
- Ikona świeci się - urządzenie jest podłączone.
Montaż urządzenia
Zalecana instalacja
Konwektor musi być zamocowany zgodnie z zaleceniami.
Wyłącznik i inne mechanizmy powinny znajdować się poza zasięgiem rozpryskiwania wody. Zabronione jest zakrywanie lub zatykanie wlotów lub wylotów powietrza, ze względu na niebezpieczeństwo wypadku lub uszkodzenia urządzenia.
Nie należy umieszczac za zasłonami, drzwiami, pod otworem w ścianie lub otworem wentylacyjnym. Przestrzegać minimalnych odległości instalacji na podłodze, powierzchniach, meblach itp.

Rys.5

natural_image
Technical line drawing of a mechanical assembly inside a circular frame (no text or symbols)Rys. 7
1. Montaż ścienny (uchwyt i instalacji szablon w zestawie)
Za pomocą wsporników zainstaluj grzejnik na ścianie zgodnie z poniższymi rysunkami. Odległość od urządzenia do podłogi i otaczających przedmiotów powinna wynosić co najmniej 10 cm (rys. 5).
Aby zainstalować wspornik na ścianie, należy wykonać następujące czynności:
- Przymocuj szablon montażowy do ściany w miejscu, w którym planowane jest umieszczenie konwektora.
. Zaznaczyć i wywiercić otwory. - Umieść wspornik na ścianie i zabezpiecz go za pomocą łączników.
Zamocować urządzenie na wsporniku w następujący sposób (rys. 6)
- Przymocuj dolną część konwektora do wspornika za pomocą specjalnych otworów umieszczonych w dolnej części konwektora.
- Przymocuj górną część konwektora do wspornika, mocując go za pomocą zatrzasków na wsporniku.

Rys. 6
2. Instalacja na podłodze
Korzystając z podwozia, po uprzednim zapoznaniu się ze schematem mocowania (rys. 7), zainstalować urządzenie na podłodze:
- Ostrożnie odwróć konwektor od dołu do góry.
- Wziąć jedną z obudów i przymocować ją do miejsca podestu po prawej lub lewej stronie konwektora, tak aby dobrze przylegała do korpusu konwektora. Otwór na śrubę musi pasować.
- Zamocuj podwozie za pomocą specjalnego mocowania dołączonego do zestawu.
- Powtórz tę samą procedurę dla mocowania drugiej ramy.
Rozwiązywanie problemów
| Objaw awarii | Przyczyna awarii | Kroki rozwiązywania problemów |
| Brak ogrzewania | 1) Brak zasilania.2) Konwektor jest w trybie gotowości.3) rzeczywista temperatura w pomieszczeniu przekracza ustawienie termostatu. | 1) Ustaw bezpieczne połączenie.2) Przełącz konwektor w tryb pracy.3) Ustaw temperaturę pracy konwektora. |
| Zapach spalonego pyłu przy pierwszym włączeniu | To nie jest usterka | Zapach znika po kilku minutach pracy konwektora. |
Jeśli problem nie zostanie rozwiązany po wszystkich próbach rozwiązania problemu, skontaktuj się z autoryzowanym centrum serwisowym w Twojej okolicy lub przedstawicielem handlowym.
Dane techniczne
| Model | ECH/AT-15003AE EEC | ECH/AT-17003AE EEC | ECH/AT-20003AE EEC |
| Moc, W | 1350-1500 | 1500-1700 | 1800-2000 |
| Prąd znamionowy, A | 6,14-6,25 | 6,82-7,08 | 8,18-8,33 |
| Napięcie znamionowe, -V/Hz | -220-240/50-60 | -220-240/50-60 | -220-240/50-60 |
| Stopień ochrony przed kurzem | IP24 | IP24 | IP24 |
| Klasa ochrony elektrycznej | 1 | 1 | 1 |
| Powierzchnia grzewcza, m^2 | 13-15 | 15-17 | 18-20 |
| Rozmiar urządzenia (S×W×G), mm | 560×420×120 | 640×420×120 | 800×420×120 |
| Wielkość opakowania (S×W×G), mm | 655×445×153 | 735×445×153 | 895×445×153 |
| Waga netto, kg | 4,028 | 4,514 | 5,51 |
| Waga brutto, kg | 5,074 | 5,626 | 6,798 |
* Podano wartość orientacyjną, która może się różnic w zależności od rzeczywistych warunków pracy.

W zestawie konwektora znajduje się Naklejka umieszczona na płycie czołowej przed rozpoczęciem użytkowania urządzenia należy ją usunąć.
Obstuga
Konwektor nie wymaga specjalnej opieki. Przed przystąpieniem do konserwacji (konserwacji) należy wyłączyć konwektor z gniazdka elektrycznego. Obudowę urządzenia należy okresowo czyścić miękką, niestrzępiącą się ściereczką lub wilgotną gąbką. W żadnym wypadku nie należy stosować środków ściernych,
piankowych ani rozpuszczalników. Czyszczenie przestrzeni za grzejnikiem zamontowanym na ścianie jest dość łatwe. Naciśnij dwa zatrzaski na tylnej ścianie grzejnika i pociągnij sam grzejnik do przodu. Po zdjęciu możliwe będzie umycie ściany, na której został zainstalowany. Po zakończeniu czyszczenia ustaw grzałkę w normalnej pozycji roboczej. Zalecana temperatura i wilgotność w pomieszczeniu: a) do pracy konwektora: -25°C do + 30°C, wilgotność od 40% do 90%; B) konwektor przechowywania: -20°C do + 80°C, wilgotność od 40% do 90%.
Rozwiązywanie problemów
Wyświetlanie błędów:
E1 - Uszkodzenie czujnika temperatury;
E2 - Zwarcie w kanale czujnika temperatury;
E3 - Czujnik temperatury przegrzany. Aktualna temperatura przekroczyta +48 °C;
E4 - Temperatura otoczenia Temperatura otoczenia spadła poniżej dopuszczalnej temperatury pracy urządzenia (ponizej -26 °C).
Kompletowanie
- Grzejnik elektryczny
- Uchwyt do montażu na ścianie
- Szablon montażowy
- Zestaw elementów złącznych
- Instrukcja obsługi
- Zestaw jezdny z kółkami
Przechowywanie urządzenia
Przed odłożeniem grzejnika do przechowywania upewnij się, że jest zimny. Zaleca się czyszczenie grzejnika i przechowywanie (najlepiej w opakowaniu fabrycznym) w chłodnym, suchym miejscu, jeśli planujesz nie używać urządzenia przez dłuższy czas.
Utylizacja

Urządzenie, którego termin upłynąt, nie może być wyrzucane wraz z odpadami domowymi (2012/19/UE).
Gwarancja
Serwis gwarancyjny jest wykonywany na warunkach określonych w punkcie "Gwarancja".
Gwarancja:
- Okres gwarancji wynosi dwa lata od daty zakupu. Jeśli w trakcie dwuletniego okresu gwarancji wystąpią jakiekolwiek wady spowodowane wadami materiałowymi i/lub produkcyjnymi, przedmiot należy naprawić lub wymienić.
- Bezpłatna naprawa lub wymiana jest możliwa tylko w przypadku dostarczenia przekonujących dowodów, na przykład
odcinka, który potwierdza, że dzień zgłoszenia usługi mieści się w okresie gwarancyjnym.
- Gwarancja nie obejmuje produktów i/ lub części produktu, które ulegają zepsuciu, mogą być uważane za materiały zużywalne lub które są wykonane ze szkła.
- Gwarancja traci ważność, jeżeli wada jest spowodowana uszkodzeniem wynikającym z niewłaściwego użytkowania, złej konserwacji (np. Awaria powstała na skutek wniknięcia ciał obcych lub płynów) lub jeśli zmiany lub naprawy zostały wykonane przez osoby nieupoważnione przez Producenta.
- Dla prawidłowego użytkowania produktu użytkownik musi ściśle przestrzegać wszystkich instrukcji zawartych w instrukcji obsługi, i powinien powstrzymać się od wszelkich działań lub manipulacji, które są opisane jako niepożądane lub o których są wskazówki w instrukcji obsługi.
- Te ograniczenia gwarancyjne nie mają wpływu na twoje prawa.
Wsparcie:
Wsparcie w okresie gwarancyjnym i po jego zakończeniu jest dostępne we wszystkich krajach, w których produkt jest oficjalnie dystrybuowany. Skontaktuj się ze sprzedawcą, aby uzyskać pomoc.
Data produkcji
Data produkcji jest podana na naklejce na korpusie urządzenia, a także zaszyfrowana w Code-128. Datę produkcji określa się w następujący sposób:

Miesiąc i rok produkcji
Nie usuwaj i numeru seryjnego na korpusie urządzenia. Jeśli naklejka z numerem seryjnym zostanie zgubiona lub uszkodzona, w razie potrzeby nie będzie możliwe wyjaśnienie daty produkcji.
Importer:
Producent: CladSwiss AG, Bahnhofstrasse 27, 6300 Zug, Szwajcaria. E-mail: info@cladswiss.com
Wyprodukowano w Chinach.
Electrolux jest zastrzeżonym znakiem towarowym używanym na licencji firmy AB Electrolux (publ.).
Producent pozostawia za sobą prawo do zmiany konstrukcji i właściwości urządzenia.
Ta instrukcja może zawierać błędy techniczne i pisarskie. Zmiany parametrów technicznych i asortymentu mogą ulec zmianie bez powiadomienia.
Błędy i pomyłki w tekście i liczbach są dozwolone. Konstrukcja i dane techniczne urządzenia mogą różnić się od przedstawionych na opakowaniu. Aby uzyskać więcej informacji, skontaktuj się z konsultantem ds. Sprzedaży.
| Wymagana informacja dotycząca miejscowych elektrycznych ogrzewaczy pomieszczeń | |||||
| Identyfikator(y) modelu: ECH/AT-1500 3AE EEC | |||||
| Nazwa | Symbol | Wartość | Unit | Nazwa | Jednostka |
| Moc cieplna | Typ dopływu ciepła tylko dla lokalnych grzejników (wybrać jeden) | ||||
| Nominalna moc cieplna | P_nom | 1,3831 | kW | ręczne sterowanie dopływem ciepła, ze zintegrowanym termostatem | NIE |
| Minimalna moc cieplna (orientacyjna) | P_min | 0,6837 | kW | ręczne sterowanie dopływem ciepła ze spreżeniem zwrotnym temperatury w pomieszczeniu i/lub na zewnątrz | NIE |
| Maksymalna ciągła moc cieplna | P_max,c | 1,3831 | kW | elektroniczna regulacja dopływu ciepła ze spreżeniem zwrotnym temperatury w pomieszczeniu i/lub na zewnątrz | NIE |
| Dodatkowe zużycie energii elektrycznej | moc cieplna wspomagana przez wentylator | NIE | |||
| Przy nominalnej mocy cieplnej | eI_max | 0 | kW | Typ mocy cieplnej/temperatury w pomieszczeniu (wybrać jeden) | |
| Przy minimalnej mocy cieplnej | eI_min | 0 | kW | jednostopniowa moc cieplna bez regu-lacji temperatury w pomieszczeniu | NIE |
| W trybie czu-wania | eI_SB | 0,00039 | kW | dwa lub więcej stopni regulacji ręcznej, bez regulacji temperatury w pomieszc-zeniu | NIE |
| z mechaniczną regulacją temperatury w pomieszczeniu za pomocą termostatu | NIE | ||||
| z elektroniczną regulacją temperatury w pomieszczeniu | NIE | ||||
| elektroniczna regulacja temperatury w pomieszczeniu oraz programator dzienny | NIE | ||||
| elektroniczna regulacja temperatury w pomieszczeniu oraz programator tygodniowy | TAK | ||||
| Inne opcje sterowania (można wybrać kilka) | |||||
| regulacja temperatury w pomieszczeniu z funkcją wykrywania obecności | NIE | ||||
| regulacja temperatury w pomieszczeniu z funkcją wykrywania otwartego okna | TAK | ||||
| z opcją zdalnego sterowania | NIE | ||||
| z adaptacyjną kontrolą startu | NIE | ||||
| z ograniczeniem czasu pracy | NIE | ||||
| z czujnikiem przepalenia żarówki | NIE | ||||
| Dane kontak-towe | Producent: CladSwiss AG, Bahnhofstrasse 27, 6300 Zug, Szwajcaria. E-mail: info@cladswiss.com | ||||
| Identyfikator(y) modelu: ECH/AT-2000 3AE EEC | |||||
| Nazwa | Symbol | Wartość | Unit | Nazwa | Jednostka |
| Moc cieplna | Typ dopływu ciepła tylko dla lokalnych grzejników (wybrać jeden) | ||||
| Nominalna moc cieplna | P_nom | 1,8546 | kW | ręczne sterowanie dopływem ciepła, ze zintegrowanym termostatem | NIE |
| Minimalna moc cieplna (orientacyjna) | P_min | 0,9313 | kW | ręczne sterowanie dopływem ciepła ze sprężeniem zwrotnym temperatury w pomieszczeniu i/lub na zewnątrz | NIE |
| Maksymalna ciągła moc cieplna | P_max,c | 1,8546 | kW | elektroniczna regulacja dopływu ciepła ze sprężeniem zwrotnym temperatury w pomieszczeniu i/lub na zewnątrz | NIE |
| Dodatkowe zużycie energii elektrycznej | moc cieplna wspomagana przez wentylator | NIE | |||
| Przy nominalnej mocy cieplnej | eI_max | 0 | kW | Typ mocy cieplnej/temperatury w pomieszczeniu (wybrać jeden) | |
| Przy minimalnej mocy cieplnej | eI_min | 0 | kW | jednostopniowa moc cieplna bez regu-lacji temperatury w pomieszczeniu | NIE |
| W trybie czu-wania | eI_SB | 0,00039 | kW | dwa lub więcej stopni regulacji ręcznej, bez regulacji temperatury w pomieszc-zeniu | NIE |
| z mechaniczną regulacją temperatury w pomieszczeniu za pomocą termostatu | NIE | ||||
| z elektroniczną regulacją temperatury w pomieszczeniu | NIE | ||||
| elektroniczna regulacja temperatury w pomieszczeniu oraz programator dzienny | NIE | ||||
| elektroniczna regulacja temperatury w pomieszczeniu oraz programator tygodniowy | TAK | ||||
| Inne opcje sterowania (można wybrać kilka) | |||||
| regulacja temperatury w pomieszczeniu z funkcją wykrywania obecności | NIE | ||||
| regulacja temperatury w pomieszczeniu z funkcją wykrywania otwartego okna | TAK | ||||
| z opcją zdalnego sterowania | NIE | ||||
| z adaptacyjną kontrolą startu | NIE | ||||
| z ograniczeniem czasu pracy | NIE | ||||
| z czujnikiem przepalenia żarówki | NIE | ||||
| Dane kontak-towe | Producent: CladSwiss AG, Bahnhofstrasse 27, 6300 Zug, Szwajcaria. E-mail: info@cladswiss.com | ||||
CONTINUT
- INTRODUCERE 35
- REGULILE DE SECURITATE....35
- SCOPUL DISPOZITIVULUI 35
- FORMA GENERALĂ A DISPOZITIVULUI....35
- PROIECTAREA BLOCULUI DE CONTROL 35
- SENSUL PICTOGRAMELOR DE PE DISPLAY 36
- PORNIREA DISPOZITIVULUI....36
- MODURI DE LUCRU SI FUNCTII 36
- MODURI DE PUTERE DE ÎNCĂLZIRE 36
- FUNCTIA PROGRAMME 36
- OPRIREA APARATULUI 37
- CONTROLUL DISPOZITIVULUI 37
- INSTALAREA DISPOZITIVULUI 38
- INGRUIRE 39
- CĂUTAREA DEFECTIUNILOR....39
- CARACTERISTICI TEHNICE....39
- ECHIPAMENT 39
- RECICLAREA....39
- OBLIGATII DE GARANTIE 39
- DATA DE FABRICATIE 40
NE GÂNDIM LA DVS
Vă multumim pentru că ați achiziționat dispozitivul Eletrolux. Ați ales produsul bazat pe zeci de ani de experiență profesională și de inovații. Unic și elegant, produsul a fost proiectat cu grijă pentru dvs. De aceea, oricând nu veți utiliza produsul, puteți fi sigur, că rezultate vor fi întotdeauna excelente. Bine ați venit la Electrolux!
Pe site-ul nostru puteți găsi:

Puteți găsi recomandări privind utilizarea produselor, instrucțiuni de exploatare, informații privind asistența tehnică la adresa: http://www.home-comfort.com/support/

Achiziționați produsul în orașul dvs: http://www.home-comfort.com/search/find-a-store/

La vânzarea echipamentului vânzătorul trebuie să completeze capitolul "Detaliile produsului", care se găsește pe partea interioară a copertii posterioare a prezentelor instructiuni de utilizare.

Marcările folosite

Atenție/Informații importante de tehnică a securității

Informații generale și recomandări
Întreținerea de garanție se efectuează în conformitate cu condițiile prezentate în secțiunea „Obligații de garanție”.
Remarcă:
În textul prezentelor instrucțiuni de exploatare, convectorul electric poate avea următoarele denumiri tehnice precum, produs, dispozitiv, aparat etc.
Acest dispozitiv este potrivit numai pentru încăperi bine izolate sau pentru utilizare ocazională.
Introducere
Vă rugăm să citiți cu atenție și să executați cu severitate cerințele, care sunt conținute în prezentele instrucțiuni de exploatare. Păstrați manualul și documentele, care confirmă data achiziționării aparatului într-un loc sigur, pentru ca, în viitor să le puteți găsi cu ușurință și să le puteți folosi.
Aparatul este destinat pentru încălzirea aerului în încăperile casnice.
Regulile de securitate

Atentie!
Cerințele, nerespectarea cărora pot cauza traume grave sau defectarea serioasă a echipamentului.
Când utilizati dispozitivul, respectați regulile generale de siguranță în timpul utilizării dispozitivului electric. Nerespectarea regulilor de siguranță și instrucțiunii poate duce la șoc electric, incendiu și/sau vătămări grave. Înainte de a utiliză aparatul, citiți cu atenție următoarele reguli de siguranță:
- Când încălzitorul este pornit pentru prima dată, poate apărea un miros caracteristic de fum din cauza arderii uleiului în elementele de încălzire. Se recomandă, înainte de instalare, să porniți încălzitorul timp de 10-20 de minute într-o încăpere bine ventilată.
- Orice aparat electric trebuie supravegheat, mai ales dacă există copii în apropiere. Asigurați-vă că copiii nu ating dispozitivul cu mâinile.
- Nu folosiți un convector care este deteriorări și/ sau un cablu de rețea deteriorat sau cu uzură.
- Cablul de rețea trebuie poziționat astfel, încât să nu fie călcat, șters, rupt, supus altor daune.
- Nu permiteți obiecte sau lichide străine să intre în dispozitiv.
- Poziționați întotdeauna aparatul astfel încât materialele inflamabile (de exemplu, perdelele) să nu fie aprinse.
- Asigurați-vă că nimic nu blochează conductele de intrare și de ieșire. Pentru a evita incendiul, nu puneți haine sau alte obiecte pe dispozitiv.
- Asigurați-vă că corpul dispozitivului și elementul lui de încălzire s-au răcit înainte ca dispozitivul să fie demontat și pus în ambalaj pentru depozitare pe termen lung.
- Nu folosiți dispozitivul în spații deschise înfara încăperii.
- Asigurați-vă că tensiunea de rețea corespunde tensiunii indicate pe eticheta dispozitivului.
- Nu încercați să reparați singuri dispozitivul. Contactați vânzătorul.
- Deconectați aparatul de la rețea atunci când nu se folosește și înainte de curățare.
Forma generală a dispozitivului

Fig 1.
- Bloc de control
- Orificiile de ventilatie de intrare
- Orificiile de ventilație de ieșire
- Sasiu pentru instalare pe podea (furnizat separat)
Proiectarea blocului de control

Figure 2 Bloc de control
- Panoul de comandă.
- Dispozitivul de fixare a modulului de control.

Fig. 2 Panoul de control
- Afişaj cu LED-uri.
- Buton pentru a mări ținta temperatura.
- Buton de pornire/oprire + comutarea între modurile Comfort, Eco, Anti-frost.
- Buton pentru activarea/dezactivarea funcției de deschidere a ferestrei.
- Buton pentru reducerea obiectivului. Buton pentru reducerea temperaturii tintă.
Marcaj indicator pe afişajul LED

- Indicarea puterii de încălzire actuale a elementului de încălzire:
- plin - sunt aprinse două bare;
- jumătate - o bară este aprinsă.
- Afișarea temperaturii tintă și a erorilor. Afișarea temperaturii tintă și a erorilor.
- Starea conexiunii Wi-Fi.
- Indicarea funcției Open Window (Fereastră deschisă).
- Indicarea funcționării convectorului:
- aprins în roșu - convectorul este pornit;
- nu este aprins - convectorul este oprit.
- Indicarea modului actual de încălzire:
- Comfort - portocaliu;
- Eco - verde;
- Anti-frost - albastru.
- Afisarea stării de funcționare a elementului de încălzire micathermică*.
Pornirea dispozitivului
Apăsați butonul de pornire/oprire Ⓞ- a încălzitorului pentru a comuta aparatul în modul de funcționare.
Faceți clic pe buton ⏻ pentru a porni aparatul. Temperatura, fabrica instalată este +24 °C.
Setarea puterii de încălzire
Pentru a comuta elementul de încălzire la jumătate de putere a elementului de încălzire, apăsați simultan tastele și timp de 2 secunde. Se aprinde o bară - jumătate din puterea de încălzire. Pentru a porni la putere maximă, apăsați simultan tastele și timp de 2 secunde. Se aprind două bare - putere maximă de încălzire.
Moduri de lucru și funcții
Există 3 moduri de funcționare a temperaturii disponibile pentru reglare:
Comfort - variază între 10 °C și 35 °C.
Eco- variază de la Comfort de la 3 °C la 7 °C.
Anti-Frost- variază între 3 °C și 7 °C
Controlați temperatura țintă de încălzire
- Pentru a crește valoarea temperaturii țintă, utilizati butonul.
- Pentru a micșora valoarea temperaturii tintă, utilizati butonul.
Pasul de comutare este de 1 grad.
Funcția "Fereastră deschisă"
Când această funcție este activă, atunci în timpul scăderii temperaturii în 10 minute (și apoi până la 30 de minute) cu 5 sau mai multe grade, modul Anti-Frost este activat pe încălzitor. Dacă în interval de timp de 10-30 minute, temperatura continuă să scadă, dispozitivul se oprește. În plus, încălzitorul așteaptă stabilizarea scăderii temperaturii camerei, dacă aceasta crește cu 2 grade, atunci ultimul mod setat este pornit.
Pentru a activa/dezactiva funcția funcția de deschidere a ferestreii, apăsați tasta o dată.
Funcția "De control parental"
Pentru a activa/dezactiva blocarea panoului de control, apăsați simultan butoanele și timp de 12 secunde.
Funcția "Auto Restart Resume"
În cazul unei întreruperi a energiei pe termen scurt, apoi la pornirea acestuia, convectorul trece automat la modul de funcționare, menținând totodată ultimul mod de operare al dispozitivului și temperatura setată (dacă a fost setat un cronometru, timpul de oprire setat este economisit). Dacă dispozitivul era în regim de așteptare la momentul opririi alimentării, atunci când refacerea alimentării cu energie electrică va fi valabilă în același mod.
Funcție de protectție la supraîncălzire
Aparatul este echipat cu un comutator automat care este activat atunci când atingerea limitei de temperatură este superioară. Încălzitorul se oprește automat în caz de supraîncălzire. După eliminarea sursei de supraîncălzire, încălzitorul se va aprinde automat.
Oprirea aparatului
Pentru a opri dispozitivul, apăsați butonul ☐ în orice mod de operare.
Controlul dispozitivului
Pregătirea pentru funcționare
- Scoateți cu grijă încălzitorul din cutia de carton.
- Îndepărtați autocolantele colorate din panoul frontal înainte de utilizare.
- La prima pornire, poate apărea un miros care va dispărea după ce convectorul va începe să funcționeze.
- Fixați dispozitivul într-o poziție stabilă conform instructiunilor de montaj și instalare.
- După instalarea convectorului, conectați-l la o priză.
- Nu este recomandat să utilizați aceeași priză electrică pentru a conecta simultan un încălzitor și un alt aparat electric de mare putere.
Modul de împerechere Wi-Fii
Pentru a pune modulul Wi-Fi în Modul de împerechere, apăsați simultan butoanele și timp de 2 secunde. Pictograma Wi-Fi va începe să clipească o dată pe secundă. În cazul în care conexiunea este reușită, se afișează Pictograma Wi-Fi va începe să se aprindă în mod constant.
Starea Wi-Fi:
- Pictograma nu este aprinsă - dispozitivul nu este conectat;
- Pictograma clipește - modul de împerechere;
- Pictograma se aprinde - dispozitivul este conectat.
Instalarea dispozitivului
Instalare recomandată
Convectorul trebuie fixat în conformitate cu reglementările. Comutatorul și alte mecanisme trebuie să se afle departe de stropirea apei. Este strict interzis să acoperiți sau să introduceți prizele de aer sau ieșirile (gratiile), din cauza riscului de accident sau de deteriorare a dispozitivului. Nu așezați în spatele perdelelor, ușilor, ventilelor de perete sau de aer. Respectați distanțele minime de instalare pe podele, suprafețe, mobilier etc.

Figure 5
1. Optiune de montare pe perete (braț de fixare și şablon de montare inclus)
Instalați încălzitorul pe perete folosind brațele de fixare conform imaginilor de mai jos. Distanța de la dispozitiv până la podea și obiectele din jur nu trebuie să fie mai puțin de 10 cm (Figure 5).
Pentru a instala brațele de fixare pe perete, urmați acești pași:
- Ataşati şablonul de montare pe peretele în care intenționați să plasați convectorul.
• Marcați și faceți găuri. - Puneti suportul pe perete și fixați-l cu elementele de fixare.
Fixați dispozitivul pe suport după cum urmează (Figure 6):
- Puneti pe brațele de fixare partea inferioară a convectorului folosind găuri speciale, situate în partea de jos a convectorului.
- Puneti partea superioară a convectorului pe brațele de fixare, fixându-l cu clanța pe elementele de fixare.

Figure 6

natural_image
Technical line drawing of a mechanical assembly inside a circular frame (no text or symbols)Figure 7
Folosind șasiul, după studierea anterioară a schemelor de montare (Figure 7), instalați dispozitivul pe podea:
- Întoarceți cu atenție convectorul cu partea de jos în sus.
- Luați unul dintre șasiu și atașați-l la zona de aterizare din partea dreaptă sau stângă a convectorului, astfel încât să se potrivească perfect la corpul convectorului. Gaura șurubului trebuie să se potrivească.
- Asigurați șasiul folosind suportul special care este inclus în pachet.
- Repetați același lucru pentru fixarea celui de-al doilea șasiu.

2. Instalarea pe podea
Căutarea defectiunilor
| Indiciul de defectiune | Cauza defectiunii | Paşii pentru eliminarea defectiunii |
| Nu-i încălzire | 1) Nu există alimentare.2) Convectorul este în regim de așteptare.3) Temperatura reală a camerei este mai mare decât setarea termostatului | 1) Stabiliți o conexiune fiabilă.2) Setați convectorul în modul de operare.3) Setați modul de temperatură al convecției |
| Miroase a praf ars la prima pornire | Nu este o defectiune | Mirosul dispare după câteva minute de funcționare a convectorului |
Dacă după toate încercările de eliminare a defectiunilor, problema nu este rezolvată, contactați un autorizat în centru de servicii din zona Dumneavoastră sau un representant de vânzări.
Caracteristici tehnice
| Model | ECH/AT-15003AE EEC | ECH/AT-17003AE EEC | ECH/AT-20003AE EEC |
| Putere, W | 1350-1500 | 1500-1700 | 1800-2000 |
| Curent nominal, A | 6,14-6,25 | 6,82-7,08 | 8,18-8,33 |
| Tensiune nominală, ~V/Hz | ~220-240/50-60 | ~220-240/50-60 | ~220-240/50-60 |
| Protecția împotriva prafului și a umidității | IP24 | IP24 | IP24 |
| Clasa de protecție electrică | I | I | I |
| Zona de încălzire, m^2 | 13-15 | 15-17 | 18-20 |
| Dimensiunea aparatului (L×H×D), mm | 560×420×120 | 640×420×120 | 800×420×120 |
| Dimensiunea ambalajului (L×H×D), mm | 655×445×153 | 735×445×153 | 895×445×153 |
| Greutate netă, kg | 4,028 | 4,514 | 5,51 |
| Greutate brută, kg | 5,074 | 5,626 | 6,798 |
* Indicat este o valoare orientativă și poate diferi în funcție de condițiile reale de utilizare.
Convectorul este furnizat cu un autocolant pe panoul frontal. Îndepărtați-o înainte de a utiliză dispozitivul.
Îngrijire
Convectorul nu necesità nicio întreținere specială. Înainte de a repara (îngriji), convectorul trebuie deconectat de la sursa de alimentare. Corpul dispozitivului trebuie șters periodic cu o cârpă moale, fără scame sau cu un burete umed. Nu folosiți niciodată detergenți abrazivi, spumante sau solventi. Este destul de ușor să curățați spațiul din spatele încălzitorului montat pe perete. Apăsați în jos pe cele două clanțe de pe spatele încălzitorului și trageți încălzitorul înainte. După ce este îndepărtat, puteți spăla peretele pe care a fost instalat. După terminarea curățării, puneți încălzitorul în poziția normală de funcțiune.
Temperatura și umiditatea interioară recomandate: a) pentru funcționarea convectorului: de la -25°C la + 30°C, umiditatea de la 40% la 90%; b) pentru depozitarea convectorului: de la -20°C la + 80°C, umiditatea de la 40% la 90%.
Eliminarea defectiunilor
Afişaj de eroare
E1 – Defecțiune a senzorului de temperatură;
E2 - Scurtcircuit pe canalul senzorului de temperatură;
E3 - Senzorul de temperatură s-a supraîncâlzit.
Temperatura actuală a depășit +48 °C;
E4 - Temperatura ambiantă
Temperatura ambiantă a scăzut sub temperatura de
functionare admisă a unității (sub -26 °C).
Echipament
- Încălzitor electric
- Brațe de fixare pe perete
- Sablon de montare
- Un set de elemente de fixare
- Ghid de exploatare
- Set şasiu cu roți
Depozitarea aparatului
Asigurați-vă că încălzitorul este rece înainte de a-l depozita.
Este recomandat să curățați încălzitorul și să îl depozitați (de preferință în ambalajul original) întrun loc uscat și rece dacă intenționați să nu utilizați dispozitivul pentru o perioadă lungă de timp.
Reciclarea

Dispozitivul a cărui perioadă de utilizare a expirat nu poate fi reciclat împreună cu deșeurile casnice (2012/19/EU).
Obligații de garanție
Întreținerea de garanție se efectuează în conformitate cu condițiile prezentate în secțiunea
"Obligații de garanție".
Garantia:
- Perioada de garanție pentru produs este de doi ani de la data achiziței. Dacă în decursul acestei perioade de garanție de doi ani vor apărea anumite defecțiuni cauzate de lipsurile materialelor și/sau fabricației, produsul va fi reparat sau înlocuit.
- Reparațiile gratuite sau înlocuirea gratuită sunt posibile numai dacă sunt furnizate dovezi convingătoare, de exemplu, o chitanță care confirmă că ziua în care se solicită întreținerea tehnică, se află în decursul perioadei de garanție.
- Garanția nu acoperă produsele și/sau părțile produsului care sunt supuse uzurii, care pot fi considerate consumabile conform naturii lor sau care sunt fabricate din sticlă.
- Garanția nu este valabilă dacă defectul este cauzat de o deteriorare cauzată de o utilizare necorespunzătoare, de o întreținere deficitară (de exemplu, defectiunea a apărut din cauza intrării unor obiecte străine sau contactului cu lichide) sau dacă au s-au efectuat modificări sau reparații de către persoane neautorizate de Producător.
- Pentru utilizarea corectă a produsului, utilizatorul trebuie să respecte cu strictețe toate instrucțiunile incluse în manualul de utilizare și trebuie să se abțină de la orice acțiune sau manipulare care este descrisă ca nedorită sau care este indicată în manualul de utilizare.
- Aceste limitări de garanție nu afectează drepturile dumneavoastră legale.
Asistenta:
Asistența în perioada de garanție și după expirarea ei poate fi primită în toate țările, unde produsul este distribuit oficial. Adresați-vă vânzătorului pentru asistență.
Data de fabricație
Data de fabricație este indicată pe autocolantul de pe corpul produsului și este, de asemenea, criptată în Codul 128.
Data de fabricație se stabilește după cum urmează:
SN

luna și anul de fabricație
Nu îndepăratați și urmăriți integritatea numărului de serie pe aparat. Pierderea sau deteriorarea etichetei cu numărul seriei nu va permite în caz de nevoie, reînnoirea datei fabricației.
Importator
Producător: CladSwiss AG,
Bahnhofstrasse 27, 6300 Zug, Elvetia.
E-mail: info@cladswiss.com
Fabricat in China.
Electrolux este o marcă înregistrată folosită sub licența AB Electrolux (publ.).
Producătorul își rezervă dreptul să modifice constructia și caracteristicile dispozitivului.
Textul și desemnările digitale/numerice din manualul de instrucțiuni pot conține erori tehnice și erori de tipărire. Modificările specificațiilor tehnice și a asortimentului se pot realiza fără o notificare prealabilă.
Sunt admise erori și greșeli de scriere în texte și desemnări numerice.
Design-ul și datele tehnice ale dispozitivului pot diferi de cele prezentate pe ambalaj.
Vă rugăm să contactați consultantul de vânzări pentru a primi informații detaliate.
| Cerintele informationale fată de încălzitoarele electrice cu ulei | |||||
| Identificatorul(ii) modelului: ECH/AT-1500 3AE EEC | |||||
| Necesar | Simbolul | Valoarea | U.M. | Necesar | U.M. |
| Puterea termică | Tipul administrării căldurii, numai pentru aerotermele cu accumulator electric (select one) | ||||
| Nominal heat output | P_nom | 1,3831 | kW | reglarea manuală a sarcinii termice, cu termastatul încorporat | NU |
| Minimum heat output (indica-tive) | P_min | 0,6837 | kW | reglarea manuală a sarcinii termice, cu feedback-ul temperaturii în încăpere și/sau în exterior | NU |
| Maximum con-tinuous heat output | P_max,c | 1,3831 | kW | comanda electronică a sarcinii termice în încăpere și/sau în exterior | NU |
| Consumul suplimentar de energie electrică | puterea termică cu ajutorul ventilatorului | ||||
| La puterea termică nominală | el_max | 0 | kW | Tipul cedării de căldură/controlului temperaturii cam-erei (selectati unul) | |
| La puterea termică minimă | el_min | 0 | kW | cedarea căldurii într-o treaptă și absenta controlului temperaturii camerei | NU |
| În regim de asteptare | el_ss | 0,00039 | kW | Încă două stări manuale fără controlarea temperaturii camerei | NU |
| cu termostat mecanic pentru controlarea temperaturii camerei | NU | ||||
| cu control electronic a temperaturii în încăpere | NU | ||||
| control electronic a temperaturii în încăpere plus temporizator zilnic | NU | ||||
| control electronic a temperaturii în încăpere plus temporizator săptămânal | DA | ||||
| Alte variante de comandă (sunt posibile câteva variante) | |||||
| controlul temperaturii în încăpere; cu de-tectarea prezenței | NU | ||||
| controlul temperaturii în încăpere; cu fereastra deschisă | DA | ||||
| cu optiunea comenzii de la distantă | NU | ||||
| cu control adaptiv a pornirii | NU | ||||
| cu limitarea timpului de lucru | NU | ||||
| cu sensorul beculetului | NU | ||||
| Informatii de contact: | Producător: CladSwiss AG, Bahnhofstrasse 27, 6300 Zug, Elveția.E-mail: info@cladswiss.com | ||||
| Identificatorul(ii) modelului: ECH/AT-2000 3AE EEC | |||||
| Necesar | Simbolul | Valoarea | U.M. | Necesar | U.M. |
| Puterea termică | Tipul administrării căldurii, numai pentru aerotermele cu accumulator electric (select one) | ||||
| Nominal heat output | P_nom | 1,8546 | kW | reglarea manuală a sarcinii termice, cu termastatul încorporat | NU |
| Minimum heat output (indica-tive) | P_min | 0,9313 | kW | reglarea manuală a sarcinii termice, cu feedback-ul temperaturii în încăpere și/sau în exterior | NU |
| Maximum con-tinuous heat output | P_max,c | 1,8546 | kW | comanda electronică a sarcinii termice în încăpere și/sau în exterior | NU |
| Consumul suplimentar de energie electrică | puterea termică cu ajutorul ventilatorului | ||||
| La puterea termică nominală | el_max | 0 | kW | Tipul cedării de căldură/controlului temperaturii cam-erei (selectati unul) | |
| La puterea termică minimă | el_min | 0 | kW | cedarea căldurii într-o treaptă și absenta controlului temperaturii camerei | NU |
| În regim de asteptare | el_ss | 0,00039 | kW | Încă două stări manuale fără controlarea temperaturii camerei | NU |
| cu termostat mecanic pentru controlarea temperaturii camerei | NU | ||||
| cu control electronic a temperaturii în încăpere | NU | ||||
| control electronic a temperaturii în încăpere plus temporizator zilnic | NU | ||||
| control electronic a temperaturii în încăpere plus temporizator săptămânal | DA | ||||
| Alte variante de comandă (sunt posibile câteva variante) | |||||
| controlul temperaturii în încăpere; cu de- tectarea prezenței | NU | ||||
| controlul temperaturii în încăpere; cu fereastra deschisă | DA | ||||
| cu optiunea comenzii de la distantă | NU | ||||
| cu control adaptiv a pornirii | NU | ||||
| cu limitarea timpului de lucru | NU | ||||
| cu sensorul beculetului | NU | ||||
| Informatii de contact: | Producător: CladSwiss AG, Bahnhofstrasse 27, 6300 Zug, Elveția.E-mail: info@cladswiss.com | ||||
www.home-comfort.com
www.home-comfort.com
You can get additional information about this and other products directly from the Seller or through our information lines:
Contact us «CladSwiss»
Switzerland, 6300 Zug, Bahnhofstrasse 27.
About the equipment purchase and cooperation:
Tel: +41 41 532 50 00
E-mail: info@cladswiss.com
For technical and service issues:
Tel. +41 41 532 50 01
E-mail: service@cladswiss.com
Internet address: http://www.home-comfort.com
Product Details (populated upon sale) · Detajet e produktit (të populluara pas shitjes)
- Szczegóły produktu (wypełniane w momencie sprzedaży) · Informații despre articol (se completează la vânzare) · Информация за продукта (попълва се при продажба)
- Informace o produktu (vyplni se pri prodeji) - Információ az áruról (eladáskor kitöltendő)
- Detalji o proizvodu (popunjeni prilikom prodaje) · Podaci o proizvodu (popunjava se prilikom prodaje) · Informacije o izdelku (izpolnite ga ob prodaji) · Informácie o produkte (vyplni sa pri predaji) · Информации за производот (што треба да се пополнат кога производот се продава) · Плпрофорíес για το προϊόν (va συμπληρωθούν κατά την πώληση)
Model · Modelul · Модел
• Modell • Movtélo
Serial number · Numër serik · Serijski broj
- Numer seryjny · Numárul seriei · Сериен номер · Sériové číslo · Sorozatszám
- Serijska številka - Сериски број
- Σειριακός αριθμός
Date of sale · Data e shitjes · Datum prodaje
- Data sprzedaży - Data vânzării
• Дата на продажба • Datum prodeje - Az eladás dátuma · Dátum predaja · Датум на продажба · Нμερομηνία πώλησης
Seller Seal · Vula e shitësit · Pečat prodavača
- Pieczęć sprzedawcy - Štampila vânzătorului
• Печат на продавача • Prodejce Seal - Az eladó pecsétje - Pečat prodavca
- Žig prodajalca · Pečiatka predajcu
• Печатот на продавачот • Пшлтніс Σφραγίδα
www.home-comfort.com


Electrolux is a registered trademark used under license from AB Electrolux (publ.).
This manual may contain technical and typing errors. Changes to technical characteristics and assortment are subject to change without notice.



RoHS IP24

- Fill your life with comfort
- www.home-comfort.com
- CONTENT
- WE THINK ABOUT YOU
- Note:
- Introduction
- Safety regulations
- Caution!
- General view of the device
- Control unit device
- Indicators designation on LED display
- Turning on the device
- Heating power setting
- Operating modes and functions
- Control the target heating temperature
- "Open window" function
- "Parental control" function
- "Auto Restart Resume" function
- "Overheating protection" function
- Switching off the appliance
- Device control
- Preparation for work
- Wi-Fi Pairing Mode
- Wi-Fi statuses:
- Installation of the device
- Recommended installation
- Wall mounted installation option (bracket and mounting template included)
- www.home-comfort.com
- Floor installation
- Care
- Troubleshooting
- Completing units
- Storing the appliance
- Recycling
- Warranty
- Warranty:
- Support:
- Date of manufacture
- SN
- Importer:
- PERMBAJTJE
- NE MENDOJMË PËR JU
- Shënim:
- Hyrje
- Rregullat e sigurisë
- Vëmendje!
- Pamja e përgjithshme e pajisjes
- Blloku i kontrollit
- Ndizni pajisjen
- Vendosja e fuqisë së ngrohjes
- Regjimet të punës dhe funksionet
- Kontrolli i synuar i temperaturës së ngrohjes
- Funksioni "Dritare e hapur"
- Funksioni "Kontrolli prindëror"
- Funksioni i "Auto Restart Resume"
- Funksioni i "Mbrojtjes nga mbinxehja"
- Fikje e pajisjes
- Përdorimi i pajisjes
- Fillimi
- Modaliteti i çiftimit WiFi
- Statuset Wi-Fi:
- Instalimi dhe montimi
- Montimi i rekomanduar
- Opsioni i montimit në mur (kllapa dhe modeli i montimit të përfshirë)
- Instalimi në dysheme
- Mirëmbajtja
- Zgjidhja e problemeve
- Përmbajtja e Paketimit
- Ruajtje e pajisjes
- Riciklimi
- Detyrimet e garancisë
- Garancia:
- Mbështetje:
- Data e prodhimit
- Importues:
- ZAWARTOŚĆ
- MYŚLIMY O WAS
- Uwaga:
- Wstęp
- Zasady bezpieczeństwa
- Uwaga!
- Urzqdzenie jednostki sterującej
- Oznaczenie wskaźnika na wyświetlaczu LED
- Włączanie urządzenia
- Ustawianie mocy grzewczej
- Tryby pracy i funkcje
- Regulacja docelowej temperatury ogrzewania
- Funkcja "Otwarte okno"
- Funkcja "Kontroli rodzicielskiej"
- Funkcja "Auto Restart Resume"
- Funkcja "Ochrony przed przegrzaniem"
- Wyłączanie urządzenia
- Sterowanie urządzeniem
- Przygotowanie do pracy
- Tryb parowania Wi-Fi
- Montaż urządzenia
- Zalecana instalacja
- Montaż ścienny (uchwyt i instalacji szablon w zestawie)
- Instalacja na podłodze
- Obstuga
- Rozwiązywanie problemów
- Kompletowanie
- Przechowywanie urządzenia
- Utylizacja
- Gwarancja
- Gwarancja:
- Wsparcie:
- Data produkcji
- CONTINUT
- NE GÂNDIM LA DVS
- Pe site-ul nostru puteți găsi:
- Marcările folosite
- Remarcă:
- Introducere
- Regulile de securitate
- Atentie!
- Pornirea dispozitivului
- Setarea puterii de încălzire
- Moduri de lucru și funcții
- Controlați temperatura țintă de încălzire
- Funcția "Fereastră deschisă"
- Funcția "De control parental"
- Funcția "Auto Restart Resume"
- Funcție de protectție la supraîncălzire
- Oprirea aparatului
- Controlul dispozitivului
- Pregătirea pentru funcționare
- Modul de împerechere Wi-Fii
- Starea Wi-Fi:
- Instalarea dispozitivului
- Instalare recomandată
- Optiune de montare pe perete (braț de fixare și şablon de montare inclus)
- Instalarea pe podea
- Convectorul este furnizat cu un autocolant pe panoul frontal. Îndepărtați-o înainte de a utiliză dispozitivul.
- Îngrijire
- Eliminarea defectiunilor
- Afişaj de eroare
- Echipament
- Depozitarea aparatului
- Reciclarea
- Obligații de garanție
- Garantia:
- Asistenta:
- Data de fabricație
- Importator
Mærke : ELECTROLUX
Model : ECH/AT-2000 3AE EEC
Kategori : Varmeapparat