OR-WIZ-1109 - Dørklokke ORNO - Gratis brugsanvisning og manual
Find enhedens vejledning gratis OR-WIZ-1109 ORNO i PDF-format.

Brugerspørgsmål om OR-WIZ-1109 ORNO
0 spørgsmål om dette apparat. Besvar dem du kender, eller stil dit eget.
Stil et nyt spørgsmål om dette apparat
Download vejledningen til din Dørklokke i PDF-format gratis! Find din vejledning OR-WIZ-1109 - ORNO og tag din elektroniske enhed tilbage i hånden. På denne side er alle dokumenter nødvendige for brugen af din enhed offentliggjort. OR-WIZ-1109 af mærket ORNO.
BRUGSANVISNING OR-WIZ-1109 ORNO
ELEKTRONICZNY WIZJER DO DRZWI Z FUNKCJA
NAGRYWANIA, CZUJNIKIEM RUCHU ORAZ WIFI TUYA
INSTRUKCJA OBSŁUGI I MONTAŻU
(PL) UWAGI / WSKAZÓWKI
Zanim przystąpisz do montażu i użytkowania urządzenia prosimy o dokładnie zapoznanie się z niniejszą instrukcją obsługi. W razie jakichkołówiek problemów ze zrozumieniem jej treści prosimy o skontaktowanie się ze sprzedawca urządzenia.
Producent nie odpowiada za uszkodzenia mogące wyniknąć z nieprawidłowego montażu oraz z dokonywania samodzielnych napraw i modyfikacji.
Uszkodzenia wynikające z błędnego podłączenia nie podlegają naprawie z tytułu gwarancji!
Z uwagi na fakti, że deze techniczne podiegają ciągłym modyfikacmon. Producent zastrzega sobie prawo do dokonywania zmian dotyczących charakterystyki wyrobu oraz wprowadzania innych Ceramician konstrukcyjnych niepogarszących parametrów i walorów użytkowych produktu. Dodatkowe informacje na temat produktów marki ONRO dostępne są na, www.support.orno.pl, Ormo-Logistic Sp. z o.o. nie ponosi odpowiedzialności za skutki wynikające z nieprzestrzegania zalećen niniejszej instrukcji. Firma Ormo-Logistic Sp. z o.o. z zastrzega sobie prawo do wprowadzania zmian w instrukcji - aktualna wonja 日 porbania ze strony www.support.orno.pl. Wsetelke prawa do ilumaczenia/interpretowania oraz prawa autorskie niniejszej instrukcji są zastrzezone
Charaktorystyka
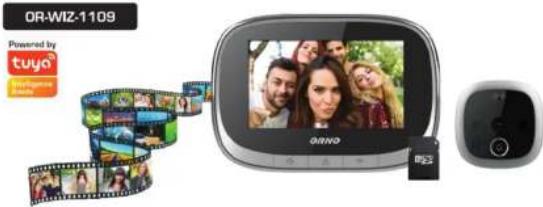
Urządzenie do podgładu osoby odwiedzającej, stojącej bezpośrednio przed drzwiami, zastępuje tradycyjny wizjer optyczny (judasz). Dzięki współpracy z aplikacją Tuya Smart urządzenie pozwala na podgląd osób stojących przed drzwiami przez telefon.
Zalety urządzenia:
- łatwy montaż i obsługa;
- szerokokatna kamera
- kolorowy ekran LCD o przekątnej 4,3";
- funkcja nagrywania plików foto i wideo na kartę pamięci Micro SD (brak w zestawie);
- oświetlenie podczerwienią umożliwia widzenie w nocy;
- przycisk dzwonka z 10-stopniową regulacją jego głośności;
- czujnik ruchu wbudowany w wizjer,
- wizjer zasilany z wbudowanego akumulatora, ładowany przez port micro USB (brak zasilacza w zestawie), - sieć WiFi 2,4GHz, współpracuje z aplikacją Tuya Smart.
Dane techniczne
Wyświetlacz: kolorowy 4,3" TFT
Kat widzenia kamery: pion 45°, poziom 77°
Zasilanie: bateria litowo-polimerowa 3.7V DC, 3500mAh
Gniazdo Micro USB: 5V DC, 1A
Karta pamięci: Micro SD, maks. 128 GB (brak w zestawie)
Standard Wi-Fi: 802.11 b/g/n
Częstotliwość Wi-Fi: 2.4GHz
Maksymalna moc czestotliwości radiowej nadainika: <10mW
Zakres grubości drzwi: 35-100 mm
Średnica otworu montażowego: ∅14-35mm
Grecunka otwera montazowege: 214-35m Wymiany wiziera (kampu): 61x61x13mm
Wymiary Wijzjera (karnery). 01x012 Wymiary monitors: 141x97x22mg
Wynnary monitora: 1 Waga netto: 0.290 kg
-
Wyświełącz LCD
-
Przycisk RESET
-
Port ladowania akumulatora (microUSB)
-
Slot na kartę Micro SO
-
Lewy klawisz/Przywracanie ustawien fabrycznych
-
Podład/Włacz-Włacz
-
Prawy klawisz/Przycisk
-
May, 2023. July, 2024
-0.3-
Instrukcja montażu
-
Dobierz odpowiednią śrubę montażową, zgodnie z grubością drzwi (1).
-
Odklej pasek z dwustronnej taśmy mocującej kamerę. Od zewnętrznej strony drzwi włóż w otwór kamerę oraz ostroźnie przeciągnij przewód taśmowy, a następnie przyklej wzjer (kamerę) do drzwi (czujnik ruchu musi znajdować się u góry, przycisk dzwonka na dole urządzenia) - (2).
-
Od wewnętrznej strony drzwi przyłoż ramkę montażową (napis UP musi znajdować się u góry) i przeciągnij przewód taśmowy przez otwór w ramce. Dokręć śrubę montażową do gwintu kamery tak aby kamera została stabilnie zamontowana (3).
-
Umieść kartę MicroSD w urządzeniu.
-
Podłącz przewód transmisji danych (4).
-
Zawieś monitor na ramce montażowej przy pomocy 4 zaczepów (5).
-04-
Obstuga
FUNKCJE PRZYCISKÓW
| Lewy klawisz | Gdy monitor jest włączony, naciśnji i przytrzymaj przyczisk przez 10 sek., uzrądzenie zostanie przyzwiccone do ustawien tabrycznych |
| 1. Przytrzymaj przyczisk przez 3 sekundy, aby włączyć lub wyłączyć urządzenie2. Naciśnji krótko, aby włączyć/wyłączyć monitor | |
| Prawy klawisz | Gdy monitor jest włączony, naciśnji i przytrzymaj przyczisk przez 5 sek., aby wejść do trybu konfiguracji sieci lub wylogic z tego trybu. |
| Naciśnji przyczisk na kamerze, aby wykonać połączenie. |
-05
Aplikacja Tuya Smart
- W przypadku systemów operacyjnych IOS wyszukaj „TuyaSmart” w sklepie App store. Dia systemów Android, wyszukaj „TuyaSmart” w sklepie Google Play. Możesz leż zeskanować kod umieszczony obok.
Po zainstalowaniu aplikacji otwórz ją i przejdź do strony startowej. Upewnij się, że funkcja Bluetooth jest włączona w telefonie.
2. Ustawienie „Uruchomienie aplikacji”
W telefonie komórkowym wejdž w Ustawienia aplikacji, znajdž aplikację Tuya Smart i dokonaj zmiany ustawienia z „Zarządzaj automatycznie” na „Zarządzaj ręcznie“ oraz zaznacz opcje: Automatyczne uruchamianie, Wórne uruchamianie oraz Działaj w tle. Poniższe opcje muszą zostać zaznaczone, aby telefon odbierał przychodzące wiadomości z urządzenia.
-
W telefonie komórkowym wejdź w Ustawienia aplikacji, znajdź aplikację Tuya Smart i wybierz opcję: Zezwolenia/ Nadaj wszystkie zezwolenia wymagane dla tej aplikacji.
-
Nowi użytkownicy muszą zarejestrować nowe konto, a następnie zalogować się podając nazwę użytkownika i hasło.

App: Tuys Smart
Dodawanie urządzenia
- Otwórz aplikację i zaloguj się. Naciśnij Dodaj urządzenie „*” w prawym, górnym rogu i wybierz zakładkę „Nadzór wideo” (rys.1). Następnie wybierz urządzenie „Smart Doorbell”, wyświetl się interfejs pokazany na rys.2.

-0.7+
Dodawanie urządzenia
-
Wiącz wizjer (monitor) poprzez dłuższe naciśnięcie przycisku. Następnie naciśnij i przytrzymaj prawy przycisk przez około 5 sek, aby wejść w tryb konfiguracji sieci. W tym samym czasie usłyszysz powiadomienie głosowe „Please use APP to setup network” (Proszę użyć aplikacji do skonfigurowania sieci), a dioda statusu WiFi będzie migać na niebiosko.
-
W aplikacji należy zaznaczyć opcję „Make sure the indicator is flashing quickly or a prompt tone is heard” (rys.2), oraz nacisnąć „Next” (Datej).
-
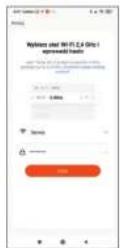
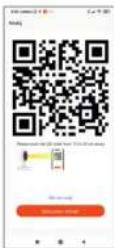
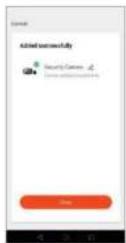
Wprowadź nazwie sieci oraz wpła własło (rys.3). naciśnij „Dale”. Na ekranie telefonu pojawią się kod QR (rys.4), który należy zbili二十四 przed obiektyw kamery na odległość 15-20cm - dostosu odległość do kamery tak, aby kod został prawidłowo czytany. Następnie, gdy uśyszysz komunikat głosowy „Connecting network” naciśnij w aplikacji „I heard a Prompt” (usłyszalem komunikaty) r.4. Na ekranie wyświetli się komunikat „Adding device...” (dodawania urządzenia) - rys.5. Po około 30 sekundach uśyszysz komunikat głosowy „Network setup successfully“ (Ustawienia sieci przebiegły pomysślne), co będzie oznaczało prawidłowe zakończenie procesu dodawania urządzenia. Naciśnij „Done“ (gotowe) i wybierz Security camera, aby wejść w tryb ustawień kamery (rys.6).
-08-
Dodawanie urządzenia
Rys.3
Rys.4

Rys.5
Rys.6
-09
Ustawienia urządzenia i aplikacji
-
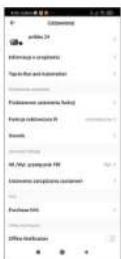
Ustawienia urządzenia: gdy urządzenie jest połączone z telefonem komórkowym naciśnij symbol „olówka” w prawym, górnym rogu. Wyświelii się ekran ustawień przedstawiony na rys 7.
-
Ustawienia aplikacji: w Menu głównym kliknij „Ja” w prawym, dolnym rogu, wyświetli się ekran ustawień aplikacji przedstawiony na rys. 8.
Rys.7

Rys.8
-10-
Każde gospodarstwo jest użytkownikiem sprzętu elektrycznego i elektronicznego, a co za tym idzie potençialnym wytwórcą niebezpiecznego dla ludzi i środowiska odpadu, z tytułu obecności w sprężcie niebezpiecznych substancji, mieszanin oraz części składowych. Z drugiej strony zużyty sprzęt to cenny materiał, z kilorego możemy odzyskać surowce takie jak miedź, cyna, szkło, żelazo i inne.

Symbol przekreiszone della kosza na smicii emieszczany na sprizpie, opakowaniu lub dokumentata da niego dottozonych wskazuje na konezcnostvo selektywnego zbierania zuzygeto sprzętu elektrycznego i elektronicznego. Rywobów tak oznaczonych, pod kara grzywny; nie można wyruzucato da whyglichen smicii razem z inymi odpadami. Oznakowanie oznacza jednocześnie, że sprzętΖ>) wprawdzionally a obrożu do dniu 13 siniere 2005r. Odowiązkiem użytkownika jest przekazanie zużygeto sprzęto do wyznaczonego punktu zbiorń w celu właściowego jego przetworzenia. Zużyty sprzęto może został również oddany do sprawdzowy, y przypadku zakupułowo wyrozku i gliWI ni萬iejselijke niż nowy kupowany sprzęt lego samtego rodzaju. Informacje c'odysplnym systerysna, informacja za zużygeto sprzętu elektrycznego można znaleźć w artigosistemi. Odeni su papieria, od dettożki, od dettożki. Odowiąziem stępowiane ze zużytem sprzętem zapoieden negatywnym konsekenciwemj dla środowiska naturalnego i ludziędko zdrowia!
Zużyte baterie i/łub akumulatory należy traktować jako odrębny odpad i umieszcząć w indywidualnym pojemniku. Zużyte baterie lub akumulatory powinny zostać oddane do punktu zbierania/odbionu zużytych bateri i akumulatorów. Informacje na temat punktów zbierania/odbionu udzielają władzne lokalne lub streetszadawcy tego rodzaju sprzętu. Zużyty sprzęt może zostać również oddany do streetszadawcy, w przypadku zakupu nowego wyrobu w Householdę się Thinkelijke niż nowy kupowany sprzęt tego samego rodzaju. Produkt wyposażony w przenośną baterie. Sposób montażu i usuwania baterień zmieszczono w półnitsznej instrukcji.

07/2023
Uproszczona deklaracja zgodności:
Omo-Logistic Sp. z o.o. niniejszym oświadcza, że typ urządzenia radiowego: OR-WIZ-1109 Elektroniczny wizjer do drzwi z funkcją nagrywania, czujnikiem ruchu oraz WiFi Tuya jest zgodny z dyrektywą 2014/53/UE. Polen tekst deklaracji zgodności UE jest dostępny pod następującym adres internetowym: www.support.orno.pl.
-11-
ORNO-LOGISTIC Sp. z o.o.
ul. Rolników 437, 44-141 Gliwice POLAND, tel. (+48) 32 43 43 110, www.orno.pl
-06
ELECTRONIC DOOR VIEWER WITH RECORDING, MOTION DETECTOR AND WIFI TUYA
OPERATING AND INSTALLATION INSTRUCTIONS

(EN) REMARKS / DIRECTIONS
Please read this manual carefully before installing and using the device. In case of any problems with understanding its contents, please contact the seller.
The manufacturer is not responsible for any damage that can result from improper device installation or operation. Any repair or modification carried out by yourselves results in loss of guarantee.
In view of the fact that the technical data are subject to continuous modifications, the manufacturer reserves a right to make changes to the product characteristics and to produce a preferred solution for various solutions without deterioration of the product. The products are available at www.support.orno.pl. Omo-Logistic Sp. z o.o. holds no responsibility for the results of non-compliance with the provisions of the present Manual. Omo Logistic Sp. z o.o. reserves the right to make changes to the Manual - the latest version of the Manual can be downloaded from www.support.orno.pl. Any translation/interpretation rights and copyright in relation to this Manual are reserved.
Characteristics
The visitor's viewer, standing directly in front of the door, replaces the traditional optical peephole. Working with the Tuya Smart app, the device allows you to view people standing in front of the door via your phone.
Advantages of the device:
- easy to install and use;
- wide-angle camera;
- 4.3" colour LCD screen;
- photo and video recording function on Micro SD memory card (not supplied);
- infrared illumination enables night vision;
- call button with 10-step volume control;
- motion sensor built into the door viewer,
- door viewer powered by built-in rechargeable battery, recharged via micro USB port (power adapter not included).
- 2.4GHz WiFi network, works with Tuya Smart application
-02-
Technical data
Display: 4.3" colour TFT
Camera view angle: vertically 45°, horizontally 77°
Power supply: lithium-polymer battery 3.7V DC, 3500mAh
Micro USB port: 5V DC, 1A
Memory Card: Micro SD, max. 128 GB (not included)
Wi-Fi standard: 802,11 b/g/n
Wi-Fi frequency: 2.4GHz
Maximum transmitter power: <10mW
Door thickness range: 35\~100 mm
Mounting hole diameter: ∅14-35mm
Camera dimensions: 61x61x13mm
Monitor dimensions: 141x97x22mm
Net weight: 0.290 kg
-
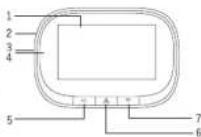
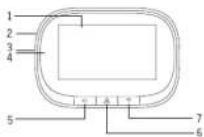
LCD display
-
RESET button
-
Battery charging port (microUSB)
-
Micro SD card slot
-
Left /Restore factor
-
Preview/On/Off
-
Right /Network configuration button
-
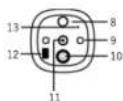
Motion sensor
-
IR diodes
-
Doorbell button
-
Camera
-
Loudspe
-
Microphone

-03-
Installation
-
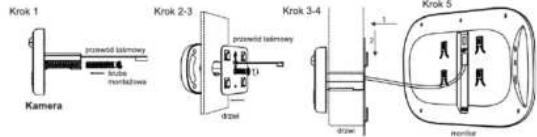
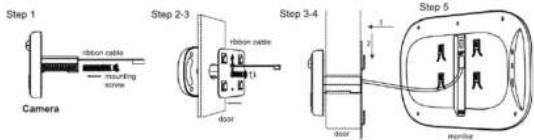
Select a suitable mounting screw according to the thickness of the door (1).
-
Peel off the strip from the double-sided tape securing the camera. From the outside of the door, insert the camera into the hole and carefully pull the ribbon cable, then stick the viewfinder (camera) to the door (the motion sensor must be at the top, the doorbell button at the bottom of the device)-(2).
-
On the inside of the door, attach the mounting frame (UP must be at the top) and thread the ribbon cable through the hole in the frame. Tighten the mounting screw to the camera thread so that the camera is securely mounted (3).
-
Insert the MicroSD card into the device.
-
Connect data cable (4).
-
Hang the monitor on the mounting frame using the 4 hooks (5).
-0.4-
Operation
BUTTON FUNCTIONS
| While the monitor is on, press and hold the button for 10 sec, the device will be reset to the factory settings | |
| 1. Hold down the button for 3 seconds to switch the device on or off2. Press shortly to switch the monitor on/off | |
| While the monitor is on, press and hold the button for 5 seconds to enter or exit network configuration mode. | |
| Press the button on the camera to make the call. |
-05-
Tuya Smart app
- For IOS operating systems, search for "TuyaSmart" in the App shop. For Android systems, search for "TuyaSmart" in the Google Play. You can also scan the code placed on the right.
Once the app is installed, open it and go to the start page. Make sure Bluetooth is enabled on your phone.
- "App launch" setting
On your mobile phone, go to Application Settings, find the Tuya Smart application and change the setting from "Manage automatically" to "Manage manually" and check the options: Auto Startup, Secondary Startup and Run in Background. The following options must be checked for your phone to receive incoming messages from your device.
-
On your mobile phone, go to Application Settings, find the Tuya Smart app and select the option: Permissions/Open all permission required for this App
-
New users must register a new account and then log in with their username and password.

-06-
Adding device
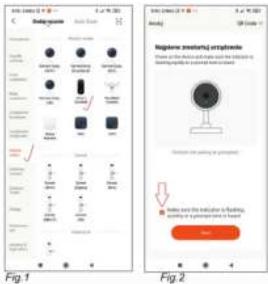
- Open and log in the app, click "add device", and select "video Surveillance" in the left product catalog, as shown in (figure 1). Then select "Smart Doorbell" in the product type on the right, and the interface as shown in (figure 2) will appear.
-07-
Adding device
-
Switch on the viewfinder (monitor) by pressing the button ☐ for a long time. Then press and hold the right button for about 5 seconds to enter network configuration mode. At this time, the host will have a voice prompt "Please use APP to setup network", and you will see the blue indicator flashes (flashes once in 1 second) on the host.
-
Please select the reminder "make sure the indicator is flashing quickly or a prompt tone is heard" on mobile APP (figure 2), and then click "next".
-
Input Wi-Fi user name and password in (figure 5). QR code will appear on the phone screen (fig.4), which should be moved in front of the camera at a distance of 15-20cm - adjust the distance from the camera so that the code is read correctly. When the host sends a voice prompt "Connecting network", click the option "hear voice prompt" in the interface (figure 4), and the interface "adding device" appears (figure 5). After about 30 seconds, when the host voice prompt "network setup successfully", the network configuration ends, and the interface of (figure 6) appears. Click "Done" and then click "Security camera" to enter the video interface.
Adding device
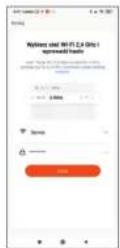
Fig.3

Fig.4
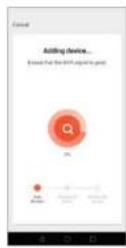
Fig.5
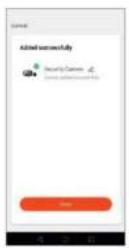
Fig.6
Device & application settings
-
Device settings: when the device is connected to your mobile phone, press the "pencil" symbol in the upper right corner. You will see the settings screen as shown in fig.7.
-
Application settings: in the Main Menu, click "Me" in the bottom right corner, you will see the application settings screen shown in figure 8.
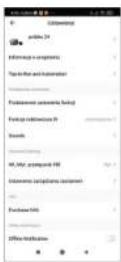
Fig.7
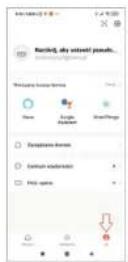
Fig.8
-09
-10-
Each household is a user of electrical and electronic equipment, and hence a potential producer of hazardous waste for humans and the environment, due to the presence of hazardous substances, mixtures and components in the equipment. On the other hand, used equipment is valuable material from which we can recover raw materials such as copper, tin, glass, iron and others.

The wee sign placed on the equipment, packaging or documents attached to it indicates the need for selective collection of waste electrical and electronic equipment. Products so marked, under penalty of fine, cannot be thrown into ordinary garbage along with other waste. The marking means at the same time that the equipment was placed on the market after August 13, 2005. It is the responsibility of the user to hand the used equipment to a designated collection point for proper processing. Used equipment can also be handed over to the seller, if one buys a new product in an amount not greater than the new purchased equipment of the same type. Information on the available collection system of waste electrical equipment can be found in the information desk of the store and in the municipal office or district office. Proper handling of used equipment prevents negative consequences for the environment and human health!
Used batteries and/or accumulators should be treated as separate waste and placed in an individual container. Used batteries or accumulators should be taken to a collection/receipt point for used batteries and accomulators. For information on collection/collection points, contact your local authority or your local dealer. Used equipment may also be returned to the seller in case of purchase of a new product in a quantity not greater than the new purchased equipment of the same type. The product is equipped with a portable battery. Please refer to the following manual for instructions on how to install and remove batteries.

07/2023
Declaration of conformity:
Orno-Logistic Sp. z o.o. declares that the OR-WIZ-1109 is compatible with Directive 2014/53/UE. The full text of the EU declaration of conformity is available at the following internet address: www.support.orno.pl.
-计
ORNO-LOGISTIC Sp. z o.o.
ul. Rolników 437, 44-141 Gliwice POLAND, tel. (+48) 32 43 43 110, www.orno.pl
ELEKTRONISCHER TÜRSPION MIT AUFNAHMEFUNKTION, BEWEGUNGSSENSOR UND WIFI TUYA
BEDIENUNGS- UND MONTAGEANLEITUNG

(DE) KOMMENTARE / NOTIZEN
Bitte lesen Sie dieses Betriebsanleitung sorgfältig durch, bevor Sie das Gerät installieren und benutzen. Sollten Sie Probleme mit dem Verständnis des Inhalts haben, wenden Sie sich bitte an Händler.
Der Hersteller haftet für Beschädigungen nicht, die sich aus der nicht fachgerechten Montage oder Einsatz der Anlage ergeben.
Schäden, die durch falschen Anschluss entstehen, unterliegen nicht der Reparatur im Rahmen der Garantie!
Da technische Daten ständigen Modifikationen unterliegen, behält sich der Hersteller das Recht vor, Änderungen bezüglich Erzeugnischarakteristik und anderer Konstruktionsänderungen vorzunehmen, die Parameter und Nutzwerte des Produkts nicht beeinträchtigen. Für weitere Informationen zu ORNO-Produkten besuchen Sie bitte die Website: www.support.orno.pl. Orno-Logistic Sp. z o.o. haftet nicht für die Folgen der Nichtbeachtung der Anweisungen in dieser Bedienungsanleitung, Orno-Logistic Sp. z o.o. behält sich das Recht vor, Änderungen in der Bedienungsanleitung vorzunehmen - aktuelle Version zum Herunterfaden und Verarbeitung oder - support.orno.pl. Alle Rechte an Übersetzung/Dolmetschen und Urheberrechten an dieser Bedienungsanleitung sind verbahalten.
Charakteristik
Ein Gerät zur Überwachung des direkt vor der Tür stehenden Besuchers, ersetzt den klassischen Türspion (Guckloch). Dank der Integration mit der Tuya-Smart App können Sie mit dem Gerät Personen, die vor der Tür stehen, über Ihr Smartphone sehen.
Vorteille des Gerätes:
- einfache Installation und Bedienung:
- Weitwinkelkamera:
- 4.3" farbiger LCD-Bildschirm
- Aufzeichnung von Foto- und Videndateien auf Micr-SD-Speicherkarte (nicht im Sat inbennflen):
- Abzeichnung vom Pob- und Videbu - infrangt Beleuchtung für Nachteicht:
- Immateri-Berechnung für Nachsicht, ein Käußerwert mit 2. stefiger 1. zutstätivergrund am
- ein Kingelknöpf mit 3-stünger Laufstärkeregehung. In den Türpian eingebauter Betreuungsrechte
- in den Türspion eingebauter Bewegungssensor, - der Türspion wird durch einen eingebauten Akku betrieben, der über einen Micro-USB-Anschluss aufgeiaden wird (kein Netzteil enthalten).
- 2.4-GHz-WiFi-Netzwerk, zusammenspielet mit Tuya Smart-Anwendung.
-02-
Technische Daten
Bildschirm: farbiges4.3" TFT
Kamerawinkel: vertikal 45°, horizontal 77°
Stromversorgung: Lithium-Polymer-Akku 3.7V DC, 3500mAh
Micro-USB-Anschluss: 5V DC, 1A
Speicherkarte: Micro SD, max. 128 GB (im Set nicht inbegriffen)
Speichenkarte: Micro GB, max. 120 GB (in) der nicht inbegrenn) Wi-Fi-Standard: 802.11 h/o/n
WIFI Standard. 602, IT High
WiFi-Frequenz: 2.4GHz
Maximale Sendeleistung: <10mW
Bereich der Türstärke: 35\~100 mn
Durchmesser der Montagebohrung: ∅14-35mm
Abmessungen des Türspions (Kamera): 61x61x13mm
Abmessungen des Tursplions (Rahiera): 01x017 Abmessungen des Bildschirms: 141x97x22mm
Abmessungen des Blüschirms. 141x97x22mm Netterwicht: 0.380 kg
Nettogewicht: 0,290 kg
-
LCD-Bildschirm
-
RESET-Taste
-
Akku-Ladeanschluss (microUSB)
-
Micro-SD-Kartensteckplatz
-
Linke Taste/Werkseinstellungen wiederherstellen
-
Vorschau-Taste/Ein-Aus
-
Rechte Taste/Netzwerkkonfigurationstaste
-
Bewegungssensor
9 IR-Dioden
-
Klingelknopf
-
Kamera
-
Lautsprecher
-
Mikrofan


-03-
Montageanweisungen
-
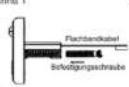
Wählen Sie die passende Befestigungsschraube entsprechend der Türstärke aus (1).
-
Lösen Sie das doppelseitige Klebeband ab, mit dem man die Kamera befestigt. Von der Außenseite der Tür die Kamera in das Loch einführen und das Flachbandkabel vorsichtig durchziehen, dann den Spion (Kamera) an die Tür kieben (Bewegungsmelder muss oben sein und die Kingeltaste unten am Gerät) - (2).
-
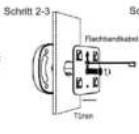
Befestigen Sie den Montagerahmen an der Innenseite der Tür ("UP" muss oben sein) und ziehen Sie das Flachbandkabel durch das Loch im Rahmen. Schrauben Sie die Befestigungsschraube am Gewinde der Kamera fest, so dass die Kamera sicher befestigt ist (3).
-
Legen Sie die Micro-SD-Karte in den Gerät ein
-
Schließen Sie das Datenkabel an (4)
-
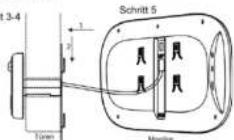
Hängen Sie den Monitor mit den 4 Haken in den Montagerahmen ein. (5)
Schritt 1
Kamera
-04-
Bedienung
TASTENFUNKTIONEN
| Linke Taste | Wenn der Bildschirm eingeschaltet ist und Sie die Taste 10 Sekunden lang gedrückt halten, wird das Gerät auf die Werkeinstellungen zurückgesetzt |
| 1. Halten Sie die Taste 3 Sekunden lang gedrückt, um das Gerät ein- oder auszuschalten.2. Drücken Sie kurz, um den Monitor ein-auszuschalten. | |
| Rechte Taste | Halten Sie bei eingeschaltetem Bildschirm die Taste 5 Sekunden lang gedrückt, um den Netzwerkeinstellungsmodus zu öffnen oder ihn zu verlassen. |
| Drücken Sie die Taste an der Kamera, um anzurufen. |
-05
Tuya-Smart App
- Für iOS-Betriebssysteme suchen Sie im App-Store nach "TuyaSmart". Für Android-Betriebssysteme suchen Sie im Google Play nach "TuyaSmart". Sie können auch den Code daneben scannen.
Wenn die App installiert ist, öffnen Sie sie und gehen Sie auf die Startseite. Stellen Sie sicher, dass Bluetooth auf ihrem Smartphone aktiviert ist.
- Einstellung "Applikationsstart"
Gehen Sie auf Ihrem Smartphone zu den Applikationseinstellungen, suchen Sie die Tuya-Smart Applikation und ändern Sie die Einstellung von "Automatisch verwalten" auf "Manuell verwalten" und markieren Sie die Optionen: Automatisches Starten, Sekundäres Starten und Im Hintergrund laufen. Die folgenden Optionen müssen aktiviert sein, damit Ihr Smartphone eingehende Nachrichten von Ihrem Gerät empfangen kann.
-
Wählen Sie auf Ihrem Smartphone die App-Einstellungen, suchen Sie die Tuya-Smart App und wählen Sie die Option: Berechtigungen / Erteilen Sie alle für diese App erforderlichen Berechtigungen.
-
Neue Benutzer müssen ein neues Konto erstellen und sich dann mit ihrem Benutzernamen und Passwort anmelden.

App: Tuya Smart
Hinzufügen eines Geräts
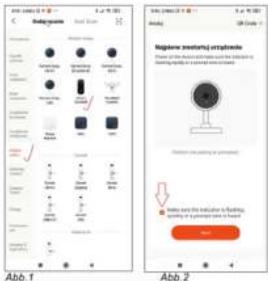
- Öffnen Sie die App und melden Sie sich an Drücken Sie oben rechts auf "+" für Gerät hinzufügen und wählen Sie das Lesezeichen "Videoüberwachung". (Abb.1). Wählen Sie dann das Gerät "Smart Doorbell" aus, es wird dann die in Abb.2 dargestellte Oberfläche angezeigt.
-0.7-
Hinzufügen eines Geräts
-
Schalten Sie den Türispion (Bildschirm) durch langes Drücken der Taste ein. Halten Sie dann die rechte Taste ca. 5 Sekunden lang gedrückt, um den Netzwerkeinstellungsmodus zu öffnen, Gleichzeitig hören Sie die Sprachmeldung "Please use APP to setup network" (Nutzen Sie die App, um Ihr Netzwerk einzustellen) und die WIFI Status-LED-Diode wird blau blinken.
-
Markieren Sie in der App die Option "Make sure the indicator is flashing quickly or a prompt tone is heard". (Abb.2), und drücken Sie "Next" (Weiter)
-
Geben Sie den Netzwerknamen und das Passwort ein (Abb.3), und dann drücken Sie auf "Weiter". Auf dem Bildschirm des Smartphones wird ein QR-Code angezeigt (Abb. 4), den Sie in einem Abstand von 15-20 cm vor die Kameralinse halten sollten - passen Sie den Abstand zur Kamera so an, dass der Code korrektgelesen wird. Wenn Sie dann die Sprachmeldung "Connecting network" hören, drücken Sie auf "I heard a Prompt" (Ich habe die Meidung gehört) Abb 4. Auf dem Bildschirm wird „Adding device...“ (Geräht hinzufügen...) angezeigt - Abb. 5. Nach ca. 30 Sekunden hören Sie die Sprachmeldung "Network setup successfully" (Netzwerkinstellung erfolgreich), was bedeutet, dass Sie das Hinzufügen des Geräts erfolgreich abgeschlossen haben. Drücken Sie auf "Done" (Fertig) und wählen „Sie Security" camera, um den Kameraeinstellungsmodus zu verlassen (Abb.6).
-08-
Hinzufügen eines Geräts

Abb.3

Abb.4

Abb.5

Abb.6
-09
Geräte- und Applikationseinstellungen
-
Geräteeinstellungen: Wenn das Gerät mit Ihrem Smartphone verbunden ist, drücken Sie auf das "Bleistift"-Symbol in der oberen rechten Ecke. Sie sehen den Einstellungsbildschirm wie in Abb.7 dargestellt.
-
Appinstellungen: Klicken Sie im Hauptmenü auf "Ich" in der unteren rechten Ecke, dann wird der in der Abb. 8 dargestellte Bildschirm mit den Applikationseinstellungen angezeigt.
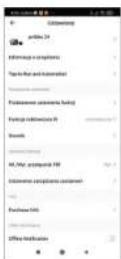
Abb.7
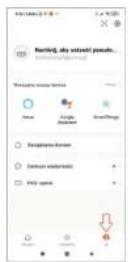
Abb.8
-10-
Jeder Haushait ist ein Benutzer von Elekträ- und Elektronikgaräten und daher ein potenzieller Produzent von gefährlichen Abfällen für Mensch und Umwelt, da die Geräte gefährliche Stoffe, Gemische und Komponenten enthalten. Andererseits sind gebrauchte Geräte ein wertvolles Material, aus dem wir Rohstoffe wie Kupier, Zinn, Glas, Eisen u.a. gewinnen können. Das Symbol des durchgestrichenen Mülleimers auf Geräten, Verpackungen oder den angehängten Dokumenten deutet auf die Notwendigkeit der getrennten Sammlung von Elektrö- und Elektronik-Altergärten in. So gekennzeichnete Produkte dürfen unter Androhung einer Geldstrafe nicht mit dem Hausmüll entsorgt werden. Diese Kennzeichnung bedeutet gleichzeitig, dass das Gerät nach dem 13. August 2005 in Verkehr gebracht wurde.

Der Benutzer soll die Altgeräte einer festgelegten Sammelstelle zur entsprechenden Entsorgung zuführen. Gebrauchtgeräte können auch an den Verkäufer übergeben werden, wenn Sie ein neues Produkt in einer Menge kaufen, die nicht höher ist als die der neu gekauften Ausrüstung desselben Typs. Informationen zum verfügbaren Sammelsystem für Elektroaltgeräte finden Sie am informationspunkt des Geschäfts und im Stadt-/Gemeindeamt. Der sachgemäße Umgang mit gebrauchten Geräten verhindert negative Folgen für die Umweit und die menschliche Gesundheit!
Verbrauchte Batterien und / oder Akkumulatoren sollten als separater Abfall behandelt und in einen einzelnen Behälter gefüllt werden. Verbrauchte Batterien oder Akkus sollten zu den Sammel-/ Sammelstellen der gebrauchten Batterien und Akkus gebracht werden. Informationen zu Sammelstellen/ Sammelstellen erhalten Sie von örtlichen Behörden oder Verkläufern dieser Art von Ausrüstung. Gebrauchte Geräte können auch an den Verkäufer übergeben werden, wenn Sie ein neues Produkt in einer Menge erwerben, die nicht höher ist als die neu erworbenen Geräte des gleichen Typs. Das Produkt ist mit einem tragbaren Akku ausgestattelt. Die Montage- und Demontage des Akkus ist in den folgenden Anweisungen enthalten.

07/2023
Konformitätserklärung:
Orno-Logistic Sp. z o.o. erklärt hiermit, dass der Typ des Funkgerätes OR-WIZ-1109 ist konform mit der Richtlinie 2014/53/EU. Der vollständige Text der EU-Konformitätserklärung ist unter folgender Internetadresse verfügbar: www.support.orno.pl.
-11-
ORNO-LOGISTIC Sp. z o.o.
ul. Rolników 437, 44-141 Gliwice POLAND, tel. (+48) 32 43 43 110, www.orno.pl
-06