0070-24122 - Skærm Ernitec - Gratis brugsanvisning og manual
Find enhedens vejledning gratis 0070-24122 Ernitec i PDF-format.

Brugerspørgsmål om 0070-24122 Ernitec
0 spørgsmål om dette apparat. Besvar dem du kender, eller stil dit eget.
Stil et nyt spørgsmål om dette apparat
Download vejledningen til din Skærm i PDF-format gratis! Find din vejledning 0070-24122 - Ernitec og tag din elektroniske enhed tilbage i hånden. På denne side er alle dokumenter nødvendige for brugen af din enhed offentliggjort. 0070-24122 af mærket Ernitec.
BRUGSANVISNING 0070-24122 Ernitec
Surveillance Monitor
USER MANUAL

- Please read this manual carefully before operating your set.
- Retain it for future reference.
- Record model number and serial number of the set.
• See the label attached on the back cover and quote this information to you r dealer when you require service.
TROUBLE SHOOTING
NOTE: There is a problem in VGA mode. (Only VGA mode applied)
| PROBLEM | POSSIBLE SOLUTION |
| The signal is out of range | -Adjust resolution, horizontal frequency, or vertical frequency.-Check it whether the signal cable is connected or loose.-Check the input source. |
| Vertical bar or stripe on back ground&Horizontal Noise&Incorrect position | -Work the auto configure or adjust clock, phase, or H/V position. |
| Screen color is unstable or single color | -Check the signal cable.-Reinstall the PC video card. |
4. Maintenance
Early manifestations can be prevented. Careful and regular cleaning can extend the amount of time in that way, you will have a new one. Be sure to turn the power off and unplug the power cord before you begin any cleaning.
Cleaning the screen
Here's a great way to keep the dust off screen for a while. Wet soft cloth in a mixture of lukewarm water and a little fabric softener or dish washing detergent. Wring the cloth until it's almost dry, and then used it to wipe the screen.
Make sure the remained water is off the screen, and then let it air-dry before you turn on your monitor.
Cleaning the cabinet
To remove dirt or dust, wipe the cabinet with a soft, dry, lint-free cloth. Please be sure not to use a wet cloth.
Extended Absence

If you anticipate to store the monitor for extended periods of time or otherwise not turning the monitor on, disconnect the monitors power cable.
TABLE OF CONTENTS
TABLE OF CONTENTS ... 1
WARNING 2
SAFETY INSTRUCTIONS .... 3
- INTRODUCTION 5
1.1 CONTROLS ... 5
1.2 ACCESSORIES.... 5
1.3 CONNECTION OPITONS.... 6
1.4 REMOTE CONTROL KEY FUNCTIONS.... 7
1.5 INSTALLING BATTERIES.... 8
1.6 EXTERNAL EQUIPMENT CONNECTIONS ... 8
-
BASIC OSD SETUP 10
-
TROUBLE SHOOTING .... 15
-
MAINTEANCE ... 16
| PROBLEM | POSSIBLE SOLUTION |
| No sound picture | -Check that the main play has been connected to a wall let-Check that you have pressed the POWER button on the front of monitor set |
| Normal picture but no sound | -Check the voice contact and为企业 settings. |
| The remote control does not work | -Check you see if there any object between the product and remote control-Causey obstruction-Correct remote operating mode set:MONTOR, VCR etc.,-Active batteries installed with correct polarity(-10,+,-10,-)-Insell new batteries. |
| Power is suddenly lined off | -Is the sleep times set-Check the power control setings. Power integrated.-No broadcast on station lined with audio artifacts. |
| Picture appears slowly after switching on | -This is Romania; the image is muted during the product starting process. Please conduct your service center. If the picture has not appeared after five minutes. |
| No or poor color or poor picture | -Adjuit the color in menu option-Keep a sufficient distance between the product and the VCR-TY another channel the problem may be with the broadcast-Are the VIDEO cables installed properly.-Activates the any function to restore the brightness of the picture. |
| Horizontal/wactical bars or picture sharing | -Check for local interference such as an electrical appliance or power tool. |
| No output from one of the speakers | -Adjust balance in menu open. |
Before connect the service technology, perform the following simple chemicals. If any problem still exists, unplug the CCTV monitor and calling for serving.
- Trouble shooting
PRODUCT CRITERIA
warranty
Do not attempt to modify this product in any way without authorization from finite Technical Support. Unauthorized modification will void the products
CAUTION
Any changes or modifications not expressly approved by the party responsible for compliance could void the users authority to operate the equipment.
-Consult the dealer or experienced radio/monitor technician for help.
receiver is connected.
- Increase the separation between the equipment and receiver. - Connect the equipment into an outlet on a circuit different from that to which the
correct the interference by one or more of the following measures:
If the equipment generates, uses and can radiate frequently energy and if the equipment does not install and used in accordance with the instructions, may cause harmful interference will not occur in a particular installation. If this equipment does interference will not occur in a particular installation, it is guaranteed that interference from radio communications however, there is no guarantee that interference to radio communications however, there is no guarantee that interference will not occur in a particular installation. If this equipment does not install and used in accordance with the instructions, may cause harmful interference which results from the determination by utilizing the equipment for and on, the user is encouraged to try to determine by adjusting the equipment for and on, the user is encouraged to try to determine by utilizing the equipment for and on, the user is encouraged to try to determine by adjusting the equipment for and on, the user is encouraged to try to determine by adjusting the equipment for and on, the user is encouraged to try to determine by adjusting the equipment for and on, the user is encouraged to try to determine by adjusting the equipment for and on, the user is encouraged to try to determine by adjusting the equipment for and on, the user is encouraged to try to determine by adjusting the equipment for and on, the user is encouraged to try to determine by adjusting the equipment for
RECEUATORY INFORMATION
The excitation point within an equilateral triangle is intended to enter the user to the presence of important operating and maintenance (servicing) instructions accompanying the application.

The lighting flash with arrowhead symbol, within an equalateral triangle, is intended to enter the user to the presence of uninsured “dangerous voltage” within the products enclosure that may be sufficient magnitude to constitute a risk of electric shock to persons.

TO REDUCE THE RISK OF ELECTRIC SHOCK DO NOT REMOVE COVER (OR BACK). NO USER SERVICEABLE PARTS INSIDE. REFER TO QUALIFIED SERVICE PERSONNEL.
WARNING


WARNING
WARNING
Basic OSD setup
2.5.3 "Sound" Menu Option

-Press "◀▶"button to select Sound menu.
-Use "▼▲" to select what you want to adjust on Mode
-Press "◀▶"button to adjust "Balance" "Sound Mode" "Auto Volume"
-When you are satisfied with your adjustment, press MENU to exit the main menu.
2.5.4 "OPTION" and "FUNCTION" Menu Option
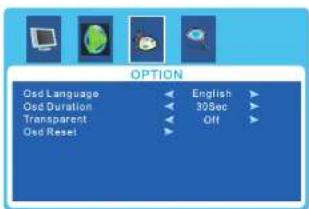
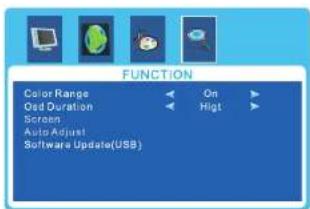
-Press "◀▶"button to select OPTION or FUNCTION menu.
-Use "▼▲" to select what you want to adjust on Mode
-Press "◀▶"button to adjust "OSD Language" "OSD Reset" "Software Update" etc
-When you are satisfied with your adjustment, press MENU to exit the main menu.
SAFETY INSTRUCTIONS
Safety instructions
WARNING:
To reduce the risk of fire or electric shock, do not expose this apparatus to rain or moisture.
Apparatus shall not be exposed to dripping or splashing area. An objects filled with liquids such as vases shall not be placed on the apparatus.
IMPORTANT SAFETY INSTRUCTIONS
| Read these instructions and keep them for future reference. | Do no install the monitor near any significant sources of heat. | |
| Do not use the monitor near water. |  | Disconnect power if the monitor will not be used for long periods of time. |
| Clean the cabinet only with a dry cloth. |  | Ensure all cables are properly stowed and not pinched anywhere. |
| Provide adequate ventilation around the proximity of the monitor. |  | Only use attachments and accessories specified by Ernitec. |
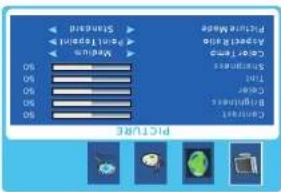
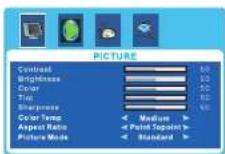
- Press " < .< ." button to select PICTURE menu. - Use " ▼.▲. " to select what you want to adjust on Picture Mode - Press " < .< ." button to adjust "Point to Point "Zom1" "Zom2" Auto " - Press " < .< ." button to adjust "Point to Point "Zom1" "Zom2" Auto " - When you are satisfied with your adjustment, press MENU to exit the main menu.
2.5.2 „Aspect Ratio“ Menu Option
Basic OSD setup
your national legislation.
Please contact your local authority for further details of your nearest designated collection point. Penalties may be applicable for incorrect disposal of this waste, in accordance with
arse from incorporate waste handling
Disposing of this product correctly will help save valuable resources and prevent any potential negative effects on human health and the environment, which could otherwise
collection points where it will be accepted free of charge.
For proper treatment, recovery and recycling, please take this product(s) to designated
general household waste.
Under the Directive 2012/9/EU on waste electrical and electronic equipment (WEEE), products(s) used electrical and electronic equipment (WEEE) should not be mixed with
On Disposal
Pixel errors in the form of tiny red, green or blue dots may appear on the screen, these do not adversely affect the monitors performance.
normal.
- The monitor may "flicker" momentarily when turned on while cold. This is
Emitec Technical Support.
please contact your vendor or
When the unit requires repairs.
SAFETY INSTRUMENTS
Basic OSD setup
INTRODUCTION
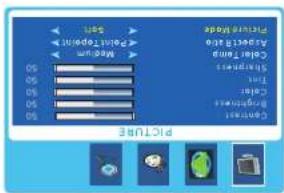
2.5.2 "Aspect Ratio" Menu Option

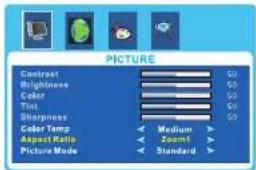
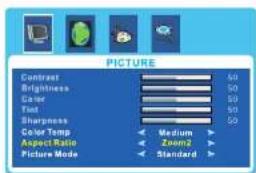
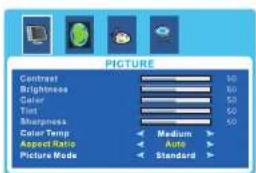
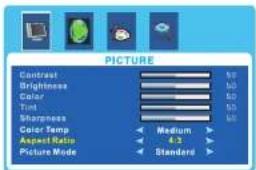
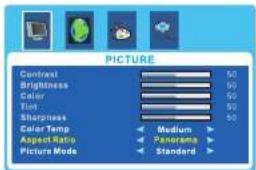
-Press "◀▶"button to select PICTURE menu.
-Use "▼▲" to select what you want to adjust on Color Temp
-Press "◀▶"button to adjust "Point to Point" "Zom1" "Zom2" "Auto"
"4:3", "Panorama"
- When you are satisfied with your adjustment, press MENU to exit the main menu.
1. Introduction
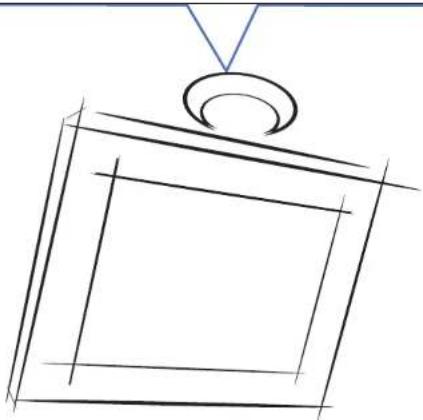
1.1 Controls
-This is a simplified representations of front panel.
natural_image
Simple line drawing of a monitor with a curved base (no text or symbols)1.2 Accessories
Ensure that the following accessories are included with your CCTV monitor. If any accessory is missing, please contact the dealer from where you purchased the product.
User manual
Safety instructions

Power adapter

Remote control
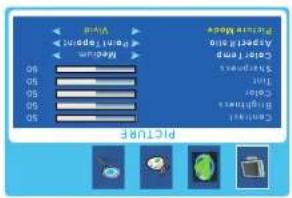
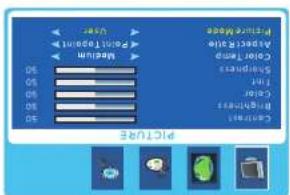
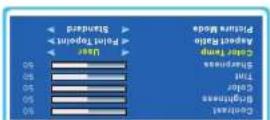
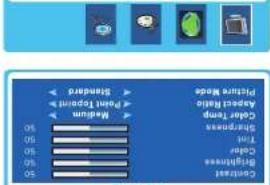
main menu.
-When you are satisfied with your adjustment, press MENU to exit the
-Press "◀ button to adjust Medium"Warm"Cold"User"
-Use "▲▲" to select what you want to adjust on Color Temp
- Press " button to select Picture menu.
S.11316

PICUYE

m = 311
3871348

m = 311
2.5.1 "Color Temp" Menu Option
C. Press the "▲▼" again to enter the submenu.
B. Press the "to select the desired submenu.
A. Press the "MENU" button to access Main Menu setting interface.
2.5. OSD setup under VGA/HDMI input mode.
Basic OSD setup
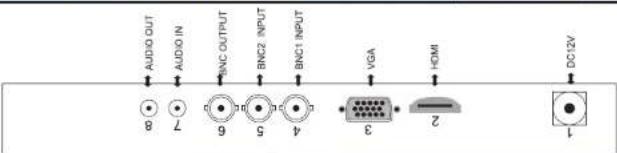
| ITEM | BUTTON NAME | FUNCTION DESCRIPTION |
| 1 | POWER | DC input socket |
| 2 | HDMI | HDMI INPUT |
| 3 | VGA | VGA INPUT |
| 4 | BNC1 INPUT | Connect the BNC output jack of PROCESSOR |
| 5 | BNC2 INPUT | Connect the BNC output jack of PROCESSOR |
| 6 | BNC OUT | Connect the BNC input jack of other monitor |
| 7 | AUDIO 1 | Audio Input |
| 8 | AUDIO 2 | Audio 2 out |
natural_image
Pure geometric line drawing of a square with a circular top and diagonal lines, no text or symbols present.1.3 Connection Options
INTRODUCTION
Basic OSD setup
2.Basic OSD setup
2.1 Turning on and off the CCTV monitor
2.1.1 Turn on monitor
- Connect the AC input cable to monitor, then press the main power switch on monitor. At this time the monitor will enter into standby mode and the indicator light turn red.
- Using buttons can turn on monitor from standby mode as follows: Press POWER keyon front panel or on the remote control.
2.1.2 Turn off monitor
- Press POWER button on front panel the or on the remote control to enter standby mode. The indicator light is red.
- Using main power switch turns off monitor completely.
2.2 Selecting screen language
NOTE: If you use your monitor for the first time, you should select the language which will be used for displaying menus and indications.
-Press the "MENU" button into main menu.
-Press the "◀▶" button to select OSD menu.
-Press the "▼▲" button to select OSD LANGUAGE
-Press the "◀▶" button to select your language.
-When you are satisfied with your choice, press MENU to exit.
2.3 NO SIGNAL
There is NO SYNC menu on screen when there is no input signal.
NO SIGNAL
2.4 Selecting input source
VGA
HDMI
AV 1
AV 2
You can select the input source by pressing INPUT button on the remote control on the front panel.
-Press the "▼▲" button to select the source you want.
-Press the "INPUT" button to confirm
INTRODUCTION
1.4 Remote Control Key Functions
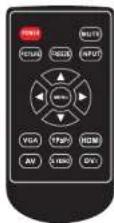
POWER
POWER Switch on monitor when at standby mode or vice versa.
MUTE
MUTE Press to mute the sound. Press again or press VOL+ to unmute.
A
A
m = 311
Menu selection.
▼▲
MENU
MENU Press to bring up the main menu to the screen and exit the current menu.
INPUT
INPUT Press to cycle through the input source in following:
VGA BNC1 BNC2 HDMI YPBPR
PICTURE
PICTURE Press repeatedly to cycle through the available video picture
- Select the VGA input source with using INPUT button on the remote control.
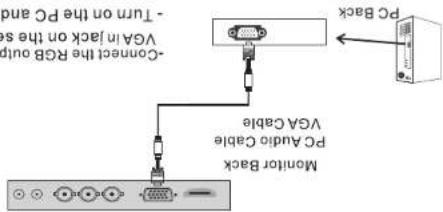
This CCTV monitor provides plug and play capability meaning that the PC adjusts information (EDD) to the PC using the Video Electronics Standard Association (VESA)/Discovery Data Channel (DBC) protocol.
1.6.4 PC Connection
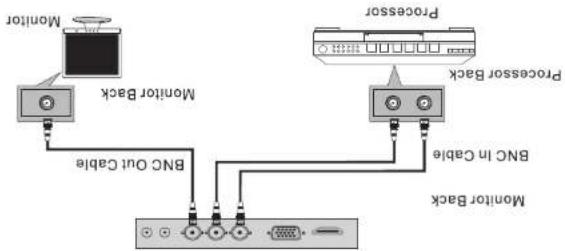
-Select BNCI or BNCC2 input source with using the INPUT button on the remote control.
-Connect the BNC out cable input of the other monitor to the BNC output on the set.
-Connect the BNC in cable output of the PROCESSOR to the BNC input on the set.
flowchart
graph TD
    A["Monitor Back"] -->|BNC Out Cable| B["Processor"]
    C["Monitor Back"] -->|BNC Out Cable| B
    D["Processor"] -->|BNC in Cable| B
    B --> E["Control"]
1.6.2 BNC INPUT and BNC OUTPUT Connection
INTRODUCTION
Connect the power cord correctly as shown. Press the POWER switch of your CCTV monitor to switch on the CCTV monitor. The power indication on the front panel lights is green.
1.6.1 Power Cord Connection
1.6 External Equipment Connections
Put the used batteries into the recycling bin since it can negatively affect the environment.
Point the remote towards the remote control sensor of the wireless monitor and use it within 7 meters.
Close the cover.


1.5 Installing Batteries