KViewCenter - Overvågningskamera Kguard - Gratis brugsanvisning og manual
Find enhedens vejledning gratis KViewCenter Kguard i PDF-format.

Brugerspørgsmål om KViewCenter Kguard
0 spørgsmål om dette apparat. Besvar dem du kender, eller stil dit eget.
Stil et nyt spørgsmål om dette apparat
Download vejledningen til din Overvågningskamera i PDF-format gratis! Find din vejledning KViewCenter - Kguard og tag din elektroniske enhed tilbage i hånden. På denne side er alle dokumenter nødvendige for brugen af din enhed offentliggjort. KViewCenter af mærket Kguard.
BRUGSANVISNING KViewCenter Kguard
KViewCenter
natural_image
Display of surveillance cameras and devices including desktops, tablets, and mobile screens (no visible text or symbols)Software User Manual
2012 / 04 / 20
Version 2.2.1.0
【Table of Contents】
【Chapter 1. KViewCenter Interface】....5
1.1. Log in....5
1.2. Log out....5
1.3. Control Panel 6
1.4. Control Panel (Preview Mode)....7
1.5. Control Panel (E-map Mode).... 10
1.6. Control Panel (Playback Mode).... 11
【Chapter 2: DVR CAM Setting】....12
2.1. DVR CAM Setup 12
2.2. Remote Backup Setting .... 15
2.3. Backup Schedule....16
2.4. Backup Center (backup the recording video in 7 days)....17
2.5. DVR Miscellaneous Setting....19
【Chapter 3: E-Map Mode】....20
3.1. Map Edit....20
3.2. Map Switch 22
3.3. Event View 22
【Chapter 4: Playback Mode】....24
4.1. Playback / Backup locally for DVR (Specified date)....24
4.2. Remote Playback 24
4.3. Playback Manager 27
【Chapter 5: Miscellaneous Functions】....29
5.1. System Setting 29
5.1.1.User Information 30
5.1.2. Startup Action....30
5.1.3. Automatic Reboot.... 30
5.1.4. Snapshot 30
5.2.User Account Setting....30
5.3. PTZ Control 32
5.4. Layout Panel 33
5.5. Quick Link....33
5.6. Server Statues (Standard Version)....34
【Chapter 6: Remote Player Tool (Standard & Professional Version)】....35
6.1. Web Sever 35
6.2. IE OCX....36
6.2.1. Download / Install DVR ActiveX Program 36
KGUARD KViewCenter Software User Manual
6.2.2. Connect Setting 39
6.3. Remote Preview Mode 39
6.3.1. Remote Connecting 40
6.3.2. System Setup 40
6.3.3. PTZ Control 41
6.3.4. Event List.... 42
6.3.5. Live Snapshot....42
6.3.6. Layout 42
6.4. Remote E-Map Mode 43
6.5. Remote Playback Mode....43
6.5. Remote Logout 44
\*Features:
KViewCenter is the latest DVR software which utilizes the exiting PC system to download & playback stream from DVR. The user can access live video from DVR devices also can search the DVR devices data base. KViewCenter has the remote backup schedule to backup DVR recording via "Backup Center". The floating panel design can allow user to allocate the panels freely. The mode of Playback support Remote Playback, Local Playback.
\*System requirement:
CPU: Intel® Core™2 Duo Processor E4300
Memory: 1 GB
Graphic card: ATI Radeon 9200 / Nvidia Geforce 6200 equivalent or above
Mother board: Intel G31 / G45 chipset or above, (Recommend Intel Chipset for superior performance)
Ethernet: 100baseT or above, (Recommend LAN/1000baseT network)
Hard Disk: 250 GB or above
OS: Window XP SP3 Professional /Server2003/Vista/windows 7
【Chapter 1. KViewCenter Interface】
1.1. Log in.
Step 1.


Step 2. Enter User name & Password.
*Default User name: admin
*Default Password: 1234
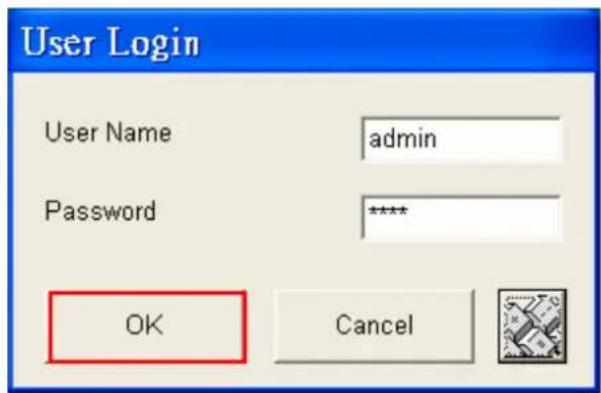
Step 3. "OK" button for log in.
1.2. Log out
Step 1.


Step 2. Enter User name & Password, again.
Step 3. "OK" button to log out system.

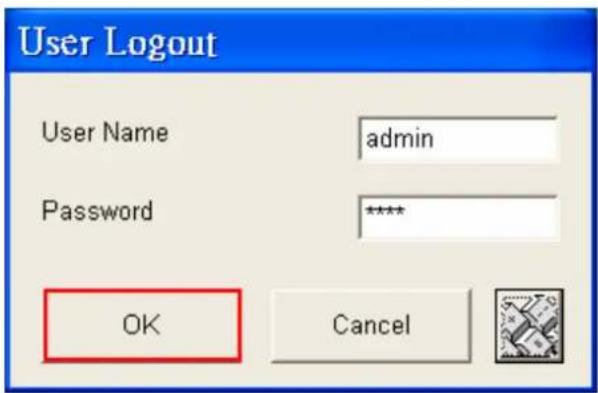
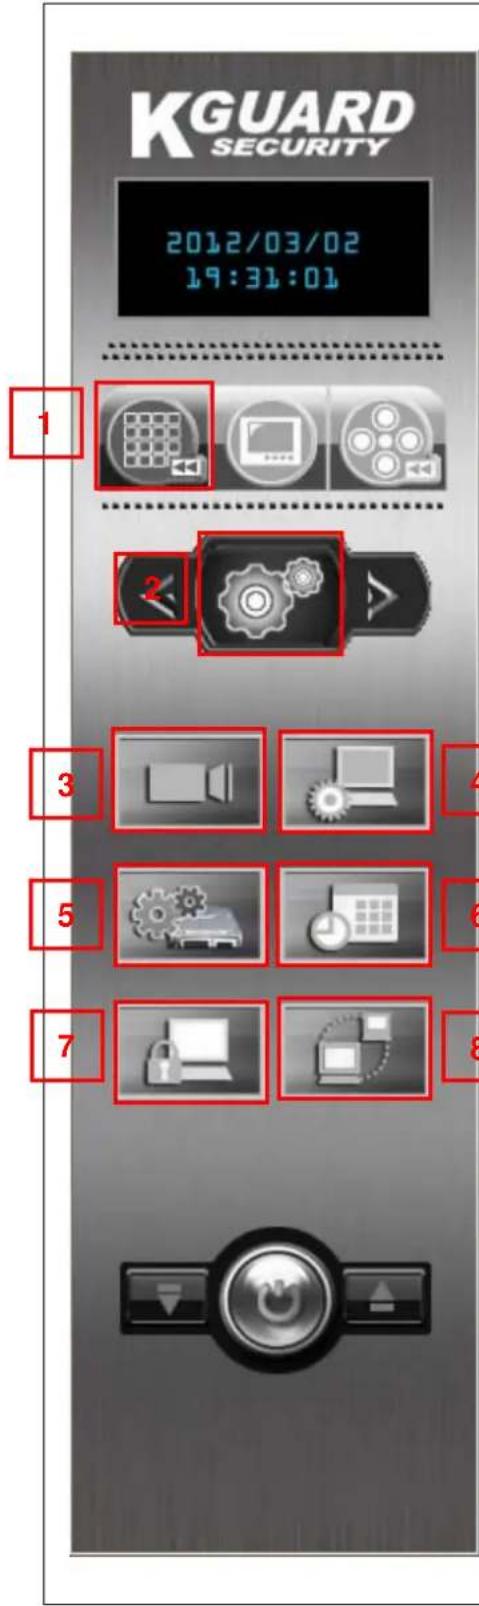
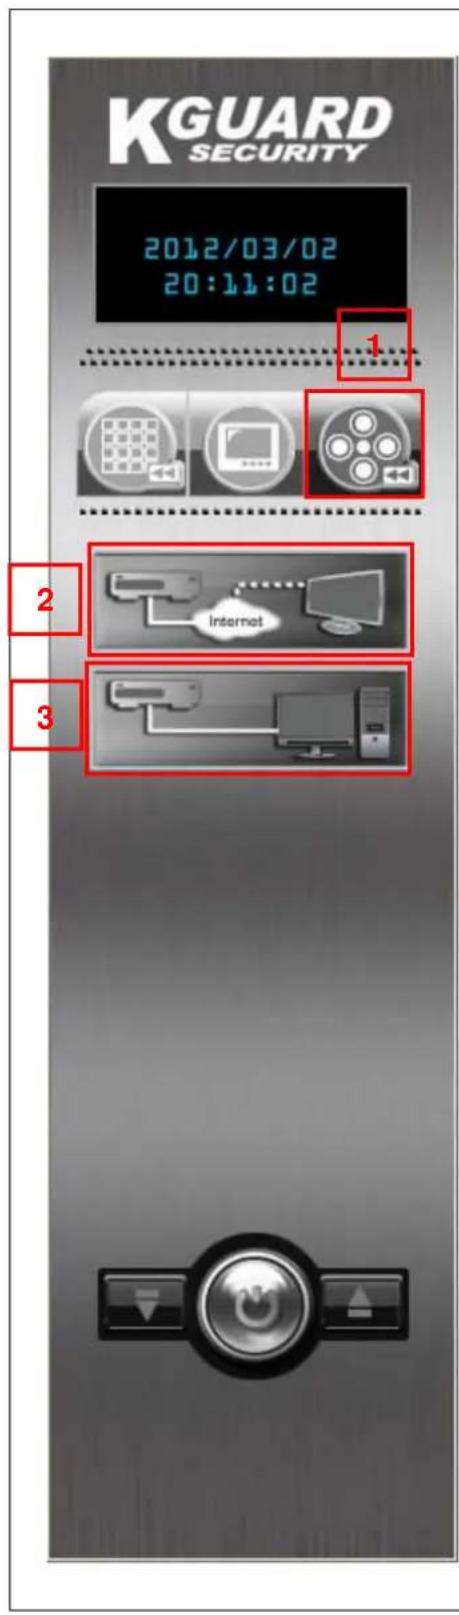
1.3. Control Panel
| No. | Functions Description | |
| 1 | Information display | For displaying the info of date. |
| 2 | Modes display | There are 3 modes: Preview , E-map and Playback. |
| 3 | Menu options | There are 3 menus: DVR CAM status display, configuration and tools. |
| 4 | Configuration panel | To configure the setting. |
| 5 | Log out and minimize/maximum panel | To Log out system as well as minimum/maximum the panel. |
1.4. Control Panel (Preview Mode)
*in the preview mode, there are 3 types of menu:
(1) Configuration menu:
| No. | Functions Description | |
| 1 | Preview Mode (Live Mode) | In this mode, you can see the configuration panel and other settings. |
| 2 | Menu options | There are 3 menus : DVR CAM status display, configuration and tools. |
| 3 | Device Configuration | Click on “Device Configuration” to add DVR CAM. |
| 4 | Configuration panelSystem SettingUser SettingSwitch User | Click on “System Setting” to configure the system setting.Click on “User Setting” to add and edit user account.Click “Switch User” to change user. |
| 5 | Remote Backup Setting | Click on “Remote Backup Setting” to set DVR remote backup. |
| 6 | Schedule Edit | Click on “Schedule Edit” to edit remote backup shcedurel |
| 7 | Lock/Unlock System | Click on “Lock/Unlock System” to lock KViewCenter control panel.Click on “Lock/Unlock System” function again to unlock system panel. |
| 8 | DVR Server (Standard Version) | Click on “DVR Server” to know server status and information. |
(2) DVR CAM Status Display Menu:
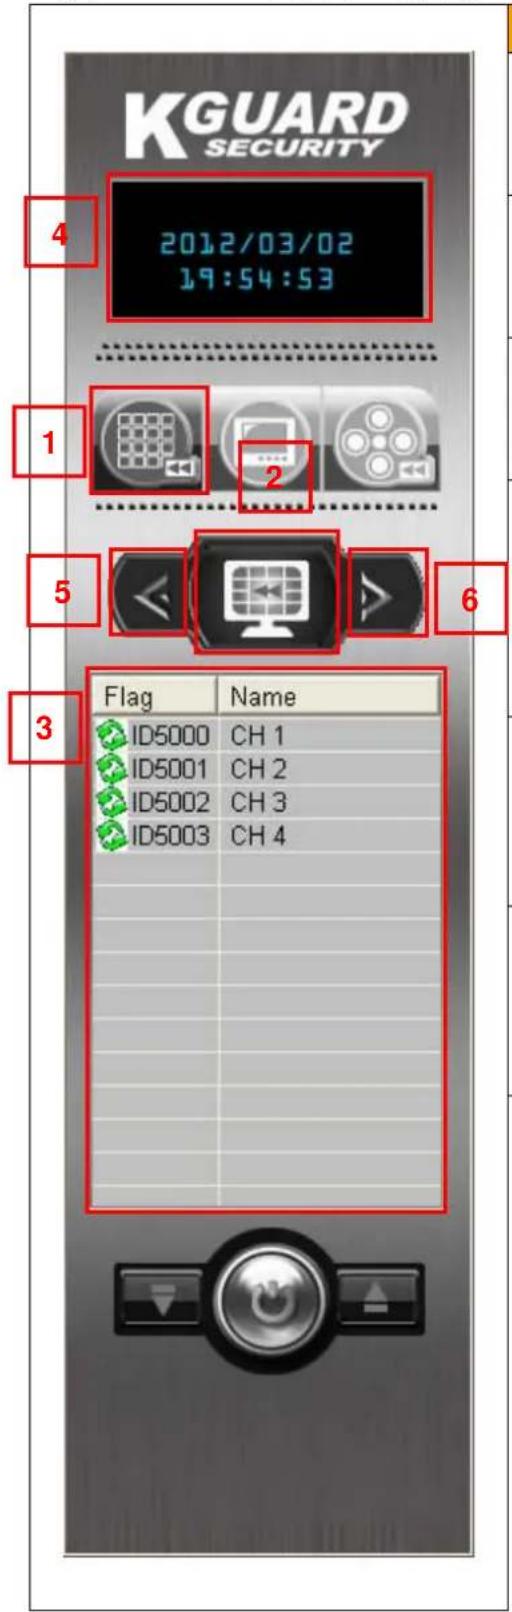
| No. | Functions Description | |
| 1 | Preview Mode (Live Mode) | In this mode, you can see the configuration panel and other settings. |
| 2 | DVR Cam status display menu | In this menu, you can check the status of DVR Cam. |
| 3 | DVR Cam status display | In this display, you can see the status of IP Cam. |
| 4 |  | The date information display panel. |
| 5 |  | Menu selection (Left forward) |
| 6 |  | Menu selection (Right backward) |
(3) Tools Menu:
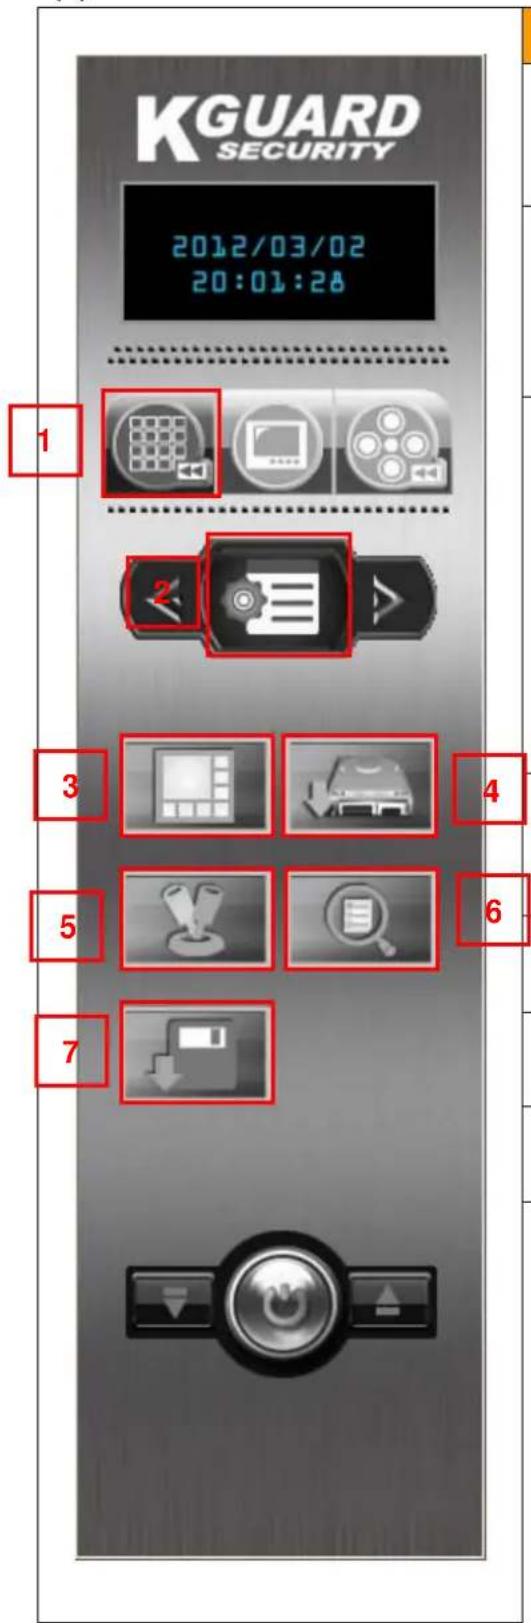
| No. | Functions Description | |
| 1 | Preview Mode (Live Mode) | In this mode, you can see the configuration panel and other settings . |
| 2 | Tools menu | In this menu, you can control PTZ, display events, backup and call layout panel. |
| 3 | Layout panel | Click to call open/close Layout panel. There are 7 types of display.*Mode 1x1 / Mode 2x2 / Mode 3x3 / Mode 4x4 / Mode 5x5 / Mode 6x6 / Full screen.“Full screen” button. |
| 4 | Backup Center | Click to “Backup Center” to download DVR recording. |
| 5 | PTZ Panel | Click to control PTZ DVR CAM. |
| 6 | Event View | Click to open/close event viewer. |
| 7 | System Backup (Standard Version) | Click on “System Backup” to save / reload user and DVR information. |
1.5. Control Panel (E-map Mode)
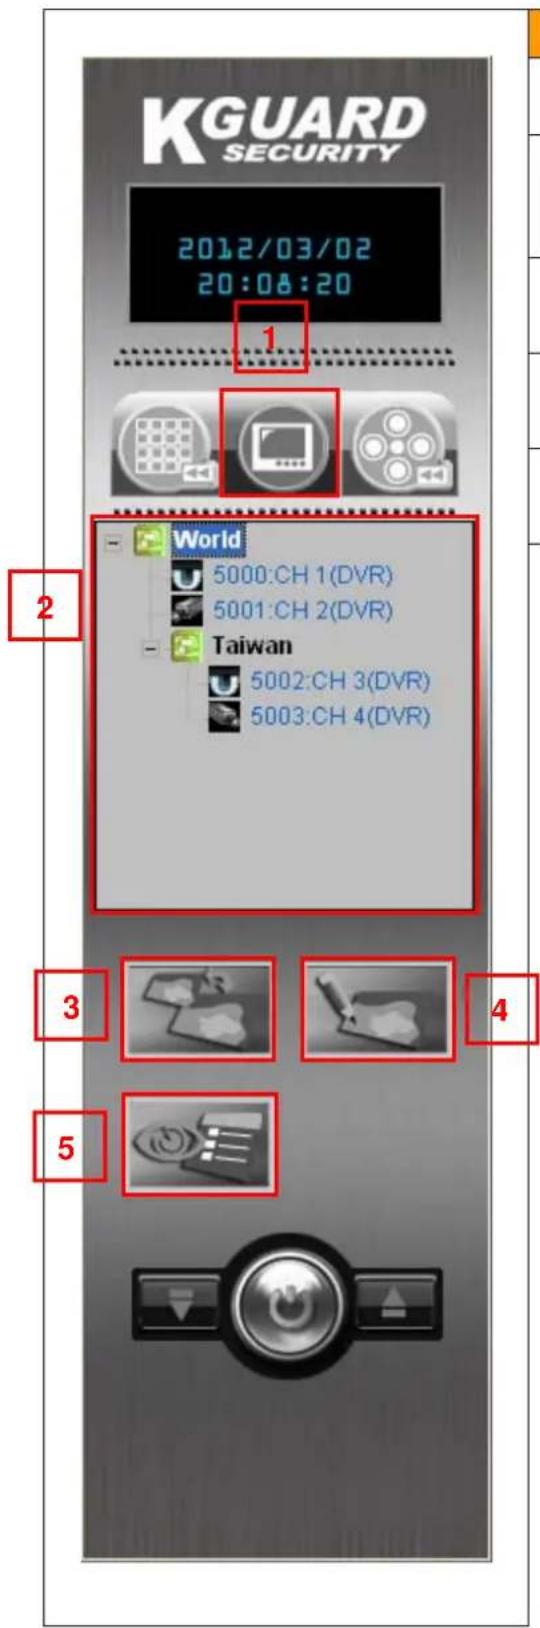
| No. | Functions Description | |
| 1 | E-Map Mode | In this mode, you can edit E-Map. |
| 2 | Edit Tree Panel | Display E-nap tree panel. |
| 3 | Switch Map | Click to Switch between different E-Map. |
| 4 | Edit Map | Click to edit E-Map. |
| 5 | Event View | Click to open/close Event list display panel. |
1.6. Control Panel (Playback Mode)
| No. | Functions Description | |
| 1 | Playback Mode | In this mode, you can search the recording |
| 2 | Remote Playback | User may remote playback record video and backup. |
| 3 | Local Playback | User may local search record video and playback. |
【Chapter 2: DVR CAM Setting】
2.1. DVR CAM Setup
Step 1. Switch to "Preview Mode" on control panel

natural_image
Three grayscale icons representing media and audio control elements (no text or symbols)and change the menu
to "Configuration Mode"

natural_image
Abstract mechanical button with gear and arrow symbols (no text or labels)“Device Configuration”

the DVR Device edit window will display.
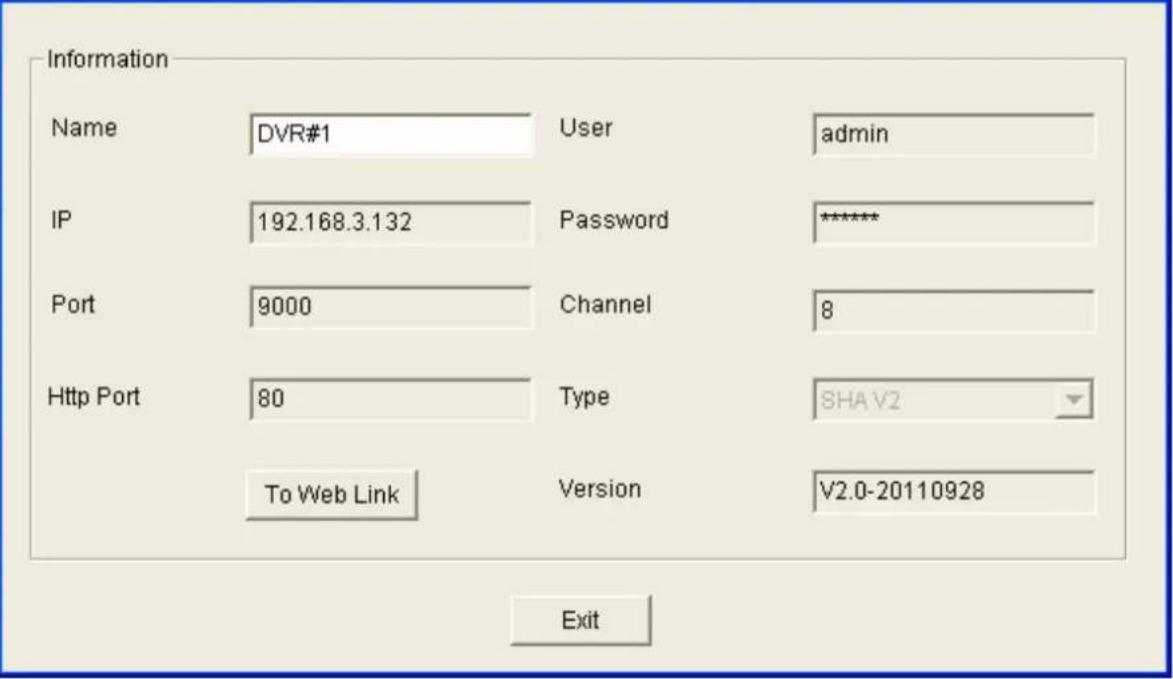
Step 2. “Add DVR” button, and key in the name、IP Address (correct IP address)、user
account、Password of Stand-alone DVR, and “OK” button.
*For example: If the IP address and Port of standalone DVR is 192.168.3.132, port is 09000, you need to key in IP address 192.168.3.132, port 9000, herein.
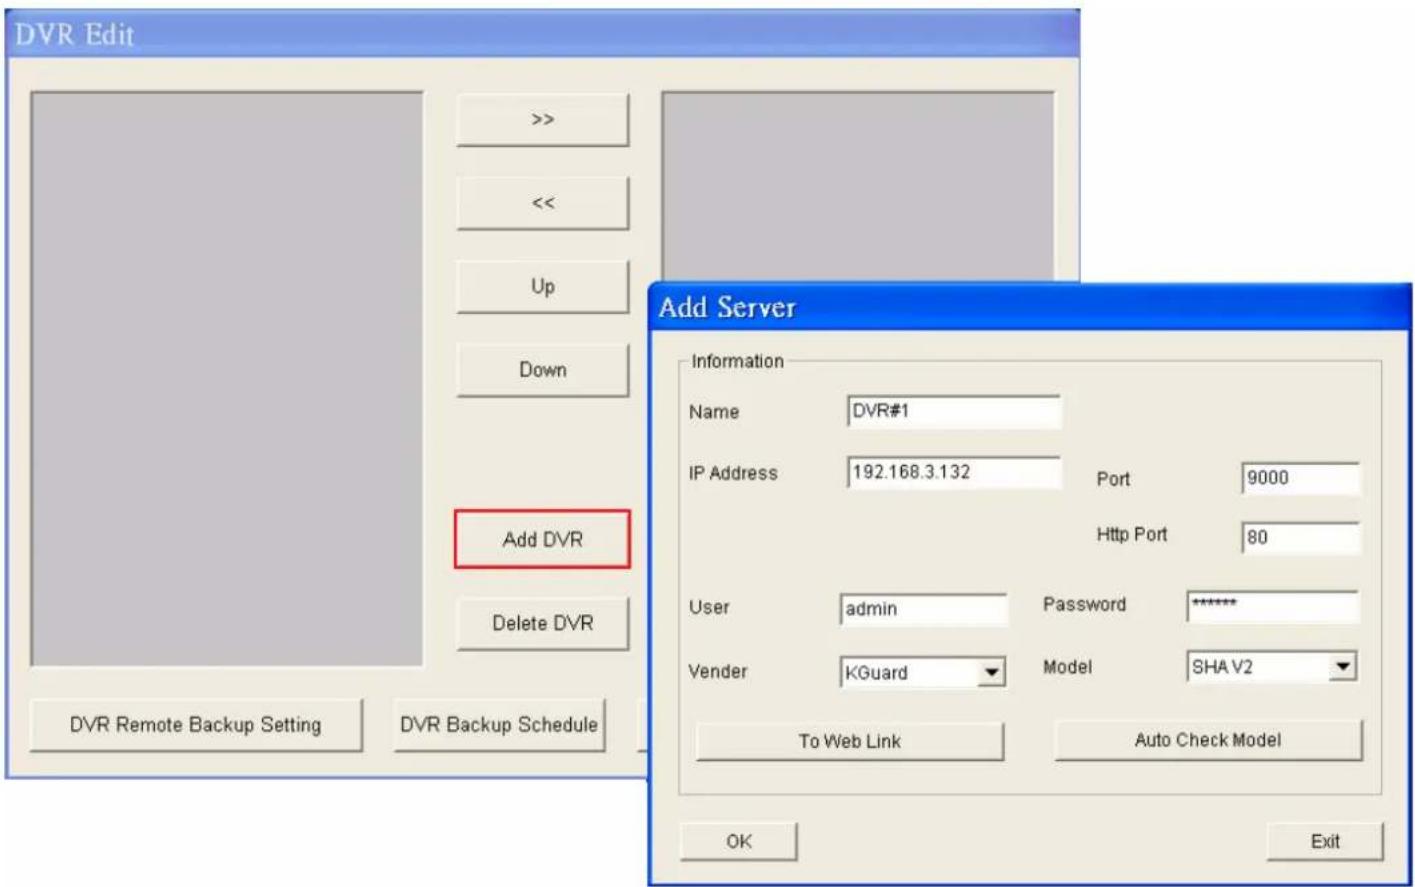
*if stand-alone DVR with User name and password, please key-in the same user name and password herein.(the default is empty/no need to put User name and password)

Delete DVR button, user
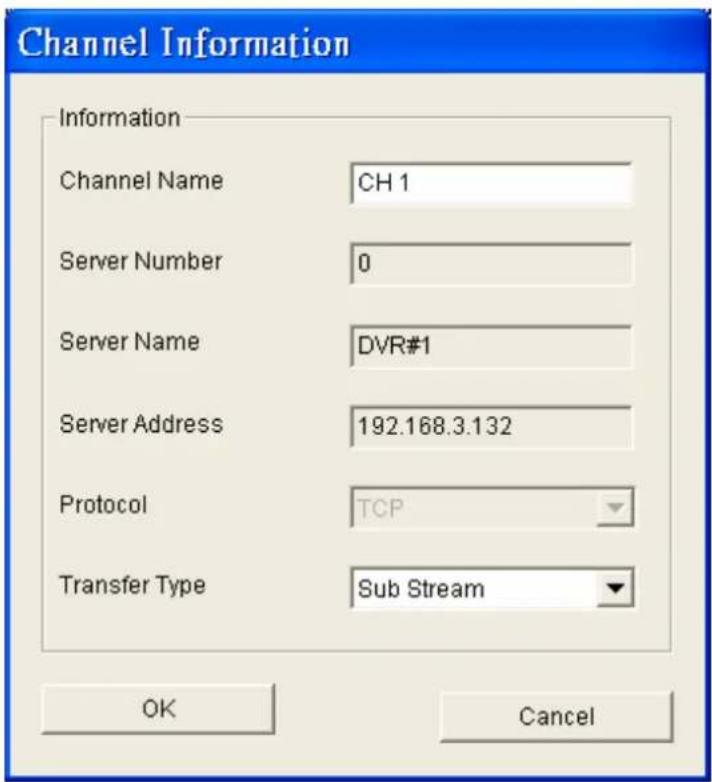
Step 3. Add channel user want to monitor.
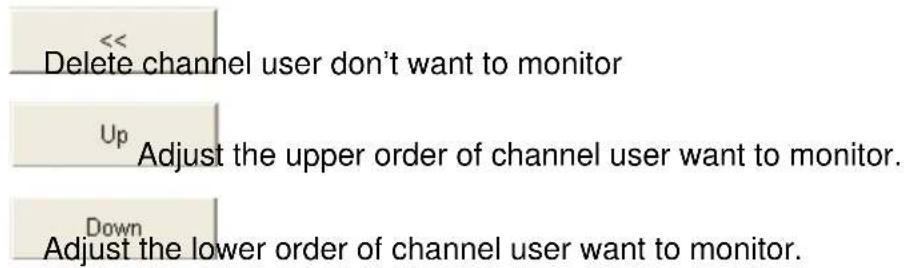

"OK" button, and user may monitor channel of DVR-SHA. Double click on left button of mouse user may adjust server / channel information again.
DVR Edit
Server Information
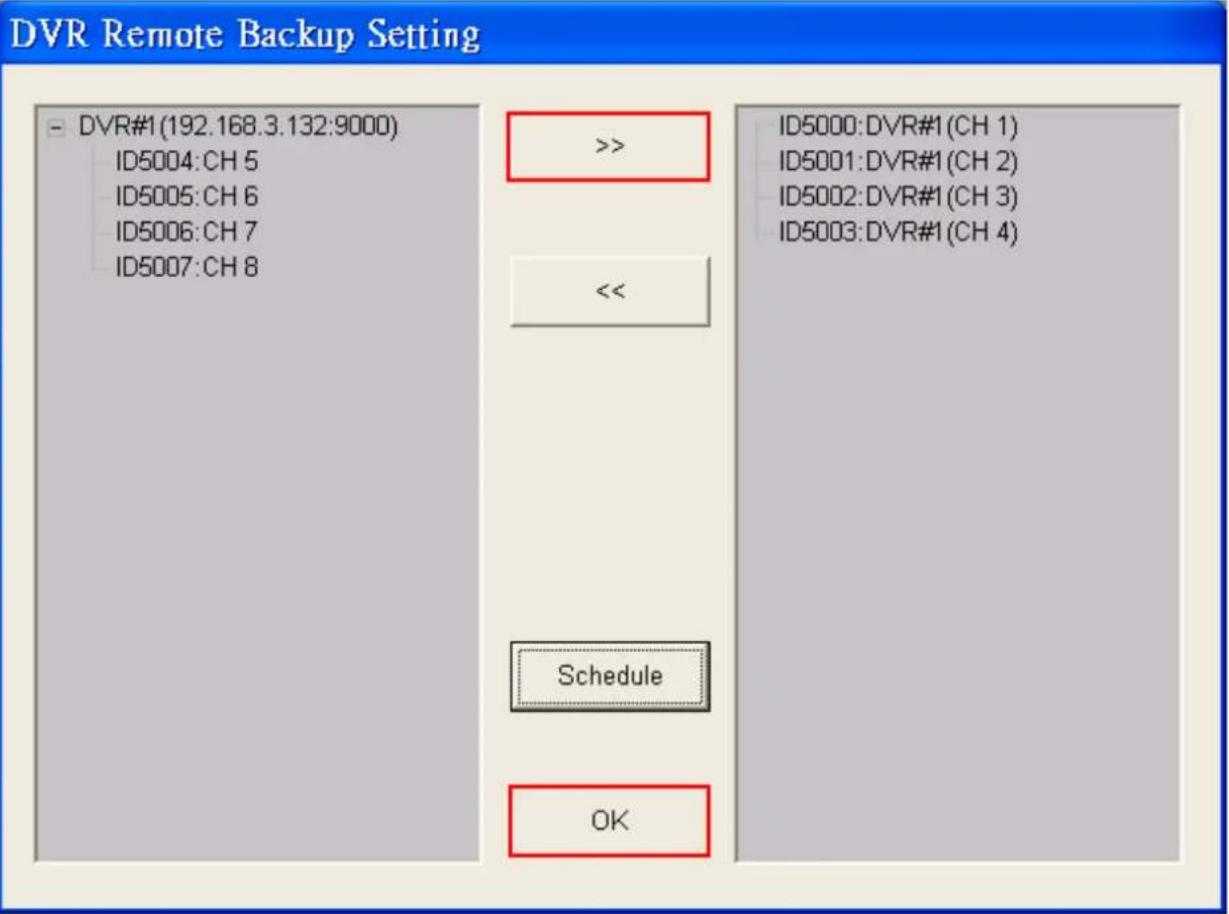
2.2. Remote Backup Setting
Step 1. Switch to "Preview Mode" on control panel

natural_image
Three grayscale icons representing media and audio control elements (no text or symbols)and change the menu
to "Configuration Mode"
natural_image
Pure mechanical control button icon without any text or symbols"Remote Backup Setting"

and the DVR remote backup setting window will display.
Step 2. >> button, to add cameras, and “OK” button.
*if you don't add cameras, herein, you wouldn't have any video file or any channels to backup. *if you don't setup DVR backup setting, the system can't run the functions of playback.
2.3. Backup Schedule
Step 1. Switch to “Preview Mode” on control panel and change the menu
to "Configuration Mode" "Schedule Edit" and the
schedule edit window will display.
Step 2. Choose the channel and the day/time (use the mouse to draw a line) which you need, and
“OK” button. *After you chose the schedule, the area will be the color of red.
Step 3. “Copy to ...” button. User may copy some channel setting to another channel.
KGUARD KViewCenter Software User Manual
Copy to all
192.168.3.103:9000(1):CH2
192.168.3.103:9000(2):CH3
192.168.3.103:9000(3):CH4
Step 4. "OK" button.

2.4. Backup Center (backup the recording video in 7 days)
The purpose of this function is to help to user backup 7 days recording video file.

natural_image
Three grayscale icons representing media and video playback controls (no text or symbols)Step1. Switch to "Preview Mode" on control panel
and change the menu
to "Tool Mode"
natural_image
Close-up of a black button with white text and arrow symbols, no readable text or numbers present.Step 2. "DVR Backup Center"
*Also, the

icon will display in the shortcut of windows as “Resident Program”.
Step 3. “Auto Download” button. KViewCenter will download specific recording file of channel by DVR remote backup and setting automatically.
Step 4. If the specific recording file of channel is finished, the green icon will display.
Step 5. Double on green icon, user may play recording.
| No. | StartTime | TotalTime |
| 1 | 2011/10/06 15:03:45 | 00:15:02 |
| 2 | 2011/10/06 15:18:45 | 00:04:08 |
| 3 | 2011/10/06 15:22:51 | 00:00:31 |
| 4 | 2011/10/06 15:23:22 | 00:02:33 |
| 5 | 2011/10/06 15:25:53 | 00:00:32 |
| 6 | 2011/10/06 15:26:23 | 00:02:59 |
| 7 | 2011/10/06 15:29:20 | 00:00:32 |
| 8 | 2011/10/06 15:29:50 | 00:00:51 |
![[1]CH 1(192.168.3.132:9000 CH01) No. StartTime TotalTime 1 2011/10/06 15:03:45 00:15:02 2 2011/10/06 15:18:45 00:04:08 3 2011/10/06 15:22:51 00:00:31 4 2011/10/06 15:23:22 00:02:33 5 2011/10/06 15:25:53 00:00:32 6 2011/10/06 15:26:23 00:02:59 7 2011/10/06 15:29:20 00:00:32 8 2011/10/06 15:29:50 00:00:51 9 2011/10/06 15:30:39 00:00:35 10 2011/10/06 15:31:12 00:00:45 [3]CH 3(192.168.3.132:9000 CH03) No. StartTime TotalTime 1 2011/10/06 15:17:32 00:09:14 2 2011/10/06 15:26:44 00:00:31 3 2011/10/06 15:27:13 00:00:31 4 2011/10/06 15:27:42 00:00:32 5 2011/10/06 15:28:12 00:00:58 6 2011/10/06 15:29:08 00:00:58 7 2011/10/06 15:30:04 00:01:00 8 2011/10/06 15:31:03 00:02:06 9 2011/10/06 15:33:07 00:00:43 10 2011/10/06 15:33:49 00:09:20 HD 4824 / 39997 (I) [2]CH 2(192.168.3.132:9000 CH02) No. StartTime TotalTime 1 2011/10/06 15:03:45 00:15:02 2 2011/10/06 15:18:46 00:02:37 3 2011/10/06 15:21:21 00:00:33 4 2011/10/06 15:21:52 00:04:24 5 2011/10/06 15:26:14 00:00:32 6 2011/10/06 15:26:44 00:01:22 7 2011/10/06 15:28:04 00:00:37 ch 0 CH2 Flip FloP O4 X II-IO-OB I4-SS-IB - IP-FOC Chyooxooxooxooxooxooxooxooxooxooxooxooxooxooxooxooxooxooxooxooxooxooxooxooxooxooxooxooxooxooxooxooxooxooxooxooxooxooxooxooxooxooxooxooxooxooxooxooxooxooxooxcnnn CD CD CD CD CD CD CD CD CD CD CD CD CD CD CD CD CD CD CD CD CD CD CD CD CD CD CD CD CD CD CD CD CD CD CD CD CD CD CD CD CD CD CD CD CD CD CD CD CD CD CD CN CN CN CN CN CN CN CN CN CN CN CN CN CN CN CN CN CN CN CN CN CN CN CN CN CN CN CN CN CN CN CN CN CN CN CN CN CN CN CN CN CN CN CN CN CN CN CN CN CN CN N N N N N N N N N N N N N N N N N N N N N N N N N N N N N N N N N N N N N N N N N N N N N N N N N N N M M M M M M M M M M M M M M M M M M M M M M M M M M M M M M M M M M M M M M M M M M M M M M P P P P P P P P P P P P P P P P P P P P P P P P P P P P P P P P P P P P P P P P P P P P P P P P P P S S S S S S S S S S S S S S S S S S S S S S S S S S S S S S S S S S S S S S S S S S S S S S S S S S T T T T T T T T T T T T T T T T T T T T T T T T T T T T T T T T T T T T T T T T T T T T T T T T T T T U U U U U U U U U U U U U U U U U U U U U U U U U U U U U U U U U U U U U U U U U U U U U U U U U U U A B C D E F G H I J K L M N O P Q R S T U V W X Y Z AA AB AC AD AE AF AG AH AI AJ AK AL AM AN AO AP AQ AR AS AT AU AV AW AX AX AX AX AX AX AX AX AX AX AX AX AX AX AX AX AX AX AX AX AX AX AX AX AX AX AX AX AX AX AX AX AX AX AX AX AX AX AX AX AX AX AX AX AX AX AX AX AX AX A B C D E F G H I J K L M A B A A B A C A B A C A A A A A A A A A A A A A A A A A A A A A A A A A A A A A A A A A A A A A A A A A A A A A A A A A A A A CA CA CA CA CA CA CA CA CA CA CA CA CA CA CA CA CA CA CA CA CA CA CA CA CA CA CA CA CA CA CA CA CA CA CA CA CA CA CA CA CA CA CA CA CA CA CA CA CA CA CA CA CA CA CA CA CA CA CA CA CA CA CA CA CA CA CA CA CA CA CA CA CA CA CA CA CA CA CA CA CA CA CA CA CA CA CA CA CA CA CA CA CA CA CA CA CA CA CA CA CA CA CA CA CA CA CA CA CA CA CA CA CA CA CA CA CA CA CA CA CA CA CA CA CA CA CA CA CA CA CA CA CA CB C C C C C C C C C C C C C C C C C C C C C C C C C C C C C C C C C C C C C C C C C C C C C C C C C C CX CX CX CX CX CX CX CX CX CX CX CX CX CX CX CX CX CX CX CX CX CX CX CX CX CX CX CX CX CX CX CX CX CX CX CX CX CX CX CX CX CX CX CX CX CX CX CX CX CX CX X X X X X X X X X X X X X X X X X X X X X X X X X X X X X X X X X X X X X X X X X X X X X X Y Y Y Y Y Y Y Y Y Y Y Y Y Y Y Y Y Y Y Y Y Y Y Y Y Y Y Y Y Y Y Y Y Y Y Y Y Y Y Y Y Y Y Y Y Y Y Y Y Y X X X X X X X X X X X X X X X X X X X X X X X X X X X X X X X X X X X X X X X X X X X X X X X X X X XY XY XY XY XY XY XY XY XY XY XY XY XY XY XY XY XY XY XY XY XY XY XY XY XY XY XY XY XY XY XY XY XY XY XY XY XY XY XY XY XY XY XY XY XY XY XY XY XY XY XY + O O O O O O O O O O O O O O O O O O O O O O O O O O O O O O O O O O O O O O O O O O O O O O O O O O O O O O O O O O O O O O O O O O O O O O O O O O O O O O O O O O O O O O O O O O O O O O O O O O O OO HD HD HD HD HD HD HD HD HD HD HD HD HD HD HD HD HD HD HD HD HD HD HD HD HD HD HD HD HD HD HD HD HD HD HD HD HD HD HD HD HD HD HD HD HD HD HD HD HD HD HD NO. [3]CH CH CH CH CH CH CH CH CH CH CH CH CH CH CH CH CH CH CH CH CH CH CH CH CH CH CH CH CH CH CH CH CH CH CH CH CH CH CH CH CH CH CH CH CH CH CH CH CH CH CH NH NO StartTime TotalTime](/content/2026/05/1010353/images/2831a257577852f8bda15c18161769262152dc026bee462e3dca9335a44a9498.jpg)
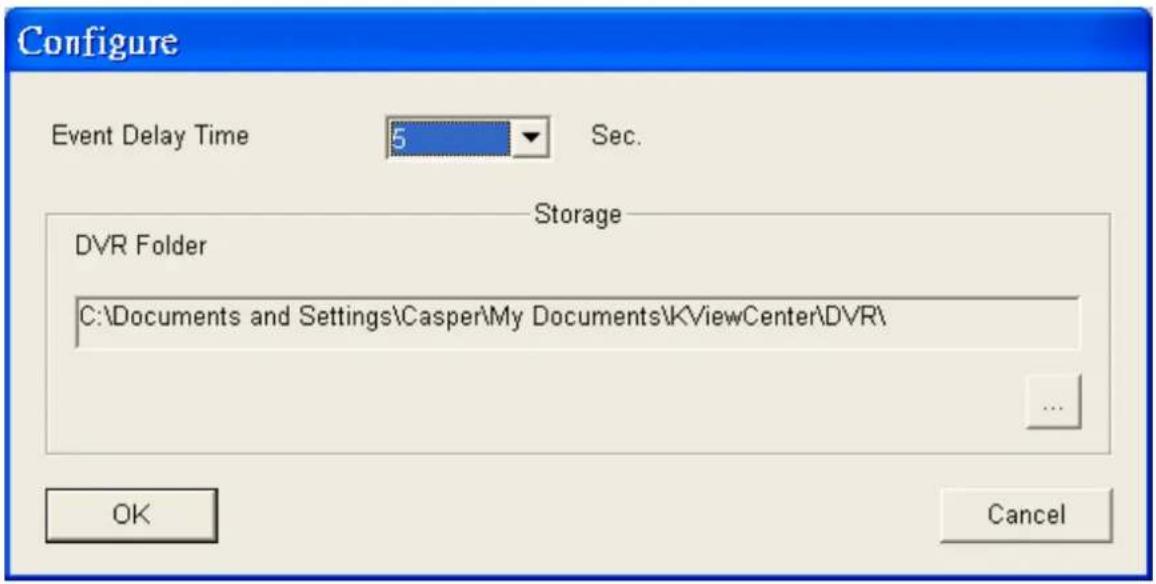
2.5. DVR Miscellaneous Setting

Step 2. Select "Event Delay Time" to change DVR motion diction delay time.
Strp 3. Button to set DVR directory of storage.
Step 4. "OK" button to save setting.
*When the DVR disconnected, the backup schedule can't reconnect to the internet automatically. Hence, you have to reconnect it manually.
【Chapter 3: E-Map Mode】
3.1. Map Edit

natural_image
Three grayscale icons representing media and film-related objects (no text or symbols)Step 1. Switch to "E-Map Mode" on control panel
Step 2. "E-Map Edit"
Step 3. Window "E-Map Edit Panel" will pop up. User need to edit the E-map at beginning.

Move mouse cursor onto black area of E-Map Edit Panel.
Click on the right button of mouse. Select "Map Setup" to edit E-Map.
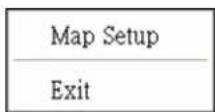
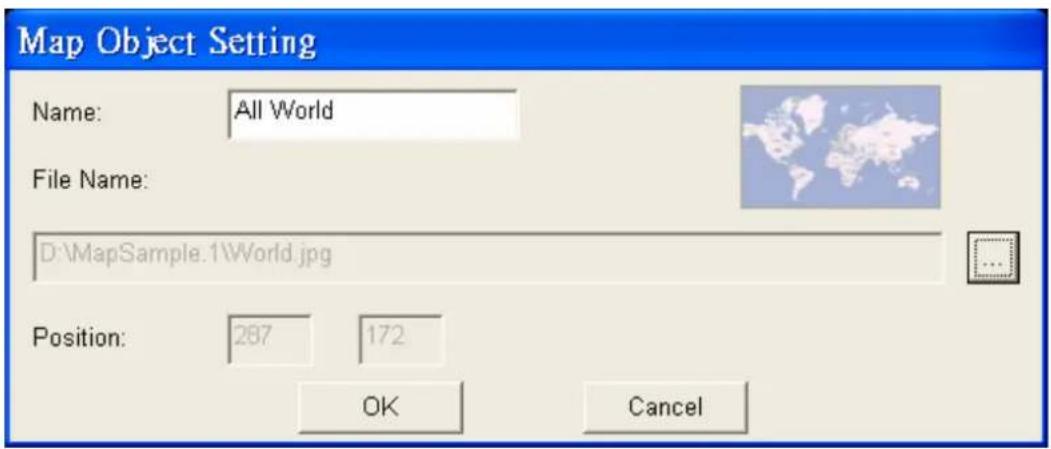
Step 4. User need to locate a picture by

*The picture size cannot greater than 800x600 .User has to base on actual map and edit it. This is a sample as below.
Enter a name for this map. “OK” button to save the setting.
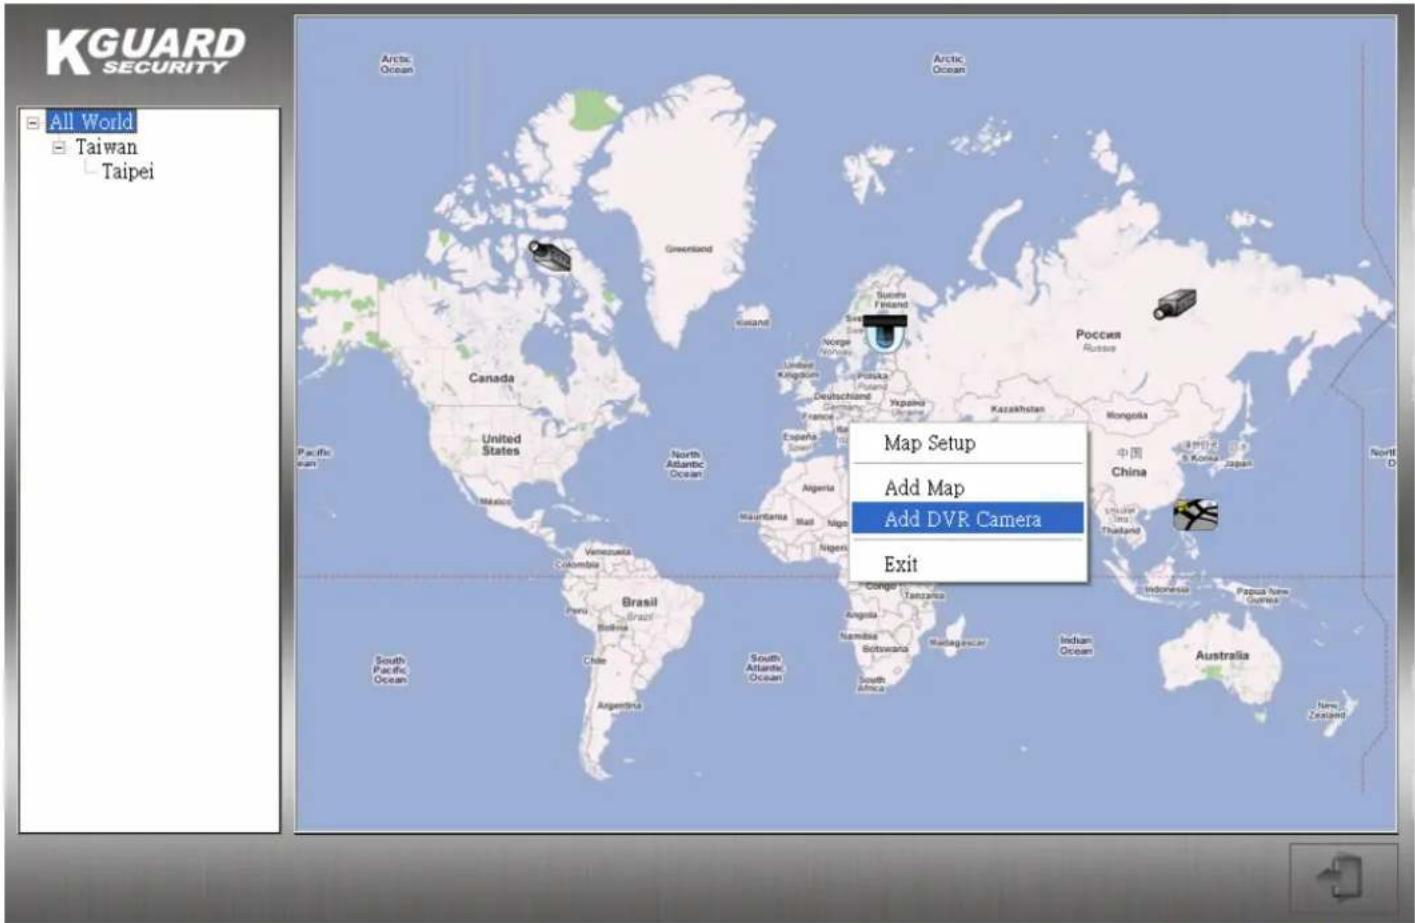
Step 5. Add "Map"、"DVR Camera". Click on right button of mouse.

Select "Add Map" option to add new map and edit map by order.
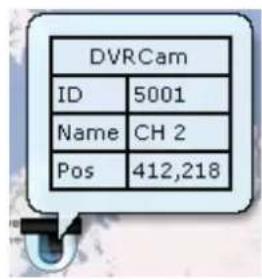
Select "Add DVR Camera" option to add an DVR CAM onto E-Map.
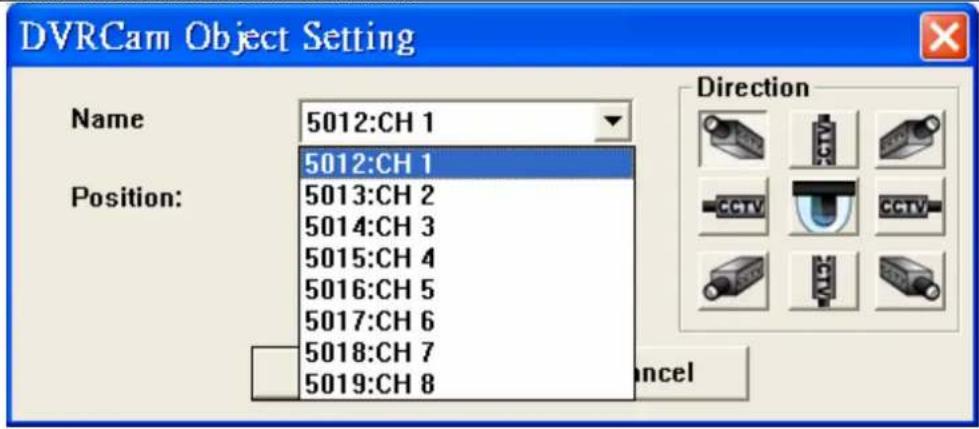
Step 4. Please select or modify DVR Camera to Emap. 📋 DVR Camera object user want to monitor.
KGUARD KViewCenter Software User Manual
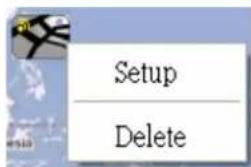
Step 6. Delete object
Move mouse cursor onto object of map. Click on right button of mouse 🎨. User can delete or re-setup objects that include “Map”、“DVR CAM”

Step 7. Save the settings
3.2. Map Switch
Step 1. “Switch Map” function.
User can select and switch item to watch map.

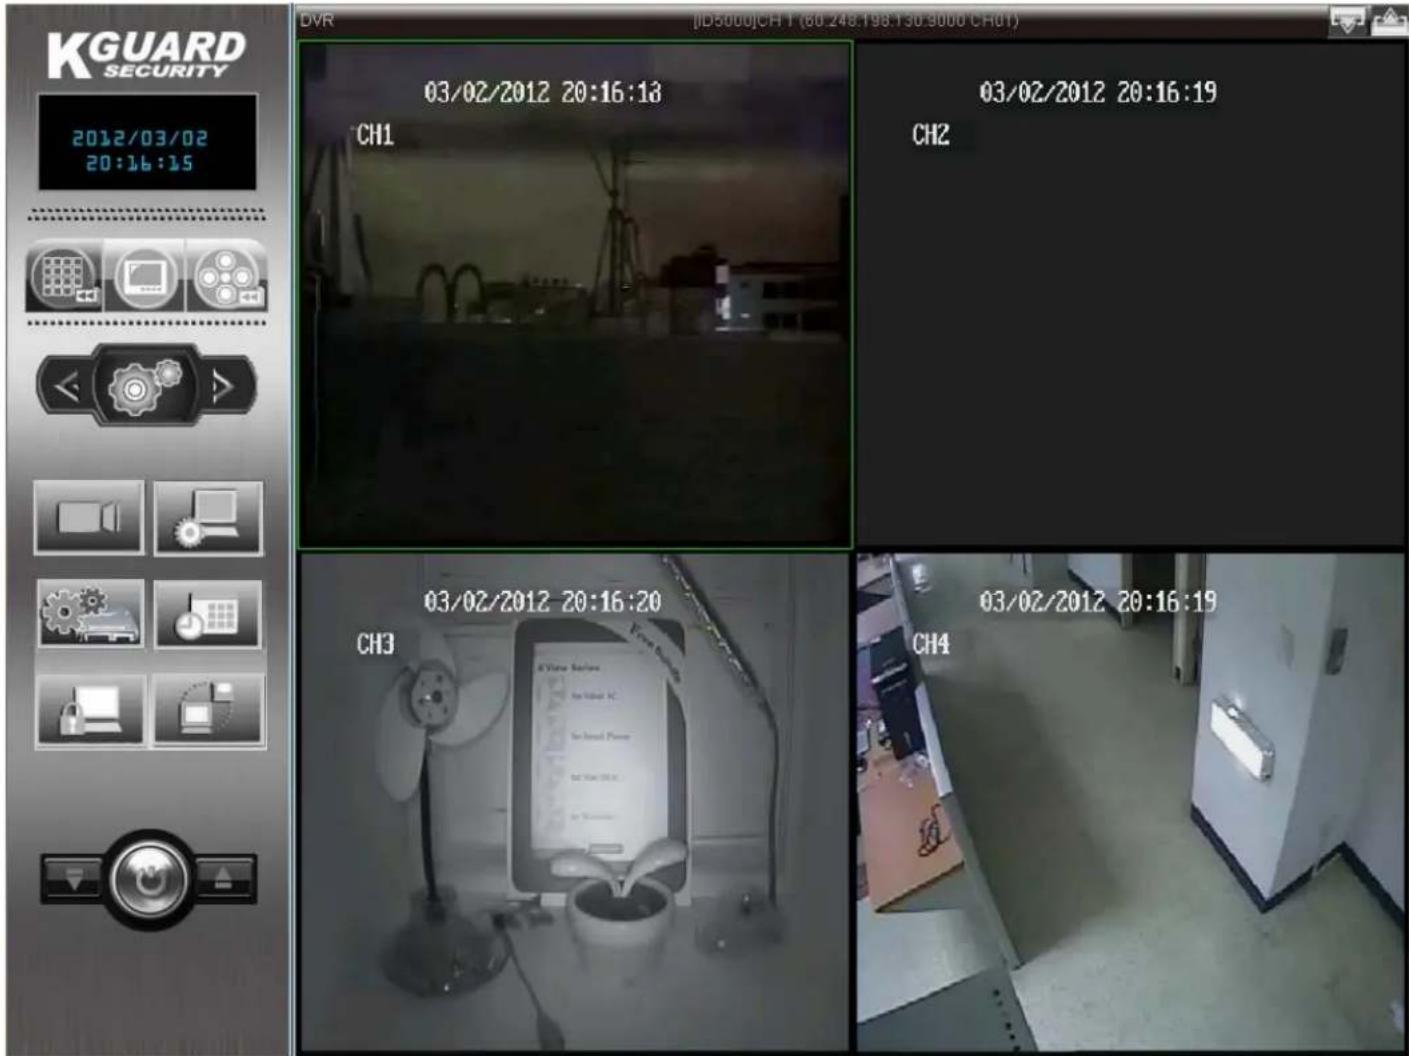
Step 2. Display DVR CAM recording. Move mouse cursor onto DVR CAM icon. Double click on left button of mouse and DVR CAM recording is displayed.
3.3. Event View

"Event View" icon to view event list display.
"Event View" panel will pop up. If motion detection is active, any motion detected event will show in the "Event View".
![KGUARD SECURITY 2011/10/13 17:45:53 All World 5000.CH 1(DVR) 5001.CH 2(DVR) 5002.CH 3(DVR) 5003.CH 4(DVR) Taiwan 5004.CH 5(DVF) 5005.CH 6(DVF) 5006.CH 7(DVF) Taipei 5009.CH 2 10/13/2011 17:45:45 CH2 Have Peace of Mind for What You Think is Most Valuable 5010.CH 3 10/13/2011 17:45:46 CH3 Event List: Time Event Type Contents 2011/10/13 17:45:51 Motion Detection ID5008 CH 1[60.246.196.130.9000]: CH01 2011/10/13 17:45:46 Motion Detection ID5002 CH 3[192.188.3.132.9000]: CH03 2011/10/13 17:45:45 Motion Detection ID5008 CH 1[60.248.198.130.9000]: CH01 2011/10/13 17:45:29 Motion Detection ID5001 CH 2[192.188.3.132.9000]: CH02 2011/10/13 17:45:29 Motion Detection ID5008 CH 1[60.248.198.130.9000]: CH01 2011/10/13 17:45:20 Motion Detection ID5002 CH 3[192.188.3.132.9000]: CH03 2011/10/13 17:45:22 Motion Detection ID5002 CH 3[192.188.3.132.9000]: CH03 2011/10/13 17:45:11 Motion Detection ID5001 CH 2[192.188.3.132.9000]: CH02 2011/10/13 17:45:09 Motion Detection ID5002 CH 3[192.188.3.132.9000]: CH03 2011/10/13 17:45:04 Motion Detection ID5002 CH 3[192.188.3.132.9000]: CH03 2011/10/13 17:44:46 Motion Detection ID5002 CH 3[192.188.3.132.9000]: CH03 2011/10/13 17:44:26 2011/10/13 17:44:25 2011/10/13 17:44:20 2011/10/13 17:44:09 2011/10/13 17:44:02 2011/10/13 17:44:02 2011/10/13 17:43:49 High An Detection ID5008 CH 4[192.188.3.132.9000]: CHQI 2011/10/13 17:43:43 Motion Detection ID5001 CH 2[192.188.3.132.9000]: CHQI 2011/10/13 17:43:27 Motion Detection ID500O CH 4[192.188.3.132.9000]: CHQI 2011/10/13 17:43:22 Motion Detection ID5002 CH 3[192.188.3.132.9000]: CHQI 2011/10/13 17:43:27 Motion Detection ID50OCH 4[192.188.3.132.90O]: CHQI 2011/10/13 17:43:22 Motion Detection ID5OOL CH 4[192.188.3.132.9O]: CHQI Set Pre-Position CO Auto](/content/2026/05/1010353/images/3e48f2588c0703ed82fdb9e8a2e8576b65026c7e4523f500640f91329b0cf242.jpg)
【Chapter 4: Playback Mode】
4.1. Playback / Backup locally for DVR (Specified date)
The user can specified the date to backup and playback video.
*you have to setup the setting of DVR Backup schedule, DVR remote backup setting, or you wouldn't be able to proceed the following procedures.
4.2. Remote Playback
natural_image
Three grayscale interface icons: a grid, a video player, and a film reel with sound waves (no text or symbols)Step 1. Switch to "Playback Mode" on control panel
Step 2. ☐ "Remote Playback"

Step 3. Window "Remote Playback" will pop up.
Step 4. Select DVR ID you want to remote monitor. User will get recording file list from DVR device.
![DVR Remote Player ID:5002 (60.248.198.130:9000:CH3:CH 3) Finish... 0 : 0 [13316]MB No. StartTime EndTime TotalTime FileSize 1 00:00:00 00:15:00 00:15:00 82859008 2 00:14:59 00:30:00 00:15:01 82937344 3 00:30:00 00:45:02 00:15:02 82898944 4 00:45:01 01:00:03 00:15:02 82877440 5 01:00:02 01:15:03 00:15:01 82819584 6 01:15:03 01:30:04 00:15:01 82931200 7 01:30:05 01:45:05 00:15:00 82822656 8 01:45:05 02:00:07 00:15:02 82933248 9 02:00:07 02:15:08 00:15:01 82886144 10 02:15:07 02:30:09 00:15:02 83028480 11 02:30:09 02:45:10 00:15:01 82930688 12 02:45:09 03:00:10 00:15:01 82897408 13 03:00:12 03:15:12 00:15:00 82676736 14 03:15:12 03:30:12 00:15:00 82834432 15 03:30:12 03:45:13 00:15:01 82957312 16 03:45:13 04:00:14 00:15:01 82914816 17 04:00:14 04:15:16 00:15:02 82843648 18 04:15:15 04:30:16 00:15:01 82835456 Manual Download Local Player lamal Browser Download End [O] HD 6434 / 39997 (MB) CPU 1%](/content/2026/05/1010353/images/764182441b1d151f2d2a373c8105411e53f48fb88fe95fb4afeaf553ace2ed5b.jpg)
Step 5. Select date-time and “Search” button and “DVR Remote Player” will search for all recording file, automatically. User may update recording file list. Double click on recording file list and user may remote monitor DVR CAM you need.
![DVR Remote Player ID:5002 (60.248.198.130:9000:CH3:CH 3) Finish... 0 : 0 [13322]MB No. StartTime EndTime TotalTime FileSize 47 11:30:44 11:45:46 00:15:02 82985984 48 11:45:45 12:00:46 00:15:01 83072000 49 12:00:47 12:15:48 00:15:01 83031040 50 12:15:48 12:30:49 00:15:01 83110912 51 12:30:49 12:45:50 00:15:01 82909696 52 12:45:50 13:00:51 00:15:01 83043328 53 13:00:51 13:15:52 00:15:01 82972672 54 13:15:51 13:30:53 00:15:02 83021312 55 13:30:53 13:45:54 00:15:01 82966016 56 13:45:54 14:00:55 00:15:01 82991104 57 14:00:54 14:15:55 00:15:01 83005952 58 14:15:55 14:30:56 00:15:01 82840064 59 14:30:56 14:45:58 00:15:02 83026432 60 14:45:57 15:00:59 00:15:02 83078144 61 15:00:58 15:15:59 00:15:01 83016704 62 15:15:59 15:31:00 00:15:01 83053568 63 15:31:01 15:46:02 00:15:01 82890240 64 15:46:02 16:01:03 00:15:01 82943488 65 16:04:93 16:16:94 22:45:93 22/2/2/2/2/2/2/2/2/2/2/2/2/2/2/2/2/2/2/2/2/2/2/2/2/2/2/2/2/2/2/2/2/2/2/2/2/2/2/2/2/2/2/2/2/2/2/2/2/2/2/ Manual Download Local Player Local Browser HD 6434 / 39997 (MB) CPU 26%](/content/2026/05/1010353/images/b129e52f35fe05c46f40d92917d1847ebf7155dd1fef254a94dcc775f9dbf946.jpg)
Step 6. Stop remote playback and user may download recording file you need. "Manual"
Download" button, the file will be downloaded automatically. When the file was downloaded completed, the green icon will display.

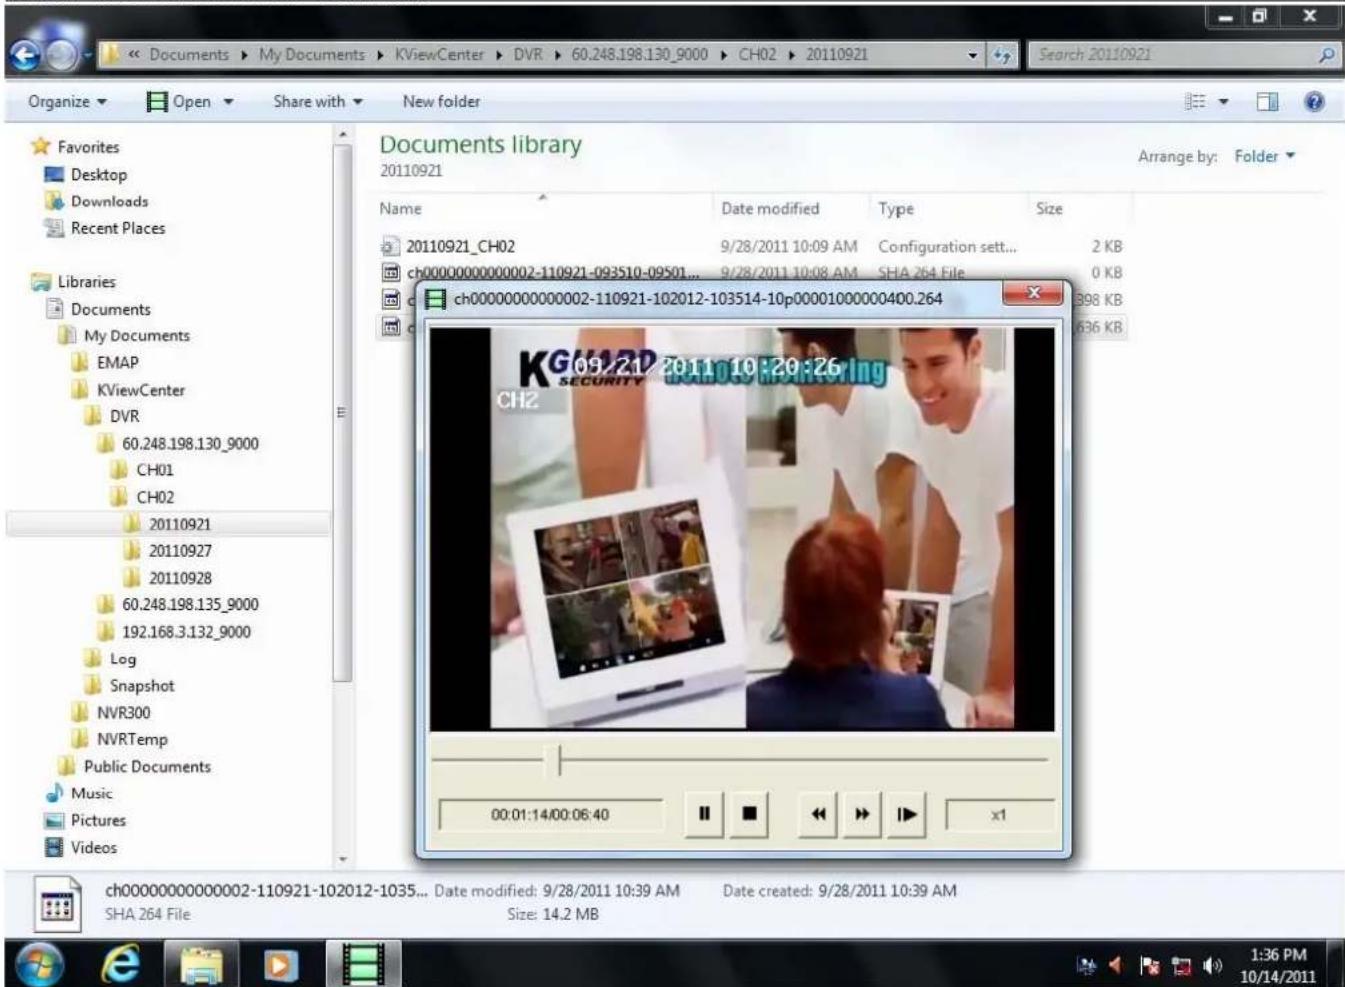
* If the DVR backup center and DVR Remote Player download simultaneously, there will display the following message:
![DVR Remote Player ID:5002 (60.248.198.130:9000:CH3:CH 3) Finish... 1 : 79 [13322]MB No. StartTime EndTime TotalTime FileSize 45 11:00:42 11:15:44 00:15:02 82949120 46 11:15:43 11:30:44 00:15:01 83150336 47 11:30:44 11:45:46 00:15:02 82985984 48 11:45:45 12:00:46 00:15:01 83072000 49 12:00:47 12:15:48 00:15:01 83031040 50 12:15:48 12:30:49 00:15:01 83110912 51 12:30:49 12:45:50 00:15:01 82909696 52 12:45:50 13:00:51 00:15:01 83043328 53 13:00:51 13:15:52 00:15:01 82972672 54 13:15:51 13:30:53 00:15:02 83021312 55 13:30:53 13:45:54 00:15:01 82966016 56 13:45:54 14:00:55 00:15:01 82991104 57 14:00:54 14:15:55 00:15:01 83005952 58 14:15:55 14:30:56 00:15:01 82840064 59 14:30:56 14:45:58 00:15:02 83026432 60 14:45:57 15:00:59 00:15:02 83078144 61 15:00:58 15:15:59 00:15:01 83016704 62 15:15:59 15:31:00 00:15:01 83053568 63 15:34:64 15:46:66 22.47.67 83222242 2% [00:54]/[03:12] Stop Download Local Player Local Browser Downloading [54]ch000000000000-3-12-3-2-1-3-2-3-2-3-2-3-2-3-2-3-2-3-2-3-2-3-2-3-2-3-2-3-2-3-2-3-2-3-2-3-2-3-2-3-2-3-2-3-2-3-2-3-2-3-2-3-2-3-2-3-3- HD 429 / 39997 (MB) CPU 0%](/content/2026/05/1010353/images/5f8197a28ae9b13740c3fbf44637cdab18b071ada4ac9ff70800b76428bb317a.jpg)
Step 7. “Local player” button, to playback the downloaded file. Local Player Step 8. “Local Browser” button to check the list of downloaded recording video from the destination folder. Local Browser
Step 9. Double click on the file of "shadvr", then you can view all downloaded recording file.
Step 10. Double click on the recording file which you would like to play, the video will display.
KGUARD KViewCenter Software User Manual
4.3. Playback Manager
Go to DVR display window, and “Playback Manager” to view the downloaded video, after you completed download procedure. Double on green icon, user may play recording.
![DVR Player Manager 02/29/2012 14:30:00 CH8 ID5107 (192.168.3.131_9000_CH08) 2012年2月 星期日 星期一 星期二 星期三 星期四 星期五 星期六 29 30 31 1 2 3 4 5 6 7 8 9 10 11 12 13 14 15 16 17 18 19 20 21 22 23 24 25 26 27 28 29 1 2 3 4 5 6 7 8 9 10 今天: 2012/3/2 StartTime EndTime TotalTime 13:53:13 13:53:13 00:00:00 14:23:55 14:24:00 00:00:05 14:24:00 14:24:00 00:00:00 14:25:11 14:25:24 00:00:13 14:27:14 14:27:14 00:00:00 14:28:33 14:28:48 00:00:15 14:29:38 14:29:38 00:00:00 14:34:33 14:46:21 00:11:48 14:46:21 14:46:56 00:00:35 14:46:56 14:47:05 00:00:09 14:47:05 14:47:40 00:00:35 14:47:40 15:35:14 00:47:34 x1 [2012/02/29 14:29:38 - 14:29:38] 00:00:21/00:00:21](/content/2026/05/1010353/images/4136d397004adf984a042588a33f276f699d1eed419e188ad5a655fa388f2aca.jpg)
Setting Procedures of Playback & remote/ local backup
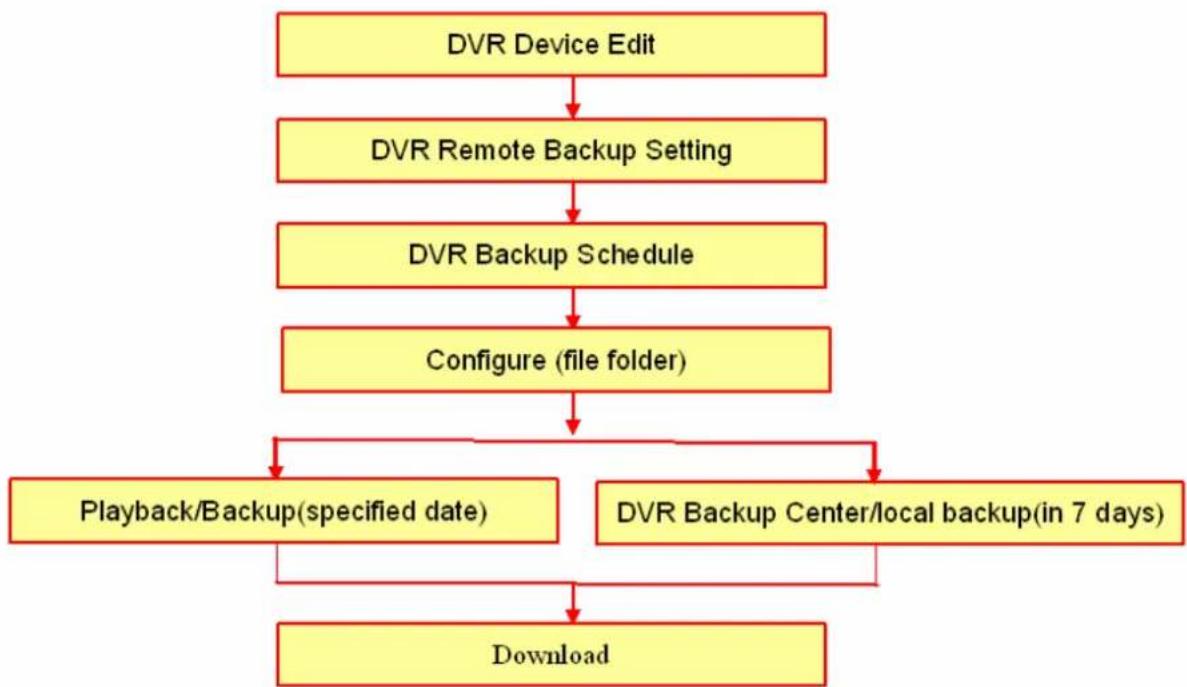
flowchart
graph TD
    A["DVR Device Edit"] --> B["DVR Remote Backup Setting"]
    B --> C["DVR Backup Schedule"]
    C --> D["Configure (file folder)"]
    D --> E["Playback/Backup(specified date)"]
    D --> F["DVR Backup Center/local backup(in 7 days)"]
    E --> G["Download"]
    F --> G
【Chapter 5: Miscellaneous Functions】
5.1. System Setting
Step 1. Switch to "Preview Mode" on control panel to "Configuration Mode".

natural_image
Three grayscale icons representing media and video playback controls (no text or symbols)and change the menu
Step 2. “System Configuration” icon.
natural_image
Pure mechanical gear icon with no text or symbolsStep 3. Select "System Setting" option.
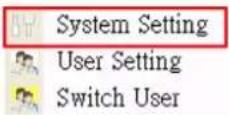
![System Setting nba-casperchin : 192.168.3.120 : 192.168.56.1 DirectX Version : 9.0c 2.12.1.20 External IP Address 59.120.205.162 StartUp Automatic Login User Name admin Password **** Minimize system Web Server 8080 Live Streaming Server 1111 Enable automatic reboot Auto Reboot Reboot Mode Every Day At time 12:00 AM Snapshot Folder Format JPEG C:\Documents and Settings\Casper\My Documents\KViewCenter\Snapshot\ OK Cancel KViewCenter 64 Professional(2.1.1.0)[0]](/content/2026/05/1010353/images/ca5e3921fb1339d027e1e909465f8ddeaed839bd699834e4a2fa3d63f5fe1e64.jpg)
5.1.1. User Information
User's public IP address can be view here.
5.1.2. Startup Action
Step 1. Select "Automatic Login" to enable automatic login when starting KViewCenter typing username and password.
Step 2. Select "Minimize System" to enable KViewCenter minimize to window bar.
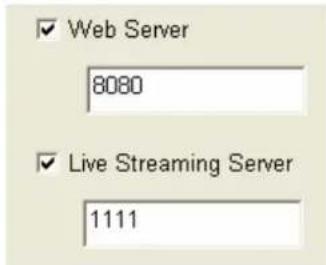
Step 3. User can set "Web Server"、"Live Streaming Server" (Standard Version). It is commutated with related server.
5.1.3. Automatic Reboot
User can define a time for system reboot.
This function will increase the stability of the system.
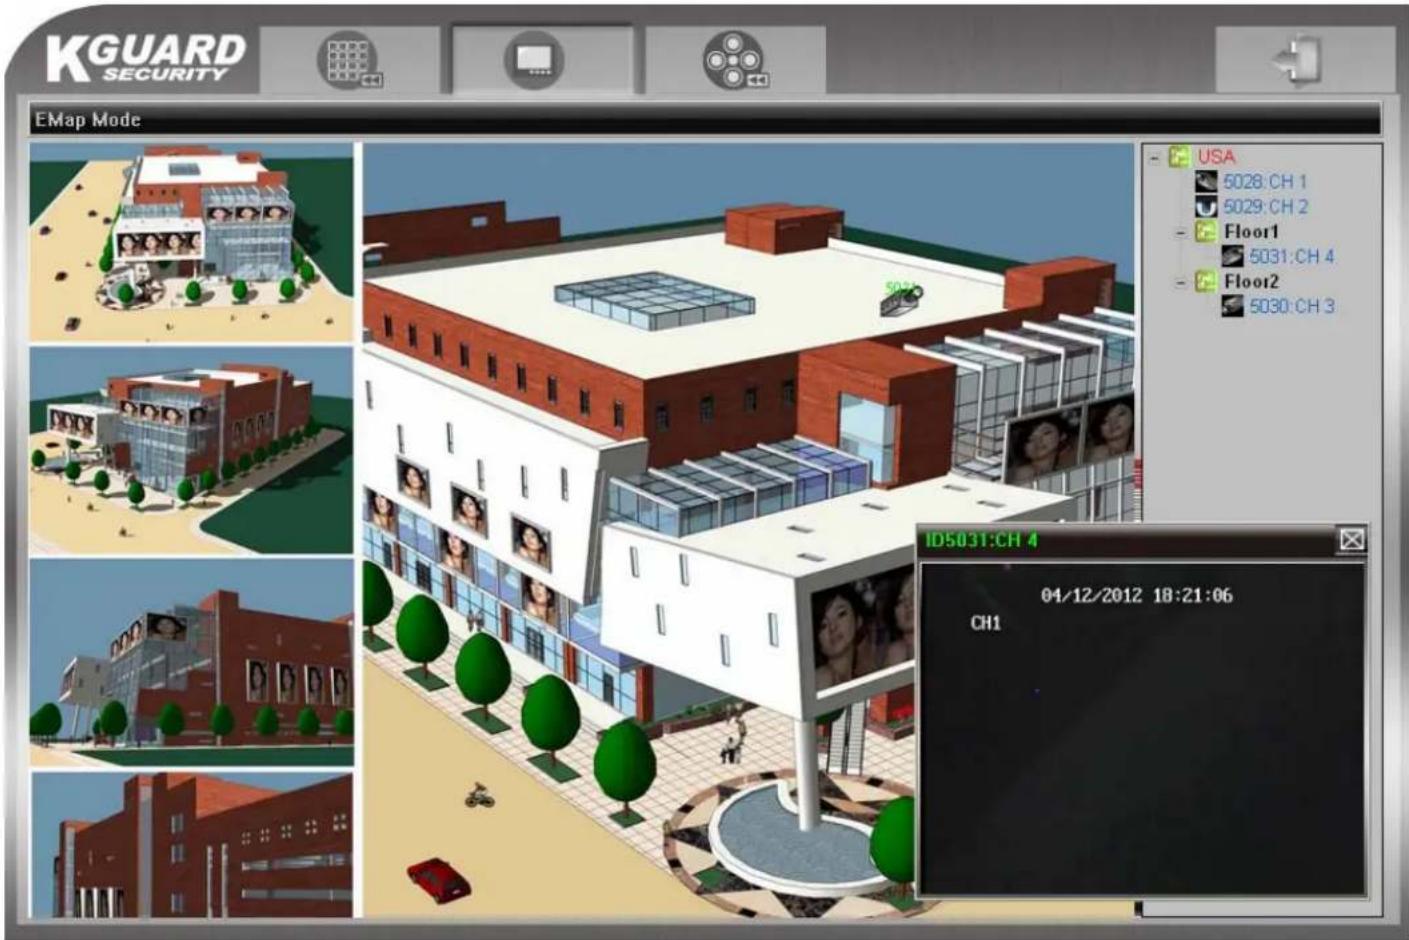
5.1.4. Snapshot
Step 1. button in snapshot to select a directory for storing snapshot photo.
Step 2. Select “Format” option to select the snapshot photo store format. *Photo format: JPEG、BMP、GIF、PNG.
5.2. User Account Setting
Step 1. Switch to "Preview Mode" on control panel and change the menu to "Configuration Mode".
Step 2. “System Configuration” icon.

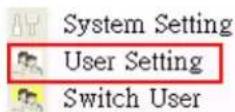
Step 3. Select "System Setting" option.
Step 4. System may offer to authority by users. Administrator has authority uppermost include "Account Setting"、"Configure Setting"、"E-Map Setting"、"Check Event"、"Playback video file"、"PTZ control" and "Exit program". Beside "Account Setting", power user hasn't limitation. Guest has minimum authority
Step 5. “Client” option to enable account that is setting which DVR CAM may be monitored by
user (client). "OK" button to save the account.
Step 6. “OK” button to save the account.
*Once a new user account is been created as administrator in "Group" option, the default username (admin) and password (1234) will no longer be use. Please use the new username and password to login.

5.3. PTZ Control
Step 1. Go to "PTZ Panel" function.
Step 2. "PTZ Panel" control panel will pop up.
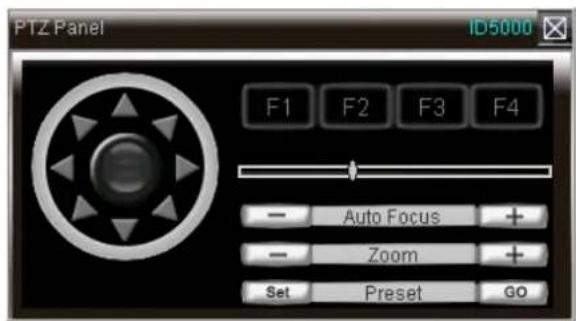
Step 3. PTZ direction control.
Step 4. PTZ moving speed bar.

To move PTZ faster drag the speed to right.

To move PTZ slower drag the speed to left.

Step 7. "Auto Focus + " button to adjust the PTZ focus manually.

Step 8. "button to adjust zoom. +
Step 9. “Set” button on “Pre-Position”, to set PTZ preset point.

"GO" button on "Pre-Position", to go to PTZ preset point.

Step 10. “Auto”, IP Dome will base on “Set” and go to preset point.

Step 11. "F1" / "F2" / "F3" / "F4" of PTZ is reserved
5.4. Layout Panel
Step 1. “Layout Panel” icon.
Step 2. Select "Mode" to layout panel and display.
Mode 1x1 / Mode 2x2 / Mode 3x3 / Mode 4x4
Mode 5x5 / Mode 6x6 / Mode Full

5.5. Quick Link
Please go to “Preview Mode” and 📋 for preview panel. It will pop up “Quick Link Item Menu”. User can link miscellaneous functions quickly.
![[ID5005]CH 6 (192.168.3.132:9000 CH06) H.254 DVR Device Edit DVR Remote Backup Setting DVR Device Backup Schedule DVR Backup Center System Setting SingleView Link to Web Connect Playback Manager Snapshot Playback Layout Mode Manual Logout System](/content/2026/05/1010353/images/2e70a78973a2b229671c30f1e506a539f6da7167491110b0b07bd267b137d73f.jpg)
DVR Device Edit: Please refer to "Chapter 2: DVR CAM Setting".
DVR Remote Backup Setting: Please refer to "2.2. Remote Backup Setting".
DVR Device Backup Schedule: Please refer to "2.3. Backup Schedule".
DVR Backup Center: Please refer to "2.4. backup Center".
System Setting: Please refer to "5.1. System Setting".
Single View: According to different DVR CAM for single view.
Link to Web: Link to different DVR web site.
Connect: Reconnect DVR streaming.
Playback Manager: User can play all recording file today by different DVR CAM.
KGUARD KViewCenter Software User Manual
Snapshot: Snapshot and quick view.
Playback: Remote playback.
Layout Mode: Direct setup view panel, include Mode 1x1、Mode 2x2、Mode 3x3、Mode 4x4、Mode 5x5、Mode 6x6、Full Screen.
Manual: About KViewCenter user manual.
Logout System: Exit system.
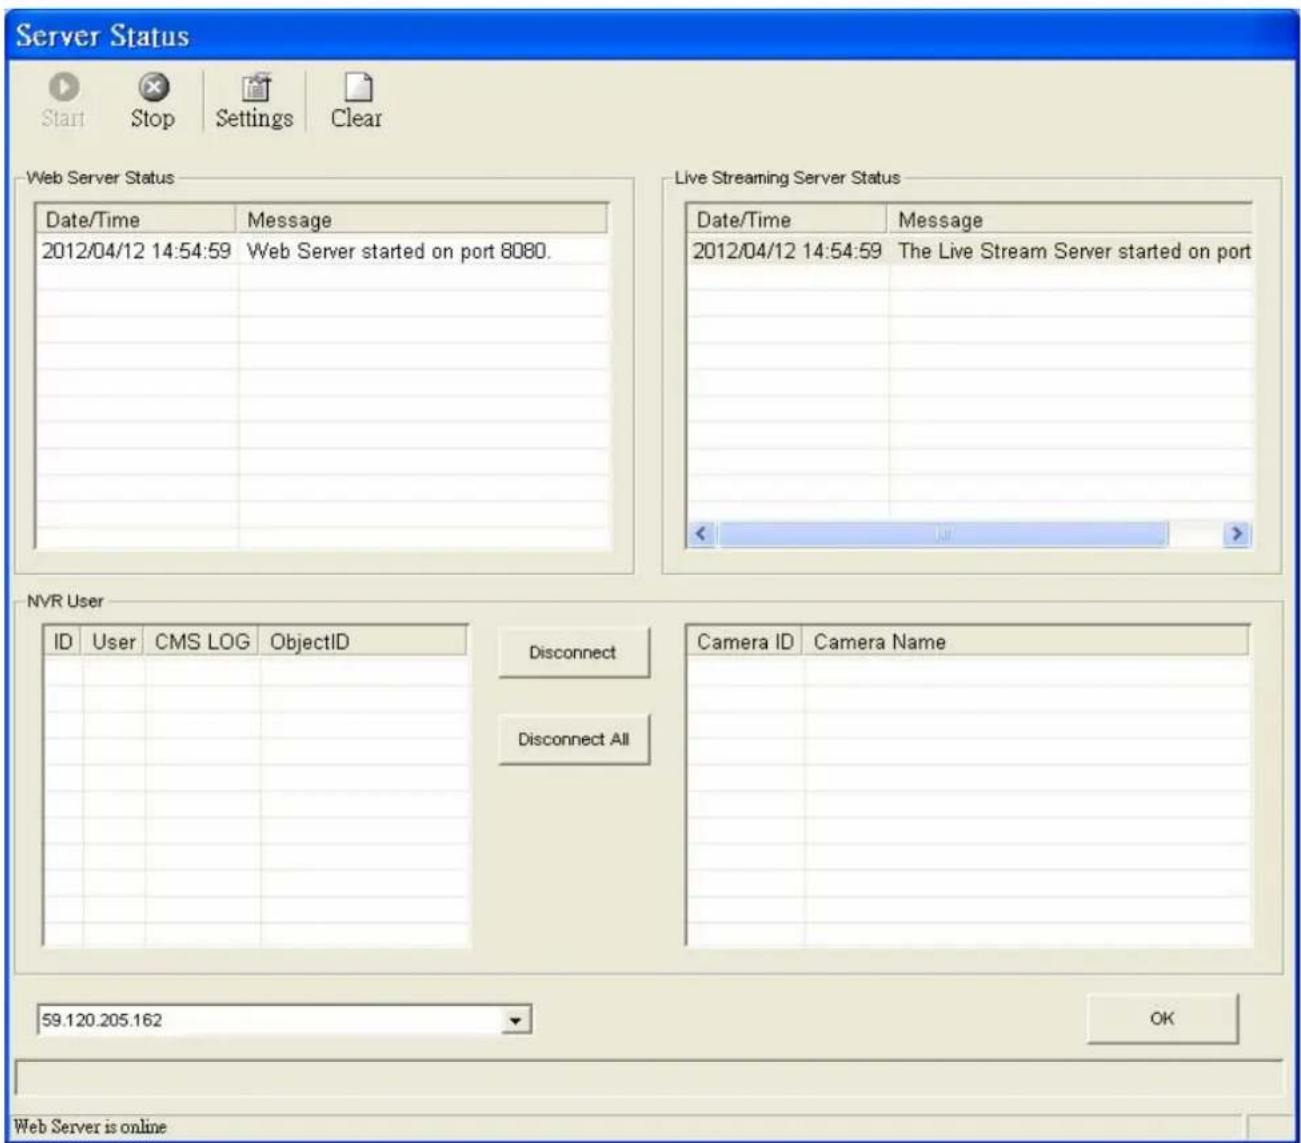
5.6. Server Statues (Standard Version)
Step 1. “Server Status” function.

Step 2. User can start / stop to control "Server Status NVR Server" and monitor status.
*If user that don't set "Web server"、"Live streaming server", who may not be able to control and monitor "Server Status".
Step 3. “Settings”, then user may get Web & DVR Settings information.
【Chapter 6: Remote Player Tool (Standard & Professional Version)】
6.1. Web Sever
Please check TSR (Terminate and Stay Resident) for Web Server whether is turned on or not.

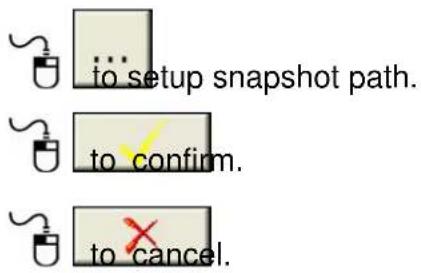
IE OCX user can get IP address for foreign and server port form "System Setup".

6.2. IE OCX
It is an example below as (base on local IP address setting) : Please input IP address and server port . http://192.168.3.120:8080/
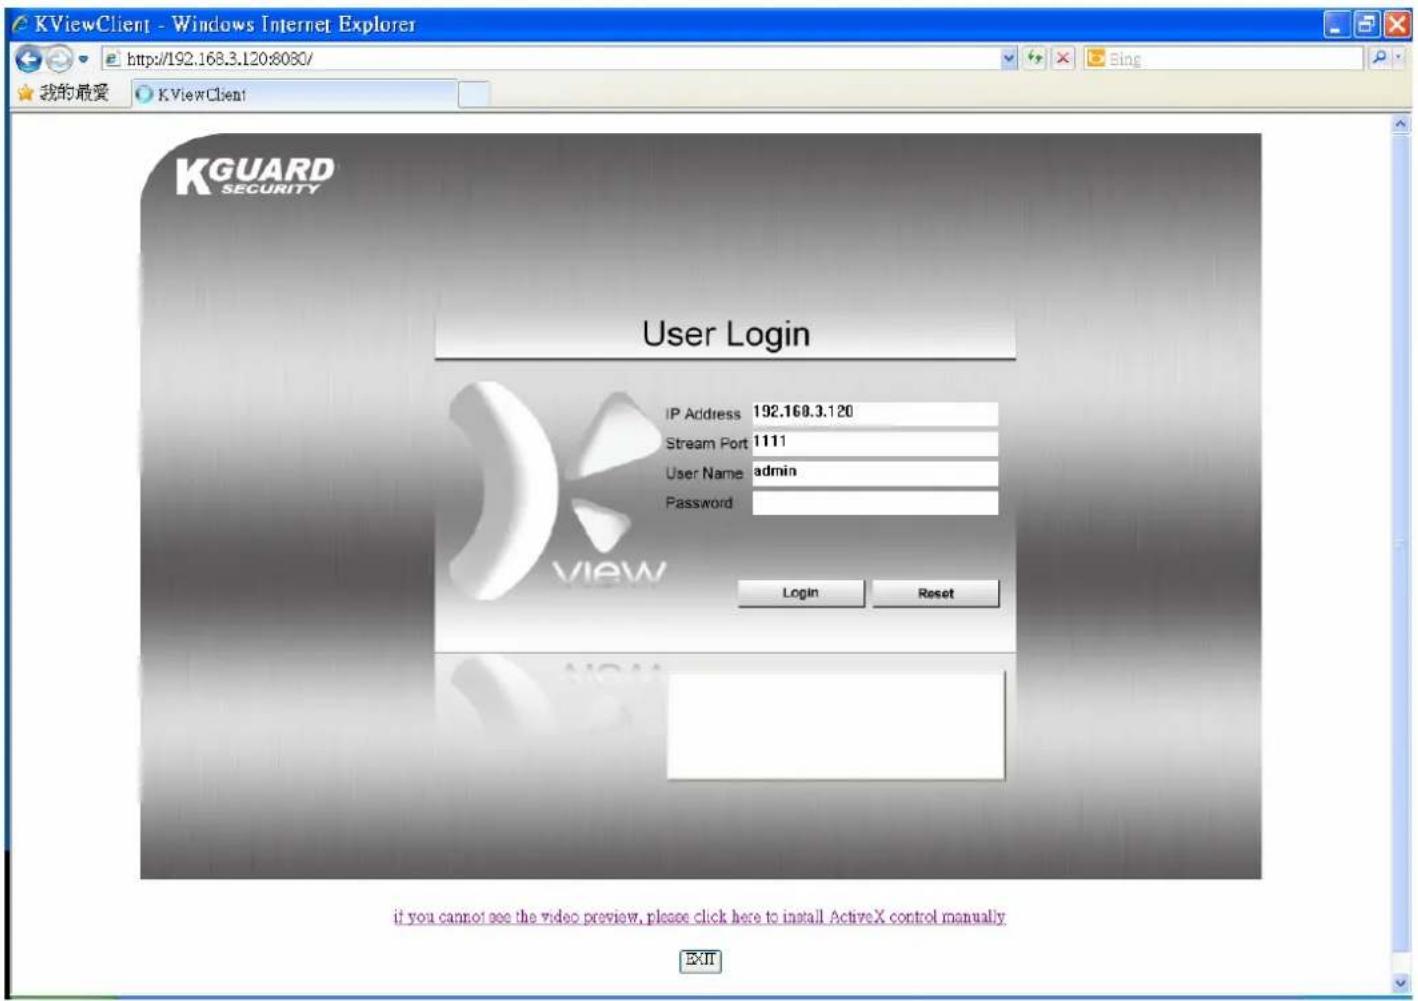
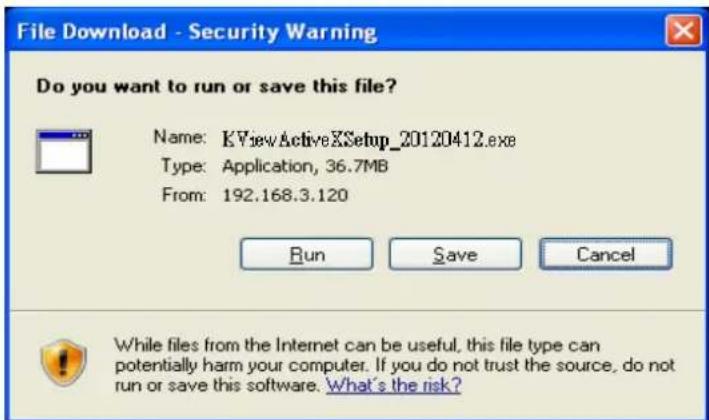
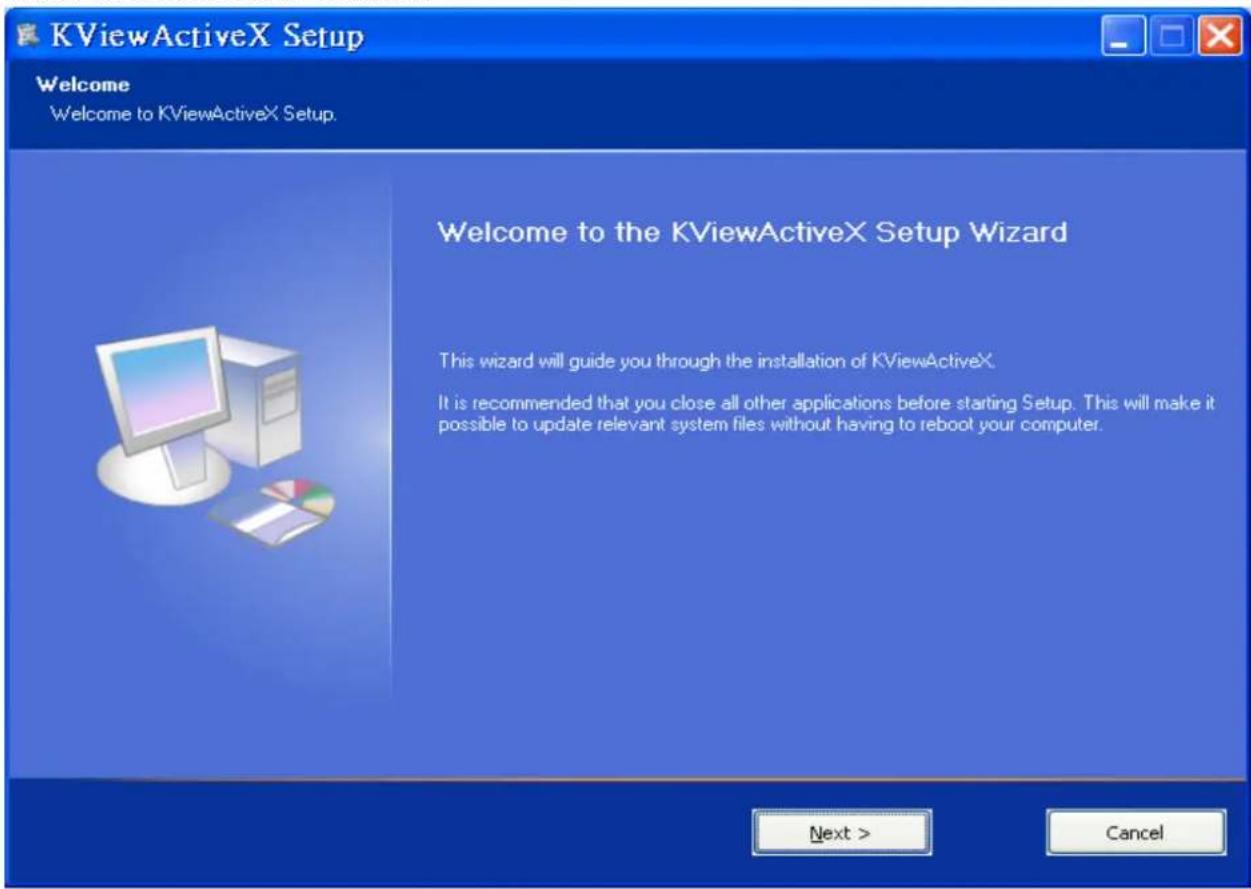
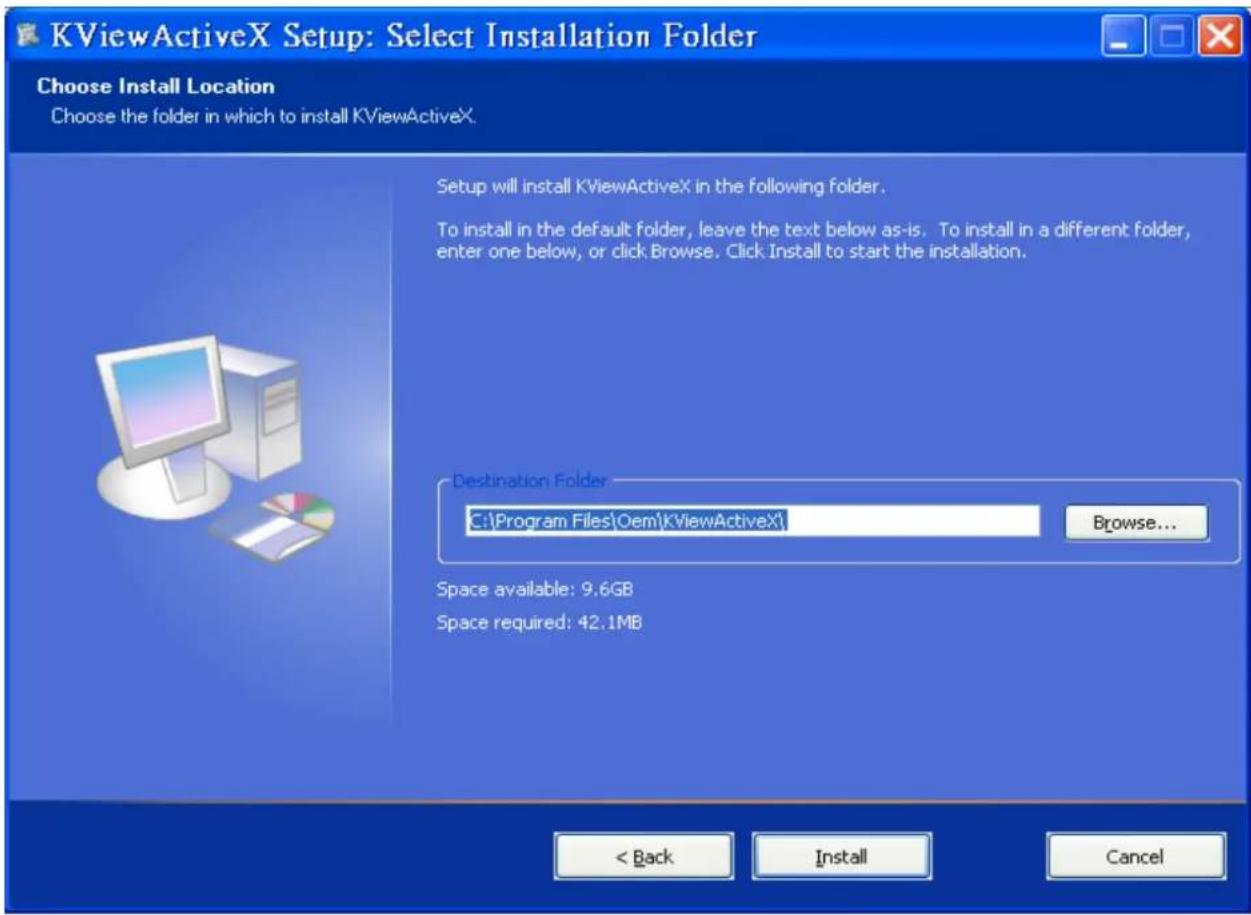
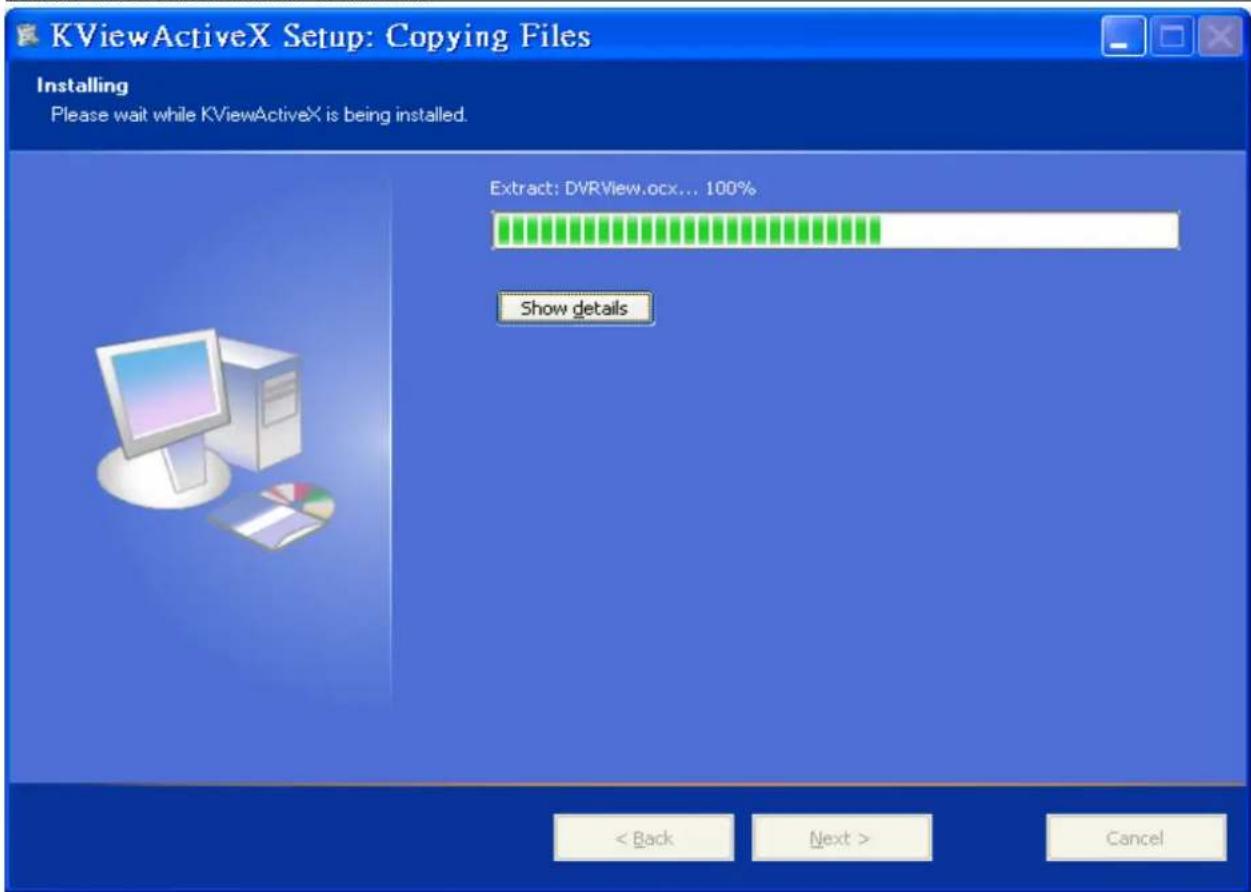
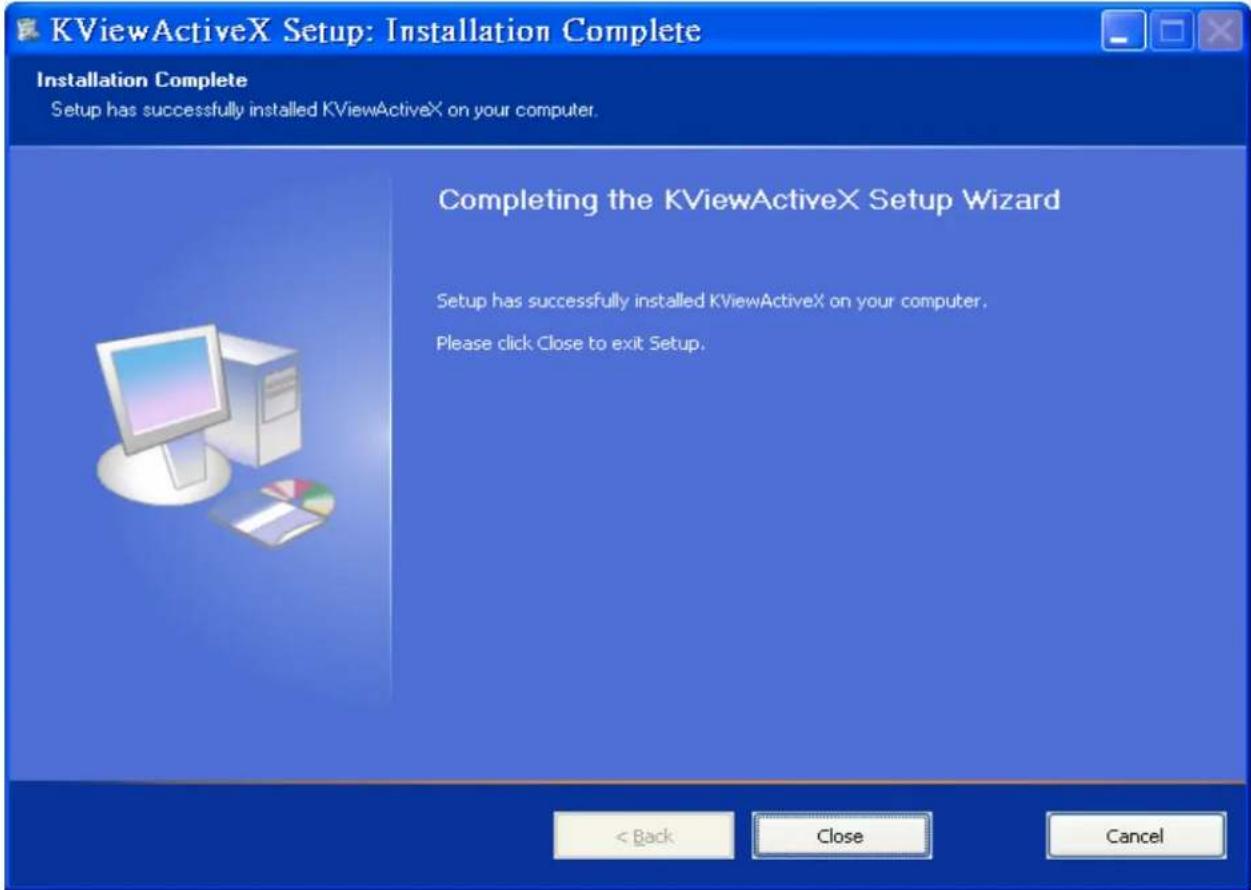
6.2.1. Download / Install DVR ActiveX Program
If user isn't ready for installing KViewCenter, please download and install DVR ActiveX program.
if you cannot see the video preview, please click here to install ActiveX control manually

6.2.2. Connect Setting
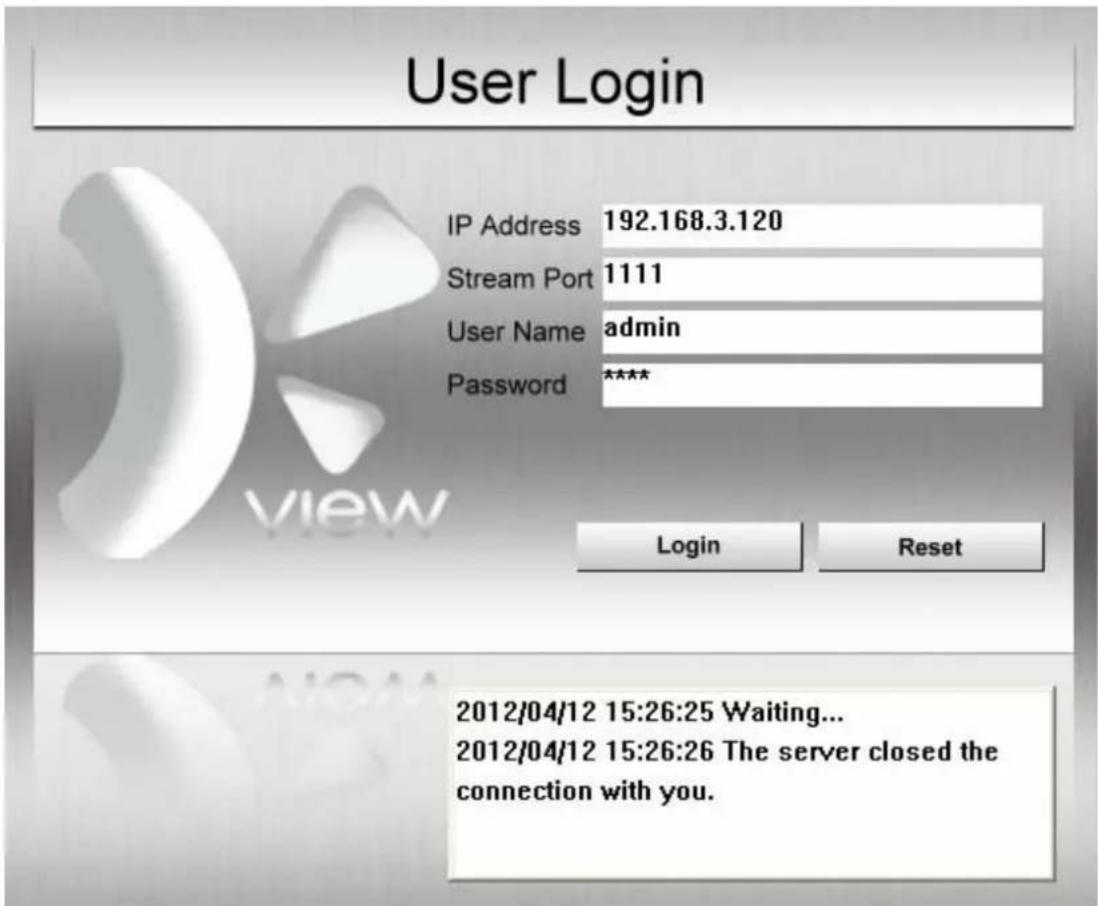
Step 1. Please key in correct DVR live streaming server port and user name / password.
Step 2. "Login" button. To connect DVR live streaming server.
Step 3. “Reset” button. User may key in correct information again.
Step 4. Prompt message.
2012/04/12 15:26:25 Waiting... 2012/04/12 15:26:26 The server closed the connection with you.
6.3. Remote Preview Mode
![KGUARD SECURITY Preview Mode [ID5028]CH 1 [192.168.3.137:9000 CH01] ID Name ID5016 CH 5(CH5) ID5017 CH 6(CH6) ID5018 CH 7(CH7) ID5019 CH 8(CH8) ID5020 CH 9(CH9) ID5021 CH 10(CH10) ID5022 CH 11(CH11) ID5023 CH 12(CH12) ID5024 CH 13(CH13) ID5025 CH 14(CH14) ID5026 CH 15(CH15) ID5027 CH 16(CH16) ID5028 CH 1(CH1) ID5029 CH 2(CH2) ID5030 CH 3(CH3) ID5031 CH 4(CH4) ID5032 CH 5(CH5) ID5033 CH 6(CH6) ID5034 CH 7(CH7) ID5035 CH 8(CH8) ID5036 CH 9(CH9) ID5037 CH 10(CH10) ID5038 CH 11(CH11) ID5039 CH 12(CH12) ID5040 CH 13(CH13) ID5041 CH 14(CH14) ID5042 CH 15(CH15) ID5043 CH 16(CH16) OK ×](/content/2026/05/1010353/images/4556da8511d5294eda0900d6e2a5c713794d6ee1123c35881194df6535890fb0.jpg)
6.3.1. Remote Connecting

User may select the front 16 DVR CAMS to connect.

User may un-select the front 16 DVR CAMS.

User may connect to DVR CAMS.
6.3.2. System Setup
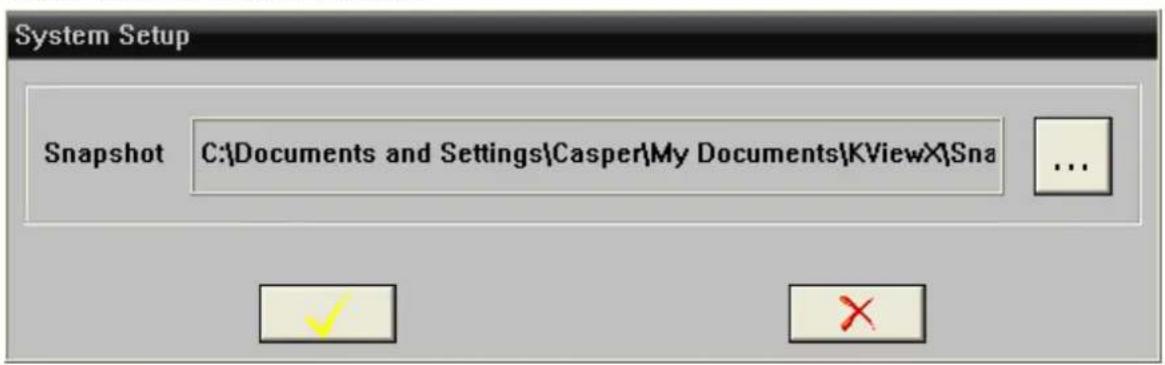
6.3.3. PTZ Control


Step 1. PTZ direction control.
Step 2. PTZ moving speed bar.
To move PTZ faster drag the speed to right. To move PTZ slower drag the speed to left.
Step 3. “- Focus +” button to adjust the PTZ focus manually.
Step 4. "Button to adjust zoom. +

6.3.4. Event List


| Event List | |||
| Time | Event Type | Contents | |
| 2012/04/12 17:48:14 | Connect Device | ID5004 192.168.3.131:80 | |
| 2012/04/12 17:48:14 | Connect Device | ID5006 192.168.3.131:80 | |
| 2012/04/12 17:48:13 | Connect Device | ID5005 192.168.3.131:80 | |
| 2012/04/12 17:48:13 | Connect Device | ID5007 192.168.3.131:80 | |
| 2012/04/12 17:47:44 | Dis-Connect Device | ID5004 192.168.3.131:80 | |
| 2012/04/12 17:47:44 | Dis-Connect Device | ID5006 192.168.3.131:80 | |
| 2012/04/12 17:47:43 | Dis-Connect Device | ID5005 192.168.3.131:80 | |
| 2012/04/12 17:47:43 | Dis-Connect Device | ID5007 192.168.3.131:80 | |
6.3.5. Live Snapshot


6.3.6. Layout


Mode 1x1 / Mode 2x2 / Mode 3x3 / Mode 4x4

6.4. Remote E-Map Mode

6.5. Remote Playback Mode

Step 1. Select DVR ID you want to remote monitor.
Step 2. Select Date-Time to search file.
Step 3.User will get recording file list from DVR device.
Step 4. Double click on recording file list and user may remote monitor DVR CAM you need.


Slow Speed x1/2, x1/4, x1/8, x1/16
Fast Speed x2, x4, x8, x16, x32

Single Step
![KGUARD SECURITY Playback Mode [ID5033]CH 6 [192.168.3.137:9000 CH06] 14:18:20 - 14:27:10 [00:08:50][6] ID Name 2012/ 4/12 上午 06:23:45 下午 06:23:45 Search ID5027 CH 16(CH16) ID5028 CH 1(CH1) ID5029 CH 2(CH2) ID5030 CH 3(CH3) ID5031 CH 4(CH4) ID5032 CH 5(CH5) ID5033 CH 6(CH6) ID5034 CH 7(CH7) ID5035 CH 8(CH8) ID5036 CH 9(CH9) ID5037 CH 10(CH10) ID5038 CH 11(CH11) ID5039 CH 12(CH12) ID5040 CH 13(CH13) ID5041 CH 14(CH14) Finish... No. StartTime EndTime TotalTime Size 1 13:44:49 13:45:50 00:01:01 1174016 2 13:46:05 13:57:38 00:11:33 14545920 3 14:03:24 14:09:14 00:05:50 7469568 4 14:10:29 14:10:39 00:00:10 261120 5 14:10:48 14:17:30 00:06:42 13628416 6 14:18:20 14:27:10 00:08:50 24989696 7 14:27:56 15:28:02 01:00:06 169334272 8 15:28:03 16:05:19 00:37:16 104458240 9 16:06:34 17:06:40 01:00:06 163282944 10 17:06:35 18:06:39 01:00:04 161975296 11 18:06:34 18:24:43 00:18:09 50723840](/content/2026/05/1010353/images/9f04f76a7dea506edb772fb6a6e0a5bf98abf644582398505d318a86c729cfe5.jpg)
6.5. Remote Logout