B22 Set-O-Matic - Kamera Bolsey - Gratis brugsanvisning og manual
Find enhedens vejledning gratis B22 Set-O-Matic Bolsey i PDF-format.

Brugerspørgsmål om B22 Set-O-Matic Bolsey
0 spørgsmål om dette apparat. Besvar dem du kender, eller stil dit eget.
Stil et nyt spørgsmål om dette apparat
Download vejledningen til din Kamera i PDF-format gratis! Find din vejledning B22 Set-O-Matic - Bolsey og tag din elektroniske enhed tilbage i hånden. På denne side er alle dokumenter nødvendige for brugen af din enhed offentliggjort. B22 Set-O-Matic af mærket Bolsey.
BRUGSANVISNING B22 Set-O-Matic Bolsey
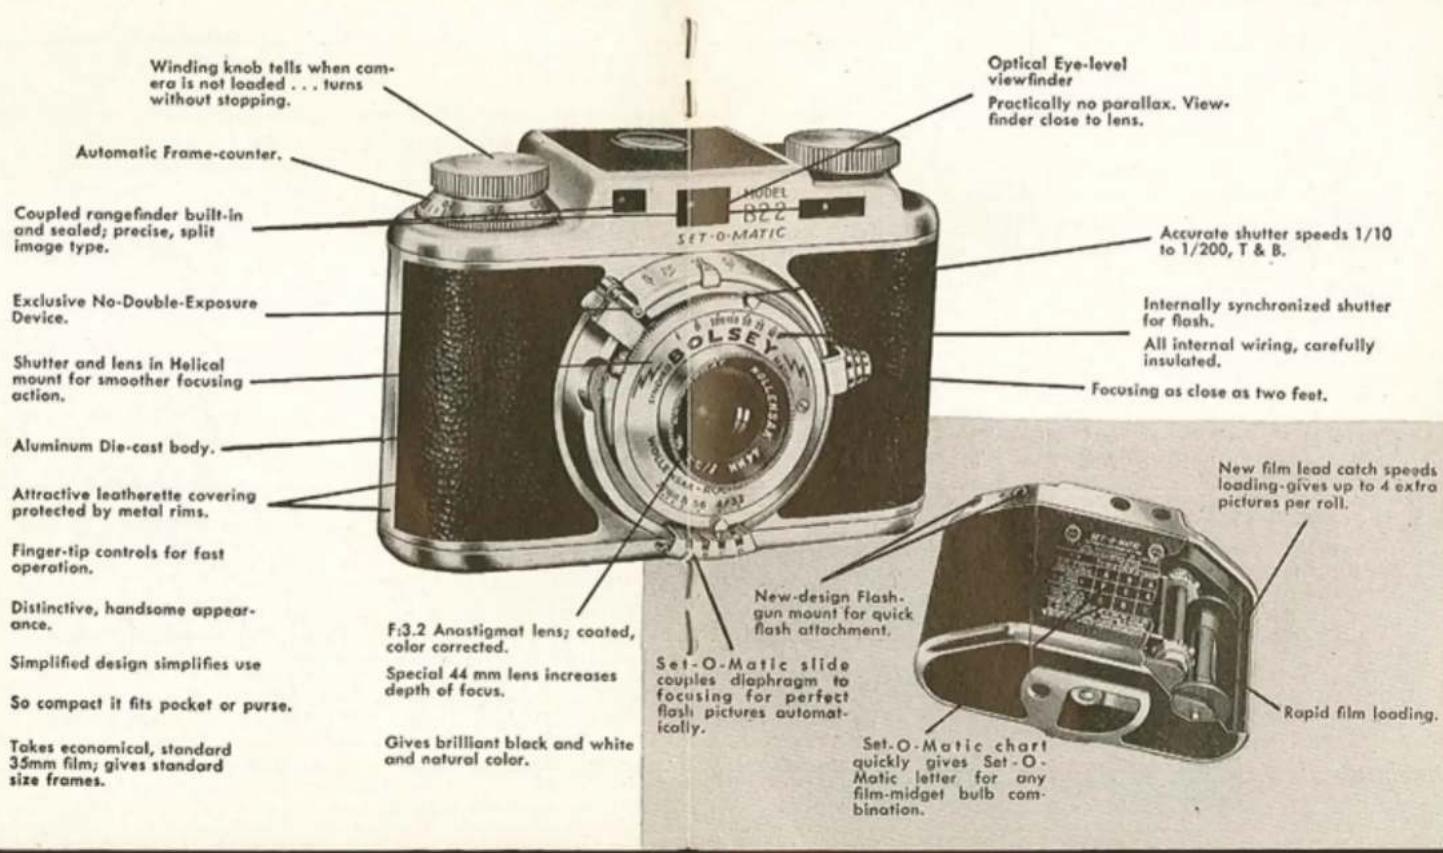
SET-O-MATIC...The Most Important Contribution To Photography Since The Coupled Range Finder ...Diaphragm Coupled To Focusing For Flash Shooting.
- Set-O-Matic automatically computes diaphragm settings for flash shooting as the distance from camera to subject changes. It is a Bolsey exclusive, amazingly fast, simple and accurate.
- Set-O-Matic makes flash shooting fully automatic. You need no longer measure distances, make calculations, make interpretations or use guide numbers.
- With Set-0-Matic you may follow moving subjects toward or away from the camera ... and shoot any moment you see a good picture.
- Set-O-Matic automatically prevents wasted shots...stops at a point at which pictures should not be taken with the film and bulb combination you are using.
- Set-O-Matic pays for itself by preventing wasted shots.
SOME "PROFESSIONAL" HINTS
- For best color rendition when using indoor color film, set shutter speed at 1/25 sec. for dark walls, 1/50 sec. for light walls.
- For all average work use SF bulbs. For the "professional" approach use #5 bulbs up to 12 feet, #25 bulb beyond 12 feet and outdoors at night for both color and black and white.
- With Kodachrome Type A film and SF or SM bulbs no filter is necessary. For "professional" results try SF bulbs and Kodachrome Type A film with an 81A filter. With other bulbs try 81B filters.
- No filter is required with Anscó Indoor Color film and SM and SF bulbs. With Anscó color film and #5, #25 and Bantam 8 bulbs a UV #16 filter is suggested.
- With Bantam 8 bulb and indoor color film, use shutter speed of 1/25 sec.
4015-15M 853AL
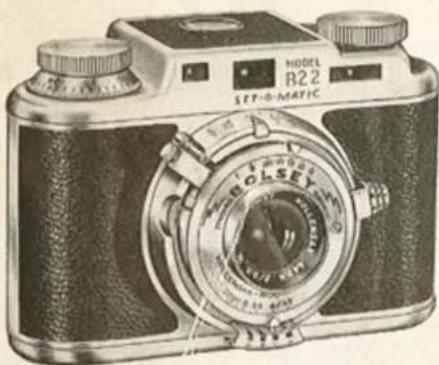
HOW TO USE YOUR NEW
BOLSEY B22
SET-O-MATIC
• AUTOMATIC DIAPHRAGM COMPUTER
natural_image
Vintage black-and-white photo of a vintage camera with dual tabs and a circular lens (no visible text or symbols)● Perfect Flash Pictures Automatically!
- Internally Flash Synchronized.
● Built-in Coupled Rangefinder.
- Fast f:3.2 Lens.
- Exclusive "No-Double-Exposure" Device.
"The Camera that THINKS for you!"

BOLSEY CORPORATION OF AMERICA
118 EAST 25th STREET NEW YORK 10, NEW YORK
TWO SIMPLE STEPS FOR PERFECT
1
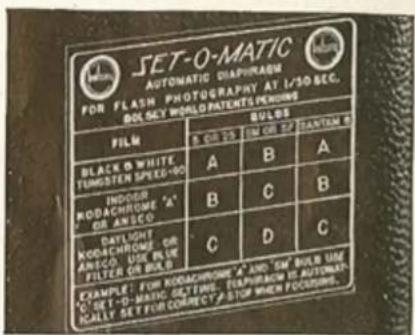
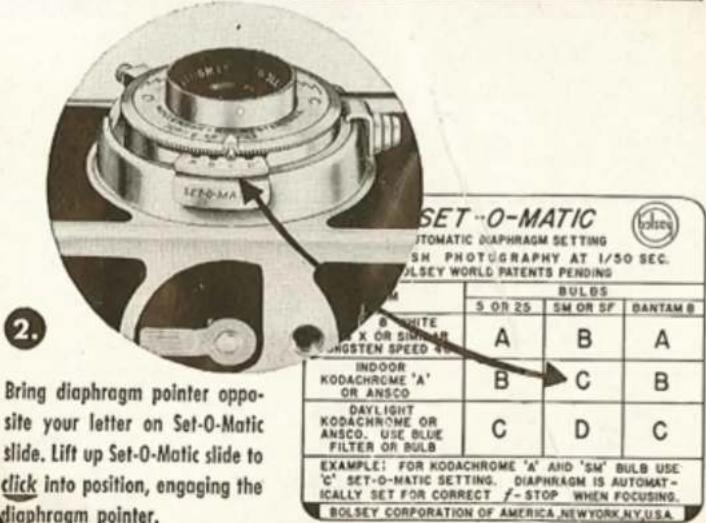
Set shutter speed at 1/50 sec. On chart in back of camera, find Set-O-Matic letter (A, B, C, or D) corresponding to your film and bulb combination.
I.E., with SF bulb and Koda-chrome A film use Set-O-Matic Letter "C."
FLASH PICTURES AUTOMATICALLY!
NOW...JUST RANGE-FIND
and Shoot!
IT'S AS SIMPLE AS THAT

natural_image
Black-and-white photo of a person holding a vintage camera and a megaphone, no visible text or symbolsYOU'VE SET...NOW FORGET
You set your Set-O-Matic slide only once after loading, and then forget it. No need to change settings as long as you use the same type of film and bulbs.
TO DISENGAGE SET-O-MATIC
Press slide down and . . . Presto . . . you have uncoupled the diaphragm for daylight pictures in brilliant color, crisp black and white.
LOADING
Few minutes to read . . . Few seconds to do. Use any 35mm black and white or color film in standard cartridges of 20 or 36 frames. Load your Camera in subdued light.
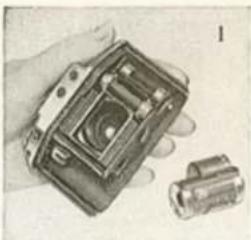
1. OPEN THE CAMERA
Hold the camera in your left hand, lens down, making sure fingers do not touch the lens. Unlock cover by turning lock lever on the bottom of the camera in the direction of the arrow. Lift cover off, by sliding it first slightly downward. See figure 1.
2. INSERT FILM CARTRIDGE
Insert the film cartridge in the recess below the Rewind Knob, by sliding it in from the camera bottom. Turn the Rewind Knob slightly until its shaft engages the crosspiece inside the cartridge.
3. ATTACH FILM LEADER TO TAKE-UP SPOOL
Turn Wind Knob until tongue (or slot on some cameras) on take-up spool faces you. Pull about 3" of film from the cartridge and insert leading edge deeply under the tongue, (or in the slot) making sure that the edge of the film rests against the bottom (outer) flange of the take-up spool. See figure 2.
4. ALIGN FILM ON SPROCKET
Align the film so that the perforations of the film will engage with the teeth of the sprocket and the film does not buckle. Turn the Wind Knob in the direction of the arrow until it locks. Do not force the Knob. If it does not turn freely, lift it and then turn. Be sure all film slack is taken up. If slack is still present after first winding, repeat operation.
natural_image
Close-up of a hand holding a small mechanical device with a cylindrical component nearby (no visible text or symbols)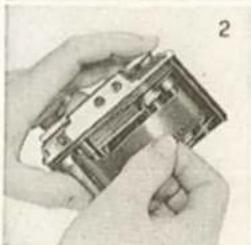
natural_image
Close-up of hands holding a mechanical component, no visible text or symbols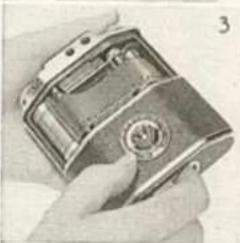
natural_image
Close-up of a hand holding a metallic mechanical device with a circular button (no visible text or symbols)THE CAMERA
5. CLOSE CAMERA
Be sure the film is riding straight in its channel, then replace the camera cover by sliding it gently over the film until the upper edge slips into position. Turn the lock. See figure 3.
6. WIND UP EXPOSED FILM LEADER
Now bring the film into position for the first exposure in this manner: Lift Wind Knob and turn slightly in the direction of the arrow, then release Wind Knob, and continue turning without additional lifting until mechanism locks. Do this twice (only after loading, thereafter, only once).
7. SET FRAME COUNTER
Set frame counter (below Wind Knob. See figure 4.) at zero by turning it in the direction of the arrow on the Wind Knob.
8. CHECK SETTINGS
Check the three basic settings: shutter speed (exposure), diaphragm (f stop), and focus, as explained on page 8 and you're ready to
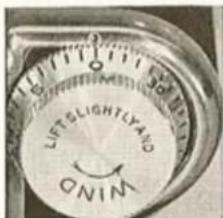
Fig. 4
shoot. When you shoot, hold the camera STEADY, press shutter lever slowly ALL THE WAY DOWN! Avoid jerks. YOU WILL HEAR TWO CLICKS, the first, releasing the no-double-exposure lever, the second, tripping the shutter.
9. WIND FILM FOR NEXT EXPOSURE
After making each picture, lift the Wind Knob and turn in the direction of the arrow. This winds the film, advances the counter, and releases the shutter lever for the next exposure.
10. DOUBLE EXPOSURE AND ITS PREVENTION
Winding film also retracts the no-double-exposure piston, which when extended, prevents a double exposure. If you desire a double exposure, do not wind the film and push in the spring loaded piston. It will free the release lever and allow you to click the shutter. (see illust. pg. 8-9.)
26 FEATURES OF YOUR MODEL B22
PICTURES IN DAYLIGHT
Learn These Three Basic Settings
- Shutter Speed Setting: The length of the "exposure time" during which light is admitted to the film is usually a small fraction of a second. Your shutter can be set for instantaneous exposures ranging from 1/10th second to 1/200th second. For an exposure of 1/25th sec. (subject not moving) set the index opposite "25" on the upper scale. For a fast moving subject, set your shutter at "100" or "200".
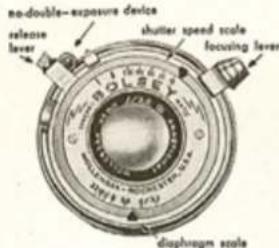
To make an exposure longer than 1/10 sec., 1 to 2 sec. for example, move index to B position. The shutter will open when lever is depressed, and will close as soon as lever is released.
For very long exposure, where the camera can be left alone during exposure, set the index at the T position. The shutter will open after the lever is tripped and will close only after it is tripped once again.
II. Diaphragm (F Stop) setting: Just like an eye, your lens has an iris, called "diaphragm", which regulates the amount of light admitted to the film. You can see it clearly (when your camera is not loaded) by opening the shutter (T position) and moving the index on the lower scale from 3.2, wide open, to 22 the smallest opening. Each time you move the index to the next marked setting, you open or close the diaphragm one "stop", thereby doubling or halving the amount of light admitted. i.e. a setting of 8 (meaning F:8) admits twice as much light as a setting of 11, and four times as much as a setting of 16.
III. Focusing: Focus with the coupled rangefinder by looking at your subject through the right hand window. The picture will appear split
IN COLOR & BLACK & WHITE
horizontally across the middle. Move the focusing lever button (left of lens) between the two fingers of your left hand, up or down until the two split images coincide, in other words, until the upper and lower halves match correctly and appear as one. This at the same time will move the lens and bring the subject in sharp focus. It is easiest to sight on any sharply defined vertical edge or line in your subject. Remember, your Bolsey focuses as close as 2 feet.
natural_image
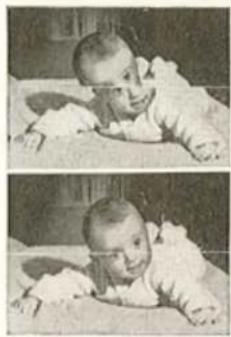
Two black-and-white photos of a baby lying on stomach, no text or symbols visibleTaking Pictures
When using black and white film, plan to do your shooting one hour after sunrise to one hour before sunset. For color film, make it two hours after sunrise to two hours before sunset, in order to avoid excessive red coloring of the subject.
- After focusing your camera, switch your eye to the view finder, left hand window, and frame your subject. The subject appears smaller in this window. When shooting at 2 feet, correct for "parallax" by lifting your camera slightly so that some space will appear between the top edge of your viewfinder and subject.
- Hold the camera STEADY, press shutter lever slowly ALL THE WAY DOWN! Avoid jerks. YOU WILL HEAR TWO CLICKS, the first, releasing the no-double-exposure lever, the second, tripping the shutter. We recommend using a Bolsey Cable Release.
- Always wind film immediately after picture has been taken. This will keep your camera ready at all times.
- After all film has been exposed, the counter will show it and film will resist further winding. REWIND it back into the cartridge until tension is relieved, turning REWIND KNOB in the direction of the arrow.
PHOTOGRAPHY IS MORE FUN
Bolsey Case: For Bolsey cameras. Handsome ever-ready cases made of top grain cowhide expertly stitched for long wear. Provides perfect protection for your camera and permits instant use without removing camera from case. 24" measuring tape on reverse side of carrying strap. \$7.95

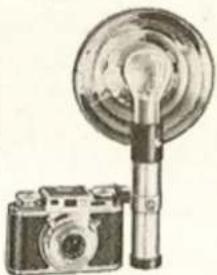
Bolsey Flashgun #2 — New design makes gun attachment quick, easy, firm. You simply insert plug in back of camera, twist thumb screw and you're set to shoot. Instructions on exposure and bulbs included. \$9.95
natural_image
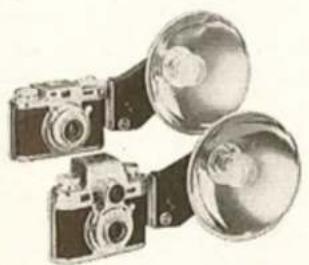
Illustration of a vintage camera with a circular lens and pointer (no text or symbols)B/C Flash Gun #3—Battery Capacitor
Utterly New, different! Uses a high capacity condenser (capacitor) charged by a 22½ volt hearing aid type battery. More energy for flashing than standard batteries. Lasts for more than 10,000 high-powered flashes or 2 to 3 years of hard use. Built-in test light, bulb ejector. Exclusive Bolsey mount for quick, easy, secure attachment. No dangling wires. Designed to blend artistically with Bolsey Camera. \$15.50
natural_image
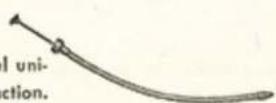
Illustration of two vintage camera holders with lenses, no text or symbols presentBolsey Cable Release: Special flexible all steel universal cable release. Assures positive shutter action. Fits all Bolsey cameras. \$1.40
WITH BOLSEY ACCESSORIES
A. Bolsey Filter Adapter: Fits Bolsey B, B2, B22, C, C22. Accepts Series V Filters and Bolsey Sunshade. Gleaming satin finish. \$1.10
B. Bolsey Sunshade: Companion piece to Bolsey filter adapter. Does not vignette or interfere with viewfinder. Satin finish.
\$1.90
C. Bolsey Filter Kit: Matched leather case snaps on carrying strap. Contains four Series V optically correct and color correct filters. \$7.50
The Bolsey Filter Kit Contains:
For Black and White:
Yellow Filter improves tone in all scenic shots. Ideal for beach scenes, and cloud effects.
Red Filter for dramatic effects through high contrast, darkened skies, night-like effects.
For Color:
Haze Filter reduces haze and bluish cast in distant shots. Type A Conversion Filter corrects for color when indoor color film is used outside.
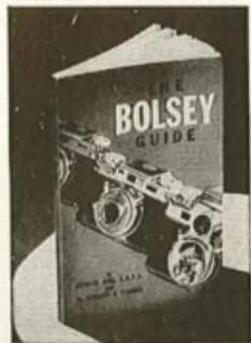
The Bolsey Guide: A compact, complete and easily used reference book, equally informative for serious amateur and beginner.
124 pages, semi hard color cover.
70 illustrations, numerous charts and tables, packed with photographic instruction in easy to understand, down-to-earth language. \$1.95