VT-1100 - Detektor Jonard Tools - Gratis brugsanvisning og manual
Find enhedens vejledning gratis VT-1100 Jonard Tools i PDF-format.

Brugerspørgsmål om VT-1100 Jonard Tools
0 spørgsmål om dette apparat. Besvar dem du kender, eller stil dit eget.
Stil et nyt spørgsmål om dette apparat
Download vejledningen til din Detektor i PDF-format gratis! Find din vejledning VT-1100 - Jonard Tools og tag din elektroniske enhed tilbage i hånden. På denne side er alle dokumenter nødvendige for brugen af din enhed offentliggjort. VT-1100 af mærket Jonard Tools.
BRUGSANVISNING VT-1100 Jonard Tools

JONARD TOOLS®
WARNING
- Please carefully read and fully understand the warnings and operating instructions before use. If the equipment is used in a manner not specified by the manufacturer, the protection provided by the equipment may be impaired.
- Please test the detector on a known live source within the rated AC voltage range before use.
- If the detector appears damaged or is not working properly, stop using it immediately.
- Do not attempt to detect voltage higher than 1000V.
- Use caution when working with voltages above AC 30Vr.m.s, 42V peak or DC 60V. Such voltages pose a shock hazard. Clean the tester casing with a damp cloth and mild detergent. Do not use abrasives or solvents!
- There may still be voltage even when no acousto-optic alarm is on.
- The insulation type, wire thickness, distance from voltage source, shielded wire, other wires, socket design, and other factors may adversely affect test result. If there are uncertainties, use other methods to verify the voltage.
- Do not assume neutral or ground wire is safe to touch. Incorrect or poorly connected circuits may cause wires to be charged.
- When low battery indication appears, please replace batteries.
- Use caution when using the tool, keep hands away from clear tip.
- Comply with local and national safety regulations and requirements.
-
The detector will not detect any voltage if:
-
The wire is shielded
- The operator is not connected with the ground or isolated from effective ground
-
The voltage is DC
-
The detector may not detect voltages if:
-
The operator does not hold the detector
• The operator is wearing gloves - The wire under test is partially buried or in a grounded metal conduit
- The magnetic field generated by the voltage source is blocked, suppressed or interfered with
- The frequency of the voltage being detected is not perfect sine wave and may be distorted by harmonics. The detector is used outside of the operating specifications (see Technical Specification for details)
Low voltage mode (24V AC - 1000V AC)
Suitable for testing low-voltage motor (<90V), audio systems, arc welding machines, underground mine lighting, cables with thick insulation layer, and other weak electromagnetic AC signals.
High voltage mode (90 AC - 1000V AC)
For detecting urban electric supply and three-phase systems.
For example, power distribution units, electrical panels, electrical appliances.
VT-1100 - VOLTAGE DETECTOR USER MANUAL
Electrical Symbols
| Protected throughout by Double insulation or Reinforced insulation | |
| [KHSK] | Alternating current |
| [CT02] | Caution, possibility of electric shock |
 | Warning! Refer to the manual |
 | In compliance with the directive of European Union |
 | Conforms to UL STD 61010-1, 61010-2-030 Certified to CSA STD C22.2 No. 61010-1, 61010-2-030. |
 | |
| [68D6] | It is applicable to test and measuring circuits connected at the source of the building's low-voltage MAINS installation. |
Panel Description
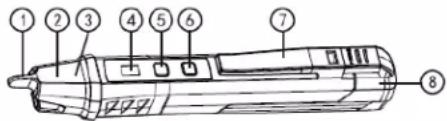 | |||
| 1 | NCV sensor head | 2 | Flashlight lighting |
| 3 | Sensing signal LED | 4 | Mode status indicator light |
| 5 | Power button | 6 | Flashlight button |
| 7 | Pocket clip | 8 | End of the detectorBattery cap |
Operating Instructions
1. Turning on the detector
Short press the power button. The buzzer will beep twice and the red indicator light on the panel will light up, indicating that the detector is on and ready for use. The default AC voltage detection range is 90-1000V.
2. Turning on/off the flashlight
Flashlight on/off: Short press the flashlight button to turn on/off the flashlight. The flashlight will automatically turn off when the detector is not used for 5 minutes or press flashlight button again to turn off immediately.
3. AC voltage detection
Place the sensor head near the test object or the power socket with the AC voltage. When AC voltage is detected, the red LED in the tip and buzzer will be on. Sensing Buzzer and LED increase in frequency when the detector gets closer to the test object. Note: Please unplug other electrical devices on the socket before detection.
4. Detection range selection
1) When the detector is on, the default mode is high voltage mode, with detection range 90-1000V. The red indicator light will switch to green, and the device will switch to low voltage mode, with range of 24-1000V. In low voltage mode, the detector is more sensitive to electrical interferences/noise. Please only use low voltage mode during weak electrical field environment.
5. Auto power off
The detector will auto power off when it is not used for 5 minutes.
6. Turning off the detector manually
Long press the power button for 2 seconds to turn off the detector
Technical Specifications
| Items\Models | VT-1100 |
| AC voltage range | 90 ~ 1000V AC(red indicator)24 ~ 1000V AC(green indicator) |
| Frequency range | 50Hz/60Hz |
| Alarm mode | Audio/visual |
| Flashlight | White spotlight |
| Auto power off | About 5 minutes |
| Low battery indication | √ |
| Vibration function | N/A |
| Magnetic field detection mode | N/A |
| IP rating | N/A |
| Safety class | CAT IV 1000V |
| Operating temperature | 0~40°C |
| Storage temperature | -20~50°C |
| Humidity | ≤ 80% (non-condensing) |
| Altitude | < 2000m |
| Battery | 2x1.5V AAA |
| Product size | 150x18x23 (mm) |
| Weight | About 50g |
| Drop test | N/A |
7. Low battery Indication
When the battery voltage is lower than 2.4V, the detector will automatically shut down.
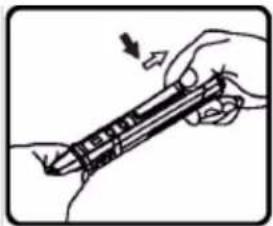
Battery Replacement
- Hold the detector with one hand, use your thumb of the other hand to press down on the battery compartment latch, and pull the end of the detector.
- Pull out the end of the detector along the direction shown at right pictures and replace the batteries.
natural_image
Illustration of a hand holding a pen or tool with an arrow indicating motion (no text or symbols present)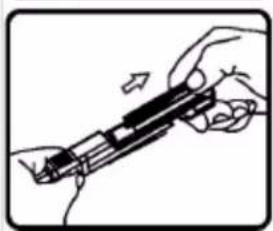
natural_image
Illustration of a hand holding a mechanical device with a tool, no text or symbols visible! WARNING:
Do not mix old and new batteries. Do not mix alkaline, standard (carbon-zlnc), or rechargeable (nl-cad, nl-mh, etc) batteries.
Standards: IEC/EN61010-1, IEC/EN 61010-2-030, IEC/EN 61326-1, IEC/EN 61326-2-2