ATV5000SM - Fjernsyn ASPES - Gratis brugsanvisning og manual
Find enhedens vejledning gratis ATV5000SM ASPES i PDF-format.

Brugerspørgsmål om ATV5000SM ASPES
0 spørgsmål om dette apparat. Besvar dem du kender, eller stil dit eget.
Stil et nyt spørgsmål om dette apparat
Download vejledningen til din Fjernsyn i PDF-format gratis! Find din vejledning ATV5000SM - ASPES og tag din elektroniske enhed tilbage i hånden. På denne side er alle dokumenter nødvendige for brugen af din enhed offentliggjort. ATV5000SM af mærket ASPES.
BRUGSANVISNING ATV5000SM ASPES
. aspes
MANUAL DE INSTRUCCIONES

natural_image
Large CRT television displaying a scenic rural landscape with yellow and green fields, distant mountains, and a paved road (no text or symbols visible)ATV5000SM
HDMI®
HIGH-DEFINITION MULTIMEDIA INTERFACE
Índice
Advertencia y Precauciones....1
Instrucciones de seguridad importantes....2
Funcionamiento del mando a distancia 4
Botones TV e interfaz terminal 5
Controle Remoto 6
Asistente de configuración ....7
Página de inicio....9
App Store 9
Clasificar 10
Aplicación de Usuario....10
Configuración 11
Media....15
Video....15
Audio....16
Imagen 16
Entrada....17
Configuración de TV....18
Imagen 18
Sonido....20
Canal....21
Bloqueo....26
Común....27
Avanzada 28
Ayuda....29
Especificaciones....30
Advertencia y Precauciones
Advertencia
Riesgo de Descarga Eléctrica. No abrir

Precaución: Para reducir el riesgo de descarga eléctrica, no retire la cubierta o la parte posterior. Adentro no hay piezas reparables por el usuario. Remita el servicio al personal de servicio calificado
El símbolo del rayo con punta de flecha dentro de un triángulo equilátero alerta al usuario de la presencia de "voltaje peligroso" no aislado dentro del producto que puede ser de magnitud suficiente como para constituir un riesgo de descarga eléctrica para una persona.

El signo de exclamación dentro de un triángulo equilátero tiene la intención de alertar al usuario de la presencia de instrucciones importantes de operación y mantenimiento (servicio) en la literatura que acompaña al
ADVERTENCIA: PARA EVITAR INCENDIOS o riesgos de descargas eléctricas, no exponga esta UNIDAD A LA LLUVIA NI A LA HUMEDAD
PRECAUCIÓN: PARA GARANTIZAR LA SEGURIDAD PERSONAL, OBSERVE LAS SIGUIENTES REGLAS EN RELACIÓN CON EL USO DE ESTA UNIDAD.
- Opere solo desde la fuente de alimentación especificada en la unidad.
- Evite dañar el enchufe de CA y el cable de alimentación.
- Evite la instalación incorrecta y nunca coloque la unidad donde no se pueda obtener una buena ventilación.
- No permita que entren objetos o líquidos en las aberturas del gabinete.
- En caso de problemas, desenchufe la unidad y llame a un técnico de servicio. No intente repararlo usted mismo ni retire la cubierta posterior.
Los cambios o modificaciones no aprobados por el fabricante podrían anular la garantía.
* Cuando no utilice este televisor durante un período prolongado de tiempo, asegúrese de desconectar el enchufe de la toma de CA y la antena para su seguridad.
* Para evitar descargas eléctricas, no use este enchufe de alimentación con un cable de extensión, receptáculo u otra toma de corriente a menos que las clavijas puedan insertarse completamente para evitar la exposición de la clavijas
No intente reparar usted mismo el producto
Precaución
Para evitar descargas eléctricas, no abra la carcasa del televisor.
Adentro no hay partes reparables por el usuario.
Consulte a personal de servicio calificado para reparaciones.
Instrucciones de seguridad importantes
1) Lea estas instrucciones.
2) Guarde estas instrucciones.
3) Preste atención a todas las advertencias.
4) Siga todas las instrucciones.
5) No use esta unidad cerca del agua.
6) Limpie solo con un paño seco.
7) No bloquee ninguna abertura de ventilación. No se debe impedir la ventilación cubriendo las aberturas de ventilación con elementos tales como periódicos, manteles, cortinas, etc. Debe haber una distancia mínima de 5 cm. de espacio alrededor de la unidad en todo momento para garantizar una ventilación adecuada.
8) No instale cerca de fuentes de calor como radiadores, registros de calor, estufas u otros aparatos (incluyendo amplificadores) que producen calor. Ni deben existir fuentes con llama descubierta como velas, ni deben colocarse en o cerca de la unidad.
9) Proteja el cable de alimentación de ser pisado o pellizcado particularmente en los enchufes, receptáculos de conveniencia y el punto donde salen de la unidad.
10) Utilice únicamente accesorios / implementos especificados por el fabricante.
11) Use solo con un carro, soporte, trípode, apoyo o mesa especificados por el fabricante o vendidos con la unidad. Cuando se usa un carro, tenga cuidado al mover la combinación del carro / unidad para evitar lesiones por vuelco.
12) Desenchufe esta unidad durante tormentas eléctricas o cuando no la use durante largos períodos de tiempo.
13) Remita todos los servicios a personal de servicio calificado. Se requiere servicio cuando la unidad ha sido dañada de alguna manera, como el cable de alimentación o el enchufe está dañado, se ha derramado líquido o los objetos han caído en la unidad, la unidad ha estado expuesta a la lluvia o humedad, no funciona normalmente o ha sido eliminado.
14) La unidad no debe exponerse a goteos o salpicaduras y no se deben colocar objetos llenos de líquidos, como jarrones, en la unidad.
15) Coloque el televisor sobre una superficie estable y plana. De lo contrario, puede caer la televisión y causar lesiones.
16) No permita que los niños pequeños jueguen alrededor o en la televisión. No cuelgue la unidad. Si lo hace, puede provocar que la televisión se caiga, causando daños.
17) No permita que niños pequeños jueguen con la bolsa de plástico que vino con el televisor cuando lo desempaquetó. De lo contrario, puede producirse asfixia, lo que puede ocasionar la muerte.
18) Evite la instalación incorrecta y nunca coloque la unidad donde sea imposible una buena ventilación. Al instalar esta unidad, se deben mantener recomendaciones de distancia entre el conjunto y la pared, así como dentro de un área o mueble herméticamente cerrado. Siga las pautas de distancia mínima que se muestran para una operación segura.
19) Precauciones para la instalación
- No incline la unidad hacia la izquierda o la derecha o hacia la parte posterior.
- Asegúrese de que el cable de alimentación esté fuera del camino del tráfico peatonal.
- La unidad generará una pequeña cantidad de calor durante la operación. Asegúrese de que haya suficiente espacio disponible alrededor de la unidad para permitir una refrigeración satisfactoria.
- Haga que dos personas retiren la unidad de la caja con la pantalla hacia usted. Es posible que su ropa (como una hebilla de cinturón o un botón) pueda rayar la parte delantera de la unidad. Haga lo mismo cuando mueva la unidad a otra ubicación.


20) Esta unidad debe estar conectada a una toma de corriente con una conexión a tierra de protección.
21) Haga suficiente espacio para insertar y quitar el enchufe de alimentación. Coloque la unidad lo más cerca posible de la salida. La fuente de alimentación principal de esta unidad se controla insertando o retirando el enchufe. Desconectar físicamente el enchufe es la única forma de desconectar completamente la unidad de la fuente de alimentación.
22) Las baterías no deben exponerse a un calor excesivo como la luz del sol, fuego o similares.
23) Cuando esta unidad está conectada a la toma de corriente de la pared, siempre está en modo de espera incluso cuando todas las lámparas LED no están encendidas. Para apagar la unidad, desenchufe la unidad de la toma de corriente.
24) Si el cable de alimentación está dañado, debe ser reemplazado antes de su uso por el fabricante, su agente de servicio o personas calificadas similarmente para evitar un peligro.
25) Coloque siempre el televisor en los muebles que puedan soportar el televisor de manera segura. Asegúrese de que los extremos del televisor no sobresalgan del borde de los muebles de soporte.
26) No coloque el televisor sobre muebles altos (por ejemplo, armarios o librerías) sin anclar tanto el mobiliario como el televisor a una pared u otro soporte adecuado.
27) No coloque el televisor sobre un paño u otros materiales colocados entre la TV y los muebles de apoyo.
28) Cuando el enchufe de la red eléctrica se utiliza como dispositivo de desconexión, el dispositivo de desconexión debe permanecer fácilmente operativo.
INFORMACIÓN IMPORTANTE
Las televisiones que no están posicionadas en lugares suficientemente estables pueden presentar posibles riesgos de caídas. Para evitar lesiones, especialmente a los niños, tome las siguientes precauciones simples:
- Coloque este televisor solo en muebles que puedan soportarlo de manera segura.
- Use solo un gabinete o soporte recomendado por el fabricante del televisor.
- Asegúrese de que la televisión no cuelgue del borde de los muebles de soporte.
- No coloque el televisor sobre muebles altos (como armarios o estanterías) sin anclar tanto el mobiliario como el televisor a un soporte adecuado.
- No coloque paños u otros materiales entre la televisión y los muebles de apoyo.
- No permita que los niños se suban a los muebles para alcanzar la televisión o sus controles.
Funcionamiento del mando a distancia
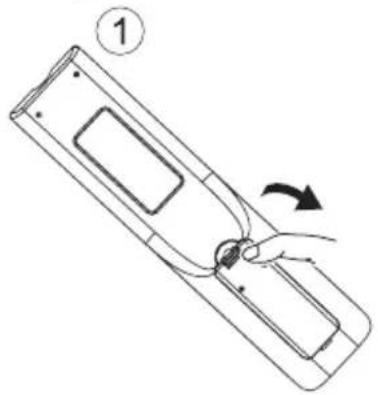
Instalación de las Baterías
- Deslice en la dirección que muestra la flecha en la Imagen 1 a continuación para abrir la tapa de las baterías en la parte posterior del mando a distancia.
- Cargue dos pilas alcalinas AAA en el compartimiento.
- Reemplace la tapa de las baterías.

natural_image
Diagram of a device with a hand holding a cable, showing a curved arrow indicating rotation (no text or symbols present)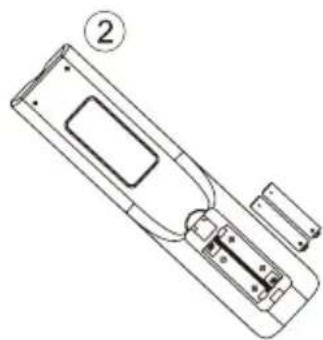
natural_image
Line drawing of a remote control panel with labeled component (no text or symbols)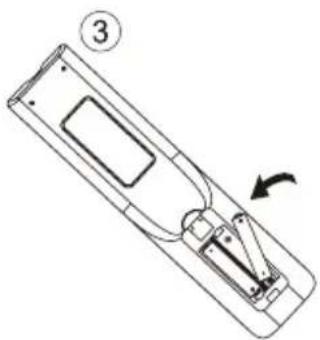
natural_image
Line drawing of a remote control panel with an arrow indicating rotation (no text or symbols)Precauciones
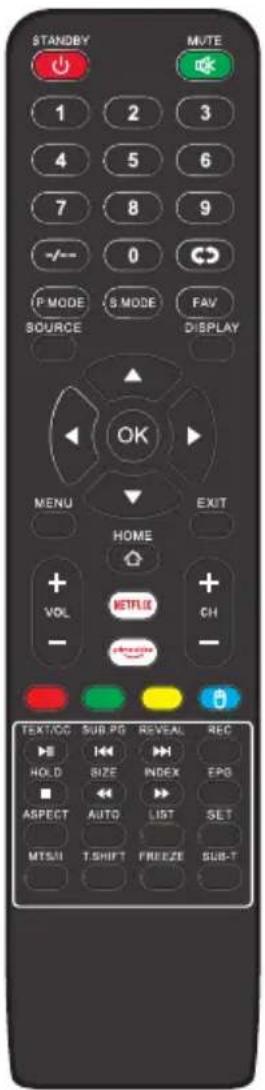
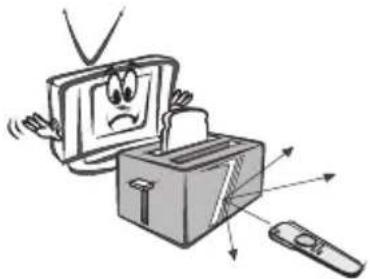
Asegúrese de que no haya ningún obstáculo entre el mando a distancia y el televisor.
Ya que la luz intensa puede interferir con las señales, cambie su posición para operar el control remoto si el televisor no se puede encender o apagar como lo espera.
natural_image
Cartoon illustration of a computer with a sad face emerging from its box, accompanied by arrows indicating motion or urgency (no text or symbols)
natural_image
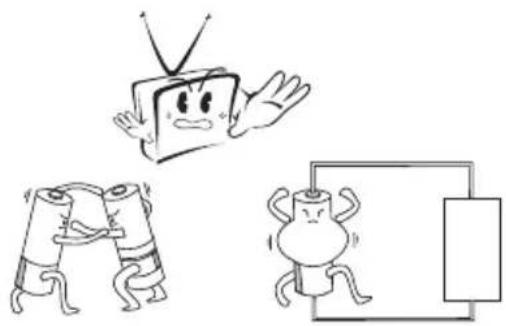
Cartoon illustration of a computer monitor with a sad face, accompanied by a lightbulb and a remote (no text or symbols)Mantenga el mando a distancia alejado de fuentes de calor y áreas húmedas para garantizar el rendimiento efectivo del mismo.
Asegúrese de que dos baterías alcalinas AAA de 1,5 V estén cargadas correctamente.

natural_image
Cartoon illustration of a computer monitor with a smiling face and a remote, no text or symbols present
natural_image
Cartoon illustration of a TV with a smiling face, a broken phone, and a soccer ball (no text or symbols)Botones TV e interfaz terminal
Botón TV
Nota: A continuación se muestra un diagrama esquemático funciona y la posición actual y el ajuste de los diferentes modelos podría diferir.
| VOL+ | VOL- | CH+ | CH- | MENU | SOURCE | (↓) |

Enciende y apaga la potencia.
SOURCE(FUENTE): Selección de entrada de señal externa.
MENÚ: Muestra el MENÚ principal y confirma la selección del elemento del menú.
CH+/-: Para la selección de canal.
VOL+/-: Para el ajuste de volumen.
Interfaz del terminal
Nota: La siguientes son diferentes interfaces del terminal, la posición y la disposición actual, el número de los diferentes modelos puede diferir.
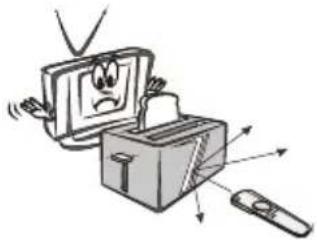
 | Entrada AVEntrada de señal AVexterna y canal de sonidoderecha/izquierda. |  | Salida de auricularesCuando se conectan los auriculares, sedeshabilitan los altavoces (Algunosmodelos sin esta interfaz) |
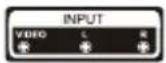
 | Entrada de YPb PrConéctese al terminalcompuesto de su DVD/VCR(Algunos modelos sin esta interfaz) |  | Entrada VGAEntrada de señal analógica de PC |
 | Entrada HDMIEntrada de la señal digitaldesde el conector de vídeoHDMI. |  | Entrada USBConecta un dispositivo USB aquí para mostrar sus archivos de medios. |
 | ANT 75Conecta la antena/cable a la entrada de la televisión.(75/VHF/UHF) |  | COAXIALConecta al recibidor SPDIF. (Algunos modelos sin está interfaz) |
 | RJ45Conecta a internet. |  | CIConnect the Data TV decryption card |
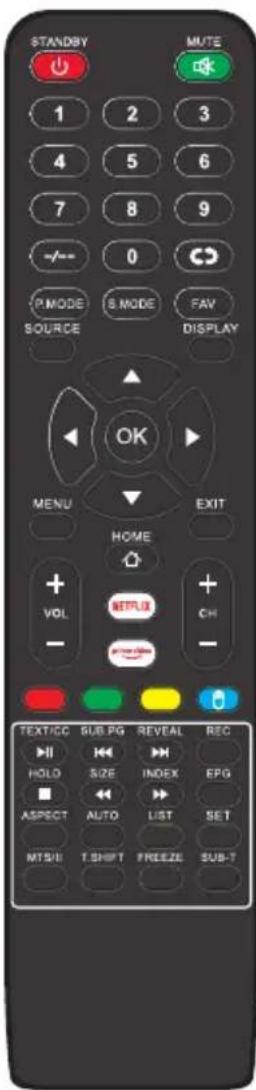
Control Remoto
text_image
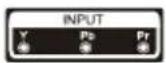
STANDBY MUTE 1 2 3 4 5 6 7 8 9 -/- 0 IP MODE S MODE FAV SOURCE DISPLAY OK MENU EXIT HOME + NETFLIX + VOL CH - TEXT/OC SUB PG REVEAL REC HOLD SIZE INDEX EPG ASPECT AUTO LIST SET MTSUI T.SHIFT FREEZE SUB-TSTANDBY: Encendido y en espera.
MUTE: Estado de silencio.
0-9: Elegir el canal.
-/-:-: Haga clic para seleccionar el canal.
G: Mudar para o canal visto anterior.
PMODE: La imagen se cambiará de la siguiente manera:
Estándar-Suave- Dinámico- Usuario. Presione una vez, se mostrará la configuración actual de la imagen.
FAV: Presione para agregar o eliminar su favorito canales.
SMODE: el sonidose cambiará de la siguiente manera:
Estándar-Música-Película -Deportes-Usuario. Presione una vez, se mostrará la configuración de sonido actual.
SOURCE: Display a lista de recurso de sinal de entrada.
DISPLAY: Muestra la barra de canales.
OK: Botón de confirmación./ Seleccione la opción de menú OSD.
MENÚ: Inicia el menú del sistema y vuelve al menú superior.
EXIT: Salir del menú o función actuales.
HOME: Presione para abrir la página inicial de Android.
VOL +/-: Aumenta / disminuye el volumen del sonido.
CH +/-: Cambiar el número de programa.
NETFLIX: Acceda a la interfaz de NETFLIX
Prime Video: Acceda a la interfaz Prime Video.
Rojo/Verde/Amarillo/Azul: Presione estos botones directamente para seleccionar la función correspondiente en la pantalla.
MOUSE: Mostrar u ocultar el ratón.
TEXT/CC/▶: Teletexto./ Subtítulos de
CC./Reproduzir/Pausa
SUB.PG/«: Mostrar la subpágina en la pantalla del teletexto./Anterior.
REVEAL/▶: Revelar u ocultar las palabras ocultas./Seguinte.
REC: Grabar.
HOLD/■: Mantener el teletexto./Parar.
SIZE/ ← :Seleccione el tamaño de la pantalla de visualización./ Hacia atrás.
INDEX/▶: Para mostrar la página del índice. / Hacia adelante.
EPG: mostrar la EPG.
ASPECT: Cambiar entre el modo de tamaño de pantalla preestablecido.
AUTO: Modelo de PC: Ajuste automático de la imagen.
LIST: Lista de programas
SET: abre el menú de configuración de red.
T. SHIFT: cuando el usuario se retira, se detendrá automáticamente el TV programa y grabar el programa en el dispositivo de almacenamiento remoto. (Está disponible cuando la función PVR es efectiva)
FREEZE:Presione para congelar el marco de la pantalla actual.
SUB-T: Muestra el subtítulo que se emitirá con el programa
MTS/II: Presione para seleccionar el modo MTS./ Modo II.
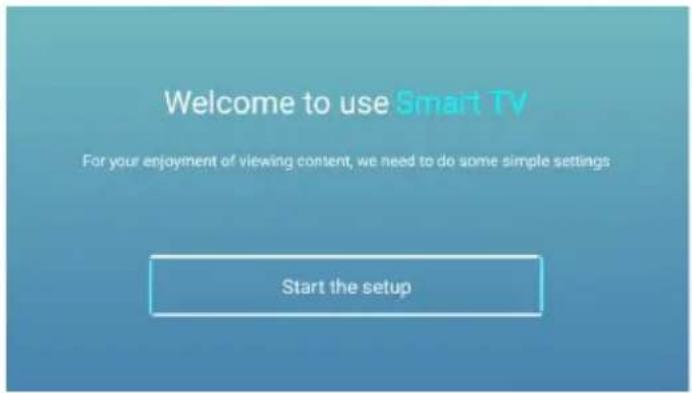
Asistente de configuración
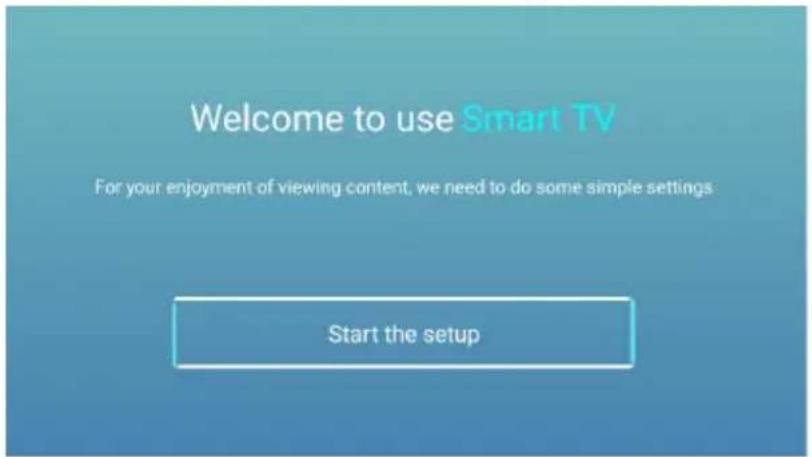
La configuración del sistema aparecerá cuando encienda el televisor por primera vez. Pulse el botón OK para iniciar la configuración.
text_image
Welcome to use Smart TV For your enjoyment of viewing content, we need to do some simple settings Start the setupPulse el botón ▼ | ▲ para seleccionar el idioma.

text_image
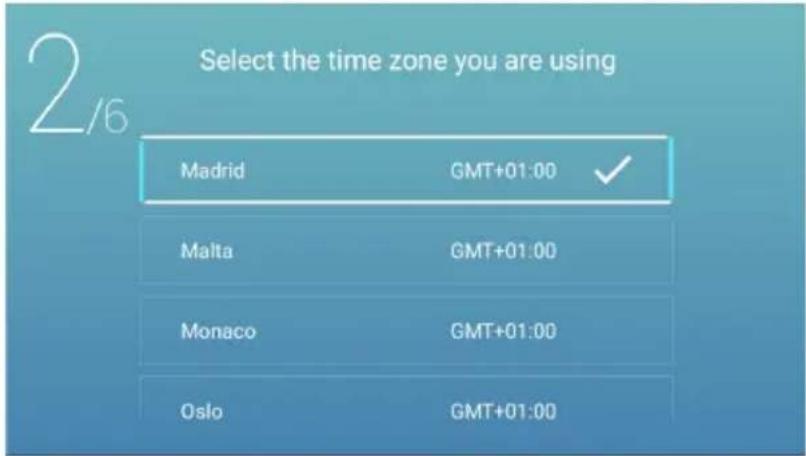
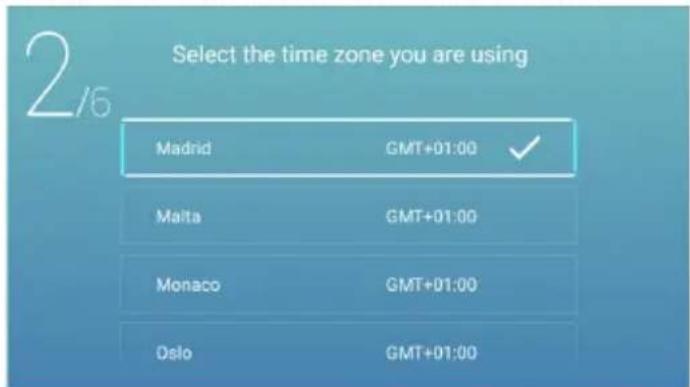
Select the language you are using English Español Français ItalianoPresione el botón ◀/▶ para seleccionar el huso horario.
text_image
Select the time zone you are using Madrid GMT+01:00 ✓ Malta GMT+01:00 Monaco GMT+01:00 Oslo GMT+01:00Nota: La ilustración es una imagen de referencia, su aparato podría diferir
Pulse el botón ◀ / ▶ para seleccionar la ECO.

text_image
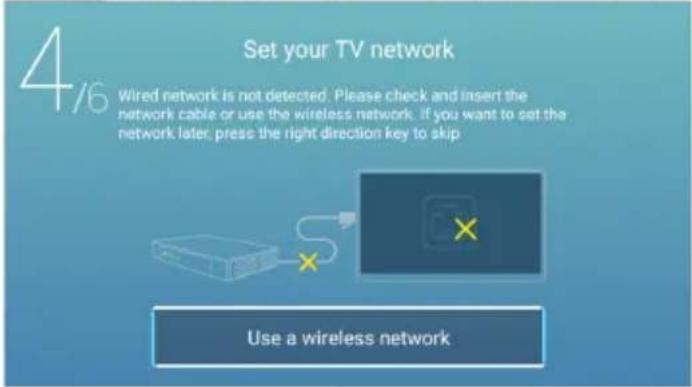
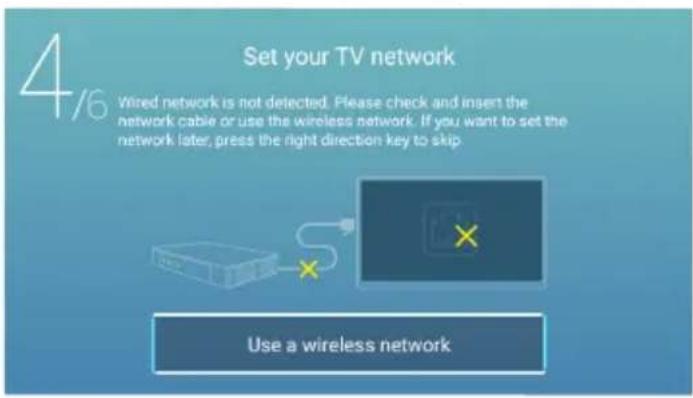
3/6 ECO Mode ECO On ECO OffPresione el botón ◀/▶ para seleccionar Configurar su red de TV.
text_image
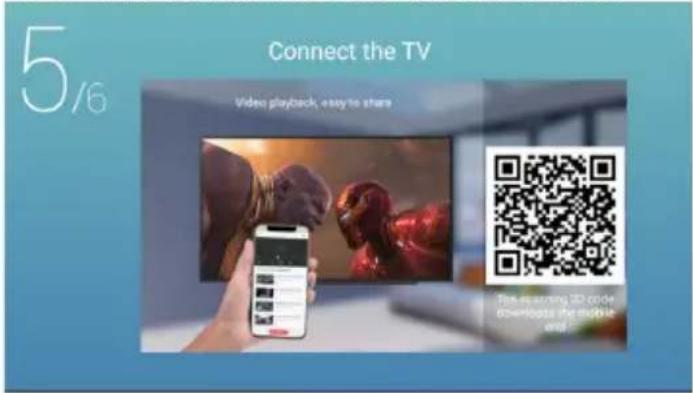
4/6 Set your TV network Wired network is not detected. Please check and insert the network cable or use the wireless network, if you want to set the network later, press the right direction key to skip Use a wireless networkPresione el botón ◀/▶ para conectar el asistente TV.

text_image
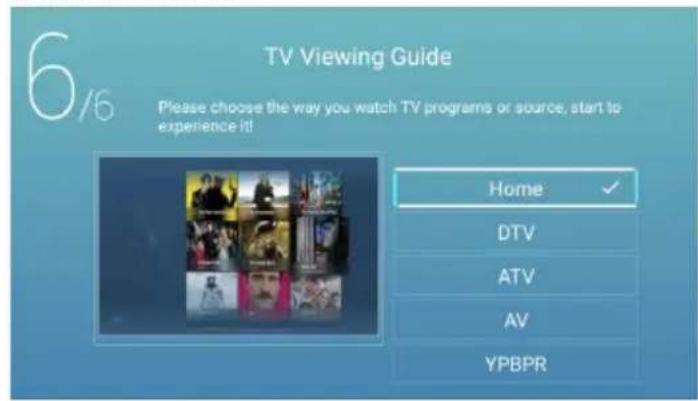
5/6 Connect the TV Video playback, easy to share The scanning 2D color drinks the mobile and the videoPulse el botón ◀ I ▶ para seleccionar la guía de visualización de TV.
Pulse el botón ▼ I ▲ para elegir la forma de ver los programas de TV o la señal: Página de inicio /DTV/ATV/AV/YPBPR.

text_image
6/6 TV Viewing Guide Please choose the way you watch TV programs or source, start to experience it! Home ✓ DTV ATV AV YPBPRNota: La ilustración es una imagen de referencia, su aparato podría diferir
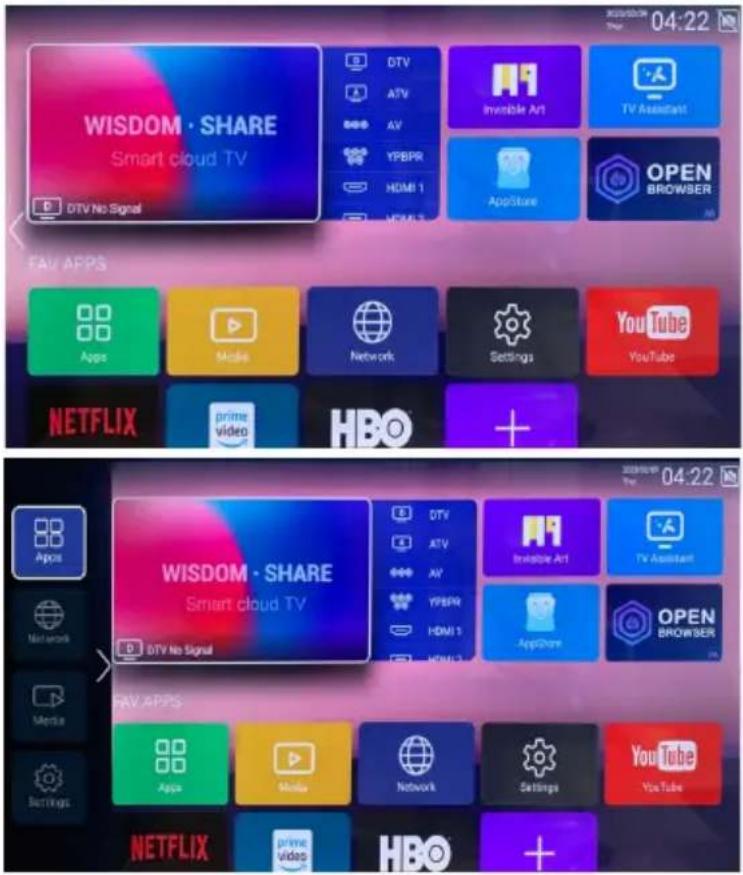
Página de inicio
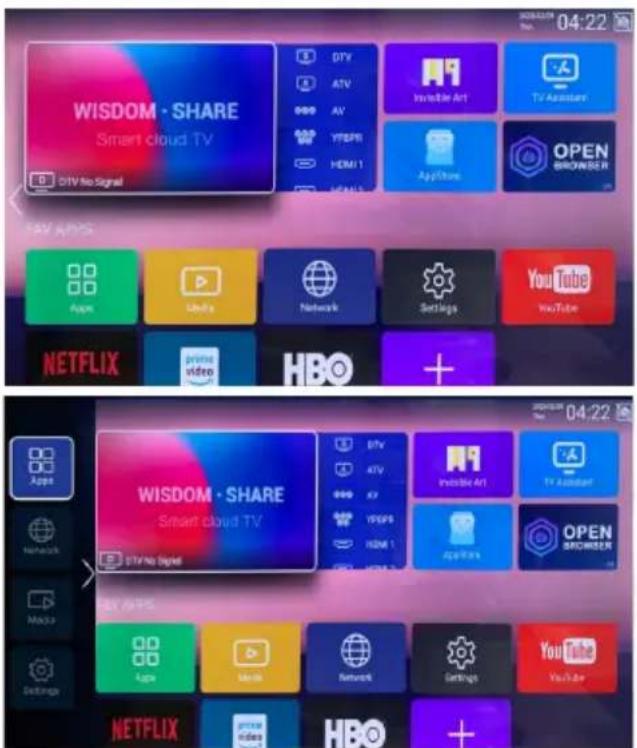
Presione el botón ▼ / ▲ para seleccionar la Página de inicio en el Asistente de configuración o presione el botón ◀ / ▶ para seleccionar Inicio en el menú de entrada ATV/DTV.
text_image
WISDOM · SHARE Smart cloud TV DTV No Signal DTV ATV AV YFEPB HDMI 1 SEAMS Inverter Art TV Assistant AppStore OPEN SHOWER FAV APPS Apps Libya Network Settings YouTube YouTube NETFLIX prime video HBO + WISDOM · SHARE Smart cloud TV DTV No Signal DTV ATV AV YFEPB HDMI 1 SEAMS Inverter Art TV Assistant AppStore OPEN SHOWER NETFLIX prime video HBOPresione el botón ▼/▲//◀/▶ para seleccionar Película/TV/HOT APP/FAV APP/Música. Puede elegir el programa que desea en la página de inicio.
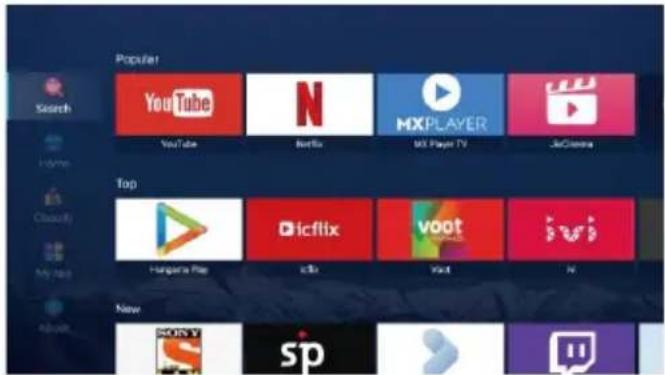
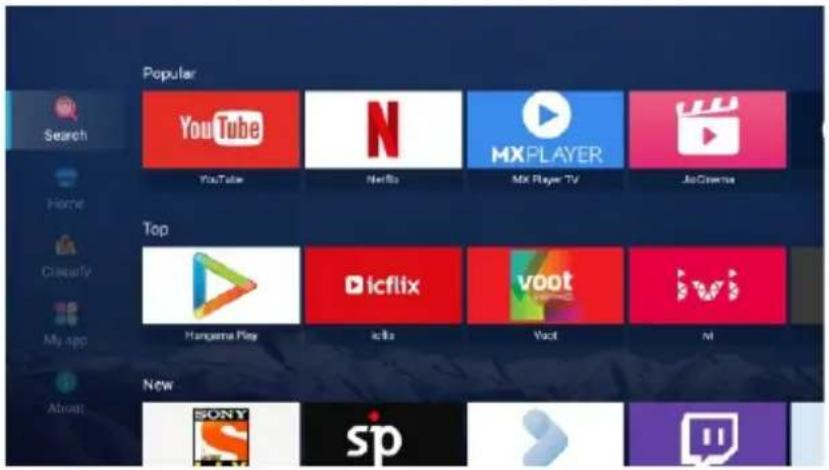
App Store
Presionar el botón ▼/▲/◄/► para seleccionar Aplicaciones. Presionar el botón ◀ / ► para seleccionar App Store y presionar el botón OK para ingresar al submenú. Presionar el botón ▼ / ▲ para seleccionar Inicio/Clasificar/Mi aplicación/Acerca y presionar el botón ▼/▲/◄/► para seleccionar la aplicación que desea.
Nota: La ilustración es una imagen de referencia, su aparato podría diferir
text_image
Popular Search YouTube N Netflix MX Player TV JrGraera Top Hungary's File iclib voot iwi New spClasificar
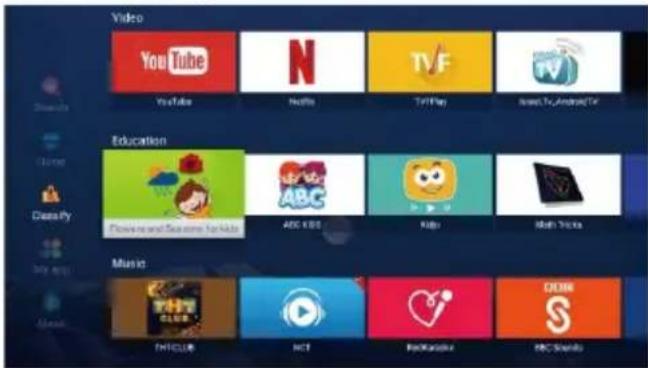
Presionar el botón ▼/▲/◄/► para seleccionar Clasificar.
Presione el botón ▼/▲/◄/► para seleccionar Vídeo / Educación / Música / Noticias / Estilo de Vida / Herramienta / Juego.
text_image
Video YouTube N TVF Instagram/Android TV Education Download and Save time for kids ABC KIDS Help Hot Sports Music THIS CLUB HOT Rockville BBC StudiosAplicación de Usuario
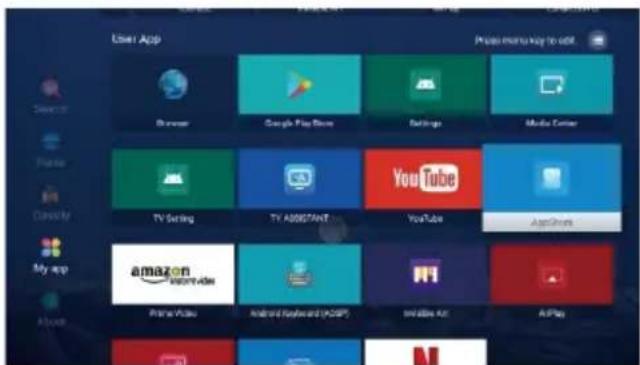
Presionar el botón ▼/▲/◄/► para seleccionar Mi Aplicación.
Presionar el botón ◀ / ▶ para seleccionar Mi Aplicación y presionar el botón OK para ingresar a la lista de Aplicaciones de Usuario.
Presione el botón ▼/▲/◄/► para seleccionar Navegador / Google Play Store / Configuración /
Centro de Medios / Configuración de TV / Asistente de TV / YouTube / App Store y así sucesivamente.
text_image
User App Browse Google Play Store Settings Media Center TV Setting TV ASSISTANT YouTube AppShare amazon My app Prime Video Android Keyland (ADSP) Initiate Art AIFayNota: La ilustración es una imagen de referencia, su aparato podría diferir
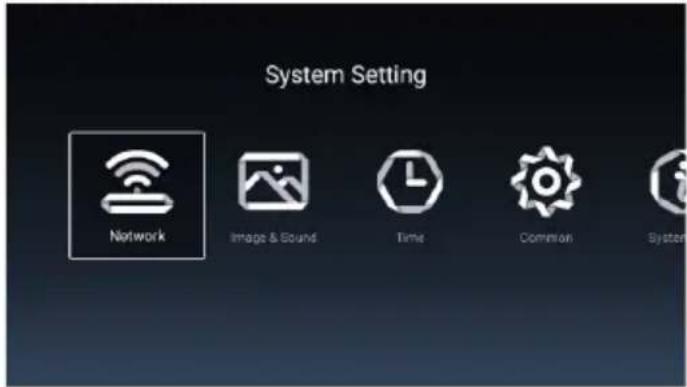
Configuración
Presione el botón ▼/▲/◄/► para seleccionar OTROS.
Presione el botón ◀ / ▶ para seleccionar Configuración y presione el botón OK para ingresar a la Configuración del sistema.
Presione el botón ◀ / ▶ para seleccionar Red / Imagen y sonido / Tiempo / Común / Información del sistema / Cuentas.
text_image
System Setting Network Image & Sound Time Common System
text_image
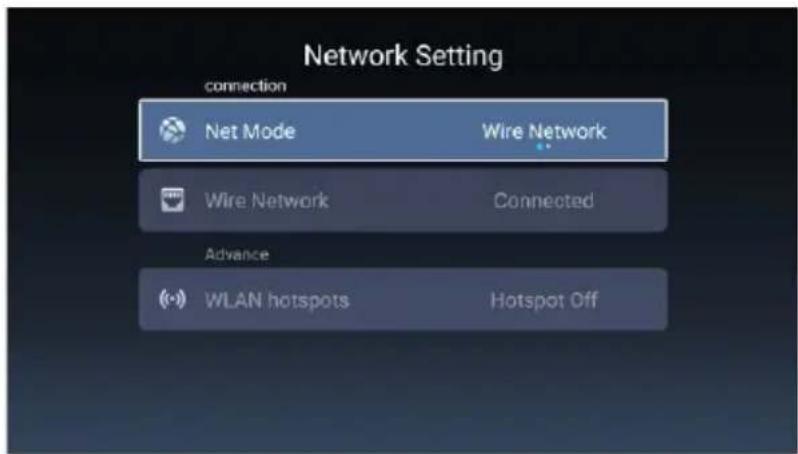
System Setting Sound Time Common System Info AccountsRed
Presione el botón ◀ / ▶ para seleccionar Red.
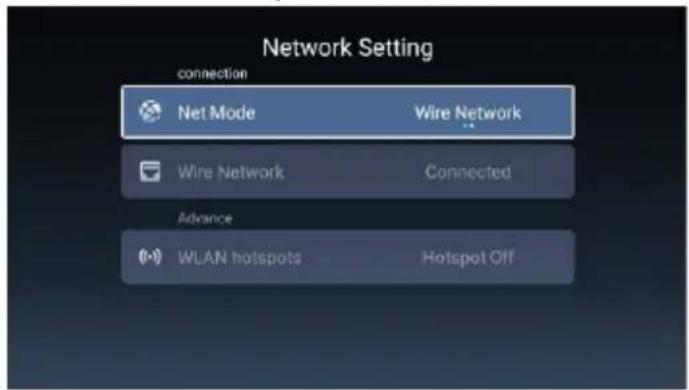
text_image
Network Setting connection Net Mode Wire Network Wire Network Connected Advance WLAN hotspots Hotspot OffNota: La ilustración es una imagen de referencia, su aparato podría diferir
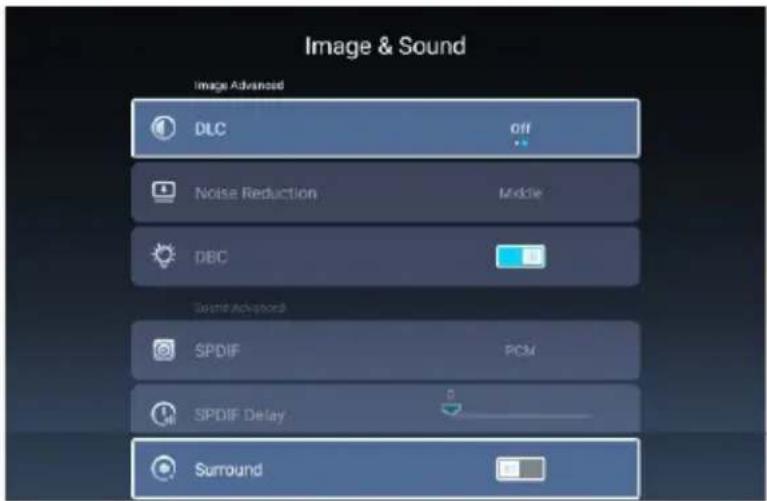
Imagen y Sonido
Presione el botón ◀/▶ para seleccionar Imagen y Sonido.
text_image
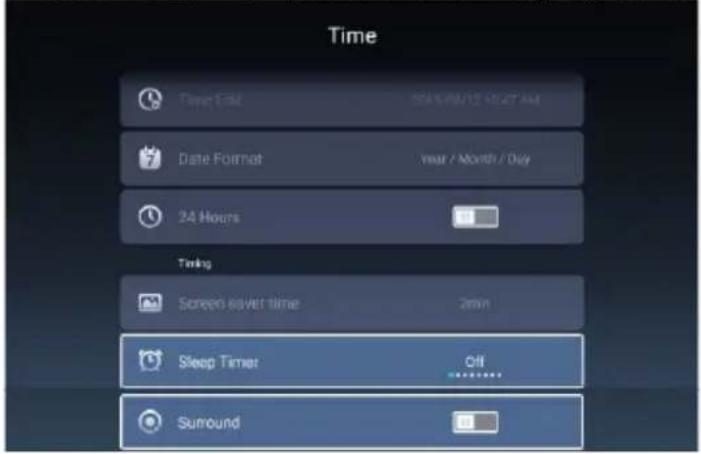
Time Time End: 00:00/12 12:27 AM Date Format: Year / Month / Day 24 Hours Timing Screen saver time: 2min Sleep Timer: Off SurroundDLC
Reducción del ruido
DBC
SPDIF
Retraso SPDIF
Entorno
Presione el botón ◀/▶ para seleccionar Activación /Desactivación.
Presione el botón ◀/▶ para seleccionar Desactivación/Bajo/Medio/Alto/Automático.
Presione el botón ◀/▶ para seleccionar Activación /Desactivación.
Presione el botón ◀/▶ para seleccionar RAW/PCM / Desactivación.
Presione el botón ◀/▶ para seleccionar.
Presione el botón ◀/▶ para seleccionar Activación/Desactivación.
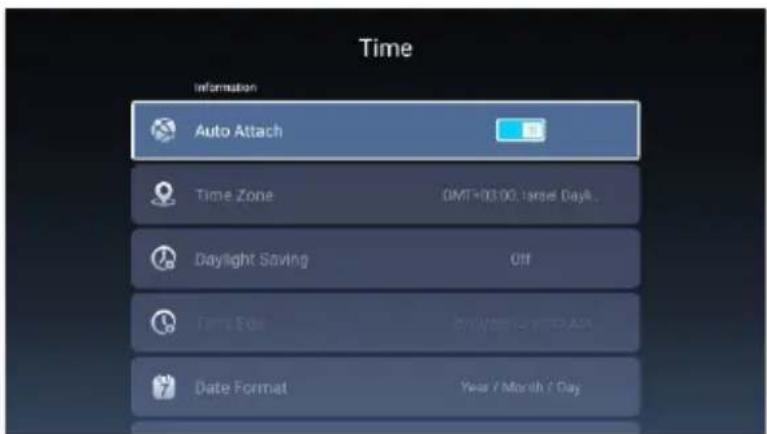
Tiempo
Presione el botón ◀ / ▶ para seleccionar Tiempo.
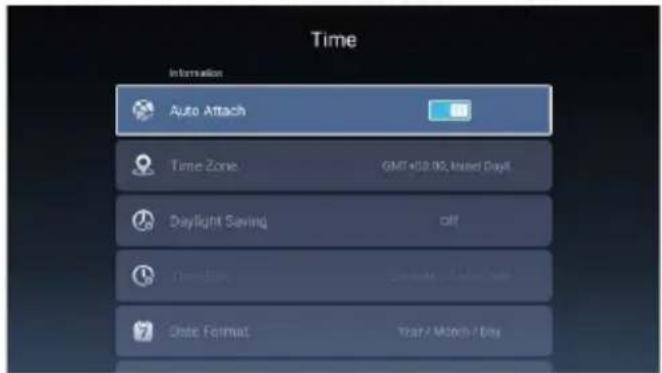
text_image
Time Information Auto Attach Time Zone GMT+58.902, Insured Daylit Daylight Saving off Date Format Year / Month / Day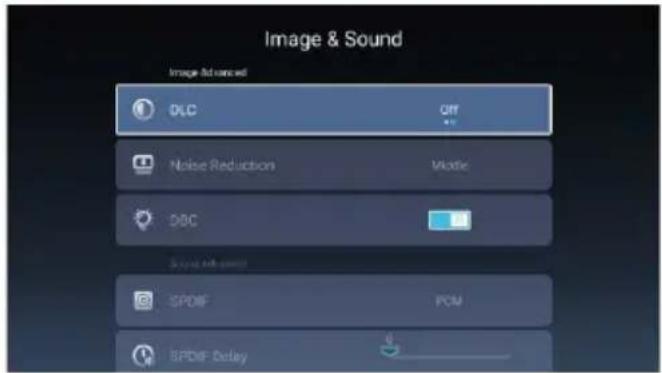
text_image
Image & Sound Image And Nexted DLC OFF Noise Reduction Mastic DBC Style: All colors SPDIF PCM BPDIF DelayNota: La ilustración es una imagen de referencia, su aparato podría diferir
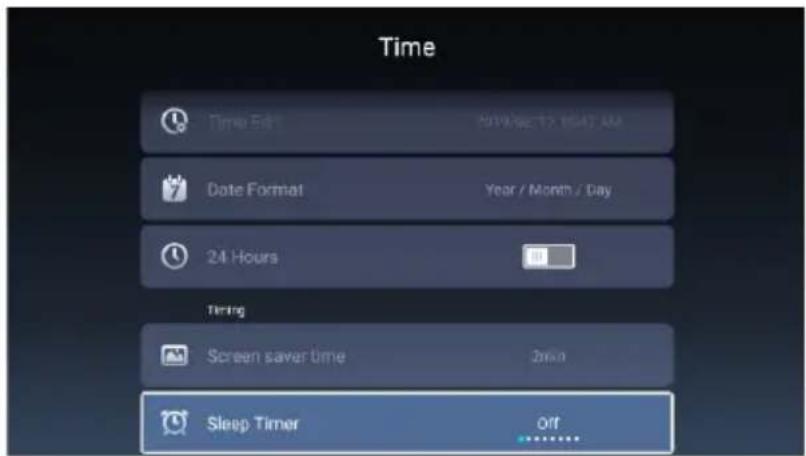
Presione el botón ▼/▲ para seleccionar Automáticamente/ Zona horaria/ Ahorro de Energía/ Editar hora/ Fecha Formato/24 horas/ Tiempo de protector de pantalla / Temporizadorde Estado de Reposo.
Automáticamente
Ajusta la hora y la fecha actuales automáticamente.
Zona horaria
Selecciona la zona horaria local.
Ahorro de Energía
Configure el horario de verano Auto/Activación/Desactivación.
Editar hora
Edita la hora y la fecha actuales automáticamente.
Fecha Formato
Ajusta el formato de la fecha actual.
24 horas
Selecciona 12 o 24 horas.
Tiempo de protector de pantalla
Configure el tiempo del protector de pantalla como Desactivación/1 min/2 min/5 min.
Temporizadorde Estado de Reposo
Configure el Temporizadorde Estado de Reposo en Desactivación/15 min/30 min/45 min/60 min/90 min/120 min/240 min.
Común
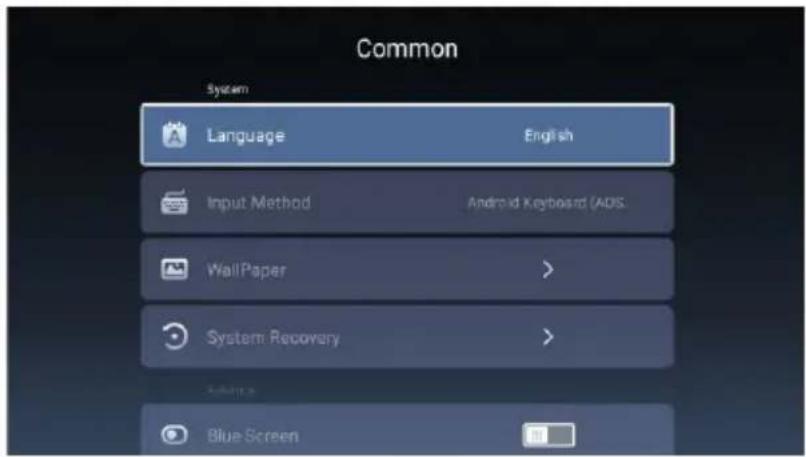
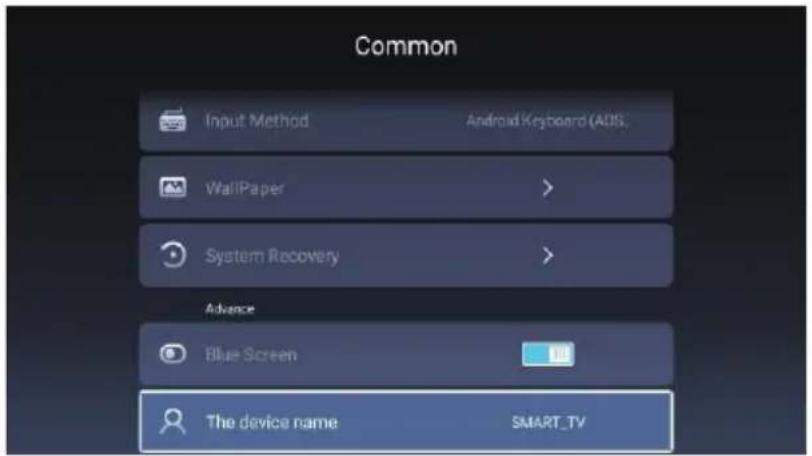
Presione el botón ◀ / ▶ para seleccionar Común.
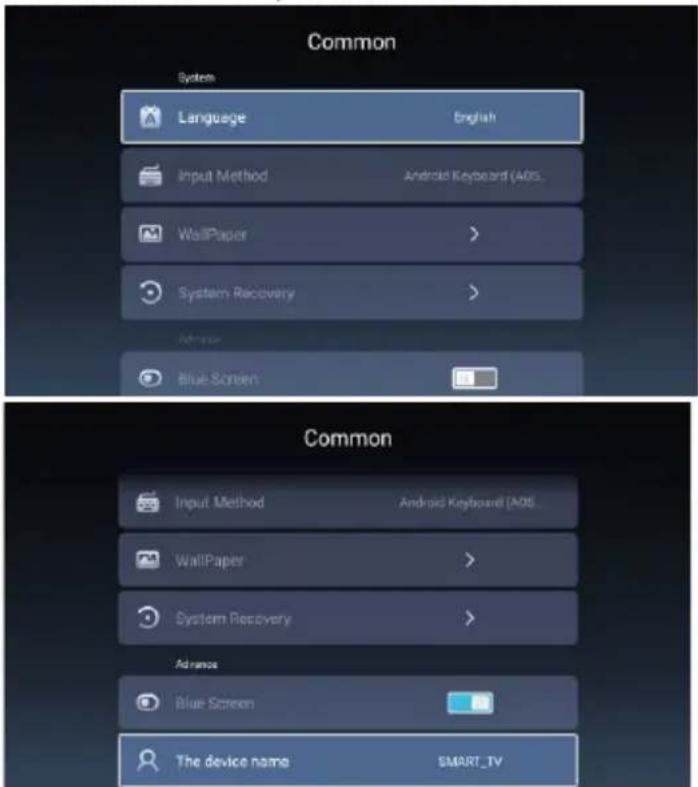
text_image
Common System Language English Input Method Android Keyboard (AOS) WallPaper > System Recovery > Advanced Blue Screen Common Input Method Android Keyboard (AOS) WallPaper > System Recovery > Advanced Blue Screen The device name SMART_IVPresione el botón ▼ / ▲ para seleccionar Idioma / Método de entrada / Papel pintado / Recuperación del sistema/Nombre del dispositivo.
Idioma
Establecer el idioma de visualización actual. El idioma predeterminado es el inglés.
Método de entrada
Seleccione el método de entrada.
Papel pintado
Establecer el fondo de pantalla.
Recuperación del sistema
Sistema de recuperación al estado original.
Pantalla Azul
Activa o Desactiva la Pantalla Azul.
Nombre del dispositivo
Establece el nombre del dispositivo.
Nota: La ilustración es una imagen de referencia, su aparato podría diferir
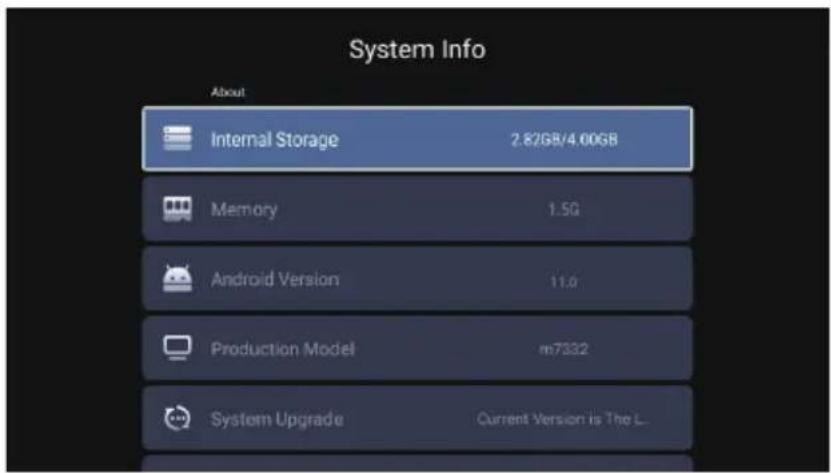
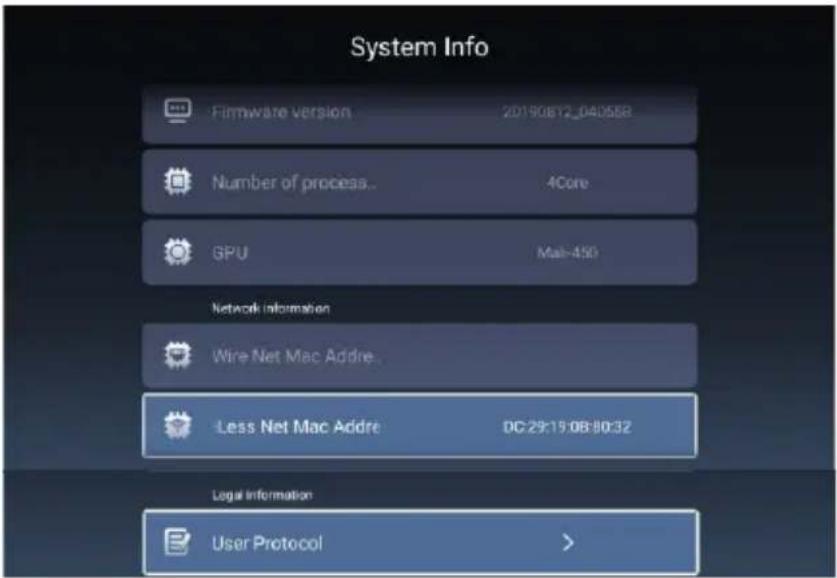
Información del sistema
Presione el botón ◀ / ▶ para seleccionar Información del sistema.
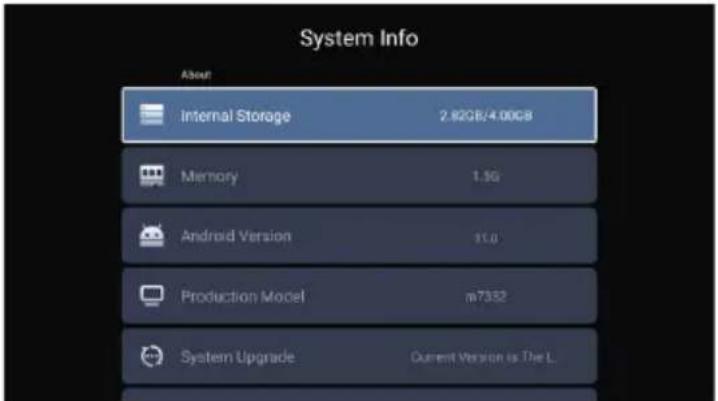
text_image
System Info About Internal Storage 2.82GB/4.00GB Memory 1.3G Android Version 11.0 Production Model m7352 System Upgrade Current Version is The L.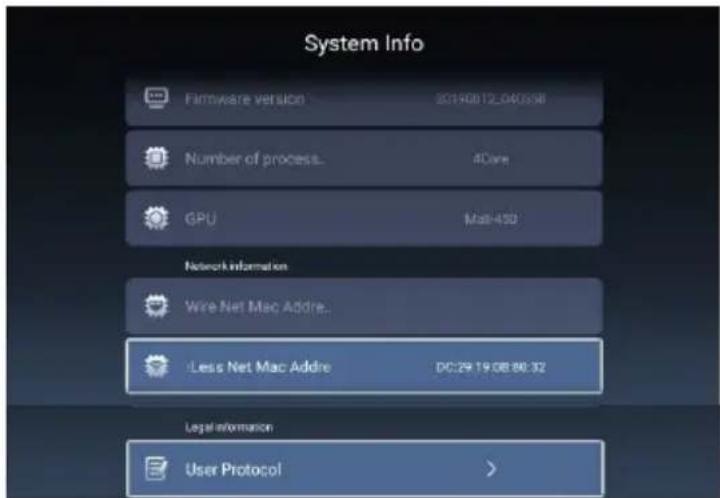
text_image
System Info Firmware version 20190812_040558 Number of process... 4Core GPU Mat-430 Network information Wire Net Mac Addre... Less Net Mac Addre DC:29 19.08.86.32 Legal information User Protocol >Cuentas
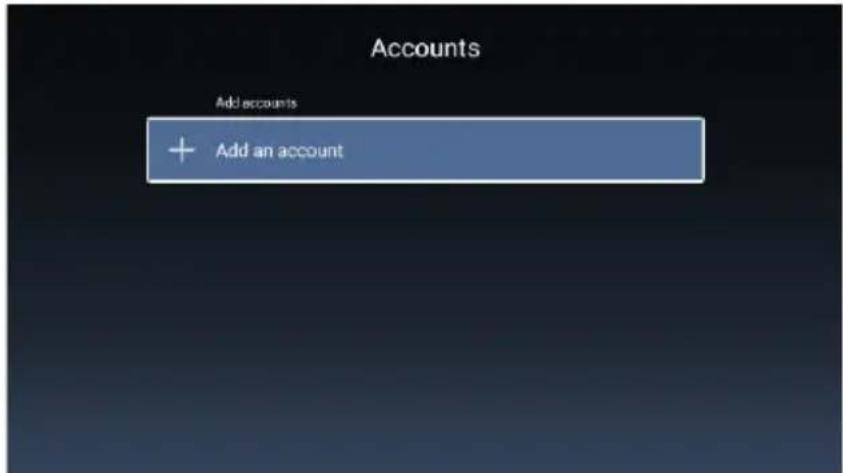
Presione el botón ◀ / ▶ para seleccionar Cuentas.
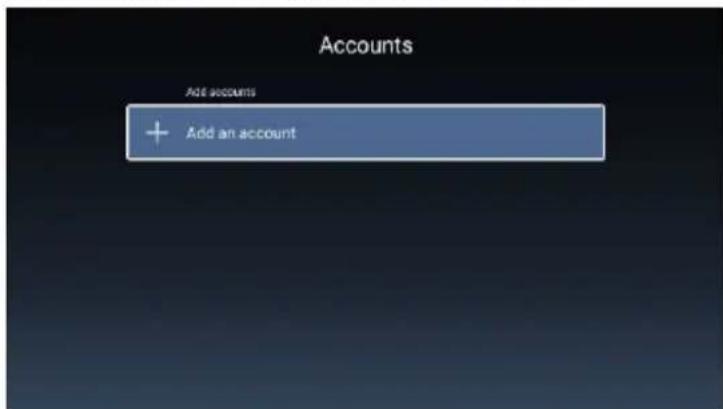
text_image
Accounts Add accounts + Add an accountNota: La ilustración es una imagen de referencia, su aparato podría diferir
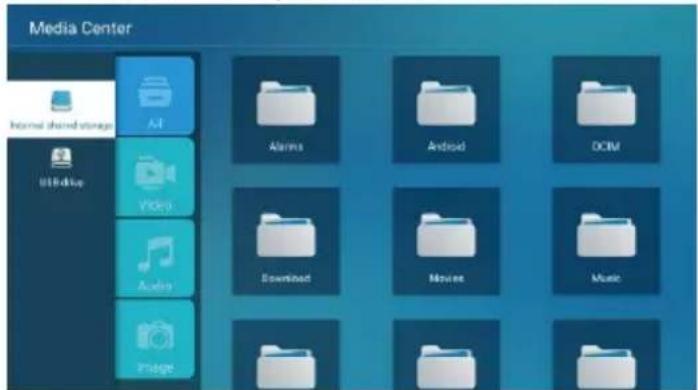
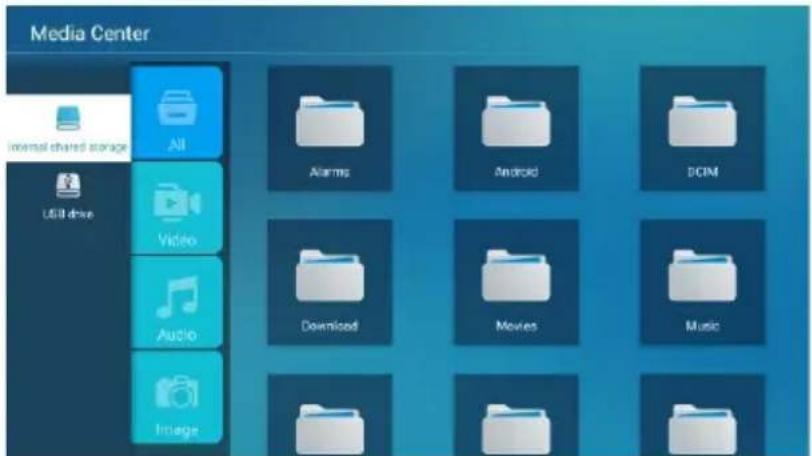
Media
Presione el botón ◀ / ▶ / ▼ / ▲ para seleccionar Multimedia en OTROS en la página de inicio o presione el botón MEDIA en el control remoto y presione el botón OK para ingresar al Centro de Medios.
Presione el botón ◀ / ▶ para seleccionar Todos / Video / Audio / Imagen.
text_image
Media Center Internal shared storage AI Alerts Android DCIM USB drive Video Download Movies Music Audio PfageVideo
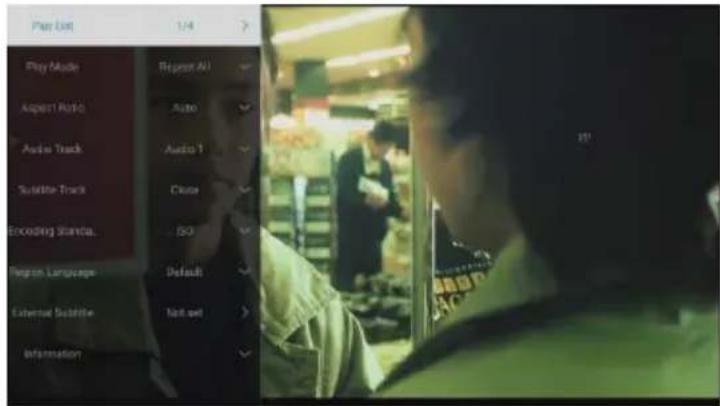
Presione el botón ▼ / ▲ para seleccionar Video o Todos, y presione el botón ▼ / ▲ / ◀ / ▶ para seleccionar Películas.
Presione el botón Menú para mostrar las opciones de configuración en el lado izquierdo.
text_image
Play List 1/4 Play Mode Repeat All August Radio Auto Audio Track Audio 1 Suite Track Clune Encoding Shanca. ISO Program Language Default External Substrate Not set InformationLista de Reproducción
Presione el botón ▼/▲ para seleccionar la Lista de Reproducción y presione el botón OK para mostrar todos los videos disponibles.
Modo de Reproducción
Presione el botón ▼/▲ para seleccionar Modo de Reproducción y presione el botón OK para seleccionar. (Opciones: Repetir Todo / Ninguno / Repite uno / Aleatorio / Lista de Reproducción)
Proporción
Presione el botón ▼ / ▲ para seleccionar Proporción y presione el botón OK para seleccionar (Opciones:Auto/16:9/4:3/Acercar1/Acercar2)
Pista de Audio
Presione el botón ▼/▲ para seleccionar la Pista de Audio y presione el botón OK para seleccionar.
Pista de Subtítulos
Presione el botón ▼/▲ para seleccionar la Pista de Subtítulos y presione el botón OK para seleccionar cerrar.
Codificación Estándar
Presione el botón ▼/▲ para seleccionar la Codificación Estándar y presione el botón OK para seleccionar ISO/WINDOWS.
Idioma de Región
Presione el botón ▼/▲ para seleccionar Idioma de Región y presione el botón OK para seleccionar.
(Opciones: Predeterminado/Europa Occidental/ Europa Central/Báltico/Cirílico/Árabe/Griego/Hebreo/Turco/Tailandés/Vietnamita/Chino)
Subtítulos Externos
Presione el botón ▼/▲ para seleccionar los Subtítulos Externos y presione el botón OK para seleccionar.
Nota: La ilustración es una imagen de referencia, su aparato podría diferir
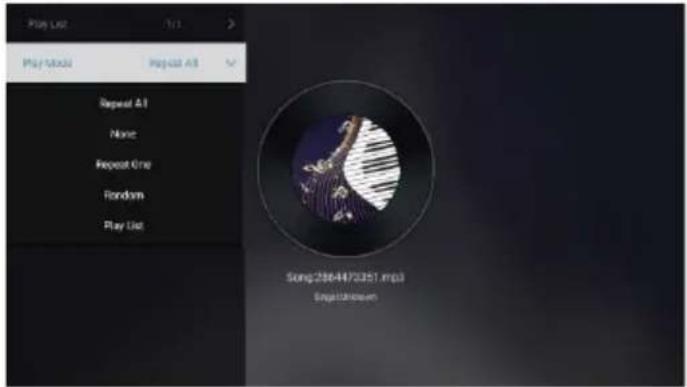
Audio
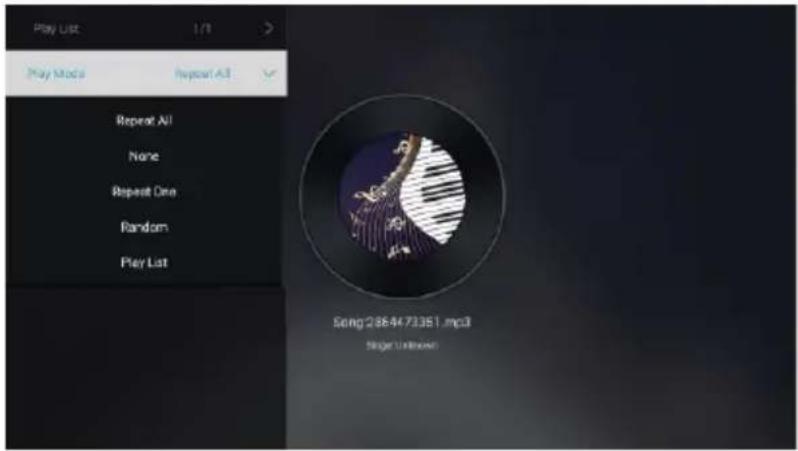
Presione el botón ▼ / ▲ para seleccionar Audio o Todos, y presione el botón ▼ / ▲ / ◀ / ▶ para seleccionar Música.
text_image
Play List Play Mode Repeat All Repeat All None Repeat One Random Play List Song:256-4470251.mp3 EnglishLista de Reproducción
Presione el botón ▼/▲ para seleccionar la Lista de Reproducción y presione el botón OK para mostrar todos los Audios disponibles.
Modo de Reproducción
Presione el botón ▼/▲ para seleccionar Modo de Reproducción y presione el botón OK para seleccionar. (Opciones: Repetir Todo / Ninguno / Repite uno / Aleatorio / Lista de Reproducción)
Imagen
Presione el botón ▼ / ▲ para seleccionar Imagen o Todos, y presione el botón ▼ / ▲ / ◀ / ▶ para seleccionar Imágenes.

text_image
Play List New! Play Style New! Time New! Time Apprent Price Apprent Price Entire Decisions Entire Decisions Terry & Paper 100%Lista de reproducción
Presentación de iapositivas
Tiempo de intervalo
Proporción
Girar
Configurar como el fondo de pantalla
Visualiza la lista de imágenes reproducibles.
Puede elegir para iniciar la presentación de diapositivas.
Seleccione el intervalo de presentación de diapositivas.
(Opciones :3/5/8/12Seg.)
Configurar la proporción. (Opciones: Automático/Pantalla completa/Alejar/ Original/Acercar1/Acercar2)
Configurar la rotación. (Opciones: Predeterminado / Girar a la Derecha / Girar a la izquierda)
Configure la imagen visualizada actual como el fondo de pantalla
Nota: La ilustración es una imagen de referencia, su aparato podría diferir
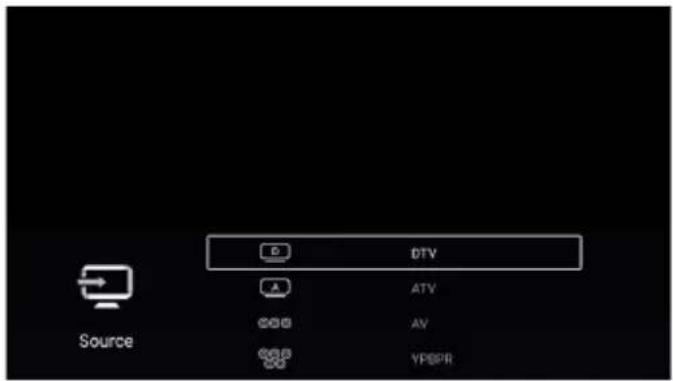
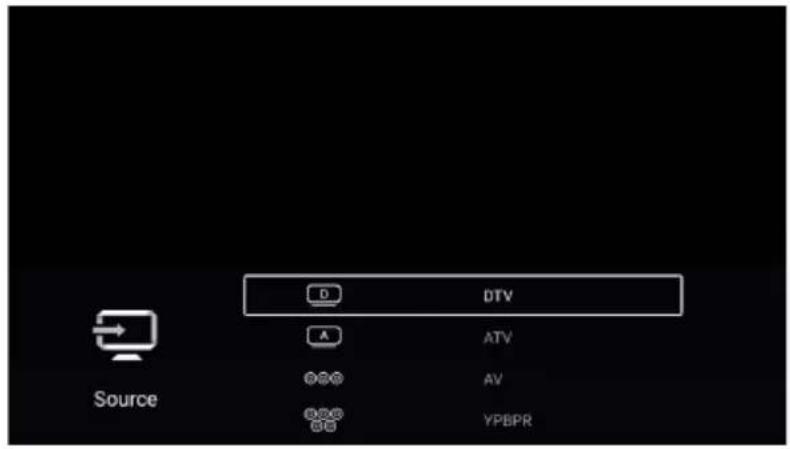
Entrada
Presione el botón ▼ / ▲ / ◀ / ▶ para seleccionar Más debajo de "WISDOM SHARE" en la página de inicio.
Presione el botón ◀ / ▶ para seleccionar ATV/AV /YPBPR/HDMI1/HDMI2/HDMI3.
O presione el botón MENU y presione el botón ◀ / ▶ para seleccionar Fuente.
Presione el botón ▼/▲para seleccionar la fuente de entrada que desea.
Presione el botón OK para entrar. Presione el botón EXIT para salir.
text_image
D DTV ATV AV VPSPR Source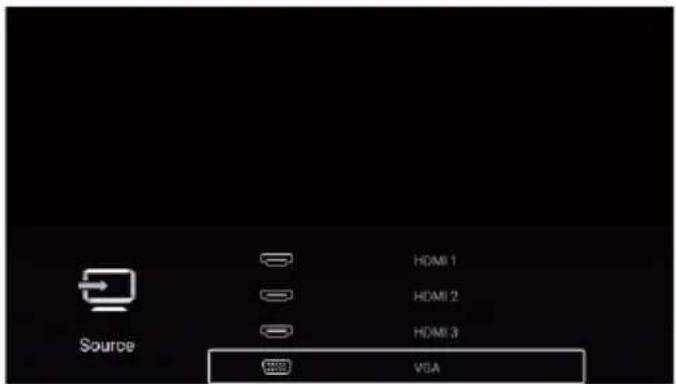
text_image
Source HDMI 1 HDMI 2 HDMI 3 VBANota: La ilustración es una imagen de referencia, su aparato podría diferir
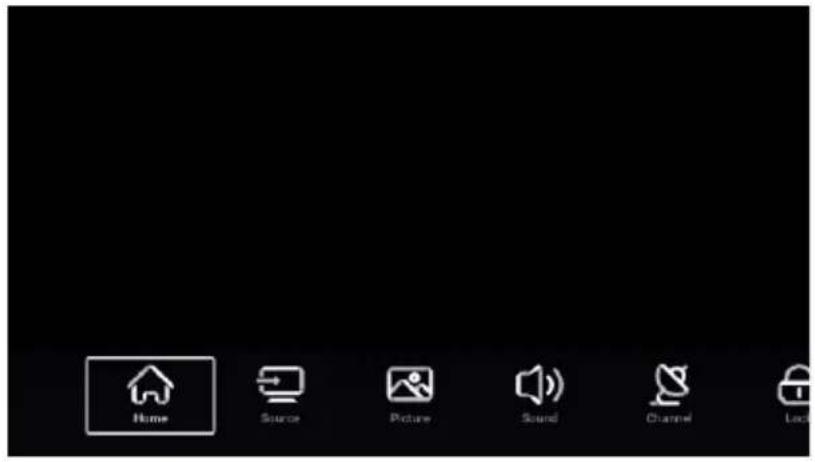
Configuración de TV
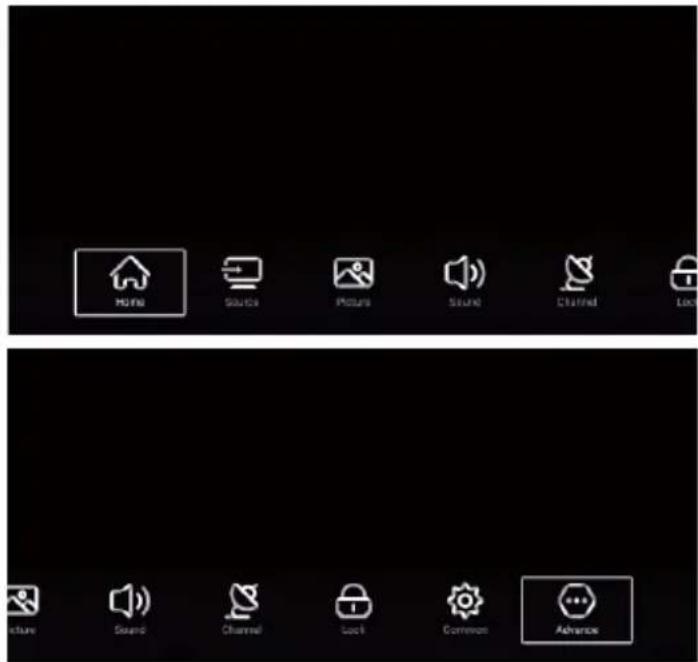
Presione el botón MENU para ingresar a la Configuración de TV.
Presione el botón ◀ / ▶ para resaltar el icono del menú deseado, y presione el botón OK para seleccionar.
(Opciones: Inicio / Fuente / Imagen / Sonido / Canal / Común / Avanzada)
text_image
HOME SOURCE PICTURE SOUND CHANNEL LOCK RUNS SOUND CHANNEL LOCK COMMON ADVANCEImagen
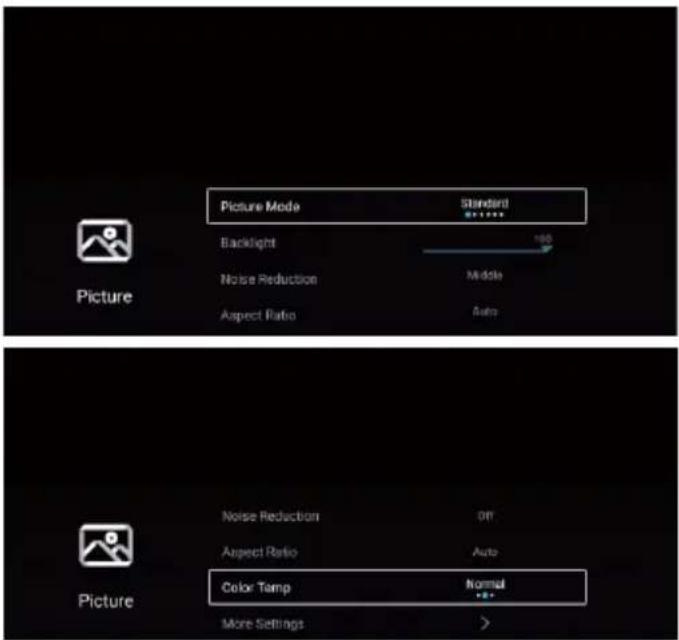
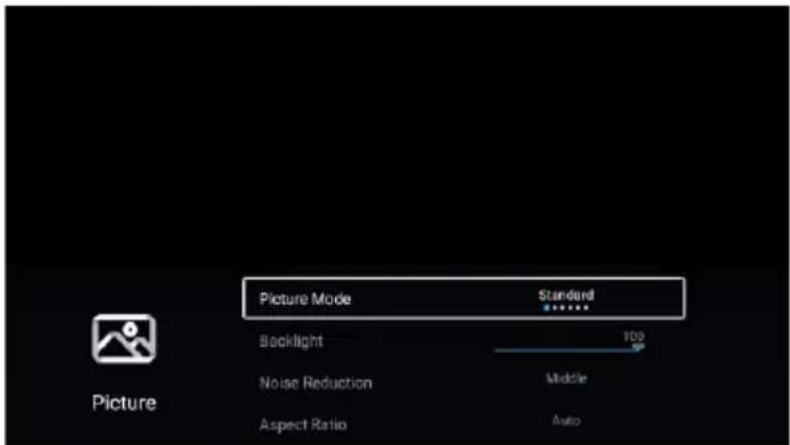
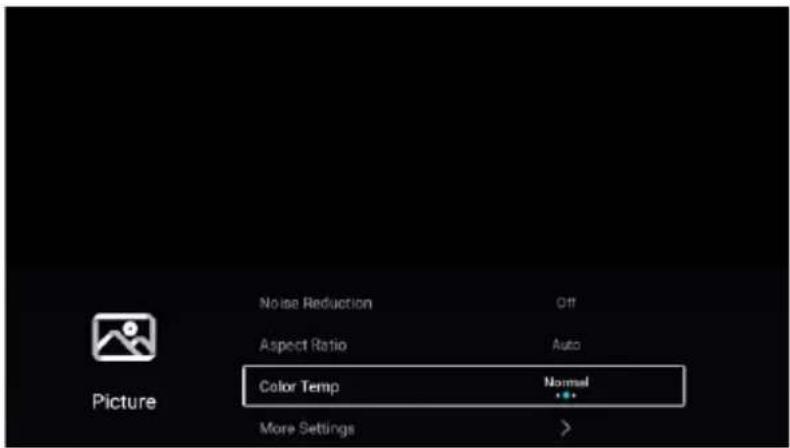
Presione el botón MENU para visualizar el menú principal.
Presione el botón ◀/▶ para seleccionar Imagen.
Presione el botón OK para ingresar al submenú.
text_image
Picture Mode Backlight Noise Reduction Aspect Ratio Standard 100 Middle Auto Picture Noise Reduction Aspect Ratio Color Temp More Settings Normal >Nota: La ilustración es una imagen de referencia, su aparato podría diferir
Presione el botón ▼/▲para seleccionar Modo de Imagen/Contraste/Brillo/Color/ Dureza /Luz de fondo/
Reducción de Ruido/ Proporción / Temperatura de color/Más Ajustes.
Presione el botón MENU o EXIT para salir.
Modo de Imagen
Resalte el elemento y presione el botón OK para ingresar al submenú, que muestra el modo de imagen que puede elegir.
Presione el botón ◀/▶ para seleccionar Estándar/ Dinámico/ Suave /Vivido/Usuario /Ahorro de Energía.
| Estándar | Produce una imagen estándar. |
| Dinámico | Mejore el contraste, el color y la claridad de la pantalla para que la imagen en la dinámica equilibre el color. |
| Suave | Reduzca el contraste, el color y la claridad de la pantalla para que la pantalla se vea suave. |
| Vivido | El color de la imagen es más hermoso y más vívido. |
| Usuario | Ajustes de imagen realizados por el usuario. |
| Ahorro de Energía | Reduceel brillo de la pantalla y mejora el contraste para el ahorro de energía |
Contraste/Brillo/Color/Dureza
Estos términos están disponibles solo cuando se selecciona "Usuario" en el Modo de imagen.
Presione el botón ▼ /▲ para seleccionar Contraste/Brillo/Color/Dureza.
Presione el botón ◀/▶ para ajustar.
| Contraste | Ajustar el contraste de la imagen. |
| Brillo | Ajustar el brillo de la imagen. |
| Color | Ajustarla densidad de color de imagen. |
| Dureza | Ajustar la dureza del borde de la imagen. |
Luz de fondo
Presione el botón ▼ /▲ para seleccionar Luz de Fondo.
Presione el botón ◀/► para ajustar.
Reducción del ruido
Ajuste de la opción para eliminar la intensidad de ruido en la imagen.
Presione el botón ▼ /▲ para seleccionar la reducción de ruido.
Presione el botón ◀/▶ para seleccionar Desactivación/Bajo/Medio/Alto/Automático.
Proporción
Presione el botón ▼ /▲para seleccionar la Proporción.
Presione el botón ◀/▶ para seleccionar 16:9/4:3/ Acercar1/ Acercar2 /Auto.
Temperatura del Color
Ajuste el color general de la imagen.
Presione el botón ▼ /▲para seleccionarla Temperatura del Color.
Presione el botón ◀/▶ para seleccionar Frío / Estándar /Caliente.
Frío La imagen está a favor de verde-azul y menos roja, todo el color está a favor de la luz. La imagen es más fresca y elegante.
Estándar La imagen no favorece ningún color. El color es moderado,
Caliente La imagen es a favor de rojo-verde y menos azul para hacer que el color sea más vivo y suave.
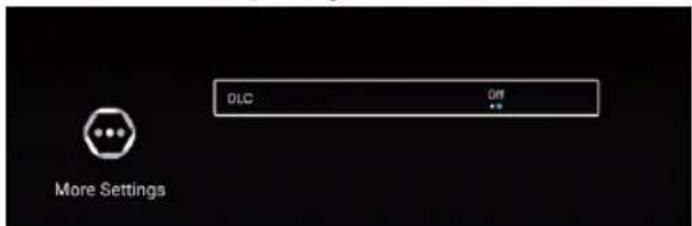
Más Ajustes
Presione el botón ▼ /▲para seleccionar Más Ajustes.
Presione el botón OK para ingresar al submenú.
text_image
DLC Off More SettingsDLC
Presione el botón ▼ /▲para seleccionar DLC.
Presione el botón ◀/▶ para seleccionar Activación / Desactivación.
Nota: La ilustración es una imagen de referencia, su aparato podría diferir
Bajos
Ajusta los efectos bajos. Increamenta o reduce los sonidos bajos.
Presione el botón ▼/▲para seleccionar Bajos. Presione el botón ◀/▶ para ajustarlo.
Agudos
Ajusta los efectos agudos. Incrementa o reduce los sonidos altos.
Presione el botón ▼/▲para seleccionar Agudos. Presione el botón ◀/►para ajustarlo.
Balance
Ajustar el balance de salida del canal izquierdo y derecho.
Presione el botón ▼/▲para seleccionar el Balance. Presione el botón ◀/▶ para ajustarlo.
AVC
Presioneel botón ▼/▲para seleccionar AVC. Presione el botón ◀/▶para seleccionar Activación / Desactivación.
Nota: Después de abrir el AVC, una vez establecido el volumen, independientemente de cualquier diferencia de la versión de la TV impresa en cada canal, puede mantener el volumen del altavoz estable.
Descripción de Audio
Presione el botón ▲/▼ para seleccionar Descripción de Audio. Presione el botón ◀/► para seleccionar Activación / Desactivación.
Personas con Discapacidad Auditiva
Presione el botón ▲/▼ para seleccionar Personas con Discapacidad Auditiva. Presione el botón ◀/► para seleccionar Activación / Desactivación.
Sonido multipista
Presione el botón ▲/▼ para seleccionar Sonido multipista.
Más Ajustes
Presioneel botón ▼/▲ para seleccionar retraso Más Ajustes. Presione el botón OK para ingresar al submenú.
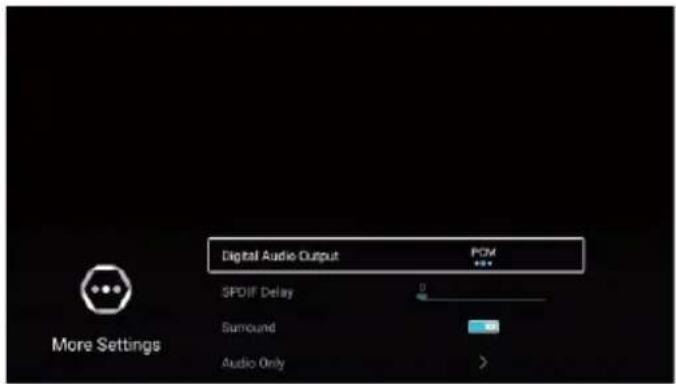
text_image
Digital Audio Output SPOIF Delay Surround Audio Only More Settings PCMSalida de audio digital
Presione el botón ◀/▶ para seleccionar Salida de audio digital. Presione el botón ◀/▶ para seleccionar Desactivación/PCM/RAW.
Retraso SPDIF
Presione el botón ▼/▲para seleccionar el retraso SPDIF, luego Presione el botón ◀/▶ para seleccionar.
Entorno
Presione el botón ▼/▲ para seleccionar Entorno, luego presione el botón ◀/▶ para seleccionar Activación /Desactivación.
Audio Solo
Presione el botón ▼/▲para seleccionar Audio Solo. Presione el botón OK para ingresar al submenú.
Nota: La ilustración es una imagen de referencia, su aparato podría diferir
Canal
Presione el botón MENU para mostrar el menú principal.
Presione el botón ◀/▶ para seleccionar Canal.
Presione el botón OK para ingresar al submenú.
ATV

text_image
Country Scan Channel List ChannelPresione el botón ▼/▲ para seleccionar País /Escaneo/Lista de canales.
Presione el botón MENU o EXIT para salir.
País
Presione el botón ▼ / ▲ para seleccionar el país. Presione el botón OK para ingresar para seleccionar el país.
Escaneo
Presione el botón ▼/▲para seleccionar Escaneo. Presione el botón OK para ingresar al submenú.
Presione el botón ▼/▲para seleccionar Escaneo Automático / Escaneo Manual Analógico.
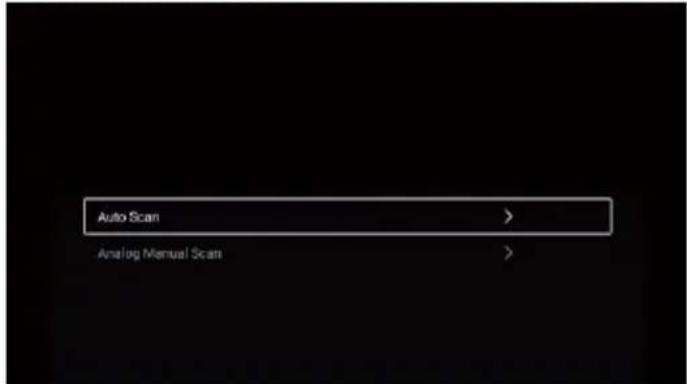
text_image
Auto Scan > Analog Manual Scan >Nota: La ilustración es una imagen de referencia, su aparato podría diferir
Escaneo Automático
La búsqueda automática puede buscar un canal de programa efectivo automáticamente.
Presione el botón ▼ / ▲ para seleccionar Auto Escanear, luego presione el botón OK para iniciar el escaneo automático.
Si desea detener la búsqueda, presione el botón EXIT o MENU para detener la búsqueda.
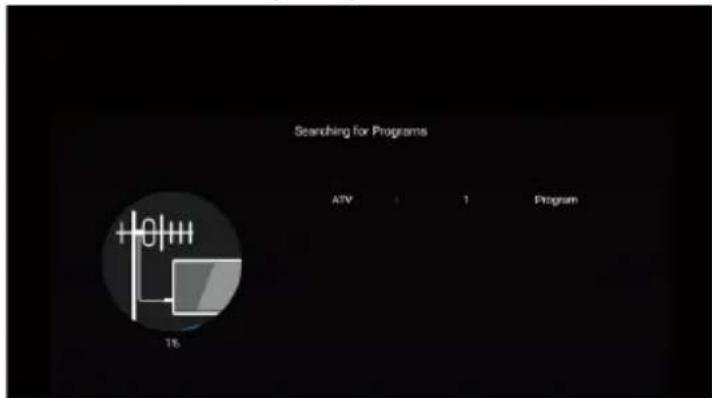
text_image
Searching for Programs ATV 1 1 Program 15Escaneo Manual Analógico
La búsqueda manual analógica puede buscar un programa de simulación eficaz manualmente.
Solo se puede seleccionar en la entrada ATV.
Presione el botón ▼/▲para seleccionar Escaneo Manual Analógico, y presione el botón OK para ingresar al submenú.
Presione el botón EXIT o MENU para salir.
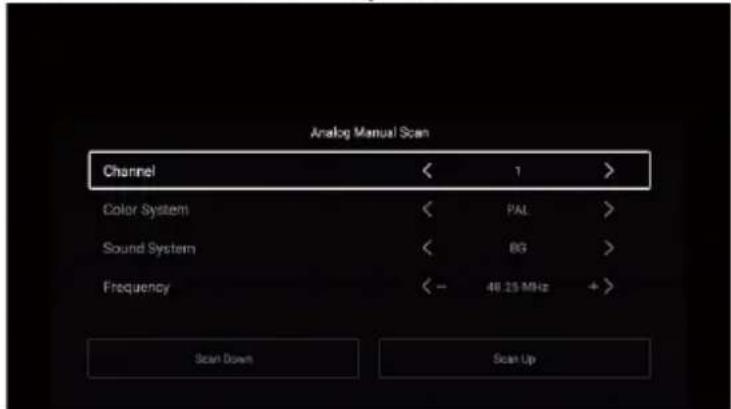
text_image
Analog Manual Scan Channel < 1 > Color System < PAL > Sound System < BG > Frequency < - 48.25 MHz + Scan Down Scan UpCanal
Presione el botón ▼/▲ para seleccionar Canal. Presione el botón ◀ / ▶ para seleccionar el número de canal.
Sistema de color
Presione el botón ▼/▲ para seleccionar Sistema de color. Presione el botón ◀ / ▶ para seleccionar PAL/SECAM/NTSC/Auto.
Sistema de Sonido
Presione el botón ▼/▲ para seleccionar Sistema de Sonido. Presione el botón ◀ / ▶ para seleccionar DK/BG/I/L/M/N.
Frecuencia
Presione el botón ▼/▲ para seleccionar Frecuencia. Presione el botón ◀ / ▶ para ajustar.
Nota: La ilustración es una imagen de referencia, su aparato podría diferir
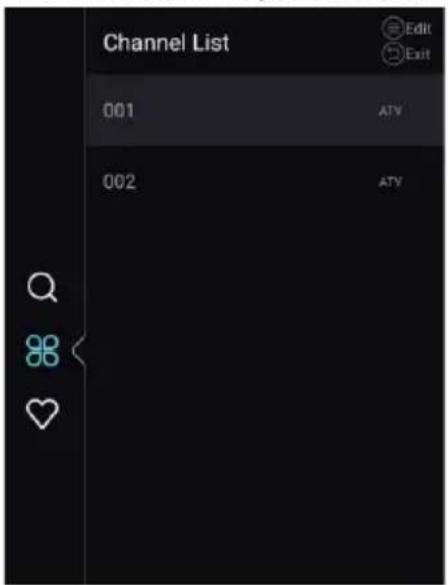
Lista de Canales
Ven todos los programas existentes.
Presione el botón ▼/▲ para seleccionar la Lista de Canales. Presione el botón OK para ingresar al submenú.
text_image
Channel List Edit Exit 001 ATV 002 ATV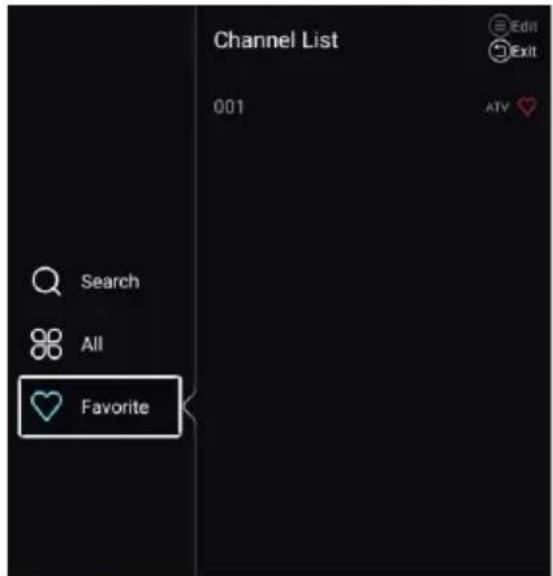
text_image
Channel List 001 Edit Exit Search All FavoritePresione el botón ▼/▲ para seleccionar Todo/Favorito.
Todos
Presione el botón ▼ / ▲ para seleccionar Todos. Presione el botón MENU para editar el programa.
(Opcional: Mover / Arriba / Favorito / Eliminar / Cambiar Nombre / Omitir).
Si el programa se selecciona como una señal analógica, se puede cambiar el nombre del programa.
Favorito
Presione el botón ▼ / ▲ para seleccionar Favorito. Presione el botón MENU para editar el canal favorito.
(Opcional: Arriba / Eliminar / Cambiar Nombre).
DTV
text_image
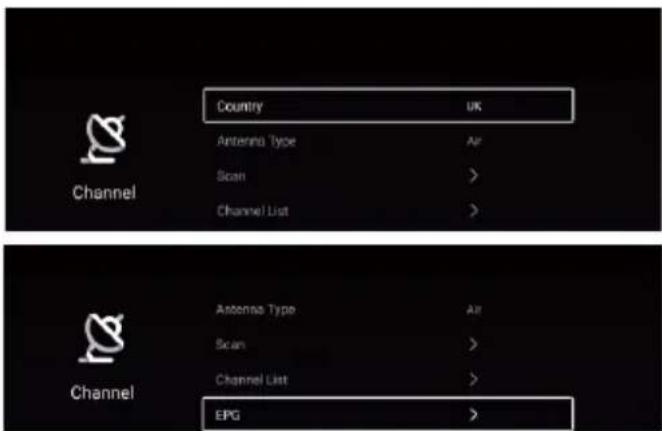
Country UK Antenna Type Air Scan > Channel List > Channel Antenna Type Air Scan > Channel List > EPGPresione el botón ▼/▲ para seleccionar País/Tipo de Antena/Escanear /Lista de Canales /EPG.
Presione el botón MENU o EXIT para salir.
País
Presione el botón ▼ / ▲ para seleccionar el país. Presione el botón OK para ingresar para seleccionar el país.
Antena deTipo
Presione el botón ▼ / ▲ para seleccionar el tipo de antena. Presione el botón ◀ / ▶ para ingresar y seleccionar Aire / Cable..
Escaneo
Presione el botón ▼/▲para seleccionar Escaneo. Presione el botón OK para ingresar al submenú.
Presione el botón ▼/▲para seleccionar Escaneo Automático/ Escaneo Manual Analógico.
Nota: La ilustración es una imagen de referencia, su aparato podría diferir

text_image
Auto Scan > Analog Manual Scan >Escaneo Automático
La búsqueda automática puede buscar un canal de programa efectivo automáticamente.
Presione el botón ▼ / ▲ para seleccionar Auto Escanear, luego presione el botón OK para iniciar el escaneo automático.
Si desea detener la búsqueda, presione el botón EXIT o MENU para detener la búsqueda.
text_image
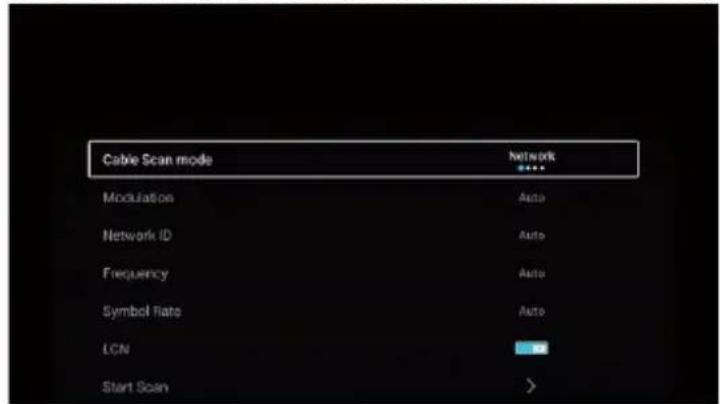
Cable Scan mode Network Modulation Auto Network ID Auto Frequency Auto Symbol Rate Auto LCN Start Scan >Modo de Escaneo de Cable
Presione el botón ▼/▲ para seleccionar el Modo de Escaneo de Cable. Presione el botón ◀/▶ para seleccionar Red/Rápido/Completo/Ciego.
Modulación
Presione el botón ◀/▶ para seleccionar la Modulación. Presione el botón ◀ / ▶ para seleccionar Auto/16QAM/32QAM/ 64QAM/128QAM/256QAM.
ID de red
Presione el botón ◀/▶ para seleccionar la ID de Red.
Frecuencia
Presione el botón ◀/▶ para seleccionar la Frecuencia.
Velocidad de Símbolos
Presione el botón ◀/▶ para seleccionar Velocidad de Símbolos.
LCN
Presione el botón ▼ / ▲ para seleccionar LCN. Presione el botón ◀ / ▶ para seleccionar Activación / Desactivación.
Iniciar escaneo
Presione el botón ▼ / ▲ para seleccionar Iniciar escaneo. Presione el botón ◀ / ▶ para iniciar el escaneo automático.
other
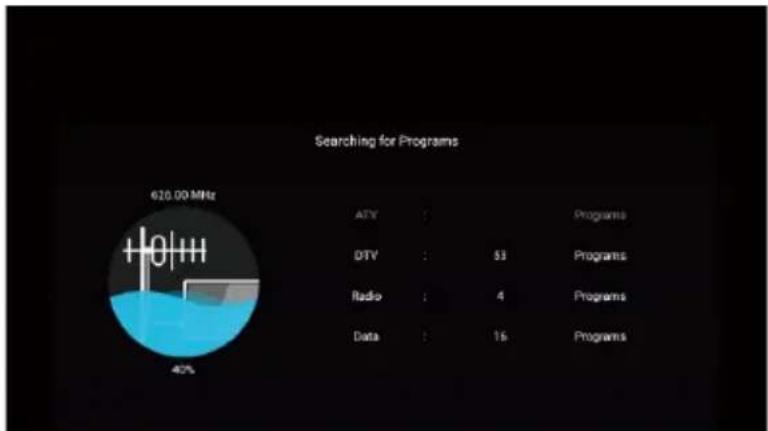
Searching for Programs | Category | Value | |---|---| | ATV | | | DTV | 53 | | Radio | 4 | | Data | 16 | | Programs | | | 620.00 MHz 40%Nota: La ilustración es una imagen de referencia, su aparato podría diferir
Escaneo Manual Digital
La búsqueda manual digital puede buscar un programa de simulación eficaz manualmente.
Solo se puede seleccionar en la entrada DTV.
Presione el botón ▼/▲para seleccionar Escaneo Manual Digital, y presione el botón OK para ingresar al submenú.
Presione el botón EXIT o MENU para salir.
text_image
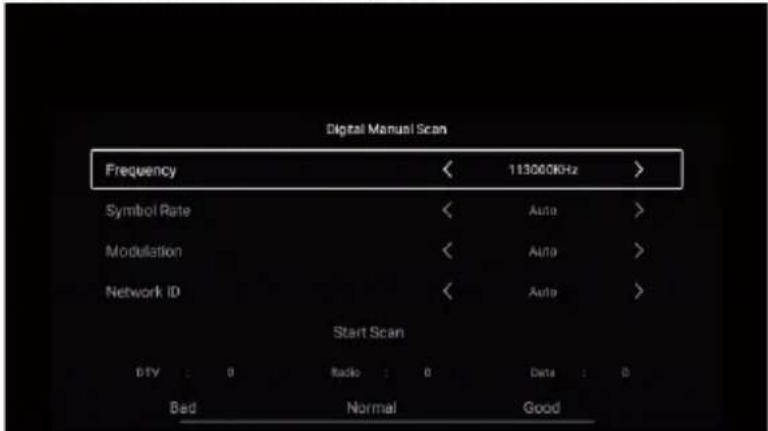
Digital Manual Scan Frequency 113000KHz Symbol Rate < Auto > Modulation < Auto > Network ID < Auto > Start Scan DTV : 0 Radio : 0 Data : 0 Bad Normal GoodFrecuencia
Presione el botón ◀/▶ para seleccionar la Frecuencia. Presione el botón ◀/▶ para ajustarlo.
Velocidad de Símbolos
Presione el botón ◀/▶ para seleccionar Velocidad de Símbolos. Presione el botón ◀/▶ para ajustarlo.
Modulación
Presione el botón ◀/▶ para seleccionar la Modulación. Presione el botón ◀ / ▶ para seleccionar.
ID de red
Presione el botón ◀/▶ para seleccionar la ID de Red. Presione el botón ◀/▶ para ajustarlo.
Subtítulos
Presione el botón ▼/▲ para seleccionar Subtítulos. Presione el botón OK para ingresar al submenú.
Lista de Canales
Ven todos los programas existentes.
Presione el botón ▼/▲ para seleccionar la Lista de Canales. Presione el botón OK para ingresar al submenú.

text_image
Channel List 001 arte HD GTV 002 N24 HD UTV 003 n-tv HD GTV 004 Bibel TV HD GTV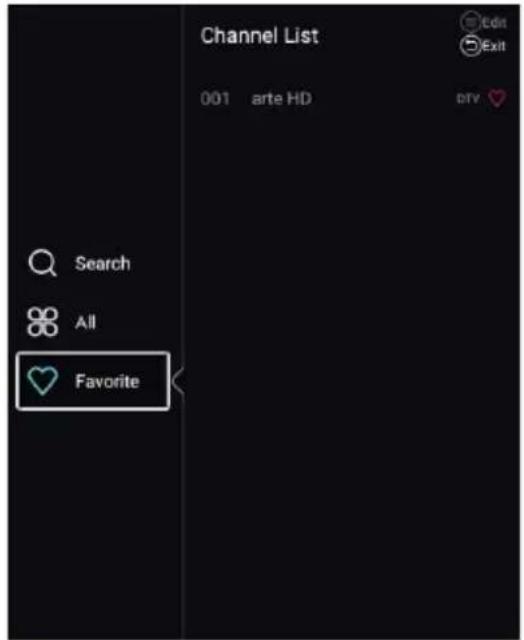
text_image
Channel List 001 arte HD Search All FavoriteNota: La ilustración es una imagen de referencia, su aparato podría diferir
Presione el botón ▼/▲ para seleccionar Todo/Favorito.
Todos
Presione el botón ▼ / ▲ para seleccionar Todos. Presione el botón MENU para editar el programa.
(Opcional: Mover / Arriba / Favorito / Eliminar / Cambiar Nombre / Omitir).
Si el programa se selecciona como una señal analógica, se puede cambiar el nombre del programa.
Favorito
Presione el botón ▼ / ▲ para seleccionar Favorito. Presione el botón MENU para editar el canal favorito.
(Opcional: Arriba / Eliminar / Cambiar Nombre).
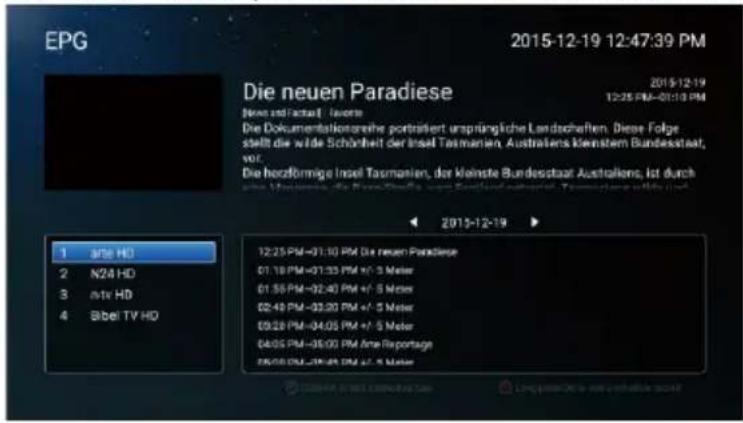
EPG
Presione el botón ▼/▲para seleccionar EPG. Presione el botón MENU para ingresar al submenú.
text_image
EPG 2015-12-19 12:47:39 PM Die neuen Paradiese Neste und Faktual - feste Die Dokumentationsreihs portrisiert ursprüngliche Landschaften. Diese Folge stellt die wärde Schönheit der Insel Tasmanien, Australiens Kleinstem Bundesstaat, vor. Die hozförmige Insel Tasmanien, der Kleinste Bundesstaat Australien, ist durch durch Monstreis, die Neueschaffte, oder Beteinbetragene, Tonsatzung nicht ist 1 ante HD 2 N24 HD 3 ante HD 4 Bibel TV HD 12:25 PM-01:30 PM Die neuen Paradiese 01:18 PM-01:33 PM +/- 3 Meter 01:55 PM-02:40 PM +/- 5 Meter 02:40 PM-03:20 PM +/- 5 Meter 03:20 PM-04:05 PM +/- 5 Meter 04:05 PM-05:00 PM Anne Reportage 06:00 PM-06:05 PM +/- 5 MeterBloqueo
Presione el botón MENU para mostrar el menú principal.
Presione el botón ◀/▶ para seleccionar Bloqueo
Presione el botón OK para ingresar la contraseña para entrar al submenú. (La contraseña predeterminada es 0000)
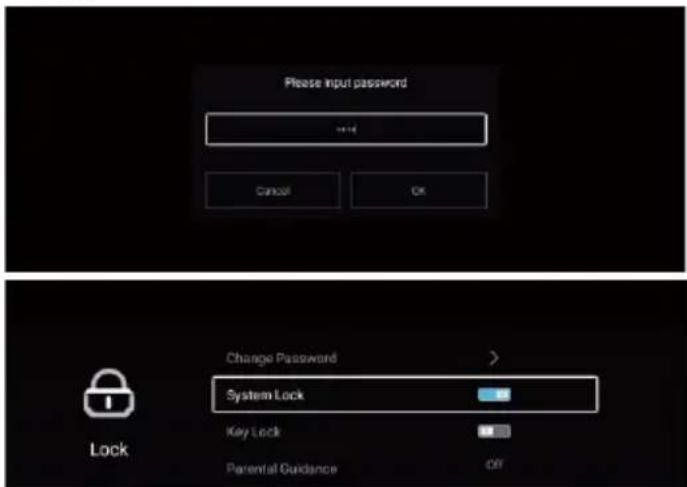
text_image
Please input password +•• Cancel OK Change Password > System Lock Key Lock Parental Guidance Off LockPresione el botón ▼ / ▲ para seleccionar Cambiar contraseña / Bloqueo del sistema / Bloqueo de tecla / Orientación Parental.
Cambiar Contraseña
Presione el botón ▼/▲para seleccionar Cambiar Contraseña. Presione el botón ENTER para configurar la contraseña.
Bloqueo del Sistema
Presione el botón ◀/▶ para seleccionar Bloqueo del Sistema. Presione el botón ◀ / ▶ para seleccionar Activación /Desactivación.
Bloqueo del Tecla
Presione el botón ▼/▲para bloquear el tecla. Presione el botón ◀ / ▶ para seleccionar Activación /Desactivación.
Orientación Parental
Presione el botón▼/▲ para seleccionar Orientación Parental. Presione el botón ◀ / ▶ para seleccionar Desactivación/5\~18.
Nota: La ilustración es una imagen de referencia, su aparato podría diferir
Común
Presione el botón MENU para mostrar el menú principal.
Presione el botón ◀/▶ para seleccionar Común.
Presione el botón OK para ingresar al submenú.
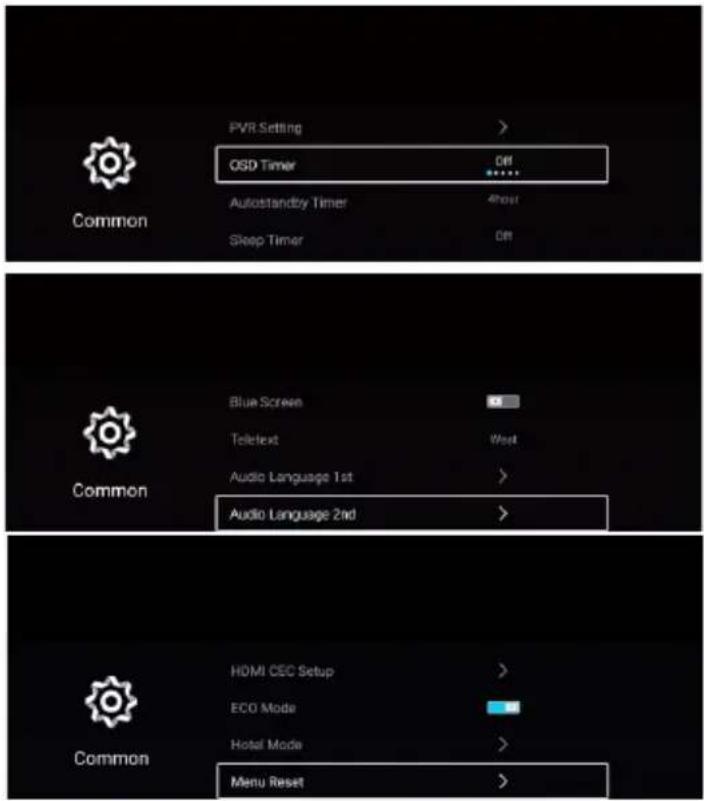
text_image
PVR Setting > OSD Timer Off Autostandby Timer 4hour Sleep Timer Off Common Blue Screen Teletext West Audio Language 1st > Audio Language 2nd > Common HDMI CEC Setup > ECO Mode Hotel Mode > Menu Reset >Presione el botón ▼/▲ para seleccionar Configuración PVR /Temporizador OSD/ Temporizador de Espera Automática/ Temporizadorde Estado de Reposo/Pantalla Azul/Teletexto/1 ^er Idioma de Audio/2 ^do Idioma de Audio/1 ^er Idioma de Subtítulos/ 2 ^do Idioma de Subtítulos/ Configuración HDMI CEC/ Modo Escena/Modo ecologico/ Reinicio de menú.
Configuración PVR
Presione el botón ▼/▲ para seleccionar la Configuración PVR.
Presione el botón ▼/▲ para seleccionar Disco/Formato/Velocidad/Lista de Grabación/Lista de Programación. Presione el botón Enter para acceder al submenú.
Temporizador OSD
Presione el botón ▼/▲para seleccionarTemporizador OSD.
Presione el botón ◀/▶ para seleccionar Desactivado/5s/15s/30s/40s.
Temporizador de Espera Automática
Presione el botón ▼/▲para seleccionar Temporizador de Espera Automática.
Presione el botón ◀/▶ para seleccionar Desactivado/3 horas/4 horas/5 horas.
Temporizadorde Estado de Reposo
Presione el botón ▼/▲para seleccionarTemporizador de Estado de Reposo.
Presione el botón ◀/▶ para seleccionar Desactivado/15min/30min/45min/60min/90min/120min/240min.
Pantalla Azul
Configura el color de fondo en azul cuando no haya señal de entrada.
Presione el botón ▼/▲para seleccionar Pantalla Azul.
Presione el botón ◀/▶ para seleccionar ACTIVADO / DESACTIVADO.
Teletexto
Presione el botón ▼/▲ para seleccionar Teletexto.
Presione el botón ◀/▶ para seleccionar Árabe / Europa Este/Oeste / Persa / Ruso.
Nota: La ilustración es una imagen de referencia, su aparato podría diferir
Configuración de HDMI CEC
Presione el botón ▼/▲ para seleccionar Configuración de HDMI CEC. Presione el botón OK para ingresar al submenú.
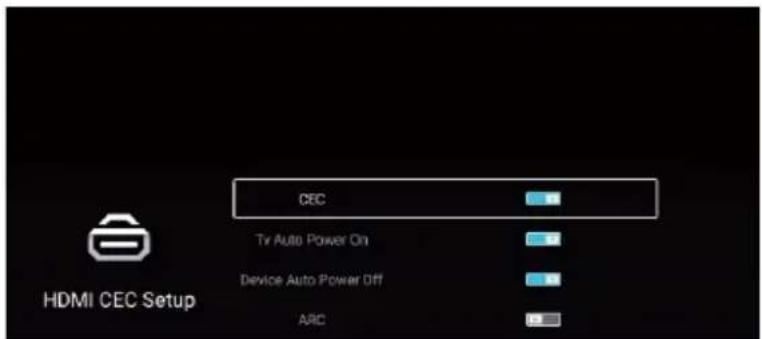
text_image
CEC TV Auto Power On Device Auto Power Off ARC HDMI CEC SetupPresione el botón ▼ / ▲ para seleccionar CEC / TV Encendido automático / Apagado automático del dispositivo / ARC.
Nota: Todas las Opciones están disponibles solo cuando la CEC selecciona Activación.
CEC
Presione el botón ▼/▲para seleccionar CEC y presione el botón ◀/▶para seleccionar Activación / Desactivación.
Los siguientes términos están disponibles solo cuando está seleccionado "Activación" en CEC.
TV Encendido automático
Presione el botón▼/▲para seleccionar TV Encendido automático y presione el botón ◀/►para seleccionar Activación / Desactivación.
Apagado automático del dispositivo
Presione el botón ▼/▲para seleccionar Apagado automático del dispositivo y presione el botón ◀/▶para seleccionar Activación / Desactivación.
ARC
Presione el botón ▼/▲ para seleccionar ARC y presione el botón ◀/▶ para seleccionar Activación / Desactivación.
Lista de Dispositivos
Presionar el botón ▼/▲ para seleccionar Lista de Dispositivos, y presionar el botón ENTER para ingresar.
Modo Escena
Presionar el botón ▼/▲ para seleccionar el Modo Escena. Presionar ◀ / ▶ para seleccionar Tienda / Hogar. Modo ecologico
Presione el botón ▼/▲para seleccionar Modo ecologico. Presione el botón ◀/▶ para seleccionar Activación / Desactivación.
OAD
Presionar el botón ▼/▲ para seleccionar el Modo Escena. Presionar ◀ / ▶ para seleccionar Tienda / Hogar.
Reinicio de menú
Recupera el defecto de la configuración.
Presione el botón ▼/▲para seleccionar Reinicio de menu.
Presione el botón OK para ingresar al submenú.
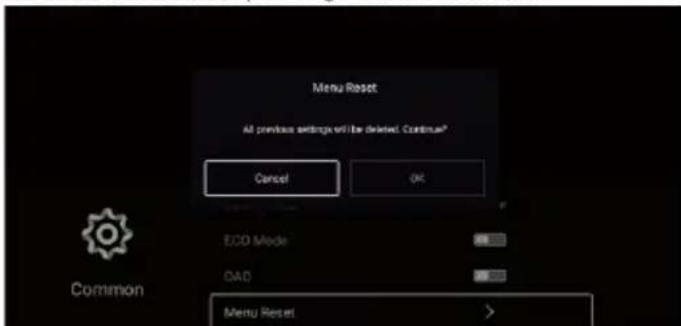
text_image
Menu Reset All previous settings will be deleted. Continue? Cancel OK ECO Mode QAD Menu Reset CommonAvanzada
Presione el botón MENU para mostrar el menú principal.
Presione el botón ◀/▶ para seleccionar Avanzada.
Presione el botón OK para ingresar a la Configuración del Sistema.
(Por favor consulte la Página de Inicio —Configuración)
Nota: La ilustración es una imagen de referencia, su aparato podría diferir
Ayuda
| Sin Electricidad | Compruebe si el cable de CA del televisor está enchufado o no.Si todavía no hay corriente, saque el enchufe y vuelva a enchufarlo después de 60 segundos. Y vuelve a abrir el televisor. |
| La señal no se recibe correctamente | Para causar doble imagen o fantasma si hay alto edificio o alta montaña alrededor de la TV. Puede ajustar el efecto de la imagen manualmente: consulte la instrucción de poca regulación o cambiar la dirección de la antena externa.Si utiliza la antena interior, recibir será más difícil bajo ciertas circunstancias. De modo que puede cambiar la dirección de la antena para ajustar el efecto de la imagen. Si tampoco puede cambiar el efecto de recepción de la imagen, tiene que utilizar la antena externa. |
| Sin Imagen | Compruebe si la antena en la parte posterior del televisor está conectada correctamente o no.Intente seleccionar otros canales y compruebe si es el problema del televisor o no. |
| El vídeo está bien sin audio | Aumentar el volumenCompruebe si el televisor está en modo de silencio o no, y presione el botón de silencio para hacer reanudar el sonido. |
| El vídeo está bien pero hay error de color o sin imagen | Aumentar el contraste y el brillo. |
| Parásitos por nieve en la imagen y el ruido | Compruebe si la antena en la parte posterior del televisor está conectada o no. |
| Línea cortada nivelada | El vacío, tal como el secador de pelo, puede interferir en el aparato eléctrico.Apague este tipo de aparatoa eléctricos, limpiadores, etc. |
| Imagen o "simulacro" dual La TV nono responde al control remoto | Es posible que la ubicación de la antena no sea buena. Utilizar la antena de transmisión alta puede mejorar la calidad de la imagen en la pantalla.Opere el control remoto directamente al sensor remoto en el televisor.Si todavía no hay respuesta para el televisor,compruebe si hay bolsa de plástico en el control remoto.Y compruebe si la ubicación de la batería es correcta.Cámbiela por una nueva.El televisor cambiará al modo de espera si no hay respuesta desde el control remoto en unos minutos. |
| No hay vídeo dentro (Modo de PC) | Compruebe si el cable de pantalla conecta correctamente con el VGA.Compruebe si hay curva en el cable de pantalla. |
| Parpadeo vertical (Modo de PC) | Entre en el menú principal. Utilice el regulador del reloj para el ruido de vídeo en la pantalla para eliminar la línea vertical. |
| Rasgón horizontal (Modo de PC) | Ajuste el sonido de Audio horizontal en el menú principal para limpiar la línea del rasgón horizontal. |
| La pantalla es demasiado brillante o demasiado oscura (Modo de PC) | Ajuste la relación de contraste o el brillo en el menú principal. |
| Función PC no responde | Compruebe la configuración del ordenador en el estado de la resolución de pantalla compatible. |
| Línea de rasgón en la conexión de RCA | Utilice un cable de conexión de buena calidad. |
| Problema todavía existe | Desconecte el cable de alimentación y espere 30 segundos para conectar. Si hay algún problema con nuestro televisor, no lo repare por sí mismo, póngase en contacto con el centro de atención al cliente. |
Habrá una imagen completa y el brillo se bajará si el televisor está en Nota. Así que no mantenga el televisor en un estado similar, ni la imagen estática durante demasiado tiempo. El menú o la misma imagen que tiene mucha diferencia en el brillo y la relación de contraste durante demasiado tiempo.
Nota: El panel de la TV está construido con una tecnología de muy alta precisión que le da detalles de imagen finos en color vibrante. Ocasionalmente, algunos píxeles no activos pueden aparecer en la pantalla como un punto fijo de rojo, verde, azul o blanco. Tenga en cuenta que esto no afecta al rendimiento del producto.
Especificaciones
| ◆ Resolution: | 3840X2160 |
| ◆ Power Supply: | AC 100-240V~50/60Hz |
| ◆ Power: | Menos que 135W |
| ◆ Video: | avi,MPEG,MPEG-4 |
| ◆ Música: | mp3 |
| ◆ Foto: | jpg,jpeg,bmp,png |
. aspes
USER MANUAL
natural_image
Large CRT television displaying a scenic rural landscape with yellow and green fields, distant mountains, and power lines (no text or symbols visible)ATV5000SM
HDMI®
HIGH-DEFINITION MULTIMEDIA INTERFACE
Read this manual carefully and keep it for future reference.
Content
Warning and Precautions 1
Important Safety Instructions 2
Remote Control Operation 4
TV Buttons and Terminal Interface 5
Remote Control 6
Setup Wizard....7
Home page 9
App Store 9
Classfiy 10
User Apps....10
SETTINGS....11
Media....16
Video 16
Audio ....18
Image....18
Input 19
TV Setting 19
Picture 20
Sound 23
Channel 26
Lock....34
Common 35
Advance 38
Help 39
Specifications 40
Warning and Precautions
Warning
Risk of electric shock. Do not open.

Warning: To avoid the risk of electric shock, do not remove cover (or back).
No user-serviceable parts inside.
Refer servicing to qualified service personnel.
The lightning flash with arrowhead symbol, within an equilateral triangle is intended to alert the user to the presence of uninsulated "dangerous voltage" within the product's enclosure that may be of sufficient magnitude to constitute a risk of electric shock to a person.

The exclamation point within an equilateral triangle is intended to alert the user to the presence of important operating and maintenance (servicing) instructions in the literature accompanying the appliance.
WARNING: TO PREVENT FIRE OR SHOCK HAZARDS, DO NOT EXPOSE THIS UNIT TO RAIN OR MOISTURE.
CAUTION: TO ENSURE PERSONAL SAFETY, OBSERVE THE FOLLOWING RULES REGARDING THE USE OF THIS UNIT.
- Operate only from the power source specified on the unit.
- Avoid damaging the AC plug and power cord.
- Avoid improper installation and never position the unit where good ventilation is unattainable.
- Do not allow objects or liquid into the cabinet openings.
- In the event of trouble, unplug the unit and call a service technician. Do not attempt to repair it yourself or remove the rear cover.
* When you don't use this TV set for a long period of time, be sure to disconnect both the power plug from the AC outlet and antenna for your safety.
* To prevent electric shock do not use this power plug with an extension cord, receptacle or other outlet unless the blades can be fully inserted to prevent blade exposure.
Do not attempt to service the product yourself
Caution
To prevent electrical shock, do not open the TV casing.
There are no user serviceable parts inside.
Please refer to qualified service personnel for repairs.
Important Safety Instructions
1) Read these instructions.
2) Keep these instructions.
3) Heed all warnings.
4) Follow all instructions.
5) Do not use this unit near water.
6) Clean only with dry cloth.
7) Do not block any ventilation openings. Ventilation should not be impeded by covering the ventilation openings with items such as newspapers, table-cloths, curtains etc. There must be a minimum distance of 5cm clear space around the unit at all times to ensure proper ventilation.
8) Do not install near any heat sources such as radiators, heat registers, stoves or other apparatus (including amplifiers) that produce heat. No naked flame sources such as lit candles, should be placed on or near the unit.
9) Protect the power cord from being walked on or pinched particularly at plugs, convenience receptacles and the point where they exit from the unit.
10) Only use attachments/accessories specified by the manufacturer.
11) Use only with a cart, stand, tripod, bracket or table specified by the manufacturer or sold with the unit. When a cart is used, use caution when moving the cart/unit combination to avoid injury from tip-over.

natural_image
Silhouette of a person climbing a ladder inside a circular frame with a diagonal line (no text or symbols)12) Unplug this unit during lightning storms or when unused for long periods of time.
13) Refer all servicing to qualified service personnel. Servicing is required when the unit has been damaged in any way, such as power-supply cord or plug is damaged, liquid has been spilled or objects have fallen into the unit, the unit has been exposed to rain or moisture, does not operate normally or has been dropped.
14) The unit should not be exposed to dripping or splashing and no objects filled with liquids, such as vases, should be placed on the unit.
15) Place the television on a stable, flat surface. Failure to do so can result in the television falling, causing injury.
16) Do not allow young children to play around or on the television. Do not hang from the unit. Failure to do so can result in the television falling, causing injury.
17) Do not allow young children to play with the plastic bag that came with the television when you unpacked it. Failure to do so can result in suffocation, which may lead to death.
18) Avoid improper installation and never position the unit where good ventilation is impossible. When installing this unit, distance recommendations must be maintained between the set and the wall, as well as inside a tightly enclosed area or piece of furniture. Keep to the minimum distance guidelines shown for safe operation.
19) Cautions for installation
— Do not tilt the unit towards the left or right or towards the back.
— Ensure the power cord is out of the path of foot traffic.
— The unit will generate a slight amount of heat during operation. Ensure that sufficient space is available around the unit to allow satisfactory cooling.
— Have two people remove the unit from the box with the screen facing away from you. It's possible your clothing (such as a belt buckle or button) may scratch the front of the unit. Do the same when moving the unit to another location.

natural_image
Simple line drawing of a human figure holding a box with a diagonal cross (no text or symbols)20) This unit shall be connected to a mains socket outlet with a protective earthing connection.
21) Make enough room for inserting and removing the power plug. Place the unit as close to the outlet as possible. The main power supply for this unit is controlled by inserting or removing the power plug. Physically disconnecting the power plug is the only way to completely disconnect the unit from the mains power source.
22) Batteries shall not be exposed to excessive heat such as sunshine, fire or the like.
23) When this unit is connected to the wall outlet, it is always on standby even when all the LED lamps are not lit. To shut down the unit, unplug the unit from the wall outlet.
24) If the supply cord is damaged, it must be replaced before further use by the manufacturer, its service agent or similarly qualified persons in order to avoid a hazard.
25) Always place the TV on furniture that cansafely support the TV.Make sure the ends of the TV do not overhang the edge of the supporting furniture.
26) Do not place the TV on tall furniture (for example, cupboards or bookcases) without anchoring both the furniture and the TV to a wall or other suitably strong support.
27) Do not stand the TV on cloth or other materials placed between the TV and the supporting furniture.
28) Where the mains plug is used as the disconnect device, the disconnect device shall remain readily operable.
IMPORTANT INFORMATION
Televisions that are not positioned in sufficiently stable locations can present potential falling hazards. To avoid injuries, particularly to children, take the following simple precautions:
- Place this television only on furniture that can safely support it.
- Use only a cabinet or stand recommended by the manufacturer of the television.
- Ensure the television does not hang over the edge of supporting furniture.
- Do not place the television on tall furniture (such as cupboards or bookcases) without anchoring both the furniture and the television to a suitable support.
- Do not place cloth or other materials between the television and the supporting furniture.
- Do not let children climb on furniture to reach the television or its controls.
ACCESSORIES:
| 1. LED TV | x1 |
| 2. Remote Control | x1 |
| 3. Stand | x2 |
| 4. Screws | x4 |
| 5. User Manual | x1 |
| 6. Warranty Card | x1 |
Remote Control Operation
Installing Batteries
- Slide in the direction shown by the arrow in Image 1 below to open the cover of the batteries on the back of the remote control.
- Load two AAA alkaline batteries in the compartment.
- Replace the cover of the batteries.
natural_image
Diagram of a device with a hand holding a cable, showing a curved arrow indicating rotation (no text or symbols present)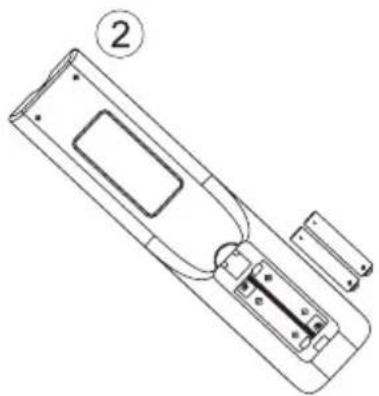
natural_image
Line drawing of a remote control device with labeled part (2), no text or symbols present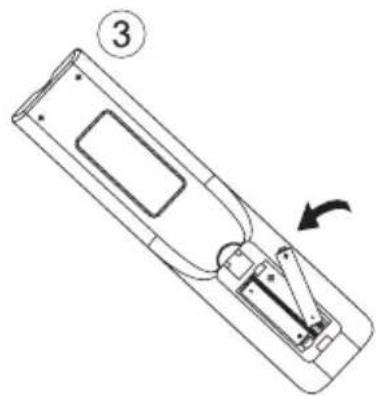
natural_image
Line drawing of a remote control device with an arrow indicating rotation (no text or symbols)Precautions
Make sure that there is no obstacle between the remote control and television set.
natural_image
Cartoon illustration of a computer monitor with a sad face emerging from a box, accompanied by a remote and directional arrows (no text or symbols)Keep the remote control away from heat sources and humid areas to ensure effective performance of the remote control.

natural_image
Cartoon illustration of a distressed computer monitor and remote with a broken screen (no text or symbols)As strong light may interfere with the signals, change your position to operate the remote control if the television cannot be turned on or off as you expect.

natural_image
Cartoon illustration of a distressed computer monitor with a sad face, accompanied by a light bulb and flying birds (no text or symbols)Make sure that two AAA 1.5V alkaline batteries are loaded correctly.
natural_image
Cartoon illustration of a TV set, an angry character holding a TV, and two anthropomorphic figures interacting with a device (no text or symbols)TV Buttons And Terminal Interface
TV Buttons
Note: The following is only functional schematic, And the actual position and arrangement of different models may be different.
VOL+
VOL -
CH+
CH-
MENU
SOURCE

(1):Turn ON/OFF Power.
SOURCE: External Signal Input Selection.
MENU: Display Main MENU And Confirm MENU Item Selection.
CH+/-:Selecting Channel.
VOL+/-:Adjusting Volume.
Terminal Interface
Note: The following are the various terminal interface, the actual position and arrangement, the number of different models may be different.
 | AV inputExternal AV Signal Input AndRelevant Right/Left Sound Channel |  | EARPHONE outputWhen earphones are plugged in,speakers are disabled(Some models without this interface) |
 | Y Pb Pr inputConnect to the composite terminal of your DVD/VCR(Some models without this interface) |  | VGA inputPC analog signal input |
 | HDMI inputDigital signal input from HDMI video connector. |  | USB inputConnect a USB device here to play its media files |
 | ANT 75Connect the antennal/cadle tv input (75/VHF/UHF) |  | COAXIALConnect the SPDIF receiver.(Some models without this interface) |
 | RJ45Connect the Internet. |  | CIComnect the Data TV decryption card |
Remote Control
text_image
STANDBY MUTE 1 2 3 4 5 6 7 8 9 -/- 0 P.MODE S.MODE FAV SOURCE DISPLAY OK MENU EXIT HOME + VOL + CH - TEXT/CC SUB PG REVEAL REC HIO HIO HOLO SIZE INDEX EPG ASPECT AUTO LIST SET MTS/B T.SHFT FREEZE SUB-TSTANDBY: Turn on and standby.
MUTE:Silence status.
0-9 : Choose channel
-/-:Press to select channel.
Switch to the previously viewed channel.
PMODE: then picture will change as following: Standard-Mild-User Dynamic. Press once, the current picture setup will be shown.
FAV: Press to add or remove your favorite
SMODE: then sound will change as following: Standard-Music-Movie Sports-User. Press once, the current sound setup will be shown
SOURCE: Displays the source list of input signal.
DISPLAY: Displays the Channel Bar.
OK : Confirmation button./Select the OSD menu option.
MENU: Accesses the Main Menu, or return to the upper level of a sub-menu.
EXIT: Exits the current menu or function.
HOME: Android homepage shortcut
NETFLIX: Access the Netflix interface.
Prime Video: Access the Prime Video interface.
VOL+/-: Increase/decrease the sound volume.
CH+/-:Switch the program number intum
Red/Green/Yellow/Blue:Press these buttons directly to select corresponding function on the screen
MOUSE:Show or hide the mouse.
TEXT/CC /▶ :Teletext./CC subtitles. / Play/Pause.
SUB.PG/◀:Display the subpage on the teletext screen./previous.
REVEAL/▶:Reveal hidden information such as the answer to a quiz in teletext/next.
REC:Record
HOLD/■ :Teletext hold./Stop.
SIZE/◄◄: Select the size of the display screen. /Backward.
INDEX/▶:Press to select the page number of the index from teletext.
/Forward.
EPG:Display the EPG
ASPECT: Switches between the preset screen size mode.
AUTO:PC-Mode:Automatic Image Adjustment.
LIST:Programme list
SET: Open the network settings menu
T.SHIFT: When the user leaves, it will auto stop the TV program and record the program into the remote store device. Available when the PVR function is effective).
FREEZE:Freeze the current screen frame.
SUB-T:Display the subtitle witch is broadcast with the program
MTS/II:Press to select the MTS mode/II mode.
Setup Wizard
The system setting will appear when you open the TV on the first time. Please set according to the on-screen guide. Press OK button to start the setup.
text_image
Welcome to use Smart TV For your enjoyment of viewing content, we need to do some simple settings Start the setupPress ▼ / ▲ button to select the language.

text_image
Select the language you are using 1/6 English ✓ Español Français ItalianoPress ◀ / ▶ button to select the time zone.
text_image
Select the time zone you are using Madrid GMT+01:00 ✓ Malta GMT+01:00 Monaco GMT+01:00 Oslo GMT+01:00Press◀/▶button to select the ECO.

text_image
3/5 ECO Mode ECO On ECO OffNote: The illustration is a reference image, your device may differ
Press ◀ / ▶ button to select Set your TV network.
text_image
4/6 Set your TV network Wired network is not detected. Please check and insert the network cable or use the wireless network. If you want to set the network later, press the right direction key to skip. Use a wireless networkPress ◀ / ▶ button to select Connect the TV as
text_image
5/6 Connect the TV Video playback, easy to share This is opening 3D code downovers the world in and it is a key.Press ◀ / ▶ button to select TV viewing guide.
Press ▼ / ▲ button to choose the way you watch TV programs or source: Home page/DTV/ATV/AV/YPBPR.
text_image
6/6 TV Viewing Guide Please choose the way you watch TV programs or source, start to experience it! Home DTV ATV AV YPBPRNote: The illustration is a reference image, your device may differ
Home page
Press ▼ / ▲ button to select Home page in Setup Wizard or press ◀ / ▶ button to select Home in the menu of ATV/DTV input.
text_image
WISDOM · SHARE Smart cloud TV DTV No Signal DTV ATV AV YPBPR HDMI 1 HDMI 2 Invisible Art TV Assistant AppStore OPEN BROWSER FAV APPS Apps Mobile Network Settings YouTube YouTube NETFLIX prime video HBO + WISDOM · SHARE Smart cloud TV DTV No Signal DTV ATV AV YPBPR HDMI 1 HDMI 2 Invisible Art TV Assistant AppStore OPEN BROWSER FAV APPS Apps Mobile Network Settings YouTube YouTube NETFLIX prime video HBOPress ▼ / ▲ / ◀ / ▶ button to select Movie/TV/HOT APP/FAV APP/MUSIC.
You can choose the program you want on the home page.
App Store
Press ▼ / ▲ / ◀ / ▶ button to select Apps.
Press ◀ / ▶ button to select App Store, and press OK button to enter the sub-menu.
Press ▼ / ▲ button to select Home/Classify/My app/About, and press ▼ / ▲ / ◀ / ▶ button to select the app you want.
Note: The illustration is a reference image, your device may differ
text_image
Popular Search Home Clearly My app About Top New YouTube Netflix Mix Player TV JiaCinema Hampasa Play icflx voot Vout SPYClassify
Press ▼ / ▲ / ◀ / ▶ button to select Classify.
Press ▼ / ▲ / ◀ / ▶ button to select Video/Education/Music/News/Lifestyle/Tool/Game.
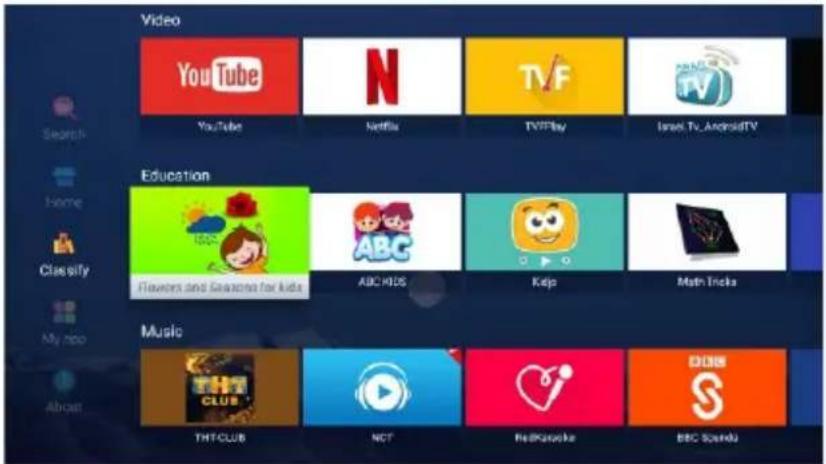
text_image
Video YouTube N Netflix TVF TVPlay Israel TV, AndroidTV Search Home Classify My info About Education Flowers and Games for kids ABC HIDS Kelp Math Tricks Music THT/CLUB NCT RedKazake BBC SoundyUser App
Press ▼ / ▲ / ◀ / ▶ button to select My app.
Press ◀ / ▶ button to select My App, and press OK button to enter the User App list.
Press ▼ / ▲ / ◀ / ▶ button to select Browser/Google Play Store/Settings/Media Center/TV Setting/TV ASSISTANT/YouTube/AppStore and so on.
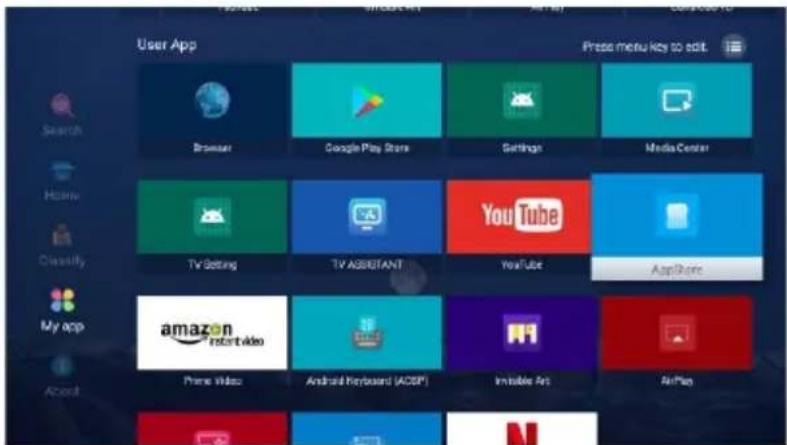
text_image
User App Search Home Classify My app About Browser Google Play Store Settings Media Center TV Setting TV Assistant YouTube App Store Amazon Instant Video Prime Video Android Keyboard (ACSP) Irritable Jet AirPlayNote: The illustration is a reference image, your device may differ
SETTINGS
Press ▼ / ▲ / ◀ / ▶ button to select OTHERS.
Press ◀ / ▶ button to select the SETTINGS, and press OK button to enter the System Setting.
Press ◀ / ▶ button to select Network/Image&Sound/Time/Commen/System Info/Accounts.
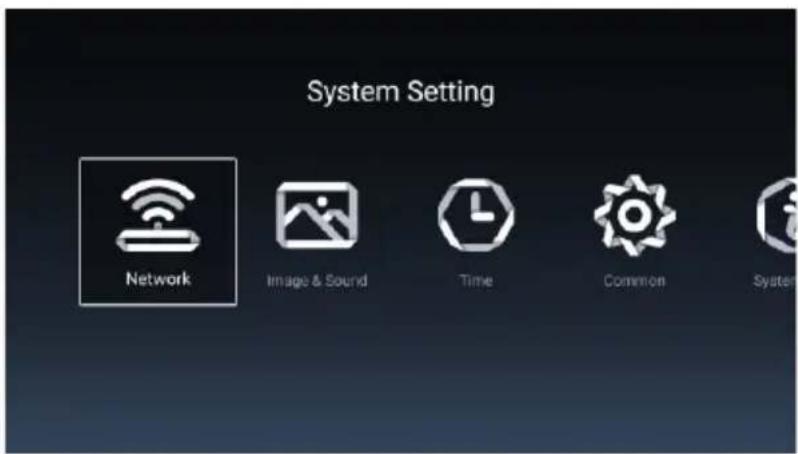
text_image
System Setting Network Image & Sound Time Common System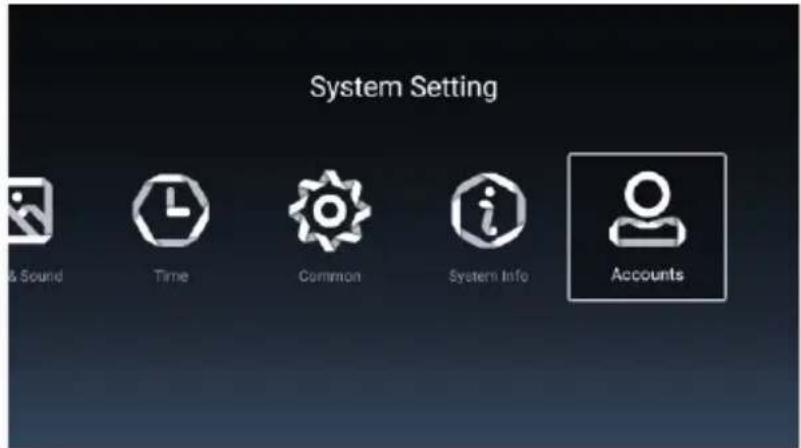
text_image
System Setting & Sound Time Common System Info AccountsNetwork
Press ◀ / ▶ button to select Network.
text_image
Network Setting connection Net Mode Wire Network Wire Network Connected Advance WLAN hotspots Hotspot OffNote: The illustration is a reference image, your device may differ
Image&Sound
Press ◀ / ▶ button to select Image&Sound.
text_image
Image & Sound Image Advanced DLC Off Noise Reduction Middle DBC Sound-Advanced SPDIF PCM SPDIF Delay SurroundDLC Press ◀ / ▶ button to to select On/Off.
Noise Reduction Press ◀ / ▶ button to to select Off/Low/High/Middle/Auto.
DBC Press ◀ / ▶ button to to select On/Off.
SPDIF Press ◀ / ▶ button to to select RAW/PCM/Off.
SPDIF Delay Press ◀ / ▶ button to to select.
Surround Press ◀ / ▶ button to to select On/Off.
Time
Press ◀ / ▶ button to select Time.
text_image
Time Information Auto Attach Time Zone GMT+03:00 Target Day Daylight Saving Off Time Edel Date Format Year / Month / DayNote: The illustration is a reference image, your device may differ
text_image
Time Time Edit: 2019 SE 12 10:47 AM Date Format Year / Month / Day 24 Hours Timing Screen saver time 2min Sleep Timer OffPress ▼ / ▲ button to select Auto Attach/Time Zone/Daylight Saving/Time Edit/Date Format/24 Hours/Screen saver time/Sleep Timer.
Auto Attach Get the current time and date automatically.
Time Zone Set the current time zone.
Daylight Saving Set the daylight saving Auto/On/Off.
Time Edit Set the current time.
Date Format Set the current date.
24 Hours Select the 12 hours or 24 hours.
Screen saver time Set the screen saver time as Off/1min/2min/5min.
Sleep Timer Set the sleep timer as Off/15min/30min/45min/60min/90min/120min/240min.
Common
Press ◀ / ▶ button to to select Common.
text_image
Common System Language English Input Method Android Keyboard (ADS. WallPaper > System Recovery > Blue ScreenNote: The illustration is a reference image, your device may differ
text_image
Common Input Method Android Keyboard (AIDS) WallPaper > System Recovery > Advance Blue Screen The device name SMART_TVPress ▼ / ▲ button to select Language/Input Method/Wallpaper/System Recovery/
Blue Screen/The device name.
Language Set the current display language. The default language is English.
Input Method Set the remote controller input method.
WallPaper Set the Wallpaper.
System Recovery Recovery system to original state.
Blue Screen Set the Blue Screen On/Off.
The device name Set the device name.
System Info
Press ◀ / ▶ button to to select System Info.
text_image
System Info About Internal Storage 2.82GB/4.00GB Memory 1.5G Android Version 11.0 Production Model m7332 System Upgrade Current Version is The L...Note: The illustration is a reference image, your device may differ
text_image
System Info Firmware version 20190812_04D558 Number of process... 4Core GPU Mal-450 Network information Wire Net Mac Addre... Less Net Mac Addre 0C:29:15:0B:80:32 Legal Information User Protocol >Accounts
Press ◀ / ▶ button to to select Accounts.
text_image
Accounts Add accounts + Add an accountNote: The illustration is a reference image, your device may differ
Media
Press ▼ / ▲ / ◀ / ▶ button to select Multimedia in OTHERS on the Home page
or press MEDIA button on the remote, and press OK button to enter enter the Media Center.
Press ◀ / ▶ button to select All/Video/Audio/Image.
text_image
Media Center Internal shared storage All Alarms Android DCIM USB drive Video Download Movies Music Audio ImageVideo
Press ▼ / ▲ button to select Video or All, and press ▼ / ▲ / ◀ / ▶ button to select Movies.
Press Menu button to display the setting options on the left side.

text_image
Play lost 1/4 > Play Mode Repeat All Aspect Ratio Auto Audio Track Audio ↑ Subtable Track Close Encoding Standa... ISO Region Language Defeat External Subtile Not out > InformationPlay List
Press ▼ / ▲ button to select Play List and press OK button to display all available videos.
Play Mode
Press ▼ / ▲ button to select Play Mode and press OK button to select.
(Options: Repeat All/None/Repeat One/Random/Play List)
Note: The illustration is a reference image, your device may differ
Aspect Ratio
Press ▼ / ▲button to select Aspect Ratio and press OK button to select.(Option: Auto/16:9/4:3/Zoom1/Zoom2)
Audio Track
Press ▼ / ▲ button to select Audio Track and press OK button to select.
Subtitle Track
Press ▼ / ▲ button to select Subtitle Track and press OK button to select close.
Encoding Standard
Press ▼ / ▲ button to select Encoding Standard and press OK button to select ISO/WINDOWS.
Region Language
Press ▼ / ▲ button to select Region Language and press OK button to select.
(Optional: Default/West Euro/Center Euro/Baltic/Cyrillic/Arabic/Greek/Hebrew/
Turkey/Thai/Vietnamese/Chinese)
External Subtitles
Press ▼ / ▲ button to select External Subtitles and press OK button to select.
Audio
Press ▼ / ▲ button to select Audio or All, and press ▼ / ▲ / ◀ / ▶ button to select Music.
text_image
Play List 1/1 Play Mode Repeat All Repeat All None Repeat One Random Play List Song 2364473361.mp3 Stage UnknownPlay List
Press ▼ / ▲ button to select Play List and press OK button to display all available Audios
Play Mode
Press ▼ / ▲ button to select Play Mode and press OK button to select.
(Options: Repeat All/None/Repeat One/Random/Play List)
Image
Press ▼ / ▲ button to select Image or All, and press ▼ / ▲ / ◀ / ▶ button to select Pictures.

text_image
Play List 4/7 Play Side Start Interval Time 3 Sec Aspect Ratio Original Rotate Default Set as wallpaper InformationPlay List
playable picture list display.
Play Slide
You can choose to start the slide show.
Interval Time
Select slide show interval. (Optional:3/5/8/12Sec.)
Aspect ratio
Set the aspect ratio. (Optional: Auto/Full screen/Zoom Out/Original/Zoom1/Zoom2)
Rotate
Set the rotate. (Optional: Default/Rotate Right/Rotate left)
Set as wallpaper
Set the current play picture as wallpaper.
Note: The illustration is a reference image, your device may differ
Input
Press ▼ / ▲ / ◀ / ▶ button to select More under the "WISDOM SHARE" on the Home page.
Press ◀ / ▶ button to select ATV/AV/YPBPR/HDMI1/HDMI2/HDMI3.
Or press Menu button, and press ◀ / ▶ button to select Source.
Press ▼ / ▲ button to select the input source you want.
Press OK button to enter. Press EXIT button to quit.
text_image
D DTV A ATV DSG AV BPG YPBPR Source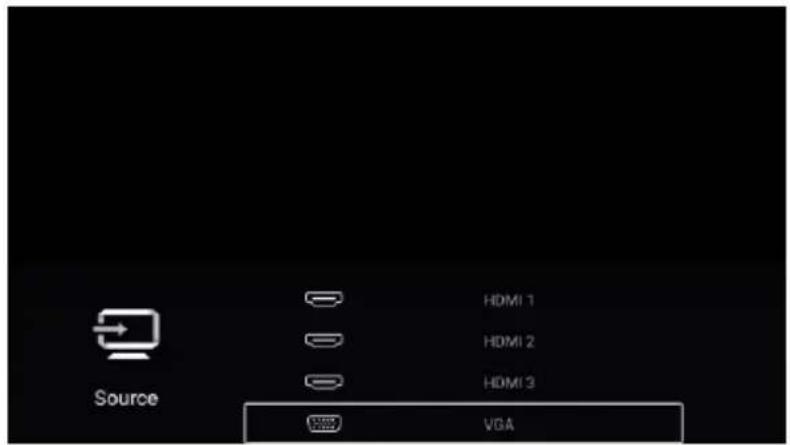
text_image
Source HDMI 1 HDMI 2 HDMI 3 VGATV Setting
Press MENU button to enter the TV Setting.
Press ◀ / ▶ button to highlight the desired menu icon, and press OK button to select.
(Optional:Home/Source/Picture/Sound/Channel/Lock/Common/Advance)
Note: The illustration is a reference image, your device may differ
text_image
Home Source Picture Sound Channel Lock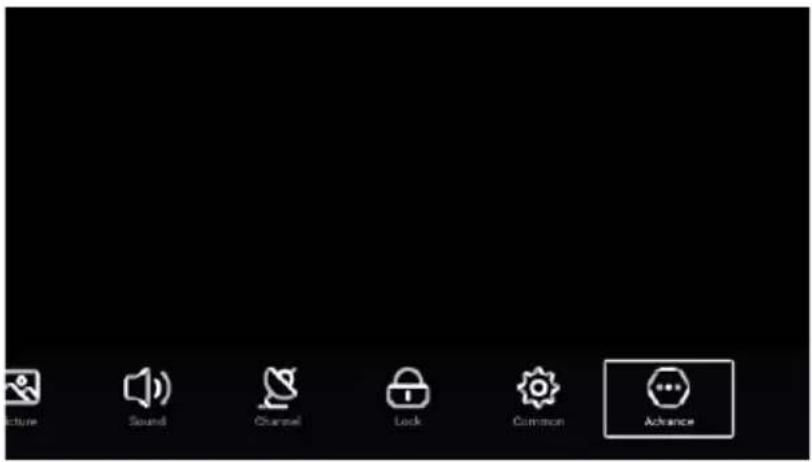
text_image
Picture Sound Channel Lock Common AdvancePicture
Press MENU button to enter the main menu.
Press ◀ / ▶ button to select the Picture.
Press OK button to enter the sub-menu.
text_image
Picture Mode Backlight Noise Reduction Aspect Ratio Standard 100 Middle AutoNote: The illustration is a reference image, your device may differ
text_image
Noise Reduction Aspect Ratio Color Temp More Settings Off Auto Normal >Press ▼ / ▲ button to select Picture Mode/Contrast/Brightness
/Color/Sharpness/Backlight/Noise Reduction/
Press MENU or EXIT button to quit. Aspect Ratio/Color Temp/More Settings.
Picture Mode
Highlight the item and press OK button to enter the sub-menu, that shows the picture
mode you can choose.Press ◀ / ▶ button to select Standard/Dynamic/Soft/Vivid/User/Energy Saving.
Standard Produces a standard image.
Dynamic Enhance the contrast, color and clarity of the screen, so that the picture in the dynamic will balance the color.
Soft Reduce the screen contrast, color and clarity to make the screen looks soft.
Vivid Enhance the contrat, color and clarity of the screen to make the color more vivid.
User Select to customize picture settings.
Energy Saving Reduce screen brightness, improved contrast for energy saving.
Contrast/Brightness/Color/Sharpness
These terms are available only when "User" is selected in Picture Mode.
Press ▼ / ▲ button to select Contrast/Brightness/Color/Sharpness.
Press ◀ / ▶ button to adjust.
Contrast Adjust the contrast of the image.
Brightness Adjust the brightness of the image.
Color Adjust the color intensity of the image.
Sharpness Adjust the edge sharpness of the image.
Note: The illustration is a reference image, your device may differ
Backlight
Press ▼ / ▲ button to select Backlight.
Press ◀ / ▶ button to adjust.
Noise Reduction
Set up options to eliminate the image noise intensity.
Press ▼ / ▲ button to select Noise Reduction.
Press ◀ / ▶ button to select Off/Low/Middle/High/Auto.
Aspect Ratio
Press ▼ / ▲ button to select Aspect Ratio.
Press ◀ / ▶ button to select 16:9/4:3/Zoom1/Zoom2/Auto.
Color Temp
Adjust the overall color of the image.
Press ▼ / ▲ button to select Color Temp.
Press ◀ / ▶ button to select Cool/Normal/Warm.
| Cool | The picture is in favor of green-blue and less red. |
| The whole color is in favor of light. The picture is more fresh and elegant. | |
| Normal | The picture does not in favor of any color. The color is moderate. |
| Warm | The picture is in favor of red-green and less blue to make the color more vivid and soft. |
More Settings
Press ▼ / ▲ button to select More Settings.
Press OK button to enter the sub-menu.
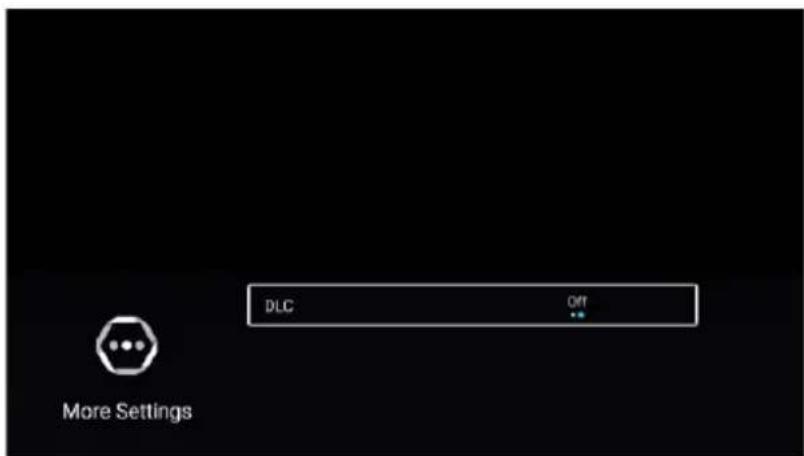
text_image
DLC OFF More SettingsDLC
Press ▼ / ▲ button to select DLC.
Press ◀ / ▶ button to select On/Off.
Note: The illustration is a reference image, your device may differ
Sound
Press MENU button to enter the main menu.
Press ◀ / ▶ button to select the Sound.
Press OK button to enter the sub-menu.
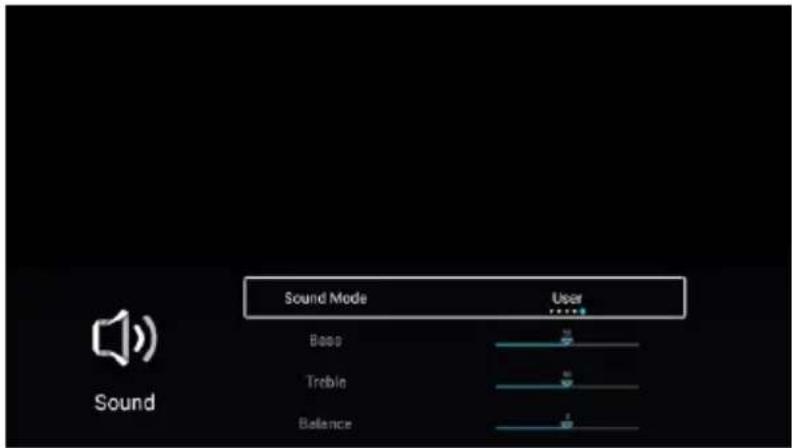
text_image
Sound Mode User Bass Treble Balance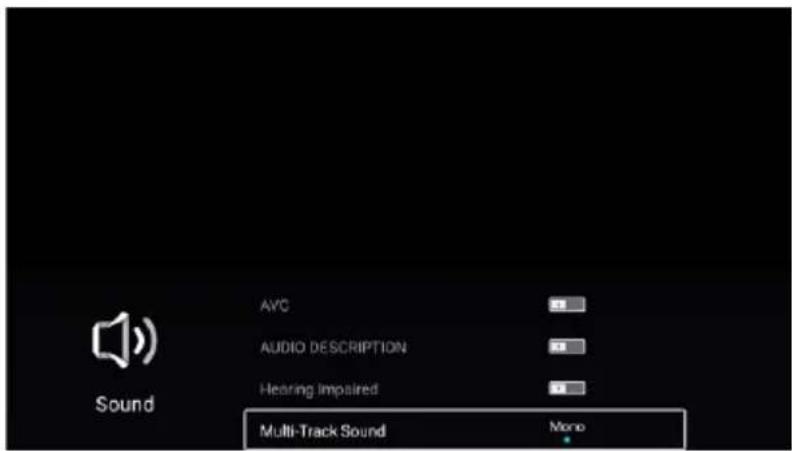
text_image
AVC AUDIO DESCRIPTION Hearing Impaired Multi-Track Sound MonoPress ▼ / ▲ button to select Sound Mode/Bass/Treble/Balance/AVC/AUDIO DESCRIPTION/Hearing Impaired/Multi-Taack Sound/More Settings.
Press MENU or EXIT button to quit.
Sound Mode
Press▼ / ▲ button to select Sound Mode.
Press ◀ / ▶ button to select Standard/Music/Movie/News/User.
Standard Emit balanced sound under any circumstances.
Music Enhance the high pitch and reduce the bass.
Movie Enhances treble and bass for a rich sound experience.
News Enhance the voice.
User Select to customize sound settings.
Note: The illustration is a reference image, your device may differ
Bass
Adjust the low frequency sounds.
Press▼ / ▲ button to select Bass.Press ◀ / ▶ button to adjust.
Treble
Adjust the high frequency sounds.
Press▼ / ▲ button to select Treble.Press ◀ / ▶ button to adjust.
Balance
Balanced left and right channels.
Press ▼ / ▲ button to select Balance. Press ◀ / ▶ button to adjust.
AVC
Press ▼ / ▲ button to select AVC. Press ◀ / ▶ button to select On/Off.
Note: After open the "AVC", once the volume is set up, it can keep the volume of the speaker steady no matter what kind of difference among the TV sound of each channel.
AUDIO DESCRIPTION
Press ▼ / ▲ button to select Audio description. Press ◀ / ▶ button to select On/Off.
Hearing Impaired
Press ▼ / ▲ button to select Hearing Impaired. Press ◀ / ▶ button to select On/Off.
Multi-Track Sound
Press ▼ / ▲ button to select Multi-Track Sound.
More Settings
Press▼ / ▲ button to select More Settings. Press OK button to enter the sub-menu.
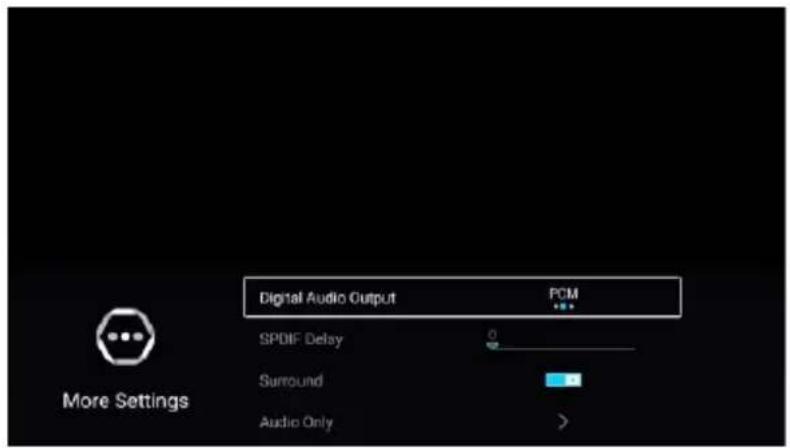
text_image
Digital Audio Output PCM SPDIF Delay Surround Audio Only More SettingsDigital Audio Output
Press ▼ / ▲ button to select Digital Audio Output. Press ◀ / ▶ button to select Off/PCM/RAW.
SPDIF Delay
Press ▼ / ▲ button to select SPDIF Delay. Press ◀ / ▶ button to select.
Surround
Press ▼ / ▲ button to select Sorround. Press ◀ / ▶ button to select On/Off.
Audio Only
Press ▼ / ▲ button to select Audio Only. Press OK button enter the sub-menu.
Note: The illustration is a reference image, your device may differ
Channel
Press MENU button to enter the main menu.
Press ◀ / ▶ button to select Channel.
Press OK button to enter the sub-menu.
ATV
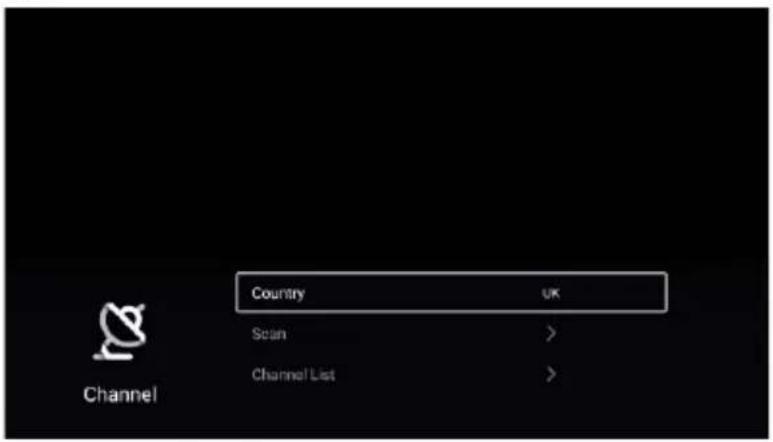
text_image
Country UK Scan > Channel List >Press ▼ / ▲ button to select Country/Scan/Channel List.
Press MENU or EXIT button to quit.
Country
Press ▼ / ▲ button to select Country. Press OK button to enter to select country.
Scan
Press ▼ / ▲ button to select Scan. Press OK button to enter the sub-menu.
Press ▼ / ▲ button to select AutoScan/Analog Munual Scan.

text_image
Auto Scan > Analog Manual Scan >Note: The illustration is a reference image, your device may differ
Auto Scan
Automatic search can search for effective program channel automatically.
Press ▼ / ▲ button to select Auto Scan, then press OK button to start auto search.
If you want to stop searching, press EXIT or MENU button to stop searching.
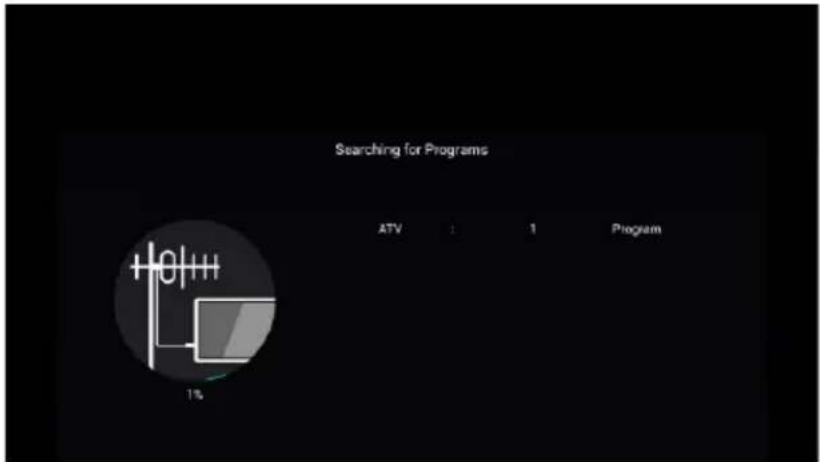
text_image
Searching for Programs ATV 1 1 Program 1%Analog Manual Scan
Analog manual search can search for effective simulation program channel manually.
It can be selected only in the ATV Input.
Press ▼ / ▲ button to select Analog Manual Scan, and press OK button to enter the sub-menu.
Press EXIT or MENU button to quit.
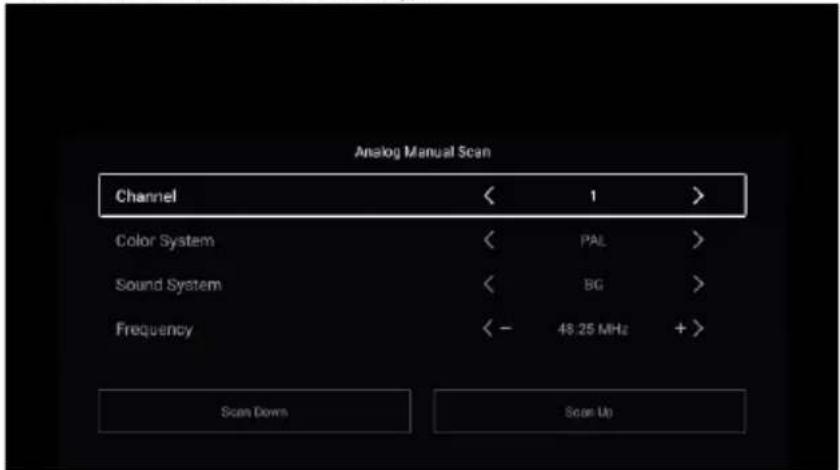
text_image
Analog Manual Scan Channel < 1 > Color System < PAL > Sound System < BG > Frequency < - 48.25 MHz + > Scan Down Scan UpChannel
Press ▼ / ▲ button to select Channel. Press ◀ / ▶ button to select the channel number.
Color System
Press ▼ / ▲ button to select Color System. Press ◀ / ▶ button to select PAL/SECAM/NTSC/Auto.
Sound System
Press ▼ / ▲ button to select Sound System. Press ◀ / ▶ button to select DK/BG/I/L/M/N.
Frequency
Press ▼ / ▲ button to select Frequency. Press ◀ / ▶ button to adjust.
Note: The illustration is a reference image, your device may differ
Channel List
View all of the existing programs.
Press ▼ / ▲ button to select Channel List. Press OK button to enter the sub-menu.
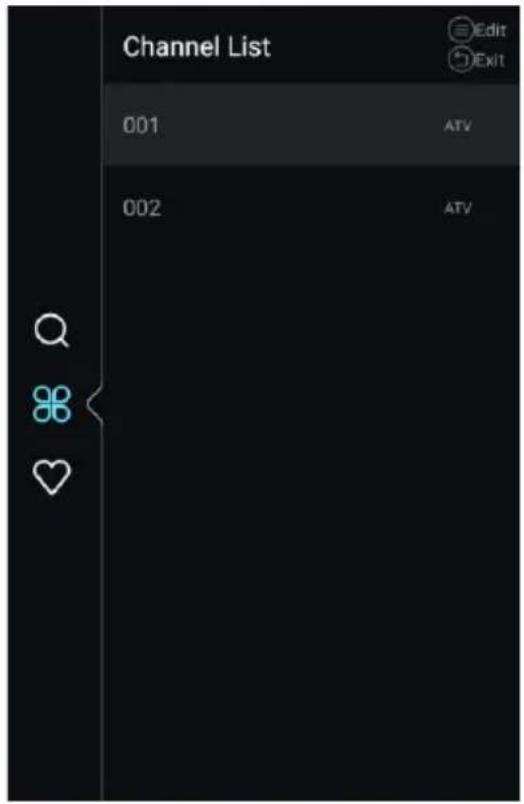
text_image
Channel List 001 ATV 002 ATV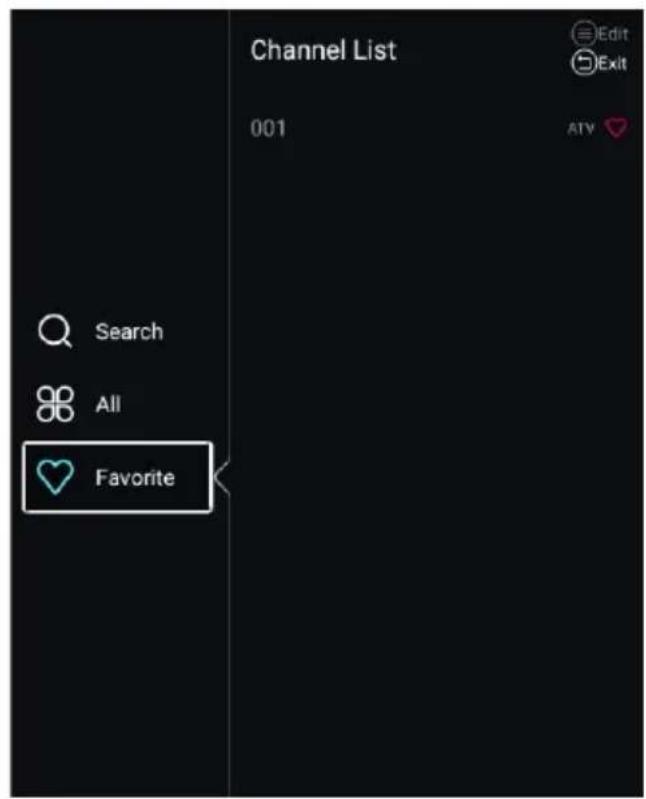
text_image
Channel List 001 Edit Exit Search All FavoritePress ▼ / ▲ button to select All/Favorite.
All
Press ▼ / ▲ button to select All. Press MENU button to edit the program.
(Optional:Move/Top/Favorite/Delete/Rename/Skip.)
If the program is selected as an analog signal, the program can be renamed.
Favorite
Press ▼ / ▲ button to select Favorite. Press MENU button to edit the Favorite Channel.
(Optional:Top/Delete/Rename.)
Note: The illustration is a reference image, your device may differ
DTV
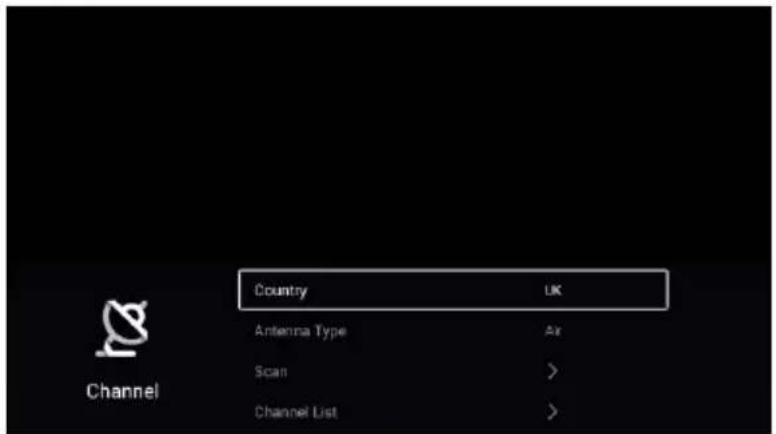
text_image
Country Antenna Type Air Scan > Channel List UK Channel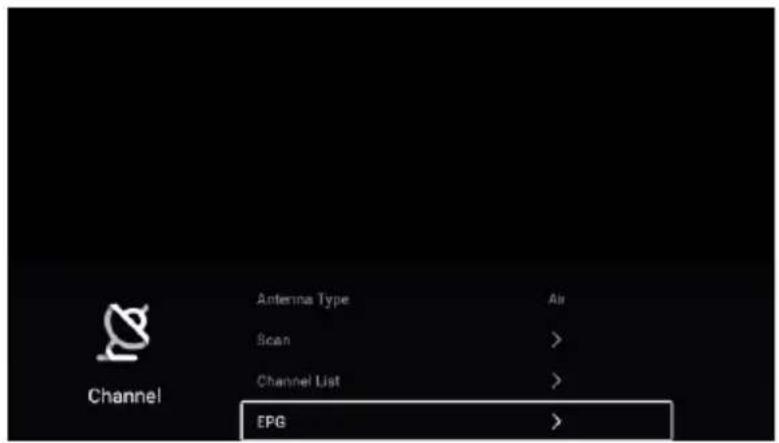
text_image
Antenna Type Scan Channel List EPG Air > > >Press ▼ / ▲ button to select Country/Antenna Type/Scan/Channel List/EPG.
Press MENU or EXIT button to quit.
Country
Press ▼ / ▲ button to select Country. Press OK button to enter to select country.
Antenna Type
Press ▼ / ▲ button to select Antenna Type. Press ◀ / ▶ button to select Air/Cable.
Scan
Press ▼ / ▲ button to select Scan. Press OK button to enter the sub-menu.
Press ▼ / ▲ button to select AutoScan/Analog Munual Scan.
Note: The illustration is a reference image, your device may differ
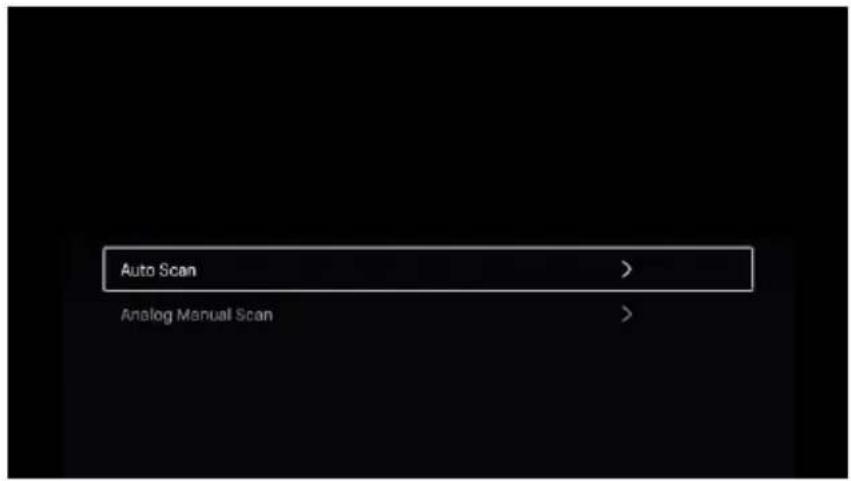
text_image
Auto Scan > Analog Manual Scan >Auto Scan
Automatic search can search for effective program channel automatically.
Press ▼ / ▲ button to select Auto Scan, then press OK button to start auto search.
If you want to stop searching, press EXIT or MENU button to stop searching.
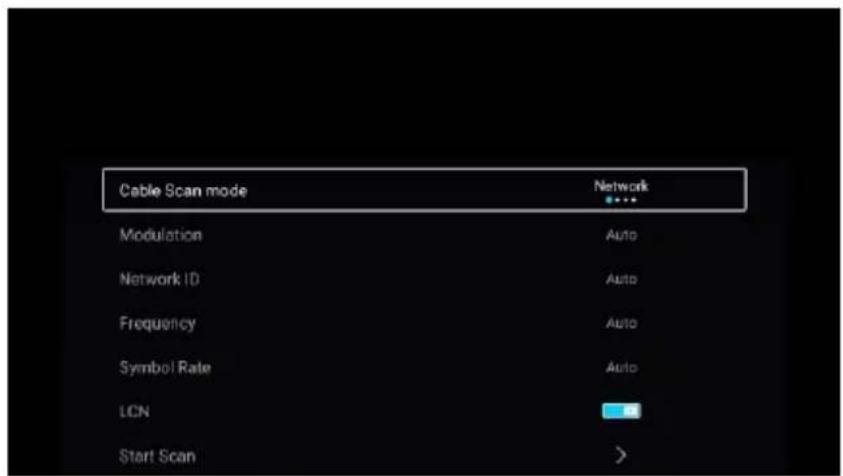
text_image
Cable Scan mode Modulation Network ID Frequency Symbol Rate LCN Start Scan Network Auto Auto Auto AutoCable Scan mode
Press ▼ / ▲ button to select Cable Scan mode. Press ◀ / ▶ button to select Network/Quick/Full/Blind.
Modulation
Press ▼ / ▲ button to select Modulation. Press ◀ / ▶ button to select Auto/16QAM/32QAM/64QAM/128QAM/256QAM.
Network ID
Press ▼ / ▲ button to select Network ID.
Frequency
Press ▼ / ▲ button to select Frequency.
Note: The illustration is a reference image, your device may differ
Symbol Rate
Press ▼ / ▲ button to select Symbol Rate.
LCN
Press ▼ / ▲ button to select LCN. Press ◀ / ▶ button to select On/Off.
Start Scan
Press ▼ / ▲ button to select Start Scan. Press ◀ / ▶ button to start auto scan.
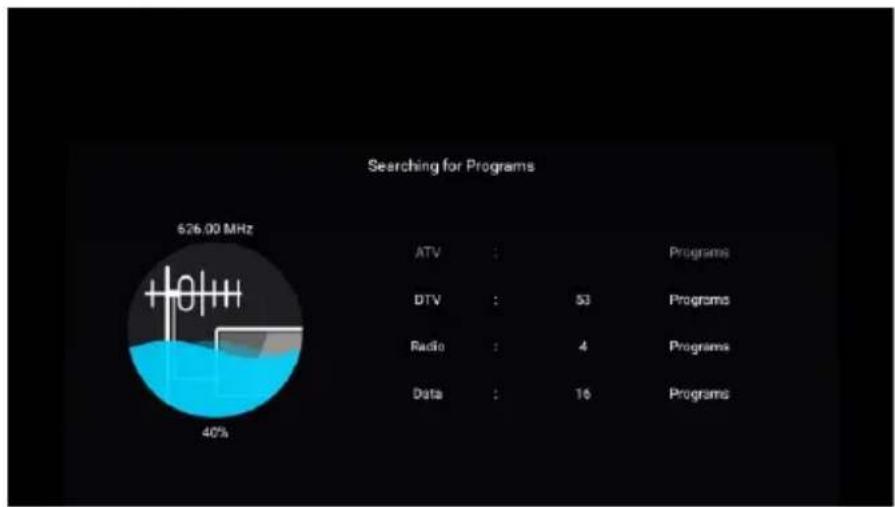
pie
Searching for Programs | Category | Value | |---|---| | ATV | : | | DTV | : | | Radio | : | | Data | : | | Programs | : | | Programs | : | | Programs | : | | Programs | : | | Programs | : | | Programs | : | | Programs | : | | Programs | : | | Programs | : | | Programs | : | | Programs | : | | Programs | : | | Programs | : | | Programs | : | | Programs | : | | Programs | : | | Programs | : | | Programs | : | | Programs | : | | Programs | : | | Program | : | | Program | : | | Program | : | | Program | : | | Program | : | | Program | : | | Program | : | | Program | : | | Program | : | | Program | : | | Program | : | | Program | : | | Program | : | | Program | : | | Program | : | | Program | : | | Program | : | | Program | : | | Program | : | | Program | : | | Programming | : | | Programming | : | | Programming | : | | Programming | : | | Programming | : | | Programming | : | | Programming | : | | Programming | : | | Programming | : | | Programming | : | | Programming | : | | Programming | : | | Programming | : | | Programming | : | | Programming | : | | Programming | : | | Programming | : | | Programming | : | | Programming | : | | Programming | : | | Technology | : | | Technology | : | | Technology | : | | Technology | : | | Technology | : | | Technology | : | | Technology | : | | Technology | : | | Technology | : | | Technology | : | | Technology | : | | Technology | : | | Technology | : | | Technology | : | | Technology | : | | Technology | : | | Technology | : | | Technology | : | | Technology | : | | Technology | : | | Data | : | | Data | : | | Data | : | | Data | : | | Data | : | | Data | : | | Data | : | | Data | : | | Data | : | | Data | : | | Data | : | | Data | : | | Data | : | | Data | : | | Data | : | | Data | : | | Data | : | | Data | : | | Data | : | | Data | : | | DTV (626.00 MHz) | : 40%Digital Manual Scan
Digital manual search can search for effective simulation program channel manually. It can be selected only in the DTV Input.
Press ▼ / ▲ button to select Digital Manual Scan, and press OK button to enter the sub-menu. Press EXIT or MENU button to quit.

text_image
Digital Manual Scan Frequency 113000KHz Symbol Rate Auto Modulation Auto Network ID Auto Start Scan DTV : 0 Radio : 0 Data : 0 Bad Normal GoodNote: The illustration is a reference image, your device may differ
Frequency
Press ▼ / ▲ button to select Frequency. Press ◀ / ▶ button to adjust.
Symbol Rate
Press ▼ / ▲ button to select Symbol Rate. Press ◀ / ▶ button to adjust.
Modulation
Press ▼ / ▲ button to select Modulation. Press ◀ / ▶ button to select.
Network ID
Press ▼ / ▲ button to select Network ID. Press ◀ / ▶ button to adjust.
Subtitle
Press ▼ / ▲ button to select Subtitle. Press OK button to enter the sub-menu.
Channel List
View all of the existing programs.
Press ▼ / ▲ button to select Channel List. Press OK button to enter the sub-menu.
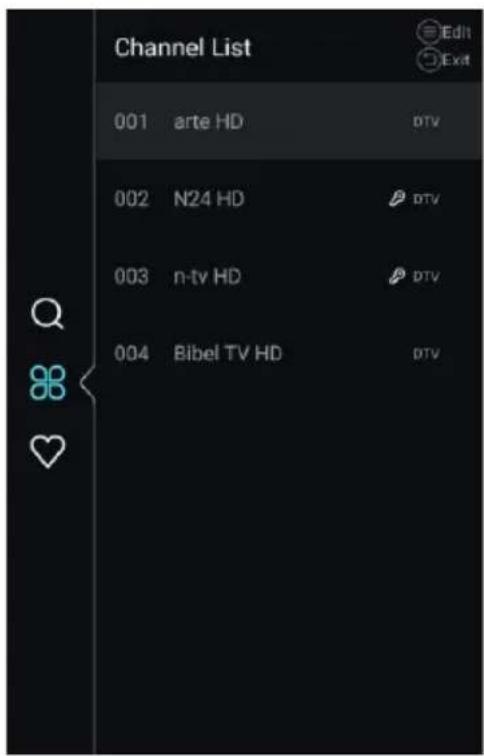
text_image
Channel List 001 arte HD DTV 002 N24 HD DTV 003 n-tv HD DTV 004 Bibel TV HD DTV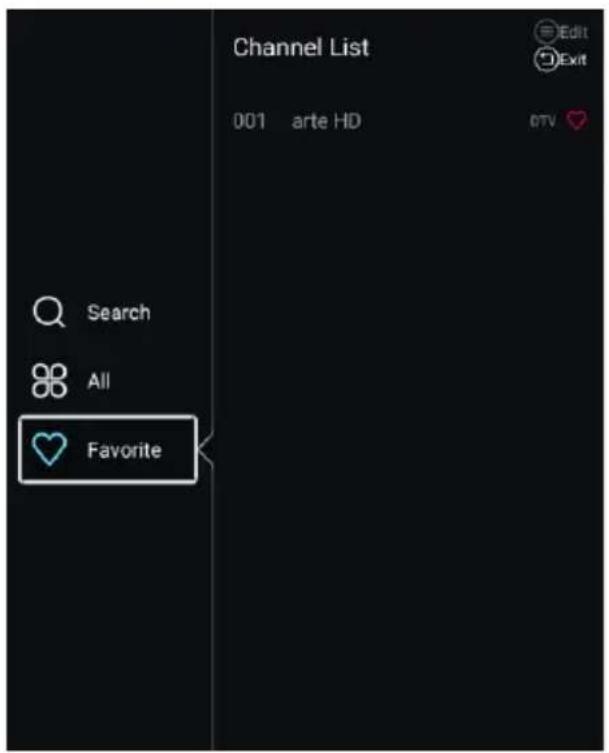
text_image
Channel List 001 arte HD Edit Exit Search All FavoriteNote: The illustration is a reference image, your device may differ
Press ▼ / ▲ button to select All/Favorite.
All
Press ▼ / ▲ button to select All. Press MENU button to edit the program.
(Optional:Move/Top/Favorite/Delete/Rename/Skip.)
If the program is selected as an analog signal, the program can be renamed.
Favorite
Press ▼ / ▲ button to select Favorite. Press MENU button to edit the Favorite Channel.
(Optional:Top/Delete/Rename.)
EPG
Press ▼ / ▲ button to select EPG. Press MENU button to enter the sub-menu.
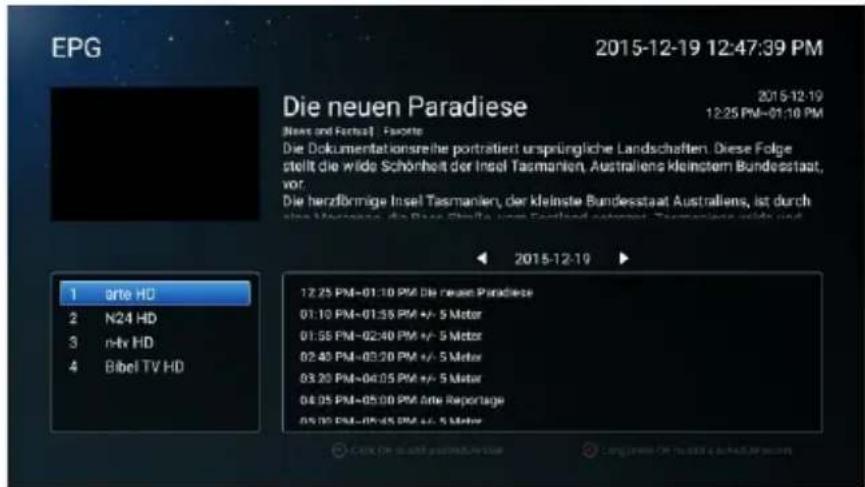
text_image
EPG 2015-12-19 12:47:39 PM Die neuen Paradiese 2015-12-19 2015-12-19 12:25 PM-01:10 PM Die Dokumentationsreite portraitiert ursprüngliche Landschaften. Diese Folge stellt die wide Schönheit der Insel Tasmanien, Australiens kleinstem Bundesstaat, vor. Die herzfrönnige Insel Tasmanien, der kleinste Bundesstaat Australiens, ist durch sina Mancere. Die Brie Steße vom Einland automert. Tannanien wird nur 1 arte HD 2 N24 HD 3 n-tx HD 4 Bibel TV HD 12.25 PM-01:10 PM Die neuen Paradiese 01:10 PM-01:35 PM +/- 5 Motor 01:58 PM-02:40 PM +/- 5 Motor 02:40 PM-03:20 PM +/- 5 Motor 03:20 PM-04:05 PM +/- 5 Motor 04:05 PM-05:00 PM Onte Reportage 05:00 PM-05:45 PM +/- 5 MotorNote: The illustration is a reference image, your device may differ
Lock
Press MENU button to enter the main menu.
Press ◀ / ▶ button to select Lock.
Press OK button to input password to enter the sub-menu.(Default password is 0000)
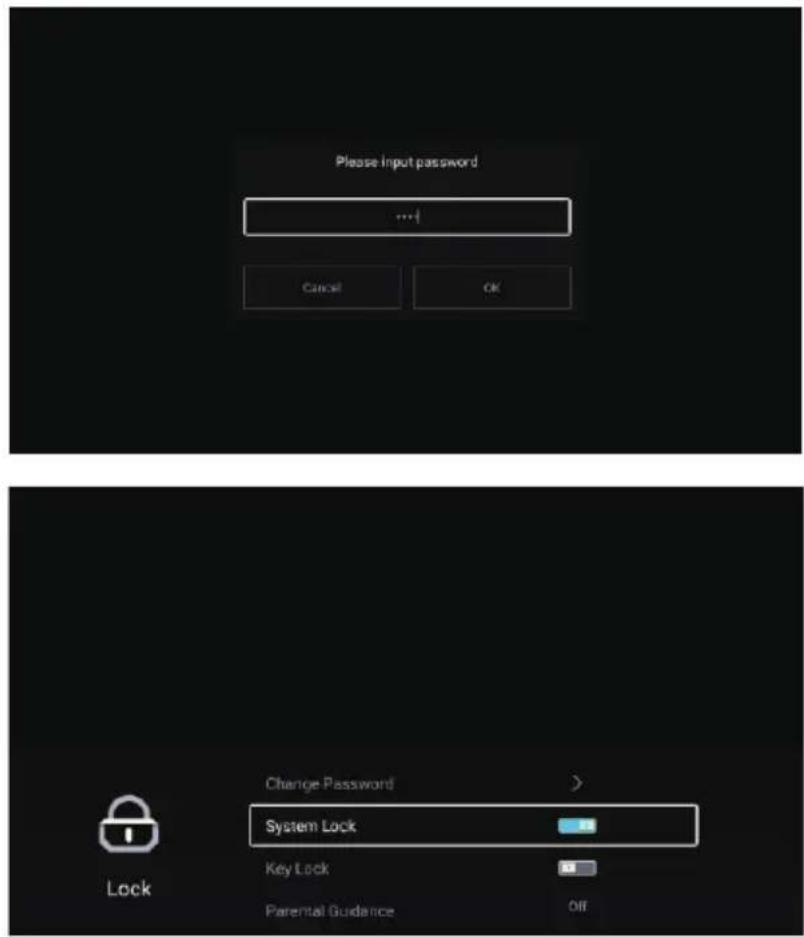
text_image
Please Input password ... Cancel OK Change Password > System Lock Key Lock Parental Guidance Off LockPress▼ / ▲ button to select Change Password/System Lock/Key Lock/Parental Guidance.
Change Password
Press ▼ / ▲ button to select Change Password. Press ENTER button to set Password.
System Lock
Press ▼ / ▲ button to select System Lock. Press ◀ / ▶ button to select On/Off.
Key Lock
Press ▼ / ▲ button to select Key Lock. Press ◀ / ▶ button to select On/Off.
Parental Guidance
Press ▼ / ▲ button to select Parental Guidance. Press ◀ / ▶ button to select Off/5\~18.
Note: The illustration is a reference image, your device may differ
Common
Press MENU button to enter the main menu.
Press ◀ / ▶ button to select Common.
Press OK button to enter the sub-menu.
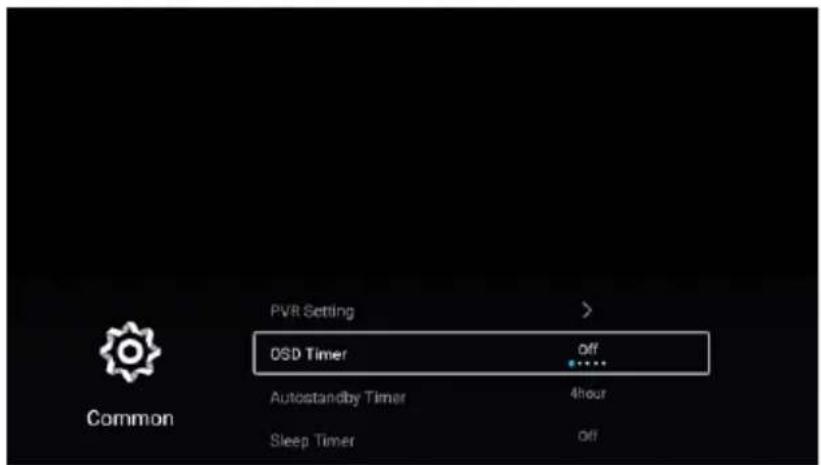
text_image
PVR Setting > OSD Timer off Autostandby Timer 4hour Sleep Timer off Common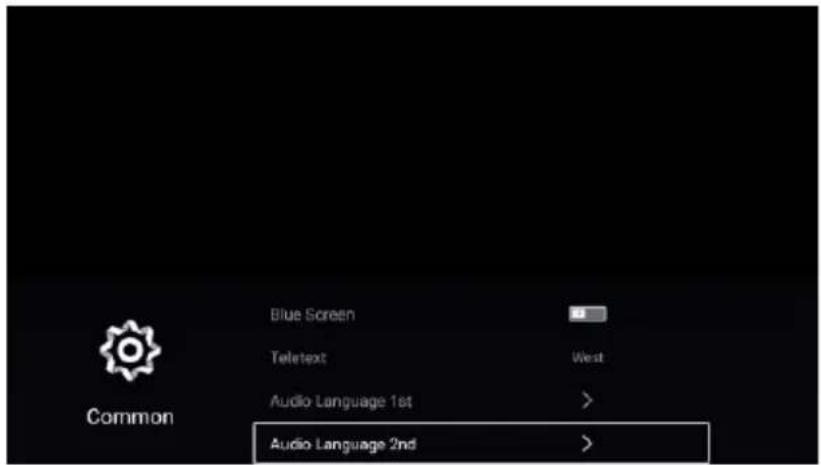
text_image
Blue Screen Teletext West Audio Language 1st > Audio Language 2nd >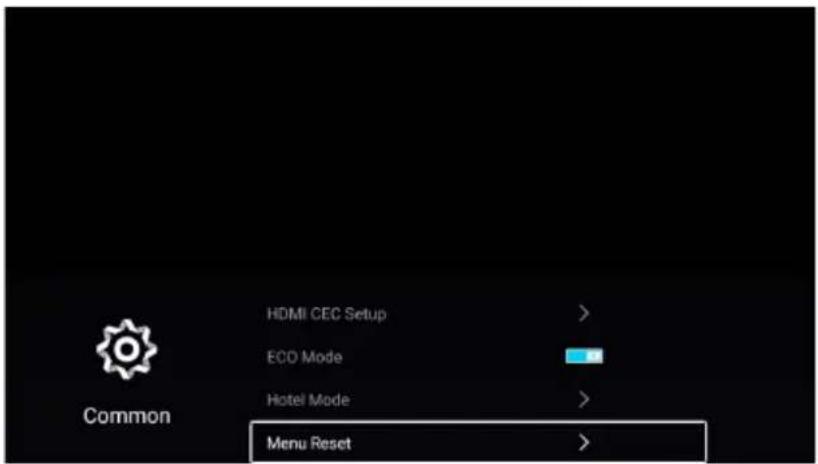
text_image
HDMI CEC Setup > ECO Mode Hotel Mode > Menu Reset >Note: The illustration is a reference image, your device may differ
Press ▼ / ▲ button to select PVR Setting/OSD Timer/Autostandby Timer/Sleep Timer/Blue Screen/Teletext/Audio Language 1st/Audio Language 2nd/Subtitle Language 1st/Subtitle Language 2nd/HDMI CEC Setup/Scene mode/ECO Mode/OAD/MenuReset.
PVR Setting
Press ▼ / ▲ button to select PVR Setting.
Press ▼ / ▲button to select Select Disk/Format/Record List/Schedule List.
Press ENTER button to enter sub-mune.
OSD Timer
Press ▼ / ▲ button to select OSD Timer.
Press ◀ / ▶ button to select Off/5sec/15sec/30sec/40sec.
Autostandby Timer
Press ▼ / ▲ button to select Autostandby Timer.
Press ◀ / ▶ button to select Off/3hour/4hour/5hour.
Sleep Timer
Press ▼ / ▲ button to select Sleep Timer.
Press ◀ / ▶ button to select Off/15min/30min/45min/60min/90min/120min/240min.
Blue Screen
Set the background color to blue when there is no input signal.
Press ▼ / ▲ button to select Blue Screen. Press ◀ / ▶ button to select On/Off.
Teletext
Press ▼ / ▲ button to select Teletext.
Press ◀ / ▶ button to select Arabic/East/West/Farsi/Russian.
Note: The illustration is a reference image, your device may differ
HDMI CEC Setup
Press ▼ / ▲ button to select HDMI CEC Setup.
Press OK button to enter the sub-menu.
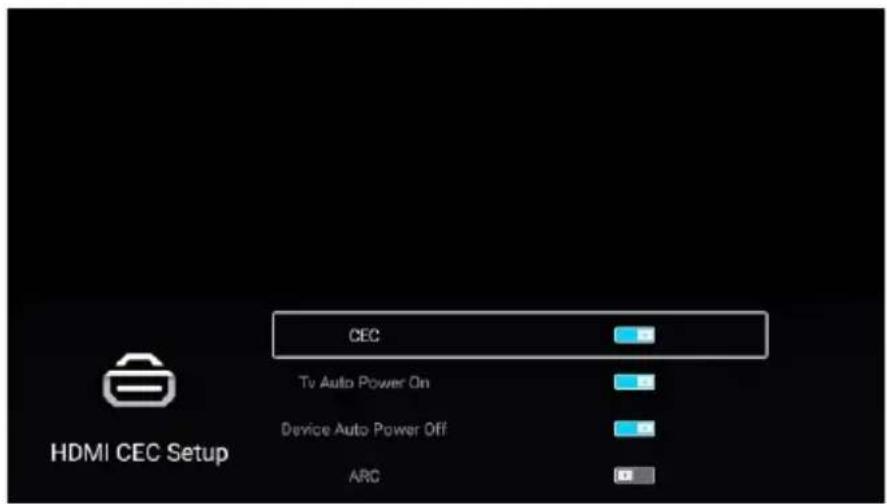
text_image
CEC Tv Auto Power On Device Auto Power Off ARC HDMI CEC SetupPress ▼ / ▲ button to select CEC/TV Auto Power On/Device Auto Power Off/ARC/.
Note: All the Options are available only when the CEC select On.
CEC
Press ▼ / ▲ button to select CEC, and press ◀ / ▶ button to select On/Off.
The following terms are available only when "On" is selected in CEC.
TV Auto Power On
Press ▼ / ▲ button to select TV Auto Power On, and press ◀ / ▶ button to select On/Off.
Device Auto Power Off
Press ▼ / ▲ button to select Device Power Off, and press ◀ / ▶ to select On/Off.
ARC
Press ▼ / ▲ button to select ARC, and press ◀ / ▶ to select On/Off.
Scene mode
Press ▼ / ▲ button to select Scene mode. Press ◀ / ▶ to select Store/Home.
ECO mode
Press ▼ / ▲ button to select ECO mode. Press ◀ / ▶ to select On/Off.
Note: The illustration is a reference image, your device may differ
OAD
Press ▼ / ▲ button to select OAD. Press ◀ / ▶ to select On/Off.
Menu Reset
Recall the default setting.
Press ▼ / ▲ button to select Menu Reset.
Press OK button to enter the sub-menu.
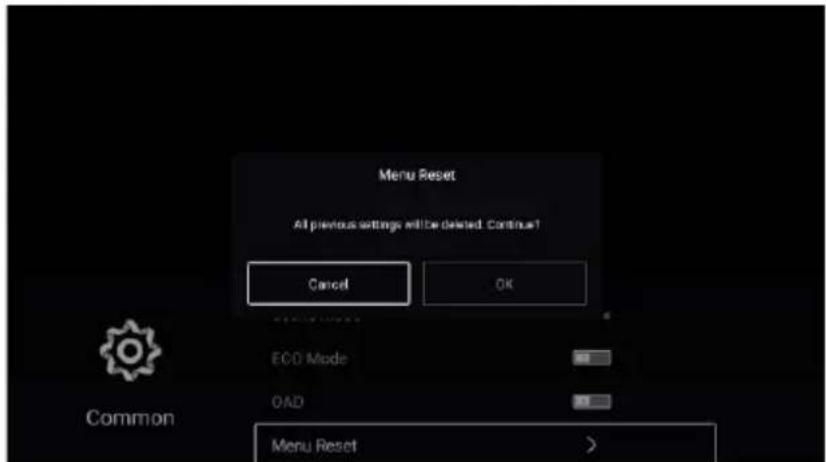
text_image
Menu Reset All previous settings will be deleted. Continue! Cancel OK ECO Mode OAD Menu Reset CommonAdvance
Press MENU button to enter the main menu.
Press ◀ / ▶ button to select Advance.
Press OK button to enter the System Setting.
(Please refer to the home page--Setting part)
Note: The illustration is a reference image, your device may differ
Help
| No Power | Check the AC cord of TV is plus in or not. If still no power, please pull out the plug and replug in after 60 seconds. And open the TV again |
| Signal receive not properly | To cause double image or phantom if there has high building or high mountain round TV. You can adjust image effect by manually operation: consult instruction of vernier regulation or change the direction of external antenna.If you use the indoor antenna, under certain circumstance, receive will be more difficult .So you can change the direction of the antenna to adjust the image effect . If can't change image receiving effect either , you have to use external antenna. |
| No picture | Check the antenna at the back of TV is connected properly or not.Try to select other channels and check whether the TV problem itself or not |
| but,Video is ok without audio | Increase the volume.Check the TV is in mute mode or not , and please press the mute button to make sound resume. |
| but, Audio is ok color error or no picture | Increase contrast and brightness. |
| Snow statics picture and noise | Check the antenna at the back of TV is connected or not. |
| Level broken line | Vacuum, such as hair drier, Maybe has electrical appliance interfere. please turn off these kinds of electrical appliance, cleaner and so on. |
| Image or-Dual "simulacrum" The TV no response with the Remote | Perhaps the location for the antenna is not good. Use the tall beamed antenna can be improved quality of the display image.Operate the remote direct to the remote sensor on the TV. If still no response for the TV, please check if the plastic bag on the remote take or not. And check if the location for the battery is correct. Change the new battery.The TV will shift to the STAND BY if no response from the remote in the few minutes. |
| NO Video In (PC Mode) | Please check if the display cable connect to the VGA correcte.Please check if there has the bend on the display cabl . |
| Vertical twinkling (PC Mode) | Enter the main menu. Use the clock regulator for the video display noise to eliminate the vertical line. |
| Horizontal ripping (PC Mode) | Adjust the Audio sound horizontal in the main menu to clear the horizontal ripping line. |
| The screen is too bright or too dark (PC Mode) | Adjust the contrast ratio or brightness in the main menu. |
| PC Function no response | Check the computer setting in the state of compatible display resolution |
| Ripping line in RCA connecting | Please use good quality connecting cable. |
| Problem still exist | Unplug the power cable and wait for 30 seconds, then connect. If there is some problem with our TV, do not repair it by yourself, please contact with the customer service center. |
There will be complete picture and the brightness will come down if the TV is in Note. So please do not keep the TV in a state of same, the static picture for too long time. Menu or same picture that has much difference in brightness and contrast ratio for too long time.
Note : TV panel is built with very high precision technology giving you fine picture details in vibrant color. Occasionally, a few non-active pixels may appear on the screen as fixed point of red, green, blue or white. Please note this does not affect the performance of the product.
Specifications
Product Specifications
| ◆ Resolution: | 3840x2160 |
| ◆ Power supply: | AC 100-240V~50/60Hz |
| ◆ Power: | Less than 135W |
| ◆ Video: | avi,MPEG,MPEG-4 |
| ◆ Music: | mp3 |
| ◆ Photo: | jpg,jpeg,bmp,png |
- ELIMINACIÓN DE LOS EMBALAJES Y DEL PRODUCTO // DISPOSAL OF PACKAGING AND PRODUCT.

natural_image
Symbol of a trash bin crossed with no text or numbers, representing environmental restriction (no text present)Deseche el material de embalaje del aparato correctamente. Todos los materiales de embalaje pueden ser reciclados. Las piezas de plástico están marcadas con las abreviaturas internacionales estándar: (por ejemplo, PS para poliestireno, material de relleno) Este aparato está identificado de acuerdo con la directriz europea 2012/19 / UE sobre residuos de equipos eléctricos y electrónicos -WEEE. La guía especifica el marco para una devolución y reutilización válidas en toda la UE de aparatos viejos.
¡Advertencia! ¡El material de embalaje podría ser peligroso para los niños! Para desechar el paquete y el aparato, diríjase a un centro de reciclaje. Corte el cable de alimentación y deje el dispositivo de cierre de la puerta inutilizable. El embalaje de cartón se fabrica con papel reciclado y debe desecharse en el contenedor adecuado para su reciclaje. Al asegurarse de que este producto se elimina correctamente, ayudará a evitar posibles consecuencias negativas para el medio ambiente y la salud humana, que de otro modo podrían ser causadas por el uso inadecuado de los desechos de este producto. Para obtener información más detallada sobre el reciclaje de este producto, comuníquese con la oficina local de su ciudad y con el servicio de eliminación de desechos de su hogar.

Dispose of packaging in an environmentally-friendly manner.
This appliance is labelled in accordance with European Directive 2012/19/EU concerning used electrical and electronic appliances (waste electrical and electronic equipment - WEEE). The guideline determines the frame work for the return and recycling of used appliances as applicable throughout to the EU.
PACKAGE INFORMATION: Packaging materials of the product are manufactured from recyclable materials in accordance with our National Environment Regulations. Do not dispose of the packaging materials together with the domestic or other wastes. Take them to the packaging material collection points designated by the local authorities.
. aspes
www.aspes.es
aspes@sareteknika.es; 902 99 69 01 / 944 04 14 08