Pro FMS403 - Fryser Cecilware - Gratis brugsanvisning og manual
Find enhedens vejledning gratis Pro FMS403 Cecilware i PDF-format.

Brugerspørgsmål om Pro FMS403 Cecilware
0 spørgsmål om dette apparat. Besvar dem du kender, eller stil dit eget.
Stil et nyt spørgsmål om dette apparat
Download vejledningen til din Fryser i PDF-format gratis! Find din vejledning Pro FMS403 - Cecilware og tag din elektroniske enhed tilbage i hånden. På denne side er alle dokumenter nødvendige for brugen af din enhed offentliggjort. Pro FMS403 af mærket Cecilware.
BRUGSANVISNING Pro FMS403 Cecilware

natural_image
Black and white abstract symbol combining snowflake, water droplet, and tree (no text or symbols)Cecilware®
BY GMCW™
PRO
Operation Manual
Gas Fryer
Table of Contents
Safety Precautions....1
Important Safety Information .....1
Specifications 3
General Information 3
Set-Up Instructions 4
Unpacking 4
Installation Instructions 4
Assembly 5
Operating Instructions 7
Cleaning & Maintenance ..... 8
Troubleshooting 9
Prior authorization must be obtained from GMCW for all warranty claims.
Retain this manual for future reference
natural_image
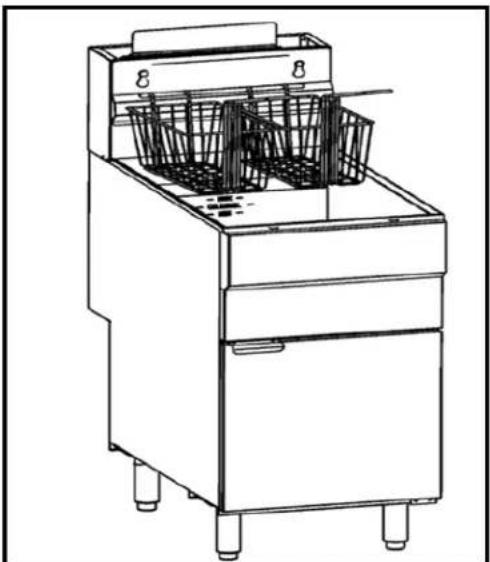
Line drawing of a dual-bone kitchen appliance with two basket baskets (no text or symbols)Models
FMS403LP FMS403NAT
FMS504LP FMS504NAT
FMS705LP FMS705NAT

Intertek
4003027
Conforms to ANSI / NSF
STD Z83.11b(R2012)
Certified to CSA
STD 1.8b(R2012)
GMCW™
4003 Collins Lane
Louisville, KY 40245 USA
(502) 425-4776
(USA & Canada only) (800)695-4500
FAX (502) 425-4664
www.gmcw.com
© GMCW, 2013
Printed in China

Intertek
Conforms to
NSF/ANSI STD 4
0913 Form # CW-308-01
Part # 390-00020
Safety Precautions
For your safety, the safety of others and to prevent damage to your appliance, read all warnings and the owner's manual before installing or using the product.
DANGER: This term warns of imminent hazard that will result in serious injury or death.
WARNING: This term refers to a potential hazard or unsafe practice, which could result in serious injury.
CAUTION: This term refers to a potential hazard or unsafe practice, which could result in minor or moderate injury or product or property damage.
NOTICE: This term refers to information that needs special attention or must be fully understood.
Important Safety Information
WARNING: Improper installation, adjustment, alteration, service or maintenance can cause property damage, injury or death. Read the installation, operating and maintenance instructions thoroughly before installing or servicing this equipment.
FOR YOUR SAFETY
Do not store or use gasoline or flammable vapors or liquids in the vicinity of this or any other appliance.

This is the safety alert symbol. It is used to alert you to potential personal injury hazards. Obey all safety messages that follow this symbol to avoid possible injury or death.
⚠️ DANGER
- You must post instructions in a prominent location to be followed in the event the user smells gas. This information shall be obtained by consulting the local gas supplier.
- If you smell gas, close the shut off valve, open windows, ventilate and evacuate the area immediately. Do not touch electrical switches or plugs. Extinguish any open flames. Immediately call your gas supplier.
• Do not store flammable liquids near this unit.
• Unit should only be used in a flat, level position. - Failure to install, adjust or maintain this equipment properly can result in injury or death.
- Improper installation, adjustment, alteration, service or maintenance can cause property damage, injury or death. Have this equipment installed and adjusted by a qualified technician in accordance with all federal, state and local codes.
WARNING
- Read installation, operating and maintenance instructions thoroughly before installing or servicing this equipment.
• A qualified service technician must handle installation, all maintenance and repair.
WARNING
- Keep the appliance area free and clear from combustibles.
- Allow fryer and oil to cool before cleaning or moving.
- Hot oil can cause severe burns. Avoid contact with hot oil. This fryer may tip and cause personal injury if not secured in a stationary position. Secure the fryer before use.
CAUTION
- Do not leave appliance unattended with main gas valve open.
- This unit is designed for use with legs or casters. Do not use without legs or casters. Use of this equipment without legs or casters can cause the unit to overheat and cause a fire.
• Before using this equipment, it must be cleaned thoroughly. Clean all surfaces before use. - Failure to clean surfaces before using the unit could cause food contamination and excessive smoking.
- Do not spray controls or outside of unit with liquids or cleaning agents.
- DO NOT use an open flame to check for leaks. Check all gas piping for leaks with a soap and water solution before operating unit.
- Provide sufficient ventilation to prevent the occurrence of unacceptable concentrations of substances harmful to the health of personnel in the room in which it is installed.
NOTICE
- Smoke appearing on initial use of the appliance is normal. This is as a result of the rust preventing coating burning off. Allow the unit to 'burn in' for at least 30 minutes before the first use.
- Adequate means must be provided to limit the movement of this appliance without depending upon the gas line connection.
- All fryers equipped with casters must be stabilized by installing restraining chains. If a flexible gas line is used, an additional restraining cable must be connected at all times when the fryer is in use.
- Operating the fryer without oil will cause heat damage. Do not operate the fryer without oil
- When this appliance is installed with casters, it must be installed with the casters supplied, a connector complying with either ANSI Z21.69 • CSA 6.16 and a quick disconnect device complying with ANSI Z21.41 • CSA 6.9. It must also be installed with restraining means to guard against transmission of strain to the connector, as specified in the appliance manufacturer's instructions.
Specifications
| Model | #of Heat Tubes | Orifice number (mm) | BTU/hr. | Width Inch (cm) | Oil lbs. (kg) | |
| FMS403 | NAT | 3 | 39 (2.5) | 90,000 | 15.5 (39) | 35-40(16-18) |
| LP | 3 | 52 (1.6) | 90,000 | 15.5 (39) | 35-40(16-18) | |
| FMS504 | NAT | 4 | 39 (2.5) | 120,000 | 15.5 (39) | 45-50(21-23) |
| LP | 4 | 52 (1.6) | 120,000 | 15.5 (39) | 45-50(21-23) | |
| FMS705 | NAT | 5 | 39 (2.5) | 150,000 | 21.0 (53) | 65-70(29-32) |
| LP | 5 | 52 (1.6) | 150,000 | 21.0 (53) | 65-70(29-32) | |
General Information
This unit is intended to be used to as a cooking appliance in commercial foodservice operations only. It is not intended for household use.
If you have questions concerning the installation, operation, maintenance or service of this product, contact your authorized service agent.
SUITABLE FOR INSTALLATION ON COMBUSTIBLE OR NON-COMBUSTIBLE SURFACES.
Unit clearances: 6"(152 mm) sides, 6" (152 mm) rear, 16" (410 mm) open-top flame units. The fryer may be installed on combustible floors.
There must be adequate clearance at the front for operation, service, maintenance and cleaning.
Do not obstruct the flow of combustion and ventilation air, under the unit or behind the unit near the flue. The space admits combustion air. DO NOT BLOCK THIS SPACE.
If equipped, the vent line from the gas appliance pressure regulator shall be installed to the outdoors in accordance with local codes or, in the absence of local codes, with the National Fuel Gas Code, ANSI Z223.1/NFPA 54, or the Natural Gas and Propane Installation Code, CSA B149.1, as applicable.
Installation must conform with local codes, or in the absence of local codes, with the National Fuel Gas Code, ANSI Z223.1/NFPA 54, Liquefied Petroleum Gas Code ANSI/NFPA 58, CSA-B149.1, or the Propane Installation Code, CSA-B149.2 as applicable and in accordance with local codes.
- The appliance and its individual shutoff valve (to be supplied by user) must be disconnected from the gas supply piping system during any pressure testing of that system at test pressures in excess of 12 psi (3.5 kPa).
- The appliance must be isolated from the gas supply piping system by closing its individual manual shut-off valve during any pressure testing of the gas supply piping system at test pressures equal to or less than 12 psi (3.5 kPa).
If the fryer is to be installed with flexible couplings and/or quick-disconnect fittings, the installer must use a heavy duty design certified commercial flexible connector and a suitable strain relief, in compliance with the Standard for Connectors for Movable Gas Appliances, ANSI Z21.69. Quick disconnect devices must comply with the Standard for Quick-Disconnect Devices for Use with Gas Fuel, ANSI Z21.41.
Do not permit fans to blow directly at the unit. Wherever possible, avoid open windows next to the units' sides or back. Avoid wall type fans, which create air crosscurrents within a room.
It is also necessary that sufficient air enters the room to compensate for air removed by any ventilating system. Otherwise, an abnormal atmospheric pressure will occur, affecting operation and causing undesirable working conditions.
General Information (continued)
A properly designed and installed hood will act as the heart of the ventilating system for the room or area in which the unit is installed, and will leave the unit independent of changing draft conditions. For more information about air flow and venting, please read NFPA 96: Standard For Ventilation Control And Fire Protection Of Commercial Cooking Operations.
This appliance is set at the factory for a specific type of gas. Converting from one type of gas to another requires the installation of specific gas-conversion components. Switching to a different type of gas without installing the proper conversion components may result in fire or explosion. Only connect to the gas type specified on the rating label.
Set-Up Instructions
DANGER
Failure to install, adjust or maintain this equipment properly can result in injury or death.
Improper installation, adjustment, alteration, service or maintenance can cause property damage, injury or death. Have this equipment installed and adjusted by a qualified technician in accordance with all federal, state and local codes.
WARNING
Read installation, operating and maintenance instructions thoroughly before installing or servicing this equipment.
CAUTION
This unit is used with legs or casters. Do not use without legs or casters. Use of this equipment without legs or casters can cause the unit to overheat and cause a fire.
Unpacking
IMMEDIATELY INSPECT FOR SHIPPING DAMAGE
All containers should be examined for damage before and during unloading. The freight carrier has assumed responsibility for its safe transit and delivery. If equipment is received damaged, either apparent or concealed, a claim must be made with the delivering carrier.
A) Apparent damage or loss must be noted on the freight bill at the time of delivery. The carrier representative (Driver) must then sign it. If this is not done, the carrier may refuse the claim. The carrier can supply the necessary forms.
B) In case of concealed damage or loss if not apparent until after equipment is uncrated, a request for inspection must be made to the carrier within 15 days. The carrier should arrange an inspection. Be certain to hold all contents and packaging material.
Container also contains: Crumb Rack, Basket Hanger, Adjustable Legs or Casters (4), Drain Pipe Extension, Twin Fry Baskets (2) and Manual.
Installation Instructions
CAUTION
DO NOT use an open flame to check for leaks.
Check all gas piping for leaks with a soap and water solution before operating unit.
Installation must conform with local codes, or in the absence of local codes, with the National Fuel Gas Code, ANSI Z223.1/NFPA 54, Liquefied Petroleum Gas Code ANSI/NFPA 58, CSA-B149.1, or the Propane Installation Code, CSA-B149.2 as applicable and in accordance with local codes.
A qualified installer who thoroughly reads, understands and follows these instructions should perform installation. Installation must conform with local codes, or in the absence of local codes, with the National Fuel Gas Code, ANSI Z223.1/NFPA 54, Liquefied Petroleum Gas Code ANSI/NFPA 58, CSA-B149.1, or the Propane Installation Code, CSA-B149.2 as applicable and in accordance with local codes.
Set-Up Instructions (continued)
A commercial, heavy-duty fryer must vent its combustion wastes to the outside of the building. A deep-fat fryer must be installed under a powered exhaust hood, or an exhaust fan must be provided in the wall above the unit, as exhaust gas temperatures are approximately 800-1000°F (427-538°C).
Check air movement during installation. Strong exhaust fans in the exhaust hood or in the overall air conditioning system can produce slight air drafts in the room.
Do not place the fryer's flue outlet directly into the plenum of the hood, as it will affect the combustion of the fryer.
Never use the interior of the fryer cabinet for storage or store items on shelving over or behind the fryer. Exhaust temperatures can exceed 800°F (427°C) and may damage or melt items stored in or near the fryer.
Adequate distance must be maintained from the flue outlet of the fryer(s) to the lower edge of the filter bank. Per NFPA Standards No. 96, a minimum of 18 in. (45 cm) should be maintained between the flue(s) and the lower edge of the exhaust hood filter. Never make flue connections directly to the fryer.
Locate the fryer under a hood with adequate connection to an exhaust duct. The hood must extend 6" (15 cm) beyond fryer on both sides.
- The gas pressure should be set at 4" W.C. (Water Column) (1.016 kPa) of pressure for natural gas and 10" W.C. (2.54kPa) of pressure for propane gas. If incoming pressure exceeds 12 PSI (3.5 kPa), an additional pressure regulator must be installed.
- The appliance and its individual shutoff valve (to be supplied by user) must be disconnected from the gas supply piping system during any pressure testing of that system at test pressures in excess of 12 psi (3.5 kPa).
- The appliance must be isolated from the gas supply piping system by closing its individual manual shut-off valve during any pressure testing of the gas supply piping system at test pressures equal to or less than 12 psi (3.5 kPa).
- The gas supply line must be at least the equivalent of 12 " iron pipe for single units and 1-1/4" for multiple units. If using the optional quick-disconnect flex hose, 34 " iron pipe for single units and 1-1/4" iron pipe for multiple units.
- The installer must include a manual valve to shut off the fuel supply into the appliance.
- Pipe thread sealing compound must be resistant to the action of liquefied petroleum gases.
- Verify that the product regulator and orifice match gas type (natural gas or LPG-propane).
- Adjust pilot if necessary.
- Adjust main burner(s) if necessary.
- Adjust main burner air shutter if necessary.
Assembly
FRYERS with CASTERS:
Use only legs and casters supplied by the manufacturer. Screw legs or casters into the permanently fastened nuts on the four corners of the unit and tighten.
NOTICE: When this appliance is installed with casters, it must be installed with the casters supplied, a connector complying with either ANSI Z21.69 • CSA 6.16 and a quick disconnect device complying with ANSI Z21.41 • CSA 6.9. It must also be installed with restraining means to guard against transmission of strain to the connector, as specified in the appliance manufacturer's instructions.
Set-Up Instructions (continued)
FLUE INSTALLATION

WARNING
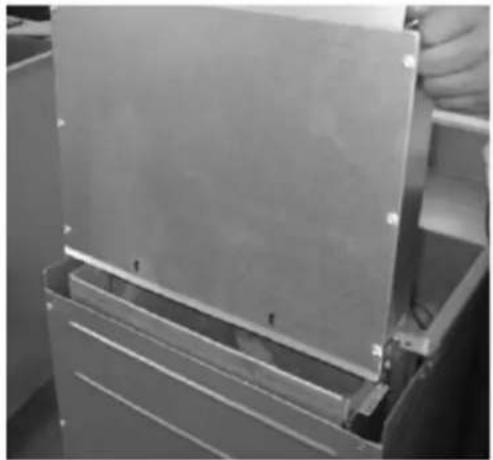
FLUE INSTALLATION: Before using fryer, assemble and install the 10 5/8 inch flue to the fryer
- Unpack the flue box and flue wrap
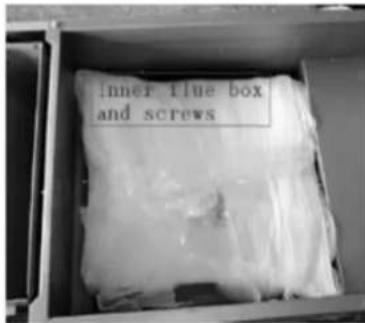
- Slide the flue box over the flue and secure it with the two self-tapping screws using a 5/16" socket
natural_image
Close-up of a metallic panel or enclosure with mounting holes, partially stacked in a metal frame (no visible text or symbols)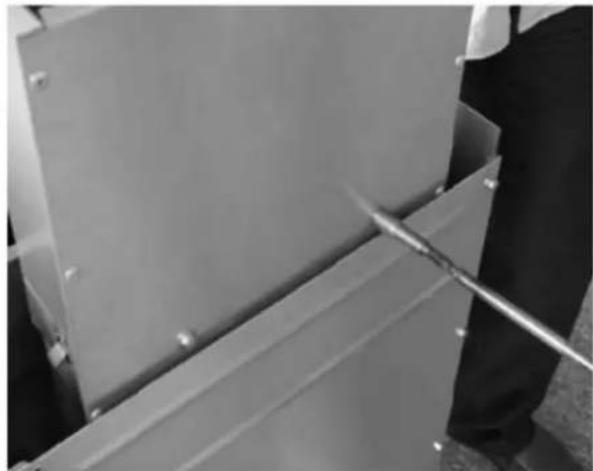
natural_image
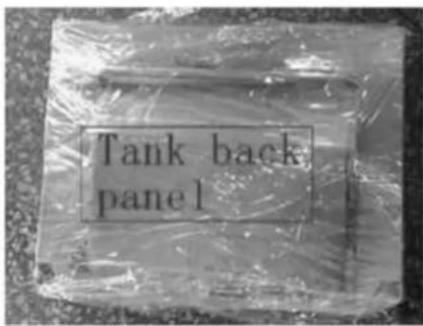
Close-up of a metallic tool interacting with a metal panel or bracket (no visible text or symbols)- Slide the flue wrap over the flue.
natural_image
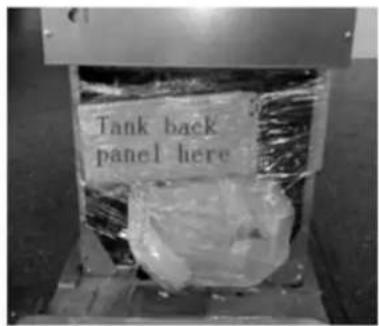
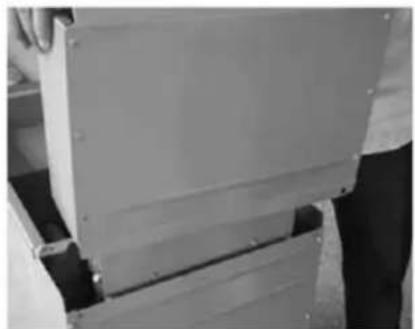
Close-up of a metal frame structure with bolt holes, no visible text or symbols- Secure it with four self-tapping screws two on the back and one on each side using a 5/16" socket.
natural_image
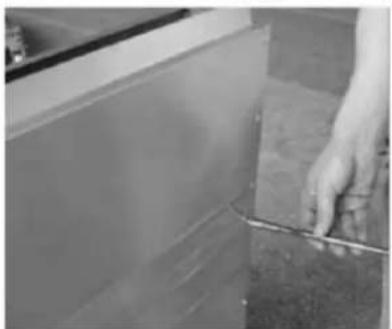
Close-up of a hand reaching toward a metal panel on a surface (no text or symbols visible)
natural_image
Hand placing a piece of plastic into a rectangular box (no visible text or symbols)Operating Instructions
CAUTION
Before using this equipment, it must be cleaned thoroughly. Clean all surfaces before use.
Failure to clean surfaces before using the unit could cause food contamination and excessive smoking.
Do not leave appliance unattended with the gas supply valve open.
Hot oil or hot parts can cause burns. Use care when operating, cleaning and servicing the fryer. Spilling hot oil can cause severe burns. Do not move fryer until oil has cooled.
Keep the area around the fryer clear to prevent obstruction of combustion and ventilation airflow as well as for service and maintenance.
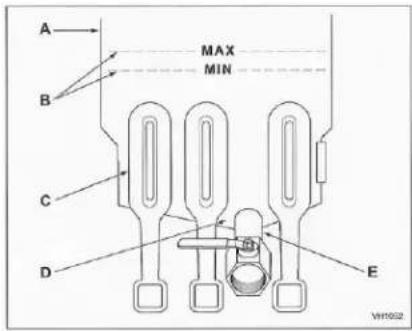
A Fryer Tank
B MIN and MAX Fill Level Lines
C Heat Pipes
D Cold Zone
E Drain Pipe
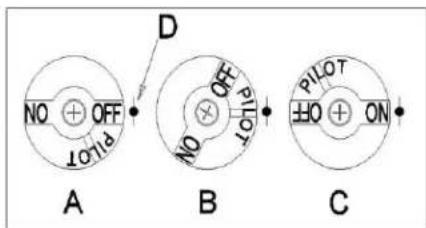
A Gas Valve Knob, View A
B Gas Valve Knob, View B
C Gas Valve Knob, View C
D Indicator Point, All Views
Filling the fryer with liquid oil.
- Close the drain valve (E).
- Fill the fryer tank with liquid shortening.
- Oil level should be between the min and max lines in the fryer tank.
- Oil will expand when heated. Do not fill the fryer tank past the MAX line.
- Add fresh oil as needed to maintain oil level.
Lighting Pilot Burner
- Open the door.
- Turn the thermostat OFF (A).
- Push the gas valve knob down and turn to OFF. Wait 5 minutes for unburned gas to vent away.
- Push down and turn gas valve knob counter clockwise to PILOT (B).
- While still holding the knob in, light the pilot with a lit flame.
- Continue to depress the knob until pilot remains lit when knob is released.
- If the pilot does not remain lit, repeat step 4 through 6.
- Depress and turn gas control knob to ON (C).
- If gas supply is interrupted, repeat steps 2 through 6.
TURNING ON THE FRYER
Set the temperature knob to desired temperature.
After the set temperature is reached, the thermostat shuts off the gas flow to the main burners.
The pilot remains lit. The burners will cycle on and off, maintaining the set temperature.
TURNING OFF THE FRYER
Turn the thermostat OFF.
Operating Instructions (continued)
To keep the pilot lit, turn the gas valve to Pilot.
To shut off all gas to the system, including the pilot, turn the gas valve knob to OFF.
RE-LIGHTING THE FRYER
Wait 5 minutes for gas vapors to clear.
Turn gas supply valve on.
Follow lighting the pilot burner procedure.
EXTENDED SHUTDOWN
Turn the thermostat knob to OFF.
Push in the pilot knob and turn to OFF.
Thoroughly drain the fryer. Refer to DRAINING THE TANK.
Clean the fryer.
Turn off the main gas shutoff valve.
DRAINING THE TANK
Turn the thermostat to OFF.
Turn the gas valve to OFF.
Direct the drain spout into the container that you want to drain the oil.
Open the drain valve. The oil will drain into the container.
When the container is full or the fryer tank is empty, close the drain valve.
Repeat this step until the fryer is empty.
OVER HEAT-TEMPERATURE SHUTDOWN
If the oil becomes overheated, a high-temperature shutoff device will turn the gas valve off and extinguish the pilot. If the fryer shuts down due to overheating, DO NOT re-light the pilot until the oil temperature is below 300 F (149 C). If an overheating situation persists, contact your local authorized service center.
Cleaning & Maintenance
CAUTION
Before cleaning, turn off all valves, including gas supply valve, and allow unit to cool to room temperature. A qualified service technician must handle all maintenance and repair.
Note: Use only non-abrasive cleaners. Abrasive cleaners could scratch the finish of your unit, marring its appearance and making it susceptible to dirt accumulation. Do not use steel wool, other abrasive cleaners or cleaners/sanitizers containing chlorine, iodine, ammonia or bromine chemicals as these will deteriorate the stainless steel and glass material and shorten the life of the unit.
Daily Cleaning
- Remove and wash all removable parts.
- Inspect fryer cabinet inside and out for excessive oil build-up. Thoroughly clean the entire cabinet using a mild detergent if necessary.
Weekly Cleaning
- Clean unit thoroughly. Clean stainless steel or chromed surfaces with a damp cloth and polish with a soft, dry cloth. A mild detergent may be used. To remove discolorations, use a non-abrasive cleaner.
Operating Instructions (continued)
Maintenance
⚠ WARNING
A qualified service technician must handle all maintenance and repair.
CAUTION
For your safety and to ensure proper operation, only use service and repair parts purchased from the manufacturer. If you have any questions or problems contact your nearest Service Representative.
All burner control valves must be checked periodically by a qualified service technician.
Troubleshooting
| Situation | Possible Solution |
| No Heat | Thermostat dial not turned on.Pilot not lit.Gas supply not turned on.Wire connections loose (call service)Wires connections need cleaning (call service)Thermopile (call service technician) |
| Insufficient or too much heat | Thermostat dial not set to desired temperature.High limit tripped (call service technician)Temperature probe (call service technician) |
| Tank will not drain | Oil too cold.Drain pipe clogged with debris. |
Exploded View

Parts List
| BALLOON NUMBER | DESCRIPTION | REPAIR PART NUMBER |
| 13 | Valve - LP | 302050045 |
| 13 | Valve - NG | 302050042 |
| 17 | Oil drainage valve | 302050001 |
| 20 | Thermostat knob | 301110362 |
| 21 | Hi Limit | 302220073 |
| 22 | Thermostat | 302220072 |
| 25 | Injector pipe | 302200623 |
| 27 | Orifice – LP | 302150058 |
| 27 | Orifice - NG | 302150057 |
| 28 | Burner | 300031 |
| 37 | Hanging basket- 3 burner | 302110471 |
| 37 | Hanging basket-5 burner | 302110484 |
New machines that have been manufactured by or for Grindmaster Corp. and all parts thereof are conditionally warranted to the original user by Grindmaster Corp. to be free from defects in material and workmanship (existing at the time of manufacture and appearing during the stated warranty period) under normal use and service as follows:
Limited Warranty 1 year parts and 90 days labor
During this warranty period, Grindmaster Corp. will at its option (and after inspection), repair or replace a defective unit with no charge for parts or bench labor during the applicable parts or labor warranty period, respectively. Grindmaster Corp.'s obligation under these warranty periods shall be limited to repairing or replacing any part of said machine (excluding plastic parts, rubber parts, light bulbs, fry baskets or other wear items) which proves defective within the warranty period. These warranty periods run from the date of installation (proof of installation date required), or 6 months following the date of shipment from the Grindmaster Corp. facility, whichever comes first. Bench labor does not include the service agent's travel time or cost of shipping to and from the service station or factory.
- This warranty is subject to the following conditions, terms and exclusions: - Warranty does not apply to machines or any part thereof which have been subject to any accident, abuse, misuse, neglect, alteration, use on incorrect voltage, improper ventilation, damage caused in transit, improper installation or operation, improper maintenance or repair, normal wear items, plastic or rubber parts, poor water conditions, machine adjustments, temporary non-functioning conditions, fire, flood, electrical surge or acts of God;
- Warranty is in lieu of all other warranties expressed or implied. In no event shall Grindmaster Corp. be liable for consequential or incidental damages.
- The model and serial number of the unit (shown on the serial plate) shall be supplied to the service station or factory along with the defective parts of the unit.
- Upon request by Grindmaster Corp., some warranty parts, are to be shipped prepaid to the Grindmaster Corp. Factory Service Center designated in the RGA confirmation. Upon receipt, Grindmaster Corp. will inspect parts to verify warranty claim is valid. Replacement parts will be billed out when shipped, and then credited on return of a part that is proven to be a valid warranty claim upon inspection by Grindmaster Corp. Warranty labor will not be paid until warranty claim parts are received and validated by Grindmaster Corp.
- The buyer shall give prompt notice to Grindmaster Corp., and must obtain prior authorization from Grindmaster Corp., for any claim to be made under said warranty via telephone at (800-695-4500) or writing to P.O. Box 35020, Louisville, KY 40232-5020.
- Upon request by Grindmaster Corp., the defective equipment shall be shipped prepaid to the Grindmaster Corp. Factory Service Center designated in the RGA confirmation, or, if requested by Grindmaster Corp., to an authorized Grindmaster Corp. service location.
- No field (including travel), outside or service station work is covered by this warranty without prior authorization by the Grindmaster Corp. Service Department.
The dealers, distributors, employees and agents of Grindmaster Corp. are not authorized to modify this warranty or to add warranties that are binding to Grindmaster Corp. Neither written nor oral statements by such individuals establish warranties and thus should not be relied upon.
This will establish your warranty rights. The purchaser's redress against Grindmaster Corp. for the breach of any obligation arising from the sale of this equipment, whether derived from warranty or elsewhere, shall be limited to repair, replacement or refund at Grindmaster Corp.'s discretion.